25 Christmas Crafts for Adults with Disabilities (Easy & Adaptive)


A craft table at Christmas does something a gift under the tree can’t. Someone holds up a bead tree or a glittery bell and says, I made that. That moment is the whole reason to do this.
The trouble starts when a project quietly expects steady hands, sharp scissors, and endless patience for tiny steps. If you support adults with disabilities as a caregiver, family member, or activity leader, you have seen a fun idea turn into a hard afternoon fast.
The ideas below were chosen with that in mind. Each one has a big, forgiving job anyone can do, like stringing, stamping, pressing, wrapping, or sticking.
The fiddly parts can be prepped ahead, shared out, or skipped. You will find projects for seated tables, low vision, limited grip, short attention spans, and mixed groups.
These Christmas crafts for adults with disabilities use simple supplies and give bright results. Pick two that suit your group and save the rest for next week.
How to Set Up a Craft Table Everyone Can Use
A good setup does half the work before the first bead is touched. These are general tips, so adjust them to the person in front of you and ask what they want to try.
- Prep the hard part first. Pre-cut shapes, pre-punch holes, and trim pipe cleaners before anyone sits down.
- Add grip. Wrap tape or foam around brush handles and pens so they are easier to hold.
- Use trays and non-slip mats. Beads and pieces stay put, and reaching stays short.
- Offer choices, not instructions. Two colors and two shapes give control without pressure.
- Check small parts. Beads, pearls, and berries can be a risk for some people, so choose larger pieces when needed.
1. String and Slide Bead Christmas Tree
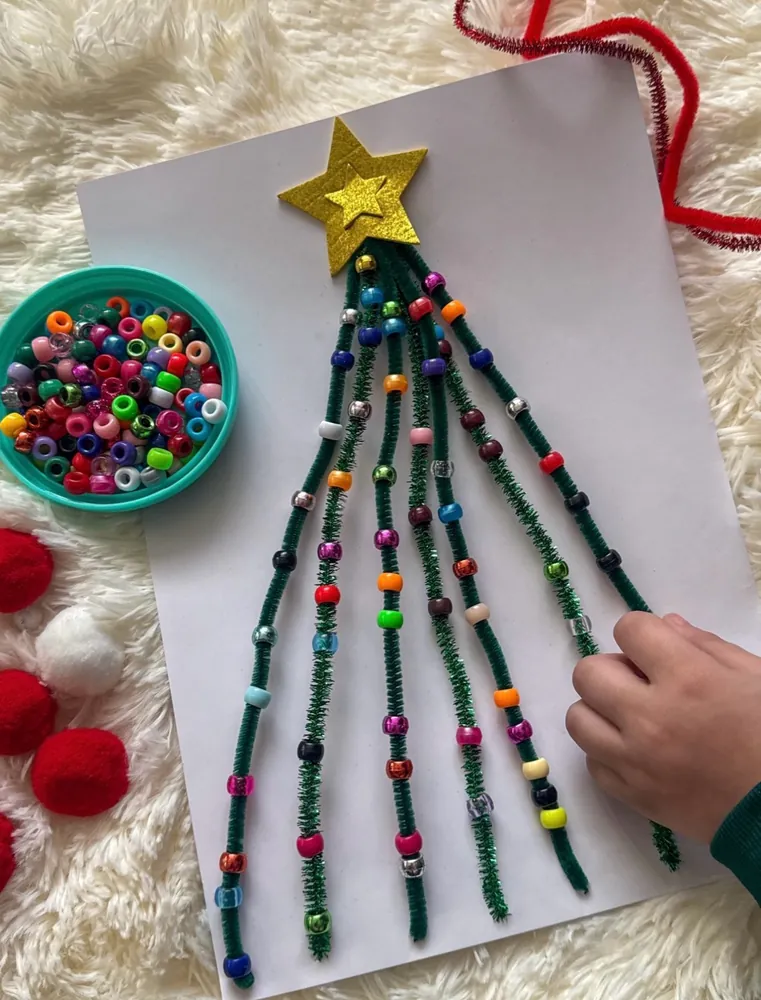
String, slide, repeat. That is the whole skill here.
- Green pipe cleaners fan out from a gold foam star, so the tree shape is built in before anyone picks up a bead.
- The pony beads have big holes and bold colors, and they show up well against the dark green.
- A small bowl sits right beside the paper, so every reach is short.
Fold over the tip of each pipe cleaner so beads cannot slide off the end. If holding the cleaner steady is hard, tape its top to the paper first and let the crafter slide beads onto a fixed line.
2. Glowing Snowman Light
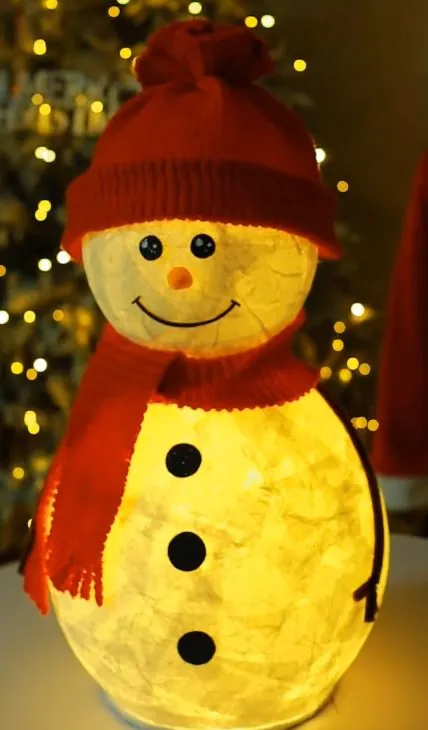
This snowman glows, and that is the reason to make it. A round white body with a crinkled, papery look holds a warm light inside, topped with a red knit hat, a red scarf, and three black button dots.
The texture looks like layers of torn tissue or paper over a round form. Tearing and pressing pieces on is a forgiving job, because ragged edges look right. A brush with a chunky handle helps anyone with a weak grip.
One safety note. Use a battery tea light or LED string inside, never a bulb that heats up.
3. Pipe Cleaner Mini Wreath Ornaments

Three tiny wreaths made from fuzzy pipe cleaner, two green and one white, each with a red satin bow, a gold charm, and a gold cord loop for hanging.
Pipe cleaners hold a bend without glue, which saves a lot of frustration. The fuzzy texture also grips fingers better than slippery ribbon or wire does.
Bows are the hard part. Tie a few ahead of time, then let the crafter pick one and press it on with a glue dot. They still choose the colors and the sparkle.
Curl a fuzzy pipe cleaner into a circle and twist the ends together.
Press on a charm, tiny stars, or beads with glue dots.
Attach a pre-tied bow and a gold cord loop for hanging.
4. Pinecone Christmas Trees with Pom Pom Lights
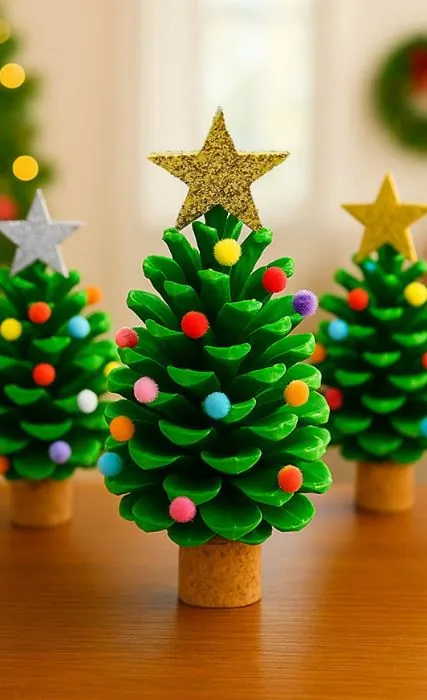
The base: a pinecone painted green, standing on a small cork piece.
The decoration: bright pom poms dotted over the scales, with a glitter star on top.
Why it suits a mixed group: each step is a different size of job. Painting takes broad strokes, dotting takes light pressure, and the star is one big piece that goes on last.
Pinecone scales can scratch. Offer a paper towel to hold it, or gloves if skin is sensitive.
5. Painted Cottage Ornaments
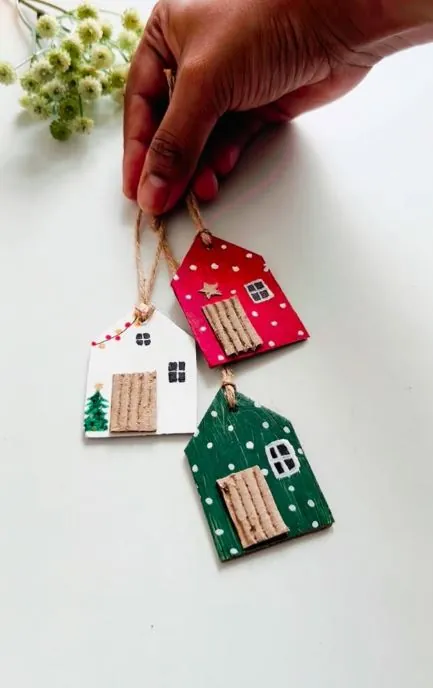
Small flat houses, one red, one green, one white, each with dots, a little window, and a ridged cardboard door. Twine loops turn them into ornaments.
The dots are the best part for beginners. They do not need to be even to look charming, and a cotton swab or the blunt end of a brush makes a round dot with no special skill. If paint is hard to control, dot stickers do the same job.
| Paint the dots | Use dot stickers |
|---|---|
| Light pressure and a steady hand | Peel and press |
| Needs a smock and drying time | Clean and instant |
| Hand painted charm | Neat and even |
6. Paper Bell Mobile

Bells cut from kraft paper hang in a spiral, each wearing a red or green bow and a small gold jingle bell at the bottom.
The fringe along each bell looks fussy, but it is just straight snips. Pre-cut the cone shapes if scissors are tough, or use self-opening scissors for the fringe.
The jingle bells add sound and movement, a small sensory reward many crafters enjoy. Build the bells at the table, then have a helper hang the finished mobile at eye level.
Straight snips are easy to repeat, and small mistakes disappear into the pattern.
A pre-tied bow adds bright color and shows exactly where the glue goes.
Sound and swing give the crafter instant feedback for the work.
7. Pony Bead Name Ornament Tree

A tiny tree built from green and pink pony beads, with a clear star bead on top and a name and year spelled in letter beads at the bottom, hung from a pink ribbon.
How to get this look:
- Pick two greens and one pink or red accent bead.
- Lay the rows out on a tray before threading, short at the top and wider at the bottom.
- Add the letter beads last, so the name is the final step.
Put a sheet of felt or a non-slip mat under the tray. Beads stay put, and they are easier to pick up with limited grip.
8. Craft Stick Tree Ornaments
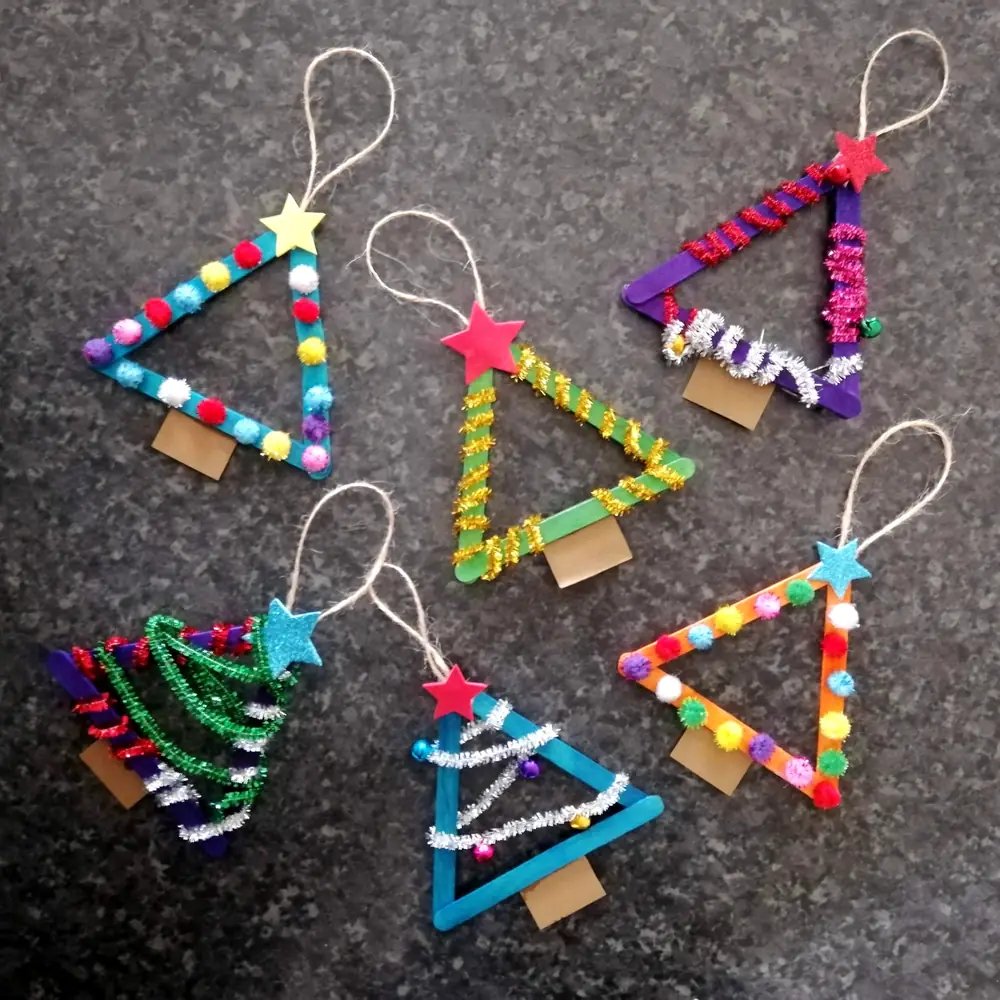
Six triangle trees made of painted craft sticks, each decorated its own way, each with a cardboard trunk, a foam star, and a jute loop.
Two decorating styles show up in the photo.
Subscribe to DIY Craft Bloom
Get updates on the latest posts and more from DIY Craft Bloom straight to your inbox.
- Pom pom trees: small fluffy balls in a row. Easy to grab and place.
- Wrapped trees: sparkly pipe cleaner twisted around the sticks. Better for crafters who like a winding motion.
Glue the triangle frames together ahead of time so everyone starts with a sturdy shape.
9. Bottle Cap Snowman

Three white painted bottle caps stack into a snowman with a dotted smile, pink cheeks, an orange nose, and a plaid ribbon scarf.
Because the face is just dots, there is no wrong way to do it. A fat marker or a dab of paint on a cotton swab works as well as a fine pen.
Be careful with metal caps. The crimped rim can be sharp. Choose plastic caps or cover the rim with tape before anyone handles it.
Paint the caps white ahead of time.
Use a thick marker or a swab for the face.
Fine liners and tiny details.
Bare metal rims on a hand held craft.
10. Linked Pipe Cleaner Wreath
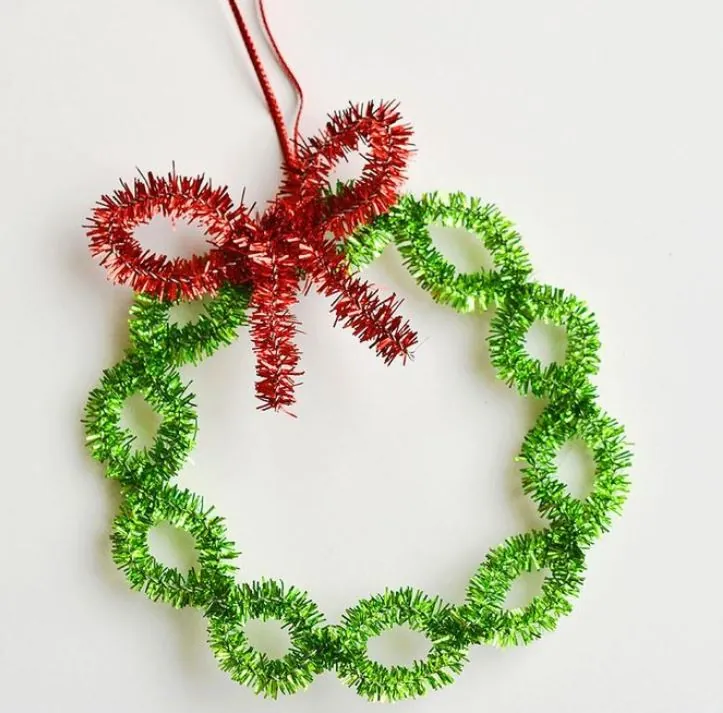
Green pipe cleaner loops hook together in a ring, finished with a red bow made from the same fuzzy material.
No glue, no mess, no waiting. Once the cleaners are cut, it is one of the fastest routes to a finished ornament in this list.
Bright green and red read clearly even for low vision, so the shape stays easy to see. Twisting takes two hands. If that is hard, a helper twists the loops closed and the crafter links them together and adds the bow.
11. Fused Bead Holiday Cards

Six folded cards, each with a small bead picture: an ornament, Santa, a reindeer, a wreath, a gift, and a tree. Glitter and kraft paper backgrounds make each one look finished.
- Placing small beads takes a steady pincer grip.
- Fusing them usually takes heat, so an adult handles the iron.
- Large beads on a big pegboard are a friendlier option.
Try splitting roles. One person lays the pattern, another picks the card color and glues it on.
12. Egg Carton Christmas Trees
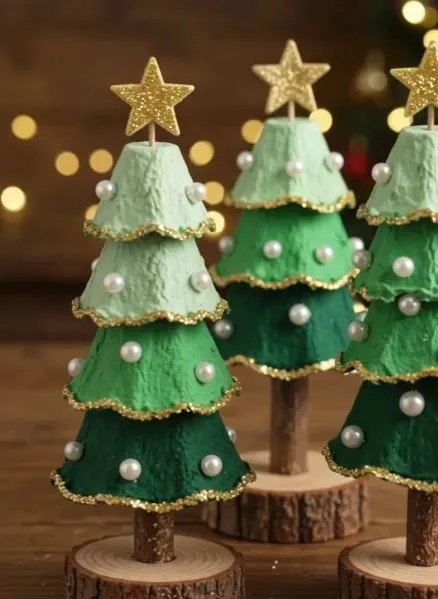
Egg carton cups painted in shades of green stack up like a tiered tree, trimmed with gold glitter, white pearl dots, and a gold star on a stick. A wood slice keeps it standing.
Going from light green to dark is a nice color job on its own. Let the crafter choose the order, and no tier will be wrong.
Cut the cups apart beforehand. Cutting cardboard is tiring on weak hands.
13. Press In Pom Pom Cardboard Tree
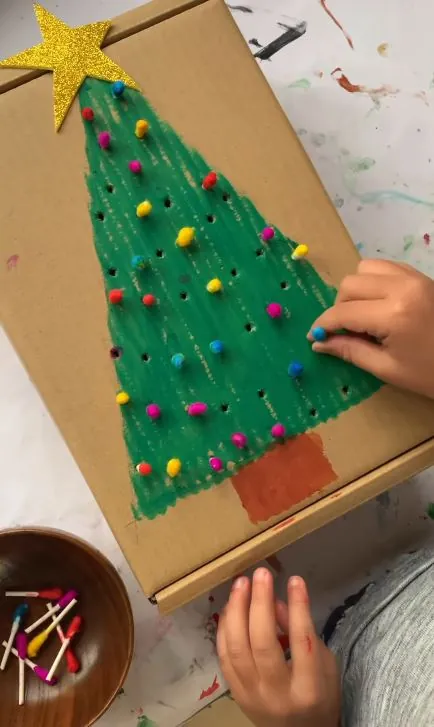
No glue needed. A green painted tree on a cardboard box lid has holes poked through it, and bright pom poms press right in. A gold star sits on top.
Press, check, press again. That steady rhythm suits people who like a calm repeated motion, and the poked holes show exactly where to go. A helper makes the holes first, and a small stick nudges stubborn pom poms into place.
14. Cardboard Tube Stamp Tree

A cardboard tube dipped in green paint makes rings that overlap into a full tree. Red and yellow dots become the ornaments, with a gold glitter star and a brown paper trunk.
- Pressing a tube is a whole hand motion, so no pencil grip is needed.
- Overlap is the goal, so there is no way to stamp wrong.
- Dots can be made with fingertips or a cotton swab.
Set the paint plate on a damp towel so it does not slide while the tube is pressed down.
A blank sheet of paper and a plate of green paint.
A full tree of overlapping rings, dot ornaments, and a star on top.
15. Hanging Paper Snowflakes
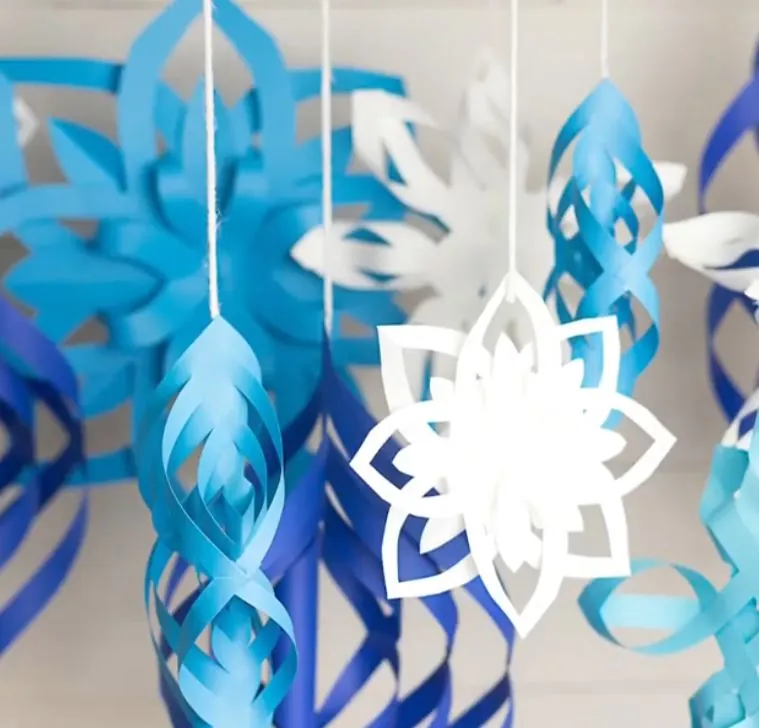
Two styles hang side by side in blue and white: flat layered snowflakes, and long twisted spirals made from paper strips.
Spirals are the easier pick. Strips can be pre-cut, and the crafter only tapes or glues the ends and lets them hang. The flat flakes need careful cutting, so save them for people who enjoy it.
Hang them at different heights near a window and the room fills with movement.
Let the helper cut the strips, and let the crafter choose the colors.
16. Yarn Ball Mantel Garland
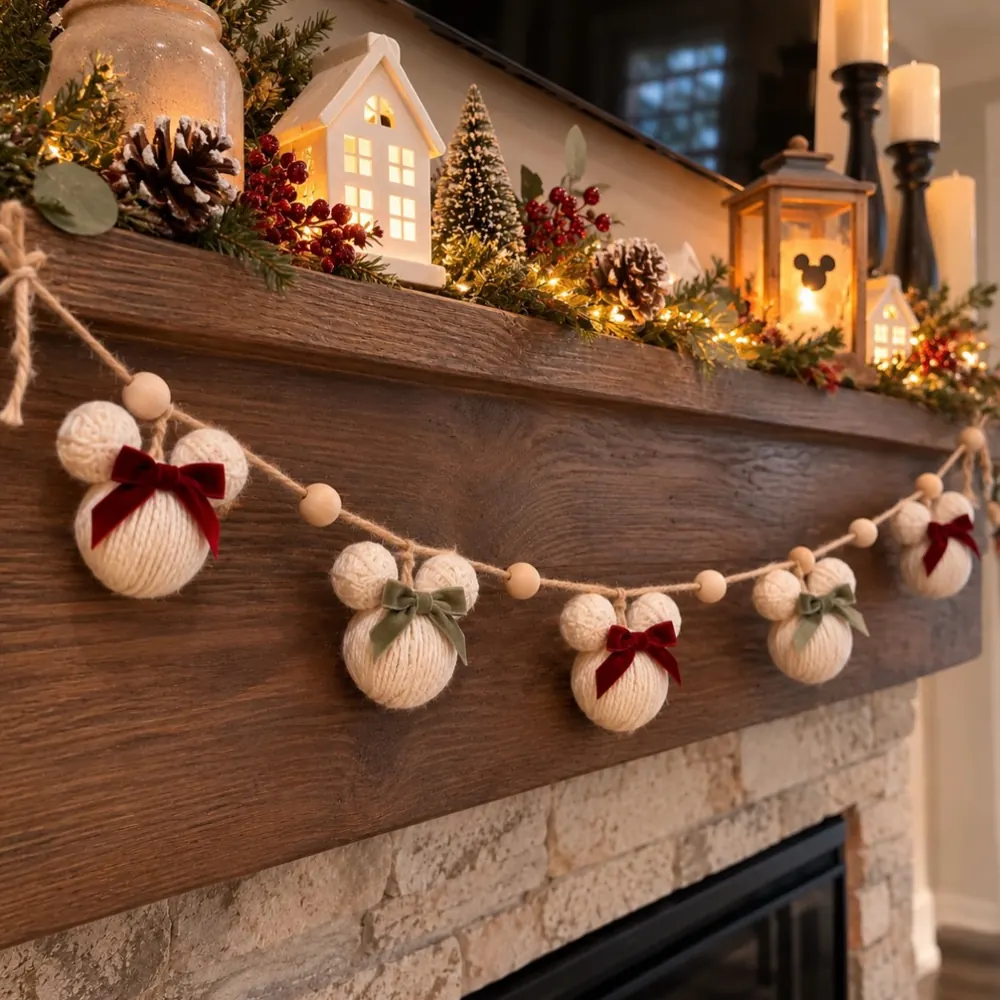
Cream yarn balls, each with two small round ears on top and a velvet bow in red or green, hang on jute twine between wooden beads across a mantel.
Winding yarn is a slow, calming job. It does not need a perfect result, because a fuzzy ball looks cozy either way.
Watch the ears. They are the one step that needs glue and a firm hold, so let a helper attach them while the crafter handles the winding and the bows.
A big, repeating motion with a soft, cozy result. Winding yarn asks for patience, not precision.
17. Yarn Wrapped Cardboard Tree Ornaments
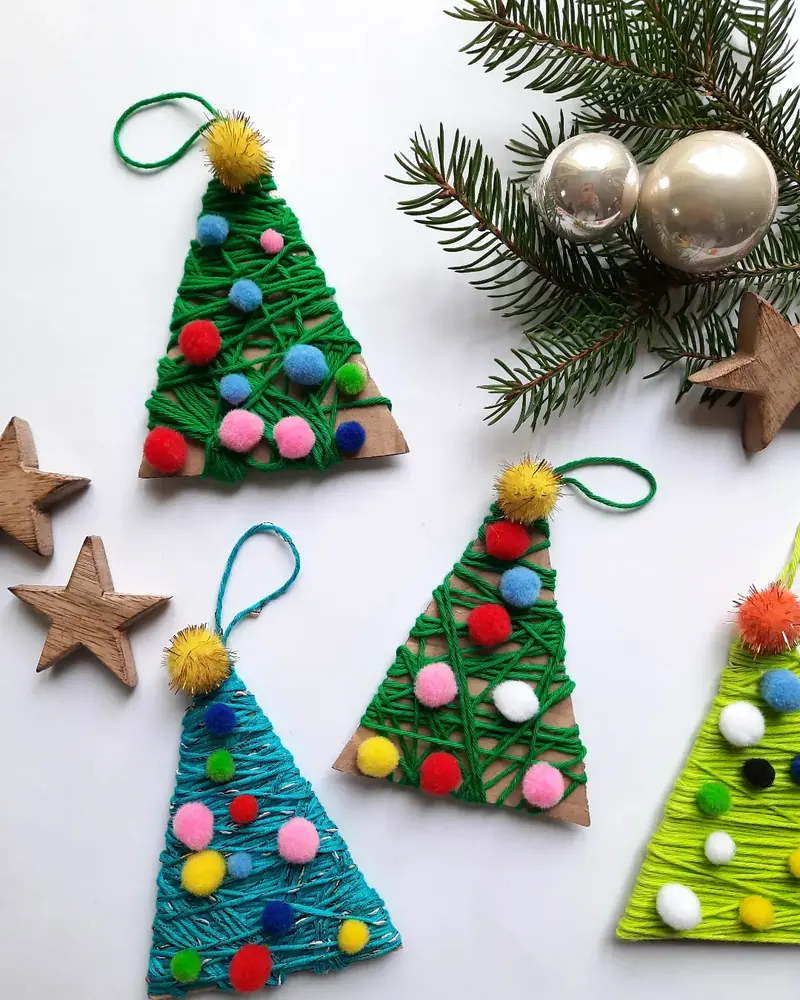
Cardboard triangles wrapped in green, teal, and lime yarn, dotted with pom poms and finished with a yellow pom pom on top.
The photo shows two wrapping styles. The loose, crisscross green is quick and relaxed. The tight teal wrap covers the cardboard fully and takes more time. Both look right.
Let the crafter pick. If the yarn keeps slipping, a tiny notch cut in the corner of the card holds the starting end.
Tape the yarn end to the back of the triangle.
Subscribe to DIY Craft Bloom
Get updates on the latest posts and more from DIY Craft Bloom straight to your inbox.
Wind around and across until the cardboard is covered. Any pattern works.
Press pom poms on with glue dots and add a loop of yarn to hang it.
18. Nativity Paper Bag Scene

A brown paper bag with an arched window cut out, a gold star above it, and a baby in a manger glowing inside. A short Bible verse, Isaiah 9:6, is handwritten on the front.
For crafters who find meaning in the Christmas story, this one gives the craft a purpose. It is also a small scene a person can hold, show off, and give away.
Skip the verse if the group has mixed beliefs. This one is a nice optional project to offer, not to assign.
19. Paper Cone Snowman
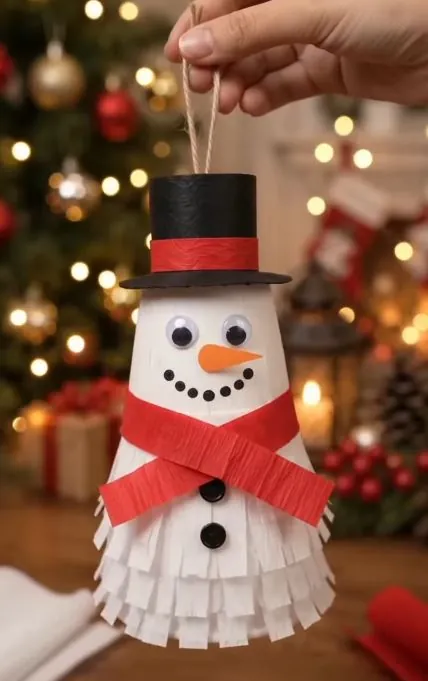
A white paper cone gets a skirt of snipped fringe, a red crepe scarf, black button circles, googly eyes, an orange nose, and a black top hat with a red band.
It looks like a lot, but the pieces are separate jobs. In a group, hand them out:
- One person snips or tears the fringe.
- One person sticks on the face.
- One person wraps the scarf and adds the hat.
Crepe paper tears easily, which makes it gentle for anyone with less hand strength.
20. String Wrapped Ball Ornaments

A white ball wrapped in crisscross string, tied with a red gingham bow, topped with a small cluster of red berries and tiny gold pods, and hung from a jute loop. Red and green versions sit behind it.
The string is the base and the cluster is the finishing touch, so the job splits cleanly in two. If wrapping string is too sticky, use pre-wrapped balls and let the crafter dress them.
Small berry picks can be a choking risk for some crafters, so check what is safe for your group before you set them out.
21. Pom Pom Berry Wreath
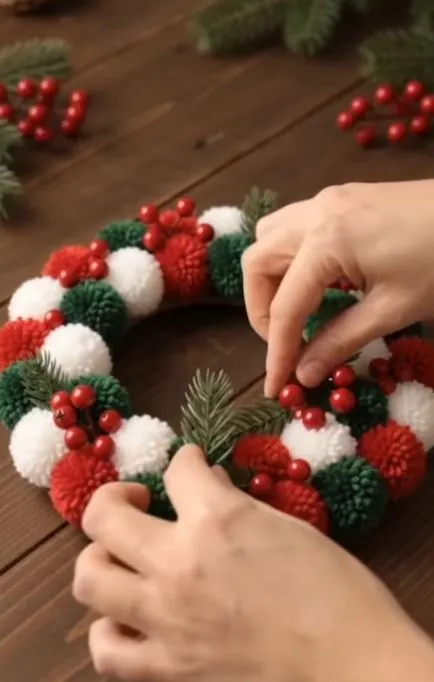
Red, white, and green pom poms packed shoulder to shoulder on a ring, with clusters of red berries and small pine sprigs tucked in between.
Pom poms are soft, light, and easy to pinch, so grabbing them takes almost no grip strength. The mix of three colors also hides any gaps, which means nobody has to place them in a neat order.
A helper can handle the glue and the ring. The crafter picks each pom pom and decides where the berries go. Berry picks can have stiff wire stems, so trim them short and tape any sharp ends first.
22. Paper Plate Santa on a Stick

A red paper plate with the center cut out becomes a Santa face, with a long red hat, a black belt and yellow buckle, and a cotton ball beard. A wooden stick at the bottom turns it into a hold-up prop, great for photos.
The cotton balls are the star. They are soft, forgiving, and almost impossible to place wrong. Use a glue stick or glue dots if liquid glue is hard to control.
Have the plate center and hat cut out beforehand. The crafter gets the fun jobs, which are the beard, the buckle, and the finishing touches.
A plain paper plate and a bag of cotton balls.
A bright Santa face with a hat, buckle, and a fluffy beard to hold up.
23. Pipe Cleaner Mini Christmas Trees
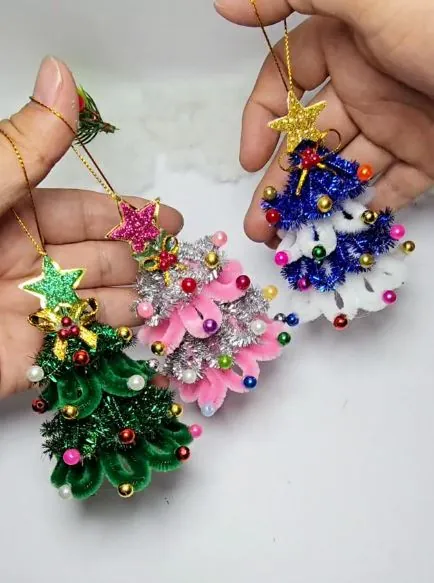
Three tiny trees in green, pink, and blue, each with a glittery star, small round beads, and a gold cord for hanging.
The color range is the draw here. Let the crafter pick the palette first, then build the tree around it. Two pipe cleaner styles show up in the photo, and they feel quite different in the hand.
Tiny round beads and stars finish each tree. Use glue dots for those, since they grip better than liquid glue and need no drying time.
| Fuzzy pipe cleaners | Tinsel stems |
|---|---|
| Soft and grippy, easy to hold | Shiny and bendy, a little slippery |
| Holds a curl or loop well | Best wrapped around a base |
| Gives a plush look | Gives a sparkly look |
24. Color Dab Bauble Cards
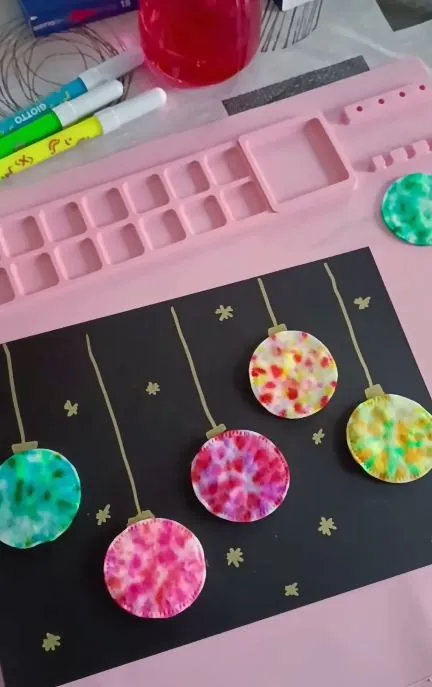
Round soft discs dabbed in rainbow color hang like baubles on a black card, each on a thin gold line, with tiny gold stars scattered around. Markers and a cup of water sit nearby, so the colors look blended and bleeding together.
That bleeding is the whole point. There is nothing to draw carefully, and every disc ends up different. Black paper also makes the bright color easy to see for anyone with low vision.
A helper can draw the gold hanging lines first, so the crafter only has to dab and place.
25. Tiny Pipe Cleaner Wreath with a Red Bow

Short green pipe cleaner pieces fan around a small ring, and a red pipe cleaner bow sits on top. It is small enough to rest on a fingertip.
Small is a plus. It finishes fast, so it works for short sessions or for anyone who tires quickly. Hang one on a tree branch, clip one to a gift, or set a few on a table.
The bow is the trickiest part, so pre-shape a few bows and let the crafter choose which one to add.
A helper snips green pipe cleaners into short, equal lengths.
Twist each piece onto the ring until it is full all the way around.
Add a pre-shaped red bow and a loop for hanging.
Pick One and Start Small
You do not need all twenty five. Choose the one that fits the hands in front of you, prep the tricky step, and let the crafter make the choices.
A bead tree on a tray, a stamped paper tree, or a bell mobile can fill an afternoon with real pride.
These Christmas crafts for adults with disabilities work because the effort lands where people enjoy it, in the colors, the textures, and the finished piece in their hands.
Swap steps, shrink the supply list, or share the work across a group until it feels right.
Save this post for the next time you want fresh holiday ideas, and come back when the tinsel comes out.