18 Egg Carton Crafts for Kids That Turn the Recycling Bin Into Playtime


Egg cartons are sneaky. They look like trash, but every one hides three ready-made craft shapes: round cups, tall pointy cones, and a flat lid. Once kids notice that, they start seeing monsters, mushrooms, and turtles in the recycling bin.
That is good news on a rainy afternoon when everyone is restless and you really don’t want to run out for a craft kit. A carton, a little paint, and a handful of googly eyes go a long way.
These egg carton crafts for kids cover a whole year of making. There are cotton ball snowmen and Christmas finger puppets for winter, smiley carrots for spring, garden bug puppets for summer, and glittery spiders and tiny ghosts for fall. Some are quick and calm enough for toddlers, like the color sorting game. Others, like the tall spotted giraffe, are weekend builds that older kids will show off to every visitor.
Each idea covers what you need, how it comes together, and the small tips that save you a mess or a meltdown. Start saving your cartons now. You’ll want more than one.
How to Prep Egg Cartons Before Kids Start Crafting
A few minutes of prep makes every project on this list go smoother. Sort out the right cartons and supplies first, and the actual crafting time stays fun instead of frustrating.
- Pick cardboard cartons, not foam or plastic. Paint and glue grip the soft, bumpy cardboard. On foam and plastic, paint peels right off.
- Skip any carton that held a cracked egg. Raw egg can leave germs behind, so toss stained cartons and have everyone wash their hands after crafting.
- Grown-ups cut, kids create. Slice the carton into strips first, then cut out cups and cones. Thick corners are hard for small scissors.
- Plan on two thin coats of paint. Gray cardboard shows through one coat. Washable tempera paint is easiest for little kids to clean up.
- Match the glue to the job. White school glue handles flat pieces. Tacky glue, or hot glue used by an adult, holds anything that has to stand up.
1. Spiky Paper-Tooth Monsters Made From Single Cones

Two cones, two paint colors, and a pile of paper scraps make the friendliest little monsters on the shelf.
- The tall cone dividers from the middle of the carton stand up on their own, so each monster has a real body, not just a flat face.
- Bright paint matters. The lime green and hot pink in the photo cover the gray cardboard in one or two coats.
- Zigzag paper teeth give each monster its personality. Fold a strip of white paper and snip little triangles.
- Mix up the eyes. One monster gets two googly eyes and the other gets one giant eye, and kids start making up names right away.
- Paper spikes can poke out of the small hole at the top, or run down the back like a dragon ridge.
Once the base coat dries, let little ones dab on spots with a cotton swab. Wobbly, uneven dots look even more monster-like.
2. Story Time Caterpillar From a Strip of Egg Cups
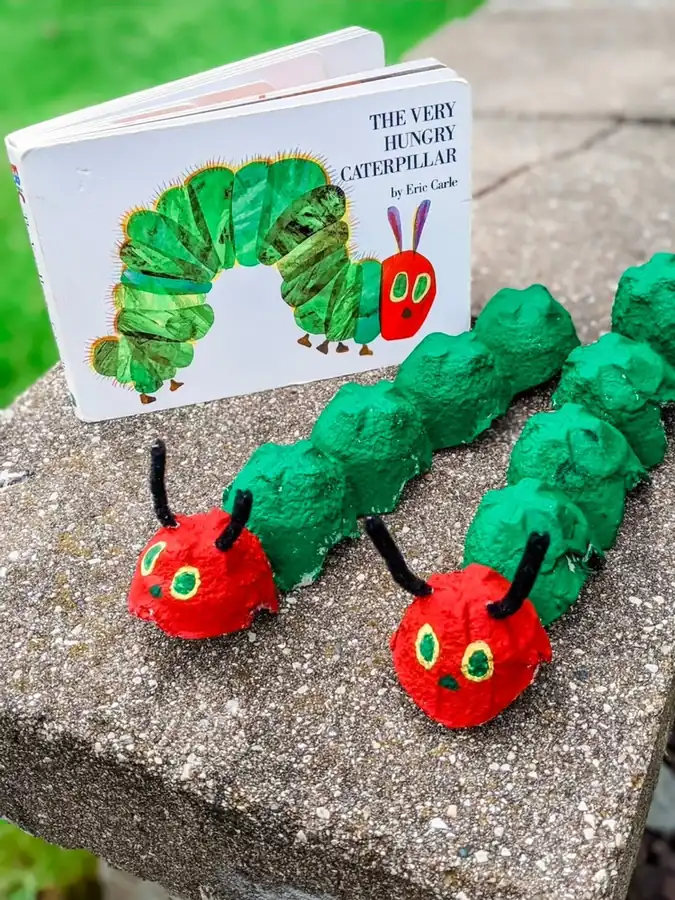
Cut one long row of cups from the carton and you already have a caterpillar body. The photo pairs the craft with The Very Hungry Caterpillar picture book, and that pairing is what makes it stick. Kids hear the story, build the character, then act the story out on the table.
The body is painted a deep green. Each head is a single cup painted bright red, with yellow ringed green eyes and black pipe cleaner antennae. Two caterpillars sit side by side, so it looks like each child made their own.
Turn it into a counting game. After the paint dries, kids count the body bumps out loud. Then they can add one more cup for each food the caterpillar eats in the book.
Cut a single row of cups along the length of a dozen carton. Six cups gives you a head plus five body bumps.
Green on the body, red on the end cup. Let it dry fully before the face goes on.
Dab a yellow circle with a cotton swab, then a smaller green dot in the middle once the yellow dries.
Make two holes in the head with a pencil tip and push in short pieces of black pipe cleaner.
3. Autumn Forest Diorama Inside the Carton
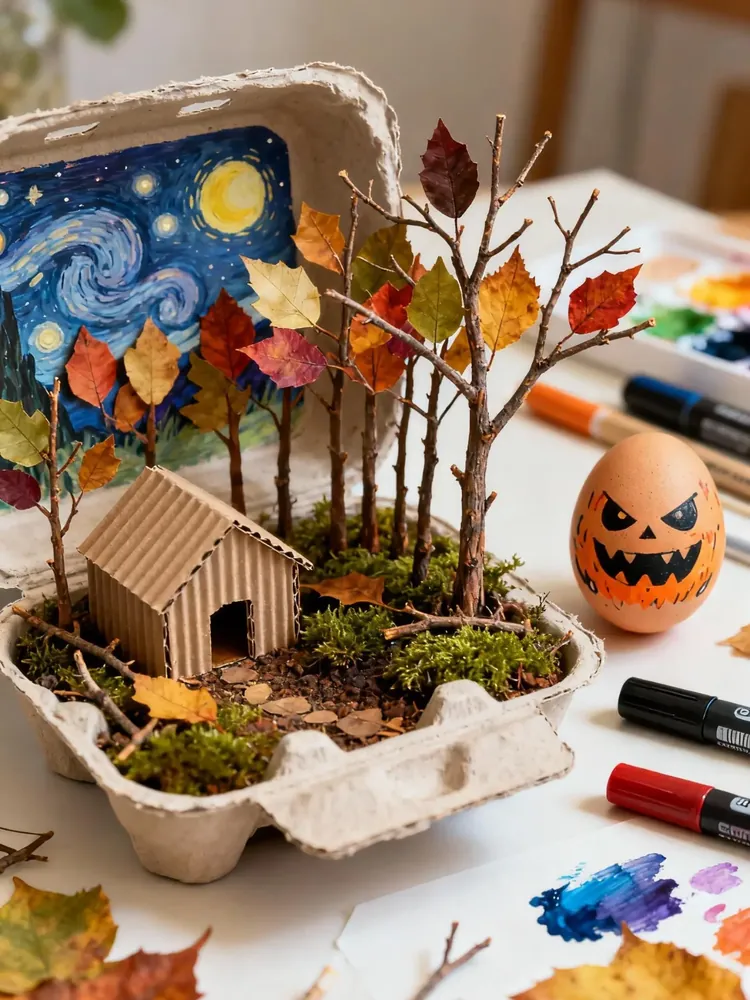
Open the carton and stand the lid up. Now the lid is a backdrop and the bottom is a forest floor. That is the whole trick behind this little world.
In the photo, the inside of the lid is painted with a swirly night sky, yellow stars, and a big glowing moon. It looks inspired by Van Gogh’s The Starry Night, which makes it a sneaky little art history lesson too. Below it, twigs stand up as trees with real autumn leaves glued to the branches. Moss and bits of bark cover the ground, and a small hut made from ridged cardboard sits in one corner.
Start with a nature walk. Hand kids a paper bag and ask them to find ten small treasures, like twigs, leaves, a pinch of moss, and seed pods.
Fresh leaves curl as they dry, so press them inside a heavy book for a day or two first.
Paint the inside of the lid first, while the carton lies flat and empty. A dark sky makes the bright leaves stand out.
Push each twig into a lump of play dough or clay hidden under the moss. Then glue on a few leaves.
Peel the top layer off shipping box cardboard to show the ridges, then fold it into four walls and a roof.
4. Smiley Carrot Sticks With Dried Leaf Tops
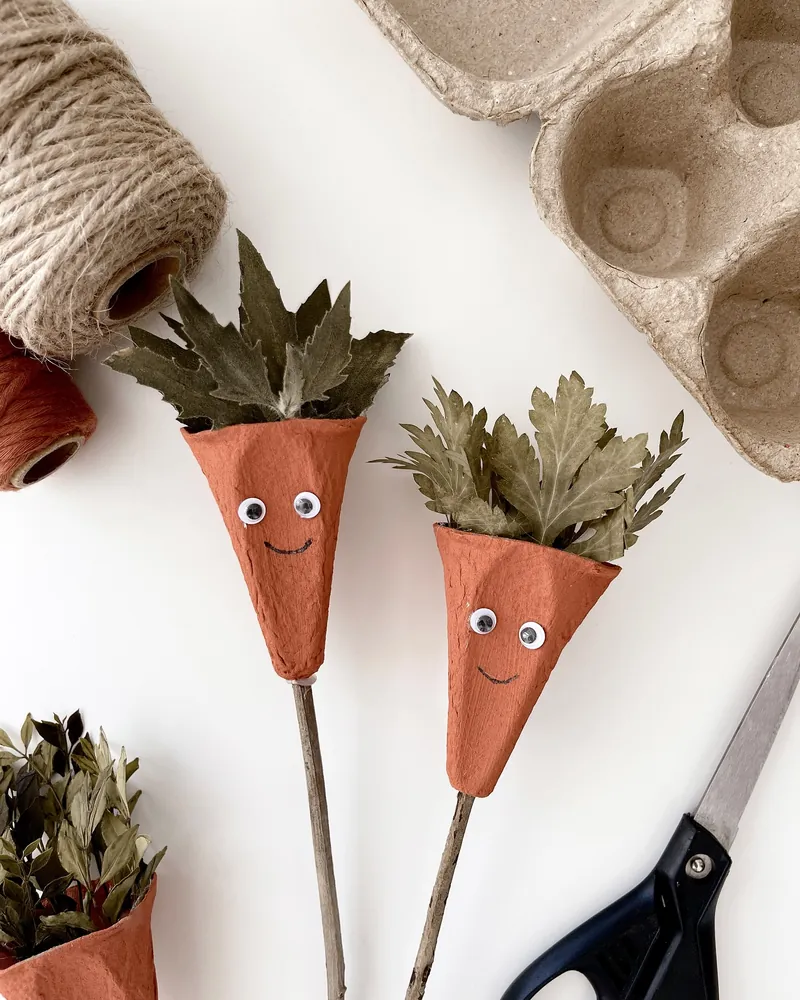
Turn a cone divider upside down and it looks just like a carrot. Kids usually spot it before you do.
- Cut out the tall cone pieces from between the cups. Trim the wide end so it is open.
- Paint them a warm orange. The ones in the photo are a soft, rusty orange that looks more like a real garden carrot than a neon shade.
- Add two small googly eyes and draw a tiny smile with a fine black marker.
- Tuck a bunch of dried leaves into the open top with a dot of glue.
- Poke a hole in the pointed tip with a pencil and push in a thin twig.
On sticks, these carrots work as garden markers, little puppets, or an Easter table display stood up in a jar. Real dried greens make them look far more grown up than paper leaves would.
5. Shimmery Star Wands on Twig Handles
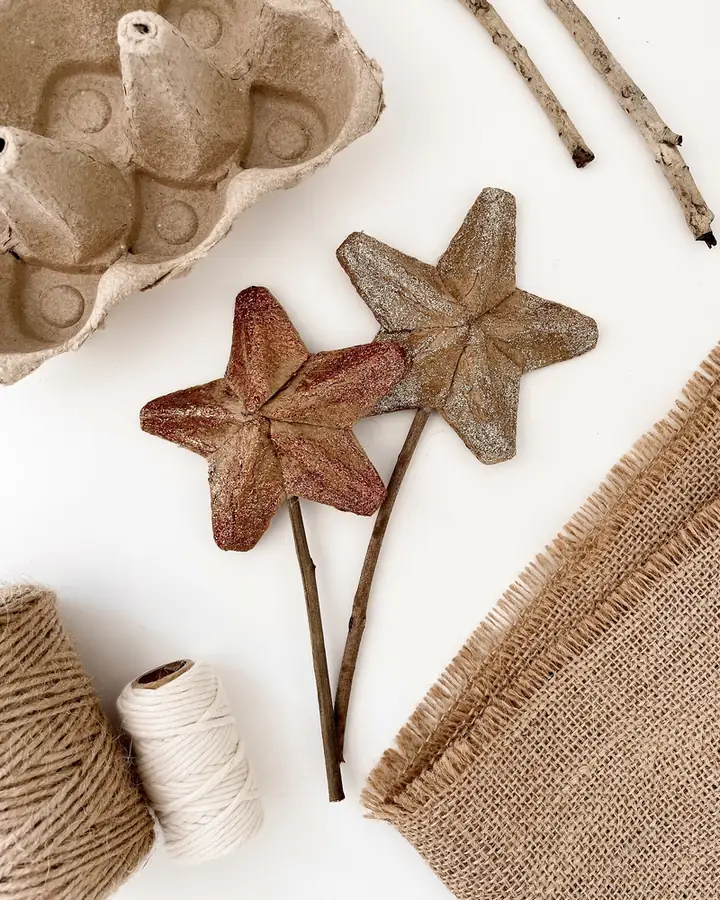
Egg carton cardboard has a soft, bumpy surface that grabs glitter paint really well. These star wands show it off. One is brushed with a rosy copper shimmer and the other with pale gold, and both sit on plain twig handles.
Look closely at the center of each star. A crease runs down every point, which gives the flat cardboard a little 3D shape. Kids can pinch those folds in with their fingers before painting.
Grown-ups cut, kids decorate. Carton cardboard gets thick at the corners and small scissors struggle. Draw and cut the stars from the flat lid ahead of time, then hand them over for painting.
Hot glue holds the twig best, so that step is for an adult. After that, the wands are ready for dress-up games, or poke a few into a plant pot as a cozy holiday decoration. They also make sweet gift toppers tied on with twine.
6. Two-Way Snowmen: Cotton Ball Fill or Painted Cups
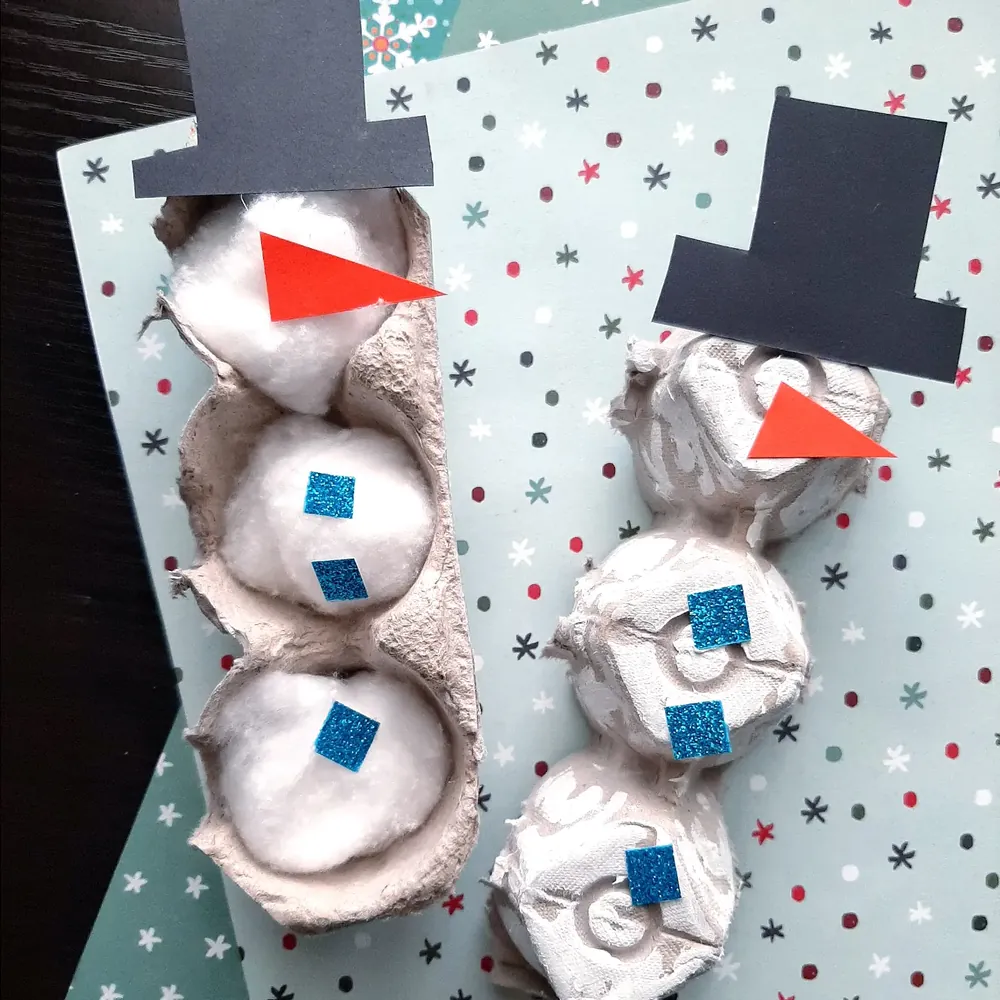
Here is a winter craft that works for two age groups at the same table.
The snowman on the left keeps a strip of three cups face up and stuffs each one with cotton balls. No paint at all. Toddlers love pulling the cotton apart and pushing it in, and the snowman looks fluffy right away.
The snowman on the right flips the cups over and paints them white. The brush strokes are streaky, so some gray cardboard peeks through, and honestly that looks like packed snow.
Subscribe to DIY Craft Bloom
Get updates on the latest posts and more from DIY Craft Bloom straight to your inbox.
Both share the same finish: a black paper top hat, an orange paper triangle nose, and little glittery blue squares for buttons. Cut the hats and noses before you start, then hand over the glue stick. Little kids can handle the rest on their own.
| Cotton ball snowman | Painted cup snowman |
|---|---|
| Best for toddlers and preschoolers | Best for preschool and older kids |
| Low mess, no paint needed | Some mess, cover the table for white paint |
| Decorate right away | Wait for the paint to dry before buttons |
| Soft and fluffy to touch | Bumpy, like packed snow |
7. Feathery Owl Collage With Cut Egg Cups

Each egg cup becomes one fluffy feather. The photo even shows the whole process in four panels, which makes this an easy one to follow with preschoolers.
- Cut an owl shape from brown card, with two pointy ear tufts at the top.
- Cut single cups from the carton and trim them short so they sit low.
- Glue the cups onto the belly in rows that get wider in the middle and narrower toward the feet.
- Add big googly eyes, a small orange triangle beak, and two dark brown wings.
- Draw little scallop lines on the wings with a black marker, then glue orange feet at the bottom.
Leave the cups unpainted. The plain gray cardboard already looks like soft feathers against the brown body, and skipping paint keeps this a quick, clean craft.
Plain white school glue works fine. Just press each cup down for a slow count of five so it grabs.
8. Garden Bug Puppets: Egg Carton Crafts for Kids Who Love Pretend Play
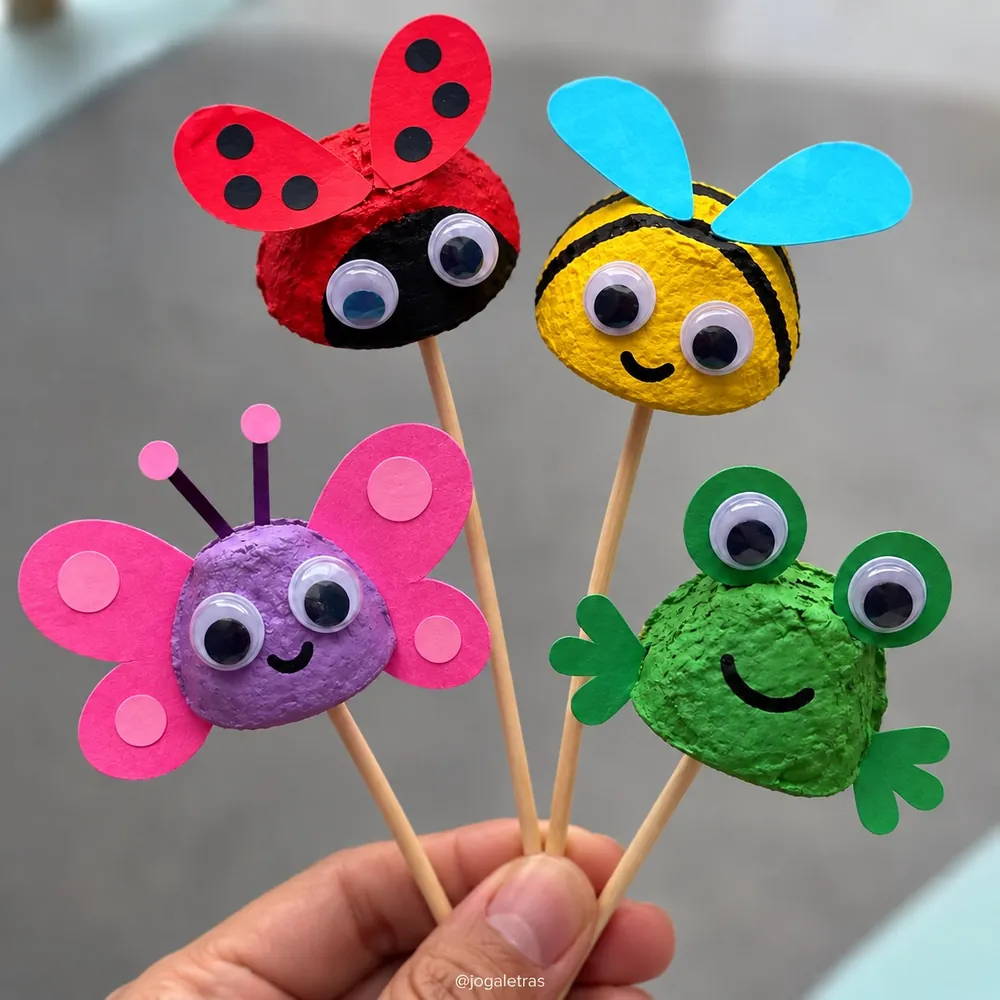
A single cup, a stick, and a few paper shapes. That is all each of these four garden friends needs.
The cups are painted in strong, solid colors: red, sunny yellow, purple, and grass green. Then paper does the real work. Spotted ladybug wings, pale blue bee wings, pink butterfly wings, and little frog hands all get glued to the sides. Oversized googly eyes on every bug make the set look like one happy family.
Hold them up and you have a puppet show. Kids buzz the bee around, hop the frog across the table, and make up a garden story as they go.
Safety note: the photo uses bamboo skewers, which have sharp points. Snip the tips off with strong scissors, or use craft sticks for younger kids.
9. Tiny Egg Cup Fairies With Bead Heads and Yarn Hair
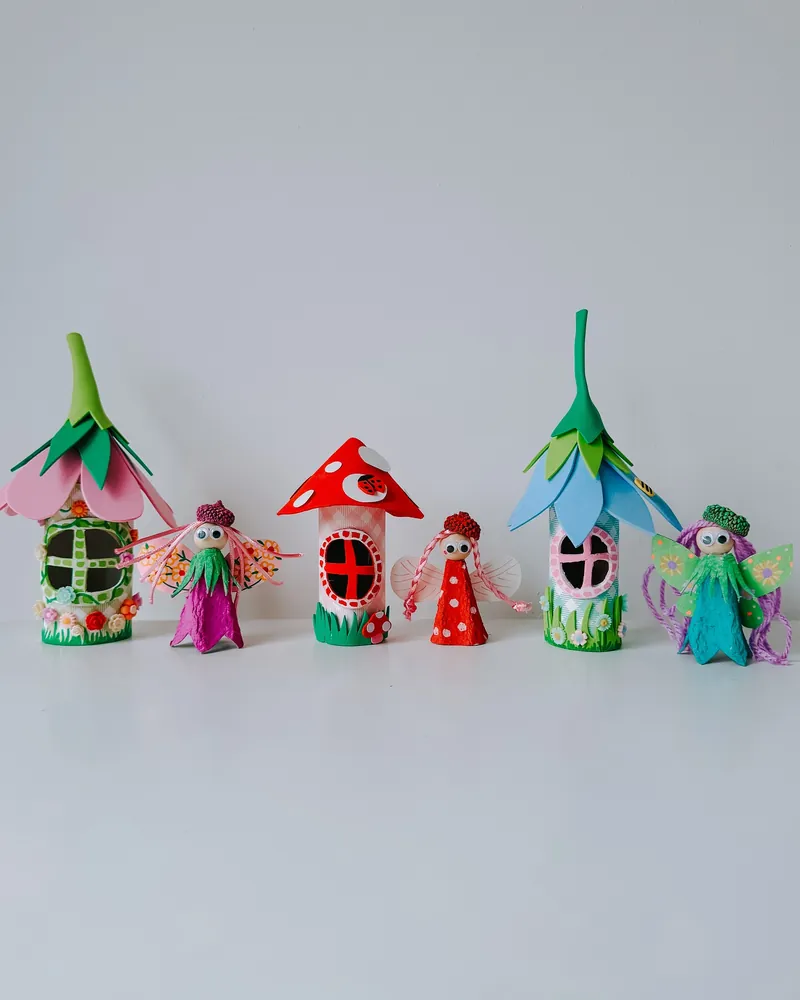
Turn a single egg cup upside down and its pointed edge looks like a twirly fairy dress. These little fairies are built on that idea.
Each one has:
- A painted cup dress in magenta, red with white polka dots, or teal
- A wooden bead head with tiny googly eyes
- Yarn hair, left loose or twisted into braids
- Paper wings, a leafy green paper collar, and a small textured crown
The photo sets each fairy beside a house made from a cardboard tube, topped with a foam flower or toadstool roof. If you have tubes in the recycling bin too, kids get a whole fairy village out of one sorting session.
Glue the bead head on with strong craft glue and let it sit overnight. Heads pop off when kids start playing too soon.
10. Teddy Bear Stick Puppet With a Satin Bow
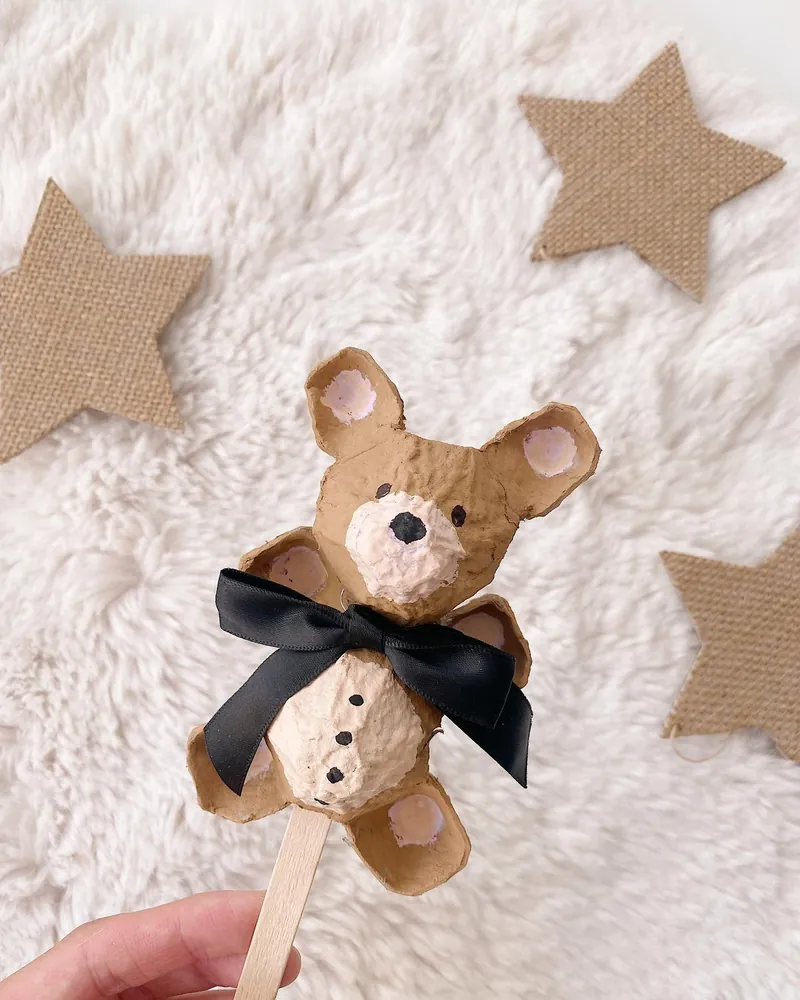
Plain, unpainted cardboard does most of the work in this bear. The natural brown carton is already the right color for teddy fur, so the only paint is a soft, pale pink.
That pink goes in four spots: inside the round ears, on the muzzle under a black dot nose, across the belly with three black dot buttons, and inside the paws and feet. The arms and legs look like rounded pieces cut from the cups, glued around the body so the bear seems to be giving a hug.
A black satin bow at the neck gives it the classic teddy look. A wooden craft stick glued to the back turns the whole thing into a puppet that is sturdy enough for a bedtime show.
Gray cartons work too. Give them a quick coat of light brown paint before adding the pink details.
11. Apple Basket Made From Doubled Egg Cups

Glue two cups rim to rim and you get a chunky, round shape that stands up by itself. Paint it red, poke in a twig, and it is an apple.
The fruit. Three apples are a classic red and one is bright lime green, which keeps the bunch from looking like copies.
The stems. Real twigs, snipped short, stick out of the top. A leaf cut from green paper is glued to each stem.
The basket. A shallow piece of the carton, painted brown, becomes a little wooden crate to hold the apples.
This one fits apple picking season or a back to school theme. Once the paint dries, kids can sort the red and green apples into the crate and count them, so the craft turns into a game.
12. Tall Spotted Giraffe on a Paper Grass Base
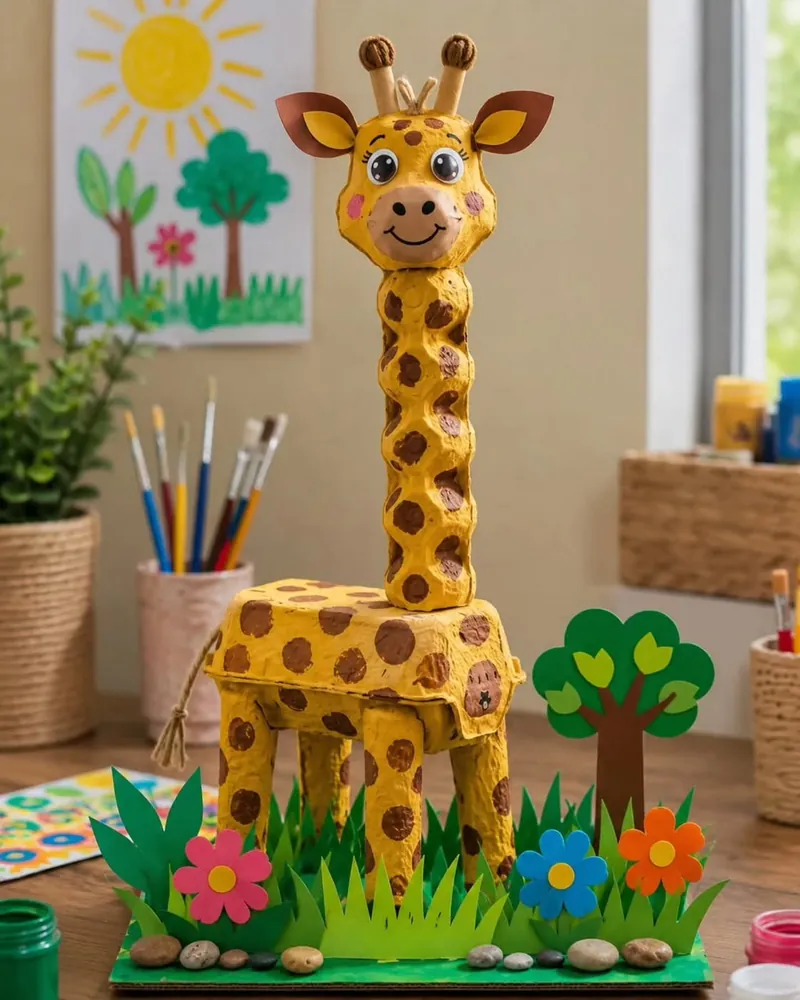
This giraffe takes more cups than anything else in this roundup, and kids stay proud of it for weeks.
Here is how it comes together, based on what the photo shows:
- Neck: a column of cups stacked end to end, so the bumps look like a ridged neck
- Body: a boxy section of carton turned upside down
- Legs: four cone pieces
- Head: painted cups with a peach muzzle, big eyes, and pink cheeks
- Extras: paper ears, two small horns with brown tips, and a twine tail
Everything is painted sunny yellow, then dabbed with round brown spots. A sponge or the end of a wine cork makes even spots fast.
The green base with cut paper grass, paper flowers, and a few pebbles turns it into a scene. It also gives that tall neck a wide, steady footing.
Build the neck a few cups at a time and let each joint dry before adding more.
Glue the legs firmly to a cardboard base so the giraffe can’t tip over.
Dabbing brown spots onto wet yellow paint. They bleed into muddy blobs.
Trying to finish in one sitting. Spread it over a weekend instead.
13. Christmas Finger Puppets for Five Little Fingers

The tall cones slide right over a child’s fingers, which means a whole hand of holiday characters at once. Kids can’t stop wiggling them.
Subscribe to DIY Craft Bloom
Get updates on the latest posts and more from DIY Craft Bloom straight to your inbox.
The five in the photo are Santa, a wrapped present, a reindeer, a Christmas tree, and a snowman. Their faces are simple: two dot eyes, pink cheeks, and a tiny smile. That easy style is something kids can copy with a fine marker, no drawing skills needed.
Small extras carry each character. Santa’s hat ends in a white pom pom. The reindeer gets black pipe cleaner antlers and a red nose. The tree wears a white zigzag garland and a yellow star, and the snowman has a little orange paper carrot nose.
Measure on your child’s hand first. Trim the open end of each cone until it slides on and off without squishing.
14. Little Ghosts for a Cardboard Halloween Village

Single cups painted white look like tiny ghosts in sheets, especially with a wavy bottom edge. That is the part kids can make all on their own.
- Cut out single cups and snip small curves all around the bottom rim.
- Paint them white. Two coats hide the gray carton.
- Draw two oval eyes and a small round mouth with a black marker.
In the photo, the ghosts gather around a village built on flat cardboard. There are two cardboard houses with black roofs and glowing windows, a tiny picket fence, mini pumpkins, and bits of moss. A grown-up can build the houses while the kids crank out a crowd of ghosts.
For that warm window glow, set a battery tea light inside each house. Keep real candles far away from cardboard.
Kids make the easy part and a grown-up sets the stage, so every little ghost ends up in one display the whole family is proud of.
15. Color Sorting Game With Craft Sticks and Slots
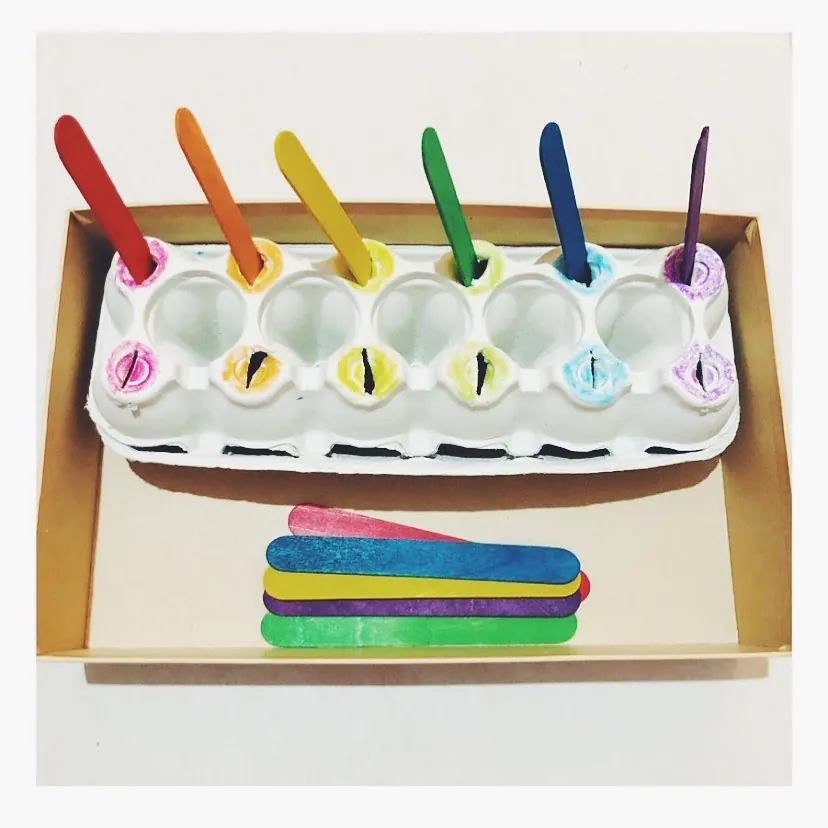
Not every egg carton craft has to sit on a shelf. Here the carton becomes a learning game for toddlers.
Small slits are cut into the tops of the cups, and each slit is ringed with one color: pink, orange, yellow, green, blue, or purple. Kids match each colored craft stick to its ring and push it through the slot. The whole set sits in a shallow box, so nothing rolls off the table.
Pushing a stick into a snug slot is real work for little fingers. It builds hand strength and focus, and color names come up on their own while they play.
Start with just three colors. Once that feels easy, bring out all six and add a second slot for each color, like the front row in the photo.
An adult cuts a slit in each cup top with a craft knife, just a little wider than a craft stick.
Circle each slit with marker or crayon. Kids can help with this part.
Use colored craft sticks, or paint plain ones to match each ring.
A shoebox lid holds the carton and loose sticks, so the game is ready to pull out any day.
16. Glitter Spiders and Pumpkin Pals for a Halloween Party Table

Need a Halloween craft for a classroom party or a table full of cousins? A dozen carton gives you a dozen characters, and every child picks which spooky friend to make.
Spiders are painted black and sprinkled with silver and orange glitter while the paint is still wet. Orange pipe cleaners poke through the sides for legs, and big googly eyes finish the face. Bend each leg at the middle so the spider stands up.
Pumpkins get bright orange paint and a simple jack-o’-lantern face drawn in black marker. A green pipe cleaner folded into a loop becomes the stem.
Ghosts are the easy option for the youngest kids. White paint, two googly eyes, a dot mouth, done.
Shake the glitter over a tray, not the table. You’ll still be finding it at Christmas otherwise.
17. Rainbow Turtle Built From a Whole Carton

Turn a whole carton upside down and those bumpy cups already look like a turtle shell.
- The shell is the full bottom of the carton, painted a soft mint green.
- Single cups, flipped over, make four short legs.
- The head is a round ball painted the same green, with a googly eye and a smile. A foam ball or a tight ball of scrunched paper works.
- Small painted flowers, dots, hearts, and rainbows cover the shell.
That decorating stage is the best part. Every bump is its own small canvas, so kids can fill each one with a different picture. Paint pens make tiny flowers much easier than a brush does.
Pick a cardboard carton for this one, not a foam or plastic one. Paint peels right off those.
An empty gray dozen carton, headed for the recycling bin.
A mint green turtle on four cup legs, with a smiling round head and a shell full of tiny rainbows and flowers.
18. Toadstool Mushrooms With Pressed Flower Caps
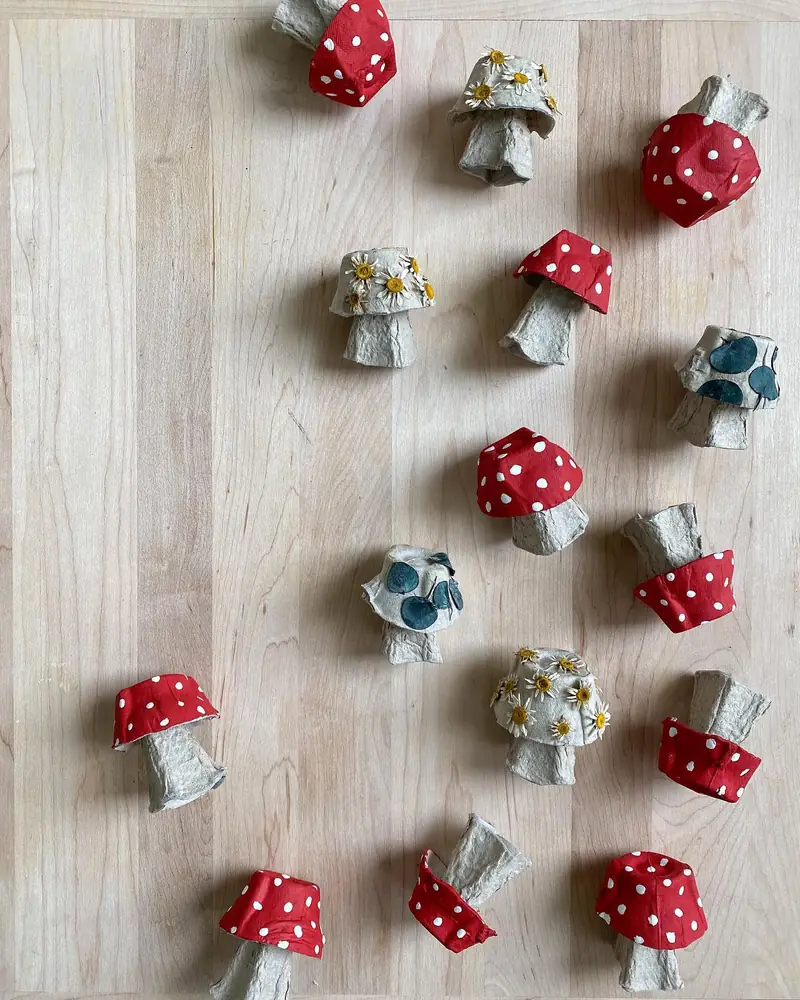
Each mushroom uses the two shapes every carton has: a cup for the cap and a cone divider for the stem. Fit the cone up into the cup and it stands on its own.
Two styles are mixed together in the photo. Most caps are classic red with white dots, the storybook toadstool look. The rest are left plain and covered with real pressed flowers, small daisies on some and round blue-green leaves on others.
That mix works well for a group. Kids who love painting take the red caps, and kids who love collecting take the nature caps. White dots go on easily with the back end of a paintbrush or a cotton swab.
Good things to press for the plain caps:
Scatter the finished mushrooms down a table runner or tuck them into a houseplant pot for a little forest floor.