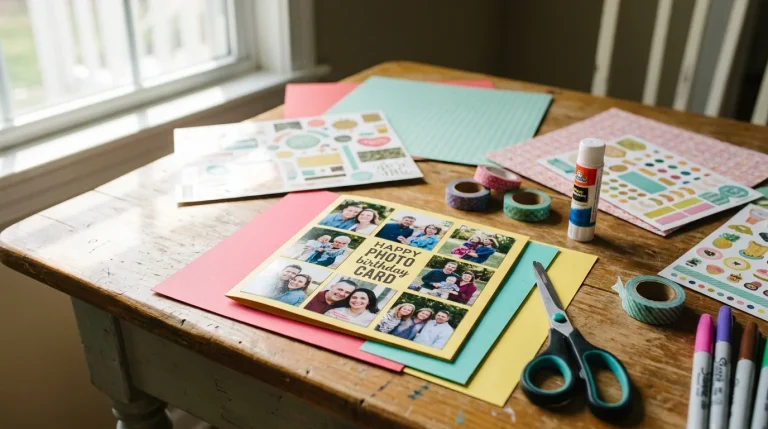
19 Easy Christmas Crafts for Seniors in Assisted Living


A craft table fails for one reason more than any other: someone sitting at it cannot do step three. The scissors are too stiff, the glue is too small to see, or the project looks like it belongs in a kindergarten room. People notice, and they quietly stop joining in.
The fix is not fewer crafts. It is better picked ones. The projects below start with big, forgiving shapes and flat materials like paper, felt and cardboard. Each ends in a piece someone would happily hang in a window or hand to a granddaughter. Most can be done seated, in short bursts, with an activity director doing the prep so the group only does the fun part.
Every idea here comes from a real photo, so you can see the finished result before you buy a single sheet of paper. If you are building a full activity calendar, our list of simple craft ideas for seniors makes a good companion. Use these Christmas crafts for seniors like a menu. Pick two or three for the week, match them to the group in front of you, and save the rest for next year.
Set Up the Craft Table Before Anyone Sits Down
Good craft time depends less on talent and more on setup. A few small choices made ahead decide whether the group feels capable or frustrated. If your group has mixed abilities, the tips in these craft ideas for adults with disabilities pair well with everything below.
- Pre-cut anything with tight curves or thick card, so the table work is folding, sticking and decorating.
- Choose bigger pieces. Large beads, wide ribbon and chunky pom poms are easier to see and hold.
- Keep the hot glue gun with a staff member, and give participants glue sticks, tape or tacky glue.
- Sort supplies into small trays, one per color or type, so choosing takes seconds.
- Use battery tea lights, never real candles, and let people stop at any stage. An unfinished piece still counts.
1. Folded Half Circle Paper Angels

Four angels, four patterns, one simple shape.
Each angel in the photo is built from half circles of patterned or foil paper. Two smaller pieces fan out as wings, and a larger one folds into the cone body. A round bead sits on top as the head, with a loop of cord for hanging. The hand lettered word above them, Engel, is German for angel, and writing a label like that gives someone a nice job too.
- Cut the half circles ahead of time so the table work is only folding and sticking.
- Gift wrap scraps and shiny foil paper add color without any paint.
- Let each person choose their own pattern. The mix is what makes the set look rich.
2. Kraft Paper Cone Trees on a Twig

Brown paper makes a quiet kind of Christmas.
These little trees are folded from kraft colored paper into overlapping tiers, then hung on red and white twine from a bare twig. White pen marks finish each one, star lines on some and dots on another, so no two match.
The twig is the clever part. It turns three small ornaments into one garland that can lean on a dresser or hang in a window. For a group, each person makes one tree and the branch comes together at the end. Dots take no drawing skill at all, and they look just as good as snowflakes.
A helper can pre-cut the paper pieces so the table work stays easy.
Glue the overlapping pieces from the bottom up so the tree looks full.
Add dots or star lines with a white pen, then tie on a twine loop.
3. Cardboard Ring Hanging Tree with Tinsel Garland

It looks like a big project, but the parts are simple. Flat cardboard rings get wrapped in fuzzy green garland, then strung from one point at the top so they hang in tiers like a tree. The photo shows two sets of hands working on it, and that is a good clue for how to run it.
Team version: one person holds the rings steady while another wraps. It suits a table of four, and nobody has to hold the frame for long.
Solo version: use fewer, smaller rings and wrap the garland flat on the table before anything gets hung.
4. Felt Shape Wreaths for a Group Table

Notice what the leader did before anyone sat down. The green ring bases are ready and the felt shapes are already cut. All that is left is choosing and placing, a job that suits hands that tire quickly.
Red bows, stars, hearts, little trees and moons in yellow, blue and white are spread across the table, so every wreath ends up different. Because arranging is the whole project, it also leaves room for chatting, and nobody has to rush to finish first.
If your table includes different abilities, these Christmas crafts for adults with disabilities follow the same prep ahead approach.
5. Paper Tube Snowmen with Top Hats

Stack three white tubes, add a hat, and the face does the rest.
- Lay three white paper tubes in a column on a bright sheet of card.
- Glue a black paper hat with a colored band onto the top tube.
- Add an orange triangle nose, pink cheeks, a smile and two eyes.
- Finish with black dot buttons and brown stick arms tucked behind.
The red and blue backgrounds in the photo do real work. They frame each snowman so it can be propped up or handed to a friend like a card. Faces are where people show their personality, so let them draw their own.
Three plain white tubes and a few scraps of black and orange paper.
A snowman with a face, a hat and stick arms, ready to stand on its card.
6. Painted Bell Ornaments in a Rainbow Row
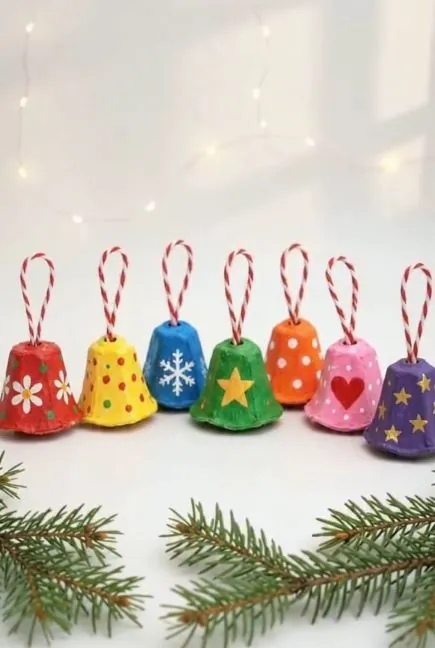
What works here: every bell gets one design and nothing more. A flower, a dotted pattern, a snowflake, a star, a heart. Each is a few brush strokes or dabs, so the painting feels doable and still looks bright.
The bells appear to be made from small molded cups, possibly egg carton cups, though the photo does not show how they were built. Each has a loop of red and white twine, and lined up in a row they read like a rainbow. That row is a good way to show them off before they go on the tree.
Offer cotton swabs or fat brushes for the dots, and let people pick their own colors.
7. Painted Cardboard Gingerbread House Ornament

A single small cardboard house can hold plenty of detail. The roof is a strip of soft white fluff. The door is bright red with painted texture, and the windows, snowflake and tiny trees are all small white or green marks. A twine loop on top finishes it as an ornament.
Subscribe to DIY Craft Bloom
Get updates on the latest posts and more from DIY Craft Bloom straight to your inbox.
The painting here takes a steady hand and a fine brush. That works for some residents. For others it is where the project stalls, so keep a back up ready for the small details.
Watch the clock. Fine detail is tiring, so plan a break or split the house across two sessions.
| Paint the detail | Stick on the detail |
|---|---|
| Windows as small white squares with a thin brush | Windows from white paper squares or stickers |
| Snowflake painted with a fine brush | Snowflake from a sticker or a paper punch |
| Best for steady hands and people who like painting | Best for tired hands and anyone who prefers no paint |
8. Spiral Paper Christmas Trees with Dot Confetti
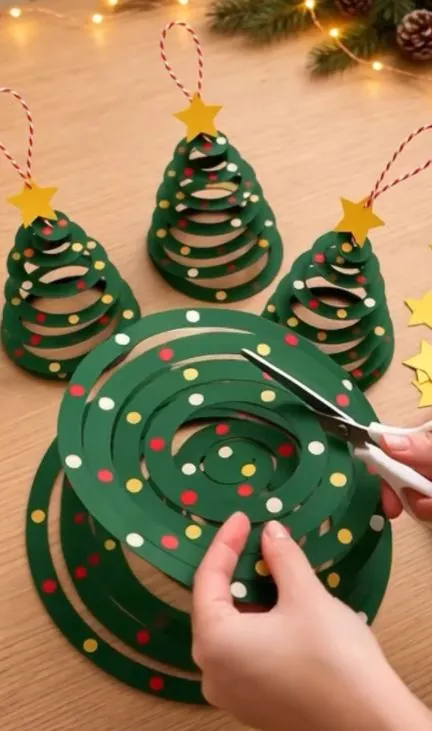
One long cut makes the tree. Start with a flat green circle covered in red, white and yellow dots. Cut around and around in a spiral, then lift the center. The paper rises into a coil, and a yellow star and a twine loop turn it into an ornament.
In the photo the spiral strips are wide and smooth, which is what keeps each tree neat. Wide strips are also easier to hold than thin ones.
Draw the spiral in pencil first so the scissors have a path to follow. If cutting is hard for someone, a helper can cut while they sort the dots and stars.
Draw the spiral line in pencil first.
Use sticker dots or a hole punch for the confetti.
Cutting freehand with small scissors.
Thin strips that flop and tangle.
9. Hanging Kraft Paper Tree Garland for the Window

Not every craft needs color. These trees in tan and brown paper hang in long vertical strands beside a window, and the daylight does the decorating. Each tree looks folded so it turns in the air, which keeps the garland moving.
It is also a good shared project. Cutting a simple tree shape is easy to learn, and a cardboard template helps everyone cut the same size. Each person makes a few trees, then the strands are joined, so the whole room ends up with something in the window.
Hang the strands in a window that gets good light, and the shadows will make the garland look twice as full.
10. Santa Belt Gift Cups with Holly Trim

Red cups become little Santa suits. A black strip with a gold glitter buckle wraps the middle, white scalloped paper trims the top and bottom, and a glittery red handle arches overhead. A sprig of holly leaves and red berries sits on the front.
The cups in the photo are filled with wrapped sweets and gold bows, so each one doubles as a gift. Not every resident can have sweets, so a tea bag, a small card or a tiny ornament works just as well inside.
Make a few extra. Someone always wants to give one away.
Strong contrast makes the cup read as Santa from across the room.
The wavy trim hides the cup rim and gives a clean finish.
It lets the cup be carried or hung.
11. Paper Tube Cottages with Glowing Windows

Five little cottages stand in a row, each with a different colored roof, white snowflakes on the walls and a warm glow in the windows. Pine sprigs and pinecones sit on top, and the bases look like cardboard rolls, with a few more lying nearby.
The glue gun in the photo is the one tool to keep with staff. Let the group handle the roof colors, the snowflakes and the toppers, and use battery lights for the glow instead of real candles.
Made as a set, they work as a table centerpiece, and each resident can take home a cottage in their own color.
12. Kraft Reindeer Gift Pouches
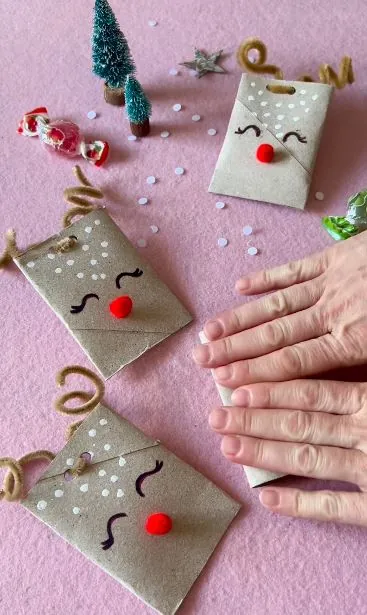
Closed eyes, long lashes, a red nose. These reindeer look sleepy, and that is half the charm.
Each pouch is plain kraft cardboard, flat and folded closed, with white dots for freckles and twisted brown chenille stems for antlers. They sit on pink felt next to tiny trees and candy, ready for a small treat or a handwritten note.
The face is the easy part. A few black lines for lashes, one round nose, done. Drawing with a marker is also a chance for people to give their reindeer a mood of their own.
13. Glittery Hanging Bells with Lace Trim

Three colors, one shape, one trim. The bells are glittery red, green and gold, each edged with white lace along the bottom. A holly leaf, red berries and a red bow sit on the front, and a gold jingle bell hangs below. Twisted jute rope joins them, with a jute bow on top.
Pick the color first and every other choice gets easier. The lace does the heavy lifting. Glue it once along the bottom edge and the bell looks finished.
Subscribe to DIY Craft Bloom
Get updates on the latest posts and more from DIY Craft Bloom straight to your inbox.
The jingle bells add a small sound at the table, which many people enjoy.
14. Pipe Cleaner Candy Canes with a Gold Bow

These two candy canes fit in the palm of a hand, which makes them a friendly size to work with.
- The stripes look like red and white soft stems twisted together.
- Two canes cross in the middle, held by a gold tinsel bow with a white pearl bead at the center.
- A thin gold loop on top makes each one ready to hang.
One thing to handle with care: cut stem ends can poke. Fold the ends back on themselves, or tuck them under the bow, before anyone takes one home.
Soft bendy stems do most of the shaping, so the hands can stay light and slow.
15. Painted Wooden Plank Christmas Tree
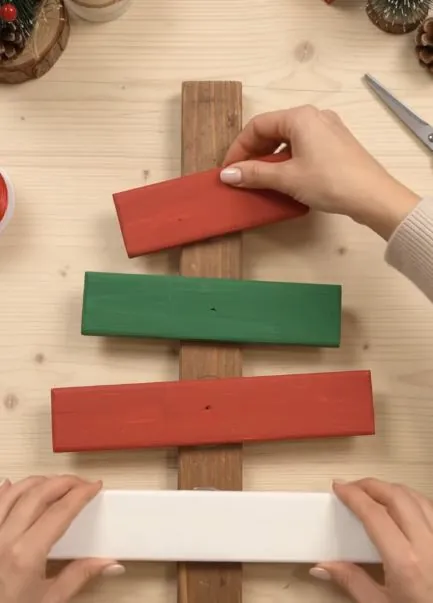
Wood feels sturdy in a way paper never does, and that is what makes this one satisfying. A long vertical plank forms the trunk, and shorter boards in red, green, red and white lie across it to build the tree. In the photo the pieces are being placed before anything is fixed down.
Laying them out first is a good habit for any group. People can move a piece, try another color order, and step back to decide.
It suits residents who like a bigger result, or who used to work with their hands. A finished tree can lean on a shelf or stand against a wall.
Sand the rough edges and let the paint dry fully before the group handles the boards.
16. Gingerbread Style Cardboard Garland

A garland is the friendliest group project, because every shape counts the same. These brown cardboard cut outs include houses, hearts, candy canes, round ornaments and mittens, strung along jute twine on a wooden table.
The white line work does the decorating. Triangles, dots, tiny windows and a snowflake look like piped icing, which gives the whole garland a gingerbread feel without a single cookie. Each person can take one shape, decorate it and add it to the string.
A white paint pen or marker is the main tool you need.
17. Striped Paper Strip Ball Garland
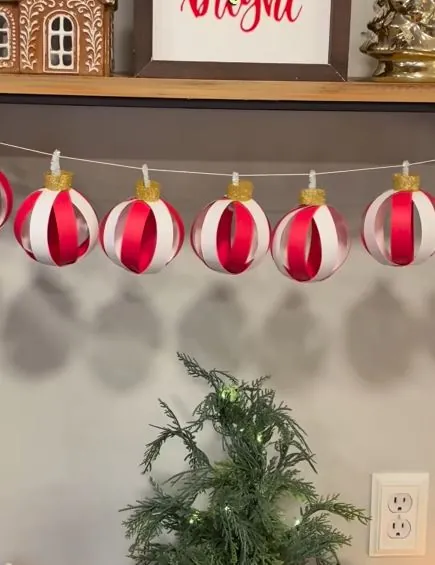
Patience matters more than skill here. Red and white paper strips curve into round balls, each capped in gold, and the balls hang along a white string over a shelf. The look is bold from across the room and neat up close.
Strips are easy to cut ahead of time, so the group only has to build. The repeating red, white, red pattern helps, because there are no choices to make once the first strip is down.
Hang the finished balls in a row and the shelf is decorated in one go.
Use the same length in red and white so the balls come out even.
Join the strip ends at the top and bottom so each one bows outward.
Add the gold cap and slide each ball onto the string.
18. Button Christmas Trees on Wire Loops

Many people have a jar or tin of old buttons somewhere. Here, green ones in graduated sizes are stacked into trees, with a green wooden bead at the top, a small gold star and a loop of wire for hanging. Blues and limes mixed in give each tree its own character.
Sorting the buttons by size is a task on its own, and a lot of people enjoy it. Once the pile is in order, building is just stacking from big to small.
Fold wire ends back, or have a helper finish the top.
19. Chenille Wreath with Pom Poms and Pinecones

The photo shows more than a craft. It shows a good table setup. The wreath, wrapped in blue and white chenille, is small enough to finish in one sitting, and it carries pastel pom poms, little pinecones and two bows, one red and one green organza.
Beside the maker, supplies sit in separate boxes, one for pinecones, one for pom poms, one for ribbons. Choosing becomes easy, and no one has to dig.
Pick a base, pick a trim, add three or four pieces. That is all it takes.
Keep It Simple and Keep It Merry
You do not need nineteen projects to fill a holiday month. Two or three that fit your group will do more than a long list nobody finishes.
Start with the shape that looks easiest, set the table before people arrive, and keep a few spare pieces ready for anyone who wants another try.
The best Christmas crafts for seniors leave people with something to hold, hang or give away, and a story about making it.
Save this post for the next time you want fresh ideas, and come back when the season rolls around again.