19 Christmas Crafts for School Age Kids (Home or Classroom)


The week before the holidays has its own strange energy. Classrooms smell like glue sticks, kitchen tables disappear under paper scraps, and somebody always needs one more googly eye.
If you have a kid between six and twelve, you already know a coloring sheet will not hold them for long. They want to build something they can hang, give away, or show off by dinner.
That is where Christmas crafts for school age kids earn their spot. The ideas below ask for real skills like folding, cutting, stamping, and gluing, yet they run on supplies you probably have already, such as paper plates, cardboard tubes, plastic cups, cotton balls, and a few sheets of colored paper.
Some are quiet table projects for a classroom station. Others make gifts for grandparents or ornaments that come out of the box year after year.
Scroll through, pick the one that suits your group and your patience level, and save the rest for another afternoon.
How to Choose the Right Craft for Your Group
Not every craft fits every table. A project that runs smoothly with four kids at home can get messy with twenty five in a classroom. A quick check of your time, space, and helpers saves a lot of stress later. Run through these before you pick.
- Count your helpers. One adult with many kids needs low step crafts, like the thumbprint cards or the cotton ball snowman.
- Match the mess to the room. Paint and glitter want a covered table. Paper, pom poms, and cotton balls clean up fast.
- Leave time for glue to set. Plan a safe drying spot and let kids add the final details later.
- Keep sharp and hot steps with an adult. Cutting thick cardboard and anything involving heat is grown up work.
- Gather supplies first. Tubes, cups, and plates from the recycling bin cover a surprising number of these projects.
1. Pop-Up Accordion Tree Card

Open this card and the tree stands up to meet you.
- The tree is made from green paper strips folded back and forth like a fan, stacked wide at the bottom and smaller toward the top.
- A gold star sits on the tip, a pink wrapped gift fills the left side, and a red ornament hangs on the right.
- A drawn string of lights runs across the top, with fingerprint dots in red, yellow, green, and pink.
Kids get real practice with careful folding, and the finished card feels like a gift worth handing over. Let the fingerprint lights dry before closing the card so the colors stay clean.
2. Paper Plate Santa Face Frame

Cut the middle out of a red paper plate and a child’s face becomes Santa’s face.
A red paper hat sits on top with a black belt strip and a yellow square buckle. A cotton ball puff marks the hat tip, and a row of cotton balls makes the beard along the bottom. A craft stick at the base works as a handle, so the whole thing turns into a hand held mask.
It is a craft and a prop in one. Kids make it in the morning and use it for a class photo or a short holiday play by afternoon.
Cut the center out of a red paper plate to make the face opening.
Glue a red paper hat above it, then add a black belt strip with a yellow buckle.
Glue cotton balls along the bottom for the beard and add one on the hat tip.
Attach a craft stick at the base as a handle.
3. Cardboard Tube Stamped Christmas Tree

Green paint, one empty cardboard tube, and a lot of circles.
The tube leaves a ring every time it touches the page. Overlap the rings in a triangle and a full, bushy tree appears without any drawing. Red and yellow fingerprints turn into ornaments, a glitter star goes on top, and a small brown paper square becomes the trunk.
This one suits mixed age groups well, because there is no wrong way to press a circle.
Spread a thin layer of paint on a paper plate and press the tube into it.
Overlap the rings so the tree fills in.
Add fingerprint ornaments after the green dries.
Pressing hard, which squashes the ring shape.
Loading the tube with thick paint.
Adding the star before the paint has set.
4. Hanging Spiral Paper Trees for a Window

Sunlight does half the decorating for these.
Each tree is a strip of paper that spirals into a cone shape and hangs from a string. Teal and lime green paper give the set a layered look, tiny silver dots add sparkle, and a gold star finishes the top. Hung at different heights in a window, the trees sway whenever someone walks past.
Let every child make one and the whole window becomes the class display.
Gather these
5. Cotton Ball Snowman on Blue Paper

Blue paper gives white cotton something to stand out against.
Kids stack three sizes of cotton balls for the body, then add a black paper hat, googly eyes, an orange nose, and little dot buttons. Brown paper strips become the twig arms. Gently pulling each cotton ball apart before gluing gives the snowman a bumpy, snowy texture.
Placing every piece one at a time is good fine motor practice, and nobody minds because it feels like building.
Subscribe to DIY Craft Bloom
Get updates on the latest posts and more from DIY Craft Bloom straight to your inbox.
6. Clear Cup Christmas Tree Snow Globe

Turn a clear plastic cup upside down and it becomes a tiny snow globe.
Inside the cup sits a printed Christmas tree picture against a blue sky, with a base of green grass paper at the bottom. Small white paper bits pile up around the tree as snow, and little gift boxes sit at the front. Flip it over, give it a gentle shake, and the snow tumbles.
Kids can color the tree picture themselves, so no two globes look alike.
| Paper bits | Glitter |
|---|---|
| Soft, matte snow look | Sparkly, catches the light |
| Easy to sweep up | Sticks to everything nearby |
| Fine for large groups | Better for a small group |
7. Gingerbread House Photo Frame

Color a gingerbread house, cut out a window, and a school photo moves right in.
The house is colored in warm browns, with pink and green candy dots, a candy cane door, and a white roof edge. Red sequins and ribbon bows add texture on the roof and sides. A child’s photo shows through a clear window in the middle, so the craft doubles as a keepsake.
Grandparents tend to keep these on the fridge long after the holidays are over.
A craft that holds a photo turns a simple coloring page into a gift worth keeping.
8. Pipe Cleaner Wreath Photo Ornament

Small enough to hold between two fingers, this wreath still has a lot of personality.
Fuzzy green pipe cleaners are twisted into a ring, then dotted with gold beads for sparkle. A red ribbon bow sits at the bottom, and a child’s photo fills the center. Loop a bit of thread through the top and it is ready for the tree.
The twisting takes some patience, so older kids in the group usually finish first and can help the others.
⚠️ Watch Out
Trim the photo with a little extra room around the face, then tuck the edges behind the ring. A cut that is too tight leaves gaps and shows the glue.
9. Colorful Stained Glass Star Ornaments

Hold one up to a window and the colors glow.
These ornaments look like stained glass stars made from small colored beads fused into one see through piece. Reds, teals, oranges, and golds mix into a mosaic, and a loop of twine at the top makes them ready to hang. On a real tree, the branches show right through the gaps.
The heating step belongs to a grown up. Kids handle the fun part, which is sorting colors and filling the star shape.
A pile of loose, mixed color beads.
One glossy, see through star with twine at the top.
10. Toothbrush Painted Christmas Tree on Black Paper

An old toothbrush does the work here, not a paintbrush.
Black paper makes bright green paint glow. A light pencil triangle shows where the tree goes. Kids brush short strokes from the middle outward so the paint looks like pine needles, then dab small green blobs near the top for branches. Once the paint is dry, a few dots of color could become ornaments.
The scratchy, streaky texture is the whole charm, so kids who worry about neatness tend to relax.
- ▸Pick a toothbrush with soft bristles.
- ▸Load only a little paint at a time.
- ▸Brush in short flicks away from the middle.
- ▸Keep a paper towel handy to wipe the bristles.
11. Paper Cup Santa Pop-Up Puppet
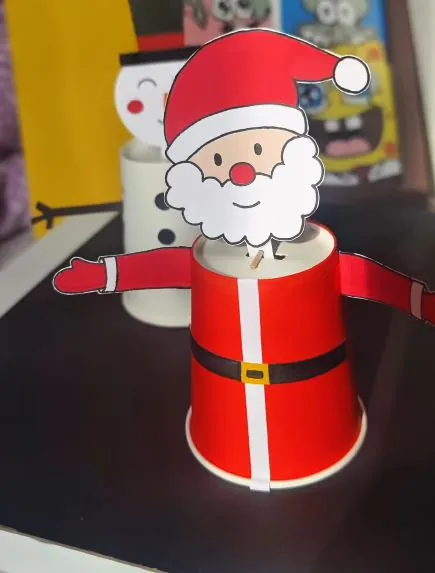
Press, lift, and Santa pops up from his cup.
A red paper cup becomes his coat, with a black belt, a gold buckle, and a white stripe down the front. His head sits on a thin stick that rises from the top of the cup. Paper arms stick out on each side, and a snowman cup in the background shows the same idea works for other characters.
Make a few characters and kids can put on a quick puppet show.
12. Fringed Paper Christmas Tree in a Cute Pot

The little faces on the pots turn these trees into characters.
Green paper is cut into fringe strips, then the strips are curled and layered so each one loops outward like a branch. Pink pom poms and button stars act as ornaments. A small pink or blue pot with a drawn smile holds everything together at the base.
Curling the paper strips is the step kids remember. Show one loop first, then let them figure out the rest.
Cut slits into a sheet of green paper, leaving a solid edge along one side.
Curl the strips and glue the ends to make loops.
Glue the tree into a paper pot and draw a face on the pot.
Decorate with pom poms and button stars.
13. Popsicle Stick Snowflake on a Glitter Plate
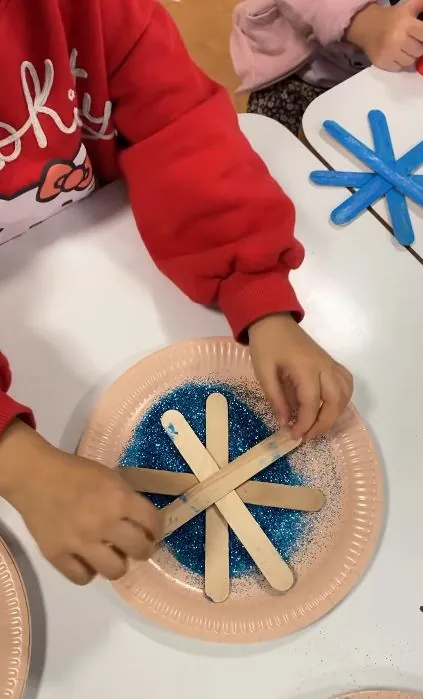
Here is a smart classroom trick: let the plate catch the glitter.
Subscribe to DIY Craft Bloom
Get updates on the latest posts and more from DIY Craft Bloom straight to your inbox.
In the photo, a child lays craft sticks in a star shape over a paper plate sprinkled with blue glitter. Press glued sticks into the glitter and the sparkle sticks only where you want it. Whatever stays loose slides off the plate into a bowl for the next child, so the table stays cleaner than you would expect.
14. Pinecone Christmas Trees with Pom Pom Lights

Pinecones already look like tiny trees, so half the work is done before you start.
Paint the scales green, set the cone on a small cork base, and glue on mixed color pom poms as lights. A glitter foam star in gold or silver goes on top. Line up a few on a shelf and they look like a little forest.
Collect the pinecones on a walk and let them dry indoors before painting.
Gather these
15. Cardboard Gingerbread Cookies With No Baking

No oven needed for these cookies.
Brown cardboard is cut into gingerbread person shapes and outlined in white paint. Wavy lines mark the wrists and ankles, and each one gets round eyes, a curved smile, and red cheeks. Because cardboard is flat and light, they hang easily or lean on a mantel next to a candle.
Make a whole batch and give each cookie its own face. A few silly ones always become the favorites.
Use brown cardboard so the white paint stands out.
Draw the outline first, then add the face.
Let each side dry before you flip it.
Piling on thick paint, which takes much longer to dry.
Cutting thin arms that bend or tear.
Stacking the cookies while they are still wet.
16. Thumbprint Christmas Light Cards
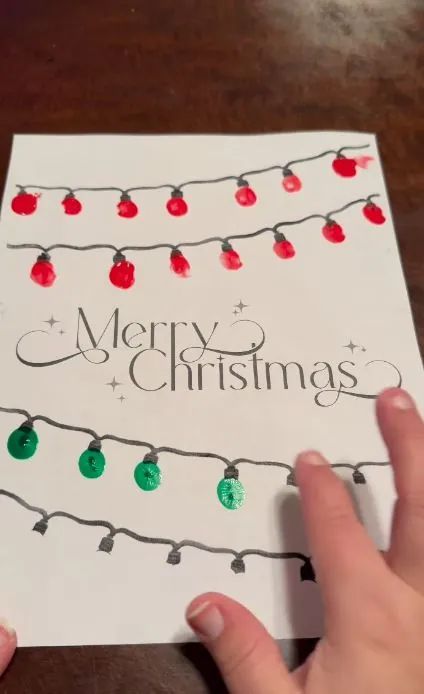
A marker line, a few fingertips, and a string of lights appears.
Wavy black lines work as the wire, with a small bulb base drawn under each dot. Red prints fill the top rows, green prints show up lower down, and the words Merry Christmas sit in the middle of the page. Kids can write their own greeting instead.
It is quick, so a full class can finish a set of cards for parents in a single session.
📌 Good To Know
Press the finger onto a damp sponge pad with washable paint so each print comes out even. Wipe fingers between colors.
17. Paper Cup Jingle Bells
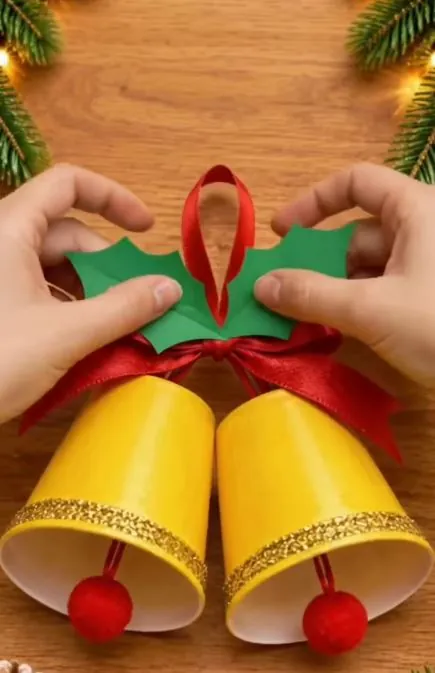
Two yellow cups, a red bow, and the door is ready for company.
The cups sit upside down to form the bells. Gold glitter trim runs around each rim, and a red pom pom hangs inside as the clapper. A red ribbon bow ties the pair together, with green holly leaves tucked in at the top. Hang the set on a door, a tree, or a classroom wall.
Ask kids to bring clean cups from home ahead of time and the supply list is already covered.
Plain recycled cups turn into a bright set of bells with just a little trim.
18. Pom Pom Santa Face on Red Paper

Fluffy white pom poms give Santa a beard with real depth.
A skin tone circle sits on red paper, with googly eyes, pink cheeks, thin eyebrows, a small red pom pom nose, and a happy mouth. White pom poms circle the face for the hat brim and beard, and one big pom marks the hat tip. Each child can give Santa a different expression.
Lay out all the pom poms before gluing. Seeing the beard first helps younger kids plan where each one goes.
| Pom poms | Cotton balls |
|---|---|
| Stay round and tidy | Wispy and easy to pull apart |
| Hold well with a dab of glue | May need a little extra glue |
| Cleaner on the table | Softer, more like real fluff |
19. Paper Bells With Bead Clappers and Holly

Roll yellow paper into cones and the bell shape arrives on its own.
Two yellow cones form the bells, and a small cluster of colored beads inside each one works as the clapper. Green holly leaves and tiny red crepe paper berries sit on top, and a blue pipe cleaner loop serves as the hanger. Hang them on a doorknob or tuck one into a gift.
Rolling the cones neatly is the trickiest part, so hold the seam for a few seconds while the glue grabs.
Flat yellow paper and a few green paper leaves.
Two bells with beads for clappers, holly on top, and a loop to hang.
Save These Ideas for the Season
Pick one craft that fits your table this week and let the kids lead on colors and decorations. The finished pieces will not match, and that is the best part. A room full of slightly wobbly trees and uneven beards says more about the season than anything bought in a store.
Keep the quick ones for busy days and save the sparkly ones for gifts. Pin this list of Christmas crafts for school age kids so it is ready the next time you want fresh ideas, and come back to it as the holidays get closer.