How to Adapt Craft Activities for Adults with Disabilities


You plan a craft afternoon and set out the paint. Then you watch someone sit back because the brush keeps slipping or the steps move too fast. This happens a lot, and it is rarely about the person. It is about the setup.
This guide shows you how to adapt craft activities for adults with disabilities so the whole group can make something they are proud of.
I have run mixed-ability craft sessions in community rooms and at kitchen tables. The groups have included wheelchair users, people with low vision, adults with intellectual disabilities, and older adults with arthritis.
The fixes that work best are small and cheap: foam on a brush handle, tape on the paper edges, a lamp in the right spot.
You will get 9 steps, in order, from the first chat to the last tea break. The setup takes about 1 hour the first time and around 20 minutes after that.
You do not need special training or an expensive kit. You need some planning and a willingness to let people do things their own way.
What You’ll Need
- Grey foam pipe insulation or foam grip tubing with about a 3/8-inch hole, cut into 4-inch pieces
- Loop scissors and chunky triangular markers
- Blue painter’s tape and a roll of non-slip shelf liner
- A rimmed baking tray and 4 shallow trays or box lids
- An adjustable LED desk lamp
- Water-based acrylic paint, sponge brushes, and white tacky glue
- Small terracotta pots, tissue paper, or another open-ended project
- A small notebook, with 1 page for each person
1. Learn How to Adapt Craft Activities for Adults with Disabilities by Asking Each Person First

The person holding the brush knows more about their own hands than any guide does. Before the first session, sit down with each person for about 10 minutes. Do it over a cup of tea so it feels like a chat, not a form.
Ask about grip, eyesight, hearing, how long they like to work, and anything that bothers them, like loud rooms or strong smells. Ask which crafts they enjoyed before and what made them stop. Write the answers on that person’s page in your notebook.
Talk to the person directly, even if a caregiver came along. Bring the caregiver in when the person wants help answering.
2. Pick a Project With More Than One Right Way to Finish

If a craft only looks right one way, somebody in the group will feel like they got it wrong. Pick projects where every version counts as done.
Painted terracotta pots work well. One person presses on mustard yellow dots with the end of a brush. Another paints sage green stripes in a loose plaid. Someone else flicks coral paint for a splatter look. All three are finished pots, and none of them is “better.”
Here is how a few beginner-friendly projects compare:
3. Add Grips and Swap in Easier Tools
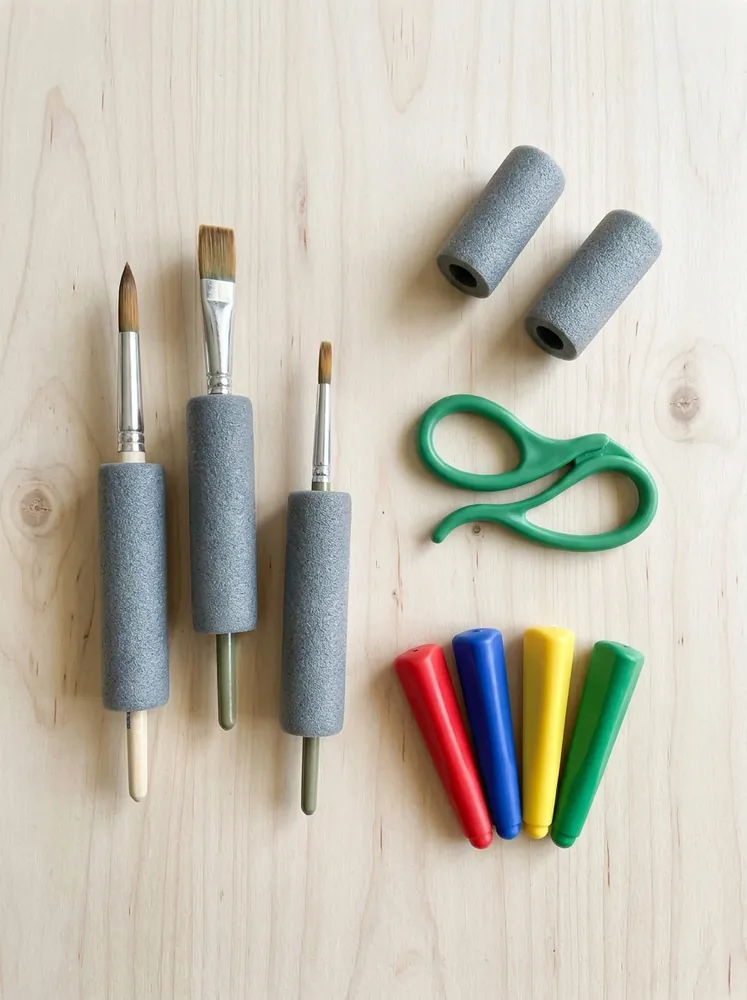
A $3 length of foam pipe insulation fixes more grip problems than most special kits. Cut it into 4-inch pieces and slide one over each brush or pencil handle. A thicker handle takes less squeezing, which helps with arthritis, weak grip, and stiff fingers.
Swap regular scissors for loop scissors, which spring back open on their own. Chunky triangular markers don’t roll off the table and are easier to hold than thin ones.
Subscribe to DIY Craft Bloom
Get updates on the latest posts and more from DIY Craft Bloom straight to your inbox.
Match the tool to the problem:
4. Set Up a Table Everyone Can Roll Up To
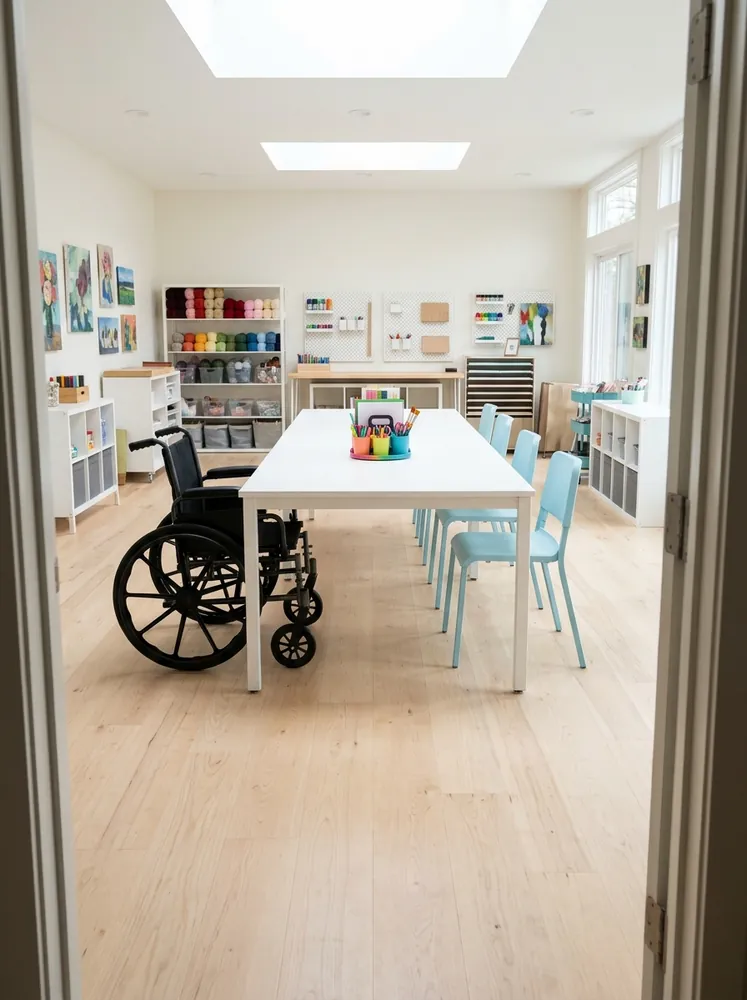
Can a wheelchair slide all the way under your table? Many folding tables have a crossbar that blocks knees, so the person ends up parked a foot away from the work.
Check these before people arrive:
- Knee space at least 27 inches high and 30 inches wide under the table
- Tabletop between 28 and 34 inches from the floor
- An aisle at least 36 inches wide along one side
- Supplies in the center, within reach of every seat
Leave one end of the table open with no chair. A wheelchair user can roll in without anyone moving furniture around them.
5. Fix the Lighting, Noise, and Color Contrast

Glare, noise, and pale paper on a pale table tire people out faster than the craft does. Set up the room so eyes and ears can relax.
An adjustable LED desk lamp aimed at the work helps anyone with low vision. A sheet of bright yellow card stock on a navy felt mat is much easier to see than white paper on a light table. Keep a pair of over-ear headphones nearby for anyone who finds the room too loud.
Here are quick changes for common sensory needs:
6. Anchor the Work So It Stays Put

If paper slides every time someone presses down, they will stop pressing. Anchoring the work helps people with tremors, one working hand, or low strength.
Lay a piece of non-slip shelf liner on the table, about 12 by 18 inches. Put the paper on top and tape all 4 edges with blue painter’s tape, running the tape onto the liner. It peels off later without tearing the paper.
For beads, buttons, or anything round, work inside a rimmed baking tray. Dropped pieces stay in the tray instead of rolling under the table.
7. Sort Supplies Into One Tray Per Step

Four trays on a table make more sense to most people than a 10-step instruction sheet. Give each step of the project its own shallow tray, and line them up from left to right.
For a painted pot, the trays look like this:
- Tray 1: a plain terracotta pot
- Tray 2: sage and coral paint with a foam brush
- Tray 3: a dish of buttons and a bottle of tacky glue
- Tray 4: a finished pot that shows where the project is headed
When a step is done, move that tray away. The person can always see what comes next.
8. Hand Over the Choices, Not the Work

Doing it for someone is faster. That is the trap. Once a helper takes over, the craft stops belonging to the person making it.
Subscribe to DIY Craft Bloom
Get updates on the latest posts and more from DIY Craft Bloom straight to your inbox.
Offer 2 or 3 choices at a time instead of an open question. Hold out a basket of mustard, teal, and coral yarn, and let them point, nod, or look at the one they want. If someone can’t do a step with their hands, they can still direct it: “Which side first? More glue or less?”
Always ask before guiding someone’s hands. Some people like hand-over-hand help. Many do not.
9. Pace the Session Around Energy, Not the Clock

Energy often runs out before the project does, and that is fine. Plan sessions of 45 to 60 minutes, with a short break every 15 to 20 minutes. A cup of tea and a stretch count as a break.
Build in stopping points. A tissue paper collage that is half covered in green and blue squares is a good place to pause. The glue dries, the work waits, and the person comes back rested.
Watch for slower movements, more mistakes, or going quiet. Those signs usually mean it is time to stop, whatever the clock says.
Put the Finished Work Where People Can See It
When the pots dry or the collages are done, give them a real home. A shelf by the door, a sunny windowsill, or a table at the next family visit all work.
Seeing your work on display tells you it counted. That feeling is what brings people back for the next session.
Start with one project and the tray setup from step 7, then adjust as you learn what your group needs. Save this pin so the plan is ready for your next craft day.
Frequently Asked Questions
What crafts work best for adults with limited hand movement?
Tissue paper collage, sponge painting, and sticker mosaics work well because they need little squeezing or fine control. Pre-cut shapes and thick foam handles make them even more manageable.
How do I keep adult crafts from feeling childish?
Adapt the tools, not the theme. Pick grown-up projects like plant pots, coasters, wall art, or jewelry, and skip cartoon designs and glitter-heavy kids’ kits.
How many helpers do I need for a group?
Plan on about 1 helper for every 3 to 4 people. Add more if several people need help with physical steps.
What if someone doesn’t want to join in?
Let them watch without pressure. Offer a small role, like picking colors for the group or handing out trays, and many people will join when they feel ready.
How do I adapt crafts for someone who is blind?
Choose materials with texture, like felt, yarn, and textured paper, and keep the trays in the same order every time. Part of learning how to adapt craft activities for adults with disabilities is describing colors and shapes out loud, so the person can make every choice themselves.