17 Creative Craft Ideas Using Paper Towel Rolls

There is a spot in most kitchens where empty paper towel rolls go to sit. On top of the fridge, in a drawer, shoved in a bag under the sink.
You keep them because throwing them out feels wasteful, then you never do anything with them, and eventually the pile wins.
Cardboard tubes are better raw material than they look. They cut with regular scissors, hold a curve, take paint, flatten into strips, and stack into shapes far bigger than one tube. That is a lot of range for something free.
What follows is a mix on purpose. Some of these craft ideas using paper towel rolls are twenty minute projects for a rainy afternoon with kids, like leaf wing bats and a mermaid with yarn hair.
Others take real patience and end up somewhere unexpected, like a gold quilled snowflake or a ring cluster you would hang above a chair.
Start wherever your pile allows. One roll gets you a napkin ring. Two dozen gets you a Christmas advent tree.
1. Painted Love Bugs for Valentine’s Day
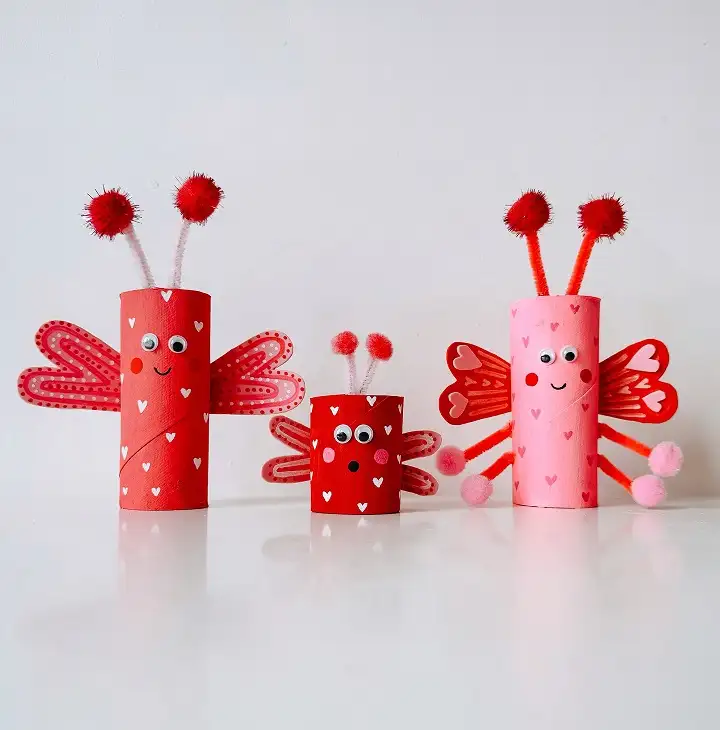
- Base: three rolls cut to three different heights so the bugs read as a family
- Paint: one bright red and one soft pink, with tiny hand drawn hearts on top
- Wings: layered paper hearts and long teardrop shapes glued to the sides
- Finishing touch: pipe cleaner antennae topped with matching pom poms
Cutting the rolls to three sizes does most of the work. The short one in the middle becomes the baby, and the height gap gives the group a story kids respond to.
Let the paint dry all the way before the wings go on, or the glue lifts the color.
Faces stay simple here. Googly eyes, a dot nose, two pink cheeks drawn with a marker, one small curved smile.
Placement note: stand them on a windowsill or mantel where the wings stick out sideways and throw little shadows.
2. Flattened Roll Flower With a Curled Stem
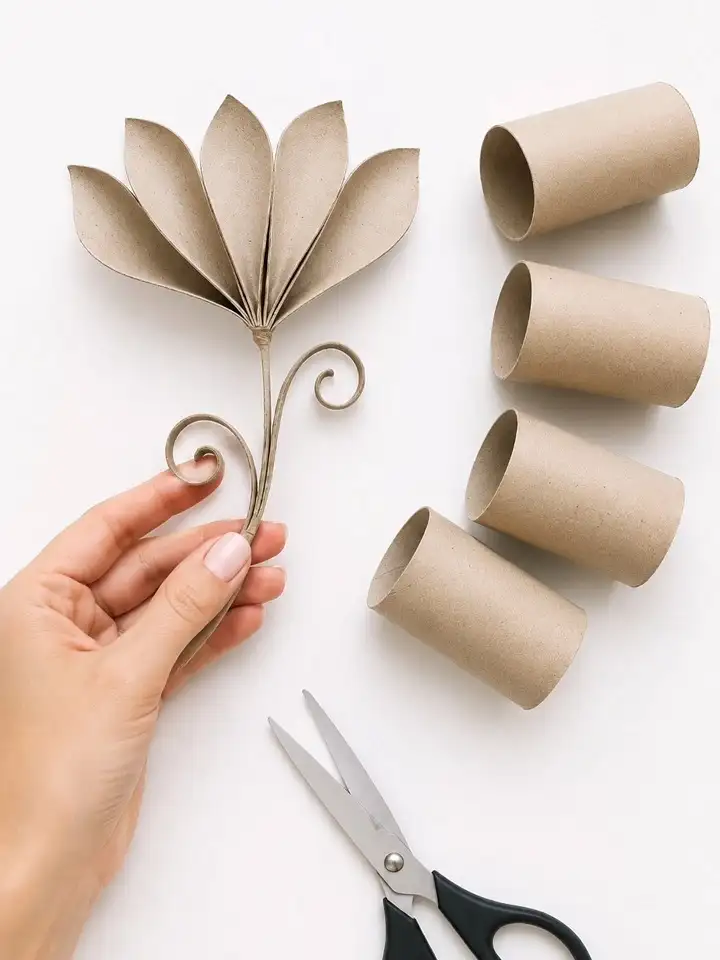
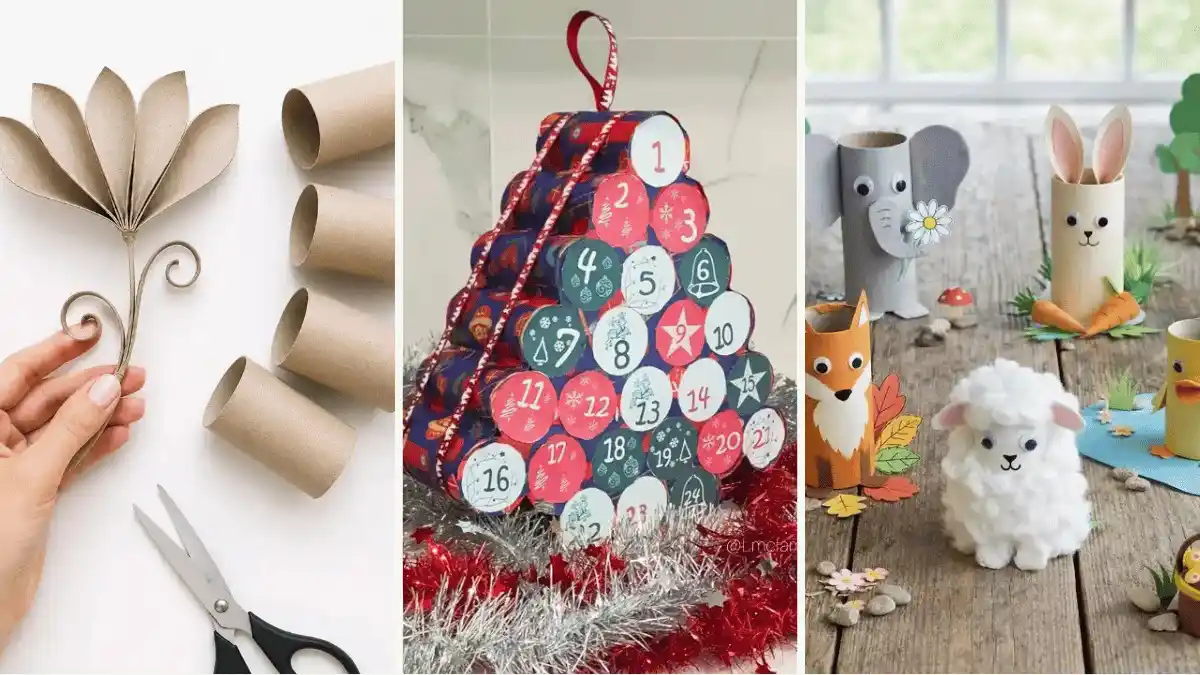
Flatten a roll, then cut straight across it to make petals with a pointed tip. Stack the petals in a fan and pinch the bottoms together so the top spreads open like a lotus.
The stem is a thin strip cut from a second roll, rolled tight at both ends into small spirals. Wrapping that strip around a pencil gives the curl without any special tool.
Left bare, the kraft brown looks closer to pressed leather than to packaging. Paint would work, though the natural color is what makes this one look finished instead of homemade.
3. Stacked Advent Calendar Tree
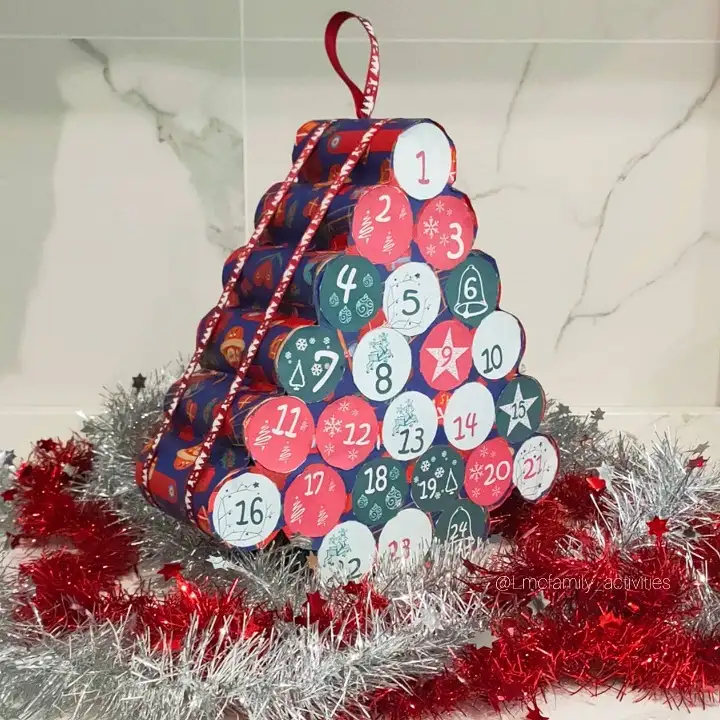
Best for: a December project that clears out a big pile of rolls at once.
Roughly two dozen rolls are wrapped in Christmas gift wrap, then glued into rows that get shorter toward the top, which forms the tree.
Open ends face forward and hold the small treats. Most craft ideas using paper towel rolls need one tube. Few scale up like this.
Numbered paper circles cover each opening, taped along one edge so a child can flip them open like doors. A ribbon loop hangs the whole thing, and a candy cane trim runs down the front to hide the seam.
How the back is braced sits out of frame, so glue a cardboard triangle behind the stack to keep it standing.
Budget swap: leftover wrap from last year covers every roll for free. Scrapbook paper or painted newspaper does the same job.
4. Gold Quilled Snowflake Ornament
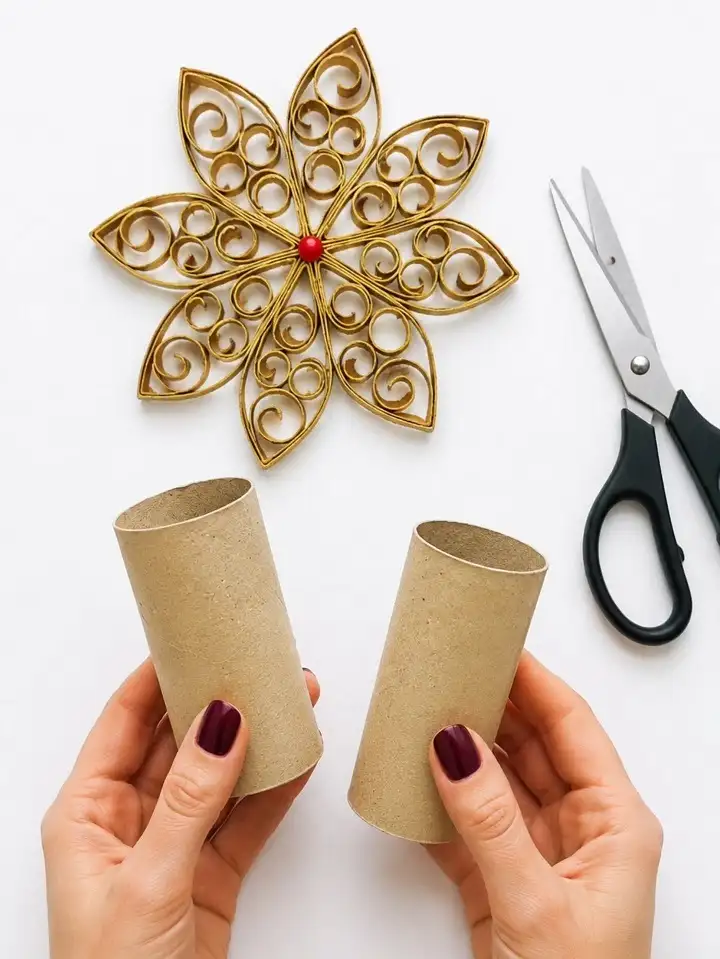
The build: flatten a roll, cut it into strips about half an inch wide, bend eight strips into pointed petals, fill each petal with tight spirals made from thinner strips.
Glue the petals into a ring with the points facing out, then press a red bead into the center to hide the join.
Gold paint is what turns cardboard into something that reads as metal. Spray gives the smoothest coat, though a craft brush and patience get close.
Each petal swallows several small coils, so treat this as a sit down project rather than a quick one. Six petals instead of eight makes the ring far easier to close.
Hanging tip: thread thin cord between two petals instead of gluing a loop to the back, where it tends to peel away over time.
5. A Whole Animal Set From One Basic Shape
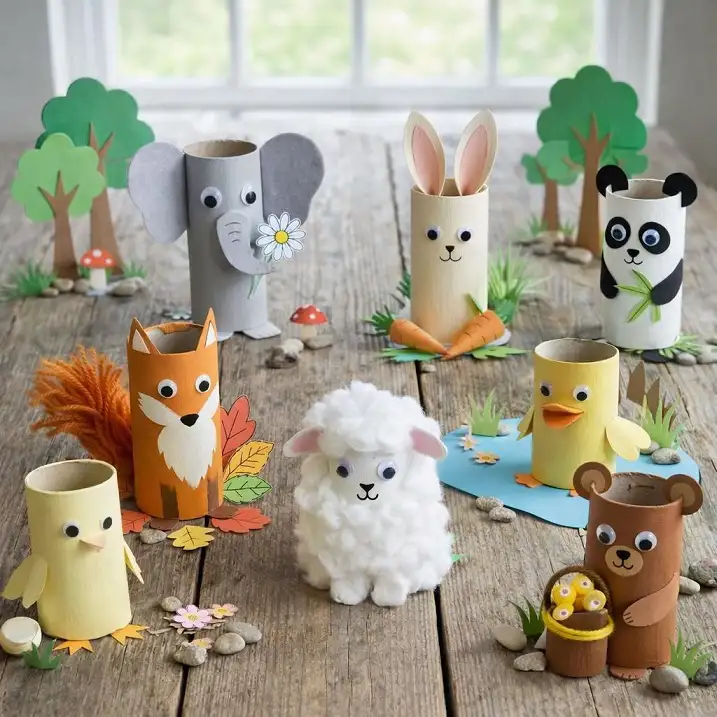
Every animal here starts from the same plain roll.
Subscribe to DIY Craft Bloom
Get updates on the latest posts and more from DIY Craft Bloom straight to your inbox.
The cardboard shape never changes, and all the character comes from what gets added: felt ears and a curled trunk for the elephant, cotton wool wrapped around the sheep, snipped yarn for the bushy fox tail, black paper circles for the panda.
Paint the roll one flat color first, then let the details do the rest.
Beginner version: start with the chick. Yellow paint, two dot eyes, an orange beak folded down the middle, two wing shapes on the sides.
Texture note: the sheep only works because cotton covers the roll top to bottom. Partial coverage looks unfinished.
Set idea: cut paper grass, trees and small stones for a scene around them, so the animals become a play set instead of separate crafts.
6. Leaf Wing Bats on a Branch
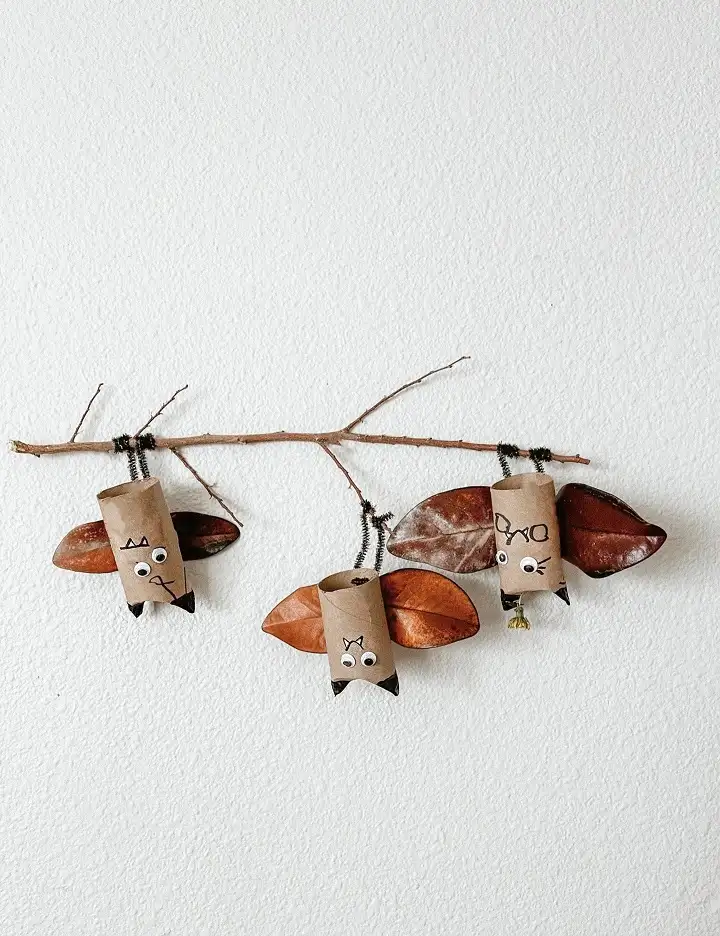
k_cheesy
Fallen leaves stand in for paper wings here, and that swap is the whole idea. Press the top of the roll flat and cut two small points for ears, then cut a shallow V at the bottom so the feet stick out.
Glue one dry leaf to each side of the back. Black pipe cleaners twist around a stick and hold each bat at a different height.
Why it works:
- Brown kraft and brown leaves sit in the same color family
- Leaf veins give the wings a papery bat texture for free
- Staggered heights make three bats look like a flock
Collect the leaves a day early and press them under a heavy book so they stay flat and do not crumble halfway through gluing.
7. Feather Birds Perched on a Branch
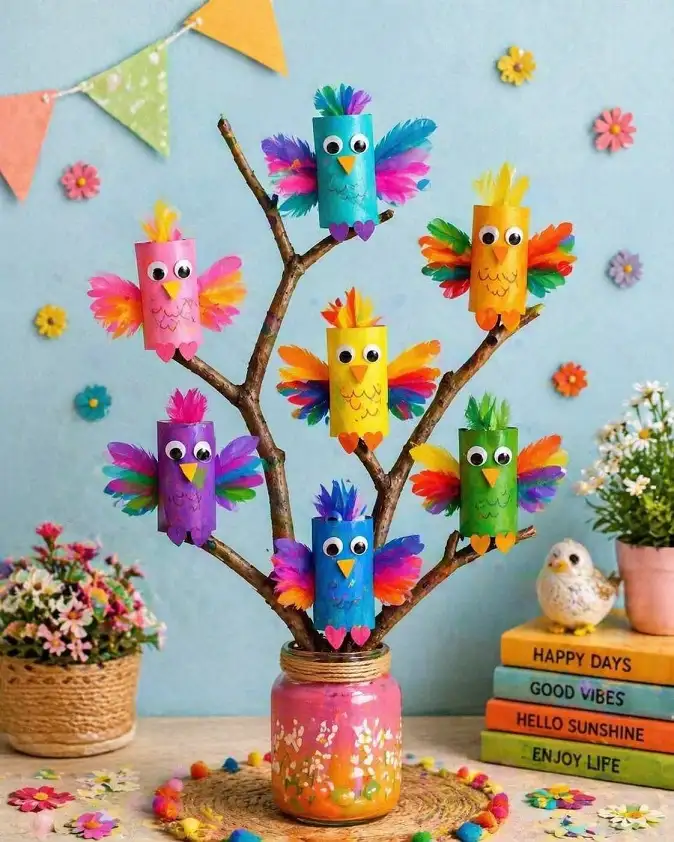
- Body: a roll covered in bright paper, one bold color per bird
- Wings: craft feathers in mixed shades, glued in a fan on each side
- Face: googly eyes, a folded triangle beak, a small drawn smile
- Display: a bare branch standing in a jar weighted with sand or stones
Seven birds in seven colors turn a branch into actual decor, which is rare among paper towel roll crafts.
Choose colors that sit near each other on a color wheel and the group reads as a set, even with mismatched feathers.
Fix each bird with a dab of hot glue at the back, or double sided tape if children are doing the sticking.
Feather note: a few feathers pushed up through the top make the crest, so cut two small slits before gluing anything else.
8. Tissue Tail Mermaid Doll
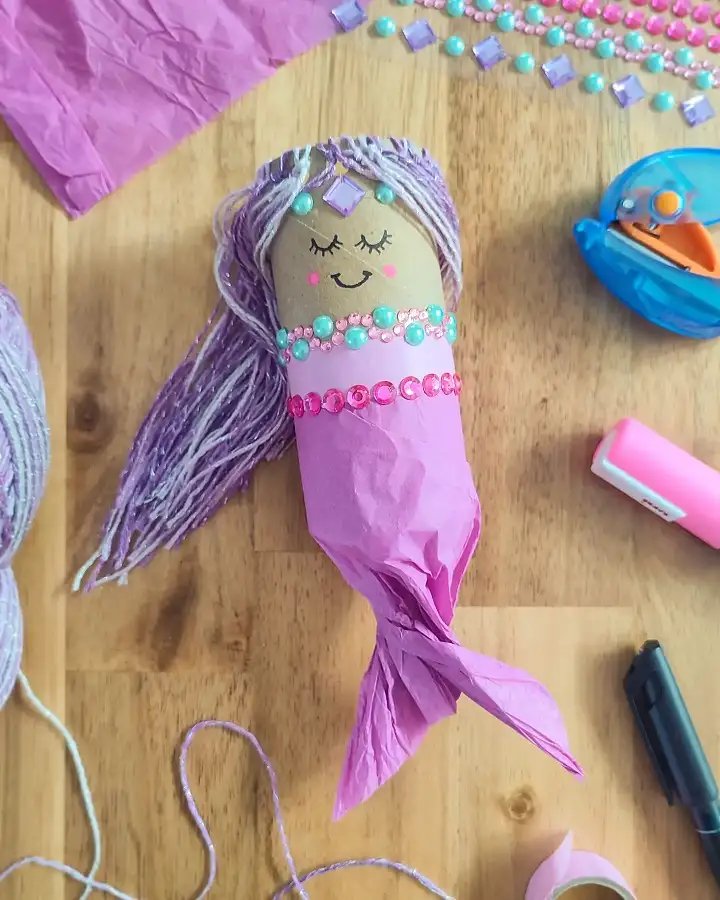
Yarn does the heavy lifting on this one. Cut lengths about twice as long as you want the hair, tie the bundle at its middle, then glue that tie across the top of the roll so the hair falls down both sides.
Pink tissue paper wraps the bottom half, twists near the base, and the loose end gets flattened and trimmed into a fin.
Face note: closed eyes with a curved lash line are easier for kids to draw than open eyes, and they look softer on cardboard.
Gem note: stick on jewels make the crown and the two rows across the tail, which hide the messy edge where tissue meets roll.
Make it easier: swap tissue for crepe paper or a fabric scrap if the tissue keeps tearing during the twist.
9. Seed Starter Pots for the Windowsill
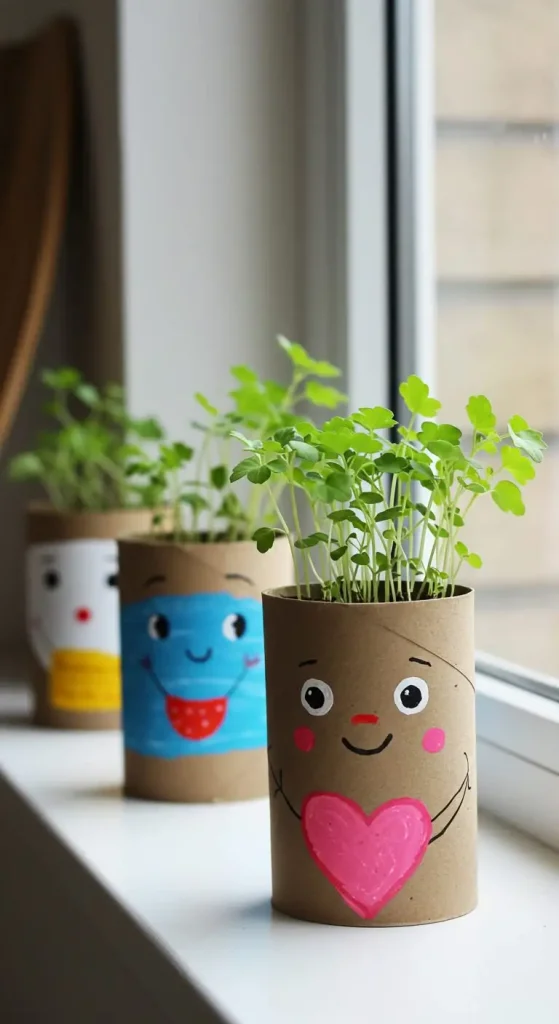
Simple version: cut a roll into three inch sections, snip four slits at the base, fold the flaps inward like a box bottom.
Fill each pot with soil and drop in a seed. Cardboard breaks down in the ground, so the whole pot goes straight into a garden bed later.
Water note: set the pots on a tray. Damp cardboard softens fast and will mark a windowsill.
10. Rolls Turned Into Desk Cups

Height is what makes this work. Cut several rolls at different lengths, glue them shoulder to shoulder inside a shallow box or tray, and the short ones hold erasers while the tall ones take rulers and scissors.
Cover the outside in leftover wrapping paper before gluing, never after. Reaching between glued rolls with a brush is a headache.
11. Peanut Butter Bird Feeder
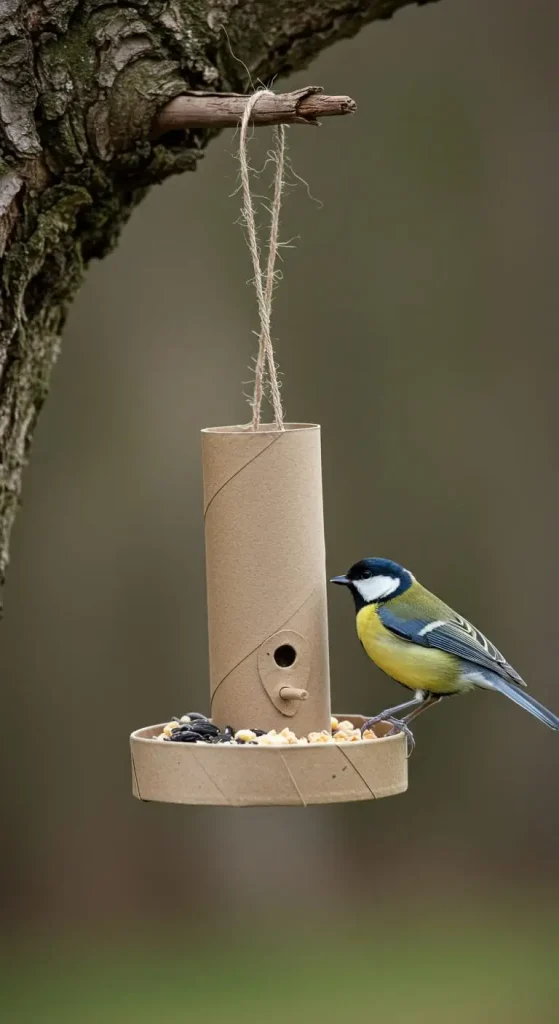
- Coat: a thick layer of peanut butter over the whole outside of the roll
- Roll: press the sticky tube into a plate of birdseed
- Hang: thread string through the tube and knot it into a loop
- Spot: a branch you can see from a window
Cold weather helps. Peanut butter firms up and holds the seed instead of sliding off.
Skip this: on hot days, the coating drips. Suet or lard holds better in warm months.
Subscribe to DIY Craft Bloom
Get updates on the latest posts and more from DIY Craft Bloom straight to your inbox.
12. Napkin Rings for the Table
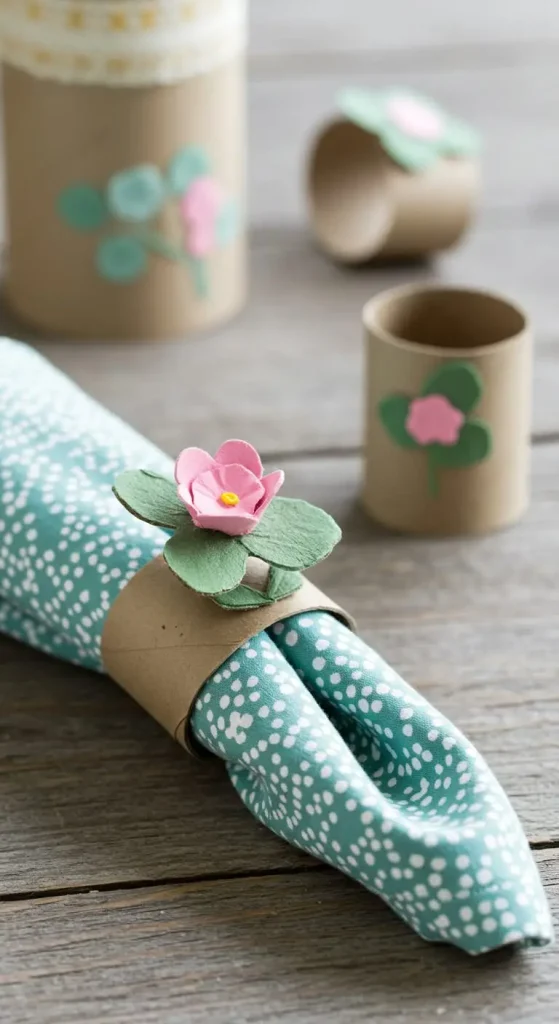
Best for: dressing up a holiday table without buying anything.
Slice a roll into rings about an inch and a half wide, then wrap each one in ribbon, fabric scraps, or paint. Rough cut edges disappear under the wrap, so the cut does not need to be neat.
Seasonal swap: burlap and twine in autumn, satin ribbon for a dinner party, painted stripes for a birthday.
13. Roll Rollers for Printing Wrapping Paper
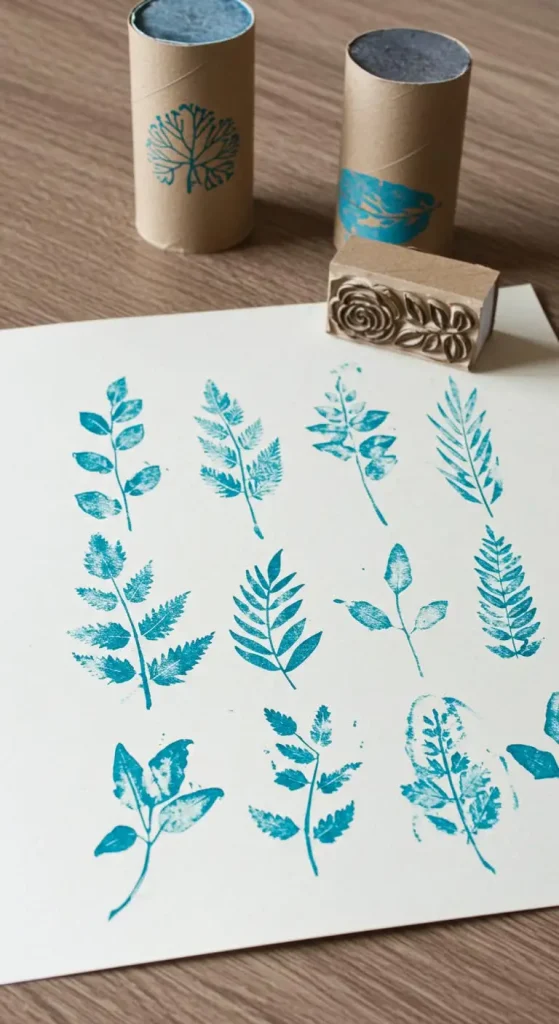
The build: glue a raised design around the outside of a roll, ink the surface, then roll it across paper in one steady pass.
The teal prints here repeat in loose rows with patchy coverage, and that unevenness is the charm of hand printing. Fight it and the results look worse, not better.
A carved block sits beside the tubes in the photo, so the design can be pressed into the roll from a stamp or cut from craft foam and glued on. Foam is cheaper and cuts with ordinary scissors.
Ink note: the tops of both rolls hold a pad of felt or sponge soaked in paint. Dab the roller on that instead of dipping it, or the design floods and loses its detail.
Paper note: thin cream stock takes this best. Glossy paper beads the paint and smears when you lift it.
14. Single Pencil Holder for a Desk
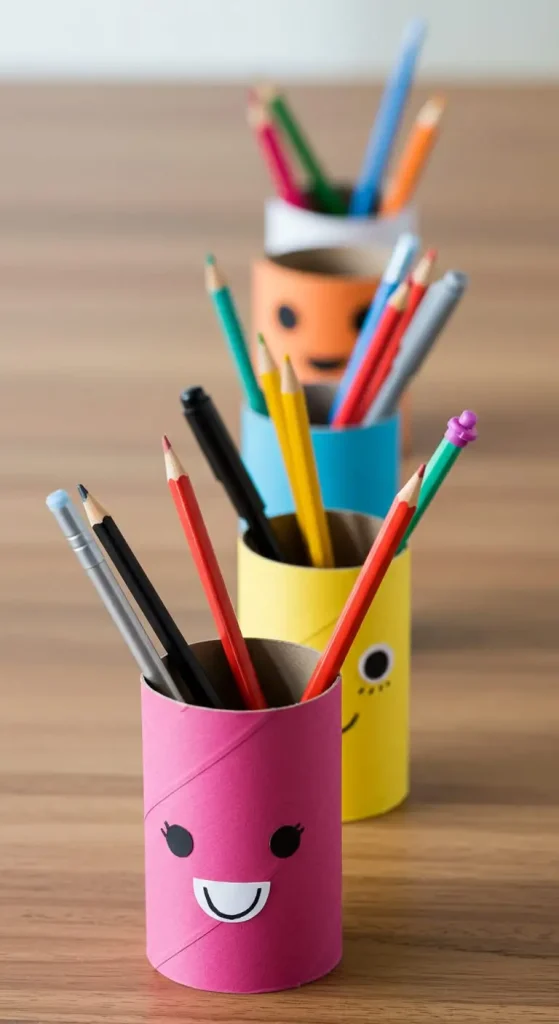
Keep the roll at full height for pens and rulers, or cut it down to about four inches so shorter pencils still reach above the rim.
Glue the tube upright onto a cardboard circle cut slightly wider than the base. That disc stops it tipping, which is the only real flaw in a standalone holder.
Finish note: washi tape wraps faster than paint and needs no drying time.
15. Toy Tunnel and Marble Run

Best for: rainy afternoons when children need something to build rather than watch.
Tape rolls end to end for a flat tunnel, or angle them down a wall with masking tape so marbles run through and drop into a bowl.
Cutting one roll in half lengthwise makes an open chute, which lets kids see the marble travel.
One small change: cut a window in the middle of a tunnel section and the run becomes a game of catch.
16. A Toy Zoo of Animal Figurines
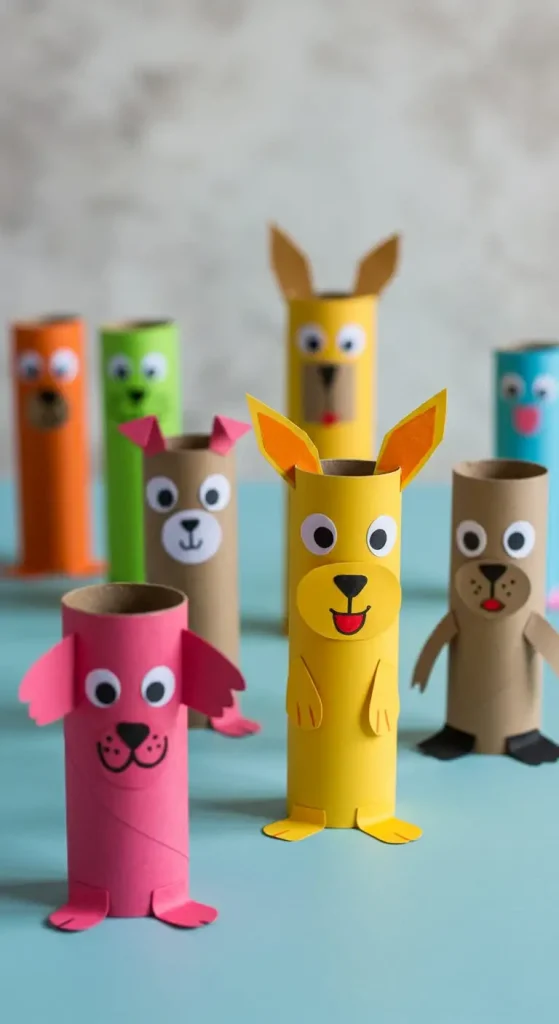
Entry 5 shows a full matching set. This one is looser, meant for kids to invent their own creatures rather than copy a model.
Copy the look:
- Body: a short roll section, painted one flat animal color
- Mane or ruff: a construction paper circle with the edges fringed
- Face: googly eyes, a paper snout, whiskers drawn on with marker
- Legs: two shallow arches cut into the bottom rim
Let each child pick the animal. Mismatched results are the point, and a shelf of odd lions and lumpy bears beats eight identical ones.
Drying time: paint the body first and leave it an hour before any gluing starts.
17. Overlapping Roll Rings as Grown Up Wall Art
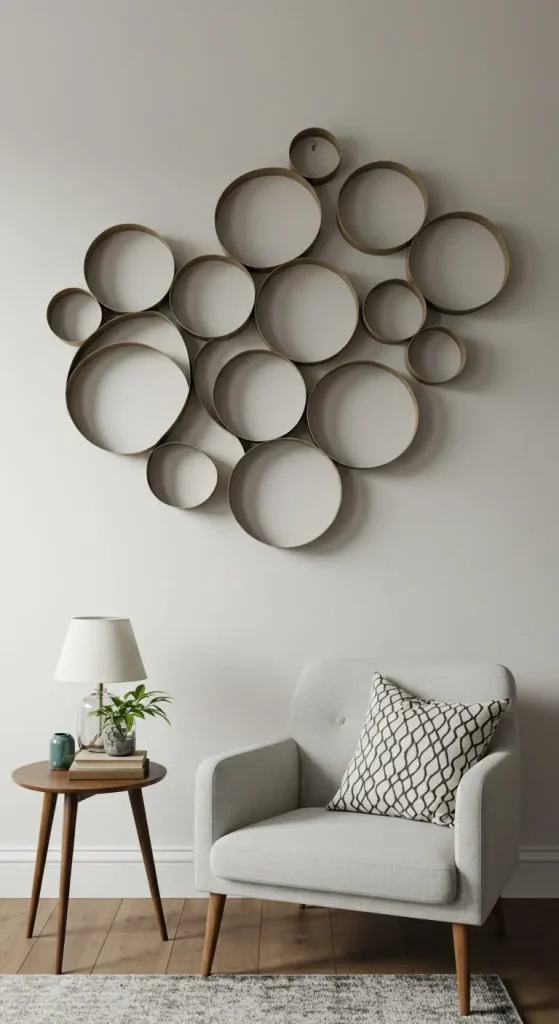
Cut rolls into wide bands, roughly an inch and a half deep, so each ring holds its shape and casts a shadow on the wall.
Vary the diameters by cutting a few rings open and retaping them smaller. Clustering big and small circles together is what makes the arrangement look designed rather than random.
Lay the whole shape out on the floor first. Glue the rings to each other where they touch, let the piece set overnight, then hang it as one panel with a couple of small nails.
Finish note: the rings here stay close to natural kraft brown with a faint sheen. A wash of warm grey or a light dry brush in bronze gets you there.
Placement note: hang it above a chair or a side table rather than centered on an empty wall, where the cluster can float and look lost.