17 Cozy Fall Themed DIY Birthday Card Ideas That Feel Like a Warm Hug

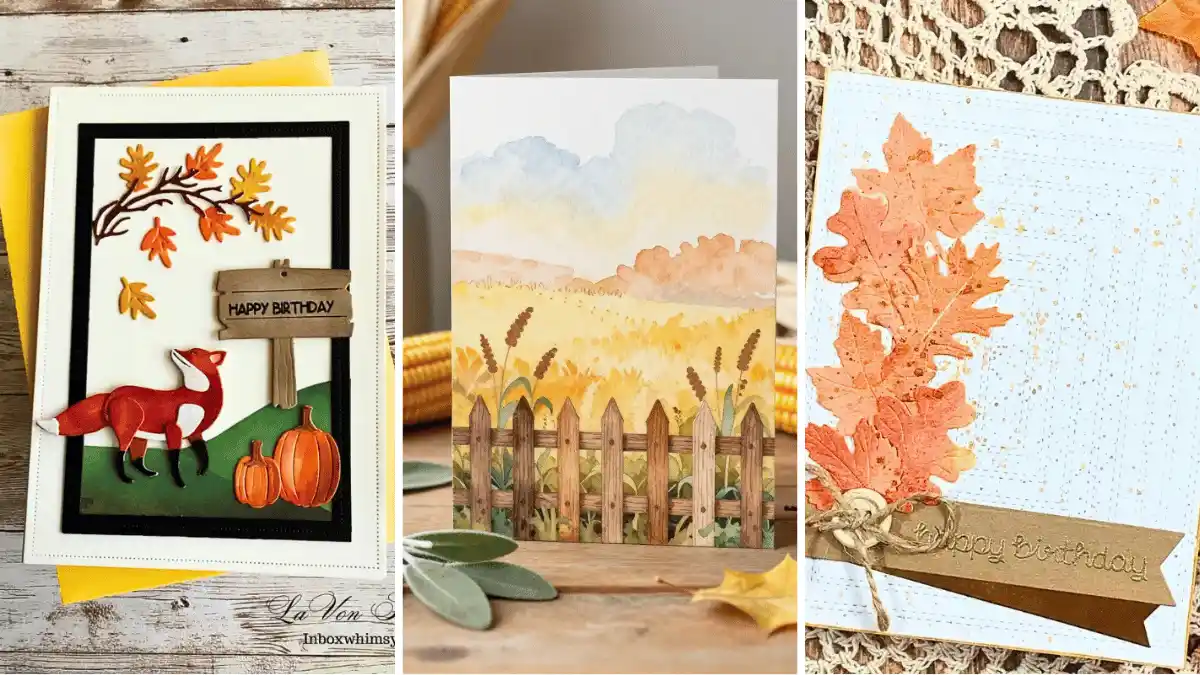
Most store cards get a quick glance, a polite smile, and a spot in the recycling bin by Tuesday. A handmade one tends to stick around.
Fall makes that easier than any other season, since half the supplies are already lying around outside.
Pine cones, crunchy maple leaves, even the corks from last weekend’s dinner can all become a birthday card someone keeps.
The hard part is knowing where to start. You want something cozy and personal, but you may not own a die cutting machine or trust your drawing skills.
That’s why this roundup of fall themed DIY birthday card ideas mixes quick wins with slower weekend projects.
Some take ten minutes, like stamping a stack of pumpkins with one fingertip. Others ask for a little more patience, such as a cork mosaic of rolling hills or a navy card with tiny gates that swing open onto a sunset.
There are also picks for a dad who loves the woods, a friend who lives in sweaters, and a kid who adores acorns. Grab some cardstock and glue, and choose the one that sounds most like your person.
1. Ombre Fingerprint Pumpkin Stack With a “Favorite Pumpkin” Pun
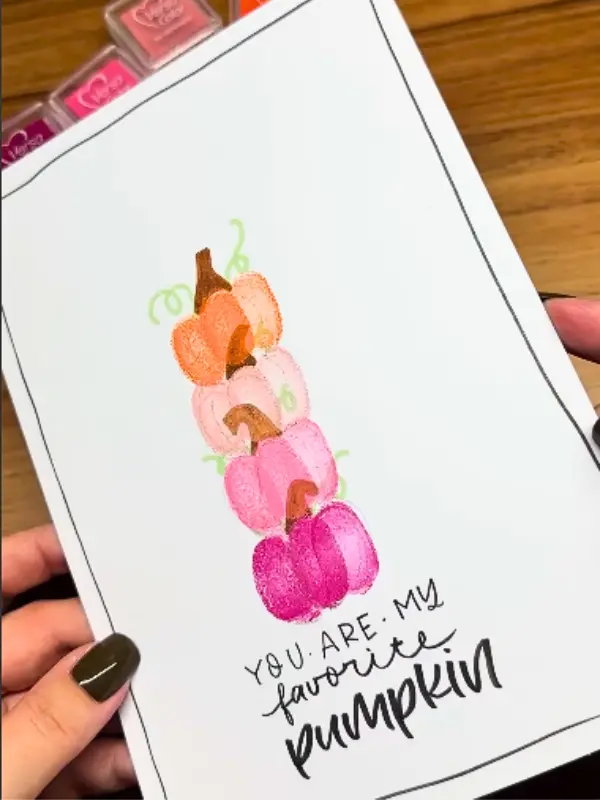
The build: white cardstock, four ink pads from orange to deep magenta, one fingertip, a brown marker, and a black pen.
Press your finger into the lightest ink and stamp two or three prints side by side.
Where they overlap, the color darkens into a rib line, so each pumpkin shapes itself. Stack the next one just below, going one shade deeper each time.
Wipe your finger clean between colors so the shades stay crisp. Once the ink dries, add curved brown stems, a few green vine curls, and a loose freehand border.
Under the stack, letter the pun in three styles: small caps, flowing script, then bold. Inside, write “Happy birthday to my favorite pumpkin.”
Birthday twist: Match the stack to their age, one pumpkin per decade. A 40th gets four pumpkins.
2. Layered Fox Scene With a Wooden “Happy Birthday” Sign
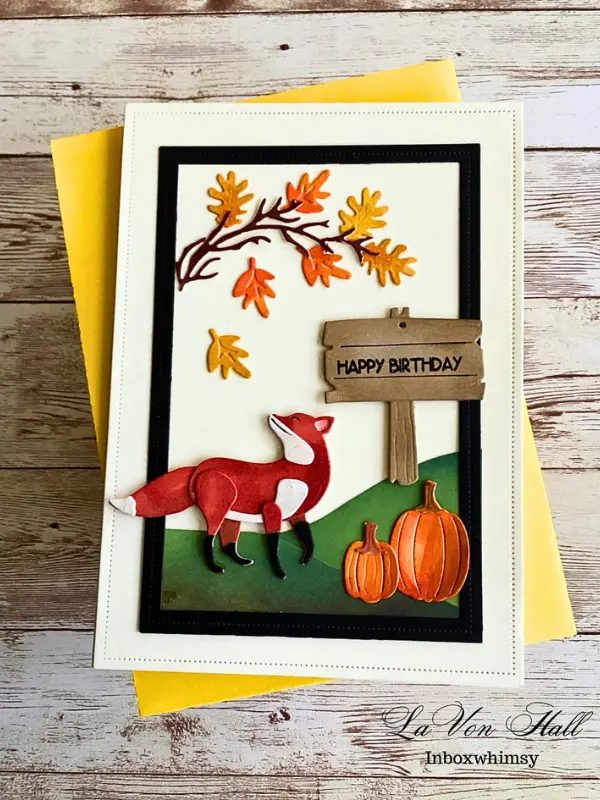
Best for: a dad, brother, or friend who loves the outdoors and wants a card that isn’t too sweet.
Think of it as a tiny fall landscape built in layers. Green hills roll across the bottom, blended darker at each edge. A red fox walks over them, gazing up at an oak branch full of orange, gold, and rust leaves.
Two shaded pumpkins fill the corner, and the greeting sits on a little wooden signpost.
Behind it all, a black mat frames the scene so every color stands out. Stitched cream edges and a golden envelope finish the fall look.
Beginner version:
Hand cutting works fine here. Trace a fox, leaves, and pumpkins onto cardstock, then cut them out with small scissors.
Rub brown ink around each edge for that shaded look. Raise the fox on foam tape so it stands off the hills.
3. Speckled Pumpkin Patch Birthday Card With Two Little Mice
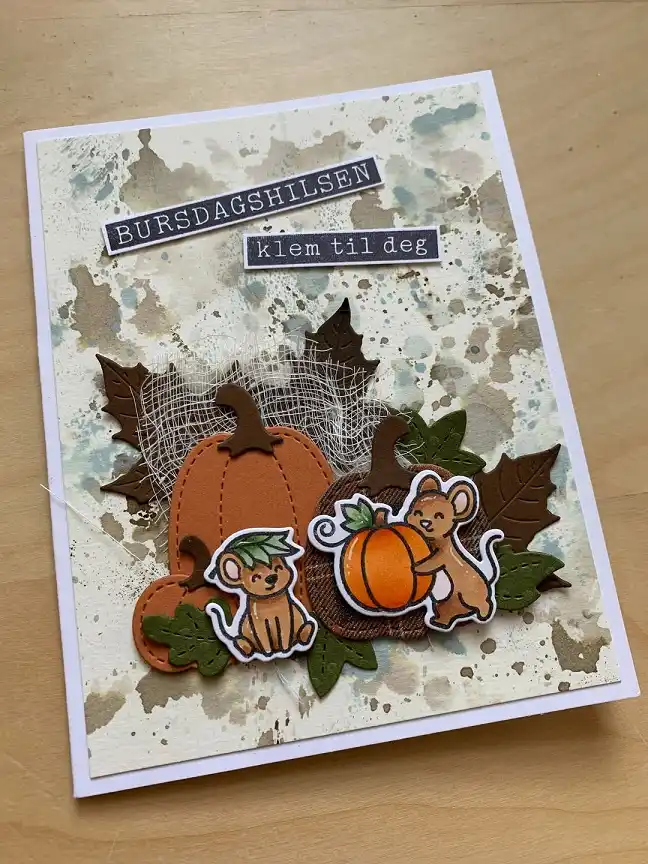
Cozy is the whole mood here. Rust, orange, and brown plaid pumpkins pile up over a speckled cream background, with a wisp of cheesecloth tucked behind like hay.
Two stamped mice sit in front, and one hugs a round orange pumpkin like a birthday present.
Why it works:
- Splattered tan, brown, and soft blue ink makes a plain panel look aged.
- Plaid, cheesecloth, and stitched pumpkins give every layer real texture.
- White borders around the mice help them stand out from the busy pile.
Greeting note:
The black strips say “birthday greeting” and “a hug for you” in Norwegian. Write your own words with a white gel pen on thin black paper strips.
For the speckled background, flick watery brown and blue paint off an old toothbrush and let it dry flat.
4. Watercolor Harvest Field Birthday Card With a Rustic Picket Fence

Copy the look:
- Base: thick watercolor paper folded into a tall card
- Sky: pale blue clouds over a soft yellow wash
- Field: golden grass, peach trees far off, and tall brown seed heads
- Finishing touch: a wooden picket fence painted in mixed browns
Paint from back to front. Wet the sky first so the blue melts into the yellow, then add the peach tree line and golden field once it dries.
Pickets go in last, each one a slightly different brown so the fence looks weathered.
Make it easier:
Cut the pickets from brown kraft paper and glue them on if straight lines feel tricky. The front has no greeting, so write your birthday note inside, such as “Wishing you a golden year ahead.”
5. Chunky Knit Sweater Birthday Card With Rust Chevron Stripes

Chunky knit says fall before anyone even opens this card. A cream knitted panel covers nearly the whole kraft front, crossed by three rust brown zigzag stripes.
Tiny V stitches give it real depth, so it looks soft enough to wear. For a dad or grandpa who likes cozy more than cute, this one fits right in.
Thrift swap: Cut a patch from an old cream sweater with a stripe or chevron. Brush fabric glue along the cut edges first so the stitches don’t unravel.
Yarn version: No sweater handy? Glue rows of cream and rust yarn in tight zigzags across the card. From a step back, the rows read like knitting.
Subscribe to DIY Craft Bloom
Get updates on the latest posts and more from DIY Craft Bloom straight to your inbox.
Mailing note: Thick fronts like this often need extra postage, so hand deliver it or ask at the post office. Inside, a line like “Sending you a warm birthday hug” matches the sweater feel.
6. Layered Paper Birch Forest Card for a Late Fall Birthday

Paper layers give a quiet birch woods real depth. Soft gray pines fill the back, while two birch trunks with dark bark marks stand up front.
Between them, a blank banner waits for your greeting, and a white hill with a grassy edge covers the bottom.
Cut your layers from white, light gray, and a slightly darker gray paper. Glue the darkest one down first, then work forward so each layer sits a little lighter.
Birch bark is easy to fake by dabbing short black lines onto cream strips with a dry brush.
White and gray run through every layer, so the card feels more like first frost than peak autumn.
That makes it a sweet pick for a November birthday.
Want more warmth? Tuck a few tiny orange and gold paper leaves at the foot of each birch. Letter the banner in dark brown ink, and the frost starts to feel cozy.
7. Cascading Autumn Leaves Card With a Twine Tied Birthday Banner
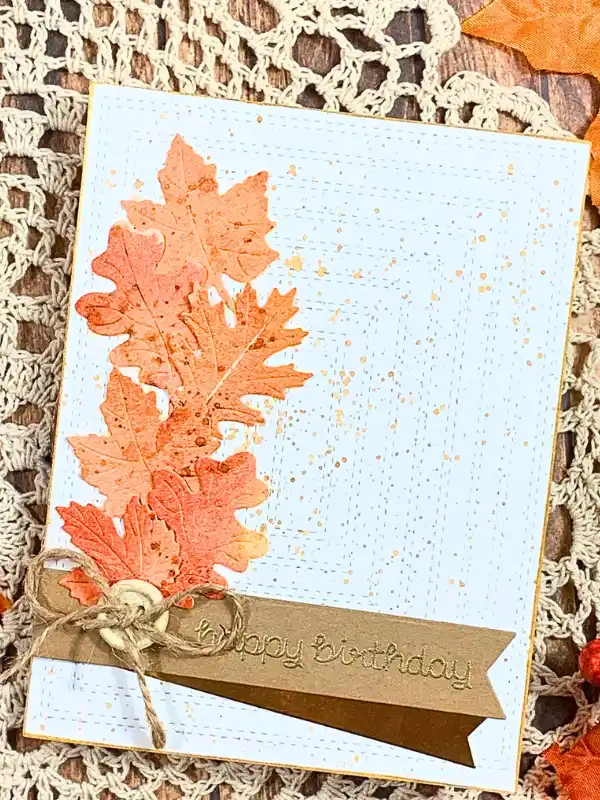
Simple version: five or six paper leaves in orange and peach, a stitched white panel, a kraft banner, jute twine, and one button.
Leaves tumble down the left side in a loose column, with maple and oak shapes mixed together.
Each one fades from pale peach to deep orange, with rust flecks that look like real autumn spots. Tiny gold dots drift across the white panel, and faint stitched frames sit quietly behind it all.
Stamp “happy birthday” in script on a kraft strip, then snip one end into a fishtail. Gold embossing powder, heated over the ink, gives the words their shine.
No heat tool? A gold gel pen works too. Wrap twine around the left edge, tie a bow, and thread a cream button onto the knot.
Leaf tip: Press real maple leaves flat in a book, trace them onto white cardstock, and cut them out. Sponge orange ink from the center outward, then flick a little brown off a brush for the spots.
8. Pressed Maple Leaf Birthday Card Over a Soft Watercolor Wash

Only two things make this fall themed birthday card: one real maple leaf and a loose puddle of paint. The leaf fades from golden tips to rust and deep plum near the center, and every vein still shows.
Behind it, a pale wash of butter yellow and sage green spreads out with soft, uneven edges, so the leaf seems to float.
Pressing note: Pick a flat, dry leaf with strong color. Tuck it between paper towels inside a heavy book for about a week. Brittle leaves crack easily, so press a few extras.
Paint note: Wet the center of your watercolor paper with clean water first. Drop in yellow and green and let them bleed on their own. Wait until the wash is fully dry before gluing anything down.
Sealing tip: Brush a thin coat of matte decoupage glue on the back of the leaf, press it down gently, then add one more coat over the top to seal it. Inside, write “Happy birthday to someone who gets better every fall.”
9. Acorn Cottage Birthday Card With a Squirrel at the Door
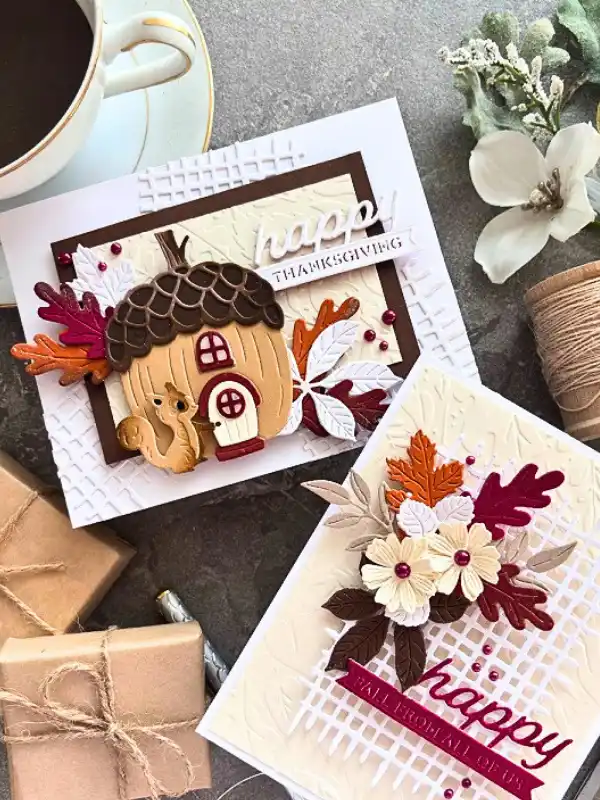
Copy the look:
- Base: a cream panel embossed with leaves, framed in chocolate brown
- Main piece: a tan acorn house with a scalloped cap and a tiny red door
- Color: rust, cranberry, chocolate, and white leaves fanned out behind it
- Finishing touch: white lattice strips, cranberry pearls, and a small squirrel
Storybook charm makes this card special. Thin grooves on the acorn look like wood grain, and a round window sits above the arched door.
Sponge brown ink along the edges of the acorn and squirrel so they look shaded, then raise both on foam tape.
Greeting swap:
The banner reads “Thanksgiving,” so keep the white “happy” and add a new strip that says “birthday.”
Beside it, a bouquet card uses the same leaves, lattice, and pearls around three cream flowers. Make that one instead if the acorn feels like too many pieces.
10. Folk Art Pumpkin Birthday Cards in Four Fall Colors
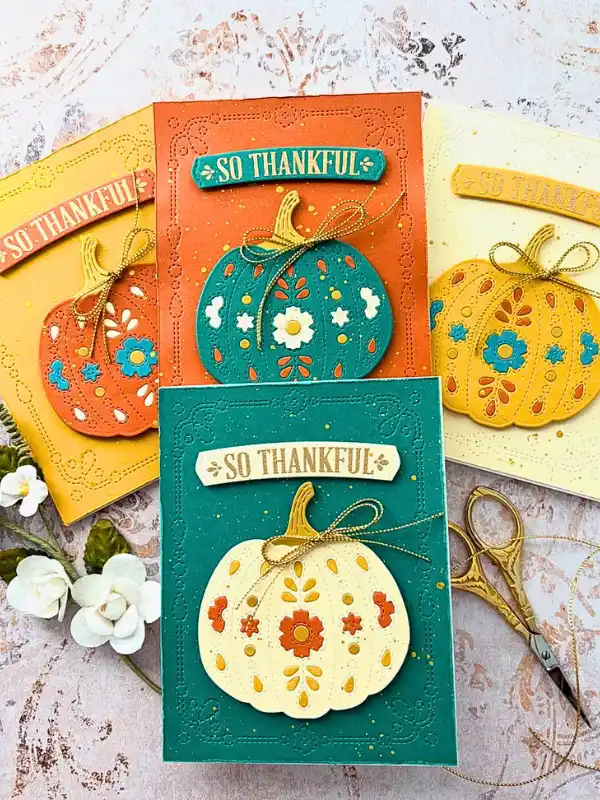
Best for: a family with several fall birthdays, since one design makes a whole matching set.
Each pumpkin has small shapes cut out of it, like flowers, leaves, dots, and teardrops.
Colored paper glued behind shows through the holes, so the pumpkin looks like folk embroidery. Rust, teal, mustard, and cream take turns as pumpkin and background, so no two cards match.
Stitched folk borders frame every panel, with gold flecks splattered across each one. A gold twine bow ties around every stem.
To make one by hand, draw a pumpkin on cardstock, punch dots with a hole punch, and cut small petals with a craft knife. Glue a contrasting color behind it.
Greeting swap: Every banner here says “So thankful.” Stamp “So glad you were born” or “Happy birthday” in gold instead, and the set works all through October and November.
11. Pierced Border Card Stitched in Rust Thread for a Fall Birthday

Small pierced holes run in a neat rectangle around a cream card front, and the center is still blank.
Nearby sit an embroidery hoop, a bundle of tan thread, a slim wooden handled tool, and a loose strand of rust thread.
Everything points to one plan: sew the border in fall colors and give the empty middle a birthday message.
Piercing note: Lightly pencil a rectangle and mark evenly spaced dots along it. Set the card on a folded towel or craft foam, then poke each dot with a thick needle or push pin.
Subscribe to DIY Craft Bloom
Get updates on the latest posts and more from DIY Craft Bloom straight to your inbox.
Thread note: Backstitch around the frame with rust or copper embroidery floss. Tape the loose ends inside so they stay put. Afterward, glue a plain sheet behind the front to hide the messy side of the stitches.
Center idea: Draw or stitch one simple maple leaf in the middle, with “Happy birthday” lettered below in brown pen. Resist adding more. The plain space is part of the charm.
12. Woodland Pine Cone Cluster Birthday Card With Soft Green Moss

Real pine cones turn a plain sage green card into a small patch of forest floor. Five little cones sit in a tight cluster over soft green moss. Below them, a wisp of pale lichen and a short twig peek out.
Why it works:
- Brown cones stand out against the muted green, keeping the colors calm and earthy.
- Moss fills the gaps and hides every glue spot.
- Nature does the design work, so no drawing skills are needed.
Prep tip:
Gather the smallest cones you can find on a walk. Bake them on a lined tray at low heat for about 30 minutes to dry the sap and clear out any bugs.
Hot glue the moss down first, then press the cones in with the biggest one on top. Inside, write “Happy birthday to someone who’d rather be outside.”
13. Wine Cork Mosaic Birthday Card With Rolling Harvest Hills

Leftover wine corks, sliced thin, build a whole harvest scene on this cream card. Round slices fill the top rows like a speckled sky.
Below them, curved bands of orange, burgundy, olive, and mustard pieces roll across like autumn hills, with rust leaves tucked into the corners.
Slice each cork into thin rounds with a sharp craft knife, and go slow. Markers color them fast, since cork soaks up ink.
Plan the layout on the card before gluing, top rows first, then the hills. Tacky glue grips cork far better than a glue stick.
Wine lovers will get the joke right away, so this handmade fall birthday card suits a dad or uncle who enjoys a good red.
“Cheers to another year, better with age” makes a fun line for the inside. Start saving corks a few weeks ahead, because one scene uses dozens.
14. Twisted Gold and Rust Cord Leaf Birthday Card on Bright Orange Paper

Leaf formula: bright orange cardstock, a pencil sketch, gold and rust twisted cord, tacky glue, and a toothpick.
Two colors of cord trace one big leaf here. Gold outlines the pointed edges and runs up the center vein, while rust fills in the side veins. Behind them, the orange paper makes the metallic shine glow like late afternoon sun.
Sketch the leaf lightly first, then squeeze a thin glue line along one section at a time. Lay the cord on top and nudge it into each point with a toothpick. Snip the ends right where lines meet so every join looks clean.
Birthday note: Leave the front alone and letter “Happy birthday” in gold pen inside. For a sharper finish, poke holes along your sketch and stitch the lines with gold floss instead of gluing.
15. Pressed Letter Birch Bark Birthday Card With One Tiny Maple Leaf

Copy this:
- Base: textured white cardstock folded into a tall card
- Lettering: big serif letters pressed down into the paper
- Bark marks: thin black dashes and two dark knots, like birch bark
- Finishing touch: one small orange and gold maple leaf in the top corner
No ink touches the greeting. Light catches each sunken letter, and soft shadow does the rest. Lay the card on a mouse pad, set a letter stencil on top, and trace hard with an empty ballpoint pen.
Fine black pen strokes make the bark, and a pressed leaf brings the only warm color.
Spelling note: Read the front closely. It says “HaPPY BIR DAY,” with the T and H missing and a stray lowercase a. Pencil your layout first and stack the words as HAPPY, BIRTH, DAY, so the full word fits in three neat lines.
16. Crinkled Tissue Ruffle Birthday Card With Little Wooden Acorns

Crinkled tissue strips ripple across a cream card like layers of fallen leaves. Mustard yellow sits on top, then sage green, rust, sage again, and rust at the bottom.
Five wooden acorns with dotted caps perch along the waves, each at a different height.
Cut each strip with a gentle wave along the top, then scrunch it into a ball and smooth it flat. Those soft creases create the ruffled texture.
Glue only the bottom edge of each strip, starting from the lowest, so every wave overlaps the next. Hot glue holds the acorns best.
Skip the printed line on this front, since it names the craft instead of the occasion. Letter “Happy birthday” across the top in brown pen, and this DIY fall birthday card suits a kid, a grandparent, or any acorn fan.
Brown kraft paper works if you can’t find wooden acorns. Cut out the shapes and dot the caps with a fine marker.
17. Starry Night Gate Birthday Card With a Glowing Autumn Window

Through a tall arched cutout, this navy card opens onto a glowing fall sunset. Stars fade into amber clouds, and red and gold trees fill the view.
Two navy gates with round gold knobs stand slightly apart, as if a birthday surprise waits beyond them.
Why it feels magical:
- Deep navy makes the orange and gold inside seem to glow.
- Stepped copper frames around the arch give the window real depth.
- Tiny gold stars on the front tie the sky and the card together.
Build note:
Cut the arch from the navy front with a craft knife, and stack two copper arches behind it, each a little wider.
Watercolor a sunset with orange trees for the back panel. Navy scraps become the gates, with brads for knobs.
Glue each one only along its outer edge so it swings open, then letter “Happy birthday” in gold pen on the sunset behind.