15 Upcycled Plastic Bottle Craft Ideas

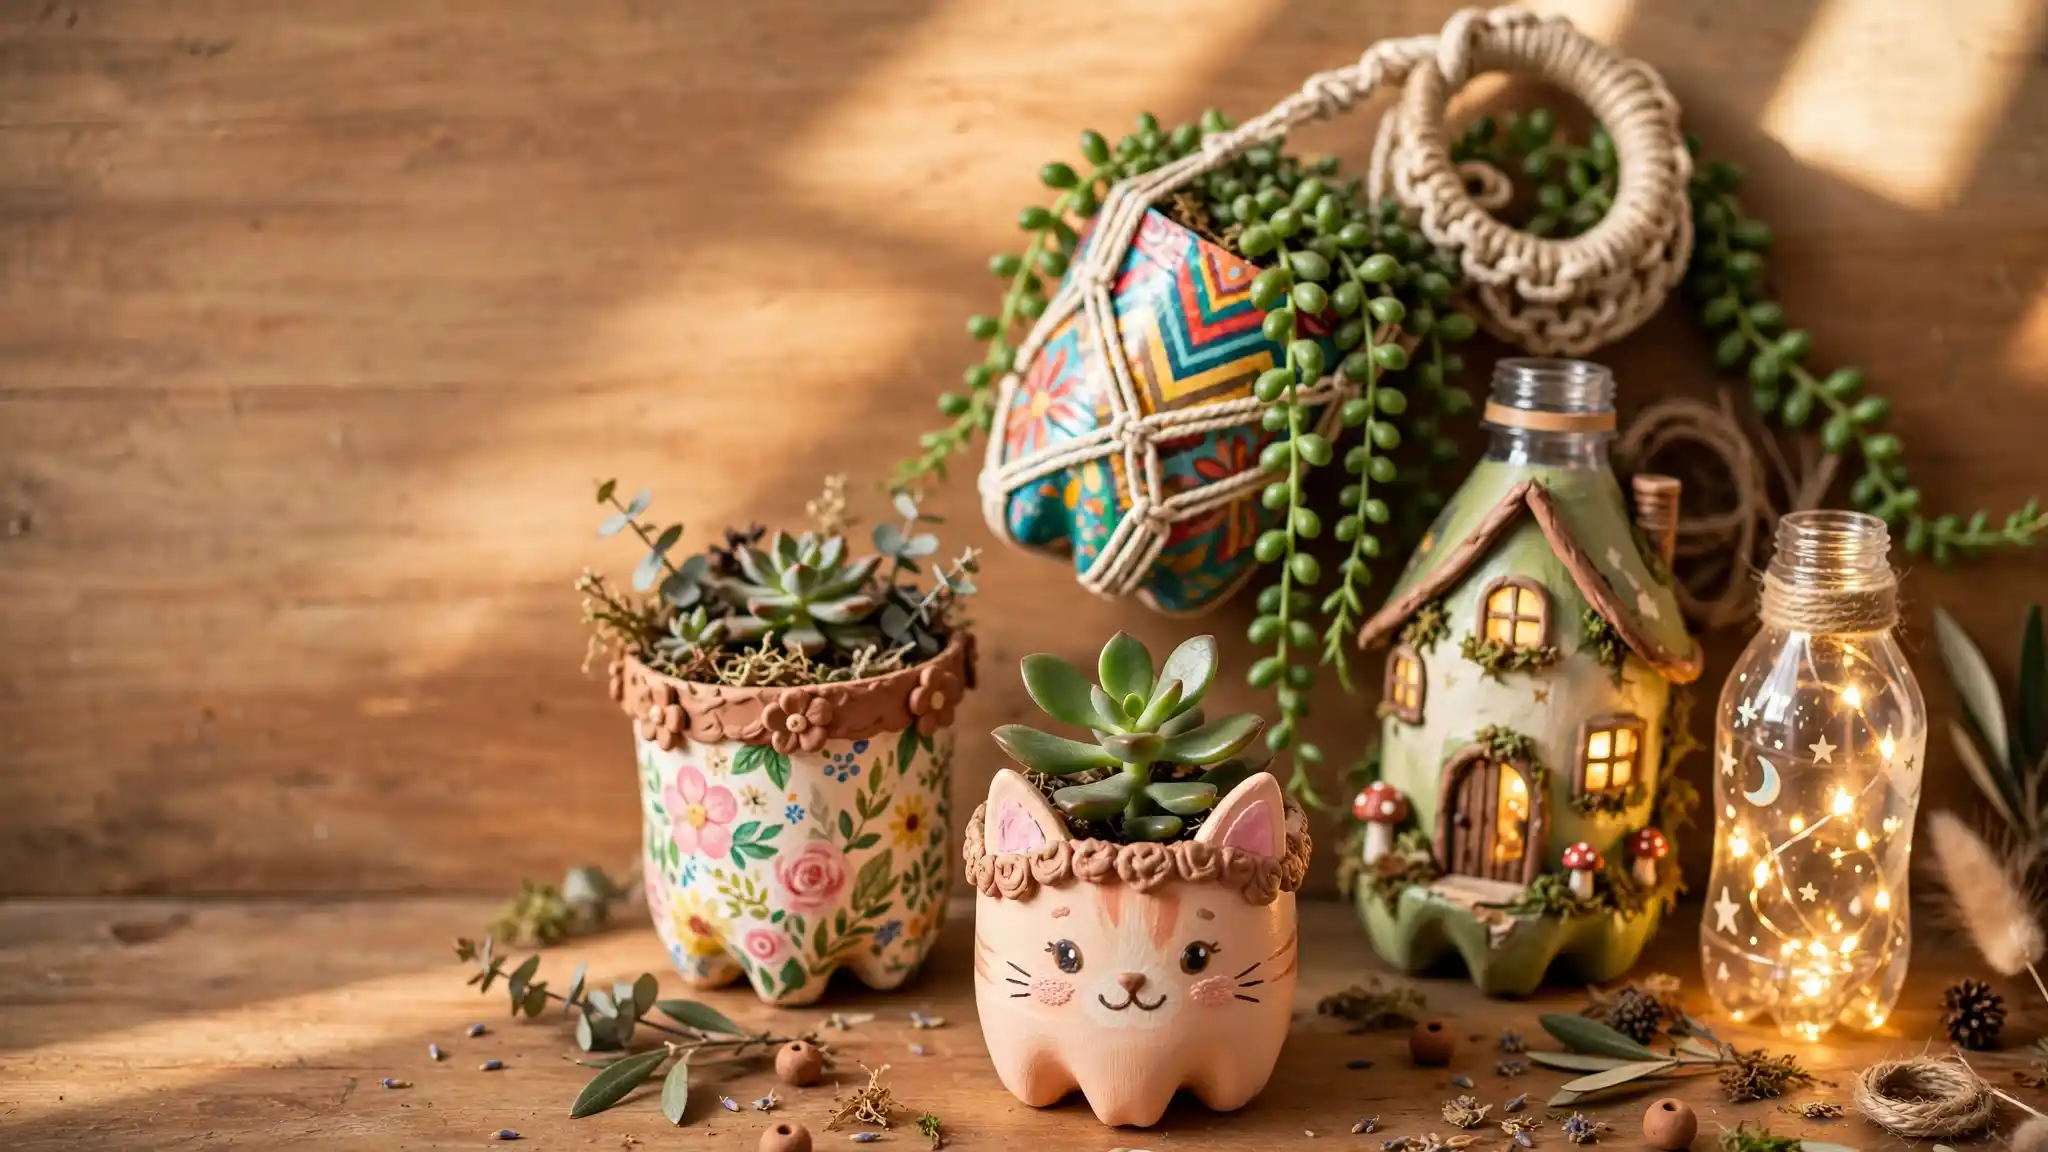
That stack of empty bottles by the recycling bin has more potential than it gets credit for.
With a little paint, some clay, and an hour or two, plastic bottles turn into planters, night lights, garden decor, and toys that actually get used instead of tossed.
This roundup of upcycled plastic bottle crafts covers a wide range on purpose, from quick weekend projects a beginner can knock out to bigger builds like a full tabletop tree made from dozens of saved bottoms.
Some ideas dress up the outside with paint and clay, others cut into the plastic itself to create windows, cages, or entirely new shapes.
A few are built with kids in mind, sturdy, simple, and forgiving of a shaky hand. Others lean more toward home decor, the kind of piece a guest might not clock as recycled at all.
Whatever your skill level or spare time looks like, there’s something here worth saving your next few empties for.
15 Upcycled Plastic Bottle Craft Ideas
1. Painted Bottle Garden Scarecrows With Straw Hats
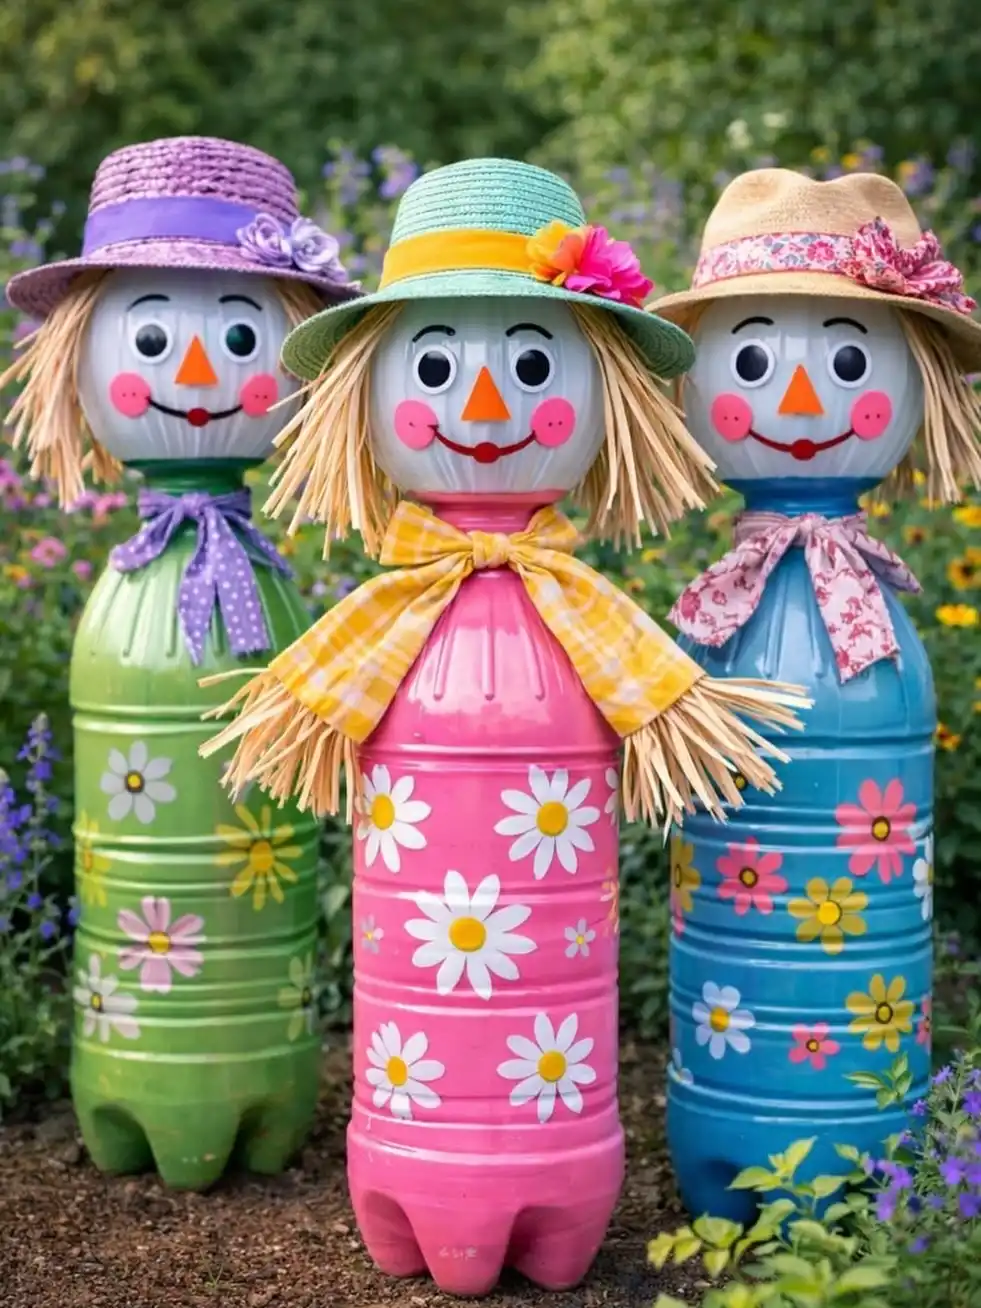
Three faces peek out from a flower bed, each one built on a plain soda bottle painted a solid color and dotted with hand painted daisies.
The trick here is the face: a plain white circle at the bottle cap, two black dot eyes, an orange triangle nose, and a couple of pink cheek circles turn a bottle into a little person in under ten minutes.
What makes this version work for a beginner project:
- Solid base coat first, then flowers painted on top once it’s dry
- A small straw hat glued straight to the cap with a bit of ribbon or a fabric flower tucked in
- A fringe of raffia or twine glued under the hat for hair
- A fabric strip tied around the neck as a little scarf, which also hides the glue line
2. Hanging Lantern Cage Planters In Bright Colors
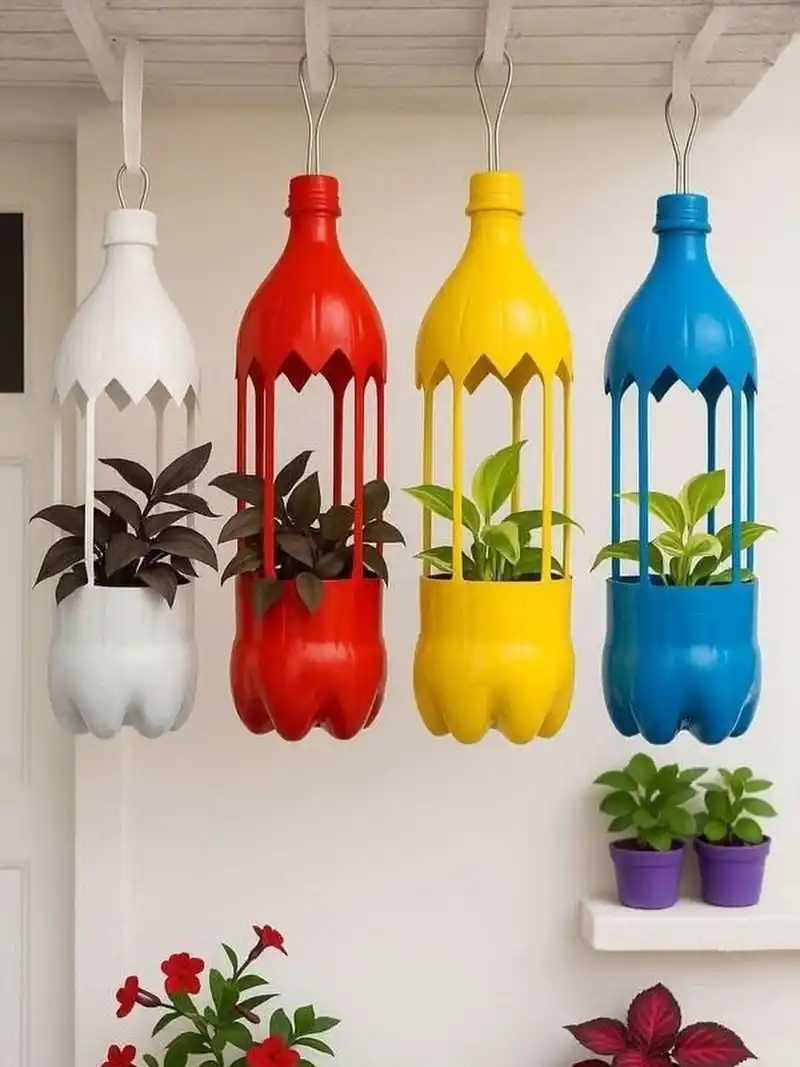
Four bottles, four colors, one clever cut. The middle of each bottle gets sliced into a ring of pointed strips, left attached at both ends, so the plastic bows outward into a cage shape once painted.
The bottom half stays intact as the actual pot, and the whole thing hangs from a ceiling hook by its neck.
How to get this look:
- Cut the zigzag cage strips freehand with sharp scissors before painting
- Spray paint the whole bottle one solid color inside and out
- Poke drainage holes in the base before adding soil
- Loop wire or sturdy ribbon through the neck to hang it
A trailing pothos or philodendron works best here since the leaves spill down through the cage strips instead of hiding behind them.
Group a few different colors together on a porch and it reads like a whole collection rather than one lonely planter.
Slice the middle of the bottle into pointed strips with sharp scissors, leaving both ends attached.
Spray paint the whole bottle one bold color, inside and out, and let it dry completely.
Poke a few small holes in the base before adding soil so water has somewhere to go.
Loop wire or sturdy ribbon through the neck and hang from a hook by the door or porch beam.
3. Tiny Painted Face Vases Made From Small Clear Bottles
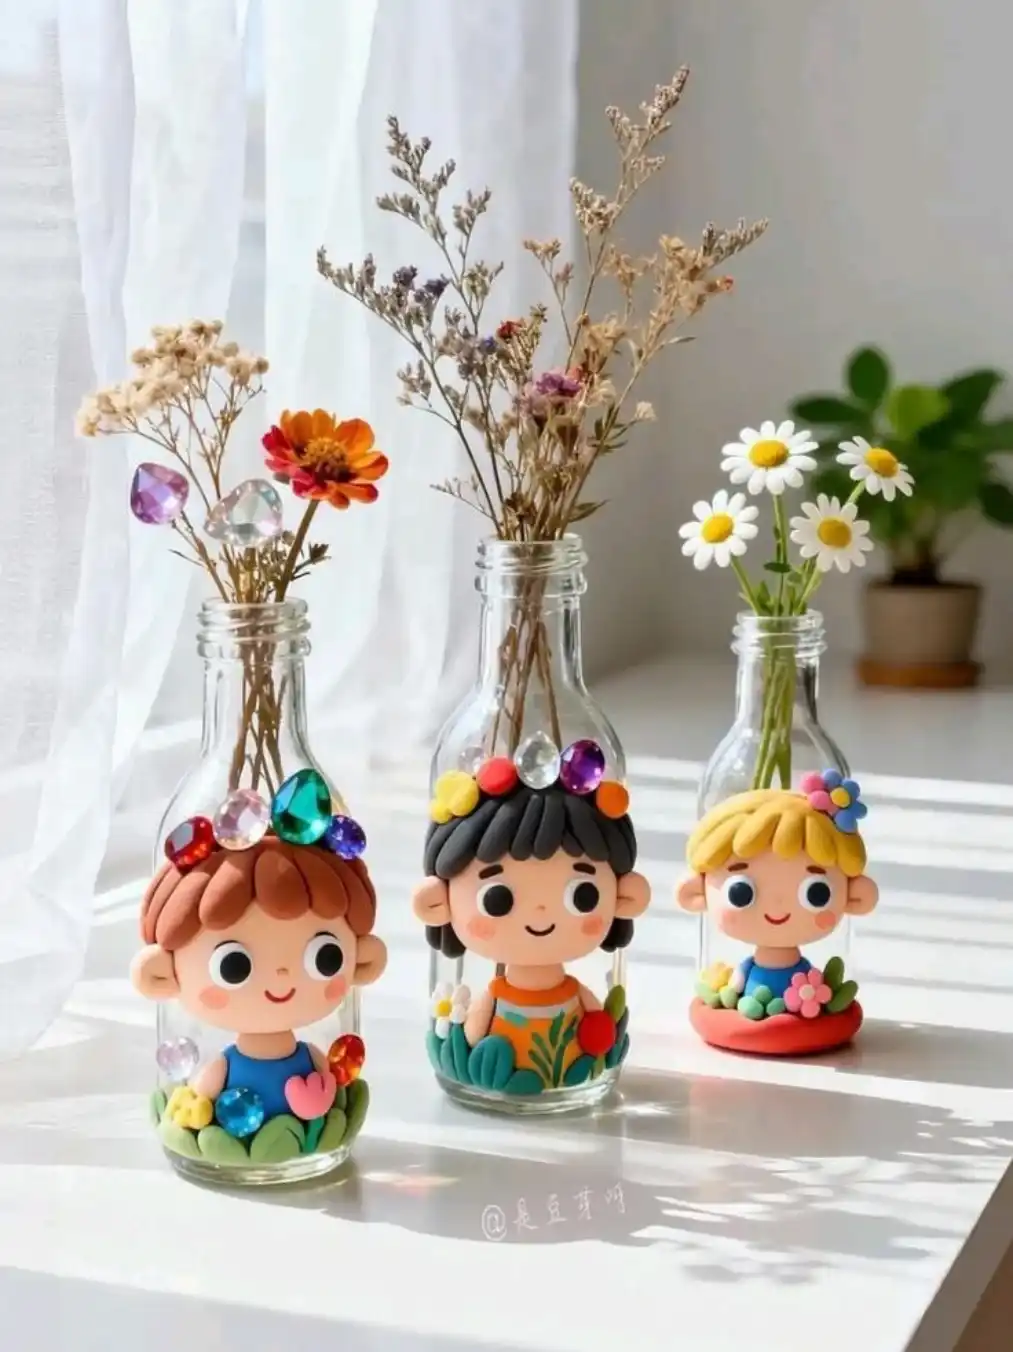
A different take on the same idea: instead of gems and paint straight on the plastic, these use a sculpted polymer clay face fitted around the neck of a small clear bottle, with a sprig of dried flowers or daisies poking out the top like hair.
Worth noting, the source photo shows small glass bottles, so if you’re keeping this one plastic, look for tiny clear water or juice bottles with a similar narrow neck and swap the glass for that.
What each one has going on:
- A hand shaped clay face with hair, blush, and tiny painted eyes wrapped around the bottle’s neck
- A few flat backed rhinestones pressed into the hair as a crown
- Real or dried stems standing up out of the open bottle top
- A small clay collar around the base dressed up with flowers or leaves
These work best in a row along a windowsill where the light comes through the glass. Kids love picking out which face gets which flower.
4. Bottom Half Bottles Painted Into Tiny Hanging Flower Pots
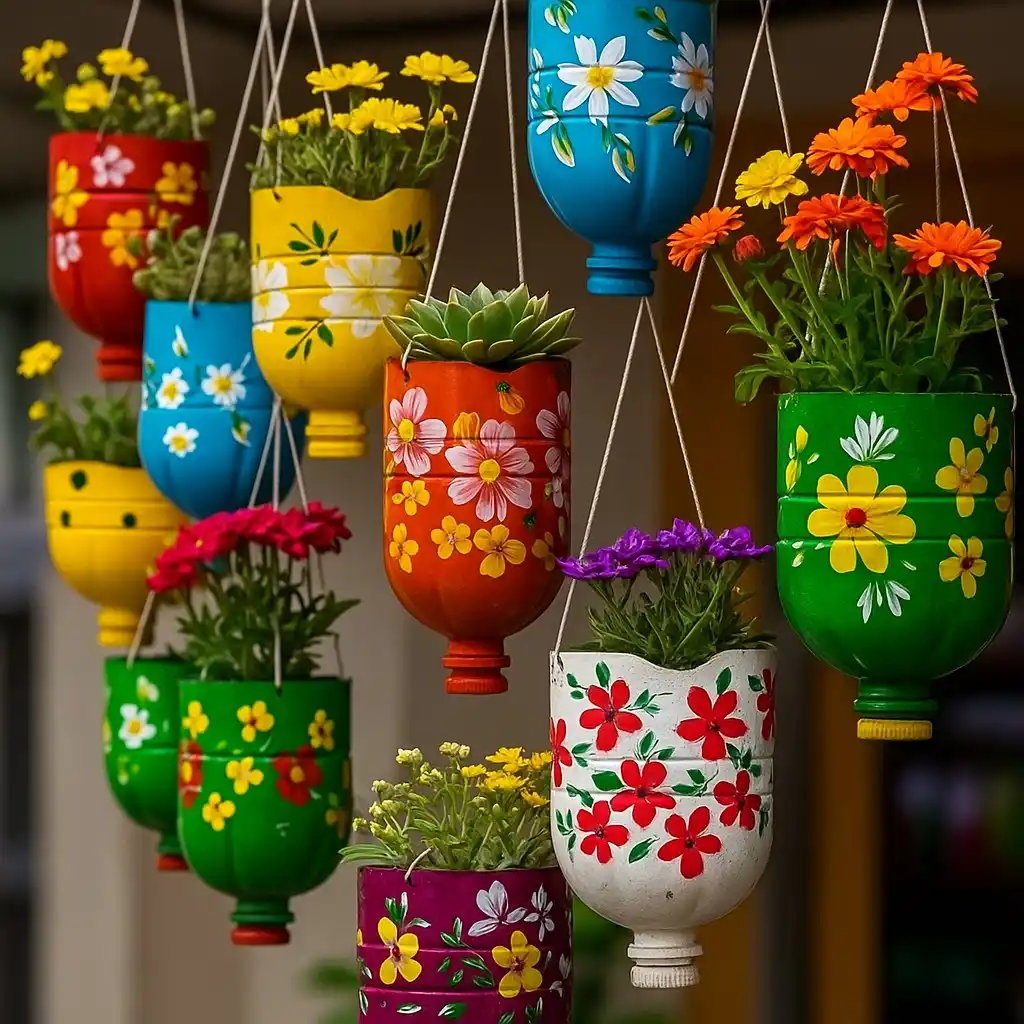
Twelve of these hang together and not one repeats the same flower pattern, which is really the whole lesson: cut off just the bottom third to fourth of the bottle, keep the ridged base intact for texture, and let each one be its own tiny canvas.
Hung on plain string at staggered lengths, they turn a bare porch or fence into a wall of color.
Subscribe to DIY Craft Bloom
Get updates on the latest posts and more from DIY Craft Bloom straight to your inbox.
What’s actually doing the work here:
- The bottle’s own ribbed shoulder reads like a lip on the finished pot, so no extra rim needed
- A solid base color first, then a simple five petal flower painted freehand in a contrasting shade
- Three or four small drainage holes punched in the bottom before planting
- Staggered string lengths so blooms don’t sit in a flat row
Doubles as a built in rim, so the pot looks finished with zero extra trim work.
A single freehand flower per bottle keeps each one different without needing real painting skill.
Uneven string lengths break up the row so the blooms land at different heights instead of one flat line.
5. Sideways Bottle Turned Into A Tiny Undersea Diorama
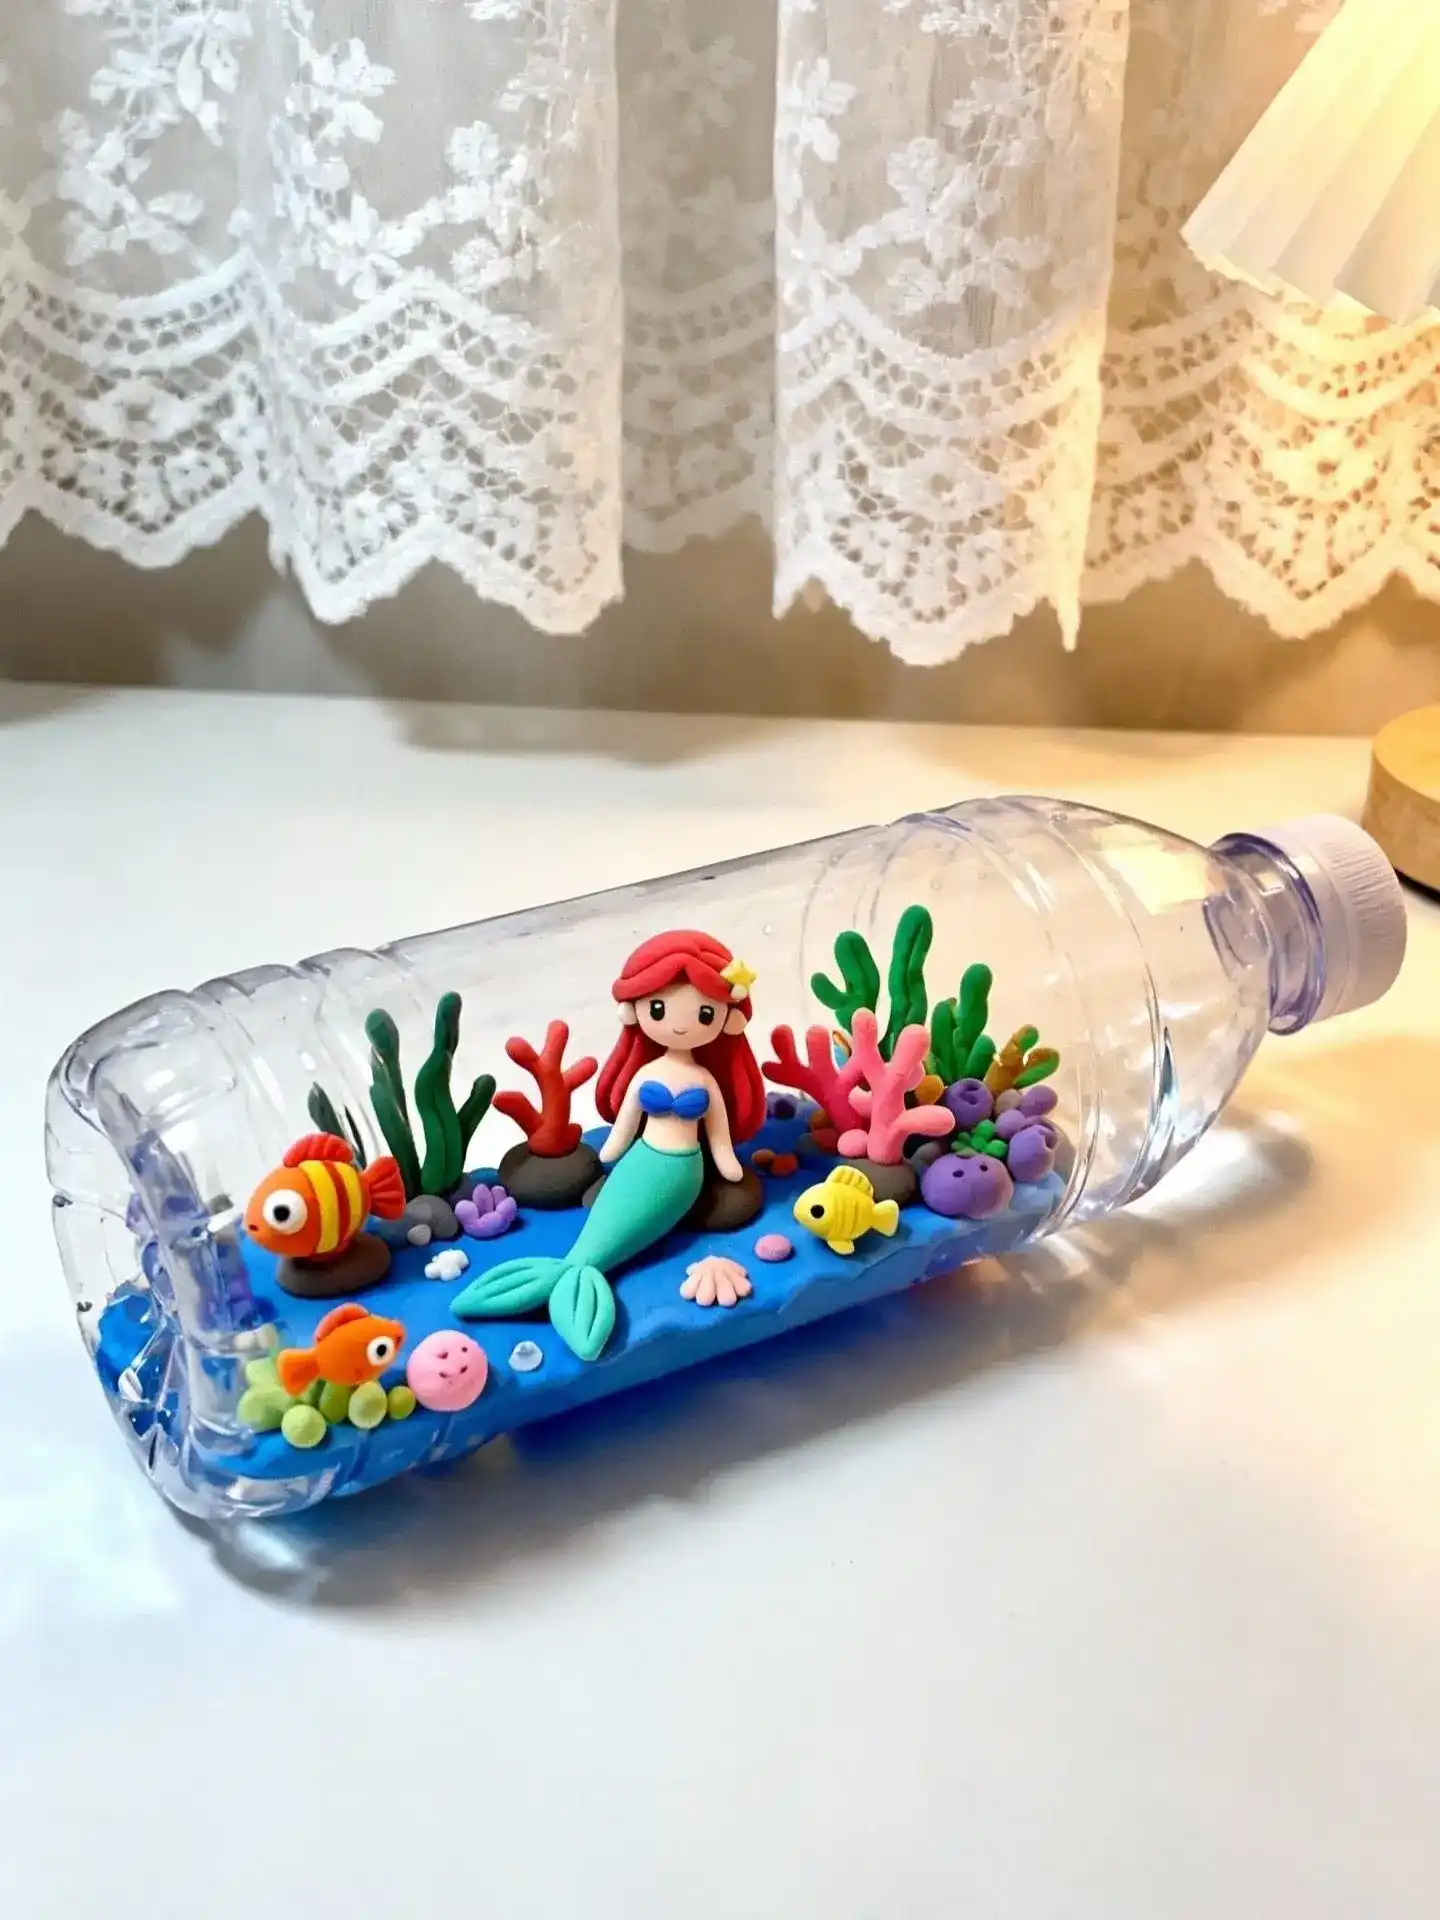
Lay the bottle on its side and the whole shape changes what it’s good for. This one skips paint entirely and instead builds a miniature scene out of polymer clay glued to a strip along the inside bottom: a clay mermaid figure, sea plants, coral branches, and a few tiny fish, all sitting on a bed of blue clay standing in for water.
A quick tip before you start: work the clay scene on a flat strip first, let it firm up, then slide it into the bottle rather than trying to sculpt inside the narrow opening. It saves a lot of frustration.
The cap stays screwed on once it’s finished, which keeps dust out and makes the whole thing safe to set on a shelf or even hand to a kid without worrying about small pieces falling loose. It reads more like a keepsake than a typical craft.
6. Bottles With A Cutout Window Framing A Tiny Painted Scene
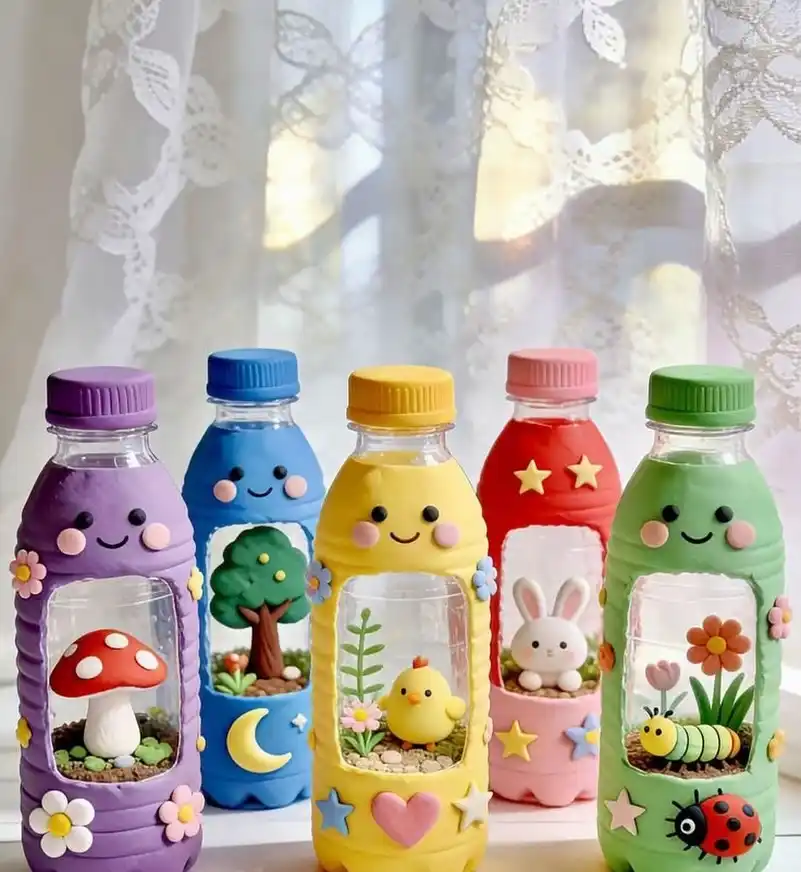
Five bottle characters lined up here, each one wearing a painted body and topped with its own cap color, but the real standout move is the rectangular window cut straight into the front of each bottle.
Behind that opening sits a little scene, a mushroom under a moon, a tree with fallen leaves, a bunny in the grass, all built from tiny clay pieces and pebbles glued to the bottle floor.
Getting the window right matters more than anything else here:
- Score the cutout lines with a craft knife before pushing the piece out, so the edges stay clean
- Round the corners slightly rather than cutting sharp right angles, which crack under pressure
- Leave at least an inch of solid plastic around the window for structure
- Glue a shallow layer of pebbles or sand first, then build the scene up from there
7. Full Size Tabletop Tree Built From Dozens Of Bottom Halves
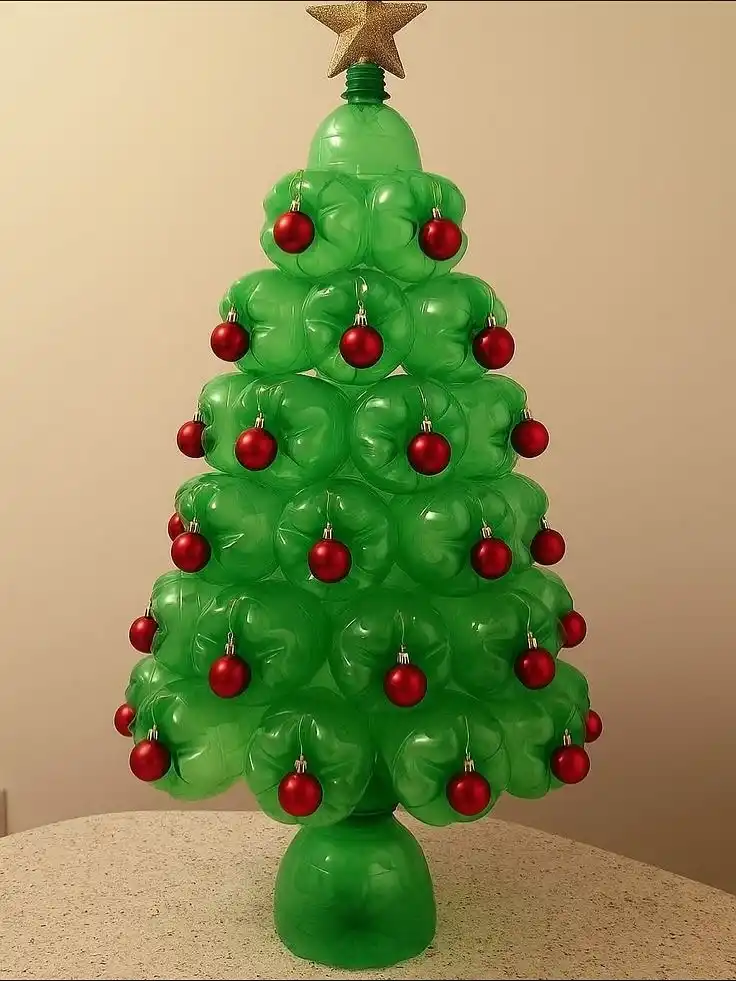
Nothing else in this roundup uses this many bottles at once, so it earns its spot as the big finish project.
Every green bottle bottom gets cut down to the rounded cup shape, and dozens of them are stacked and glued in overlapping rows from a wide base up to a narrow point, mimicking the layered look of real pine boughs.
A single intact bottle forms the trunk and base, and a plastic star tops off the neck.
Plan on saving bottles for weeks before starting. A tree this size easily uses 40 or more bottoms, so it works best as a slow collection project rather than a weekend one.
8. Painted Animal Bottle Buddies For A Kids Craft Afternoon
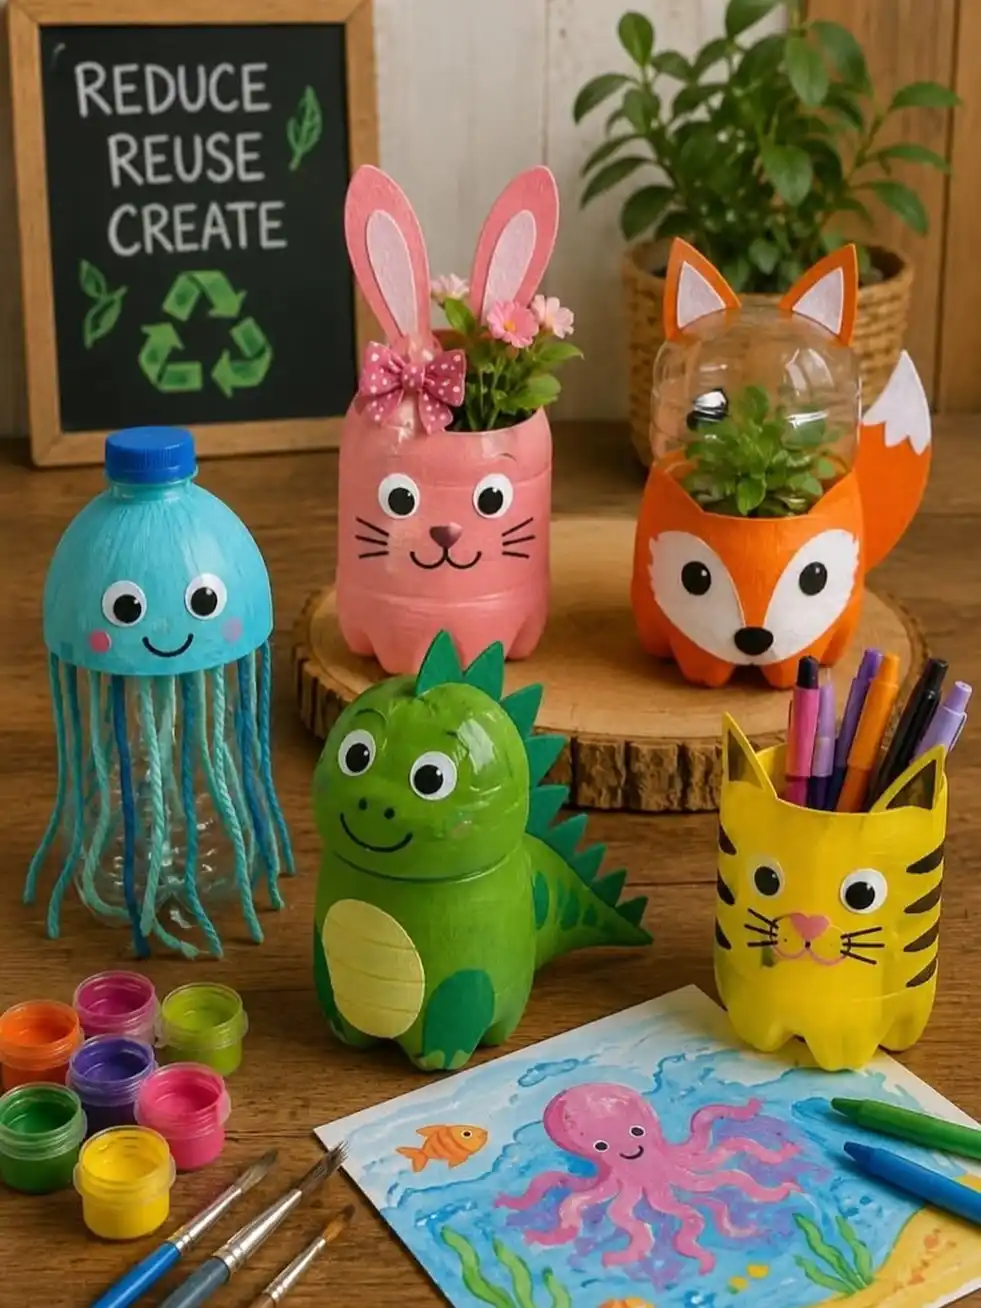
A whole little zoo comes out of one box of paint and a handful of saved bottles here, a bunny with felt ears, a fox with a fabric tail, a wide eyed dinosaur, a striped cat holding markers, and a jellyfish with yarn strands dangling from the dome for tentacles.
What ties them together is the same basic build: cut the bottle to the right height for the animal, paint the base color, then add painted or glued on features to give it personality.
- Cutting the bottle shorter makes a pencil cup or planter, leaving it full height keeps it as a standalone character like the jellyfish
- Felt, foam, or paper scraps for ears, tails, and spikes hold up better than trying to paint 3D details
- Googly eyes or simple painted circles both work, so this scales down for younger kids
- A quick coat of clear sealant keeps the paint from chipping if these get handled a lot
Use acrylic paint and let each coat dry fully before adding features.
Save a few different bottle sizes ahead of time so kids get to pick their animal.
Don’t cut the bottle before the child is ready to paint, edges get handled less carefully when there’s a wait.
Skip hot glue for younger kids, a craft glue stick is safer for attaching ears and tails.
9. Folk Art Face Planters With Closed Eyes And Painted Flower Crowns
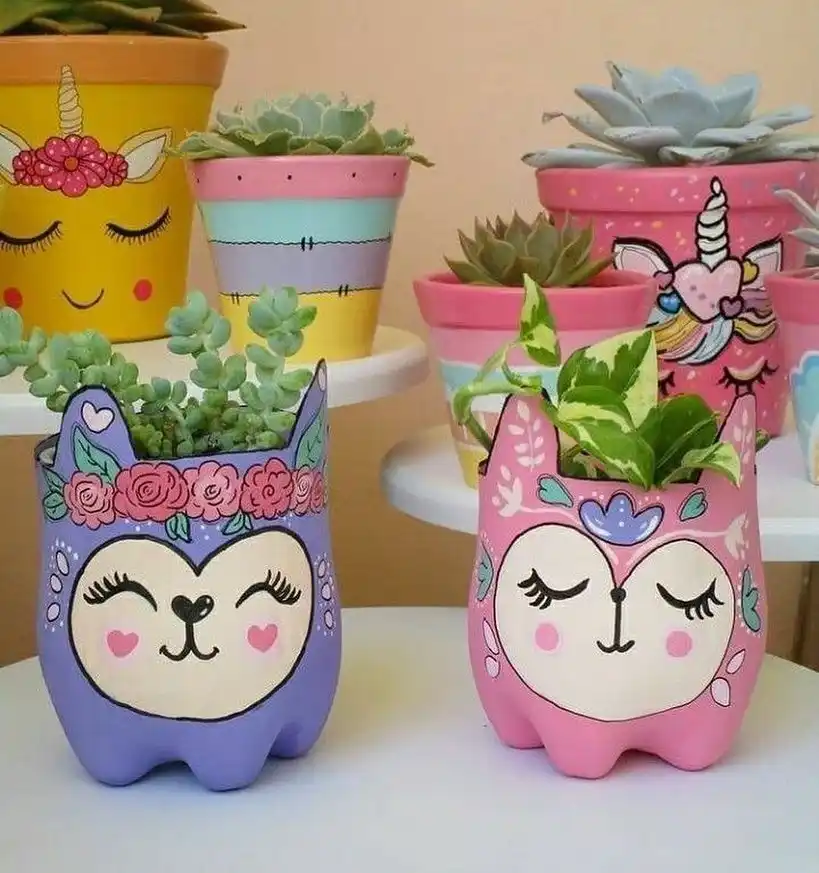
These two sit apart from the earlier face bottles because of the linework: instead of simple dot eyes, each one gets hand drawn closed, lashed eyes and a painted floral crown running across the ears, giving it a folk art feel closer to a boutique ceramic pot than a kid’s craft.
The bottle’s own ridges still form the ears and paws, they’re just dressed up with much finer detail work this time.
A liner brush is worth the few extra dollars for this style since the eyelashes and thin flower stems need a steady, thin line that a regular craft brush won’t give you cleanly.
Base coat first, let it cure a day, then go back in with the fine detail work on top.
Subscribe to DIY Craft Bloom
Get updates on the latest posts and more from DIY Craft Bloom straight to your inbox.
| Purple version | Pink version |
|---|---|
| Rose garland across both ears, more detailed pattern | Single blue flower centered between the ears |
| Small dot trim along one side of the face | Painted leaf shapes scattered around the crown |
| Heart shaped blush marks | Round blush marks, slightly bigger |
10. Clear Bottle Fairy House Lit From Inside With String Lights
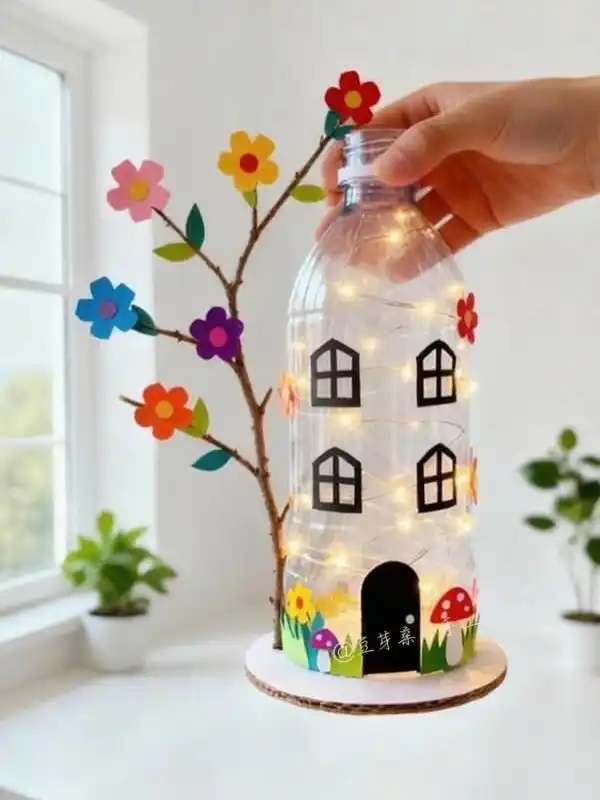
Cut black paper into window and door shapes, glue them straight onto a clear bottle, then thread a battery powered string of fairy lights down inside before capping it off.
Once the room dims, the light glows out through the paper cutouts like a tiny house window, while a twig “tree” strung with paper flowers stands next to it on the same round base.
Mushroom shapes and a bit of grass fringe along the bottom hide the seam where the bottle meets its cardboard circle base, so nothing about the construction gives itself away once it’s lit up.
This one leans decor piece more than toy, good for a windowsill or a shelf that could use a little glow after dark.
11. Galaxy Night Light Bottle With A Fairy Light Storm Cloud Roof
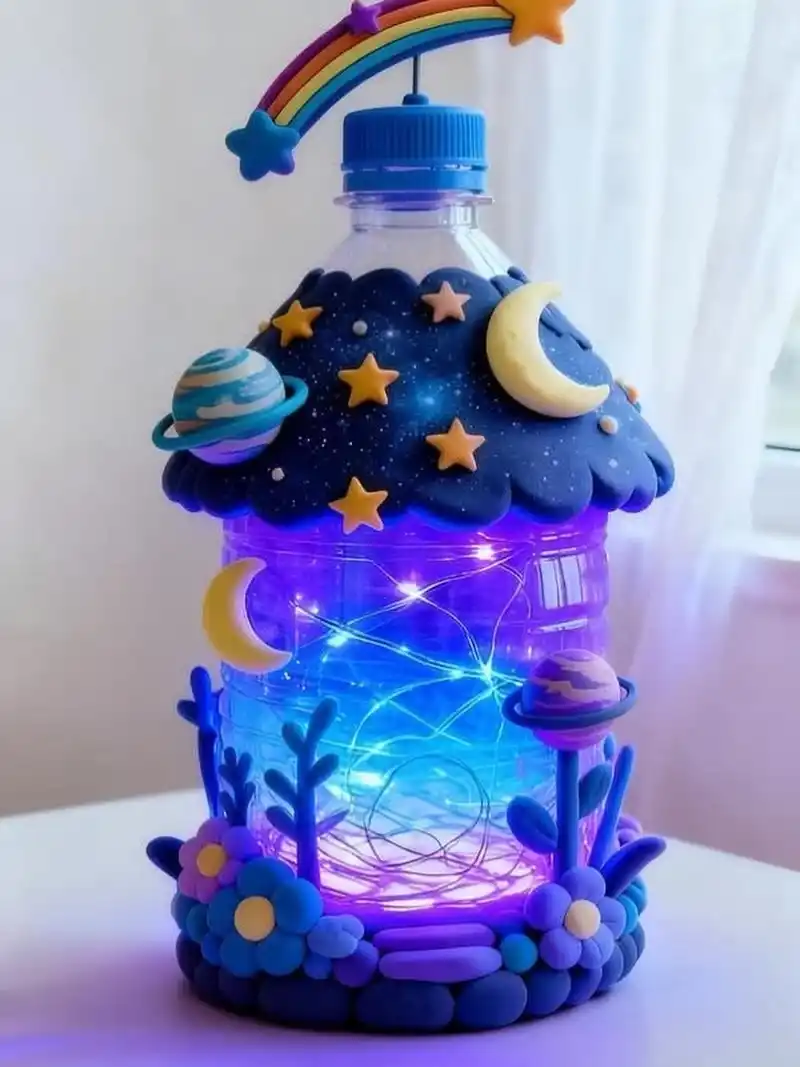
Blue LED lights swirl inside this one instead of white, throwing a violet glow up through a clay roof shaped like a cloud dotted with stars, a crescent moon, and a tiny painted planet.
Rainbow polymer clay shooting stars dangle off the cap on wire, giving the whole thing a finished silhouette even before it’s lit.
- Dark navy clay pressed flat and scalloped along the edge forms the roof, glued around the bottle’s shoulder
- A battery pack fairy light string coils loosely inside rather than wrapping tight, so the glow spreads unevenly and looks more like scattered stars
- A ring of clay pebbles, tiny plants, and flowers hides the battery pack at the base
- Small clay planets on thin dowels stick up out of the base ring for extra height
This is a plug free night light, so it’s safe for a kid’s room, and the battery pack tucked in the base means you just reach up under the flower ring to switch it on.
12. All Over Painted Floral Vase With Bold Outlined Petals
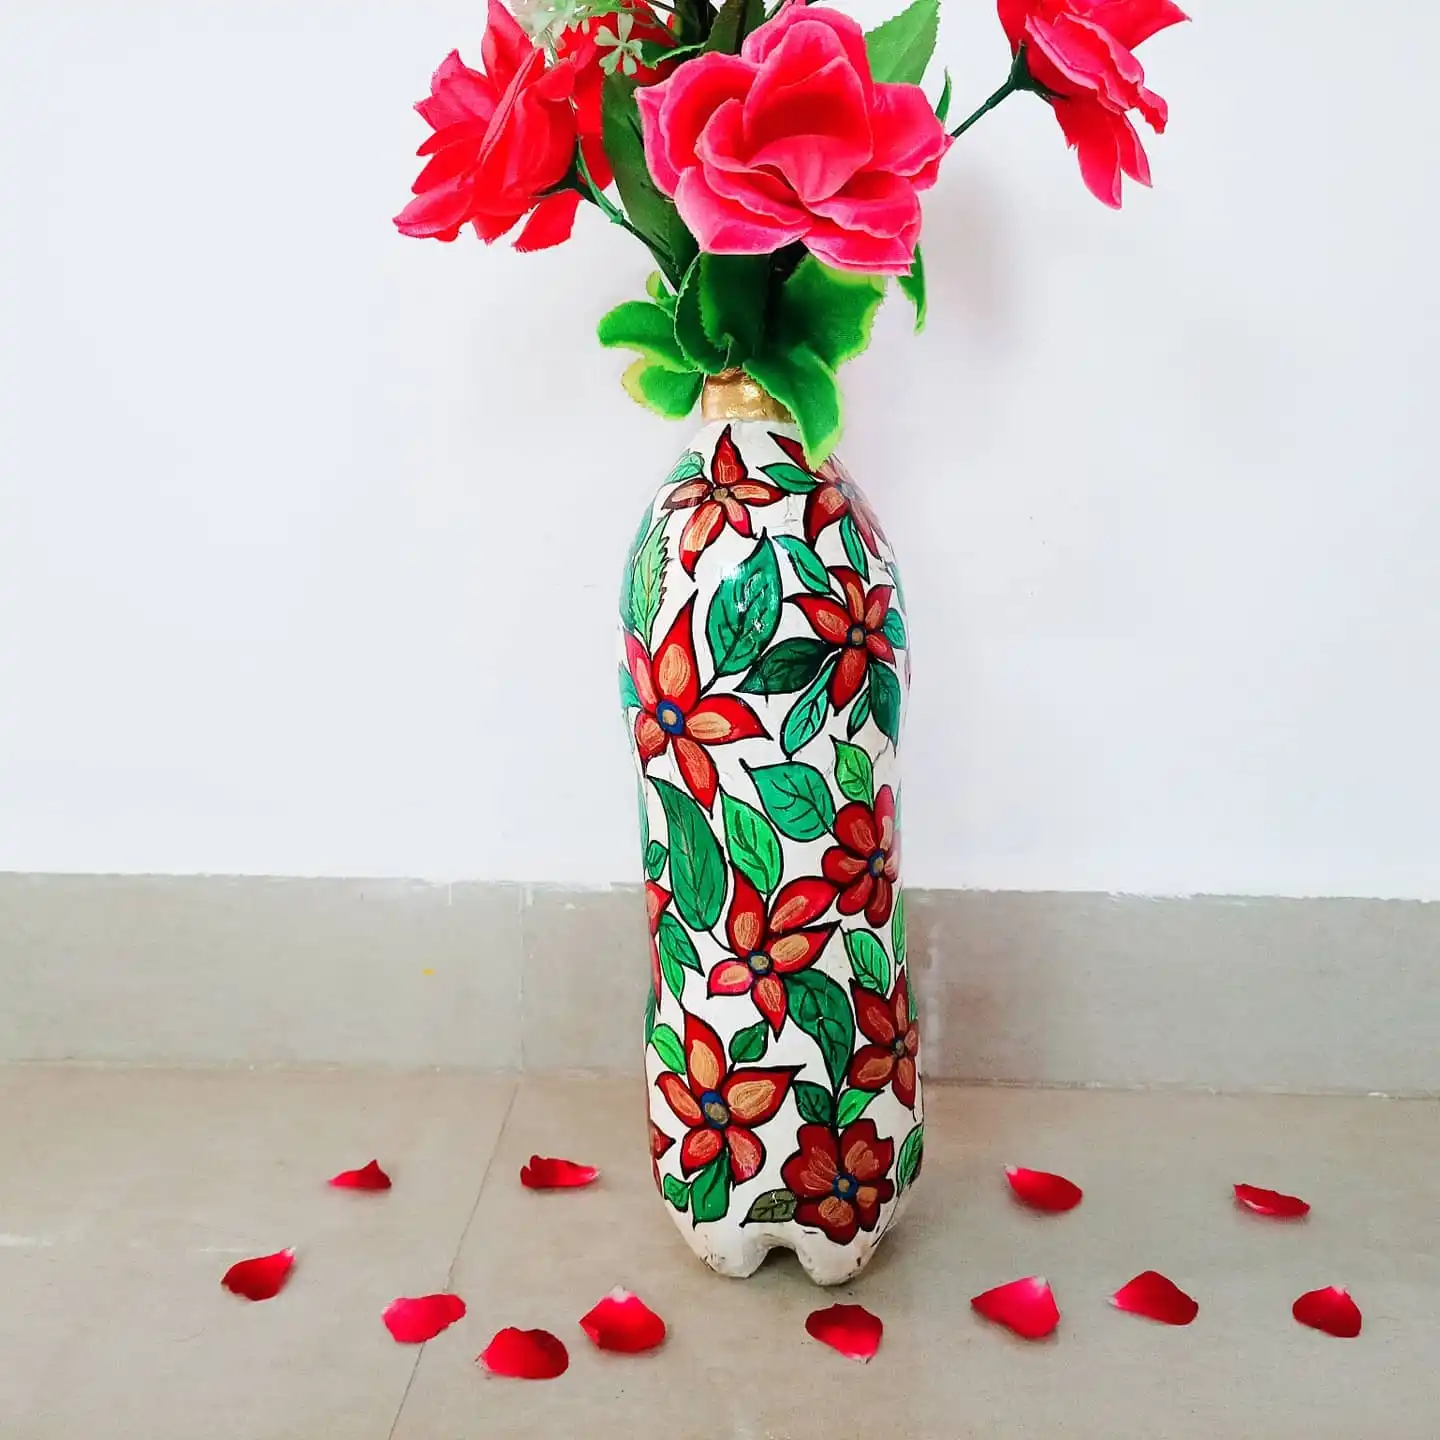
White base paint, then the whole surface gets covered edge to edge in thick black outlined flowers and leaves colored in with red, coral, and two shades of green, more like a page from a coloring book than a typical craft paint job.
The neck gets a plain gold wash, which reads as a proper vase collar once a bouquet is tucked in on top.
The density is what sells it: leave any white showing through and it looks unfinished, so keep sketching leaves and petals until the background barely peeks out.
A paint pen with a fine tip gives cleaner black outlines than a brush, and it’s much easier to keep steady.
Full coverage paint jobs hide the bottle shape completely, so nobody clocks it as recycled until you tell them.
13. Straw Topped Bee Bottle Using Cardboard Wings And Yarn Stripes
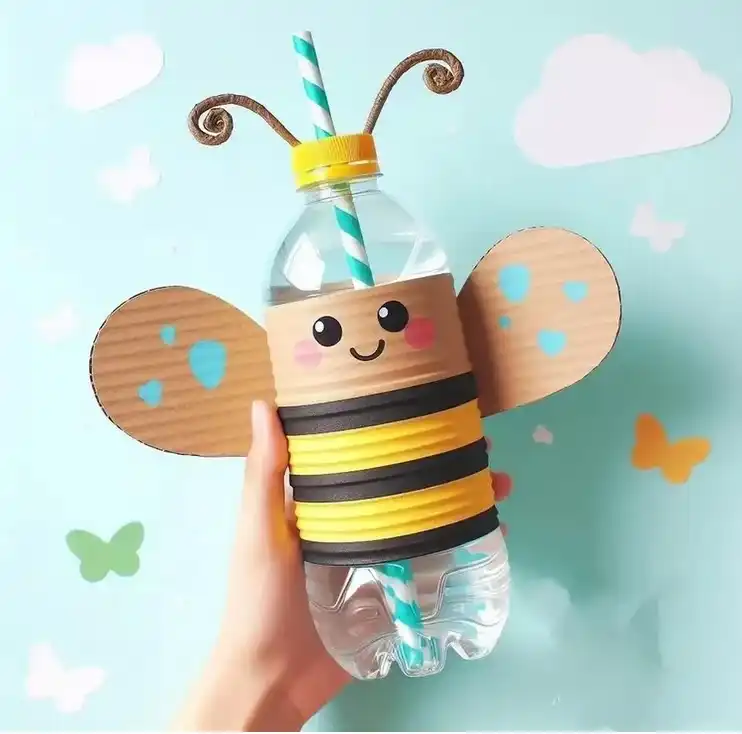
Kids can actually drink from this one, that’s the twist. The bottle stays fully intact and functional, wrapped in black and yellow paper or foam bands for stripes, with a smiling face painted right on the label area.
Cardboard wings glued to the sides and pipe cleaner antennas curled at the top turn a water bottle into a bee costume it still works as, straw included.
14. Hanging Sun Catchers With Clay Charms Dangling From Wavy Trim Rings
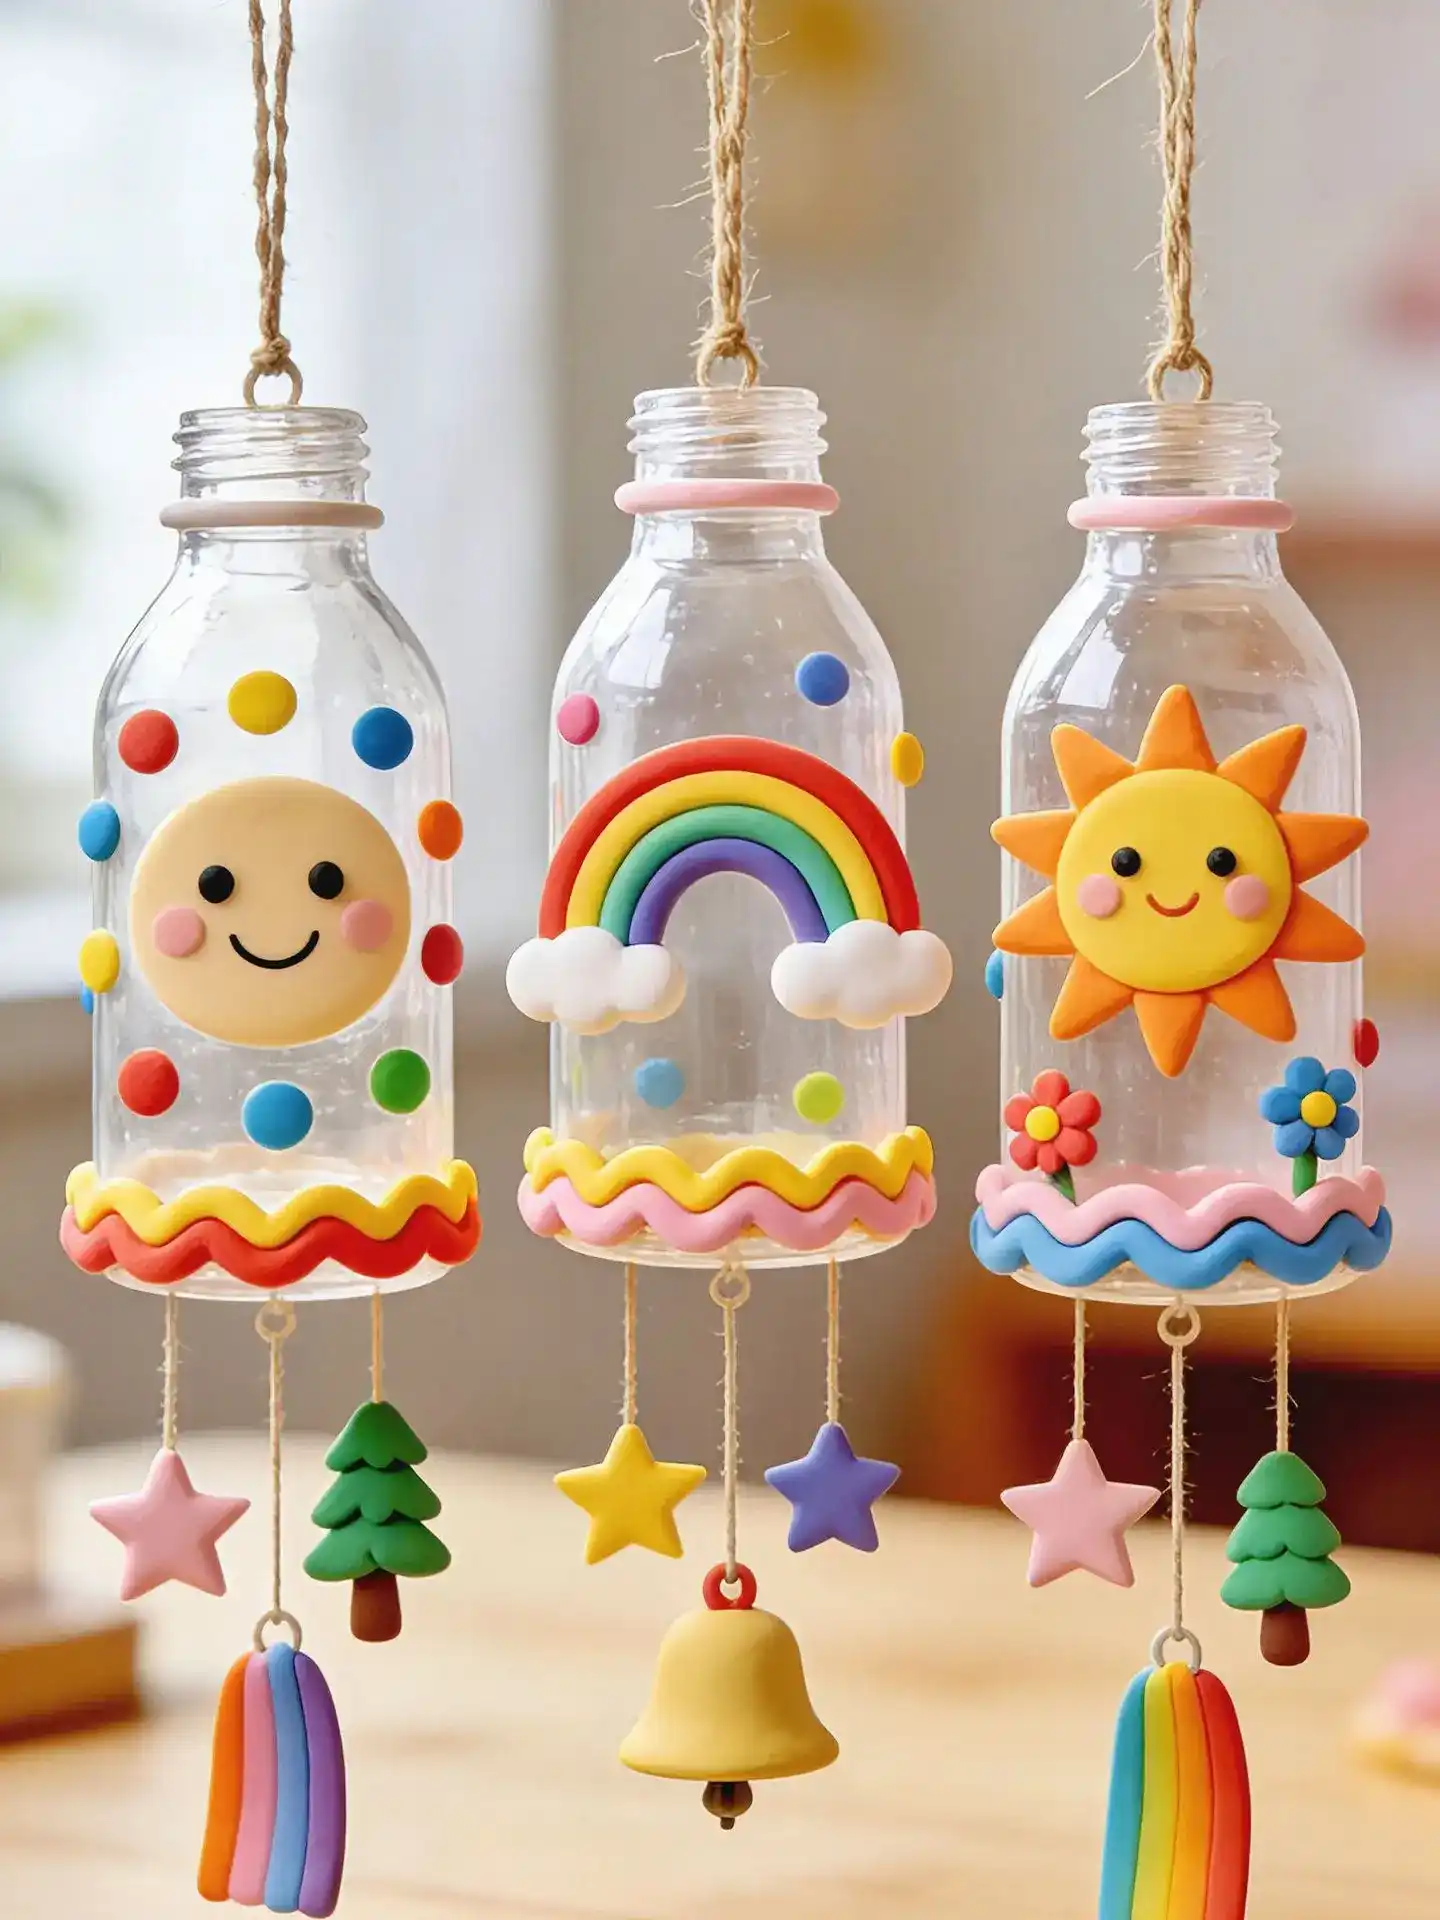
Sunshine, rainbow, and a plain smiley face, three small clear bottles turned into wind chime style hangers with a wavy clay collar glued around the base and a cluster of tiny clay charms swinging underneath on string.
Same as an earlier entry, the source photo uses small glass bottles, so swap in mini clear plastic ones with a narrow neck if you want this version fully upcycled.
🎨 Clay Bottle Decoration Ideas
15. Solid Cat Face Planters In Three Different Fur Colors
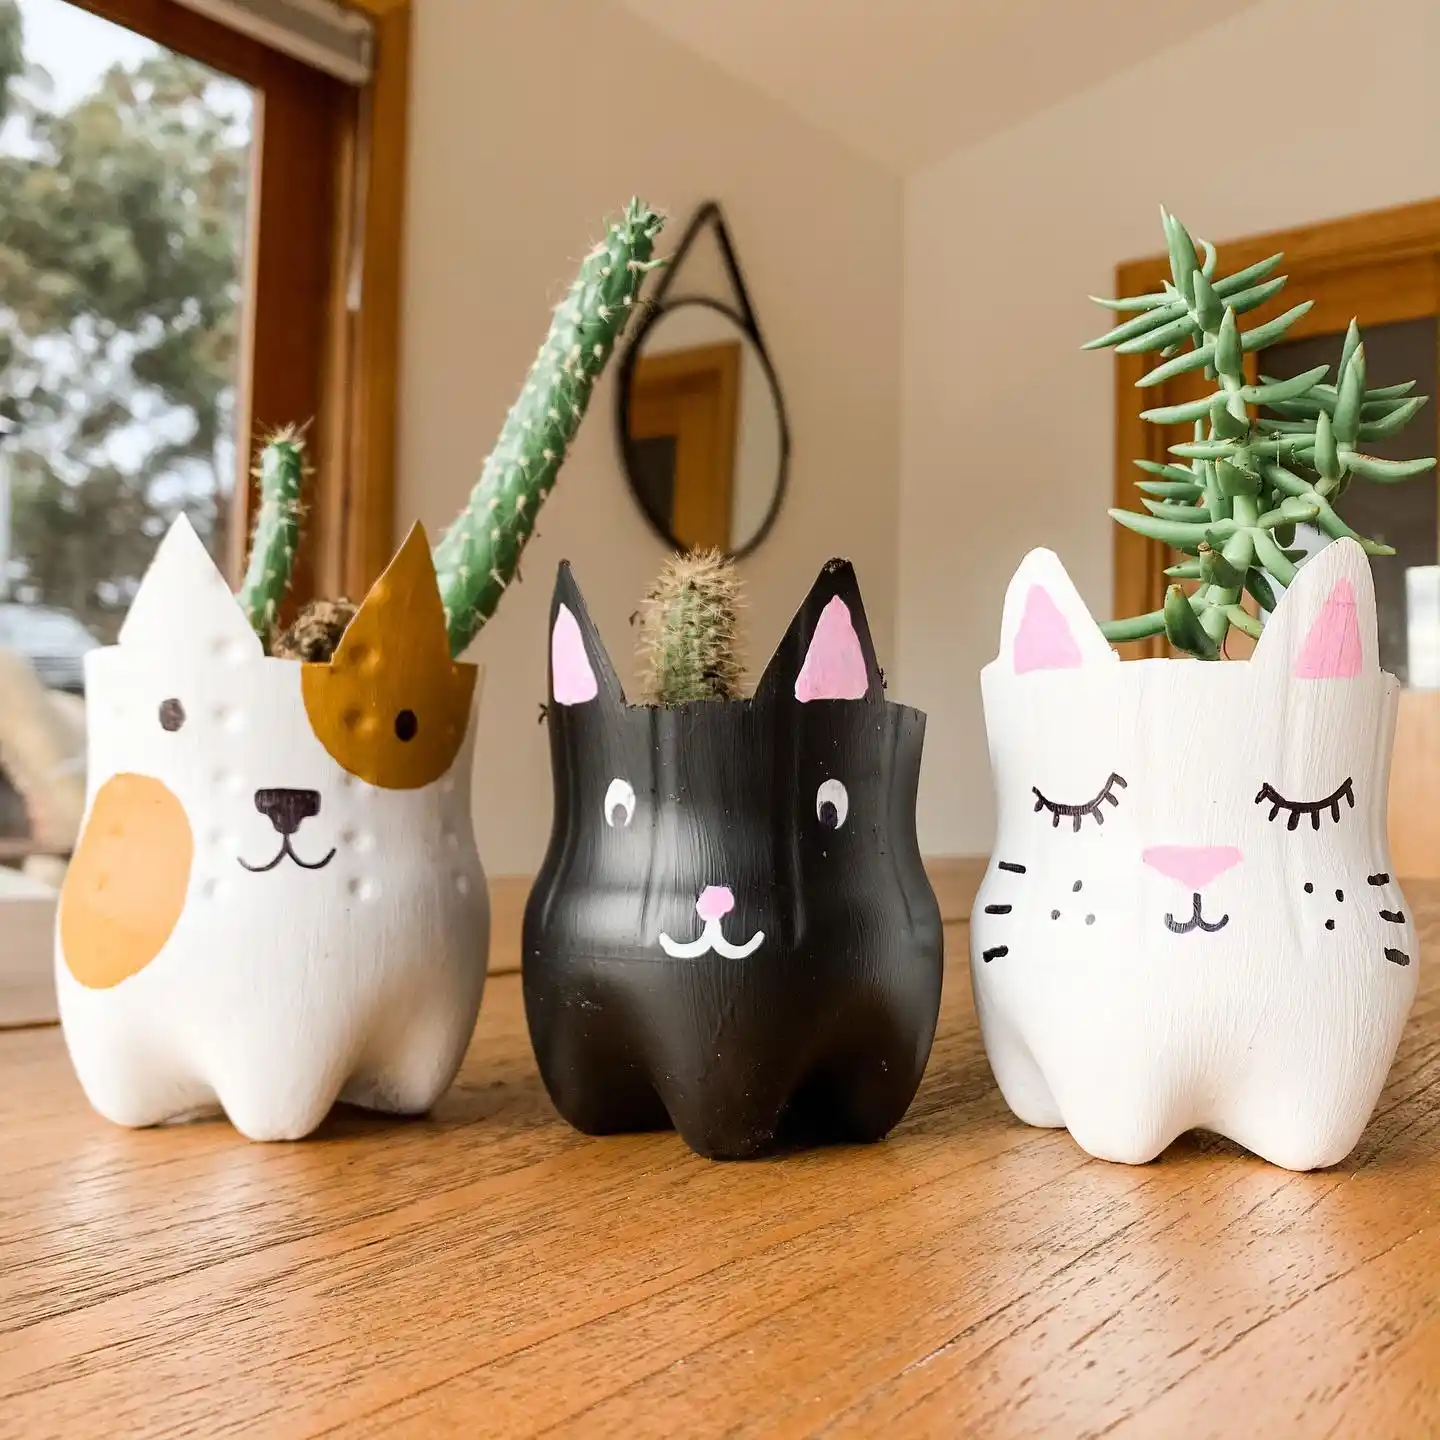
Real cactus and succulents poke out the top of these three, each carved from the same basic bottle bottom shape but painted in a totally different pattern, calico patches, solid black, and closed eye white.
Ears are simply the natural peaks of the cut bottle plastic, pinched a bit before the paint sets, so no extra material gets added for that part.
Sharp textured plants like cactus pair naturally with this shape since the spiky ears and spiky plant echo each other.
A softer trailing plant would look a little mismatched against these pointed features.
Let the bottle’s own shape suggest the ears before you reach for glue and extra pieces.
Conclusion
Fifteen ideas, and not one of them needed anything you’d have to buy new. That’s really the appeal of upcycled plastic bottle crafts, the materials are already sitting around, and the only real investment is a little paint, glue, and patience.
Start with whichever one matches a bottle shape you’ve already got on hand, a tall soda bottle for the tree or fairy house, a small water bottle for the animal planters.
Save this for the next time you’re about to toss one in the recycling and want to make something out of it instead.