14 Macrame Plant Hanger Ideas for Beginners


Most beginner macrame projects start the same way: one knot, repeated until your hands cramp, tied in whatever cream cord was on sale.
That works, but it also explains why so many first hangers end up looking like practice pieces instead of something worth hanging near a window.
The good news is that almost none of what separates a beginner project from a polished one comes down to skill. It comes down to small choices: which two colors you pair, how tight you pack your knots, whether you add a bead or a tassel tier, and how you shape a pot cradle to match the pot you actually have.
This diy macrame plant hanger roundup pulls together fourteen real examples, from simple two-tone color blocking all the way to a wall-mounted crescent moon panel, so you can see exactly which small decisions make a hanger look finished.
Whether you’re tying your very first square knot or looking to push past the basics, there’s a pattern here at your level.
Save the ones that catch your eye, since you’ll likely want to come back to more than one.
14 Macrame Plant Hanger Ideas for Beginners
1. Two-Tone Color Blocking Turns One Basic Pattern Into Two Completely Different Looks
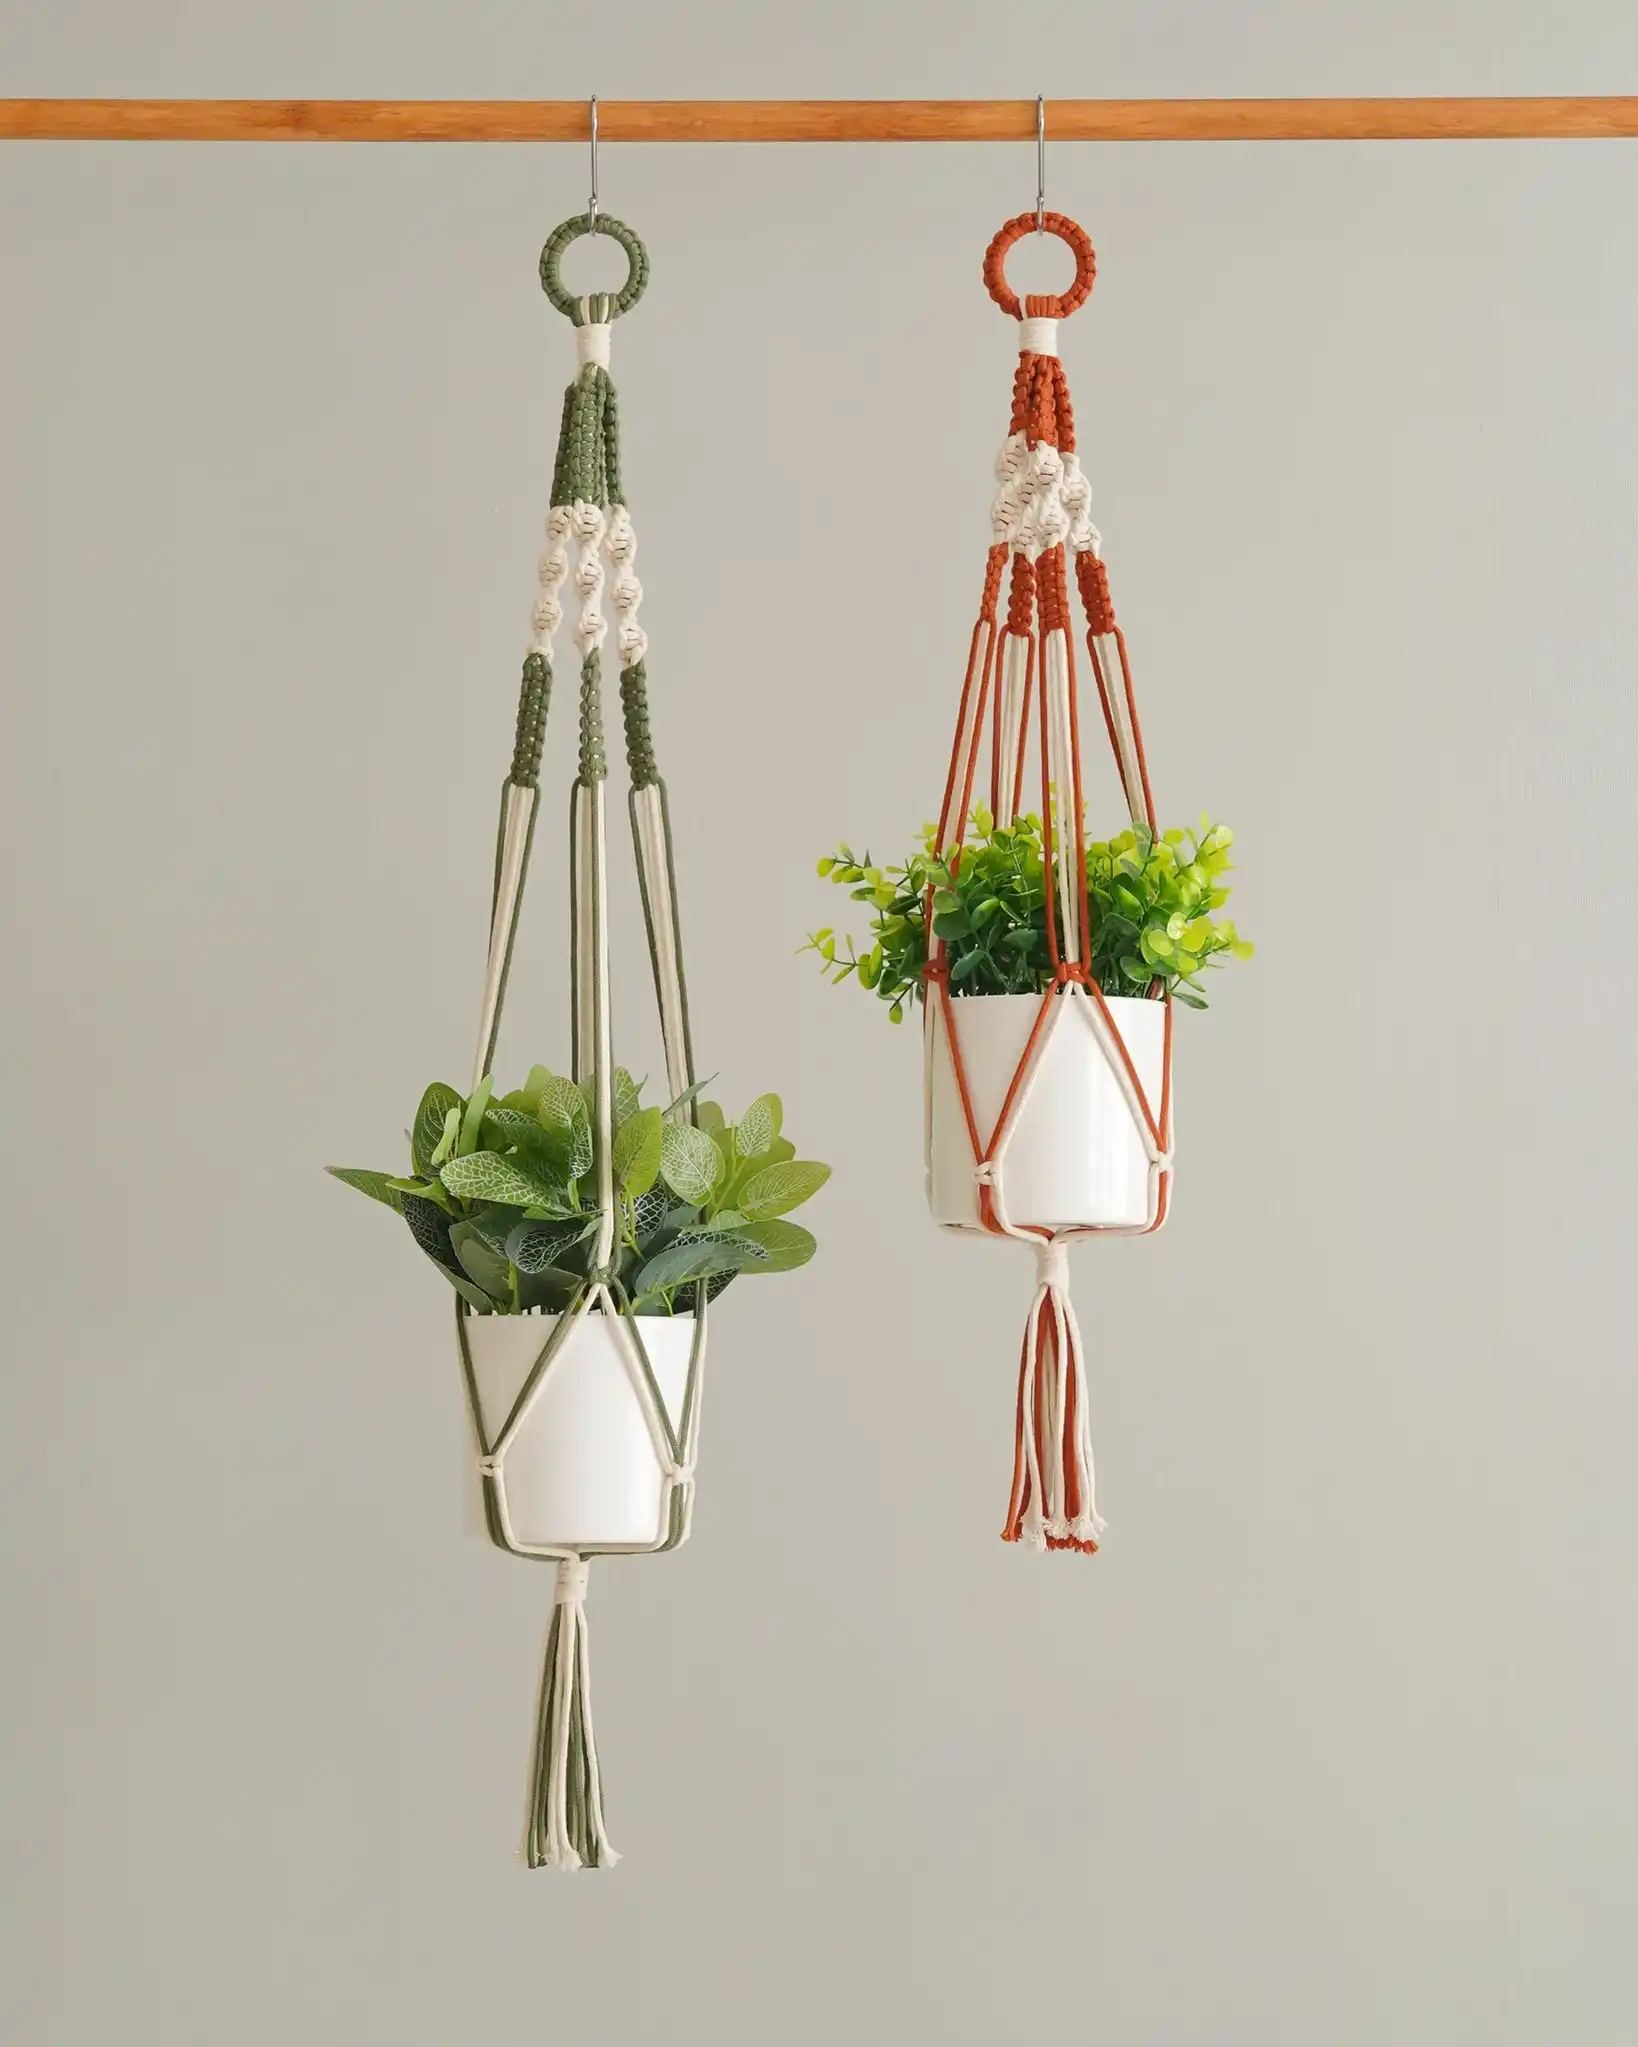
Look closely at these two hangers and you’ll notice they use almost the same knot pattern. The difference is just where the color starts and stops.
- The left hanger keeps color at the very top, near the ring, then lets the cords fade into plain cream for the rest of the drop
- The right hanger flips it, mixing color and cream together through the whole knotted section instead of blocking it in one spot
- Both finish with a loose fringe tassel at the bottom, which is what gives the piece that finished, “not still a work in progress” look
- Neither hanger uses more than two colors total, which is what keeps them from looking busy
For a first project, pick one main color and let plain cream or white do the rest of the work. Two colors, kept simple, almost always look more intentional than three.
2. A Solid Column Of Knots Makes This Lavender Hanger Look Woven, Not Tied
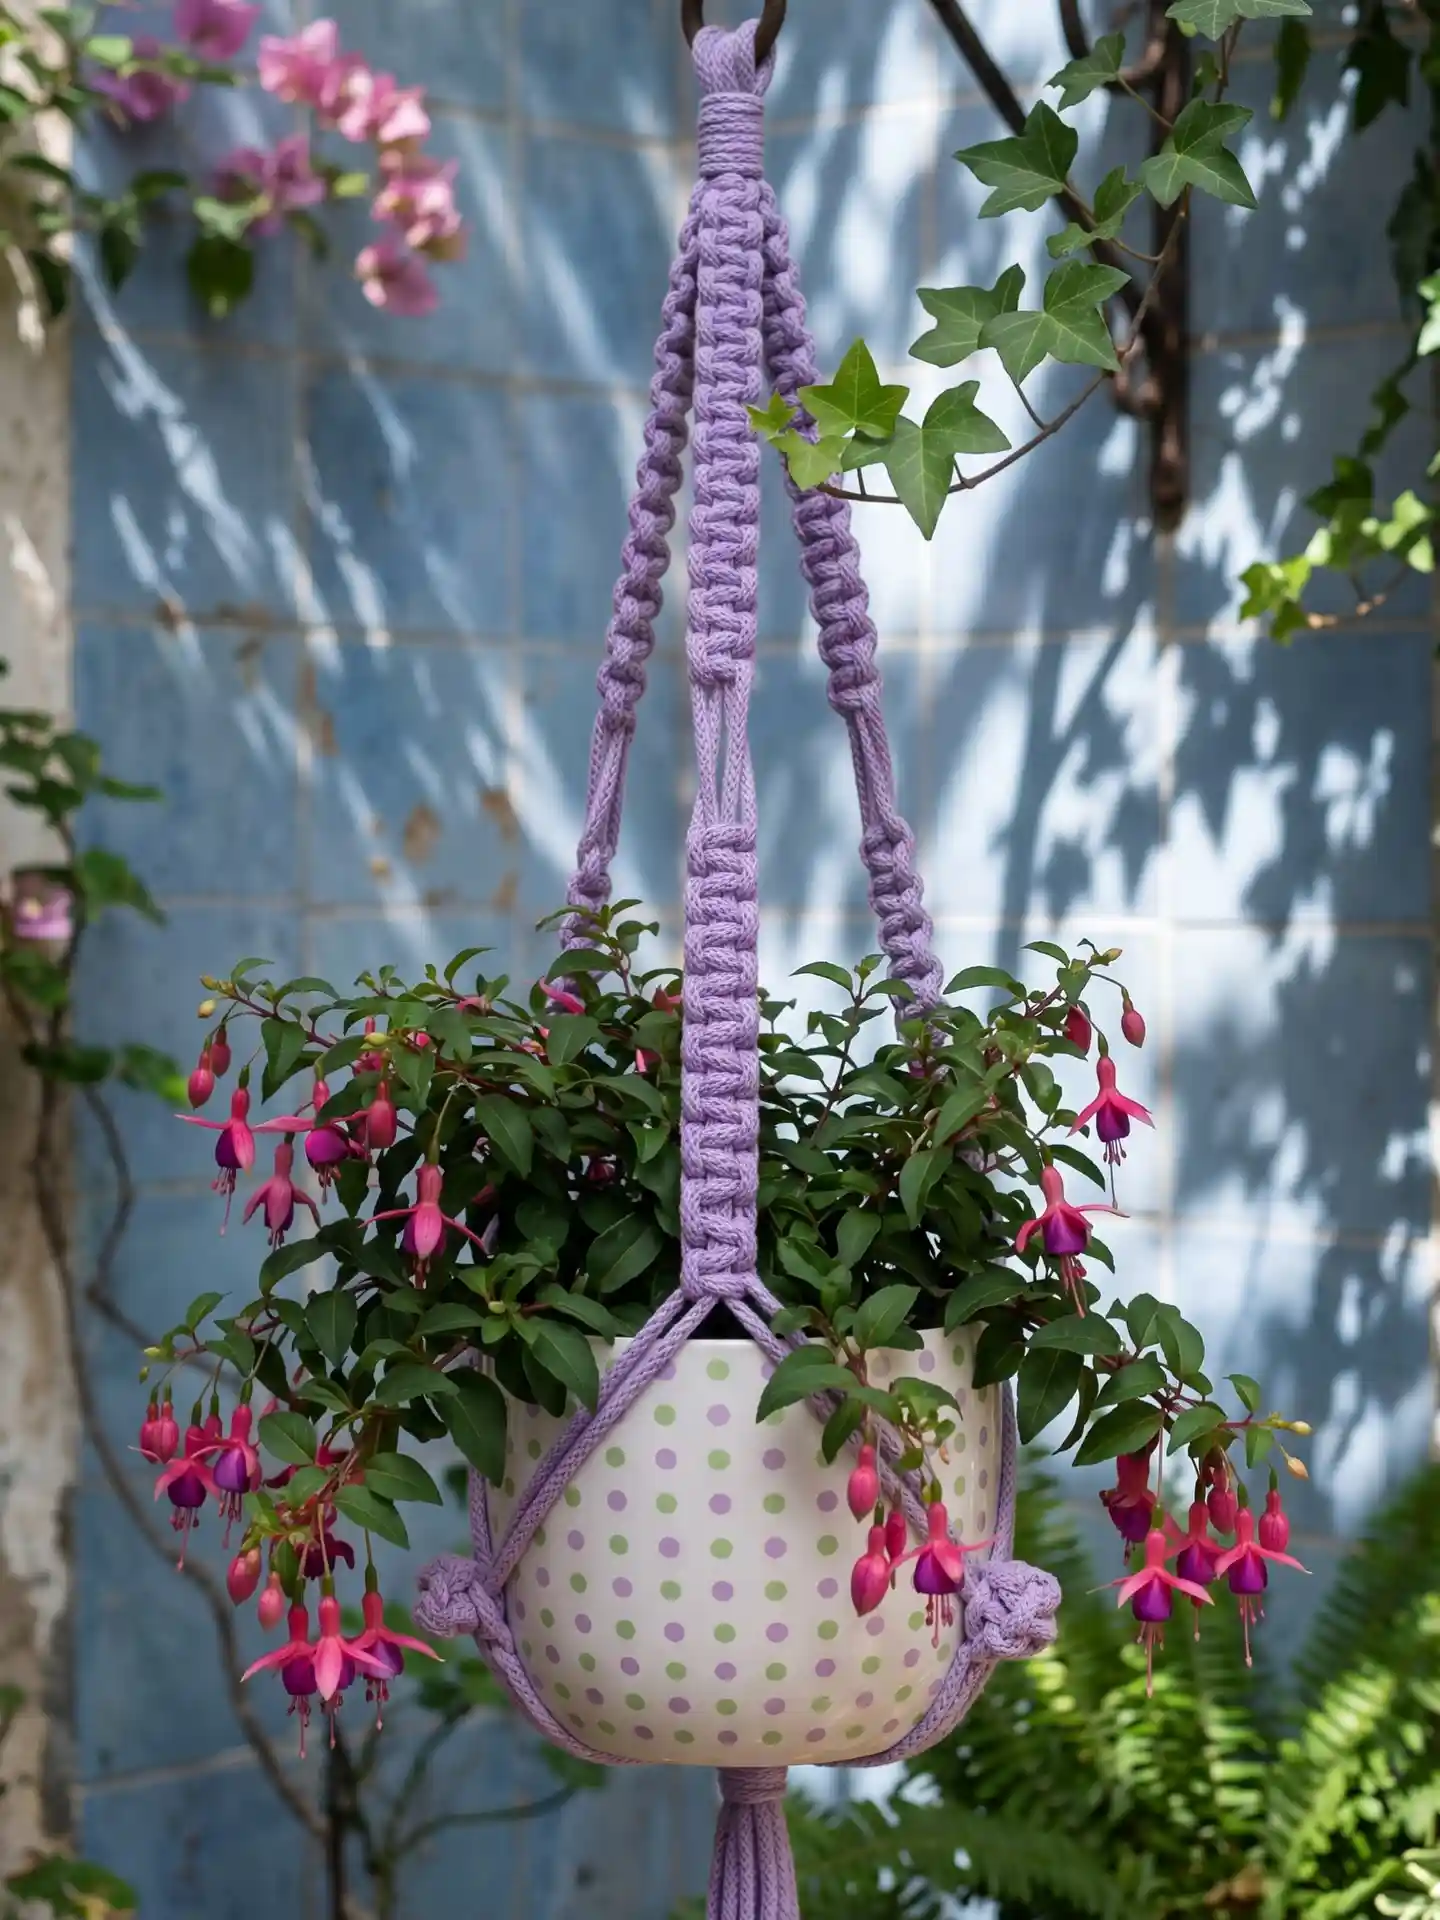
Lavender rope and a dense knot pattern turn this one into something closer to a woven cord than a typical macrame hanger.
Instead of leaving gaps between knots the way the first example did, the maker packed square knots tight against each other, all the way up the drop.
The polka dot pot underneath and the trailing fuchsia blooms do a lot of the visual work too, but the rope itself is the real star here.
- Pick one saturated color. A pastel like lavender only reads well in a solid block, not mixed with cream.
- Use the same knot, repeated close together. Square knots stacked with no space between them create that woven look.
- Finish with a wrapped knot cluster at the base, like the round bundles cradling this pot, instead of a plain tassel.
This pattern takes more cord and more repetition than a beginner starter piece, but it uses only one knot type, so it is more about patience than skill.
Save the color mixing for later projects. One saturated shade like lavender reads as intentional, not accidental.
Tie square knots with no gap between them so the strands read as one solid woven column.
Skip the loose fringe tassel and gather the ends into a round wrapped knot instead, like a soft pom at the base.
3. One Wall, Four Patterns: How Mixing Beginner Knots Creates An Instant Collection
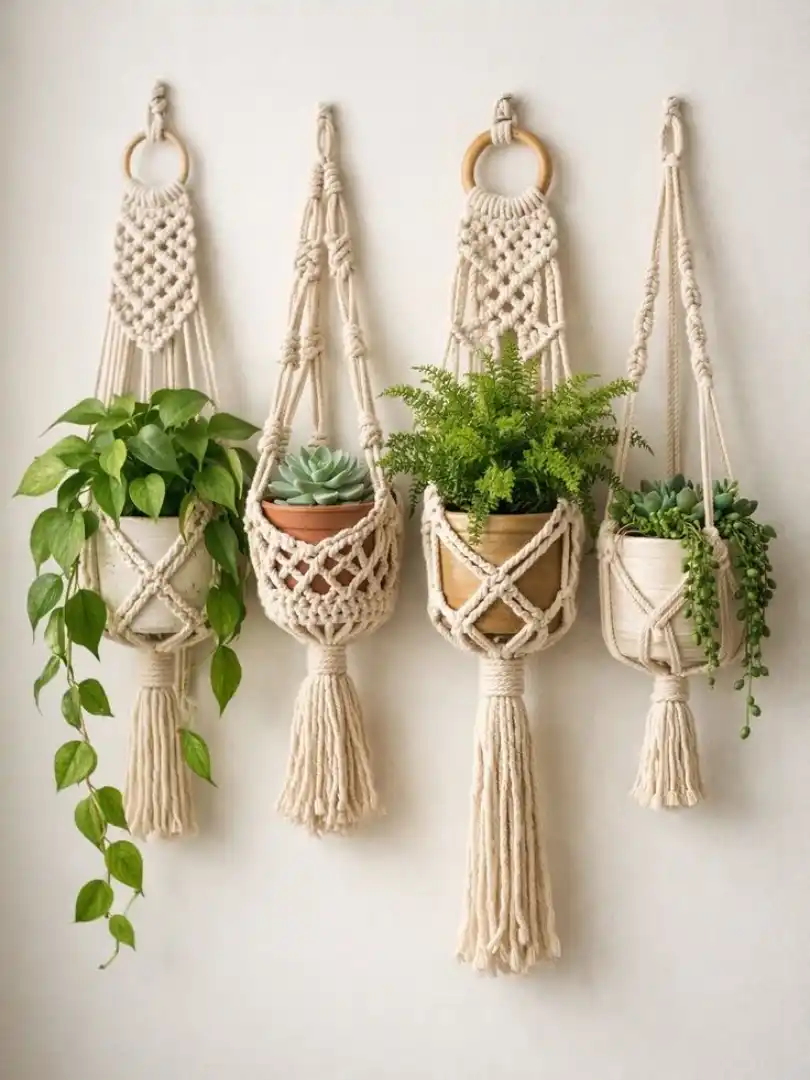
Hang four different patterns side by side on the same wall, and suddenly a beginner project looks like a curated set instead of four separate practice pieces.
What ties this whole grouping together isn’t the pattern, since every hanger here uses a different one. It’s the material.
Same natural cream cord, same tassel length family, same pot-cradling style, top to bottom.
| Pattern | Best For |
|---|---|
| Loose diamond lattice | Trailing plants like pothos |
| Tight woven diamond | Small succulents needing full support |
| Bold X-cross, chunky cord | Heavier ceramic pots |
| Simple crossed cords | Fastest beginner build, lightweight pots |
4. This One Isn’t A Basket At All, It’s A Woven Pocket
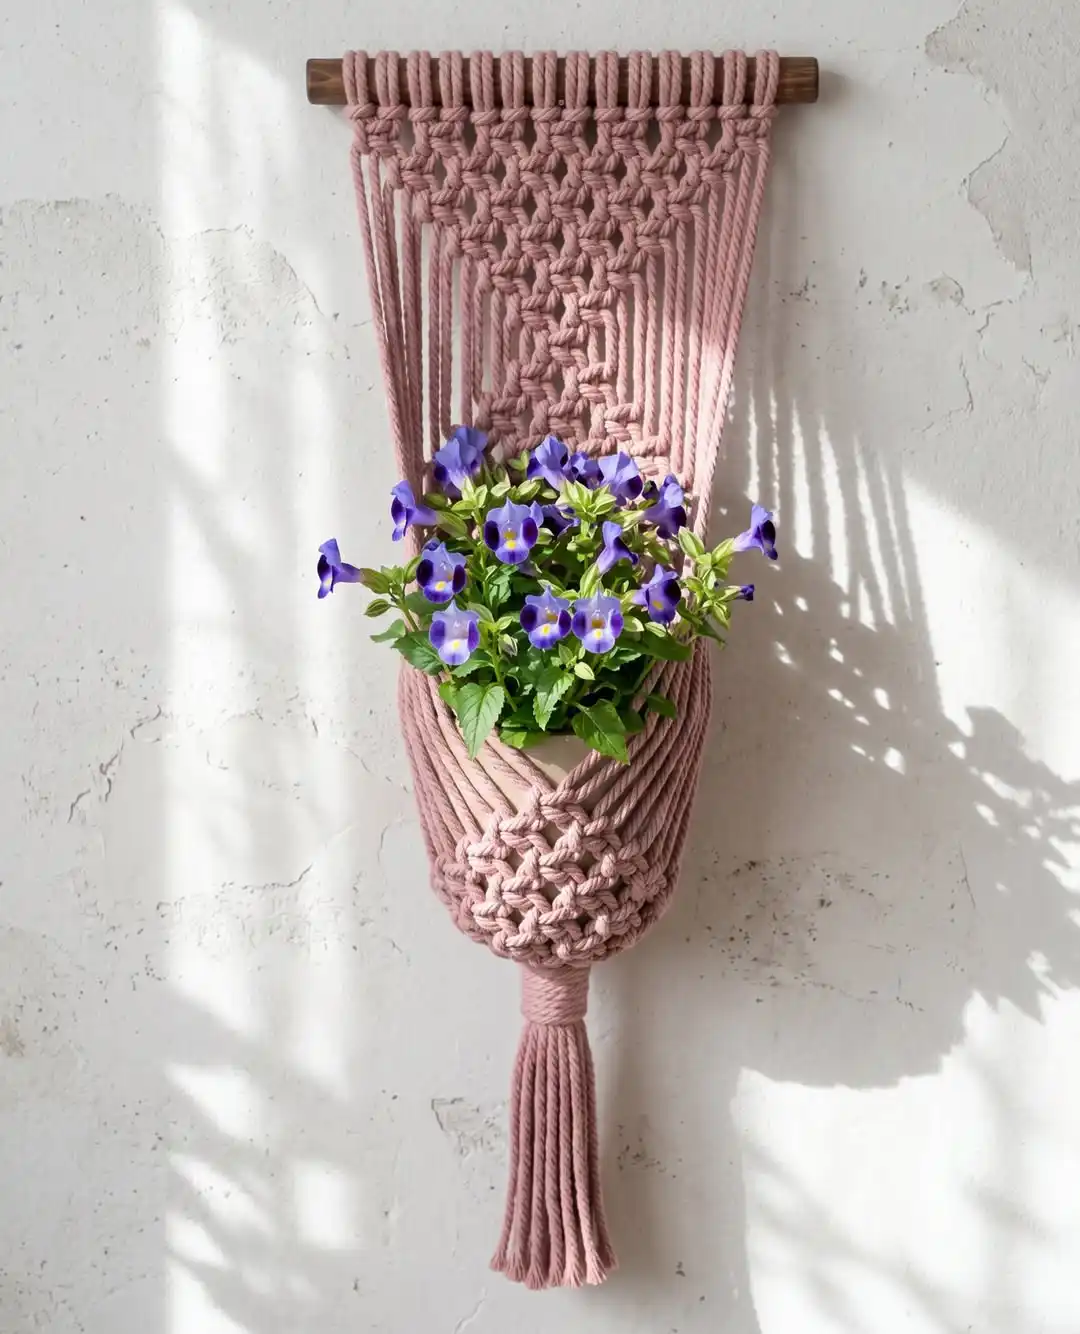
Mount it on a dowel like a wall hanging, then knot the cords into a closed panel instead of an open cradle, and you get something that holds a pot without ever showing rope legs or a knotted net underneath.
The diamond weave up top does double duty as decoration and as the structure that narrows into a pouch, cinching tight right where the pot sits.
Three things set this apart from a typical hanging planter:
- It mounts flat against a wall on a dowel, so it needs a stud or hook, not just a ceiling anchor
- The knotting closes into a solid pocket instead of leaving open netting, which hides the pot completely
- One long tassel finishes the bottom point instead of the multi-strand fringe seen on hanging styles
Because the whole piece is one continuous panel, this pattern takes more planning upfront than a basic hanger, but it’s a strong pick once you’ve got a few simple projects under your belt and want to try shaping cord instead of just knotting it.
A closed knotted pocket hides the pot completely, giving wall hangers a cleaner look than open netting ever can.
5. A Full-Cage Net Pattern Shows Off The Pot Just As Much As The Plant

These three take a completely different approach than anything before them. Rather than narrowing to a cradle near the bottom, the netting wraps the entire pot in a tight diamond mesh from top to bottom, so the basket itself becomes part of the display instead of getting hidden by rope.
Sage green wraps a woven basket pot. Tan wraps a textured ceramic one, half hidden by a trailing vine.
Coral wraps a plain white pot, letting the mesh pattern take center stage. Same knot count, same cage shape, three completely different personalities depending on color and what’s sitting inside.
Subscribe to DIY Craft Bloom
Get updates on the latest posts and more from DIY Craft Bloom straight to your inbox.
If your pot has any texture or pattern worth showing, this full-cage style is the one to pick. Anything with a plain hanger and a cradle base would just cover it up.
6. Same Branch, Three Skill Levels: A Beginner’s Cheat Sheet In One Photo

Hang these three side by side and you’re basically looking at a skill progression chart. The braided cream one on the left takes the least technique but the most patience, since it’s a single flat braid pattern repeated top to bottom with zero cage or netting underneath the pot.
The center one adds two wooden beads mid-drop and separates into four clean legs before cradling the pot in a simple diamond.
The one on the right skips beads entirely and instead ties big round knots stacked in pairs down each cord, which takes more rope but fewer new techniques than the beaded version.
One repeated flat braid, snug-fit pot with no separate cradle needed.
Wooden beads mark the split point before a simple diamond cradle.
No new knots to learn, just steady repetition down each cord.
7. Three Tiers Of Fringe Is What Makes This One Look Full Even Before The Plant Fills In

Most macrame hangers finish with a single tassel drop below the pot. This one stacks three separate fringe tiers of decreasing width, cascading straight down from the woven cradle.
That layered fringe is doing as much visual heavy lifting as the actual plant sitting above it, which matters a lot for a corner spot like this one, tucked next to a window where the hanger reads almost as sculptural as it does functional.
📌 Good to know: tiered fringe eats a lot more cord than a single tassel. Budget close to double what a basic hanger pattern calls for if you’re planning to add a second or third layer.
Pair this with a longer drop length too. Short fringe tiers just look chopped off, while long ones catch light and move a little with airflow, which is exactly what gives this piece its softness against a plain wall.
8. Same Cream Cord, Two Totally Different Diamond Spacings
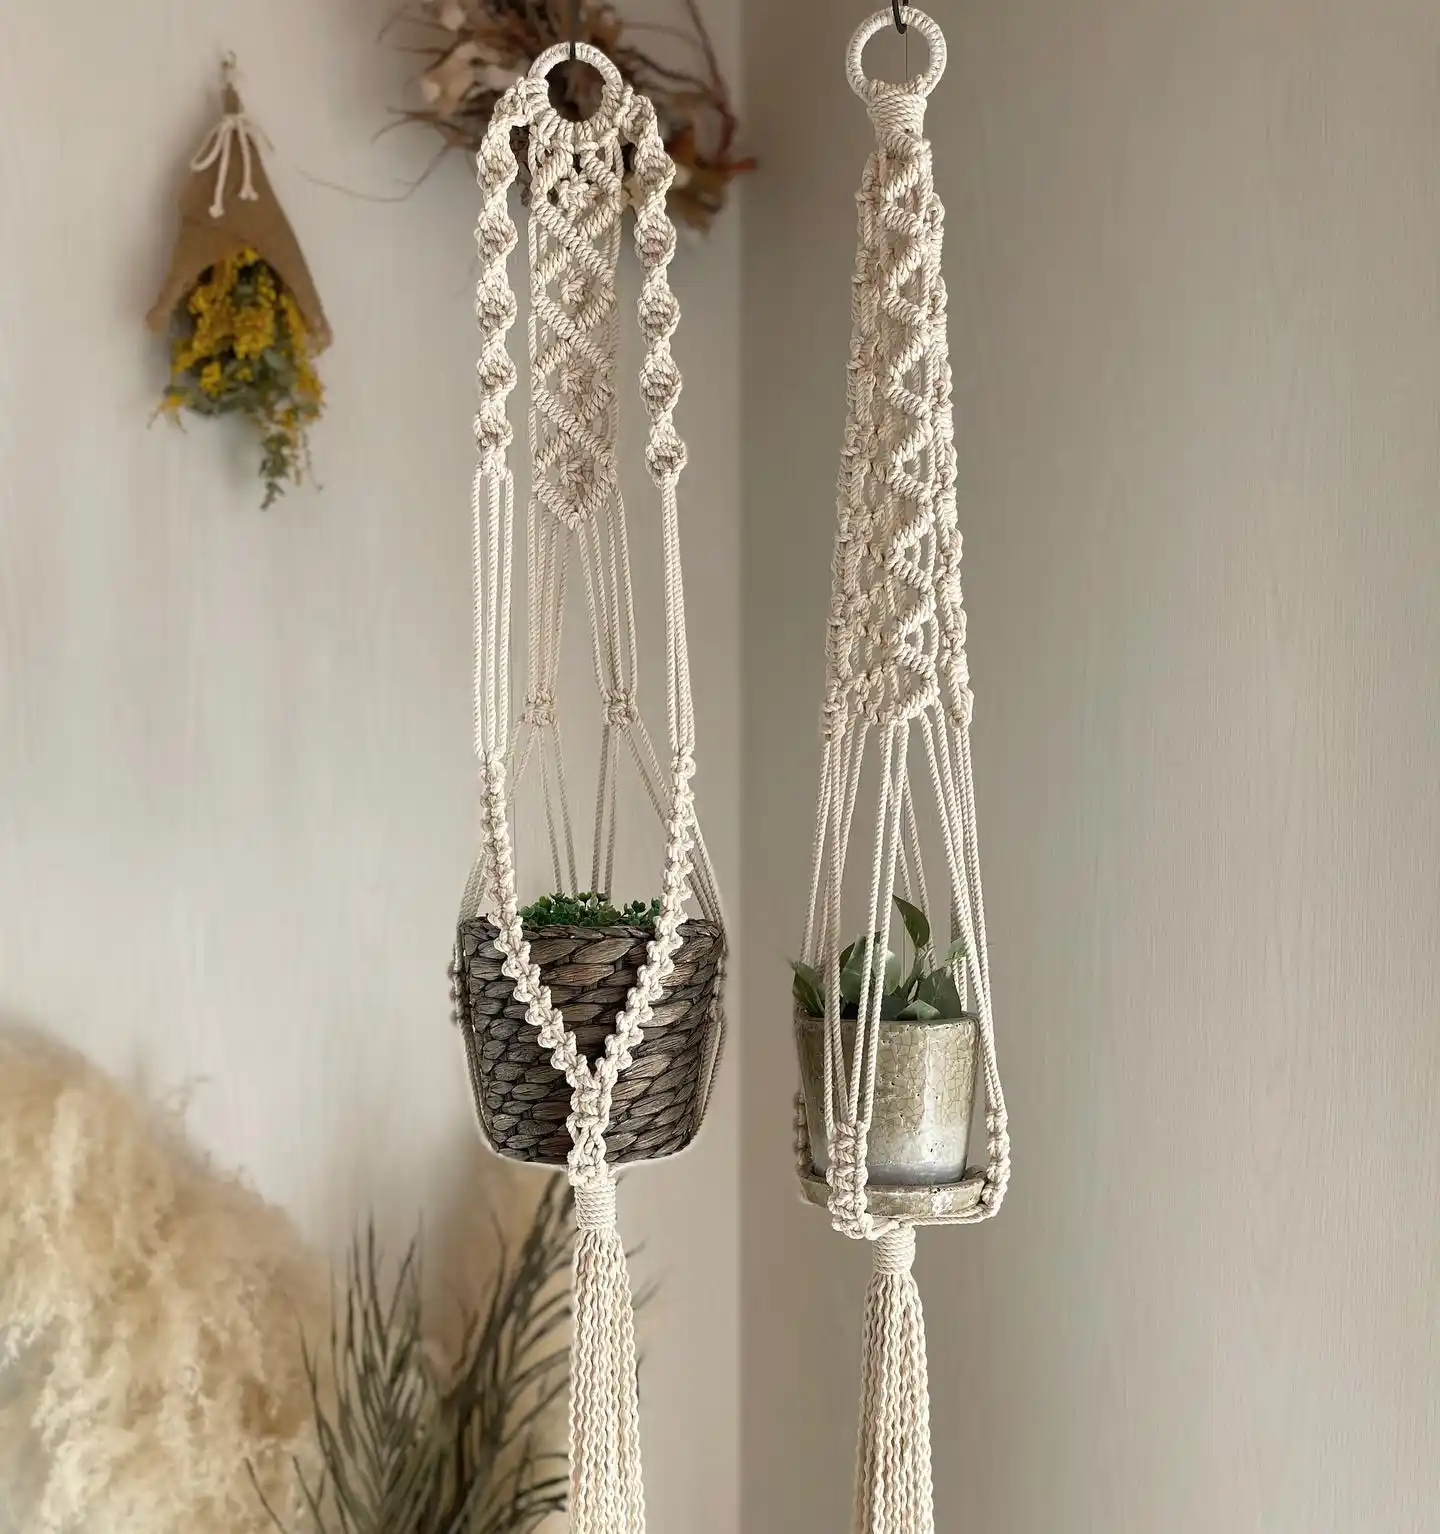
Put these two side by side and the difference jumps out immediately: identical color, identical basic diamond lattice, but the spacing between knots tells two different stories.
The left hanger stretches its diamonds out long and loose, leaving open gaps you can see straight through.
The right one packs the same diamond shape tight, almost stacking one on top of the next with barely any negative space.
Loose spacing (left):
- Faster to tie since fewer knots per inch
- Shows more of the pot through the netting, works well with a textured woven basket like this one
- Forgiving for a first attempt since uneven tension is less noticeable
Tight spacing (right):
- Takes noticeably longer per inch of cord
- Nearly hides a plain pot completely, so the knot pattern itself becomes the focal point
- Uneven tension shows up fast, so it rewards practice more than a first try
Both patterns start from the exact same diamond technique. The only variable is how much you pull the knots together as you go.
Faster to tie, fewer knots per inch.
Shows off a textured basket pot underneath.
Slower to tie, knots packed close.
Nearly hides a plain pot, pattern becomes the star.
9. Single-Strap Bag Style Skips The Multi-Leg Cradle Entirely
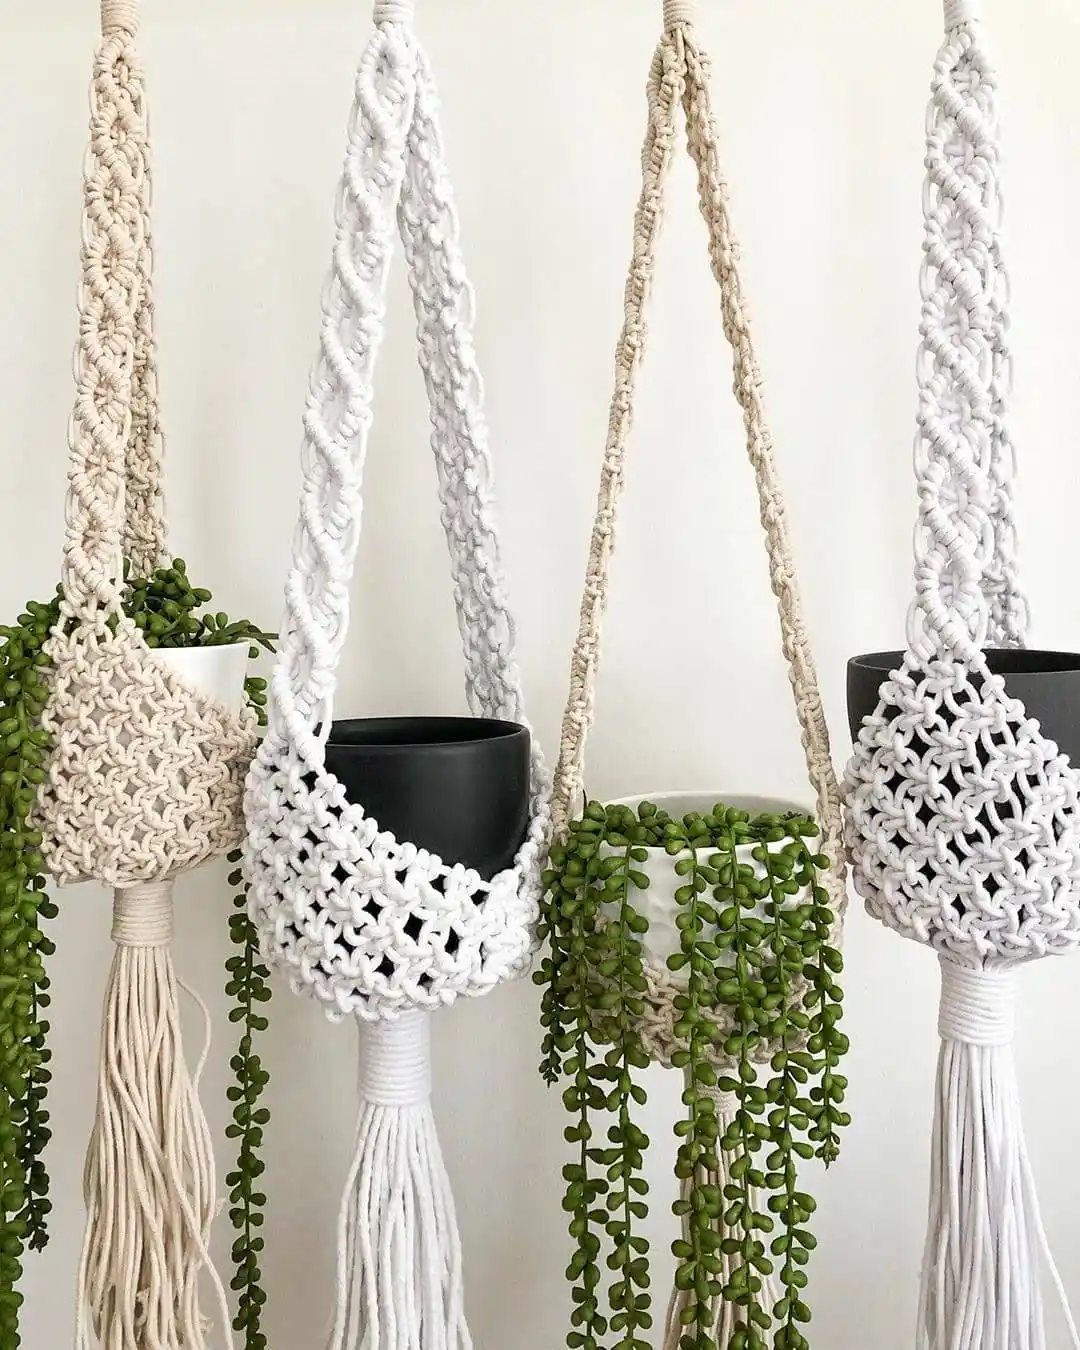
Every hanger in this row uses one continuous knotted strap instead of the usual three or four separate cords that split apart to cradle a pot.
The strap widens into a mesh pouch near the bottom, closes around the pot like a drawstring bag, then narrows again into a tassel.
No open netting with visible pot underneath here, the mesh itself is dense enough to actually hold the container’s shape.
Cream and white sit side by side, plus one slightly looser lattice weave in the third slot, but the bag structure stays consistent across all four.
String of pearls plants draping out of two of the pouches make the mesh pattern read almost like a knit tote bag rather than a typical hanger.
Subscribe to DIY Craft Bloom
Get updates on the latest posts and more from DIY Craft Bloom straight to your inbox.
Keep the pot light. A single-strap bag design carries all the weight through one seam, so a heavy ceramic pot will pull the mesh out of shape over time.
10. Buttery Yellow Proves Macrame Doesn’t Have To Stay Neutral
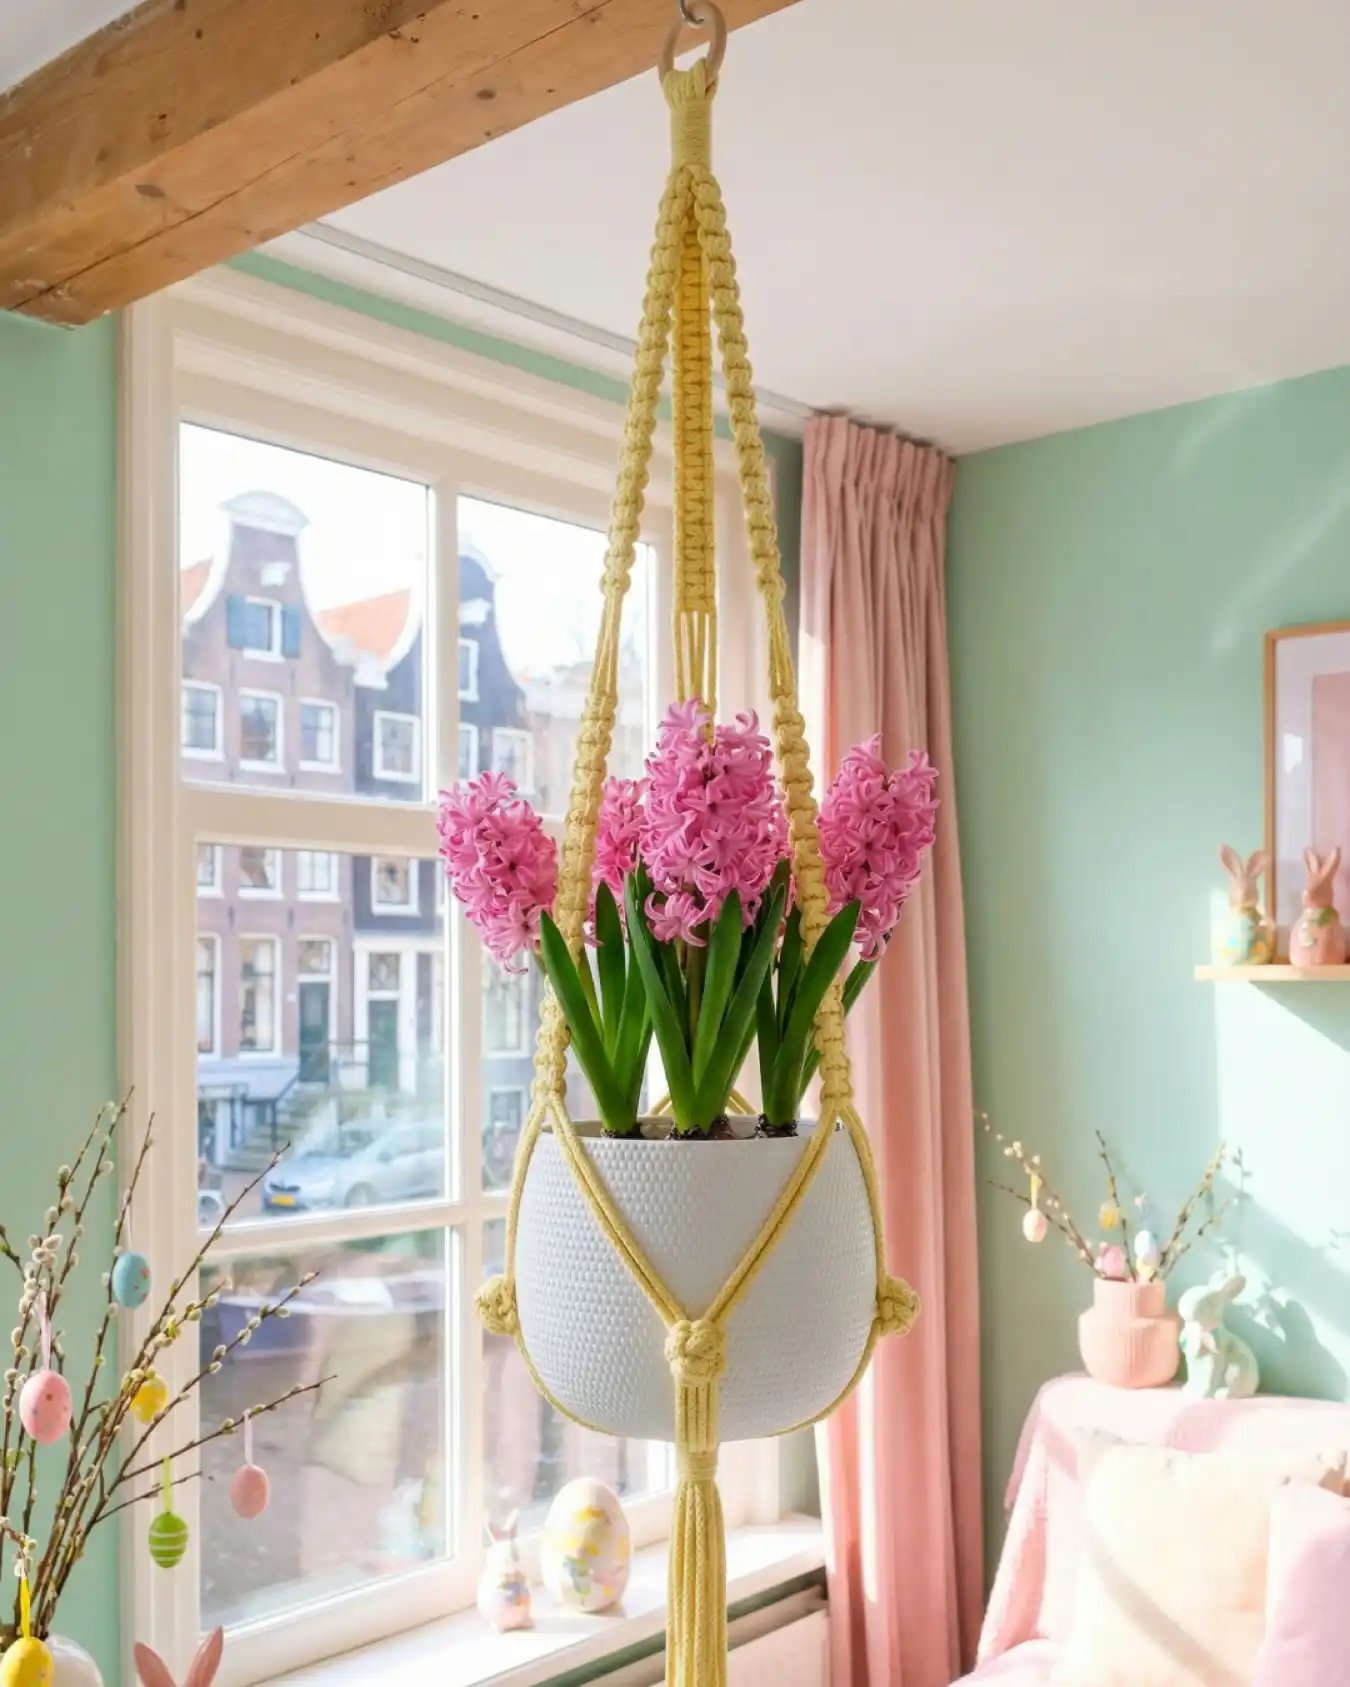
Every hanger so far has stuck to cream, white, or one earthy accent color. This one breaks that pattern completely with a soft pastel yellow that leans straight into the room around it instead of staying neutral background decor.
The knot pattern itself is nothing fancy, a simple diagonal double half hitch column splitting into three legs, but the color choice alone is what makes this one feel seasonal and specific rather than generic boho.
A plain white textured pot keeps the yellow from competing with the pink blooms sitting inside it.
If the pot had any pattern or color of its own, the whole look would start fighting itself.
11. Mustard Gold Cord Makes A Round Ceramic Pot Look Like It’s Sitting In A Net Bag
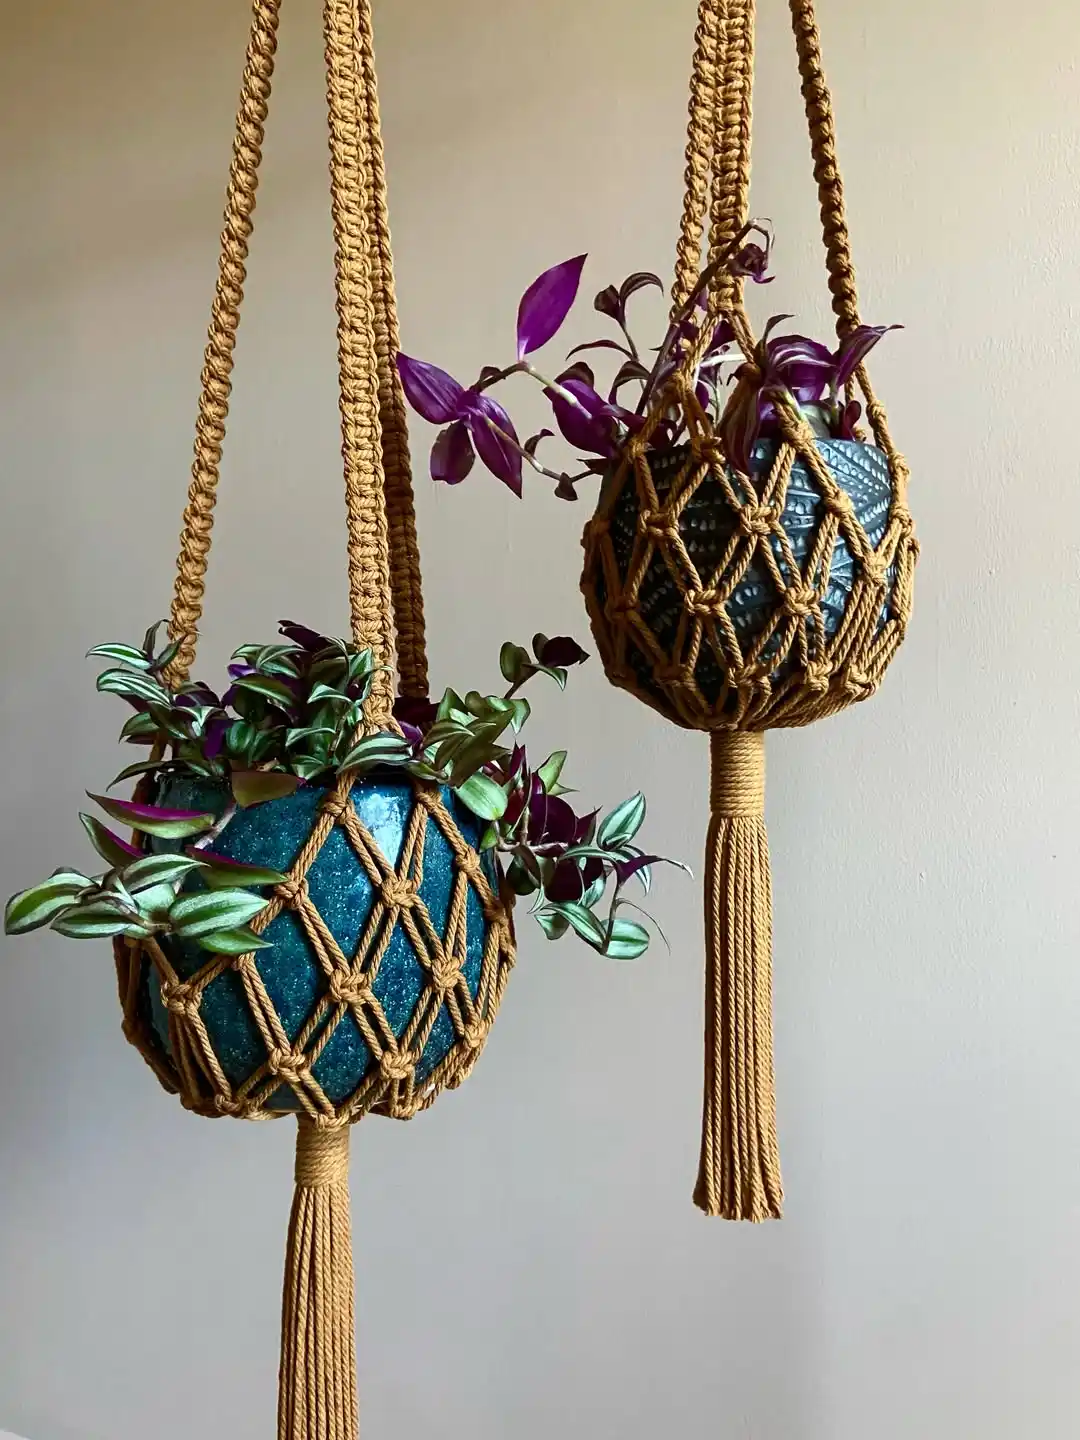
These two ditch the standard cylindrical planter entirely for round, bulbous ceramic pots, and the diamond netting stretches around the curve instead of hanging flat the way it does on a straight-sided pot.
Mustard gold cord against a deep teal glazed pot and a dark speckled one gives this pair a richer, more jewel-toned feel than the pastels and neutrals covered so far.
Getting the net to hug a round pot instead of gapping around it comes down to knot count:
- Start the diamond pattern tighter at the top where the pot curves inward toward the neck.
- Widen the spacing gradually as the diamonds move down toward the pot’s widest point.
- Pull the netting back in near the base so the mesh cinches under the curve instead of sliding off.
A round pot without this shaping trick just slips straight through a standard straight-drop net, so this technique matters more than the color choice does.
Start the diamonds close together where the pot curves inward at the top.
Let the diamond spacing open up as the netting reaches the pot’s widest point.
Pull the mesh back in near the base so it hooks under the pot instead of sliding off.
12. Six Identical Hangers On One Wooden Rod Is How You Skip Designing A Whole Display
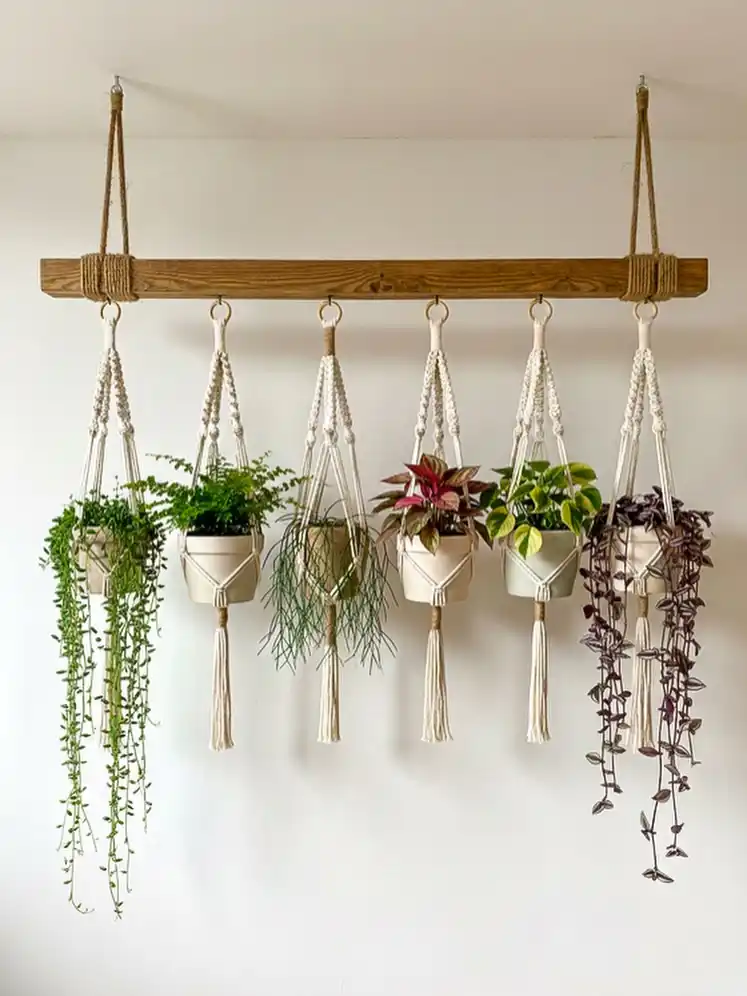
Instead of hanging pieces at random heights and spacing on hooks scattered across a wall, this project ties six matching macrame hangers onto a single horizontal wooden bar suspended by two thick jute ropes.
Every hanger uses the exact same knot pattern and tassel length, so the design work happens once and just repeats six times.
- Same pattern, six times: a short diamond lattice neck dropping into a four-point cradle
- Even spacing along the rod keeps pots from crowding or bumping in a breeze
- Varying trail lengths, from string of pearls draping to the floor to a compact fern staying tidy, add movement without touching the hanger design itself
- The wooden rod and jute suspension ropes do the heavy lifting visually, so the individual hangers can stay simple
| What Stays Fixed | What Varies |
|---|---|
| Diamond lattice pattern | Plant type and trail length |
| Cream cord color | Pot color, cream to charcoal |
| Tassel length | Spacing along the rod |
13. Wood Beads Mark Where This One Splits From Diamond Weave To Cradle
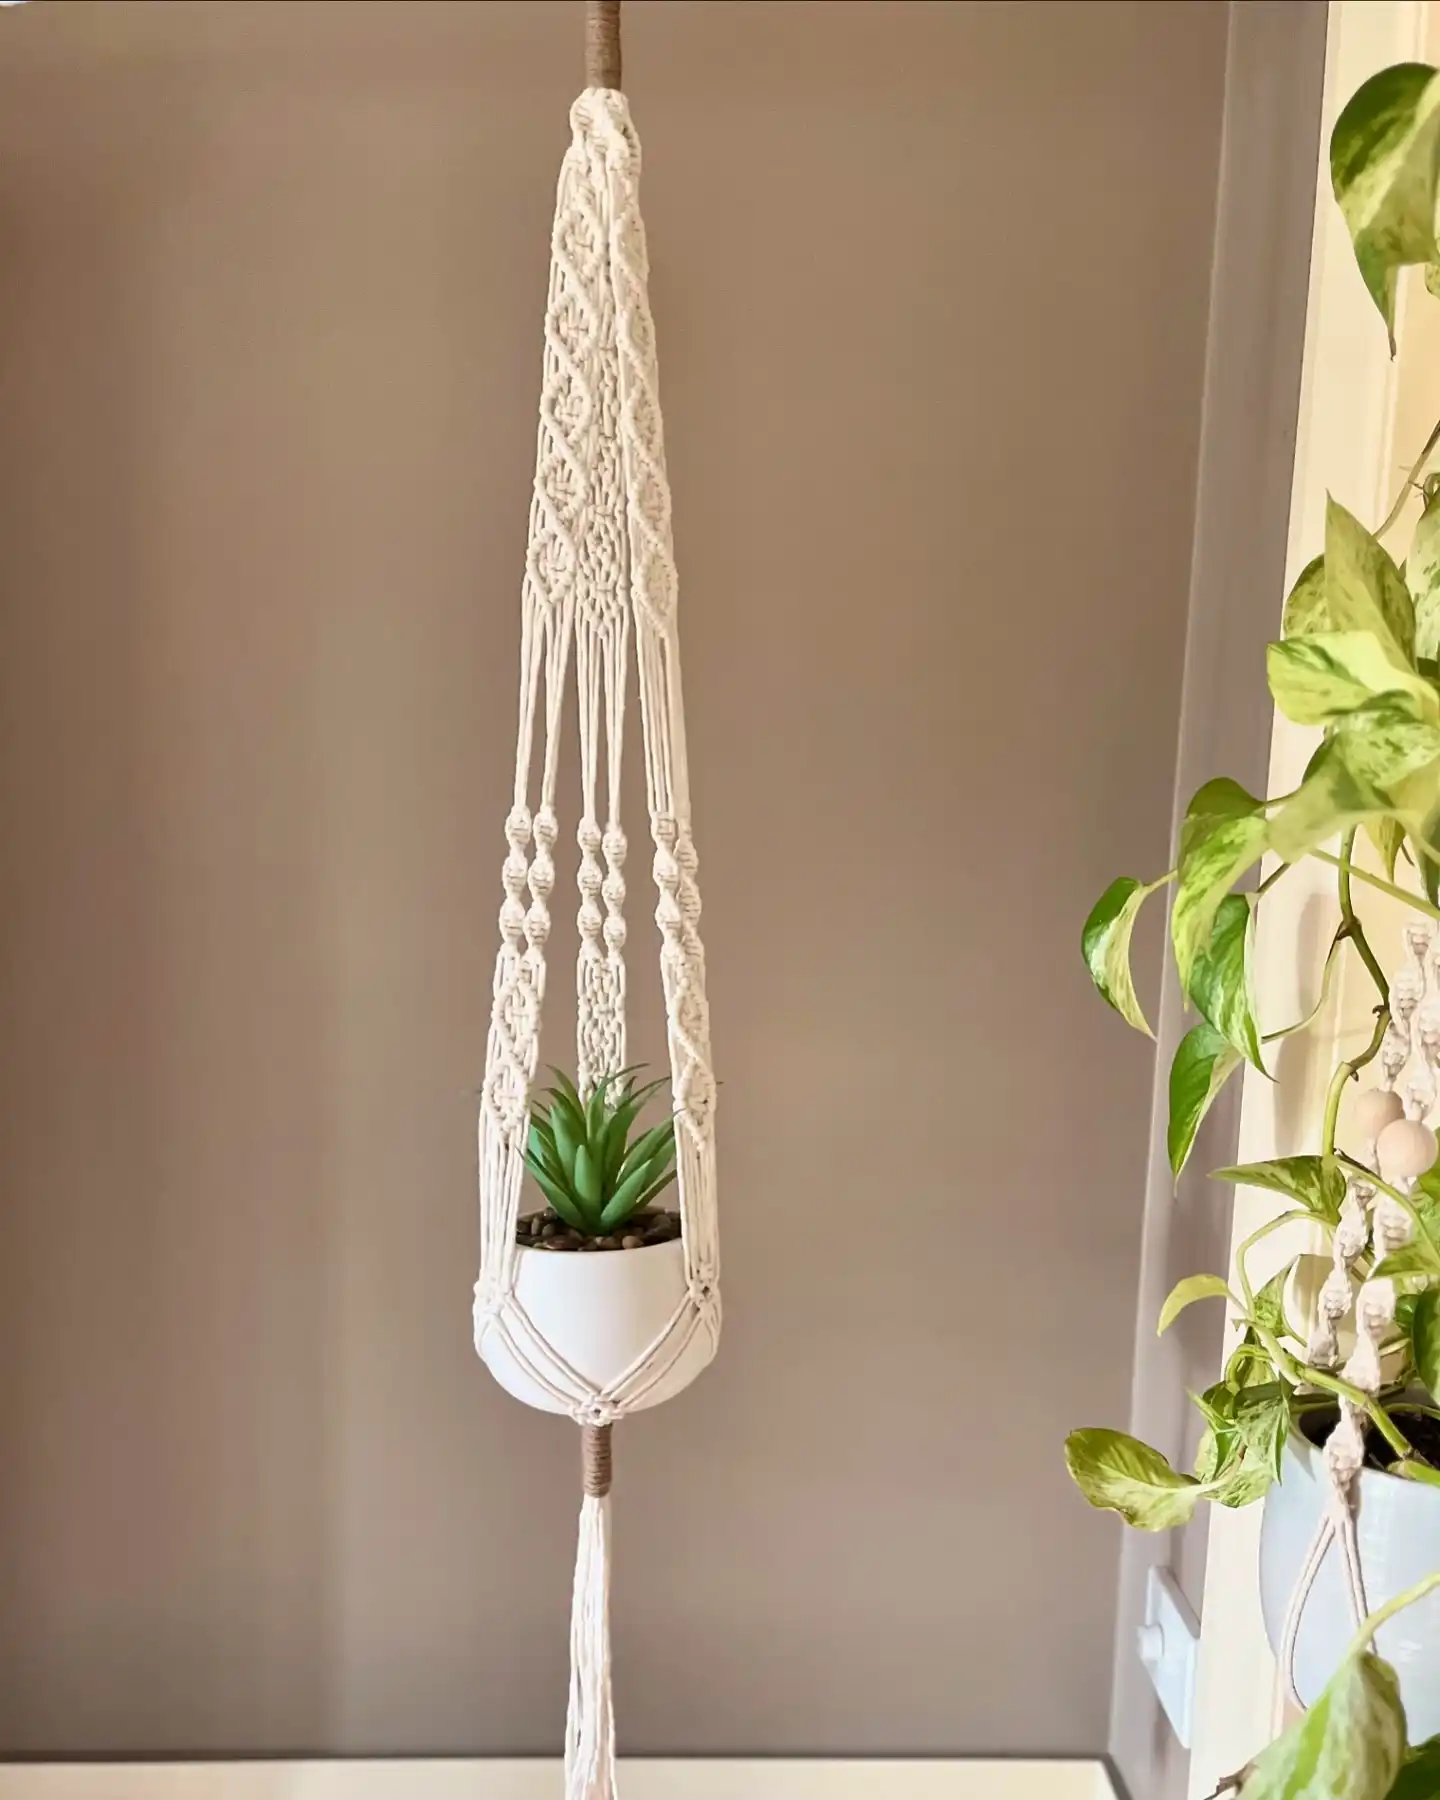
This piece uses the same diamond lattice neck seen a few times now, but a row of natural wood beads sits right at the transition point, exactly where the woven panel stops and the three separate cradle legs begin.
That row of beads acts almost like a punctuation mark, telling your eye “the decorative part ends here, the functional part starts now.”
- Style: classic diamond lattice, cream cord
- Transition: wood bead row marks the split point
- Cradle: three-leg cinch below the beads, no fourth strand
- Tassel: single long drop after the pot
The trick with bead placement is timing. Thread them on after your diamond section is fully tied but before you start separating the legs.
Beads added too early get buried in knot work and barely show; too late, and there’s nothing to visually mark the shift.
14. This Trio Turns The Same Navy Cord Into A Diamond Column, A Terracotta Cradle, And A Crescent Moon
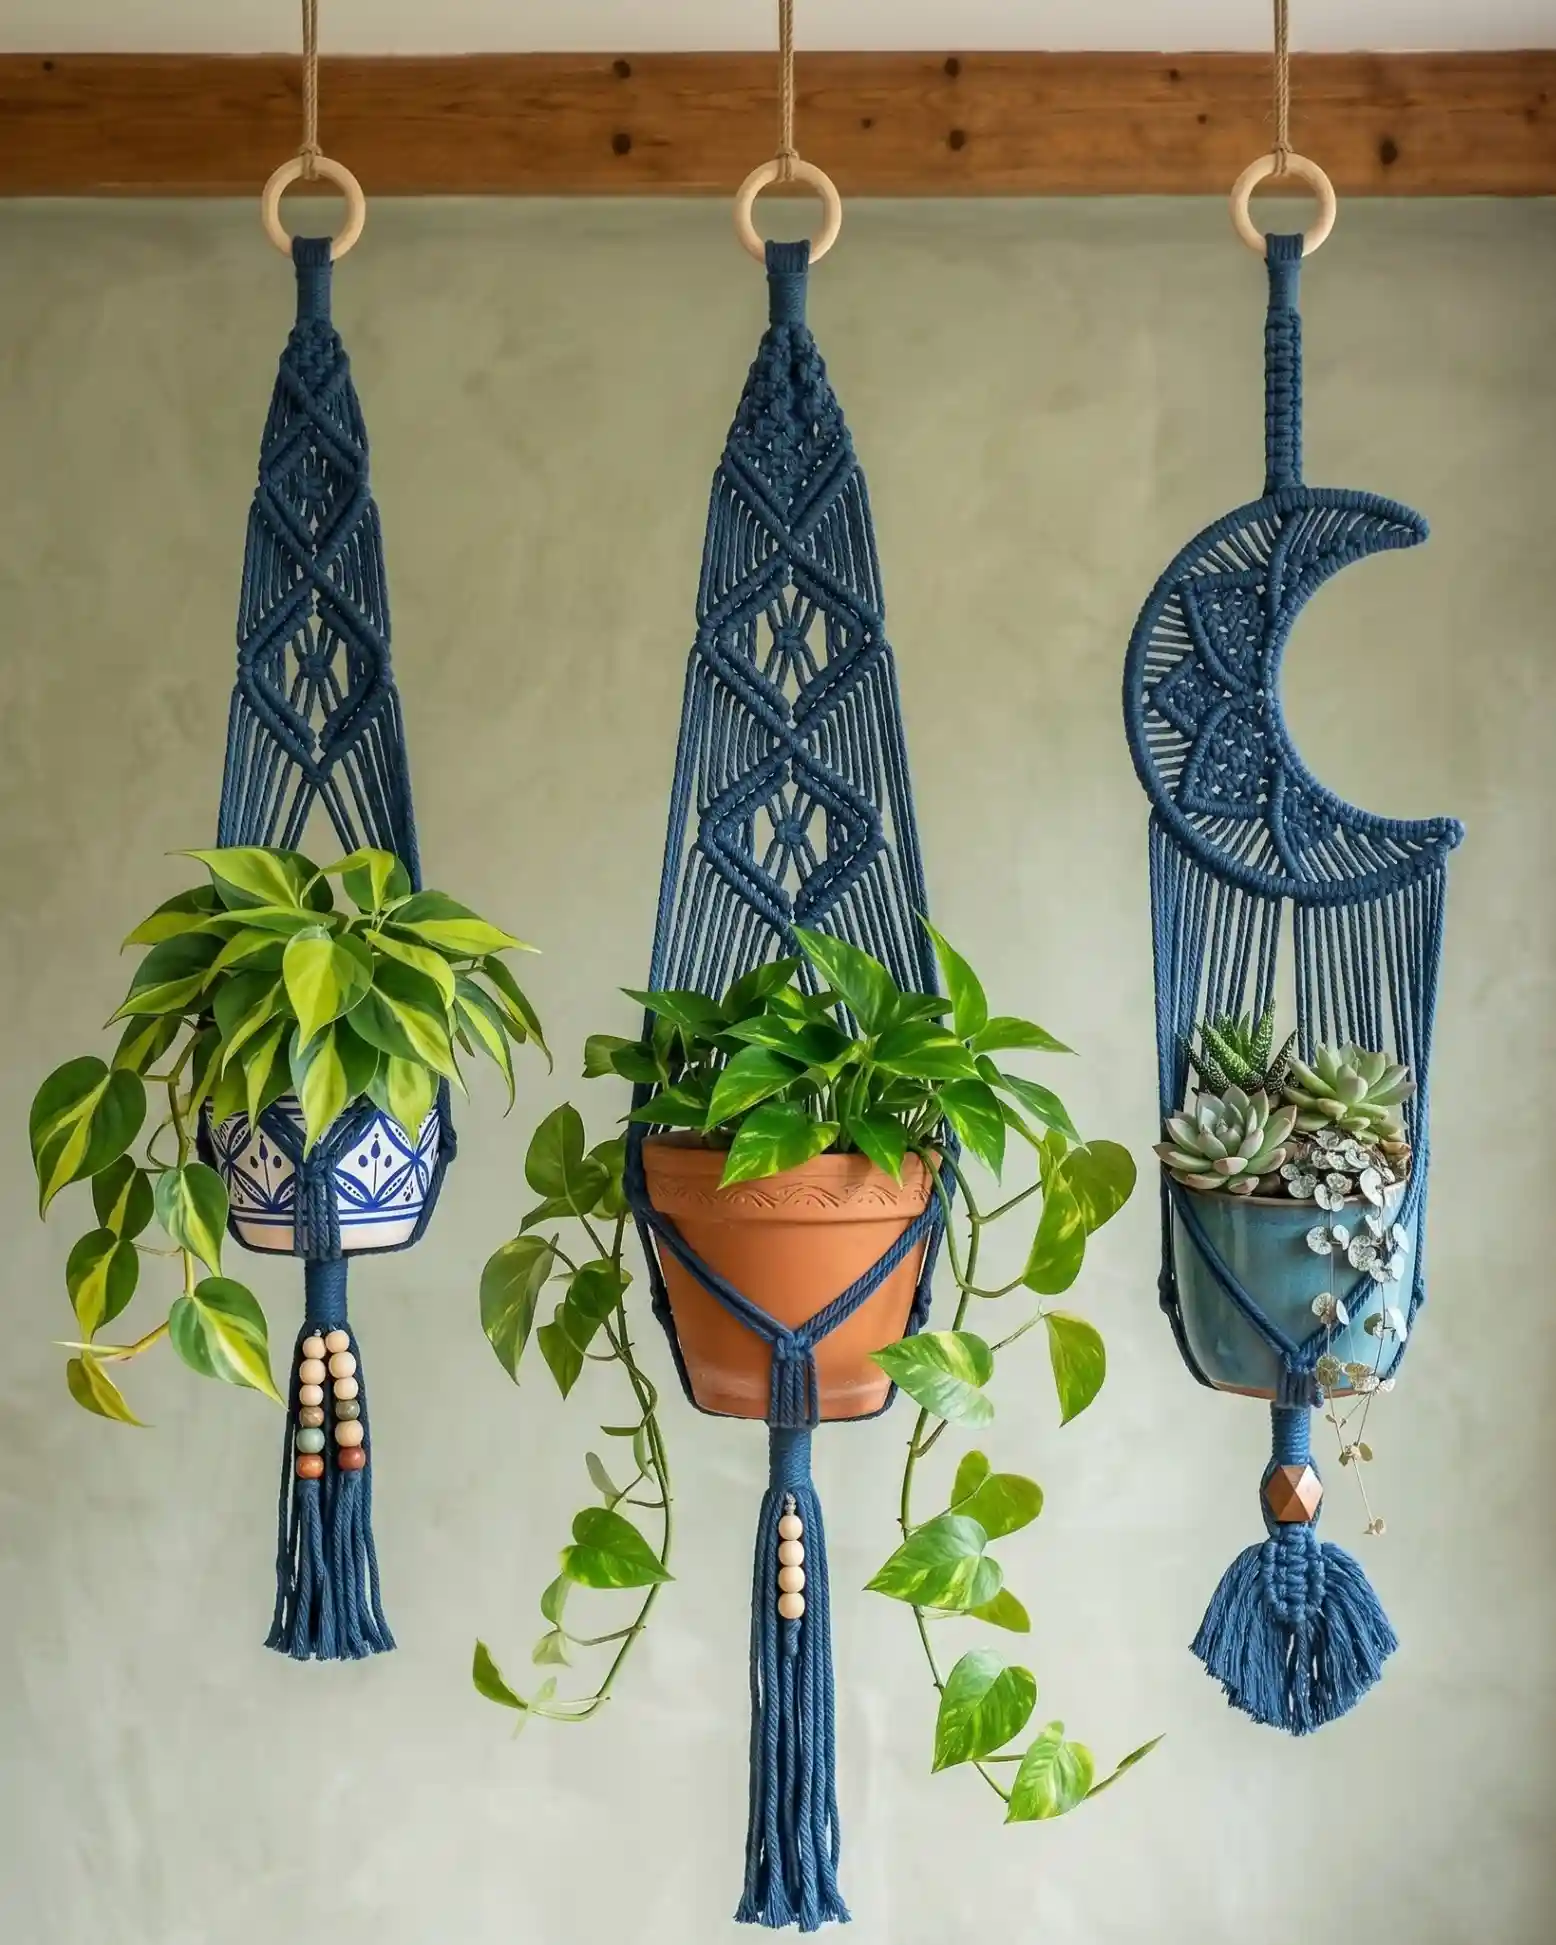
Three hangers, one deep navy cord color, three completely different ideas about what macrame can even look like.
The first two use variations on the diamond lattice already covered a few times, but the third breaks the pattern entirely and shapes the knot work into a crescent moon silhouette with a small pouch tucked into the curve for succulents.
- Left: diamond lattice with a beaded tassel bottom, wooden and stone beads mixed into the fringe instead of left plain
- Center: the same diamond pattern stretched taller and narrower, cradling a plain terracotta pot with a single wood bead accent on the tassel
- Right: not a hanger at all in the traditional sense, a flat wall-mounted crescent shape with a closed pouch built into the lower curve for a small succulent arrangement
The moon shape proves macrame doesn’t have to hang straight down from a single point.
Once you know basic square knots and lark’s head starts, you can shape a panel into almost any silhouette, not just a triangle.
conclusion
Fourteen hangers, fourteen different ways to twist, bead, or color the same handful of knots. If there’s one thing this roundup makes clear, it’s that a beginner pattern and a beginner-looking pattern aren’t the same thing.
Pick one cord color you actually love, commit to it the whole way through, and let a single detail (a bead row, a tassel tier, a tighter knot spacing) do the work of making it feel intentional.
Start with something simple like the two-leg cradle or the diamond lattice, then work your way toward the netted pouches and shaped panels once your tension feels steady.
Save this for the next time you want fresh macrame ideas to work from.