13 Macrame Wall Hanging Patterns for Beginners

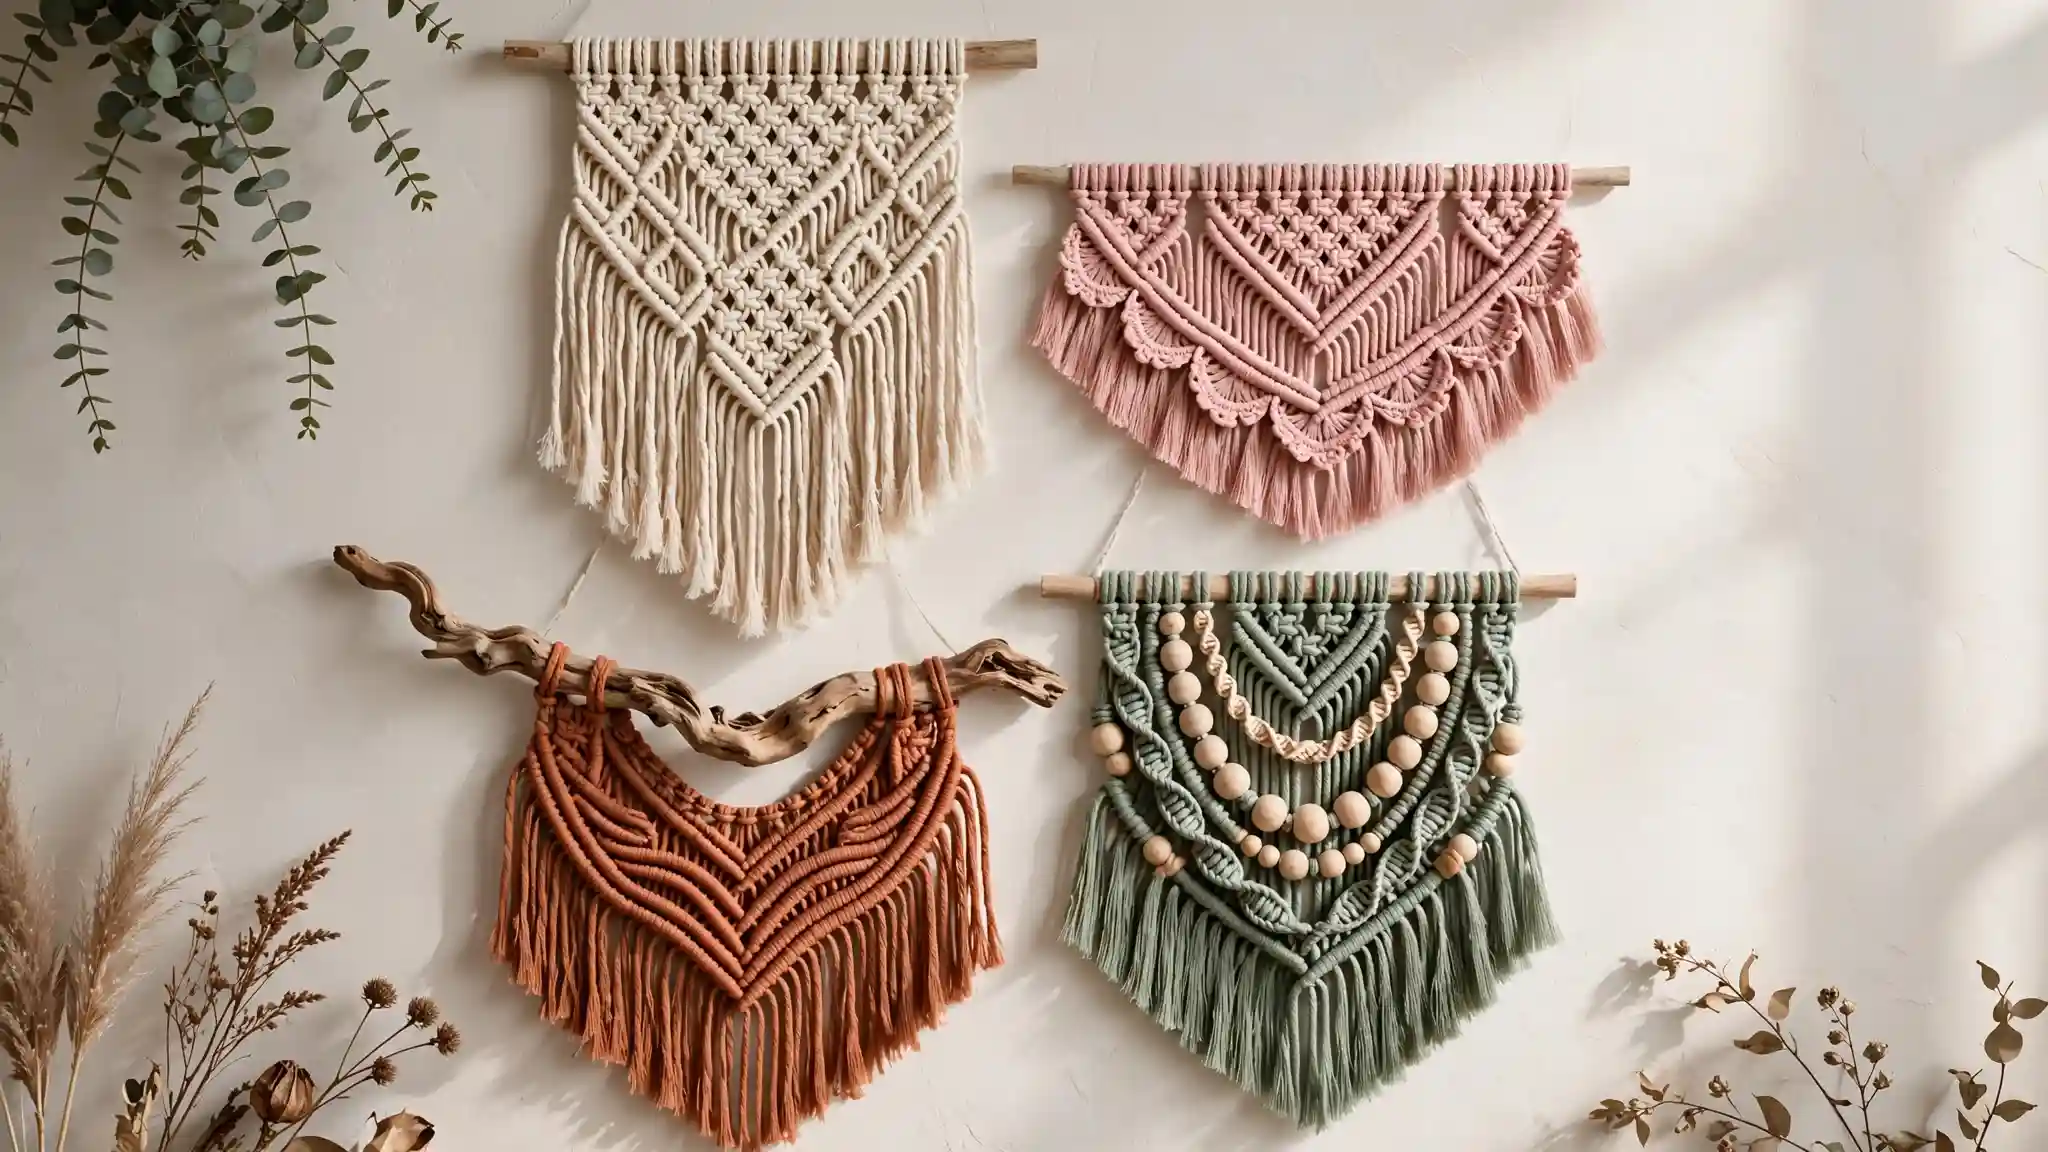
If you’ve been eyeing macrame wall hanging ideas on Pinterest but aren’t sure where to start, the good news is that almost everything in this roundup comes back to two or three basic knots.
What changes is the color, the shape, and the small extras you layer on top, like beads, braids, or a curved branch instead of a straight dowel.
Some of these pieces stick to plain cream cord and let the knot pattern carry the whole design.
Others lean on dye, ombre fringe, or stacked color blocks to turn a simple technique into something that looks far more advanced than it actually is.
A few skip the fringe altogether in favor of trimmed scallops, and one swaps out knotting almost entirely for strung beads.
Whether you want a tall statement piece for an entryway or a wide horizontal panel for above a console table, there’s a version here that fits your skill level and your wall. Grab some cotton cord and a dowel, and pick the one that speaks to you first.
13 Macrame Wall Hanging Patterns for Beginners
1. The Diamond Lattice V for a Classic First Wall Hanging
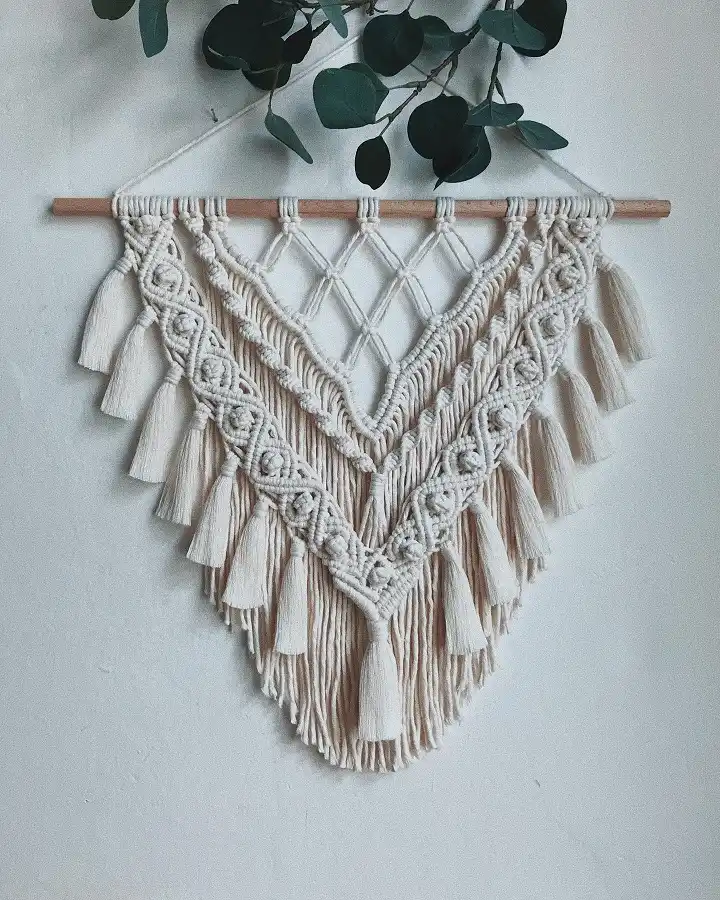
This is the pattern most beginners picture when they hear “macrame,” and it earns that reputation.
The whole design is built from rows of double half hitch knots stacked into diamonds, starting wide across the dowel and narrowing into a single point at the bottom. That taper is what gives it the soft V silhouette.
A few things worth noticing in this one:
- The diamonds get smaller as they stack downward, which is what creates the pointed shape instead of a straight triangle
- The cord stays undyed and natural, so the texture of the knots does the visual work instead of color
- Fringe lengths are uneven on purpose, left long and loose instead of trimmed flat
- A slim wood dowel keeps the top edge simple so the knotting stays the focus
If you’re new to knotting, this pattern is a good teacher because it repeats the same two knots over and over. Once you learn the diamond, you just keep going until you run out of cord.
Hang it under a trailing plant or a stem of greenery like this one. The soft leaves break up the straight line of the dowel and make the whole piece feel less staged.
2. Layered Chevrons With a Curved Driftwood Top
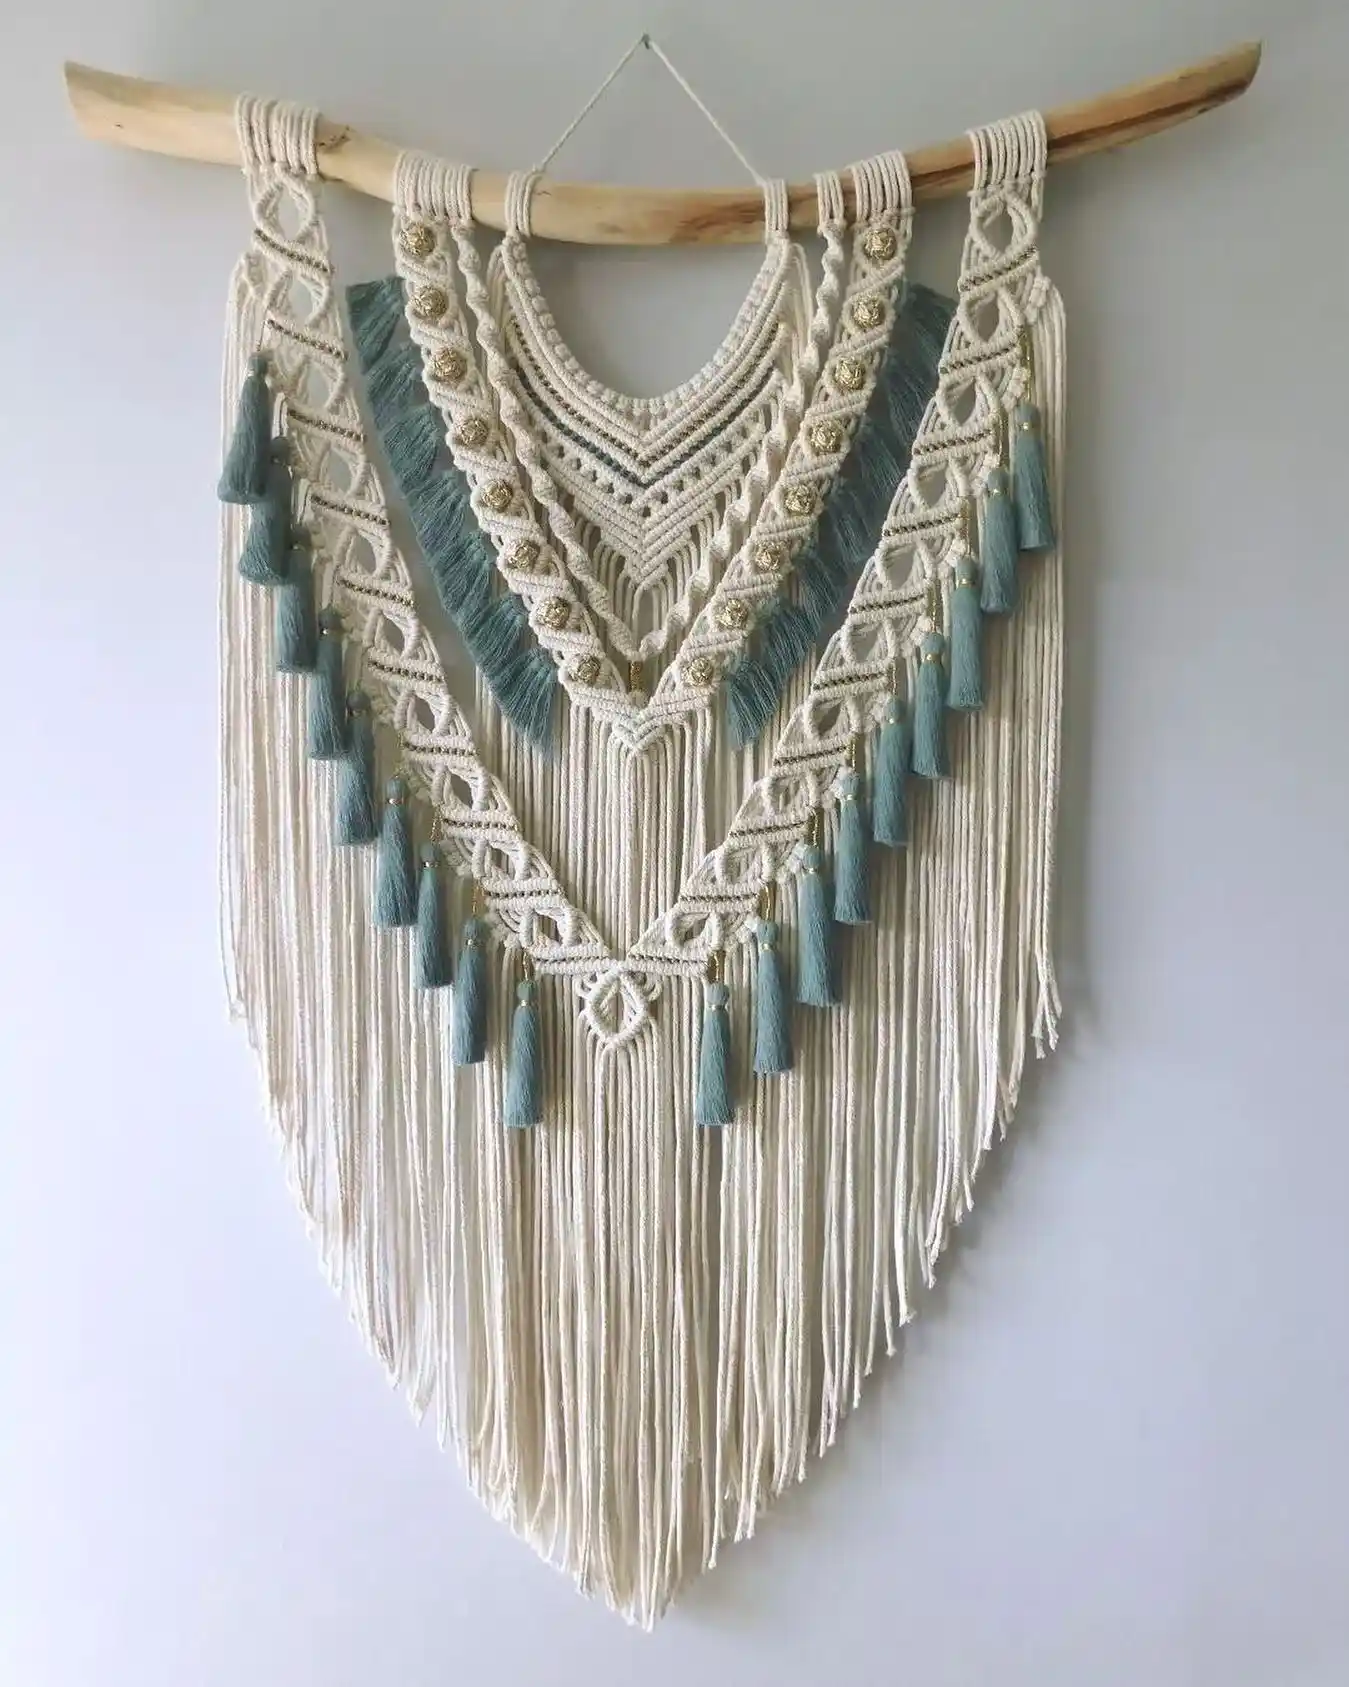
Not every beginner piece needs a straight dowel. Here the knotting hangs from a naturally curved branch, which changes the whole feel of the finished piece before you even get to the knots.
Underneath, several layered V shapes sit one behind the other, each edged in a dusty sage color and dotted with small gold beads for a little shine against all that natural cord.
What makes this one worth trying next:
- Start with the branch. Any curved stick from the yard works, and it skips the step of finding a perfectly straight dowel.
- Tie your rows of half hitch knots in plain cord first, then only add the colored cord along the outer edge of each V.
- Thread wood or metal beads onto a few strands before you tie the final knot below them, so they sit locked in place.
- Leave the fringe long and untrimmed at first. You can always cut it shorter once it’s hanging and you can see the real length.
The layering is really just the same V shape repeated at different sizes, so once you’ve made one, the rest is just repetition.
3. A Zigzag Pattern That Proves Macrame Doesn’t Have to Stay Neutral
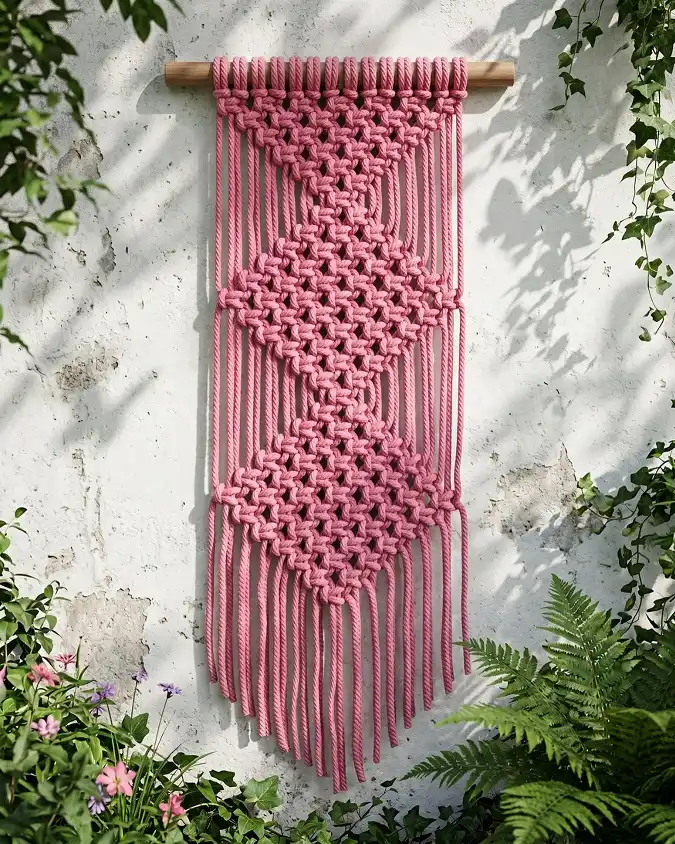
Dyed cord changes everything about how a beginner pattern reads. Here the same basic diagonal knotting most people learn first gets picked up by a rose pink cord, and the zigzag rows suddenly look less like a craft project and more like wall art.
The pattern itself is simple diagonal clove hitches worked back and forth, which makes it a solid second pattern to try once the diamond lattice feels easy.
What works here:
- The color does the heavy lifting. Plain diagonal knots in pink read as intentional and modern instead of plain.
- Mixed cord thickness adds texture. A thicker twisted cord runs alongside the thinner knotted strands, so the fringe doesn’t look flat.
- Three even zigzag bands. Repeating the same diagonal three times keeps the piece easy to plan and easy to knot in one sitting.
- A short, simple dowel. Nothing distracts from the color, so the wood stays plain and thin.
A single saturated color keeps the knot pattern readable. Ombre cord can hide the diagonals you worked hard to tie.
Three rows of the same diagonal knot stack cleanly and keep the counting simple as you go.
A twisted rope-like cord dropped in with the knotted strands gives the fringe more depth once it hangs.
4. Two Curved Braids and a Bead Strand for a Statement Centerpiece
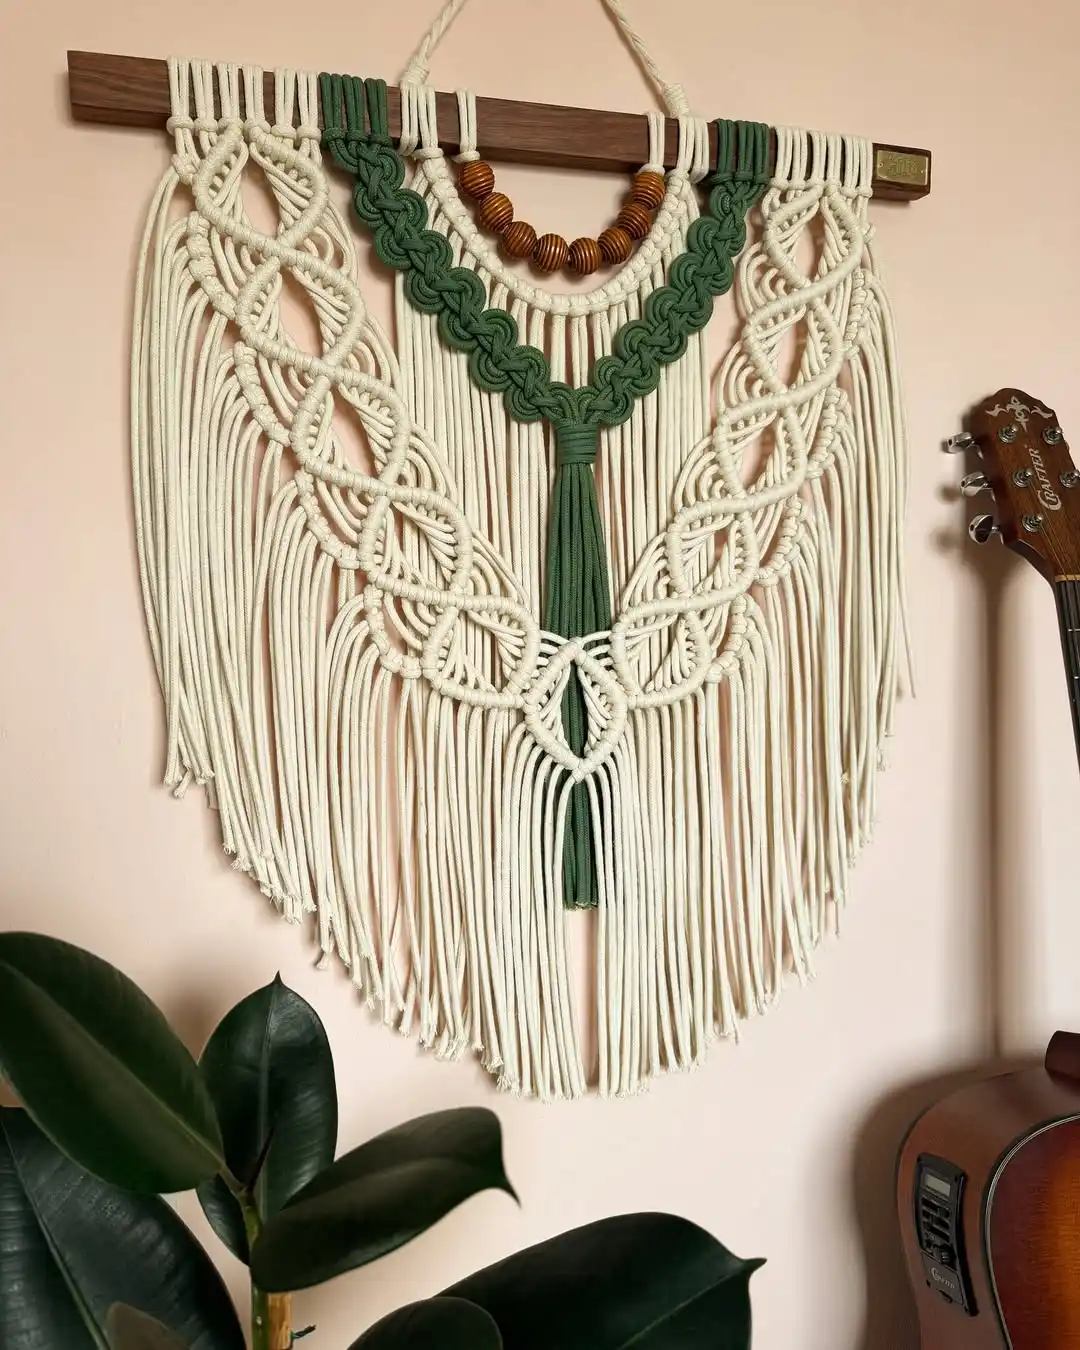
Wood grain gets to be part of the design here instead of hiding behind it. A dark stained dowel anchors two feathery cream wing sections, but the real focus sits in the middle: a pair of curved braided ropes in forest green, hung with wooden beads, dropping into a single tasseled point.
It’s a good next project once you’ve got the diamond lattice and diagonal knots down, since it introduces a braided rope element you haven’t used yet.
Things to notice before you start:
Subscribe to DIY Craft Bloom
Get updates on the latest posts and more from DIY Craft Bloom straight to your inbox.
- The wing sections on either side are just the diamond lattice pattern from before, mirrored and pulled to the outer edges
- The green braid isn’t knotted macrame at all, it’s a simple three strand braid, which makes it an easy add even for a first timer
- Wooden beads slide onto the center cords before the final knot locks them in place
- Fringe is left uneven and slightly frayed at the ends for a softer, worn in look
If braiding rope sounds intimidating, it isn’t. It’s the same braid you’d use on hair, just thicker and with cotton cord.
5. Twisted Vertical Cords That Look Like a Field of Grass
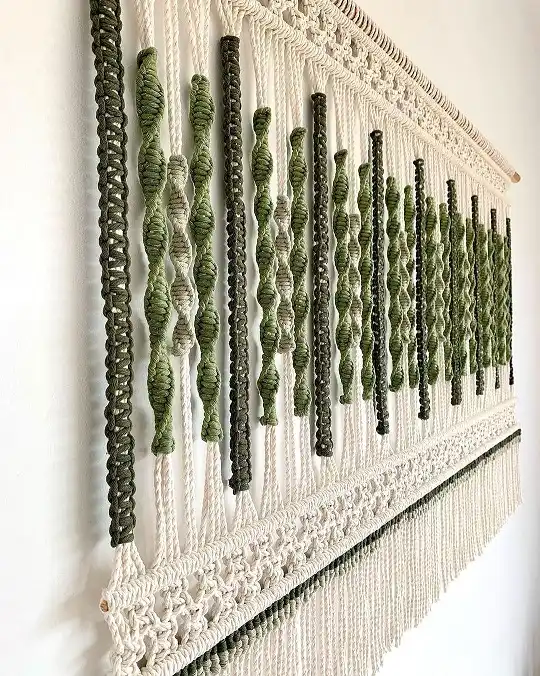
Shot from the side, this one shows off something flat photos miss: real dimension.
Each hanging strand is spiral wrapped or double half hitched into its own twisted rope, colored in shades of moss and olive so the whole row reads like grass caught in the wind.
Below it, a wide band of clustered knots and shell-like scallops finishes the piece before the loose fringe drops.
What’s actually happening here:
- Every vertical strand is a spiral knot, made by tying the same half hitch on one side over and over, which naturally twists the cord
- Alternating dark and light green cord down the row is what creates the sense of movement
- A dense knotted band separates the twisted section from the plain fringe, giving your eye a place to rest
- The whole piece is wide and shallow rather than tall, so it reads more like a headboard accent than a single focal point
Spiral knots are one of the easiest techniques to learn since it’s really the same knot repeated, but getting the color placement right takes some planning before you start tying.
Spiral knots in two shades of green turn one simple technique into something that reads as texture, not just cord.
6. Rust Terracotta Turns a Beginner V Pattern Into a Bold Statement
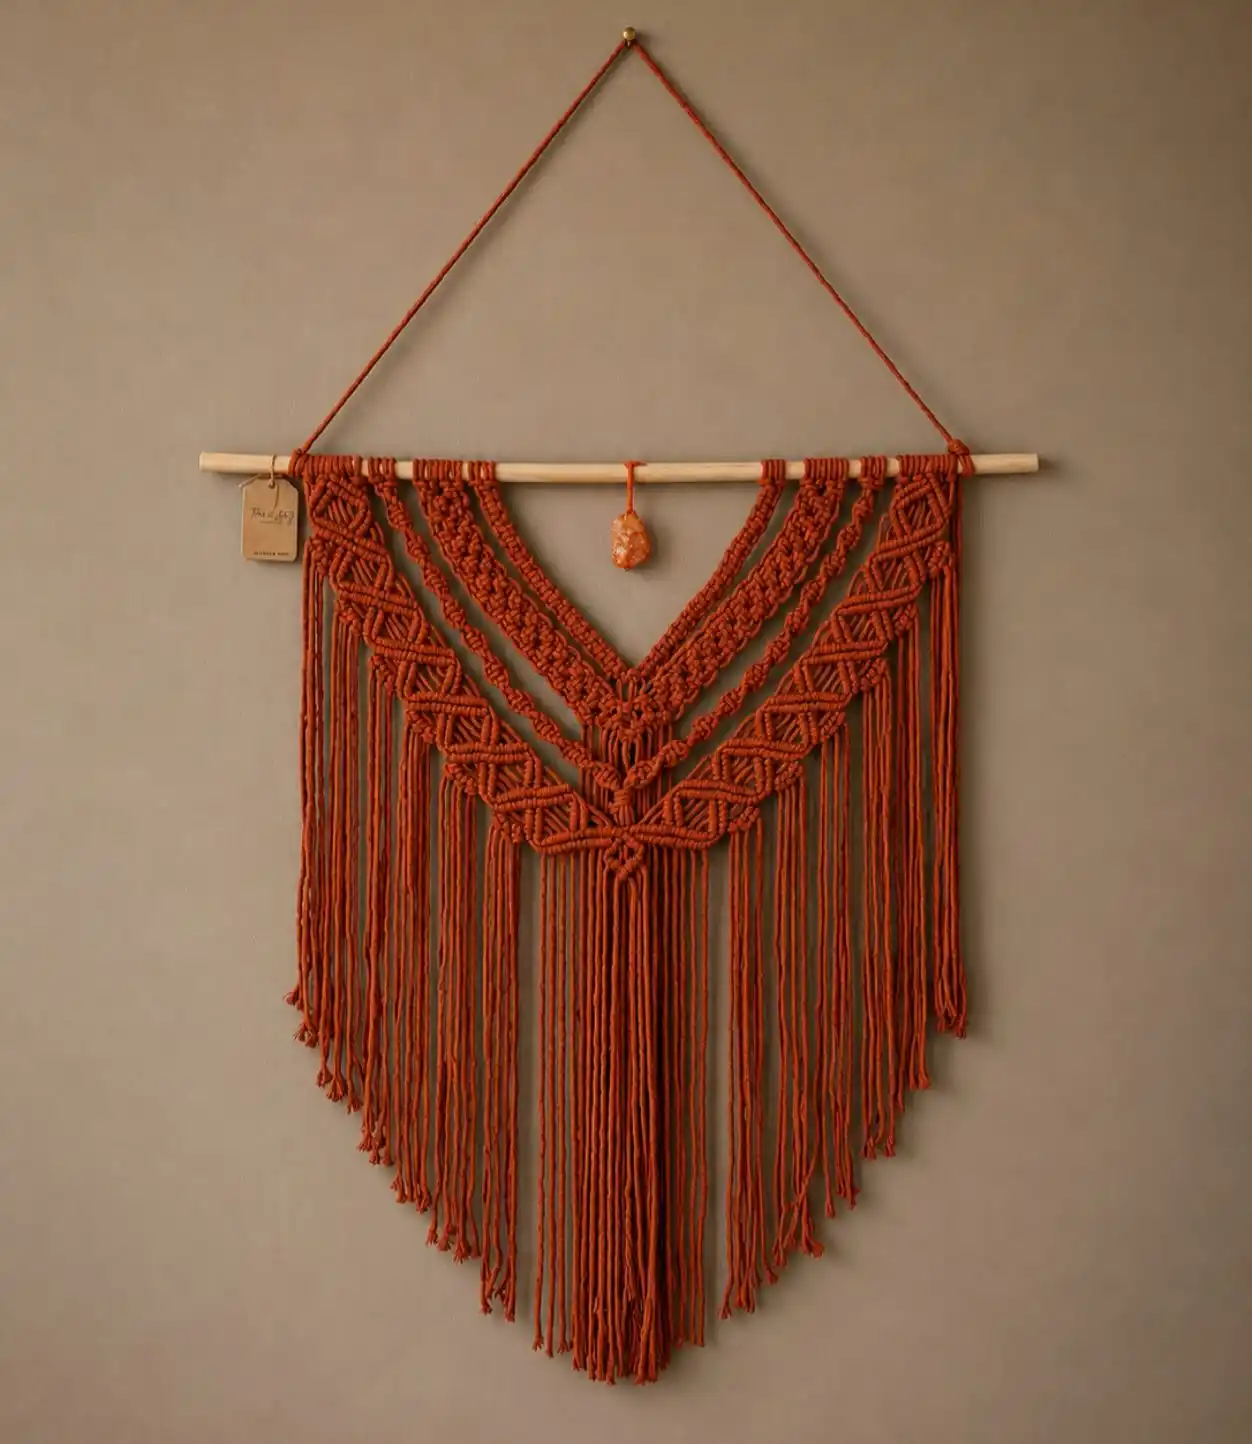
Color can carry a simple pattern a long way, and this one proves it. Underneath the deep rust dye, the technique is nothing new: it’s the same layered diamond and chevron rows from the first entry, just knotted tighter and stacked in three narrowing tiers.
What sets it apart is the long cord triangle hanger looping up to a single nail, plus a small polished stone dangling in the open V at the top.
A few details that make this one feel finished:
- The stone hangs from its own short cord, dropped after the knotting is done, so it swings freely inside the negative space
- A simple round wood dowel is left completely bare, letting the deep color of the cord be the only real decoration
- Three stacked V rows, each slightly smaller, keep the piece from feeling like one flat block of fringe
- The hanging cord itself matches the wall hanging color, so the whole thing reads as one continuous piece from nail to fringe tip
One thing to watch for: dyed cord can bleed a little the first time it gets damp, so keep a piece like this away from steamy bathrooms or direct sun that could fade the color unevenly.
Tied on its own short cord in the open V, it adds a focal point without any extra knotting.
Same dyed cord runs from the dowel to the nail, so the piece reads as one solid color top to bottom.
Repeating the V at three shrinking sizes gives depth without needing a new knot technique.
7. A Full Half-Moon Scallop Edge Dressed Up With a Tassel Fringe
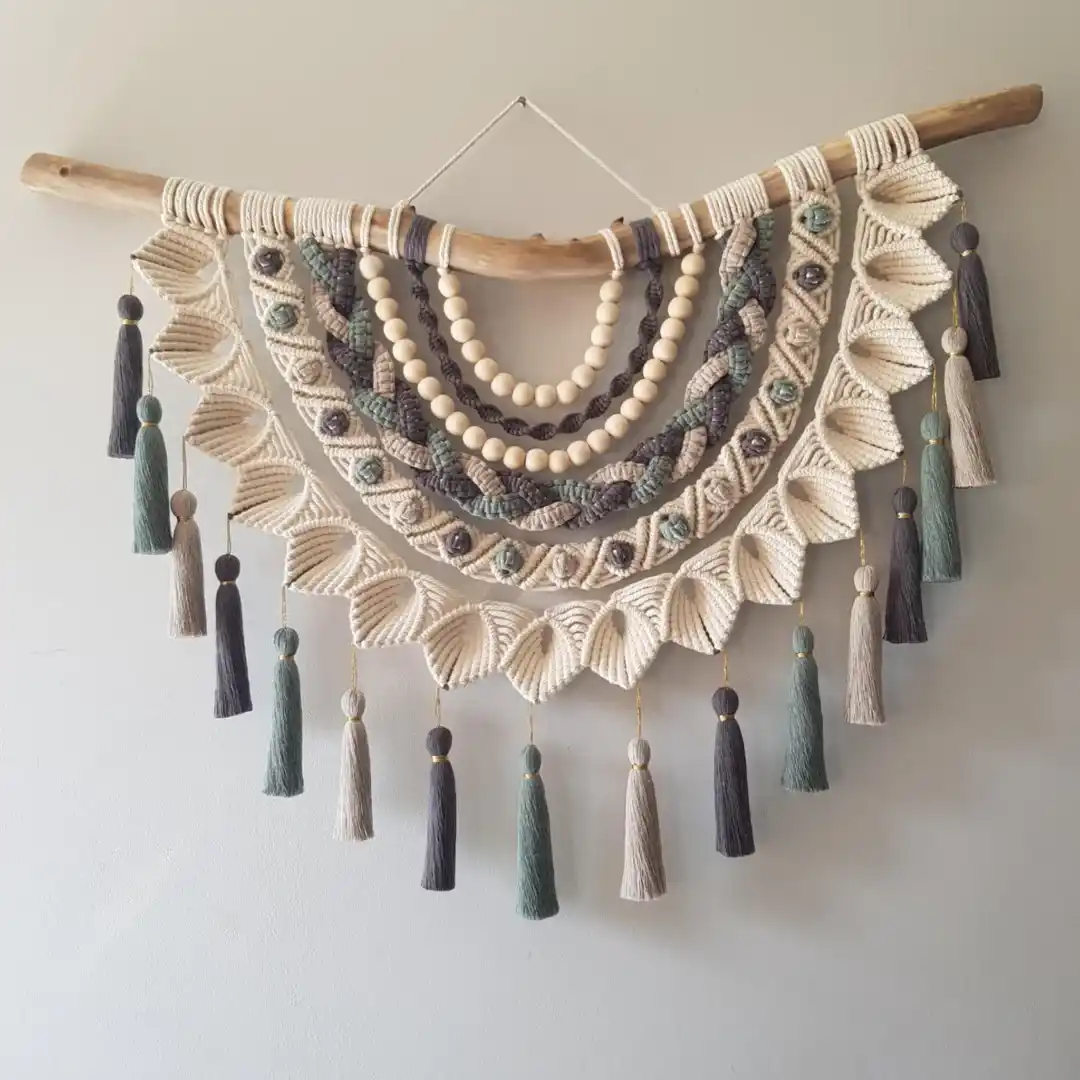
Here’s a pattern that skips the pointed V shape entirely. Instead, dozens of small looped petals fan out into a wide half circle, curved to follow the natural bend of the driftwood above it.
Layered inside that scalloped edge sit a few extra details stacked one behind the other: wooden beads on a plain cord, a braided rope in gray, and a second braid in sage, before a full row of chunky two-tone tassels drops below the curve.
Why the scallop shape reads as more advanced than it actually is:
- Each petal is just a small loop of double half hitch knots, repeated dozens of times in a row
- The curve comes from the branch itself, not from anything tricky in the knotting
- Layering beads and braids inside the curve is optional, so you can start with the scallop edge alone and build up from there
8. Four Mini Patterns Grouped Into One Gallery Wall
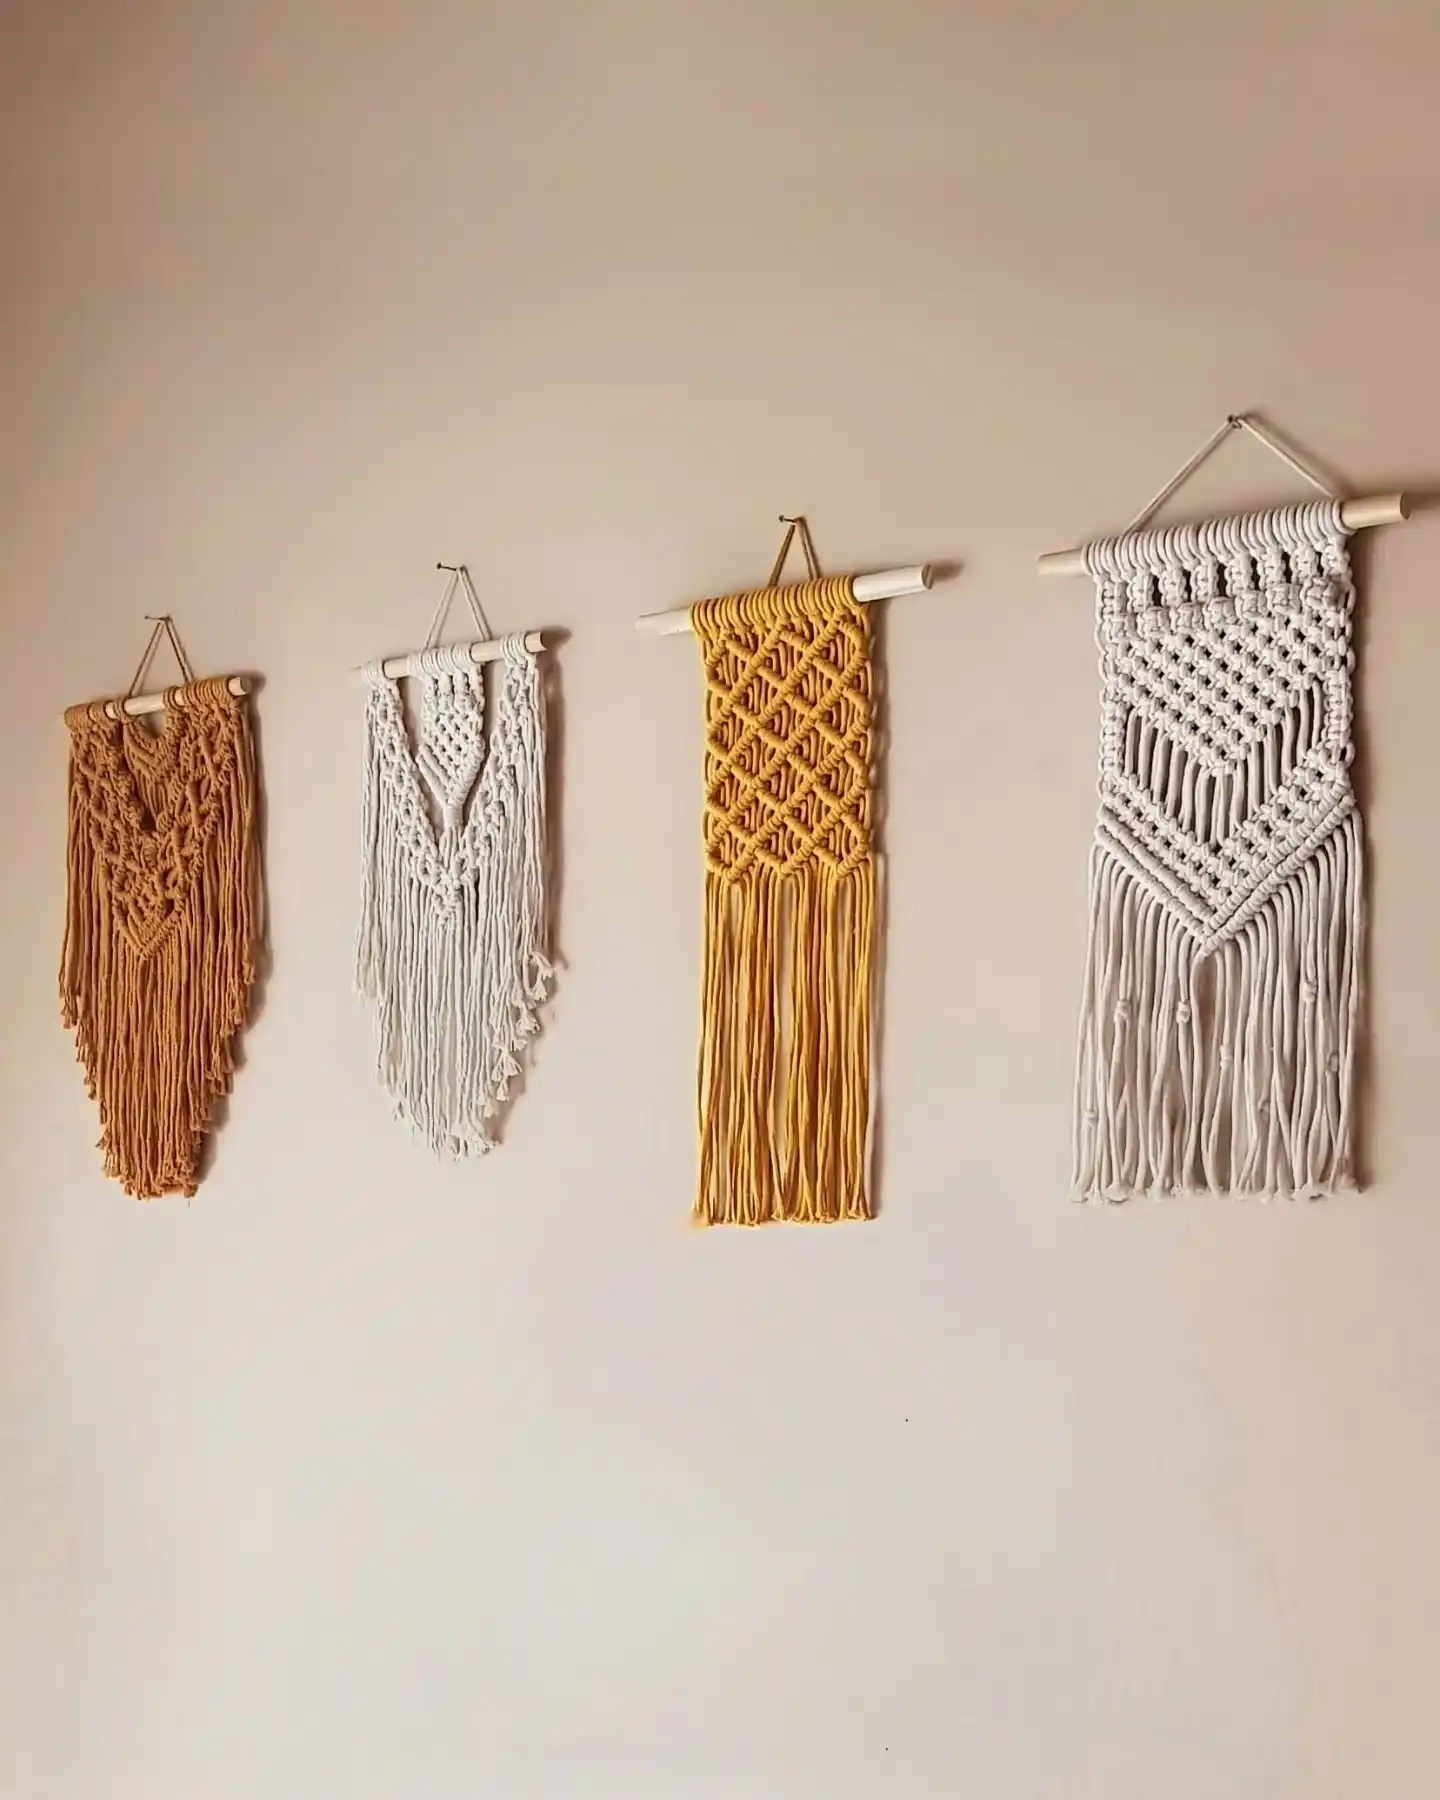
Sometimes the best beginner project isn’t one big piece, it’s four small ones. Lined up together, a rust diamond lattice, a plain cream chevron, a tight yellow diamond grid, and a fuller cream lattice with a lace-like top row all sit at slightly different heights, turning simple practice pieces into an actual gallery moment on the wall.
This is a genuinely smart way to learn:
- Each piece uses a different basic knot pattern, so you’re practicing several techniques instead of repeating one over and over
- Staggering the heights and widths keeps the grouping from looking like a matched set, even though the color families relate
- Smaller pieces use less cord and take less time, which makes them a low pressure way to try a new pattern before committing to something large
- The mustard and rust tones tie the group together visually, while the two cream pieces keep it from feeling too busy
If you’re overwhelmed by which single pattern to start with, this is your answer. Make a few small ones and let them build into a collection.
9. Rainbow Ombre Fringe Paired With a Beaded Rainbow Arc
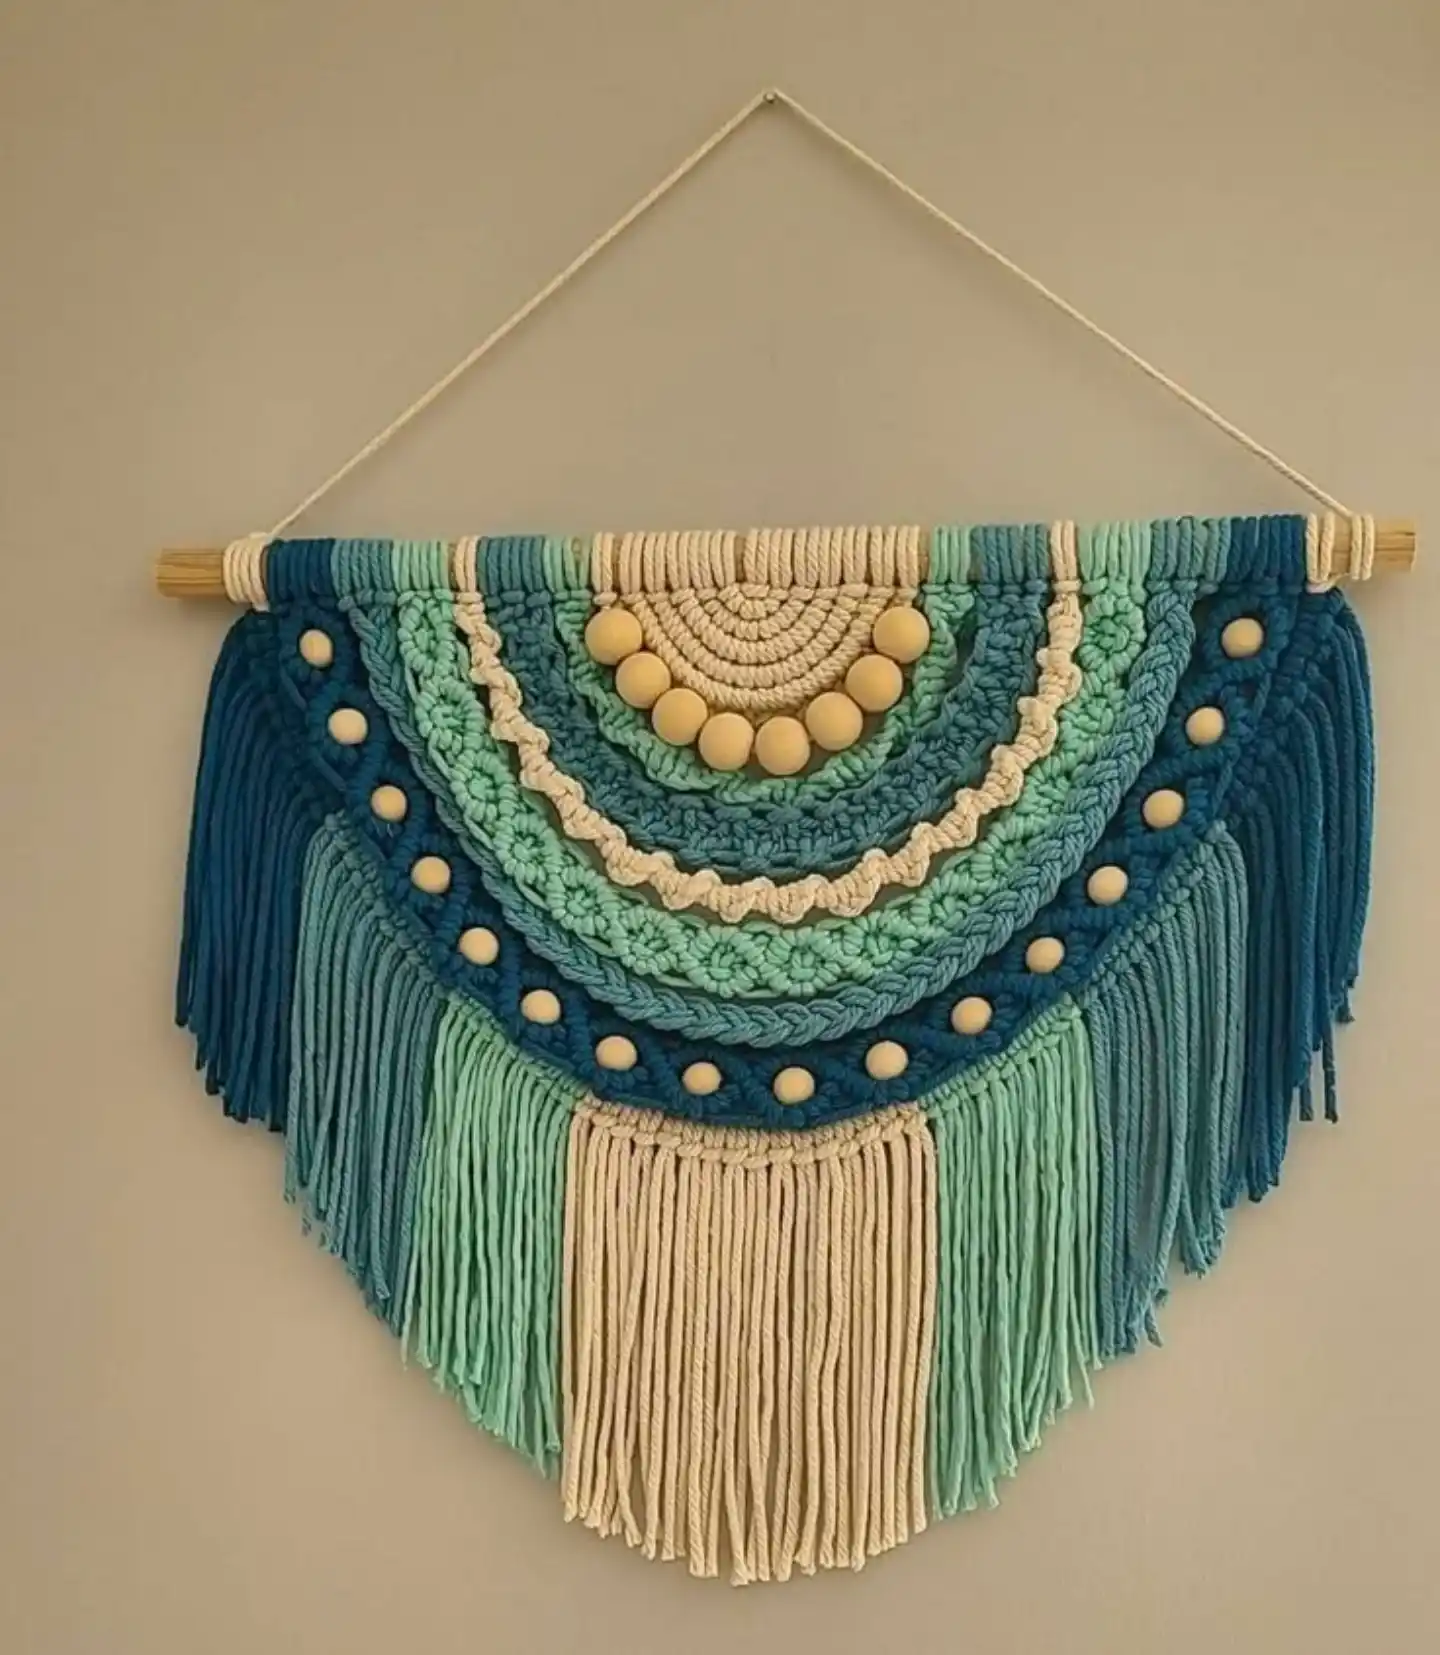
Blue and seafoam cord fade into each other here in wide vertical blocks, an easy trick that makes a beginner project look far more advanced than it is.
Above the fringe, five curved rows of clove hitch knots stack into a rainbow shape, finished off with a string of wooden beads sitting right at the center like a smile.
To try this at home:
- Split your cord into color groups before you start tying, so the blue, teal, and cream sections are already sorted and ready to grab.
- Knot the curved rows first, working each color band as its own short arc rather than one continuous line.
- Add wooden beads along the lowest arc last, threading them onto a few center cords before locking them in with a final knot.
- Let the fringe fall in solid color blocks straight down, resisting the urge to mix strands between sections.
The color blocking is really the whole trick. Keep each hue in its own lane and the piece reads as intentional, not accidental.
Subscribe to DIY Craft Bloom
Get updates on the latest posts and more from DIY Craft Bloom straight to your inbox.
Sort cord by color into separate bundles before you begin.
Keep each fringe color in its own solid vertical block.
Don’t randomly mix cord colors strand by strand.
Don’t crowd the beads too close together on the arc.
10. A Wide Horizontal Pattern With Hanging Crystals Between the Diamonds
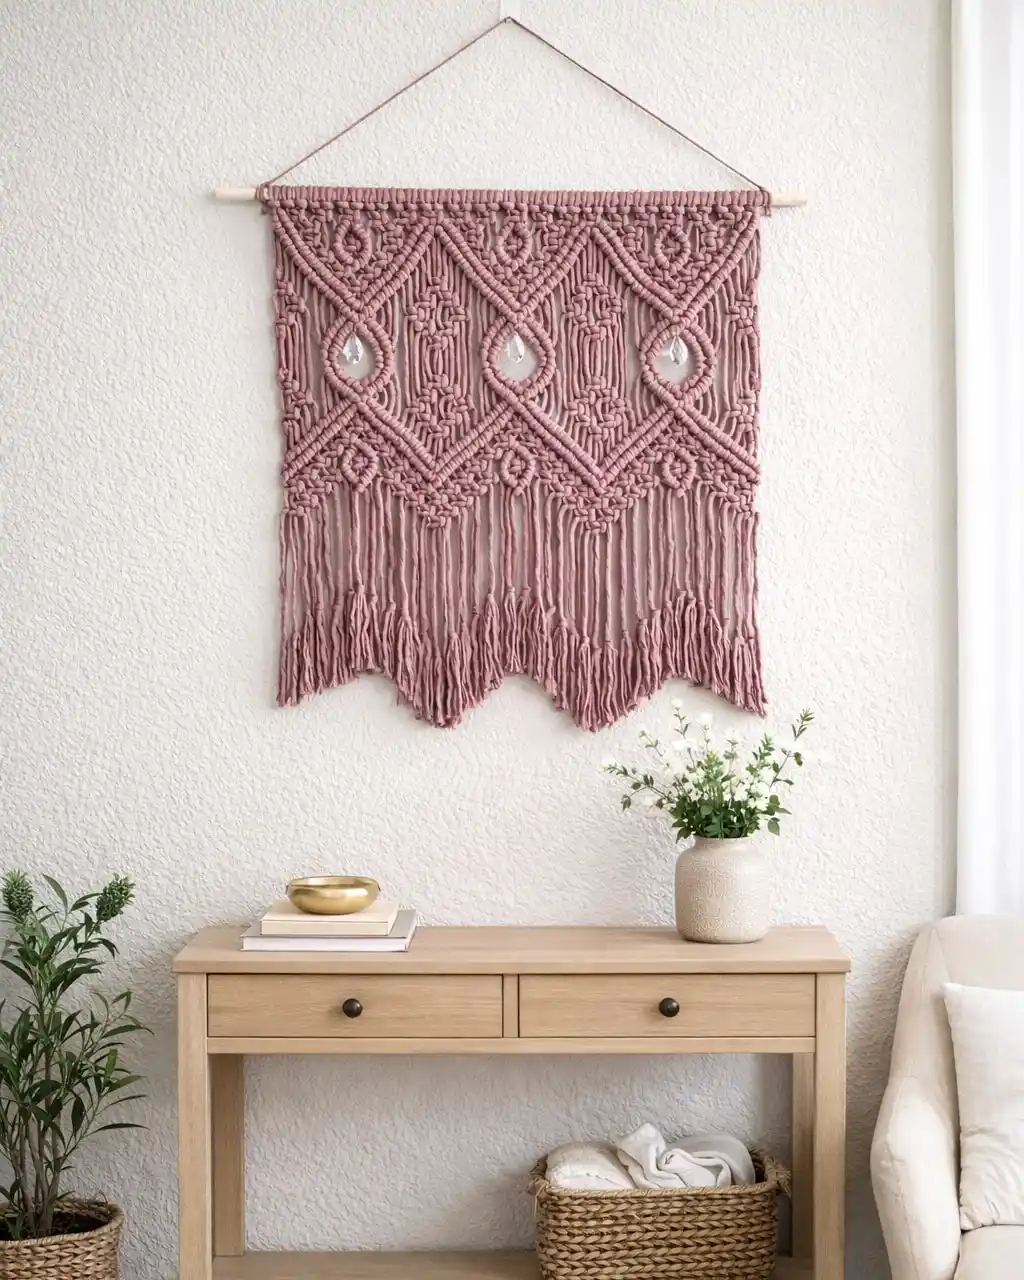
Turning the pattern sideways changes how it works in a room. Instead of one tall narrow piece, this project stretches wide and short, built from three connected diamond motifs in dusty rose that repeat side by side rather than stacking top to bottom.
A small glass crystal hangs inside each open diamond, catching light against the plain cord around it, and the bottom fringe is trimmed into soft scallops instead of left loose.
| Tall pointed style | Wide horizontal style |
|---|---|
| Works best above a bed or sofa. | Works best above a console table or shelf. |
| Fringe left long and loose. | Fringe trimmed into a scalloped edge. |
| Pattern repeats once, tapering down. | Pattern repeats three times, side by side. |
11. Banded Stripes Alternate Diamond Mesh With Solid Color for a Headboard-Ready Piece
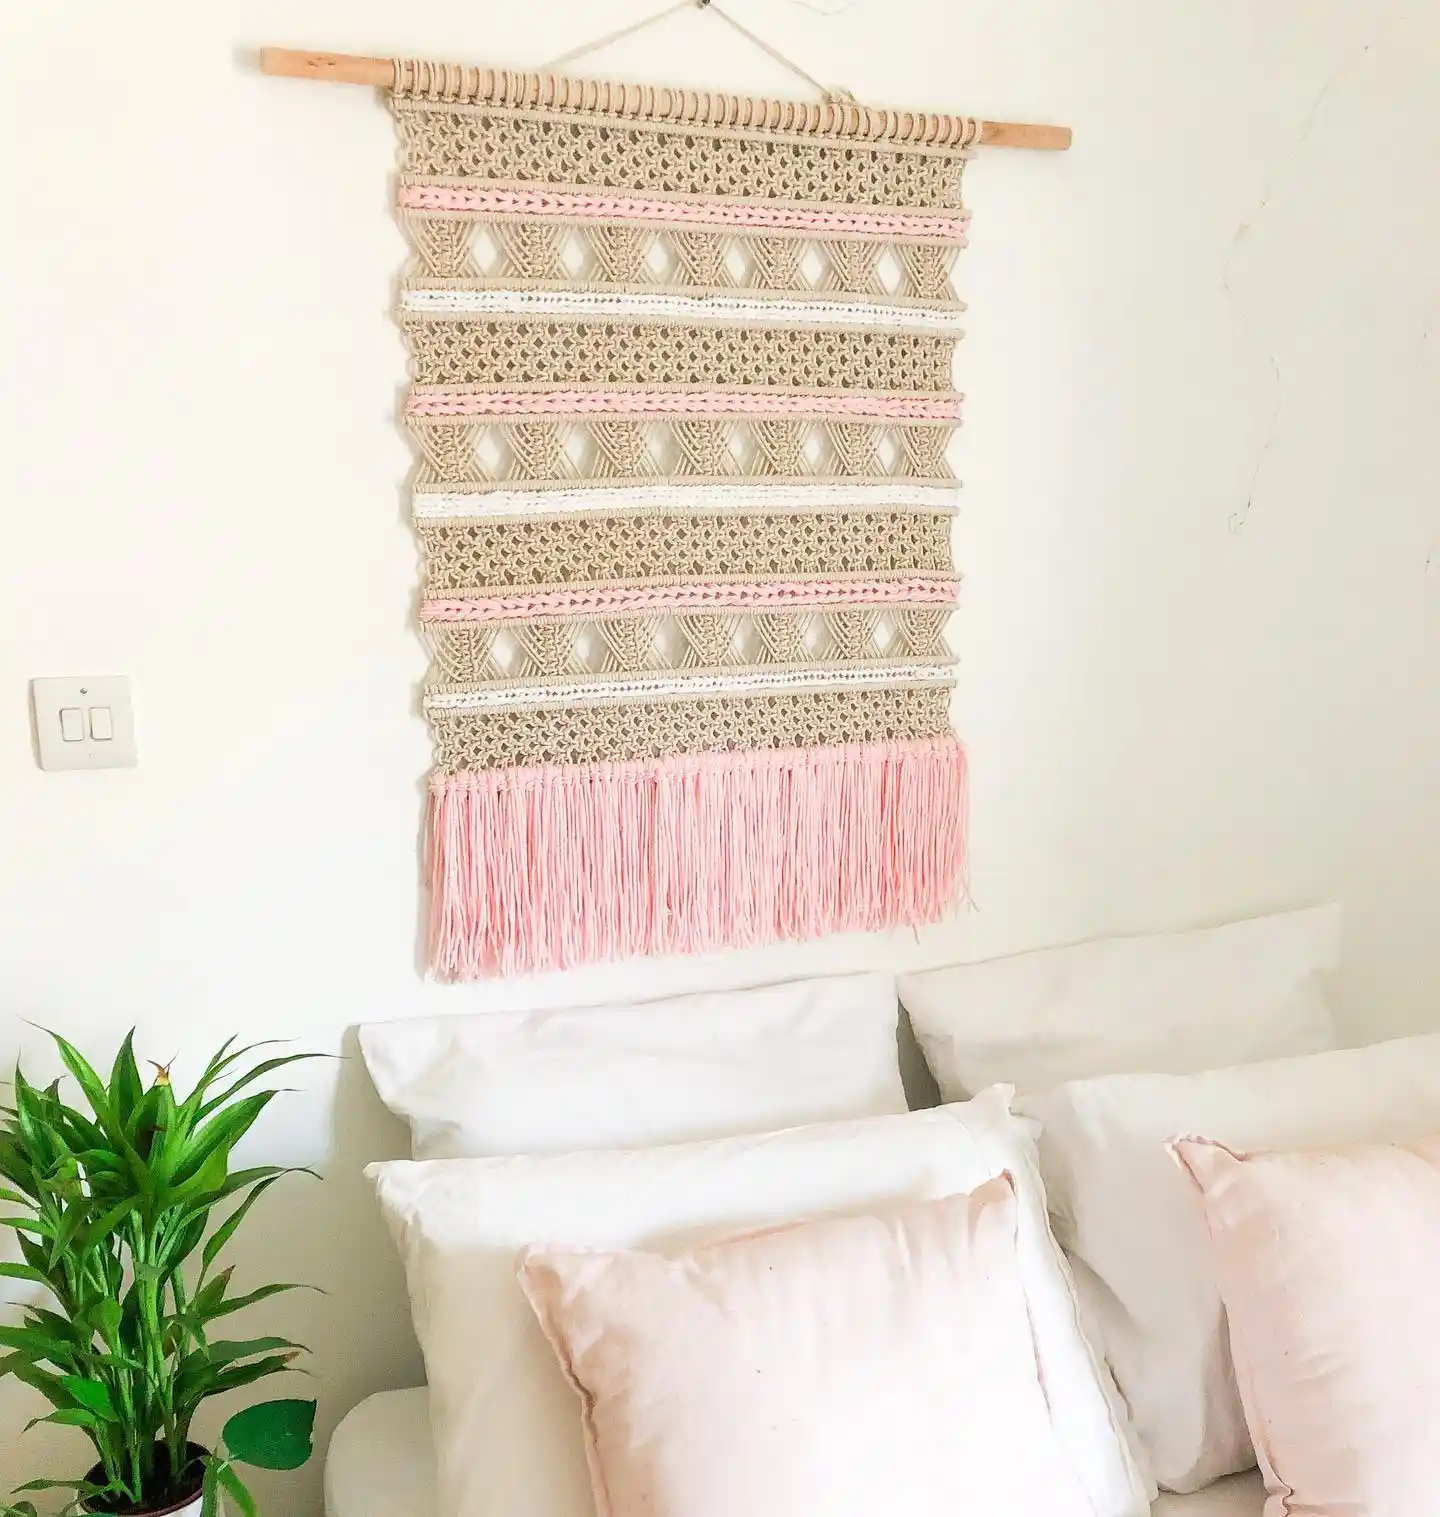
Rows do a lot of organizing work in this pattern. Open diamond mesh knotting alternates with narrow solid bands in blush pink and cream, stacked one after another down a rectangular panel that stays the same width from top to bottom instead of narrowing into a point.
It’s a smart pick for above a bed, since the straight rectangle shape fits a headboard’s lines better than a tapered V would.
Notable choices in this one:
- Solid bands break up the open mesh. Without them the diamond pattern would run together into one busy texture, but the pink and cream stripes give the eye somewhere to rest.
- The rectangle stays flat. No tapering means it reads as more structured and tailored than a pointed piece.
- Pink fringe only at the very bottom. The color is saved for the last row, so it reads as a deliberate finishing touch rather than being scattered throughout.
- A short, thin dowel wrapped in matching cord. Even the hanging rod picks up a hint of the same palette.
12. A Brown and Cream Fringe Contrast With Layered Bead-Tipped Tassels

Two tones of fringe sit side by side without ever blending in this one, and that contrast is what makes it pop against a plain wall.
A short brown chevron section drapes just below the driftwood, framed by longer cream cord that runs the full length underneath.
Down the center, a row of tassels tipped with wooden beads hangs at staggered depths, giving the flat fringe some real dimension.
To build something similar:
- Tie your cream cord first as the long base layer, letting it run the full drop length from the branch to the floor line.
- Add a shorter brown section on top, knotted only partway down so the two colors stay visually separate instead of merging.
- Thread wood beads onto short lengths of cord and knot a tassel below each one.
- Hang the beaded tassels at slightly different lengths down the center so they don’t line up in a flat row.
Skip trimming the fringe evenly here. Part of what makes this piece feel handmade is the uneven cascade of tassels dropping past the main fringe line.
Knot the full length cream cord first so it sets the overall drop of the piece.
Knot brown cord only partway down so both colors stay distinct instead of fading together.
Hang beaded tassels at uneven lengths down the center for a handmade, cascading finish.
13. Beaded Swags Layer Over Long Cream Fringe for a Softer, Airy Finish
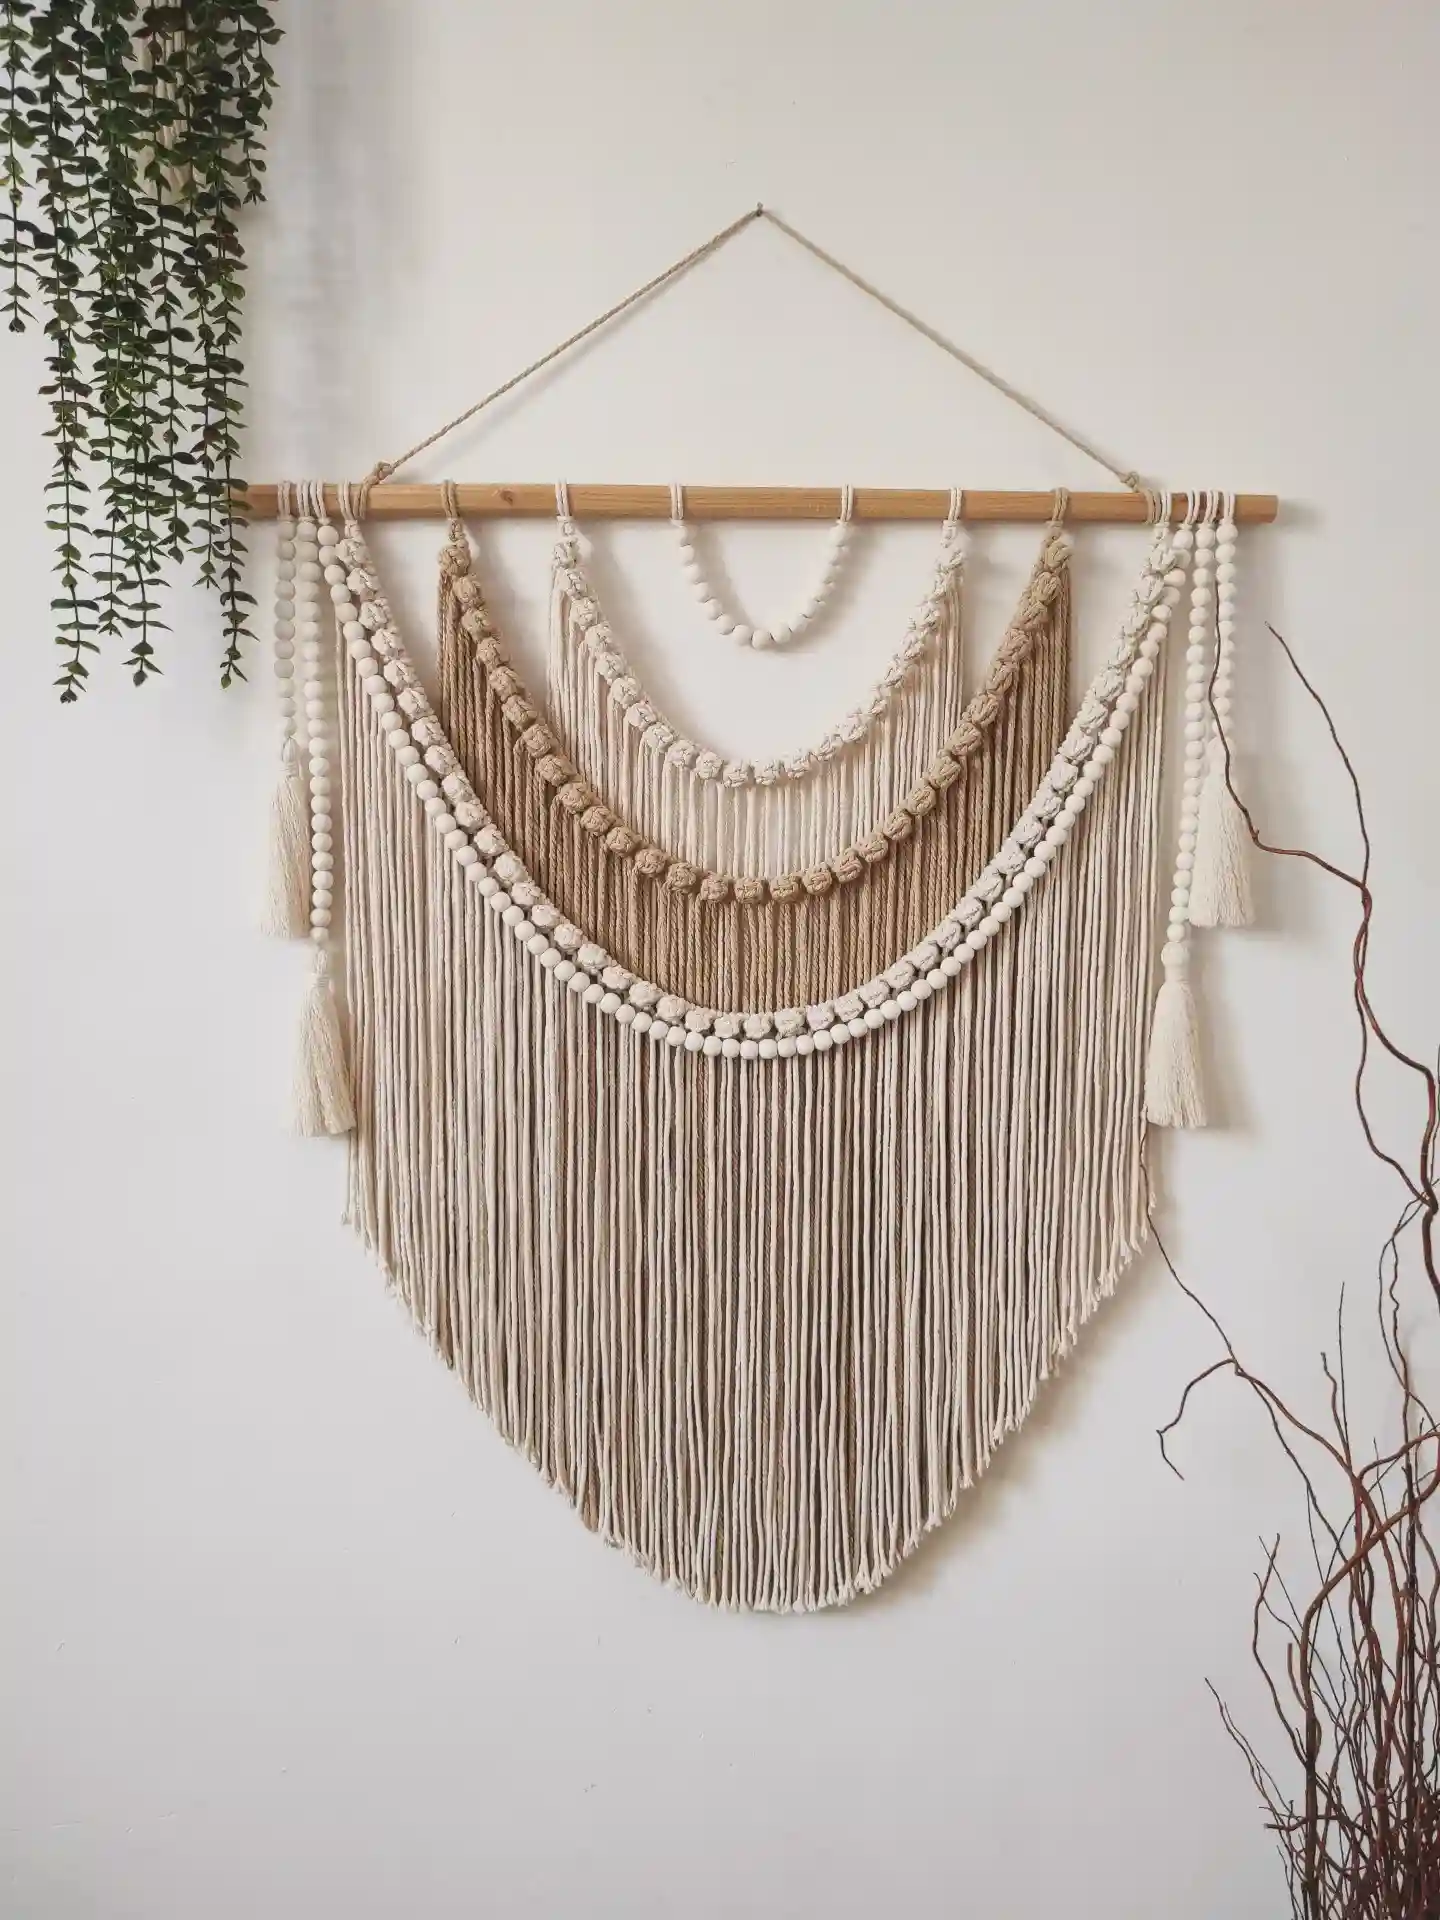
Beads take center stage in this last one, and the knotting steps back to let them.
Two curved rows of natural and white wood beads swag down like garlands under a plain wood dowel, with a third loose beaded strand dropped even lower in the open center.
Below all that, the fringe stays completely plain, long and undivided, so nothing competes with the beadwork up top.
Notice how restrained the rest of the piece is:
- No dyed cord anywhere. Every color shift comes from the beads themselves, cycling between raw wood, white, and marbled tones
- Tassels made of the same beads used in the swags hang off both outer edges, tying the whole composition together
- The fringe underneath is left totally unknotted below the top section, so the eye has somewhere calm to land after the busy beadwork
- A single loose beaded string drapes free in the open V, unattached at the bottom for a bit of movement
This one is proof that a beginner piece doesn’t need a single fancy knot pattern to look finished. Half the work here is stringing beads, not tying cord.
conclusion
If you’re new to knotting, start simple. The diamond lattice and diagonal chevron patterns from the first few entries show up again and again throughout this list, just dressed differently with color, beads, or a curved branch.
Master those two knots and you can recreate almost everything here. Pick one pattern, gather your cord, and give yourself an afternoon to get comfortable with the repetition.
Save this for the next time you’re ready to start a new macrame wall hanging project.