12 Macrame Keychain Ideas You Can Make in an Afternoon

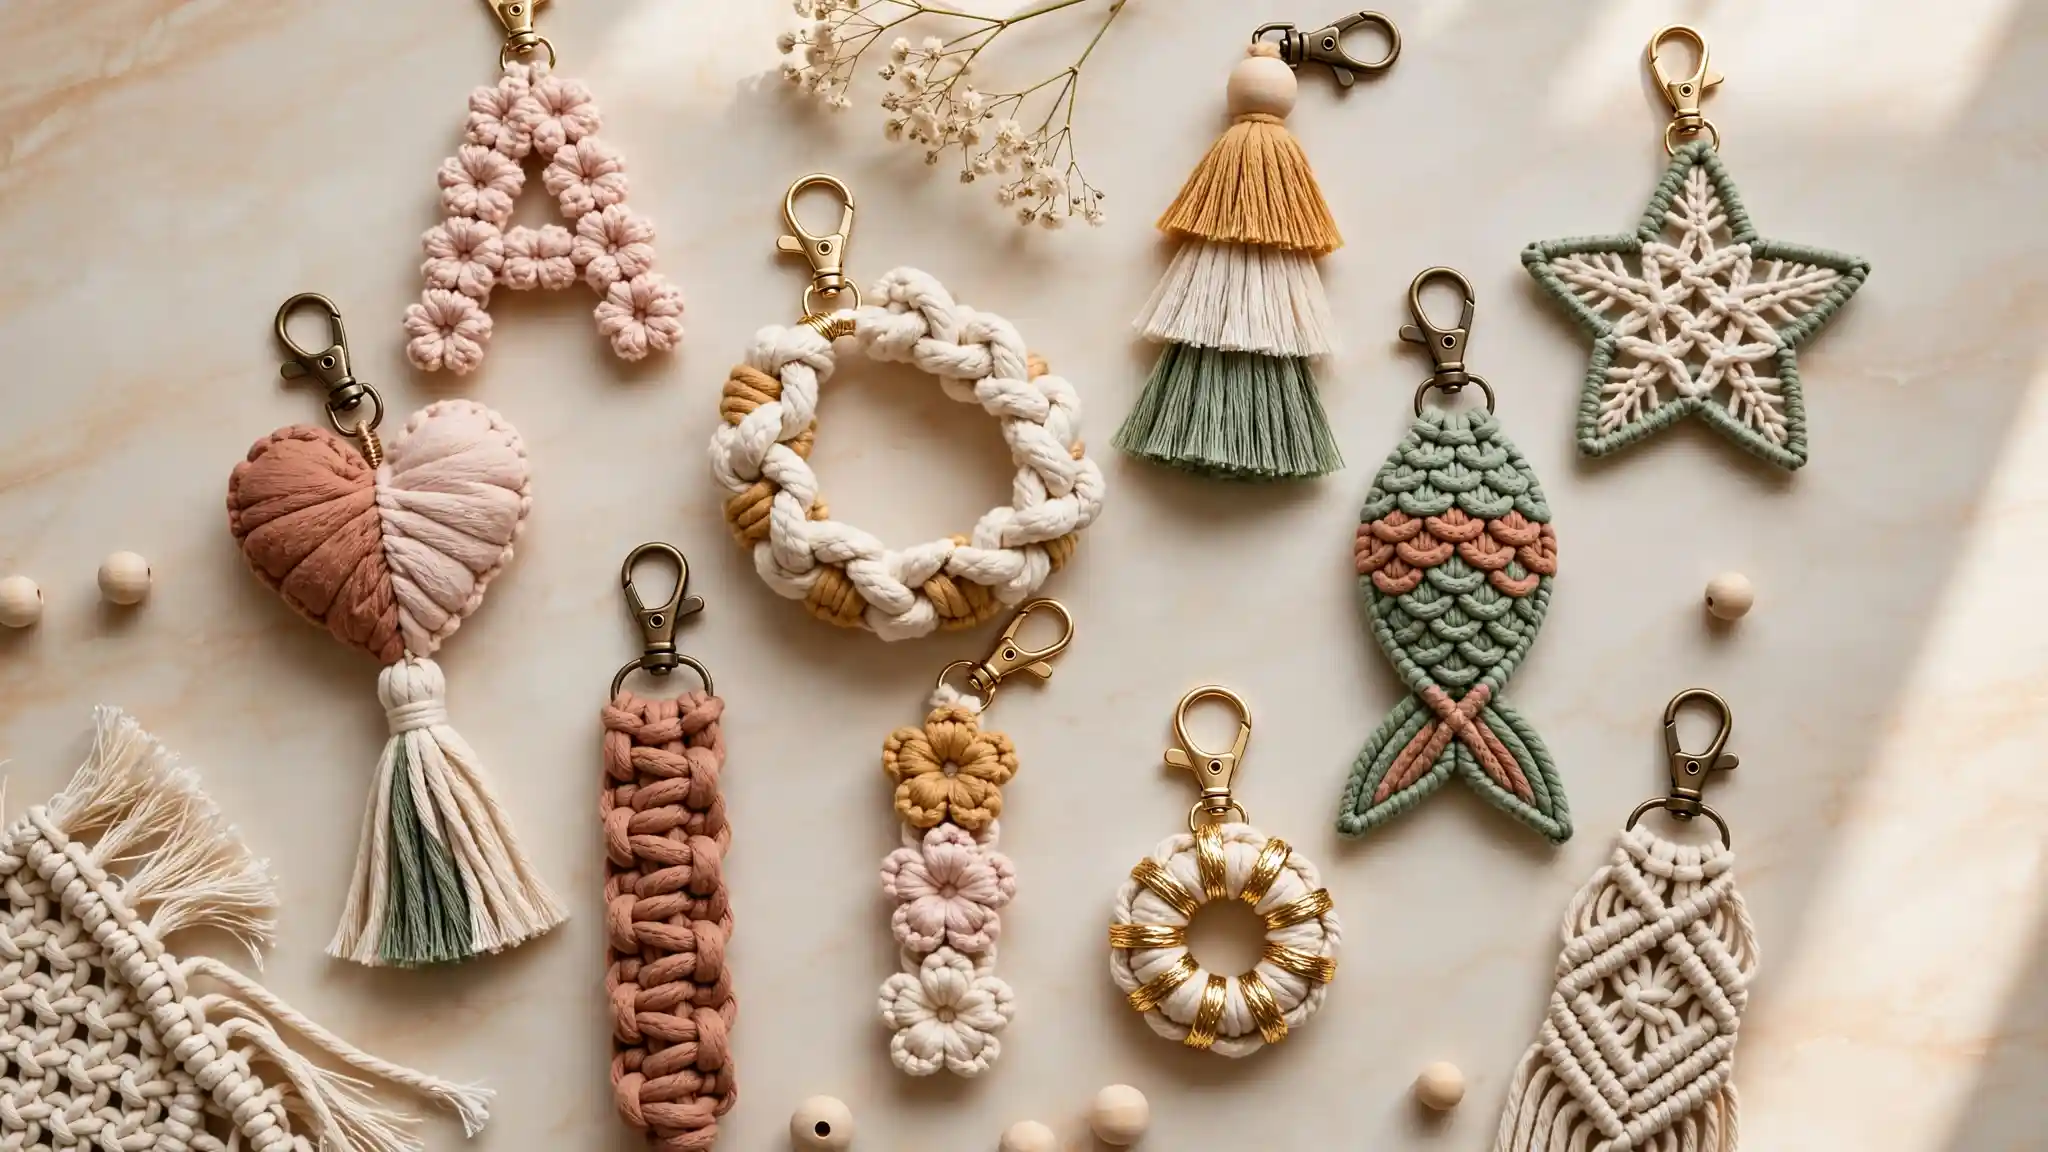
From letter charms to fish tails, coin knots to full pattern samplers, this roundup covers a real range of macrame keychain ideas without repeating a single build twice.
Every one of these started as somebody’s scrap bin project. A handful of leftover cord in a few colors, an afternoon, and a basic knot vocabulary that most macrame beginners already have.
What changes from piece to piece isn’t the technique so much as the decisions: which knot scale to use, how long to leave the fringe, whether to trim it or let it fall raw, and how far to push a single color palette before it needs a second one.
Some of these macrame keychain ideas lean tightly detailed, like the lattice stars and the letter charms built from tiny flower puffs.
Others lean fast and chunky, like the single-cord knot column that skips fine stitching entirely.
A few, like the earth-tone sampler and the tone-on-tone neutral set, are really lessons in how to make a whole batch read as one cohesive collection instead of scattered one-offs.
Whether you’re stocking a shop, planning gifts, or just working through a pile of cord, there’s a starting point here for wherever your patience and your color stash happen to land.
12 Macrame Keychain Ideas
1. Letter Charms Made From Tiny Flower Puffs
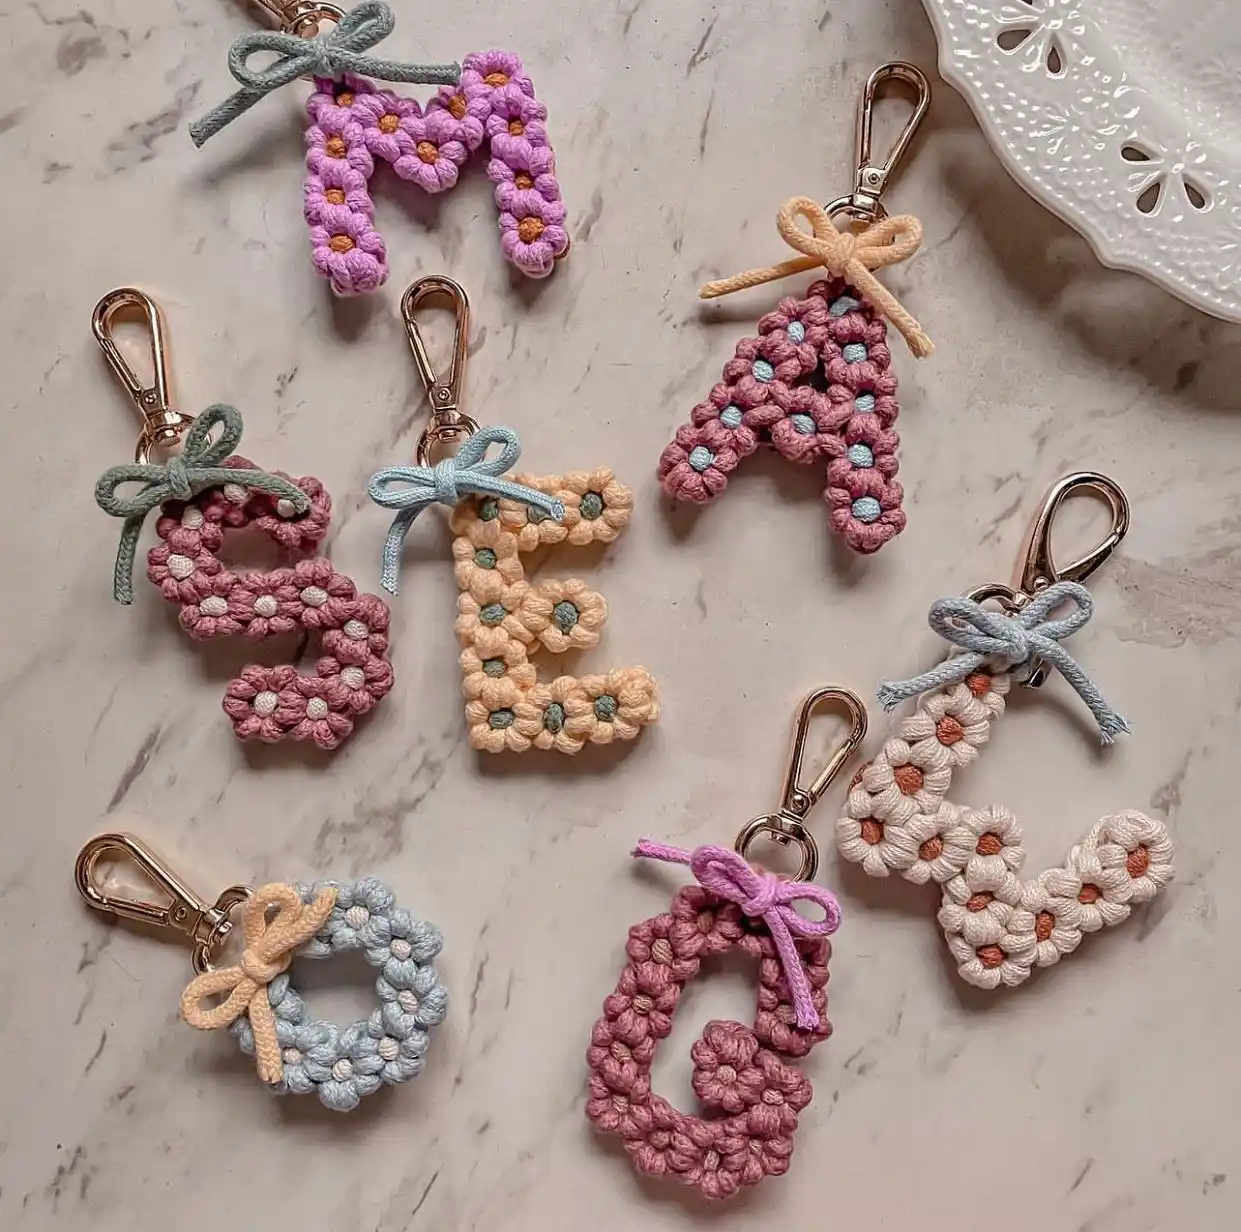
Instead of one big knot pattern, this idea builds the whole letter out of small flower shaped clusters, packed close together so the shape reads clearly even from across a bag.
Each flower gets a contrast color in the center, which is what makes the letters pop instead of blending into one solid blob.
A few things worth copying from this batch:
- The cord bow at the top isn’t just decorative. It hides the join where the flowers meet the clasp.
- Contrast dots (orange on cream, blue on mauve) do more work than a second yarn color would.
- Rounded letters like O and C use the same flower unit, just curved into a ring instead of a straight line.
- Gold lobster clasps read as more finished than plain jump rings, especially in pastel sets like this.
If you’re new to letter shapes, start with a straight letter (E, A, M) before trying a curved one. The curves take more flowers to fill in evenly.
2. Color-Blocked Tassels With a Wood Bead Finish
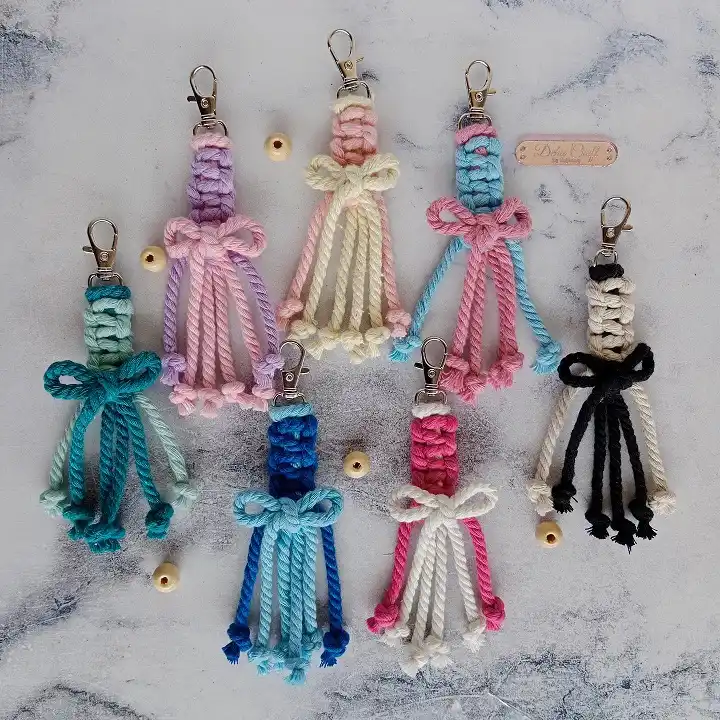
Braided knot pattern up top, loose tassel fringe below, a wrist bow tying it together. That’s the whole formula here, and it works because the color choices carry all the visual interest instead of the knotting.
Two ways people are running with this idea:
Solid color tassels (the teal, the navy, the hot pink) read bold and graphic, good for someone who wants their keychain visible in a crowded bag.
Ombre tassels (the lilac to pink, the peach to cream) feel softer and more gift shop worthy, better for a wedding favor or a birthday bundle.
The loose wood bead sitting next to a couple of the charms isn’t attached in this photo, but it’s a common add-on: thread one onto a tassel strand and knot below it so it can’t slide off.
Keep the top braid section tight and even. A loose braid is the one thing that makes an otherwise nice tassel look unfinished.
3. Flat Woven Stars, From Simple to Detailed
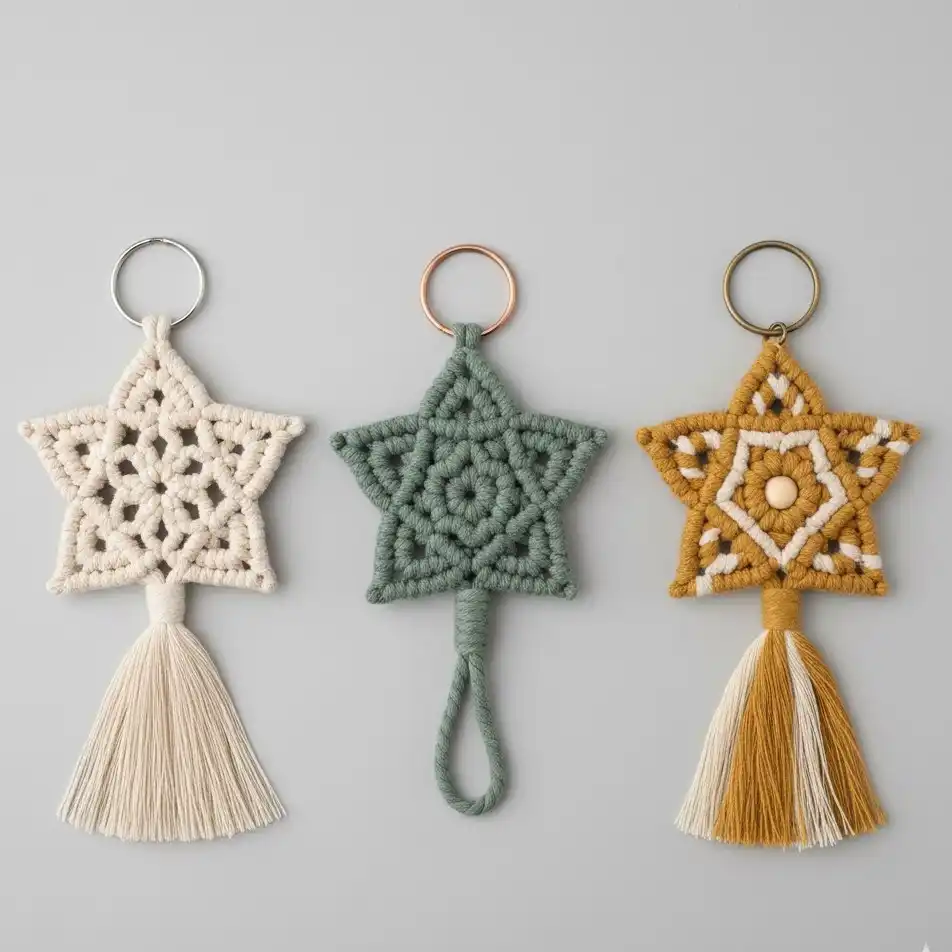
Star shapes turn a keychain into something that looks almost laser cut, except every line here is knotted by hand instead of machine cut. The three versions side by side show just how much the same star outline can flex.
The cream one on the left uses a dense lattice pattern packed with tiny knots, which takes the longest but gives the most detail.
The sage green middle one strips that back to open triangular gaps and a plain loop instead of a tassel, a good pick if fringe isn’t your thing.
The mustard one on the right adds a second layer, a smaller star knotted inside the first with a wood bead at the center, plus a two-tone tassel to finish it off.
None of these need a clasp. All three use a plain metal ring, so this is a solid option if you’re working with hardware you already have on hand.
4. Two-Tone Puff Hearts With a Loose Tassel Tail
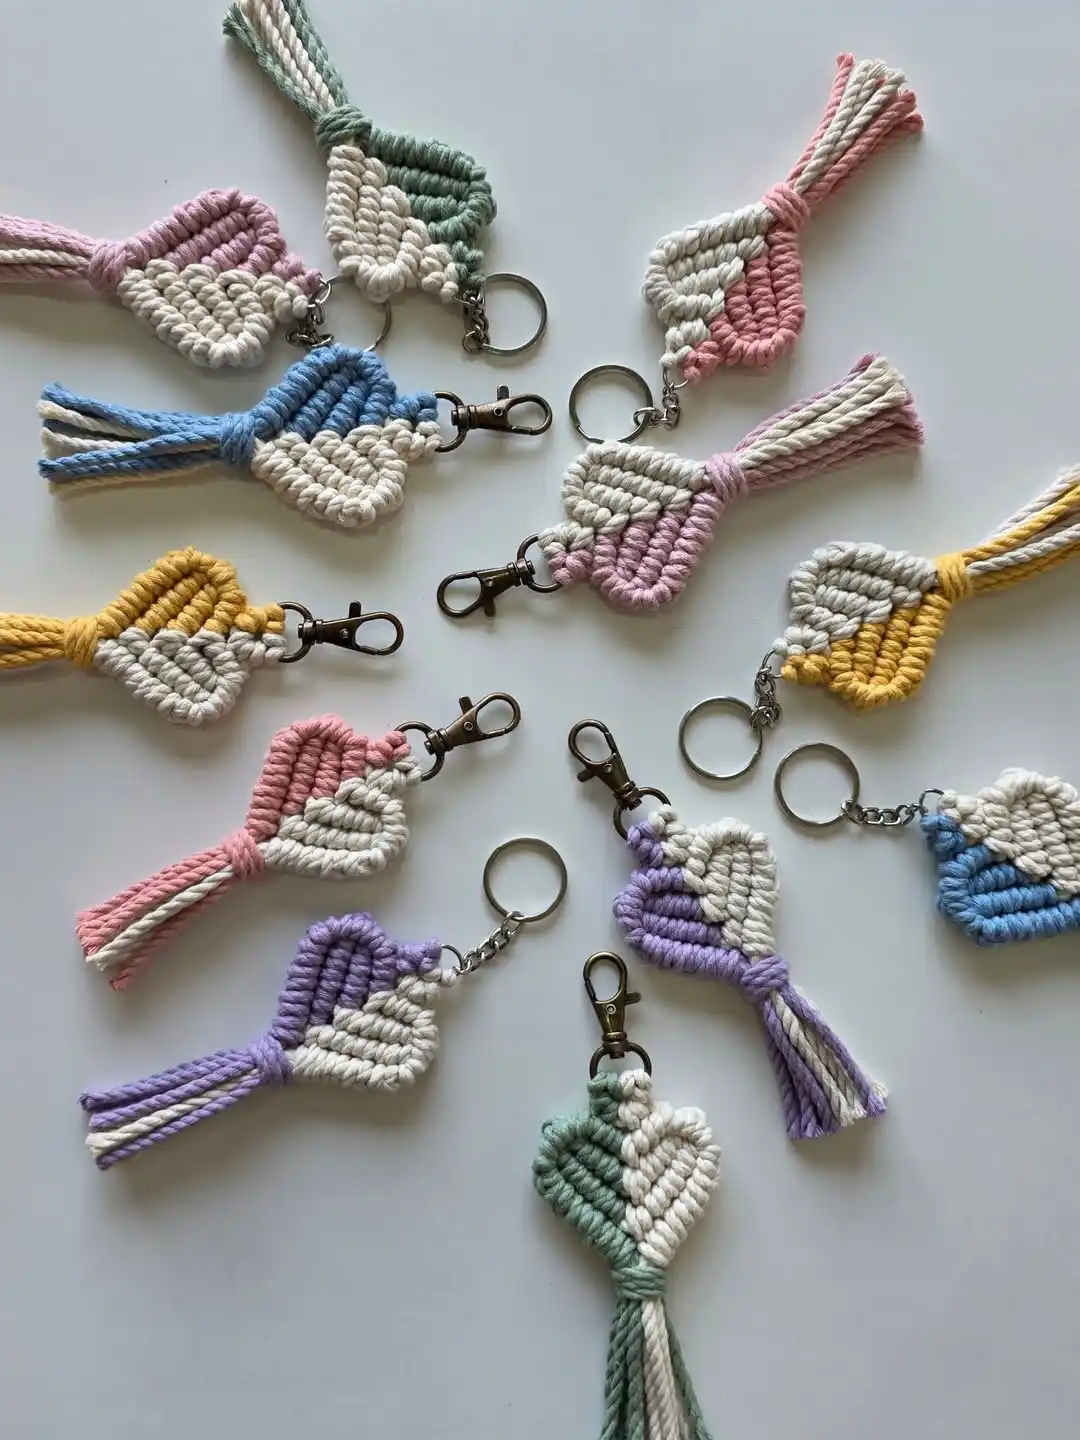
Ten of these laid out in a circle, and every one follows the same build: a solid color heart worked in dense puff stitches, a white or cream stripe running through the middle, and a loose two-strand tail hanging off the bottom point.
What’s actually making this pattern work:
- The white stripe. It splits every heart into two color blocks instead of one flat shape, so the heart outline stays readable even in a busy photo.
- The stitch density. These are tightly packed rows, not open lattice work, which gives the heart weight and a slightly plush feel.
- The tail length. Short on some (yellow, blue), long on others (green, purple). Longer tails read more boho, shorter ones stay closer to a classic bag charm.
- Mixed hardware. Bronze clasps, silver rings, and chain extensions are all used across the set, proof this pattern doesn’t need matching metal to look cohesive.
Pick one accent color and let white do the rest of the work. Two saturated colors together tends to fight instead of pop.
Splits the heart into two clean color blocks.
Gives the heart shape and a slightly plush texture.
Subscribe to DIY Craft Bloom
Get updates on the latest posts and more from DIY Craft Bloom straight to your inbox.
Adjust the length to shift the mood from boho to classic.
5. One Pink Palette, Five Totally Different Textures
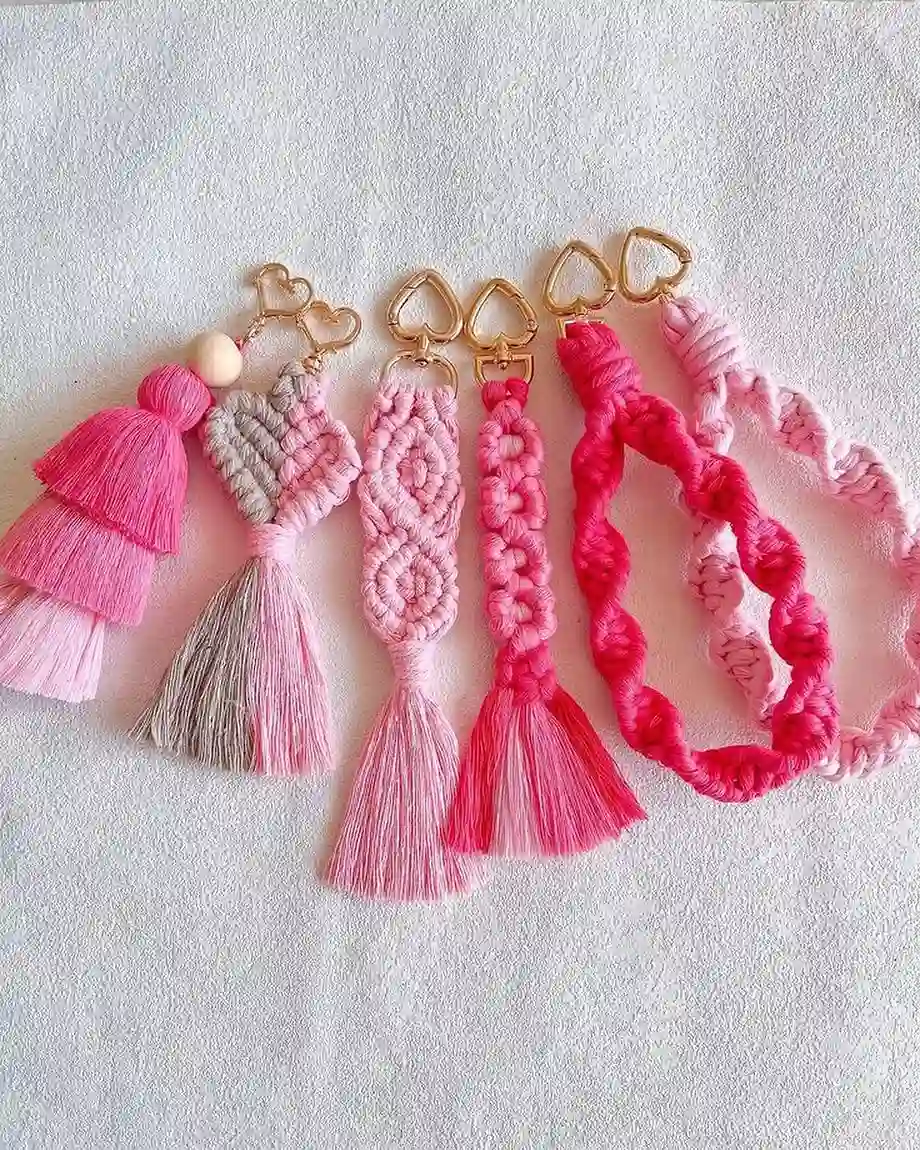
Skip the color decision entirely and focus on technique instead. Every piece here sits somewhere on the same pink to blush spectrum, but the knotting styles couldn’t be more different side by side.
From left to right: a tiered fringe tassel with a wood bead spacer, a flat heart worked in a spiral lattice, a rectangle panel with a raised eye motif, a chunky rope style braid, and two twisted cord pieces that read more like a bracelet than a bag charm.
The heart-shaped clasps tying most of them together are doing quiet work here, they’re a small detail but they repeat the color story even in the hardware.
If you only have scraps of one or two colors left over from other projects, this is the move.
Match the palette, vary the technique, and the set still looks intentional instead of mismatched.
| Technique | Best for |
|---|---|
| Tiered fringe tassel | Quick beginner project |
| Spiral lattice heart | Gift or bridesmaid favor |
| Raised eye motif panel | Practicing a new knot |
| Chunky rope braid | Using up thicker cord |
6. Long Wristlet Fobs, Ranked by How Much Patience They Take
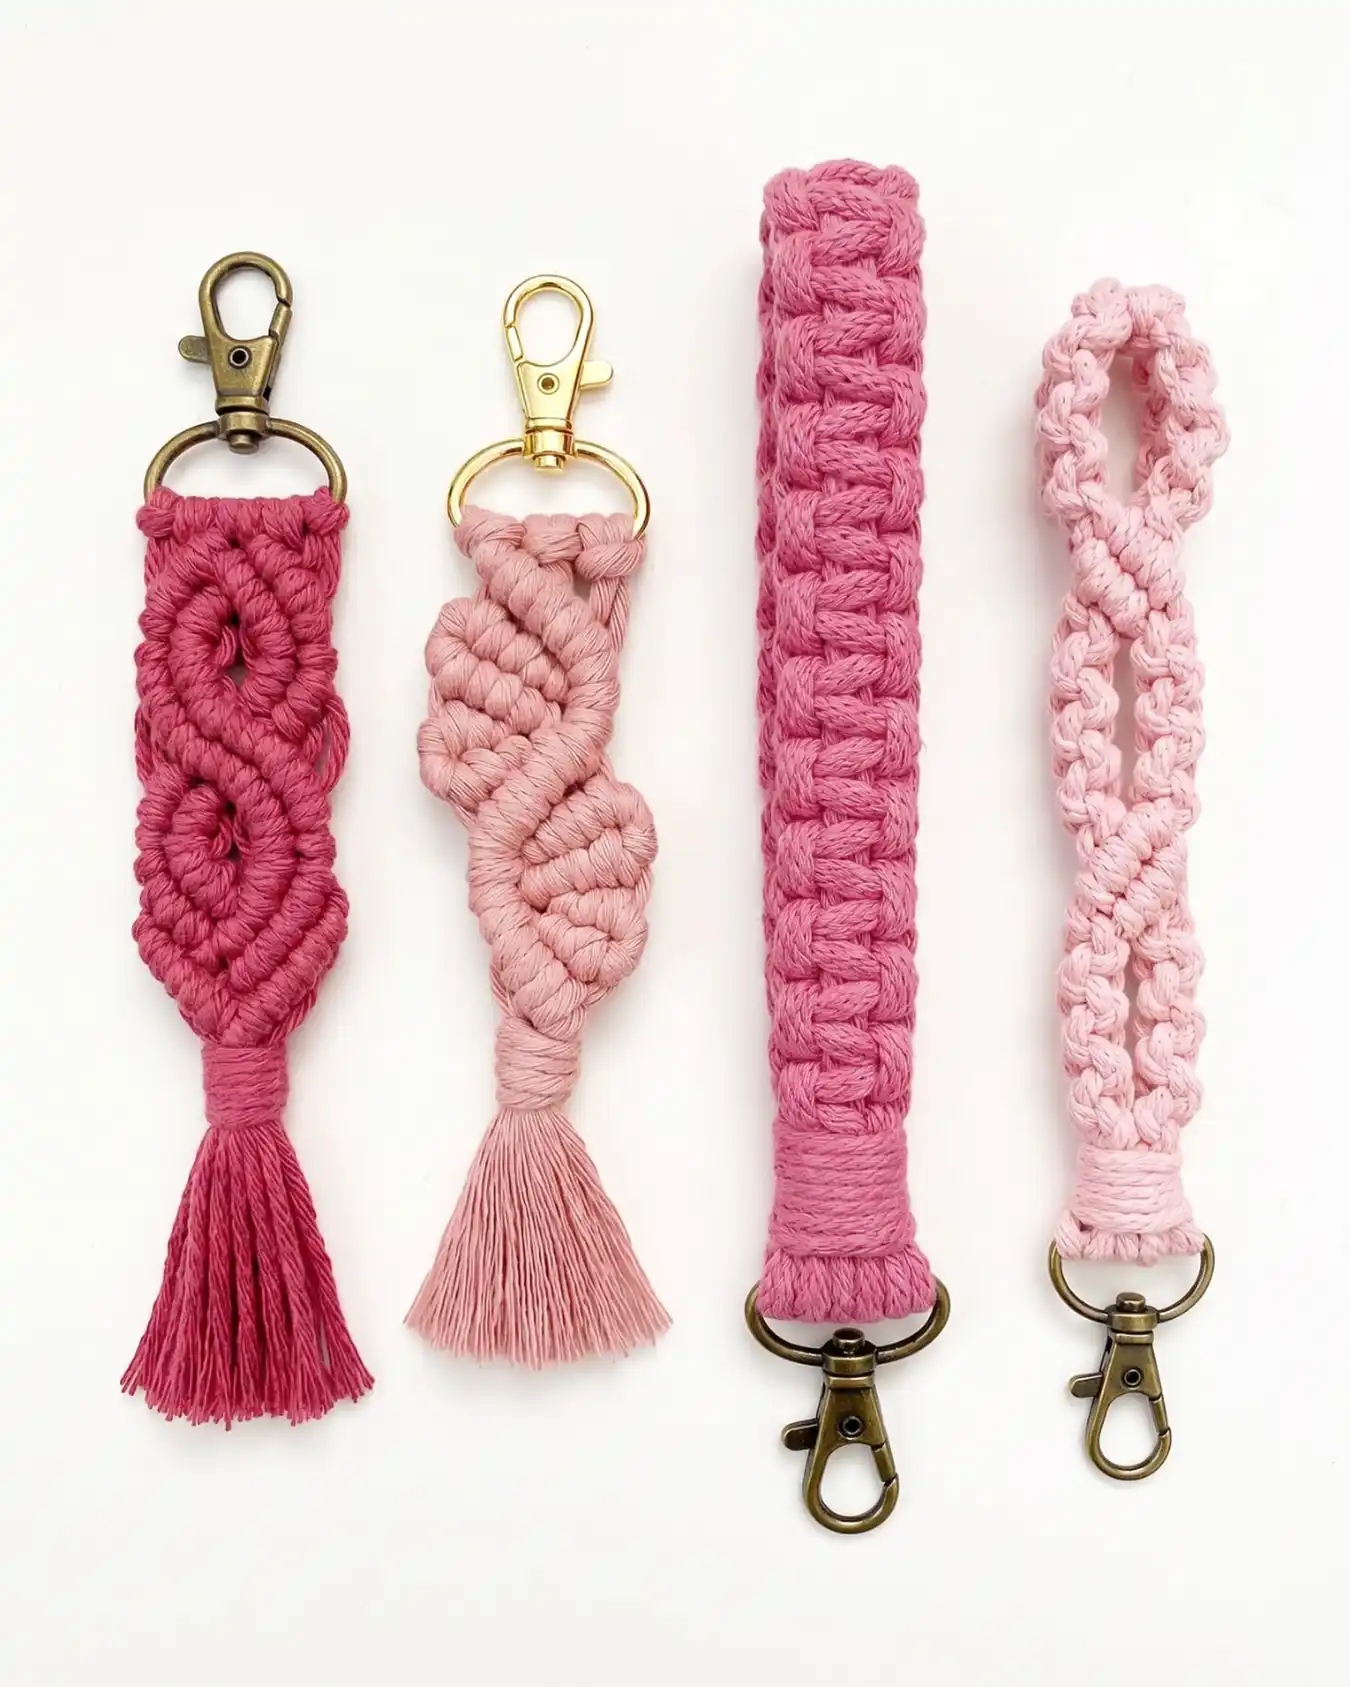
Four long rectangular styles lined up here, and they split neatly by difficulty. The pink diamond spiral on the far left uses a repeating lark’s head pattern that’s genuinely tricky to keep even.
Next to it, the blush piece with the twisted knot cluster looks freeform but is actually a series of half hitches stacked at slight angles, easier than it looks once you get the rhythm.
The two square knot braids on the right, one thick, one thin, are the most beginner friendly of the bunch, just a repeated square knot worked straight down the cord.
None of these have fringe. The tassel-free ones (the two braids) end in a clean wrapped finish instead, which makes them sit flatter against a bag or belt loop than a tasseled charm would.
If you’re deciding where to start, work right to left on this one.
7. Fish Tail Charms Knotted to Look Scaled
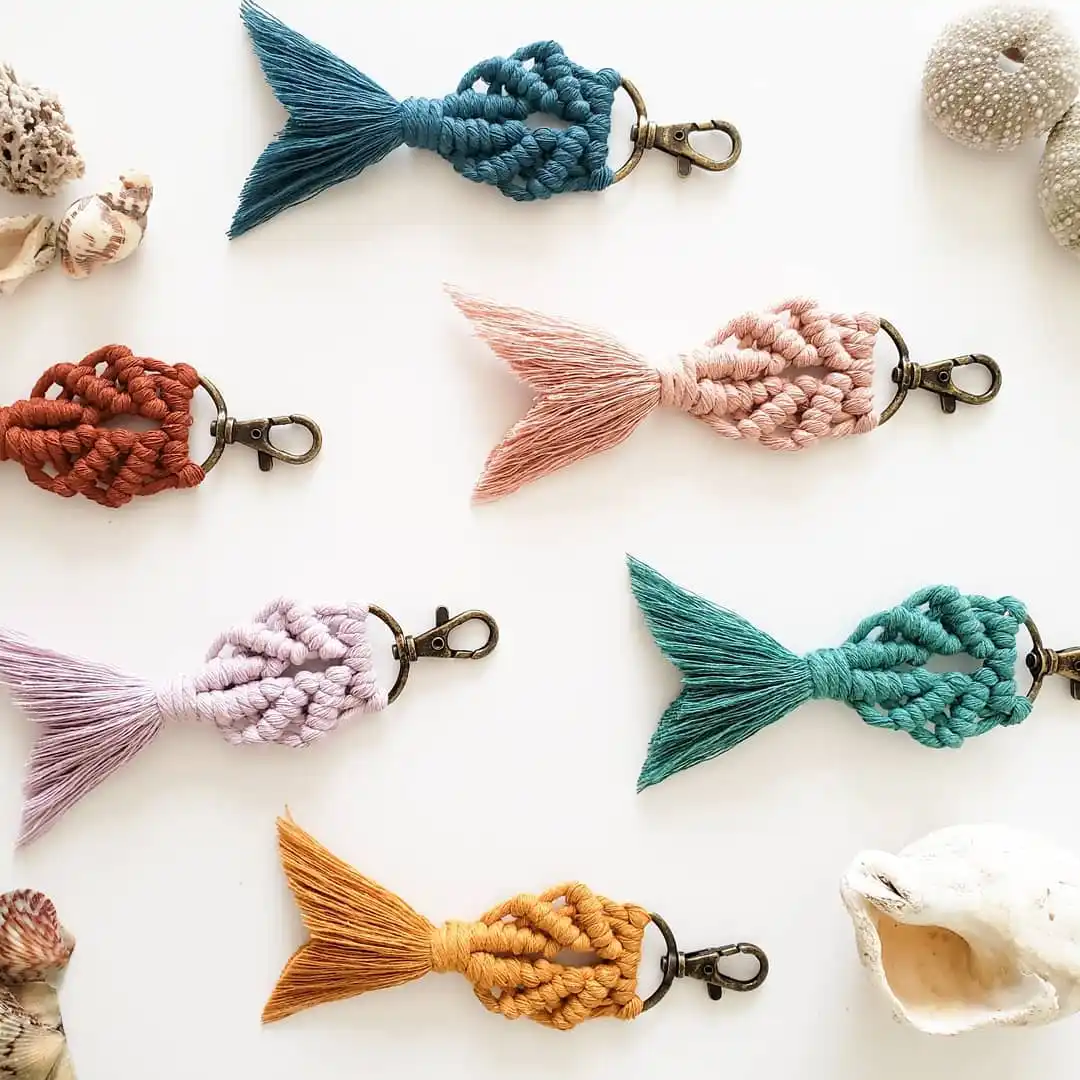
Six fish, six colors, and every one uses the same trick: rows of tight double half hitches stacked to mimic overlapping scales, tapering down into a fanned thread tail that’s left completely loose.
Displayed here against shells and coral, but that scaled texture is really what sells the fish shape, more than the color does.
Getting the scale texture right comes down to keeping row spacing consistent. Too far apart and it reads as stripes instead of scales. Too close and the body looks stiff instead of fish shaped.
Warm tones (rust, mustard, dusty pink) feel more like autumn or a beachy sunset palette. Cooler ones (teal, lavender, deep blue) lean more coastal or ocean themed.
Either way, the fan-cut tail is the one part of this build that benefits from trimming after the fact, brushing it out and cutting the ends at a slight angle keeps it from looking blunt.
Even row spacing is what turns simple knots into a believable scale texture.
8. Three-Flower Chains With a Fringe Base

Three flowers stacked in a vertical line, each one a different shade, joined by a short knotted collar, then finished with a loose fringe tail.
Five color combos shown here, and every single one uses a two-color flower plus a neutral center, never the same color twice in one row.
What stands out on closer look: the black and lavender version reads almost gothic against the pastel ones next to it, proof this pattern isn’t locked into a boho color story. The green clip on the far left is also worth noting.
It’s the odd one out hardware-wise, since every other piece uses a gold lobster clasp, a small reminder to double check your hardware order matches before you commit to a whole batch.
Fringe length here is short and even across all five, just long enough to move but not so long it tangles in a bag.
9. Single-Cord Chunky Knot, No Fringe Trim Needed
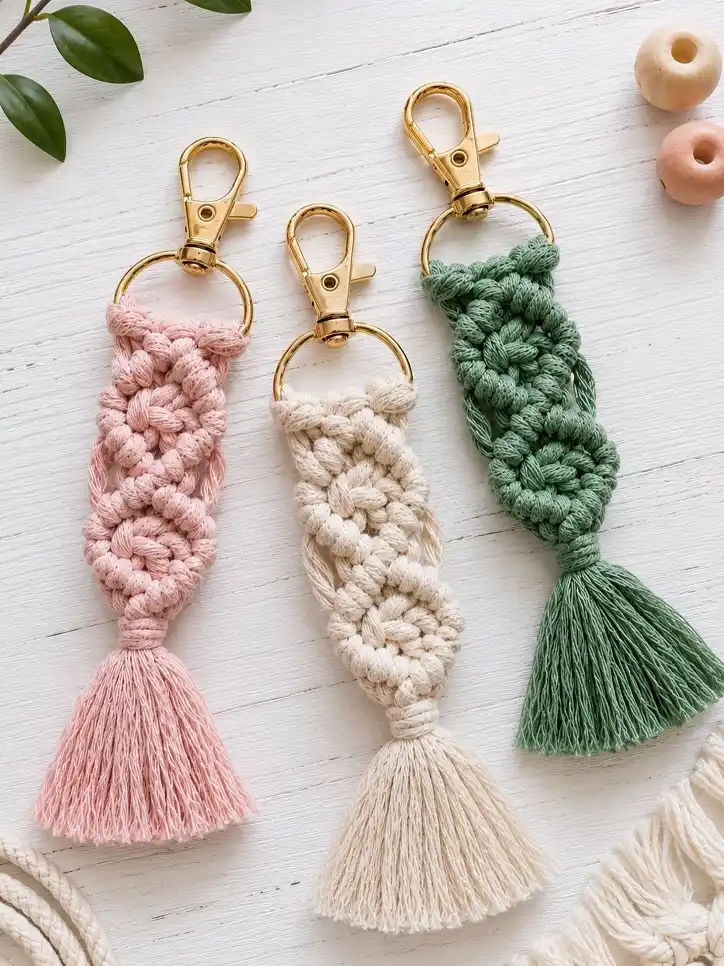
Three colors, one build: a tightly packed column of larger, more open square knots running top to bottom, tapering into a natural loose tassel at the base.
Unlike some of the earlier tassel styles, nothing here gets trimmed or brushed out. The fringe is left exactly as the cord ends fall.
This is the chunkiest knot scale in the whole set so far. Where the letter charms and flower chains used small, tight stitches, this one uses fewer, bigger knots, which means it works up fast and reads well even from a distance.
Sage green and blush pink lean seasonal, while the natural cream stays neutral enough to pair with anything.
The wood beads sitting in the corner of the photo aren’t attached, but they hint at an easy add-on: slide one onto the top cord before attaching the clasp for a small extra detail.
Subscribe to DIY Craft Bloom
Get updates on the latest posts and more from DIY Craft Bloom straight to your inbox.
Space the knots evenly so the column stays straight.
Let the fringe fall naturally at the base.
Don’t pull the knots too tight, it flattens the texture.
Don’t trim the tassel, the raw ends are the look.
10. Tone-on-Tone Neutrals, Styled as a Matching Set
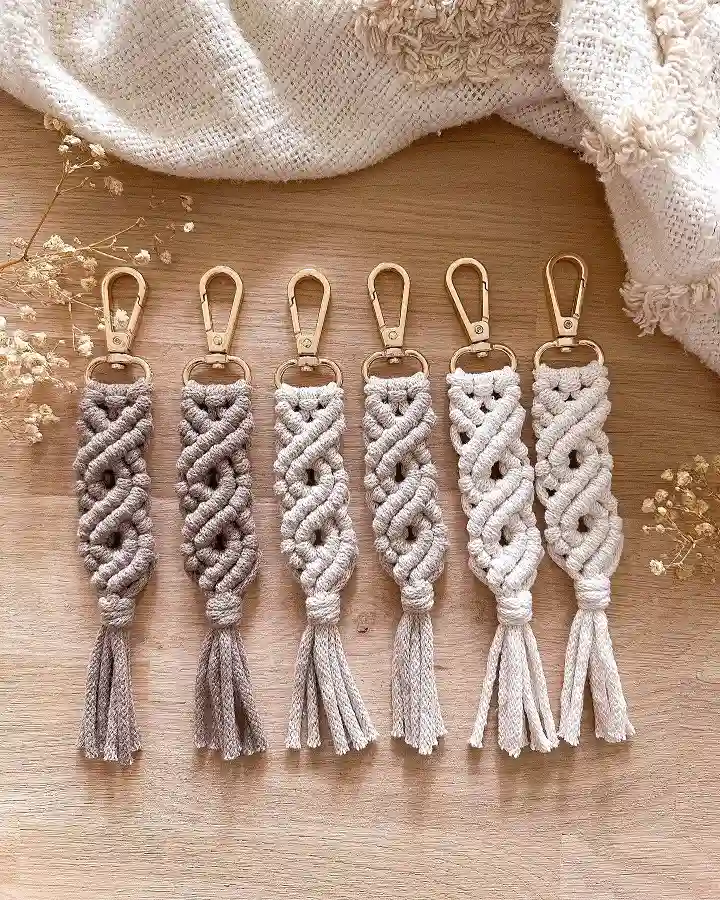
Six of the same diamond weave pattern, running from warm grey on the left to soft cream on the right, all finished with matching gold hardware.
This is less about a single charm and more about presenting a whole batch as one cohesive product line.
A slower paragraph, then the practical part: keeping six pieces this visually consistent takes more planning than the knotting itself.
Same cord weight throughout, same clasp finish, same tassel length trimmed to match, and a gradual color shift instead of random placement, so the eye reads it as an intentional collection rather than six unrelated keychains.
For anyone selling in sets or bundles, this is worth studying. A buyer scrolling past a shop page stops longer on a matched row like this than on six scattered, mismatched colors, even if the pattern underneath is identical.
Lay pieces out and photograph them in gradient order, lightest to darkest or darkest to lightest, before listing them as a set.
A matched neutral set photographs better than the exact same pattern in scattered colors.
11. A Full Pattern Sampler in One Earth-Tone Family
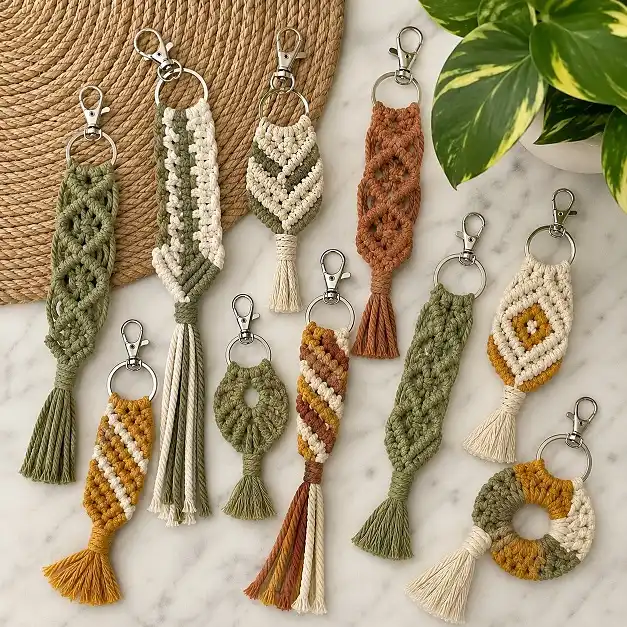
Eleven pieces, one shared palette of olive, terracotta, mustard, and cream, and almost no two patterns repeated.
If you’re trying to figure out what’s even possible with basic square knots and half hitches, this photo is close to a reference sheet.
A quick breakdown of the pattern families showing up here:
Chevron and diamond weaves (the cream and olive vertical pieces) use angled rows to create a zigzag look.
Ring or donut shapes (the small olive circle, the mustard and green ring at the bottom) wrap cord around a center hole instead of building a solid panel.
Diagonal stripe patterns (the mustard and terracotta piece, the rust colored one) run the color change on a slant instead of straight across.
Solid textured panels (plain olive, plain rust) skip the pattern entirely and let a dense stitch do the work on its own.
None of these use a single technique twice, which is really the lesson of this whole photo: one color story can carry a lot of pattern variety without ever looking chaotic.
12. Round Coin Knots With a Gold-Wrapped Braid Below
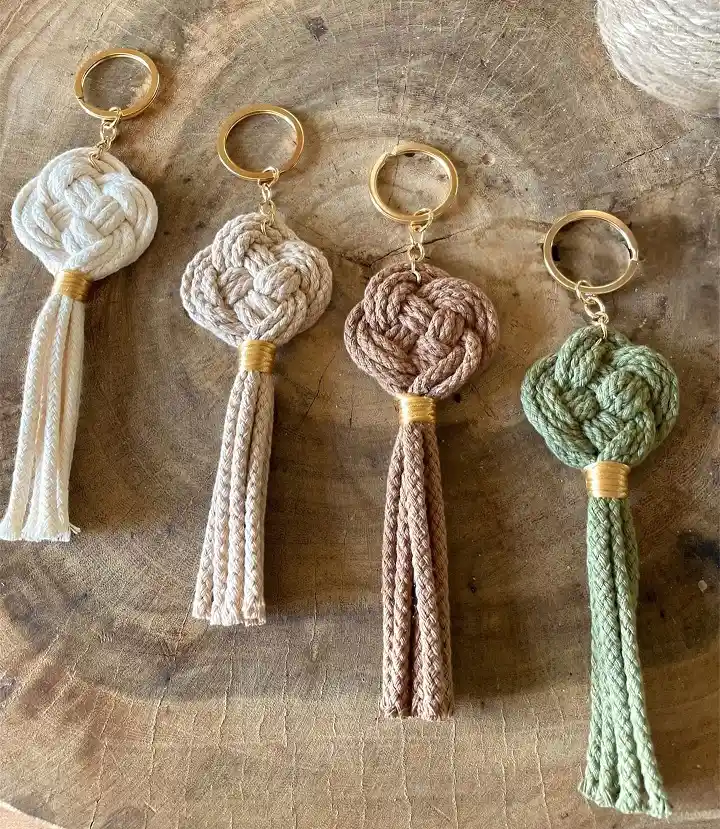
Twelve down, and this last one is the roundest shape in the whole set. Instead of a flat panel or a linear column, the cord gets worked into a single circular coin knot, then wrapped tight in gold thread right where it meets a braided tassel.
That gold wrap band isn’t just for looks. It’s the seam holding the round knot to the braid below, so it’s doing structural work as much as decorative.
The tassel itself is braided rather than loose, which keeps it from tangling and gives the whole piece a slightly more polished, less rustic finish than a fringe tail would.
Color-wise this one runs a warm gradient, ivory into taupe into a soft moss green, so even set as a group of four it photographs like a matched product line rather than random leftovers.
If your coin knot keeps coming out lopsided, tighten it in small stages, working around the circle a little at a time instead of cinching one side all the way before moving to the next.
conclusion
Twelve ideas, twelve completely different builds, and every one of them started with cord anyone can buy at a craft store.
Whatever’s left in your stash, from a scrap of blush pink to a full earth-tone set, there’s a pattern above that’ll use it well.
Some of these come together in an afternoon, others reward the slower, more detailed knotting, but none of them ask for anything you don’t already have on hand.
Pin your favorites now so you’re not scrolling back to find them later, and if you end up making a set of your own, this is the kind of project that looks even better lined up in a matching row.
Save this for the next time you want fresh macrame keychain ideas to work through.