17 Graduation Gift Craft Ideas They’ll Actually Love

Store shelves fill up with the same generic diploma frames and gift cards every graduation season, but the best diy graduation gift ideas usually start with something you already know how to make, a needle and thread, a glue gun, or just a sheet of kraft paper and a pencil.
This roundup pulls together seventeen ways to turn a small craft skill into a gift that actually gets kept, not tossed in a drawer with the other cards.
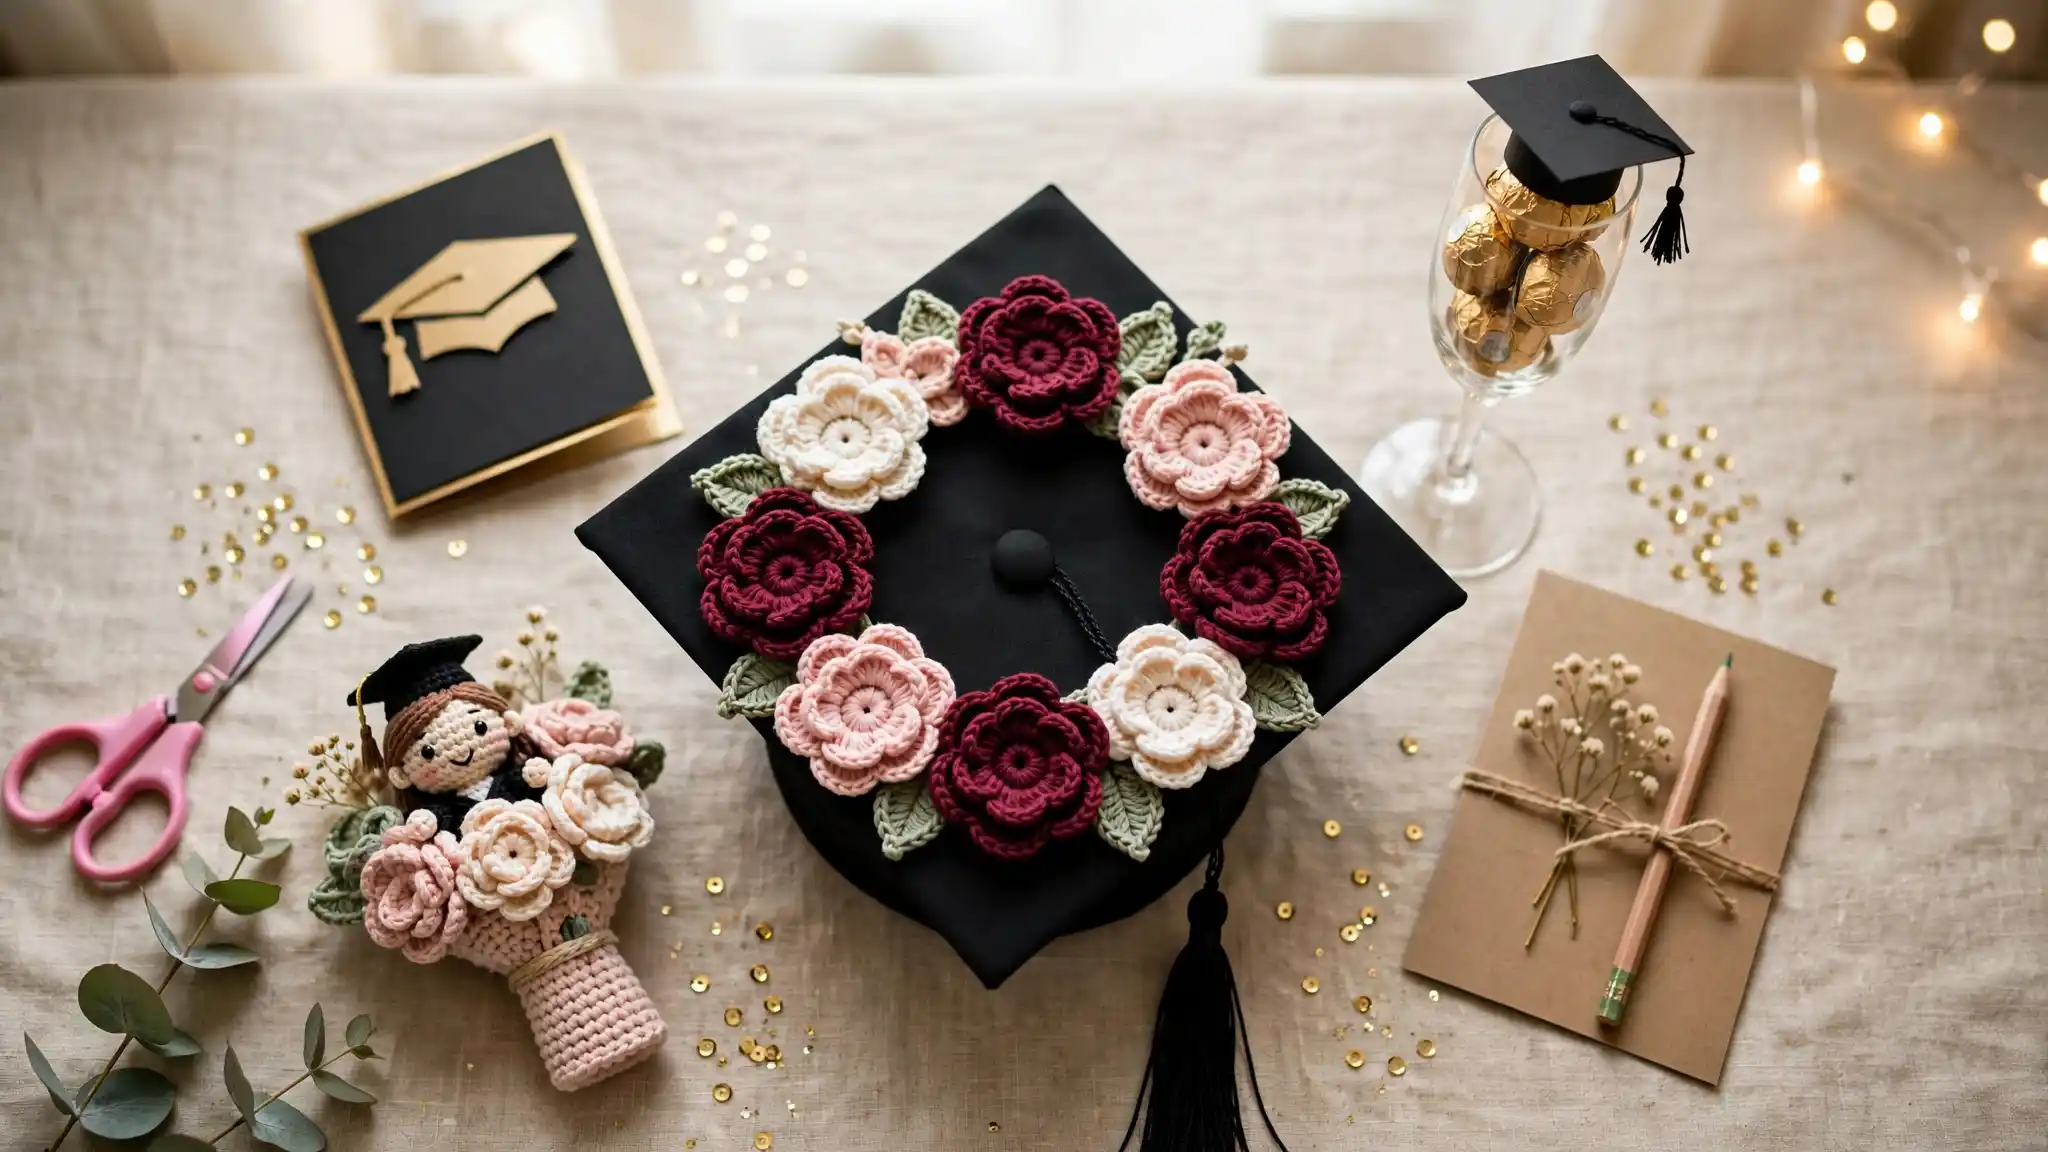
Some of these lean into fiber crafts, crochet flowers stitched onto a cap band, a full bouquet with its own tiny amigurumi graduate tucked inside.
Others focus on presentation, filling a champagne flute with candy or layering cardstock into a card that looks hand designed rather than printed.
A couple lean sentimental, a teddy bear dressed for the occasion, a pencil that turns into a plant.
Whatever skill level you are working with, there is an idea here that fits a weekend project or a quick evening one.
17 Graduation Gift Craft Ideas
1. Quilled Paper Cards With Each Grad’s Name on It
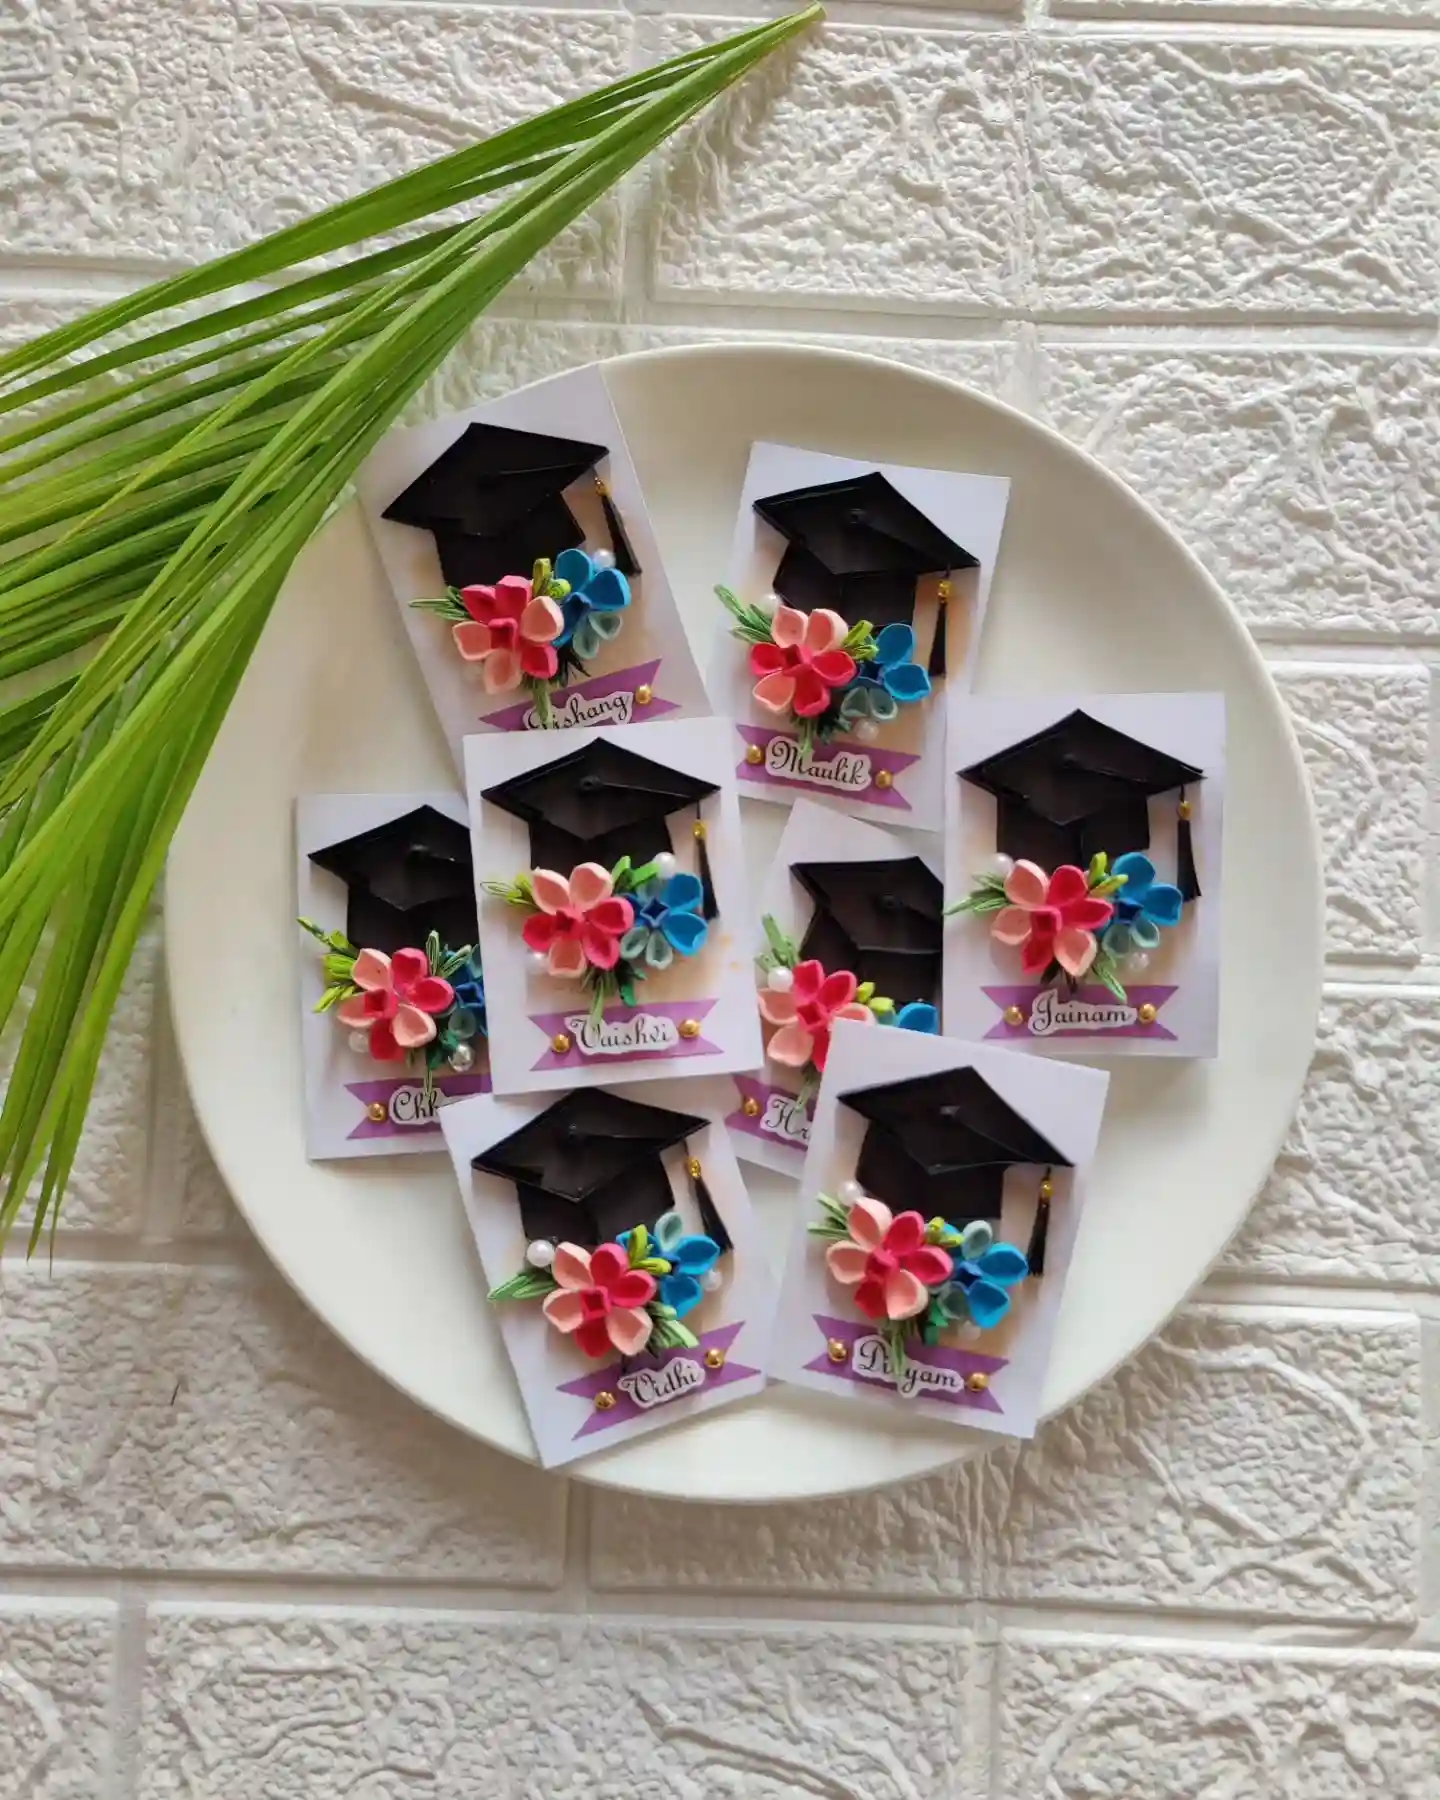
A whole stack of these fanned out on a plate makes an easy gift for a graduating class or a friend group.
Each card has a paper cap, a small quilled flower cluster in pink and blue, and a name banner underneath, so no two are identical even though they follow one format.
Quilling just means rolling thin paper strips into tight coils, then pinching and shaping them into petals. It sounds fussier than it is once you get the rhythm going.
- Cut and shape the cap. Use black cardstock for the flat square top and a small folded base, then glue on a thread tassel with one bead at the end.
- Roll the flower petals. Quill five or six small paper coils in two colors, pinch one end into a teardrop, and glue them into a cluster.
- Add the name banner. Print or hand letter each name on a small ribbon shape and glue it just under the flowers.
- Mount on a blank card. Center the whole design on white cardstock so it reads clearly from a few feet away.
Once you’ve made one, the rest go fast. Batch the caps first, then the flowers, then the names last so nothing gets mixed up.
2. A Shadow Box That Holds the Whole Story, Not Just the Cap
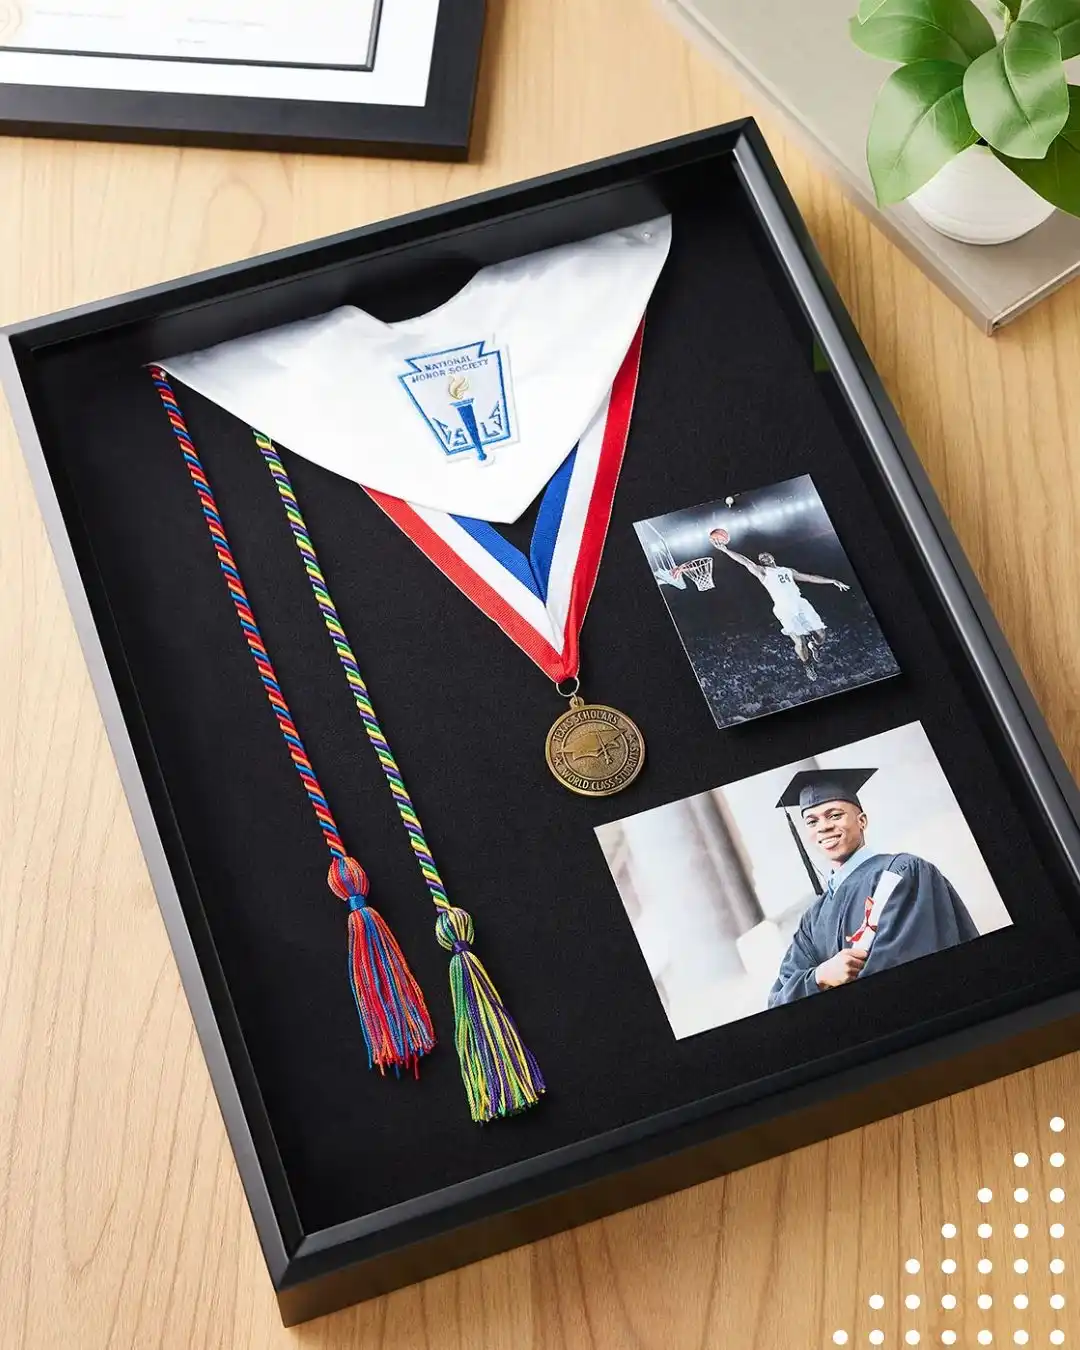
This is the gift for a grad who earned real honors along the way. A deep shadow box lets you frame the honor cords, a medal, the sash, and a couple of photos together instead of scattering them across drawers where they’ll eventually get lost.
Pick a box with enough depth for the medal to lie flat without pressing against the glass.
Pin or lightly stitch the fabric pieces to the backing board first, since fabric shifts more than paper.
- The honor cords anchor the left side, draped loose so the tassels show
- The sash or stole sits just behind, angled slightly for depth
- The medal hangs at the center, the natural focal point
- Two photos fill the open space on the right, one candid and one formal
Drape loose on one side so the tassels catch light and add texture.
Let it hang naturally from its ribbon instead of laying it flat.
One action shot, one formal cap and gown photo, balanced on the open side.
3. A Seed Pencil That Turns Into a Plant Long After Graduation
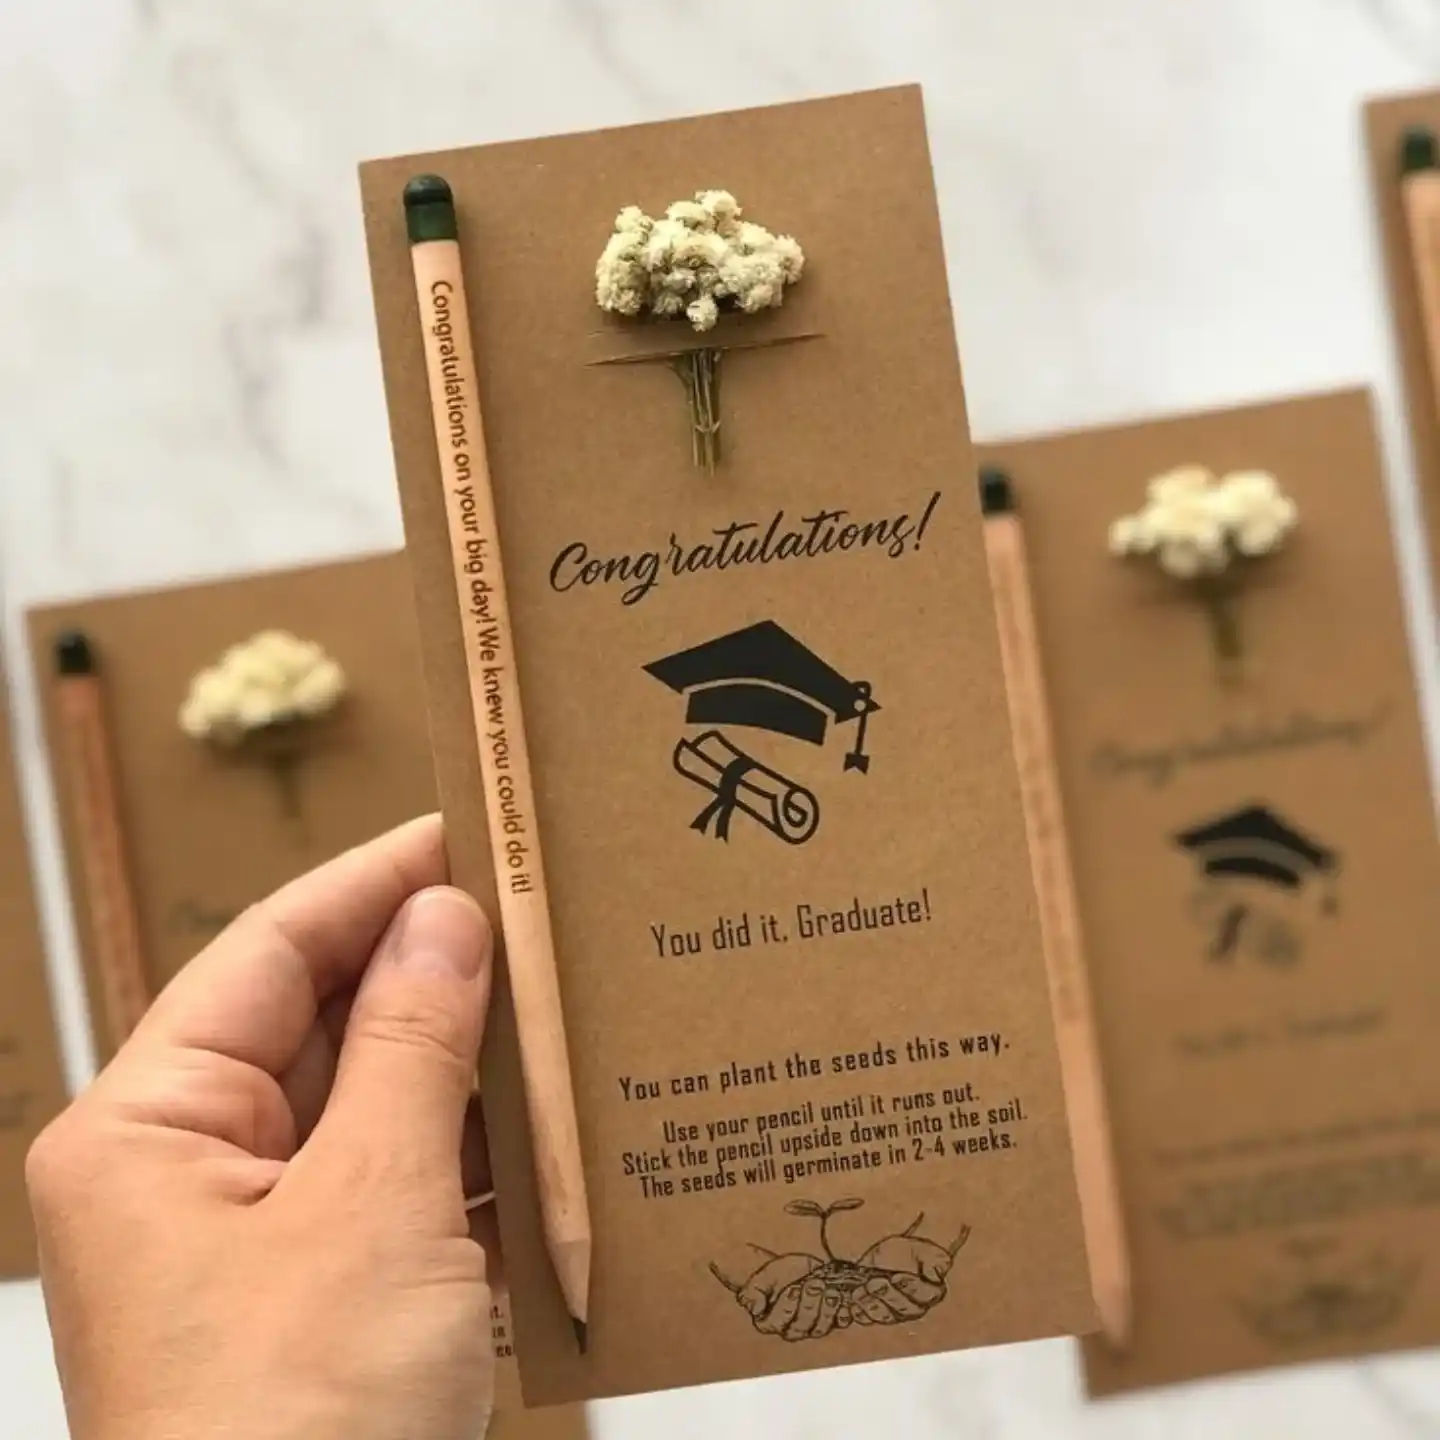
Kraft paper, a sprig of dried baby’s breath, and a plantable pencil turn this into a gift with an actual second life.
Once the pencil gets used down to a stub, the graduate plants the end in soil and, according to the card, seeds sprout in two to four weeks. It is the rare grad gift that keeps giving value after the ceremony is long over.
What works about this design:
- The whole card is kraft brown with black ink only, so it feels rustic and understated rather than glitzy
- Instructions for planting the pencil are printed right on the card, no separate insert needed to explain the gimmick
- A tiny illustration of hands cupping a seedling ties the planting theme together visually
- The dried flower glued at the top gives the flat card a bit of texture and dimension without adding bulk
Let the graduate write with it normally, until it gets down to a stub.
The seed capsule sits at the eraser end, so it goes into the soil first.
Seeds germinate in about two to four weeks with regular watering.
4. Open-Lid Cap Boxes Stuffed With Mini Candy
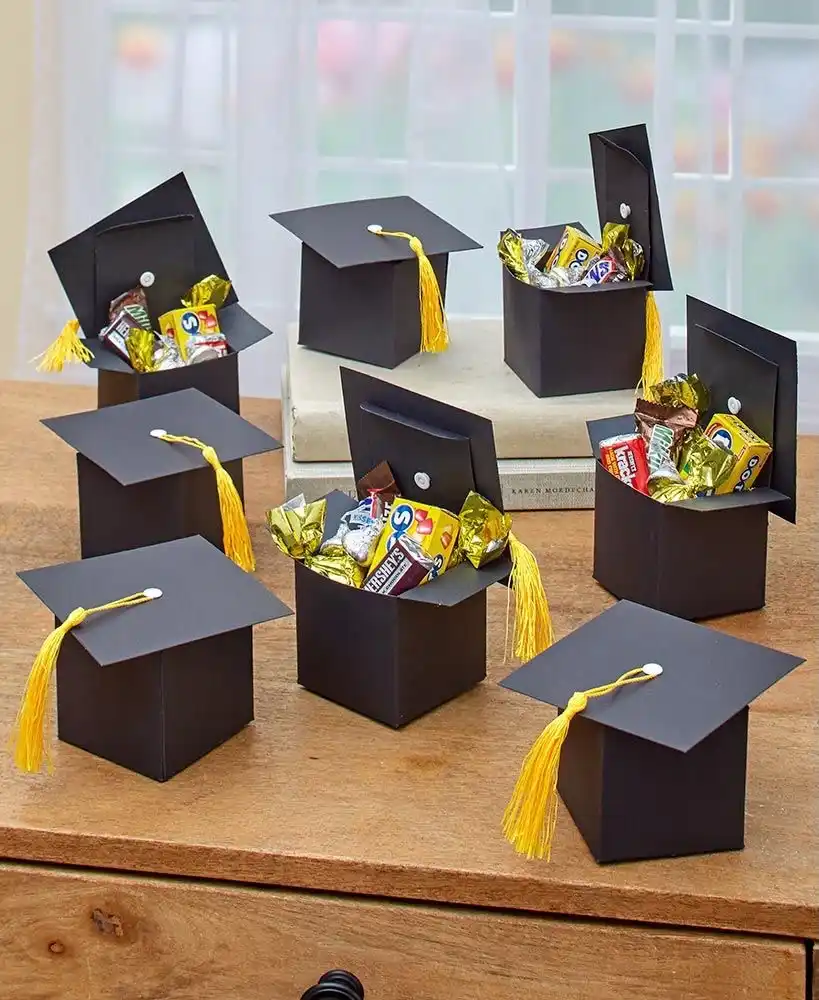
Where the felt-topped favor boxes hold one chocolate each, this version opens like an actual hinged mortarboard and holds a real handful of treats.
It reads more like a piece a grad would set on a shelf, not just tear into and toss.
Cardstock is the whole trick here. Score two folds on the box body so the lid tips back on a hinge instead of lifting off completely, then glue a tassel loop and a small round button at the center point where the tassel would sit on a real cap.
- Cut the box body as one piece with fold lines scored, not cut
- Score the cap top separately so it hinges instead of detaching
- Glue a folded paper loop for the tassel string, then knot embroidery floss through it
- Fill with wrapped minis before folding the lid down, not after
5. Layered Rolled-Paper Roses on a Textured Cardstock Card
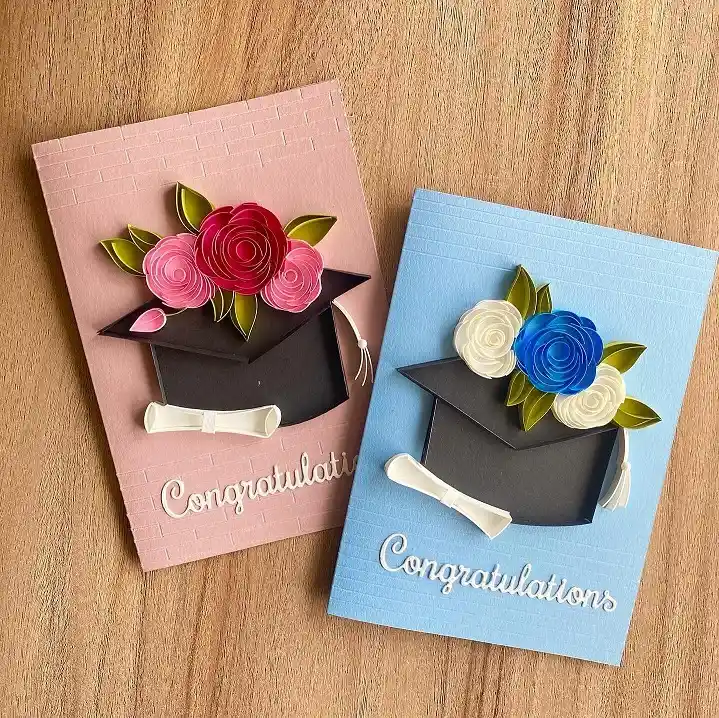
Two color paths, same technique. Both cards use the same rolled paper flower method but land in totally different moods, which makes this one worth showing as a pick-your-palette project rather than a single fixed design.
Rolled paper roses start as a spiral cut, not individual petals. You cut a continuous spiral out of a paper circle, then roll it from the outside in, and it naturally coils into a rose shape when you let go and glue the base.
Subscribe to DIY Craft Bloom
Get updates on the latest posts and more from DIY Craft Bloom straight to your inbox.
Layer three roses with a few punched leaves behind them, glue the cluster onto a die-cut cap silhouette, and finish with a thin paper diploma scroll tucked under the brim.
The word “Congratulations” in a script die cut sits below the cap and pulls the whole card together.
| Blush palette | Cool blue palette |
|---|---|
| Pink cardstock base with a subtle brick texture | Soft blue cardstock base, same texture |
| Rose and magenta paper roses | White and royal blue paper roses |
| Reads warm and soft, good for a close friend | Reads crisp and classic, good for school colors |
6. Seed Bead Keychain Charms With a Tiny Word Bar
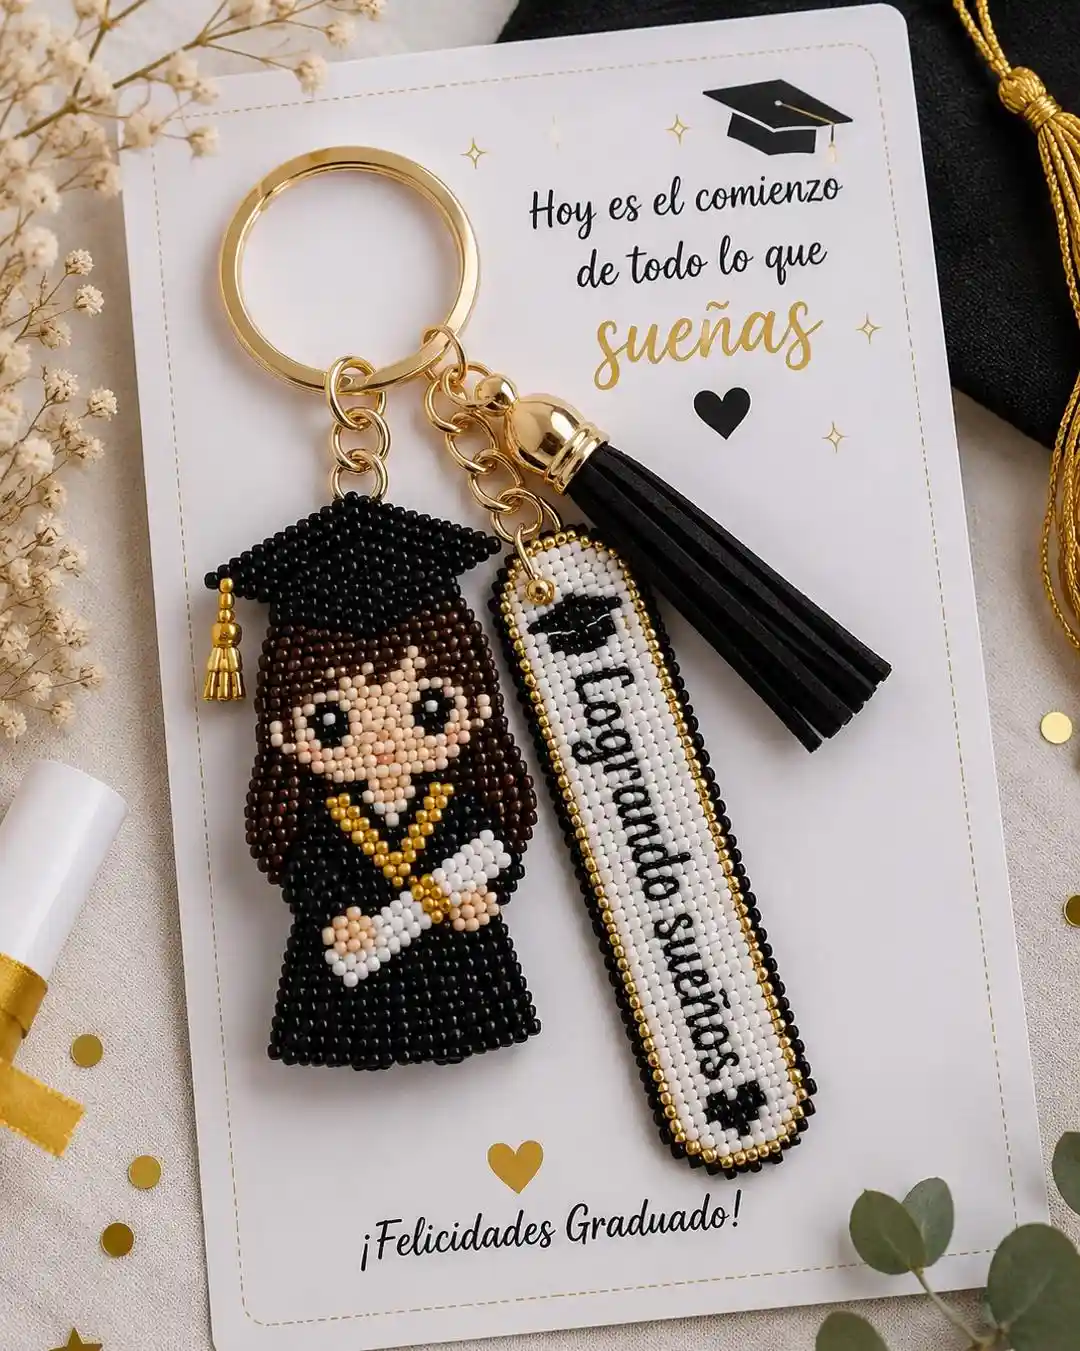
Bead weaving takes patience but almost no specialty tools, which makes this a good pick if the recipient likes small detailed handwork over cutting and gluing.
The figure is built from a pixel-style bead pattern, so it looks intricate but is really just following a grid.
Two charms work better than one. The little graduate figure gives it personality, and the word bar underneath carries a short phrase, so the whole piece reads as a finished set instead of one lonely charm dangling alone.
- Work off a printed bead pattern chart so you’re not counting stitches from memory
- Use a peyote or brick stitch for the flat panel shape, since it keeps edges straight
- Attach a small metal cap and bail for the graduation hat detail
- Finish both charms with jump rings onto one keyring, then add a tassel for movement
7. A Rose Bouquet Styled to Wear Its Own Cap
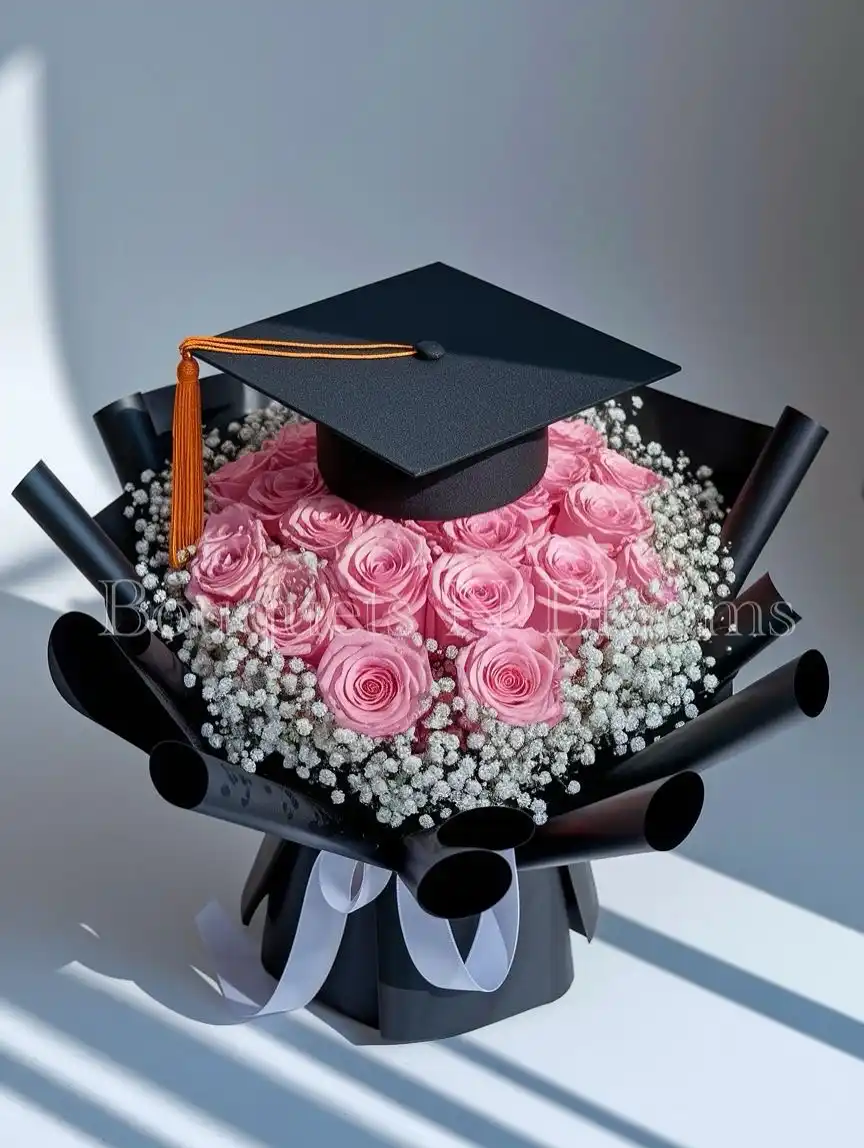
Most gift bouquets tuck a small cap charm off to the side. This one flips that completely: the flowers get arranged into a dome shape, and a full size mortarboard sits right on top like the bouquet itself is the one graduating. It’s a striking centerpiece if you want the craft to double as a photo prop.
Bunch pink roses tightly into a dome using baby’s breath as filler between stems, so the surface stays rounded rather than flat.
Wrap the base in black paper cones fanned out around the flowers, tied off with a wide white ribbon.
The cap sits directly on top of the rose dome, held in place with a bit of floral wire looped through the underside, with an orange tassel draped off one corner for a pop of school color.
This works best with real or high quality faux roses, since the density is what makes the dome shape hold up in photos.
Density of the roses, not the cap, is what sells the effect. Pack the flowers tight before you set anything on top.
8. A Chocolate Bouquet Built Around a Sitting Bear
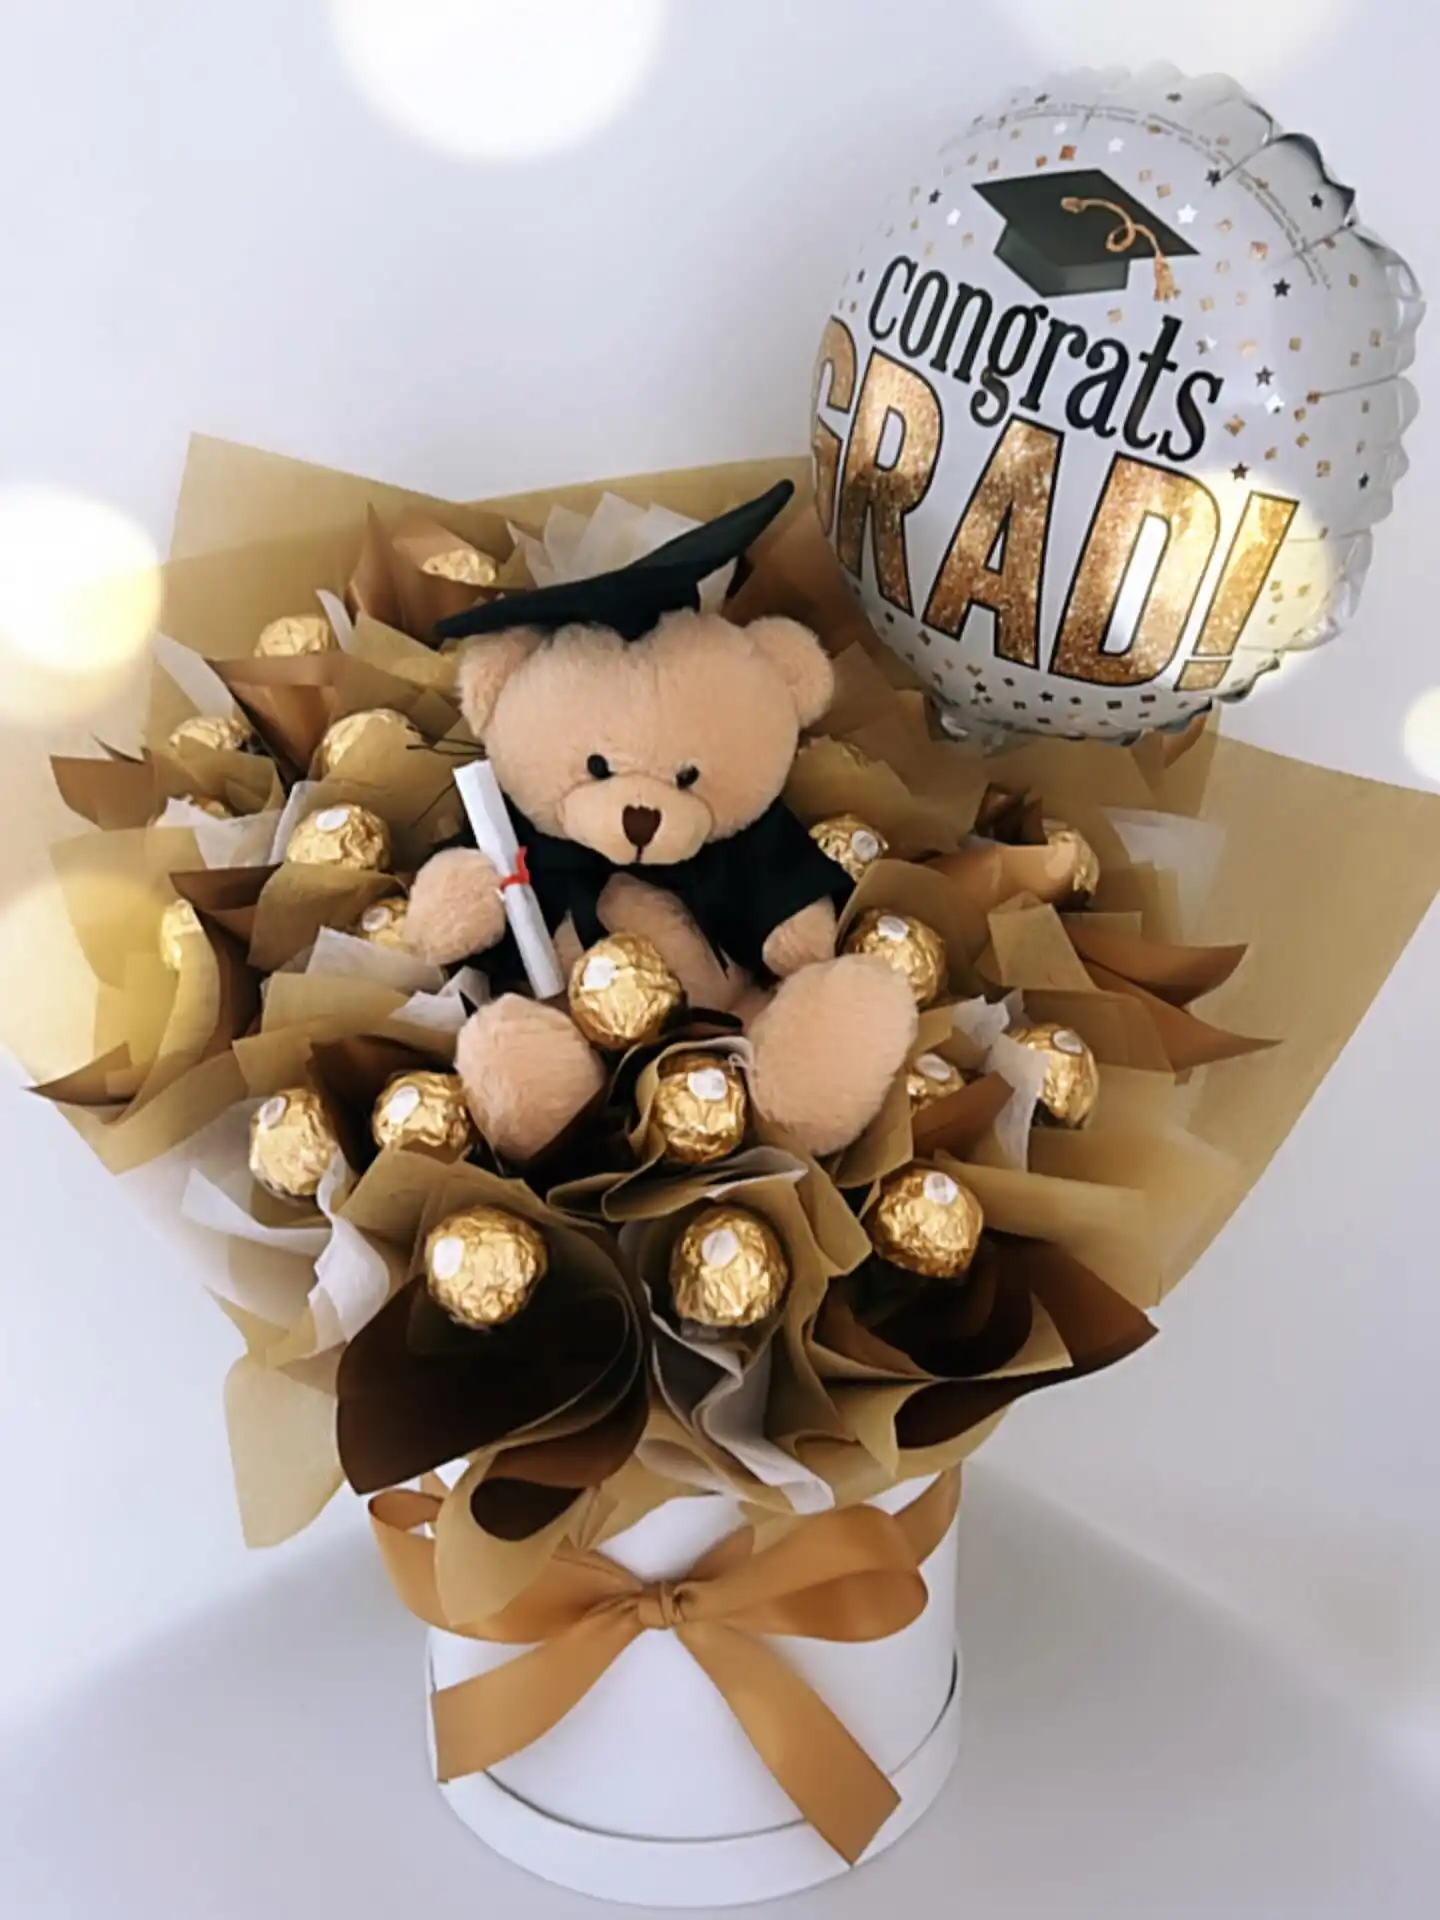
Chocolate bouquets usually arrange the foil-wrapped pieces around a single central object, and this one uses a plush bear in a tiny cap instead of a bow or a flower as that anchor.
The bear sits at eye level in the middle, holding a small paper diploma, while the chocolates fan out and around it like petals.
Getting the bear to sit upright in the middle takes a bit of engineering. Insert a wooden skewer or floral pick down through the back of the bear’s seat and into the foam base below, so it’s actually held in place rather than just propped between the chocolates.
Anchor the bear with a skewer into the foam base, not glue.
Wrap in warm gold and brown tones to match the bear’s fur.
Gluing the bear in place, since it can’t be taken apart later.
Cool-toned wrapping paper, which clashes with the gold foil.
9. A Balloon-Topped Snack Tower, No Flowers Involved
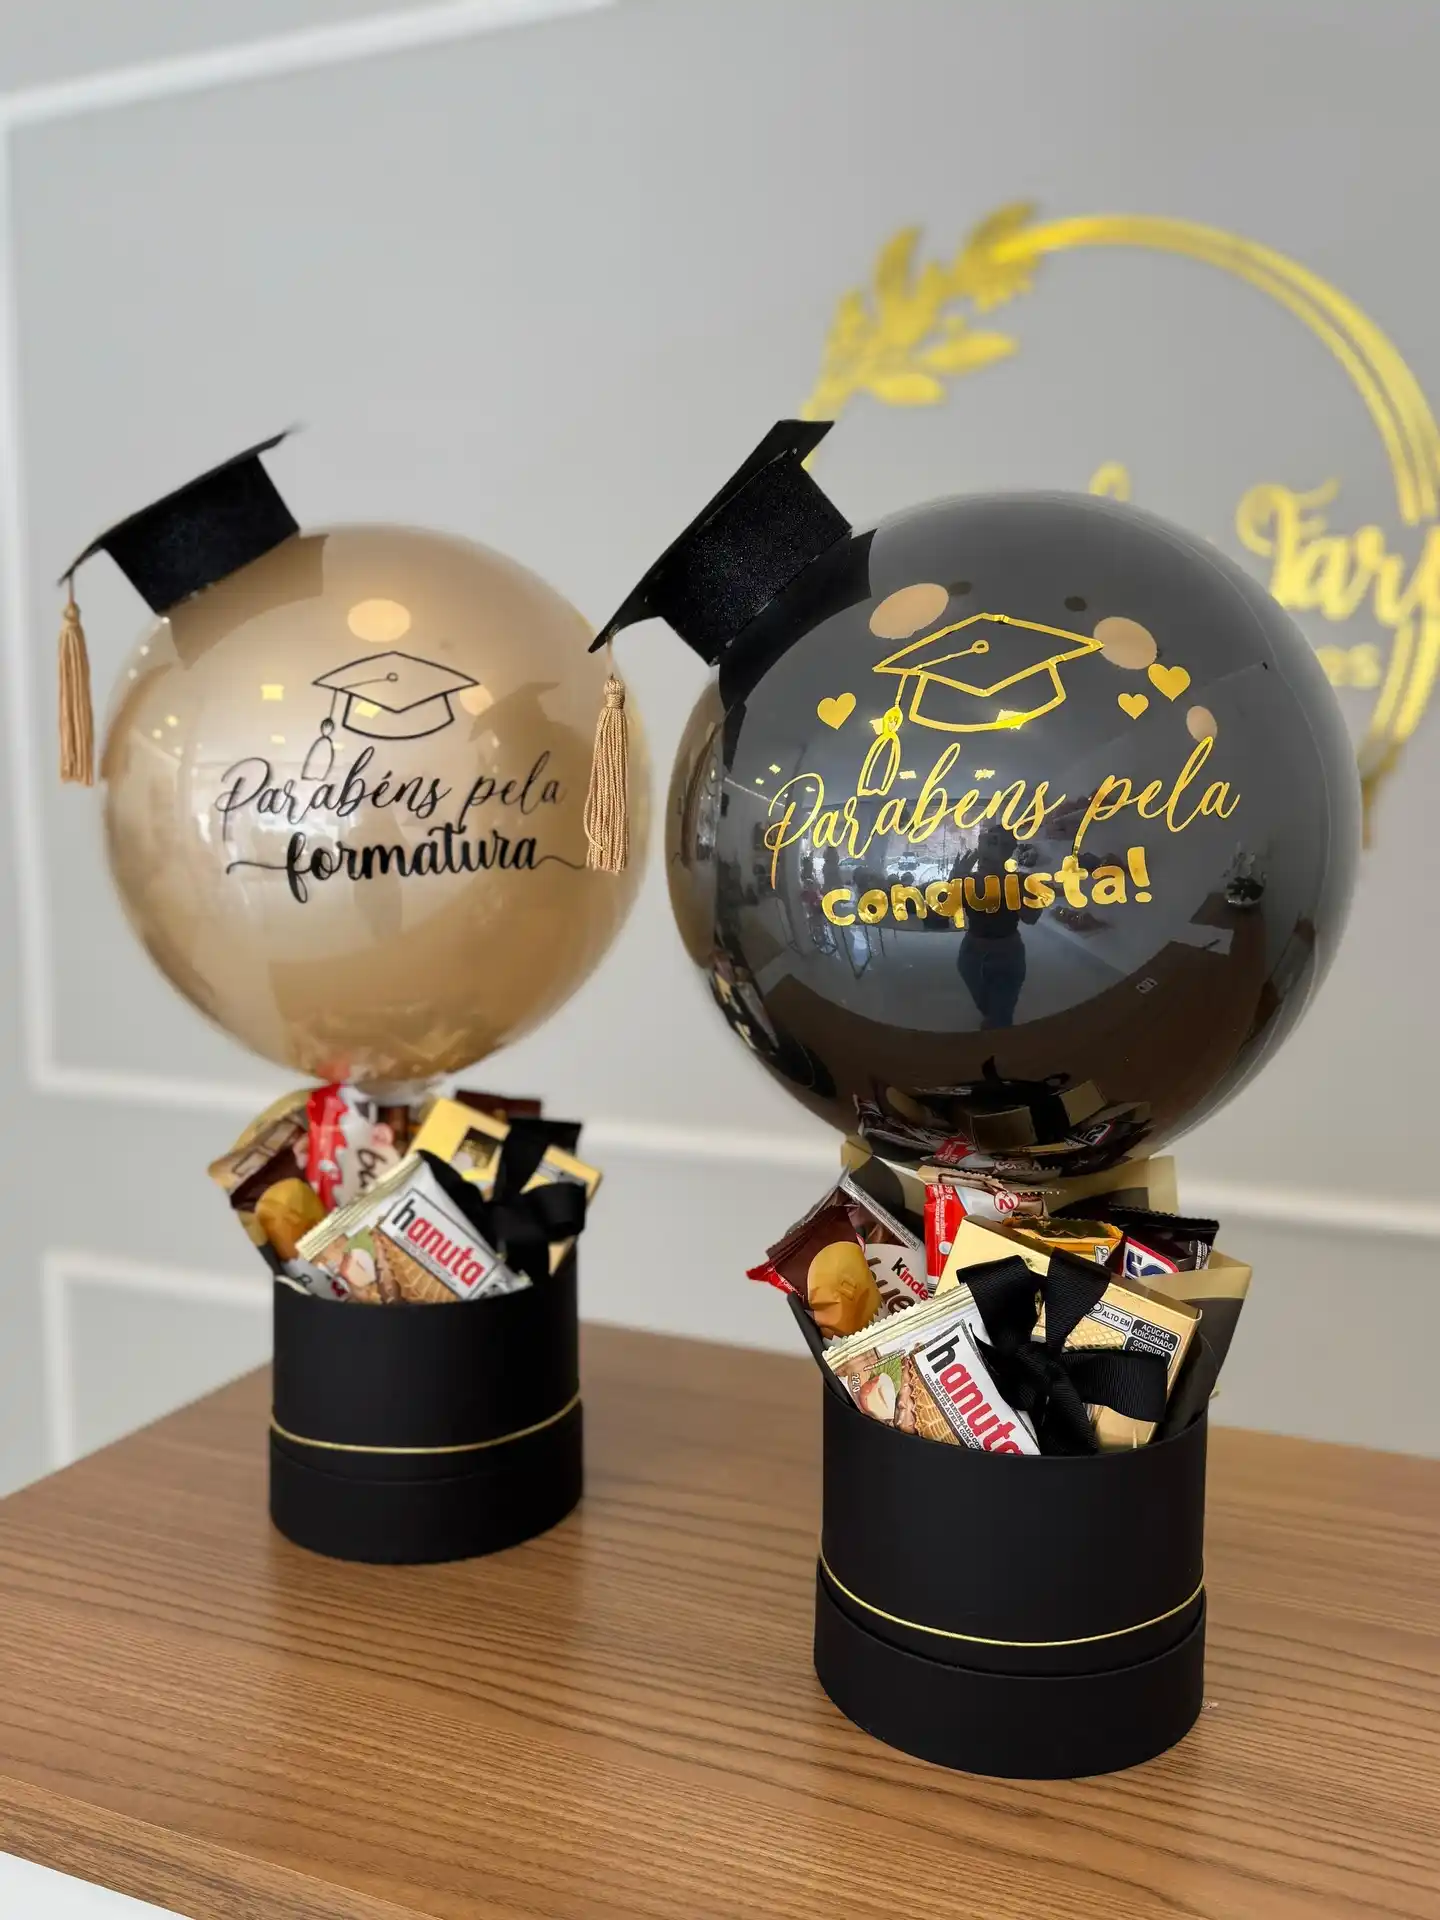
For someone who’d rather eat than admire flowers, swap the roses for a wrapped snack tower and top it with a giant round balloon instead of a bouquet.
The balloon does double duty as the height and the message, since it can be printed or hand lettered right on the surface.
Round mylar balloons come pre-printed in some shops, but a plain gold or black one works just as well with a paint pen for the lettering and a small foam cap glued to the top curve.
- Base: short round hat box, black or gold to match the balloon
- Filling: full size candy bars and snack packs, stood upright and packed tight
- Topper: one round balloon on a stick, weighted into the base
- Cap: foam or cardstock square glued directly onto the balloon, tassel optional
10. A Hot Air Balloon Bubble Filled With Mini Balloons
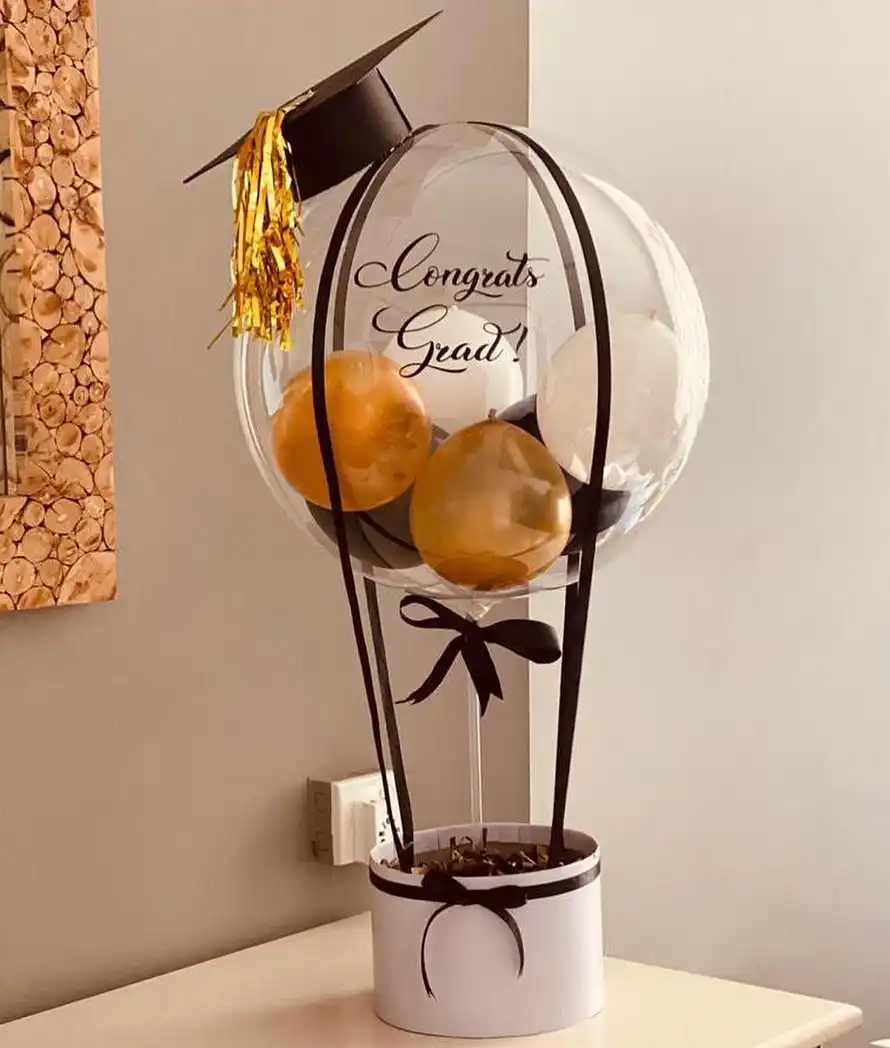
This is the most technical build in the bunch, but it gets the most reaction. A clear bubble balloon becomes the “balloon” of a hot air balloon shape, filled with smaller balloons in gold, black, and white, then rigged with ribbon straps down to a round box base that acts as the basket.
The structure comes from four ribbon strips, not wire. Tape or knot four lengths of ribbon evenly around the neck of the bubble balloon, let them hang down in a loose curve, then gather and tie all four to the rim of the box base.
The curve in the ribbon is what sells the hot air balloon shape, so don’t pull them taut.
Inflate the mini balloons about half to two-thirds full before slipping them inside the bubble through the fill valve.
Fully inflated minis fight each other for space and round out the bubble unevenly instead of clustering loosely.
Loose and curved always beats tight and straight when you’re faking a hot air balloon shape.
Subscribe to DIY Craft Bloom
Get updates on the latest posts and more from DIY Craft Bloom straight to your inbox.
11. Crochet Flower Cap Band, a Grad Gift They Can Actually Wear
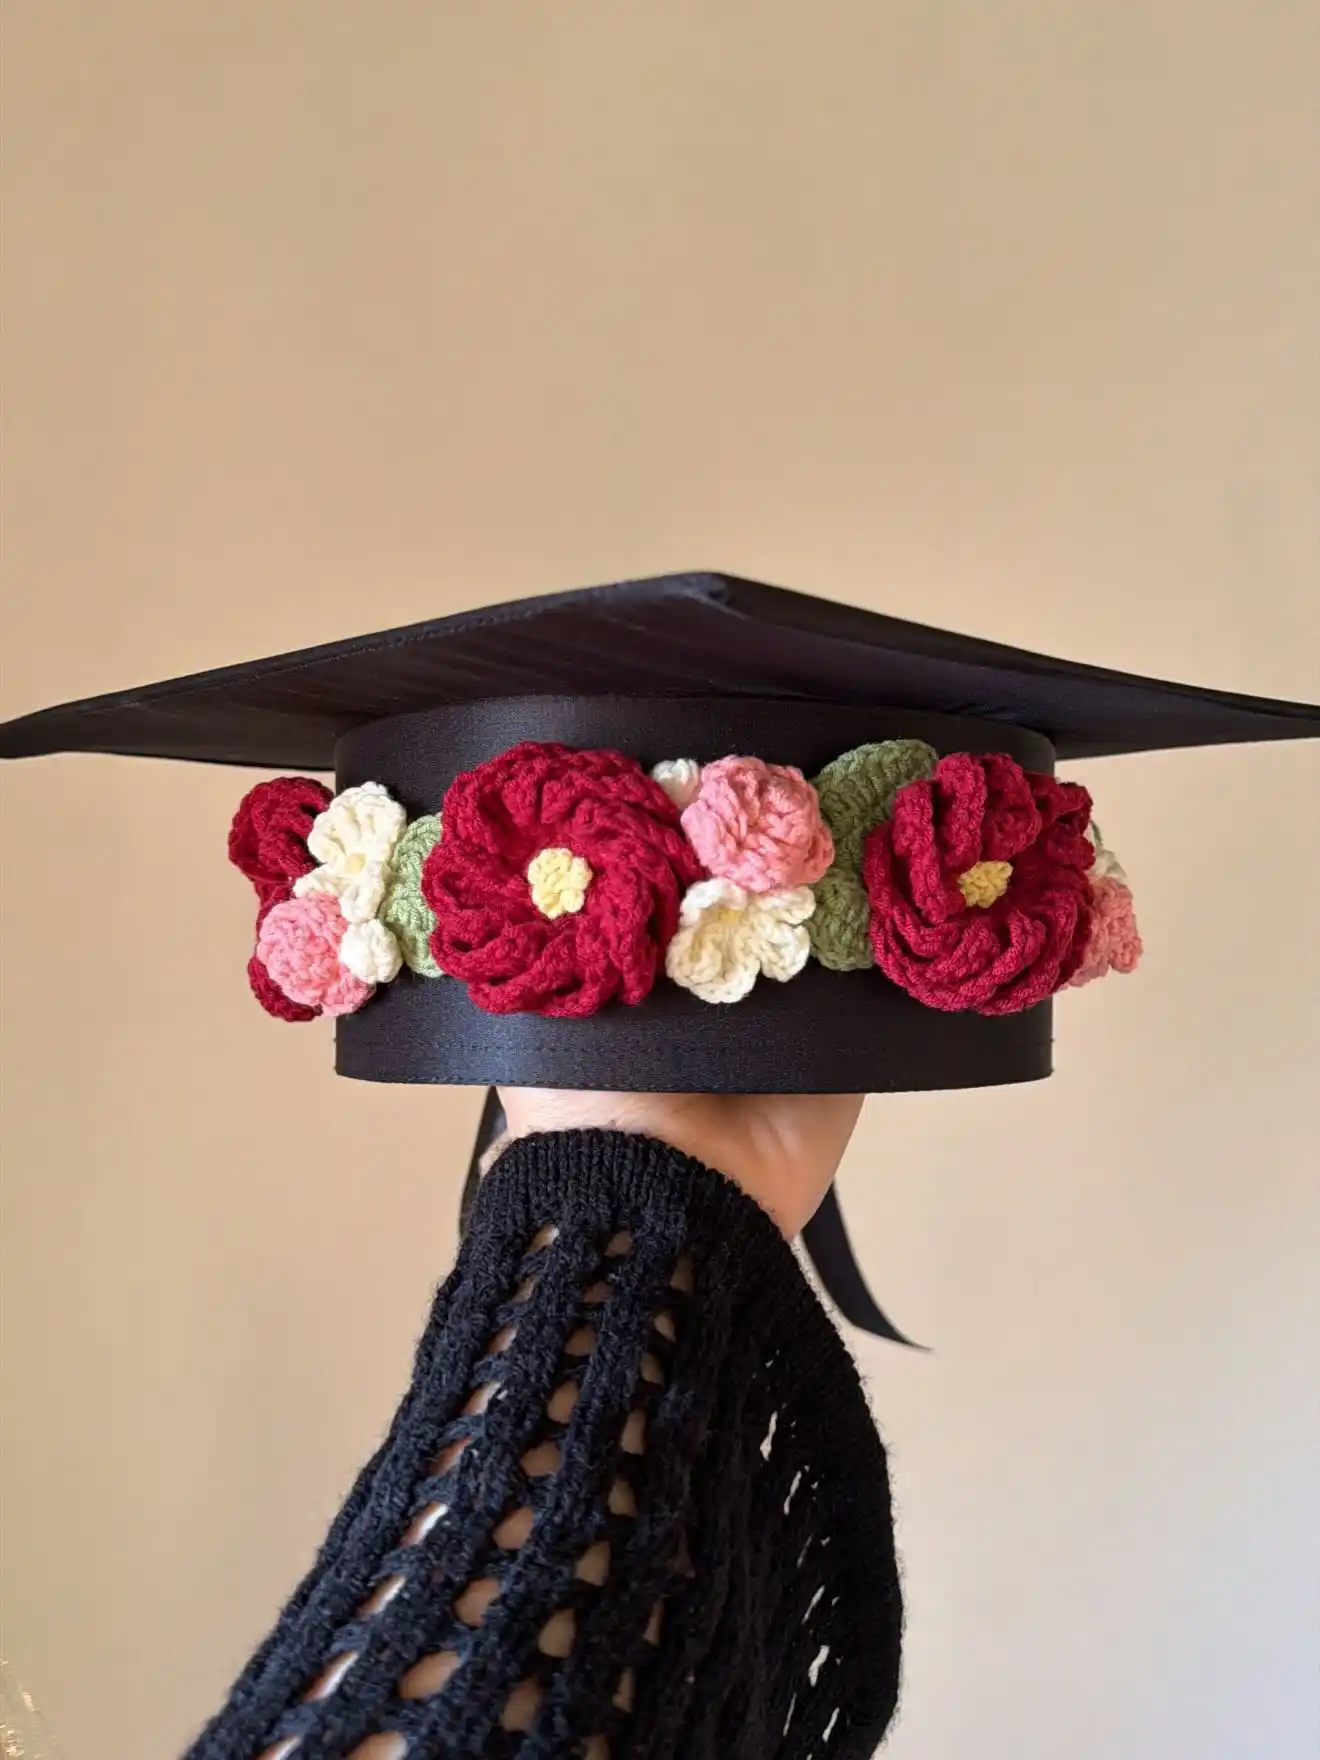
A plain black cap turns into something special with a row of crocheted flowers stitched right onto the band.
This idea works because it does not touch the actual cap, so the graduate can remove the flower garland after the ceremony and keep it as a keepsake, maybe pinned to a jacket or hung on a wall.
What makes this one stand out:
- The flowers are mixed sizes, big roses next to smaller blossoms, so the row never looks stiff or too matched
- Deep red and soft pink sit next to cream and sage green, a combination that reads as classic rather than trendy
- Yellow centers on the roses catch the eye and keep the deep red from looking too heavy
- The band covers the full width of the cap, so it looks finished from every angle, not just the front
12. A Crochet Bouquet Doll, the Gift That Never Wilts
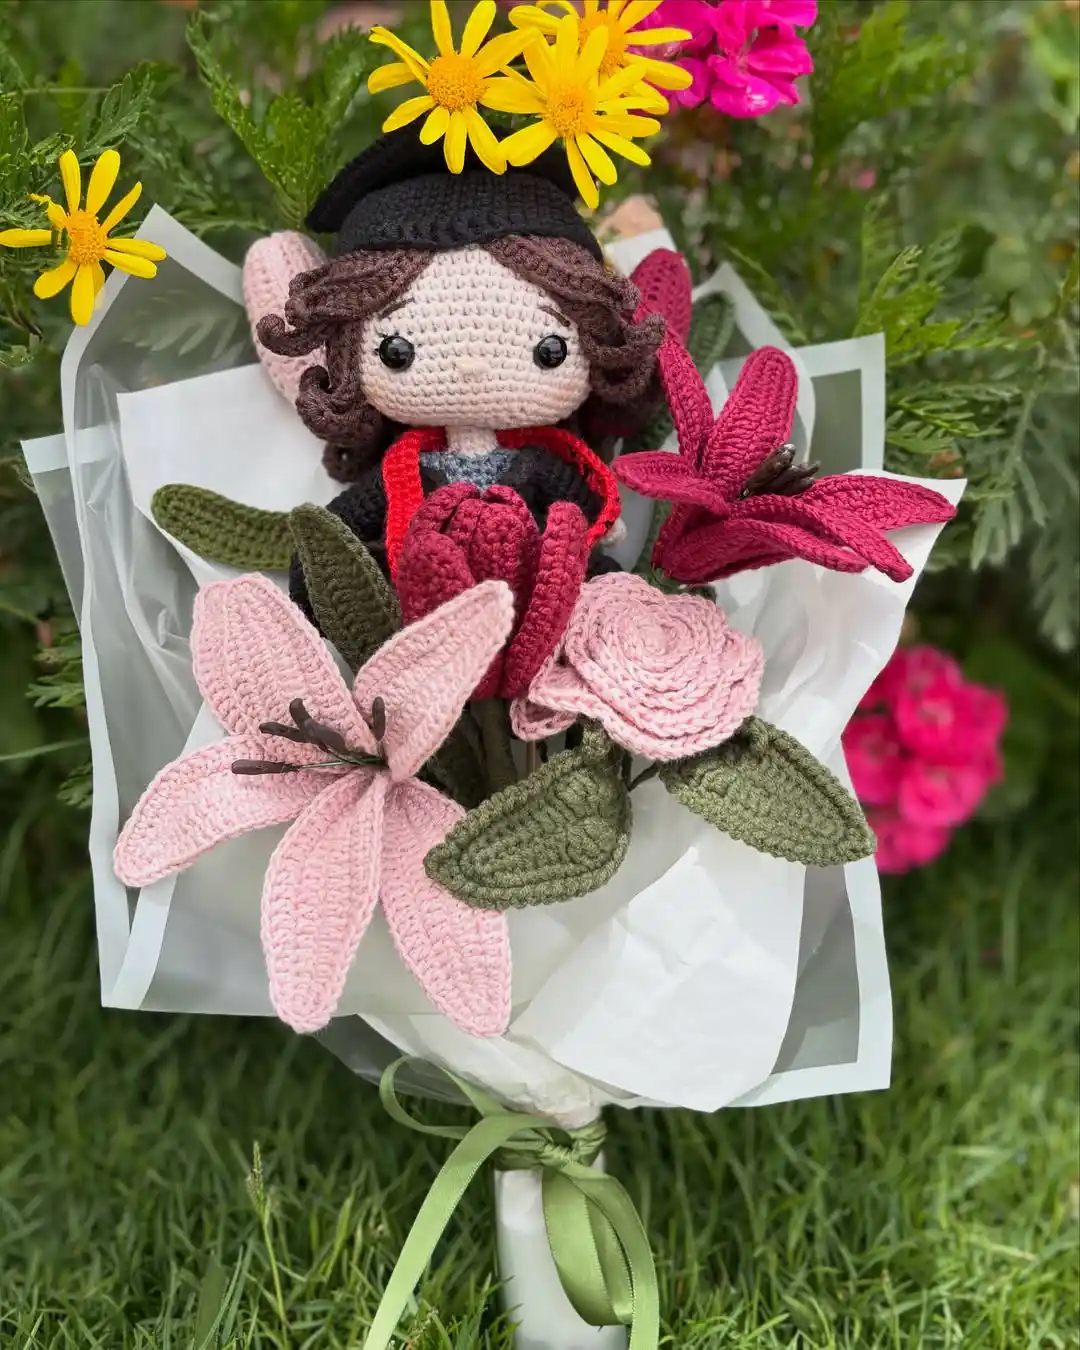
Real flowers fade within a week, but this little graduate doll wrapped in a bouquet of crocheted lilies, roses, and a tulip stays exactly this pretty for years.
She wears a tiny black cap and a graduation gown with a red sash, tucked right into the center of the bouquet like she is part of the flowers herself.
What makes this arrangement work:
- The doll’s face is simple, just two dot eyes and a soft expression, so she reads as cute rather than trying too hard to look realistic
- Pink lilies and a blush rose sit at the front, with a deep magenta lily and a burgundy tulip layered behind for contrast
- Sage green leaves fill the gaps so no bare stems show through
- White paper wrap and a sage ribbon finish it off exactly like a florist shop bouquet
13. A Handmade Card That Skips the Store-Bought Look
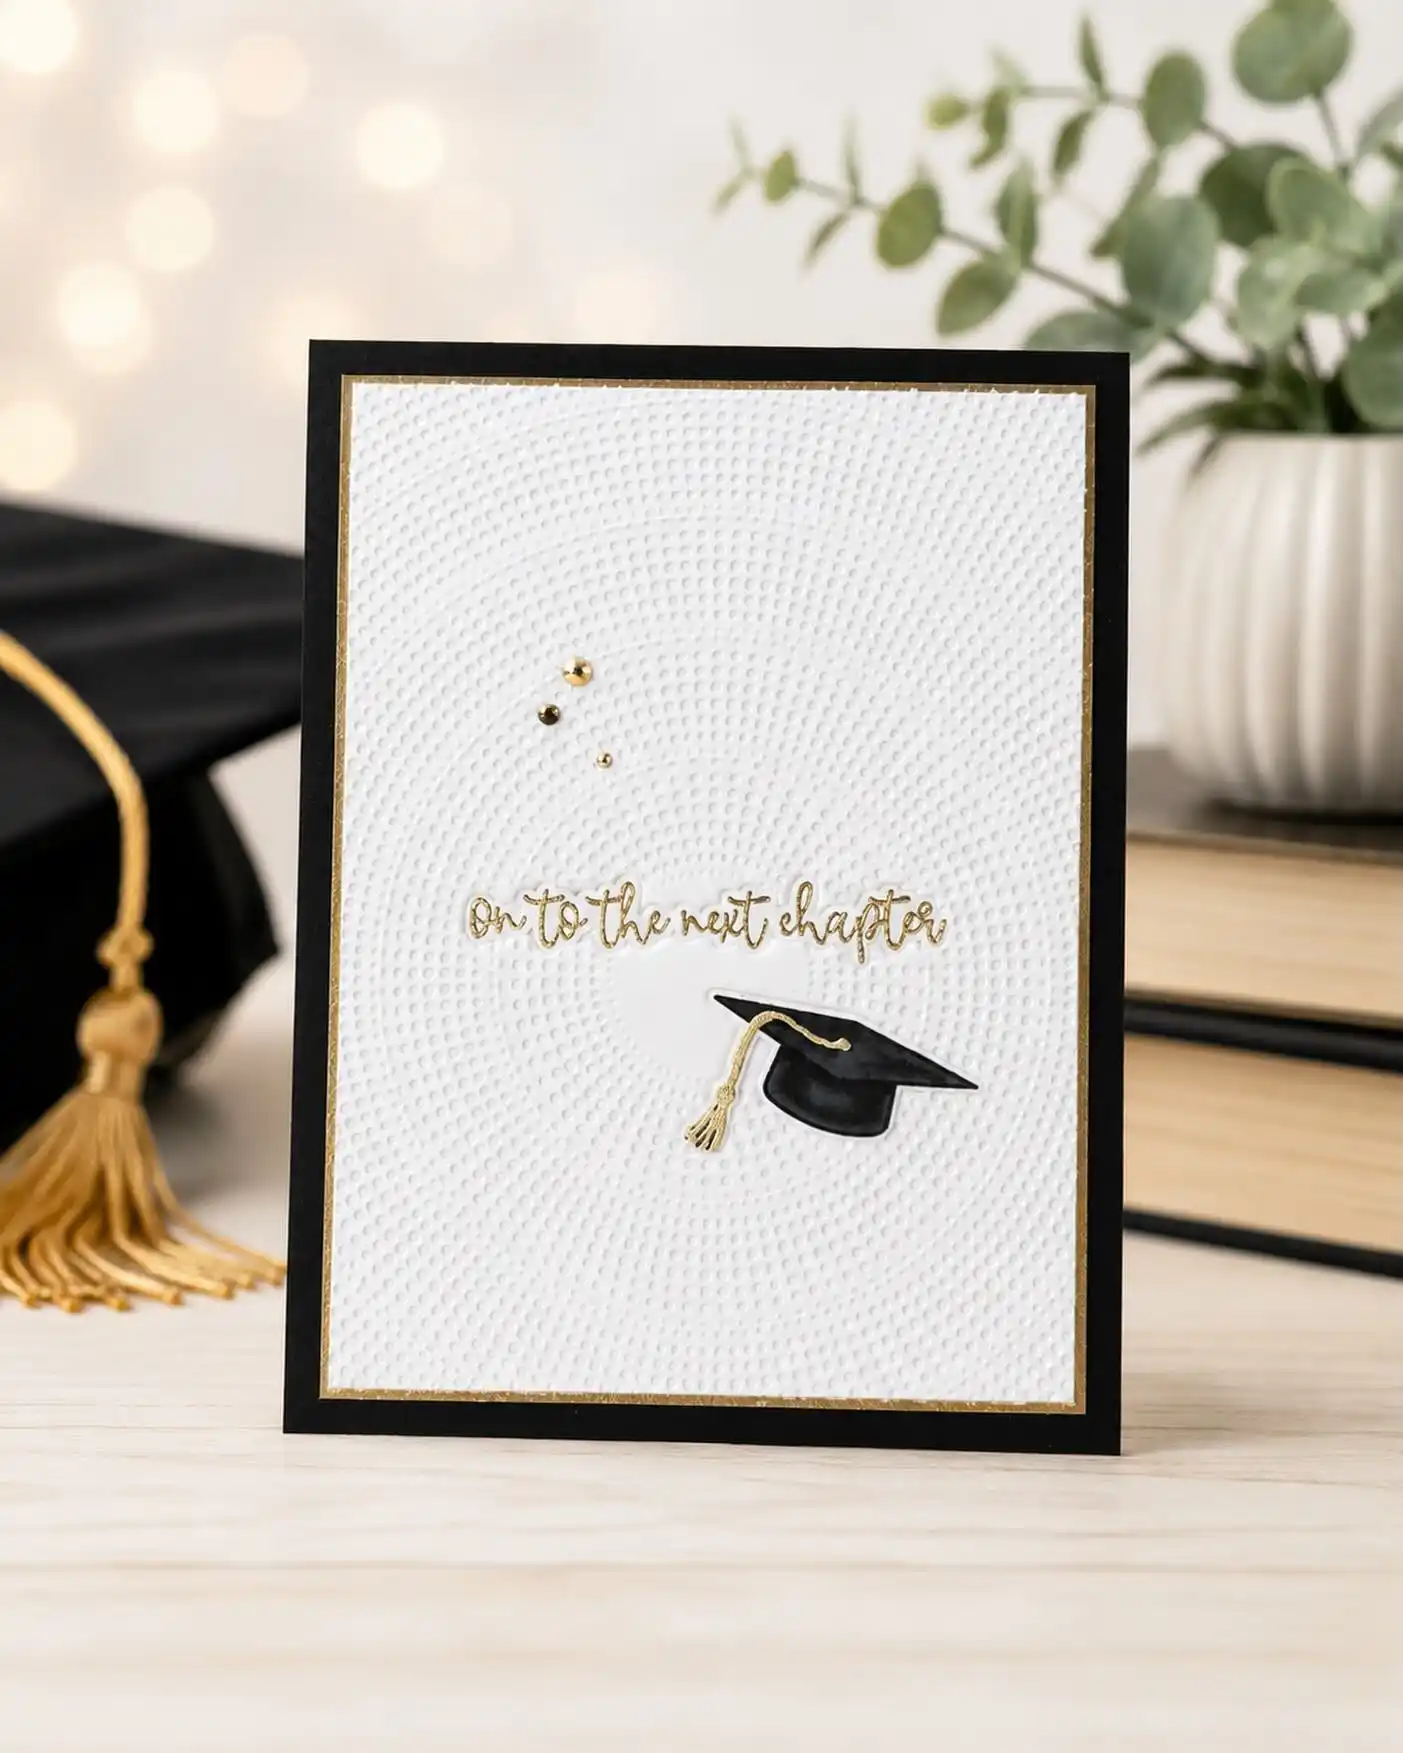
Dotted embossed cardstock, a black and gold border, and one small die-cut cap turn a simple card into something that feels designed rather than picked off a rack.
The gold foil sentiment “on to the next chapter” does the heavy lifting here, paired with just three gold sequins scattered above it like confetti mid-air.
How to recreate this look:
- Layer your base — start with a black cardstock panel, then a slightly smaller gold panel, then white embossed cardstock on top so each color peeks out as a thin border.
- Stamp or die-cut your sentiment — heat emboss it in gold for that raised, shiny script if you have the tools, or use a gold gel pen for a simpler version.
- Add one small focal image — a single cap die-cut or sticker is enough. Resist adding more than one graphic so the card stays clean.
- Finish with a few loose sequins or gems — three or four scattered near the text adds sparkle without cluttering the design.
Black cardstock, then gold, then embossed white on top so each color shows as a thin border.
Heat emboss it in gold, or trace it with a gold gel pen for an easier version.
A single cap die-cut is plenty. More than one graphic starts to compete for attention.
Three or four loose sequins near the text add sparkle without cluttering the card.
14. A Build-Your-Own Grad Care Package, Snacks Included
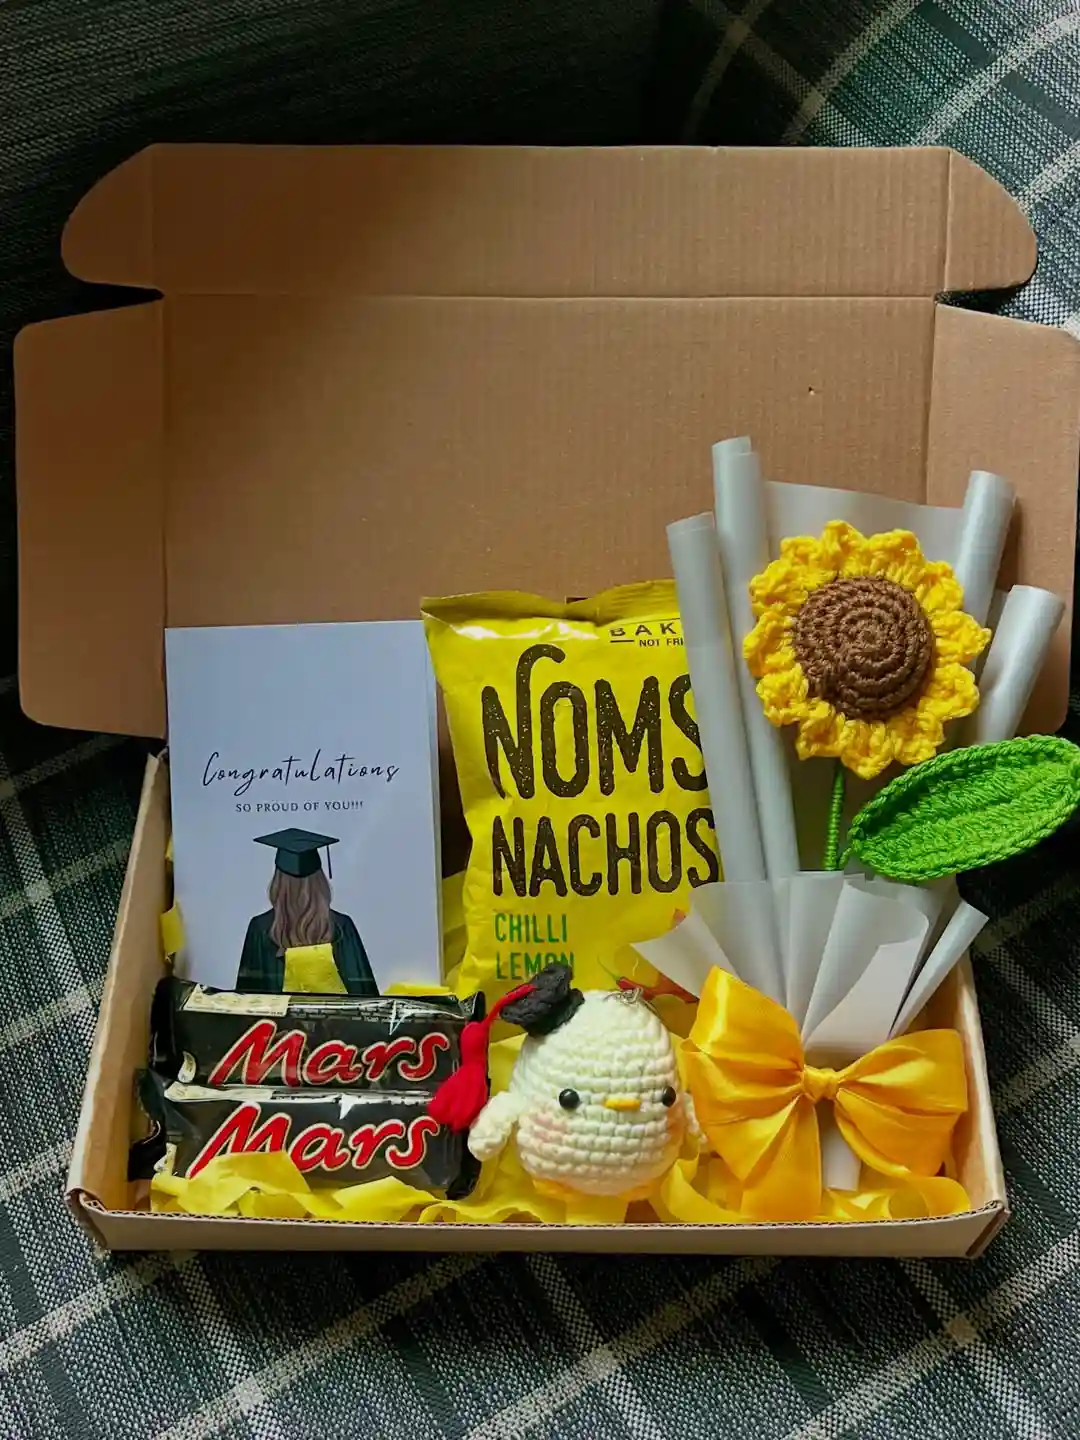
This one is not one craft, it is a whole system: pick a sturdy box, then fill it with a mix of handmade and store-bought pieces so it feels personal without taking twenty hours to assemble.
The crocheted sunflower bouquet and a tiny chick amigurumi wearing its own graduation cap are the handmade centerpieces, while chocolate bars and a bag of chips round it out with something to actually eat during the celebration.
15. Turn a Teddy Bear Into the Graduate, Paper Cap and All
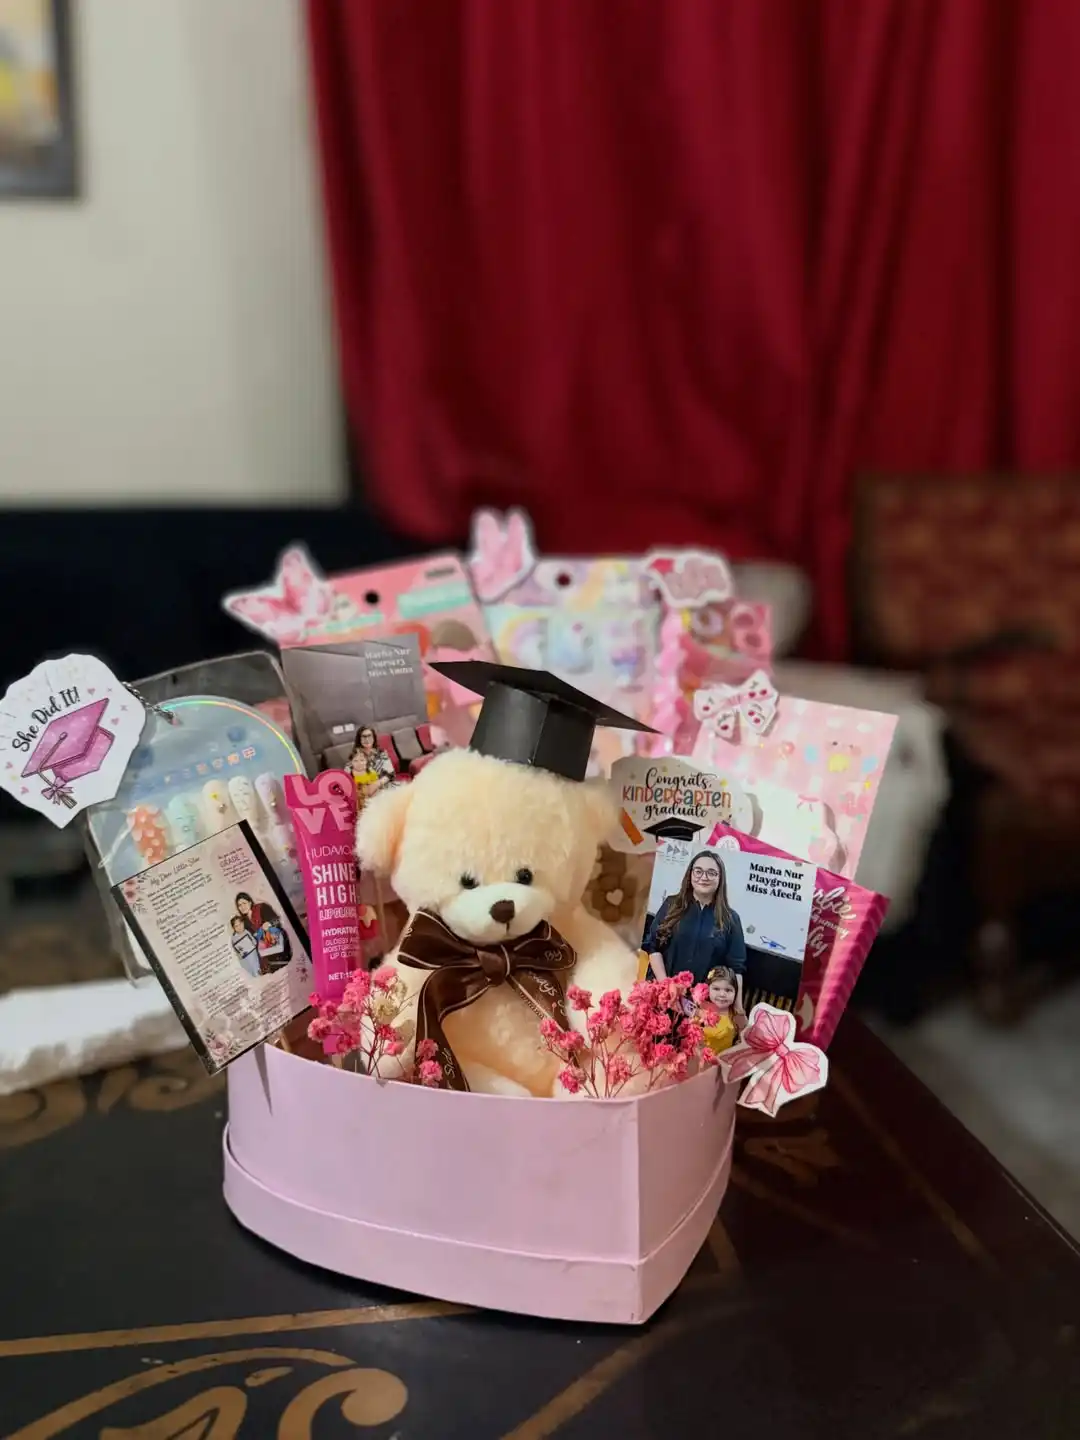
Skip the miniature diploma and go straight for something the graduate will actually keep hugging years later.
Here, a plush teddy bear gets its own tiny graduation cap made from folded black cardstock, glued right onto its head, then gets tucked into a heart shaped keepsake box surrounded by dried baby’s breath and a handful of personal touches.
This idea leans into sentiment over spectacle:
- A photo tag with the graduate’s name and school pinned to the front makes the box feel made for one specific kid, not a generic gift set
- Small extras like lip gloss, nail stickers, and a hair bow fill the gaps so the box does not look sparse
- Dried pink flowers tucked around the bear soften the whole arrangement and keep it from feeling like a pile of stuff
- A brown satin bow tied at the bear’s neck gives it one clean finishing detail
A named photo tag turns a generic bear into a keepsake made for one kid, not a shelf item.
16. Fill a Champagne Flute With Candy and Top It With a Paper Cap
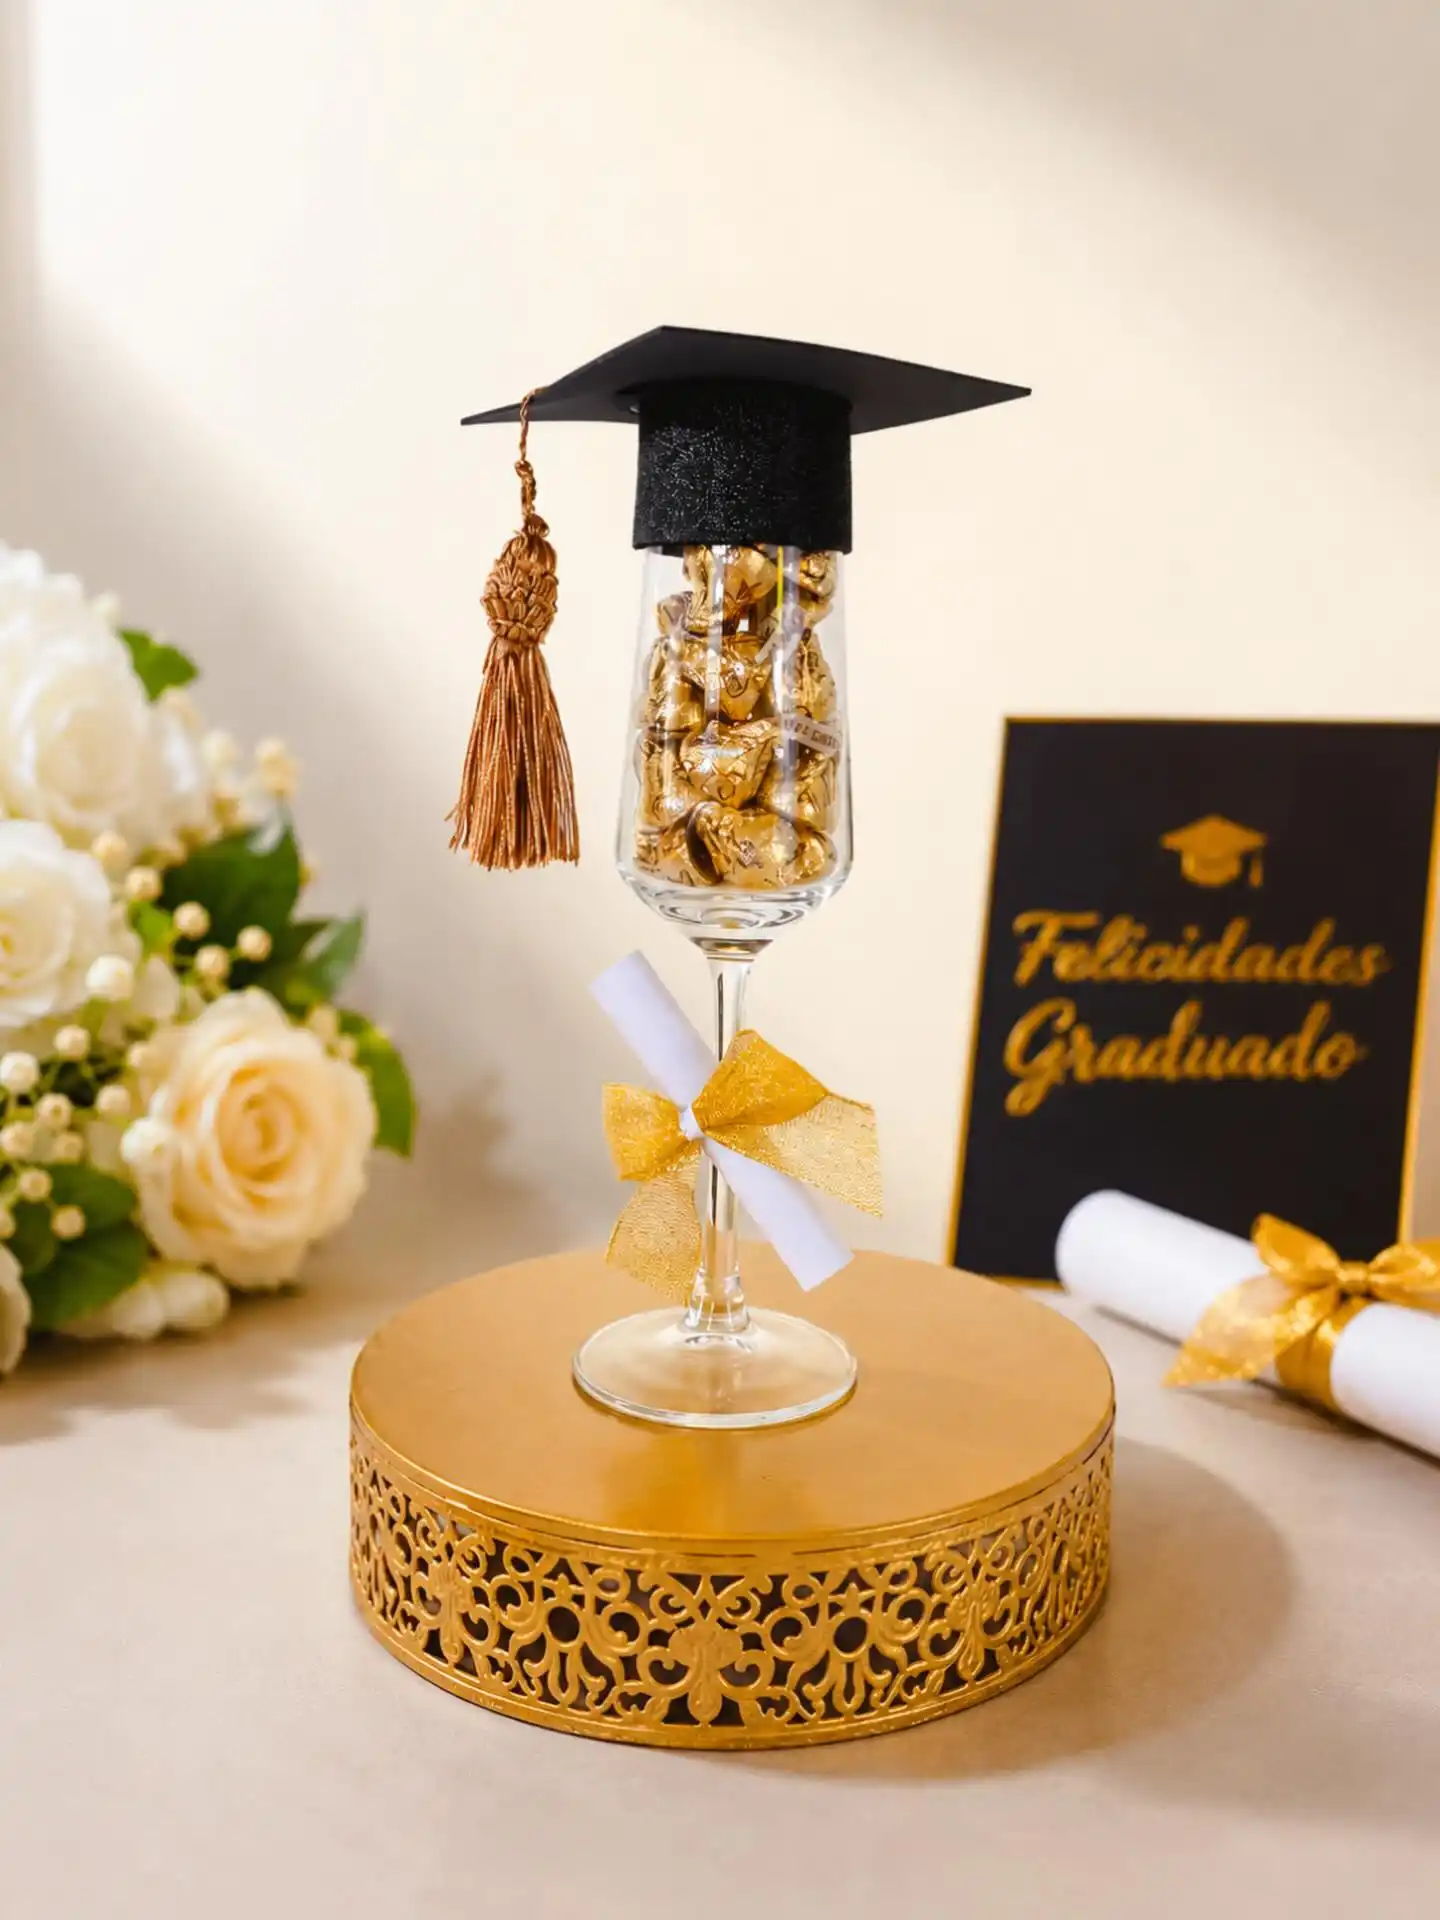
A stemmed glass becomes the container here, no box or bag needed. Wrapped gold chocolates get stacked inside a champagne flute until it is full, then a small folded paper mortarboard with a real tassel sits balanced right on top like a lid.
A tiny rolled diploma tied with an organza bow wraps around the stem as the finishing touch.
Why this reads as more than just candy in a cup:
- The black cap against the gold foil wrapping makes the colors do the work, no extra decoration needed
- Tying the diploma scroll around the stem instead of setting it beside the glass keeps every element attached to the glass itself
- Using a champagne flute instead of a mason jar gives it an elegant, gift shop finish rather than a rustic one
- The tassel hanging off the side adds movement so the piece does not look too stiff or symmetrical
17. A Paper Bag Owl Gift Bag for the Littlest Grad
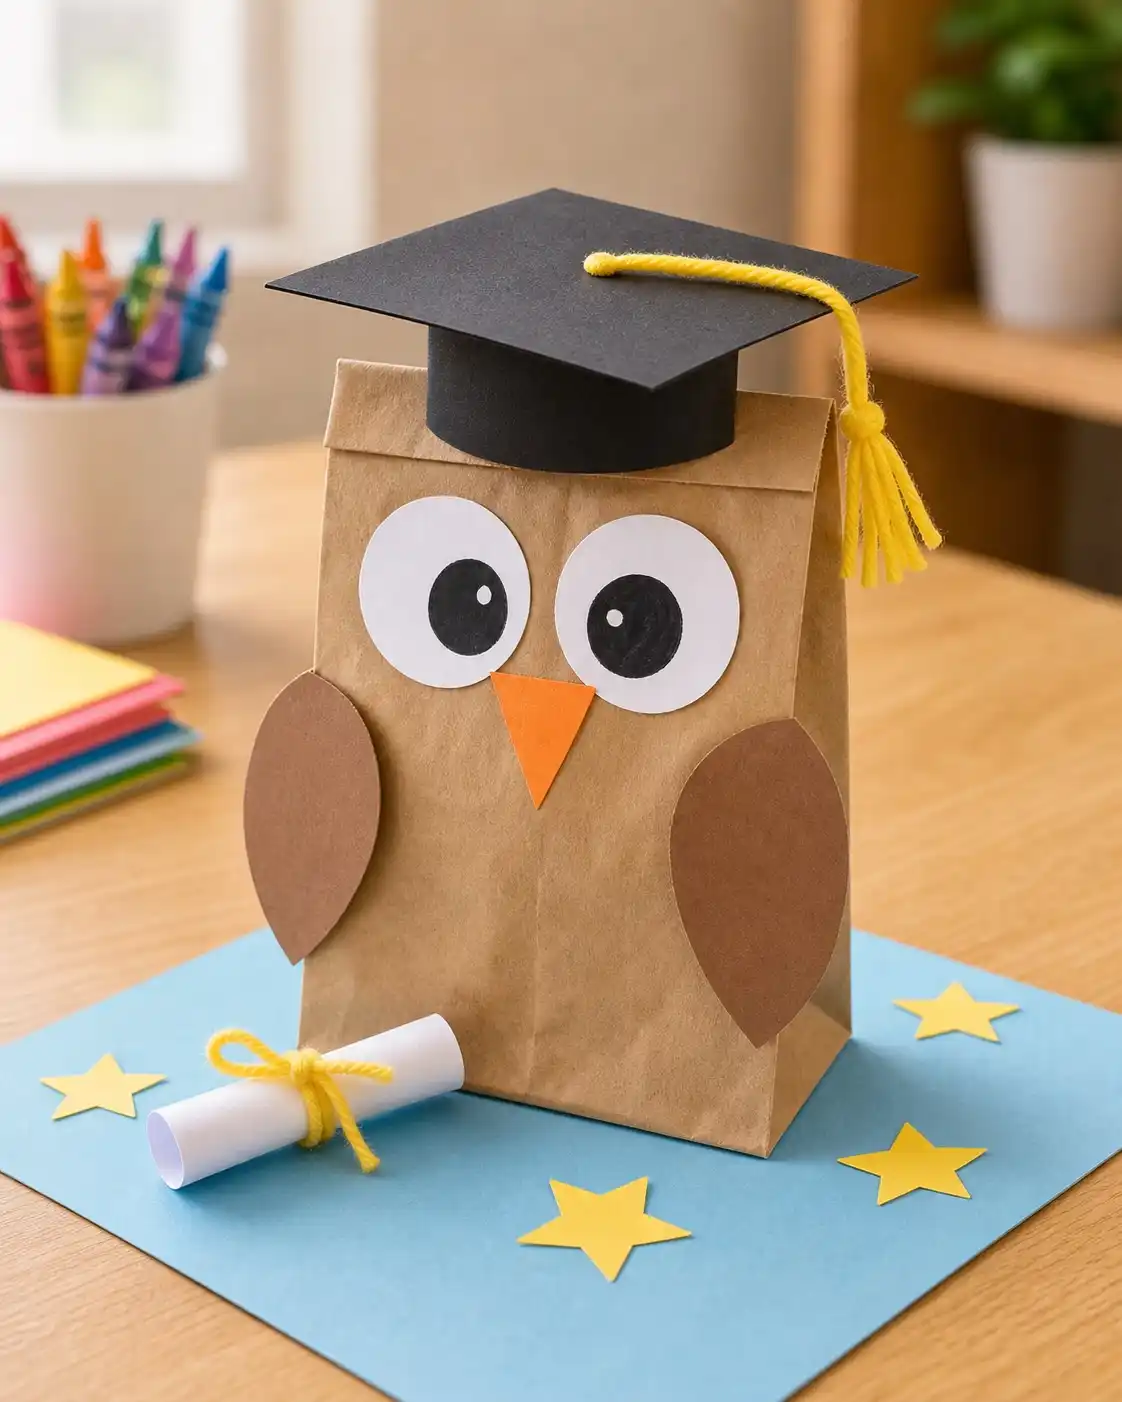
Preschool and kindergarten graduations call for something goofier than a card. A plain lunch bag turns into an owl in about fifteen minutes, and it doubles as the actual gift bag, so there’s no separate wrapping step.
Fold the top of a paper bag down about two inches to make the head, then glue on white circle eyes with smaller black pupils, an orange triangle beak, and two teardrop wing shapes lower down.
The cap is a black paper square glued to a small cardstock tube, with a few strands of yarn knotted into a tassel. A tiny paper diploma tied with yarn sits at the base for the photo.
- Age: works for ages 3 and up with adult help on the cap
- Time: under 20 minutes start to finish
- Materials: paper bag, cardstock, glue, yarn
Conclusion
Graduation gifts hit different when they show a little effort, and none of these ideas require professional craft skills to pull off.
Pick whichever matches the time you have and the graduate you are shopping for, a fast card for a big class, a detailed bouquet for someone special.
Save this for the next time you want fresh diy graduation gift ideas that actually feel personal.