15 Backpack Charm and Keychain Ideas

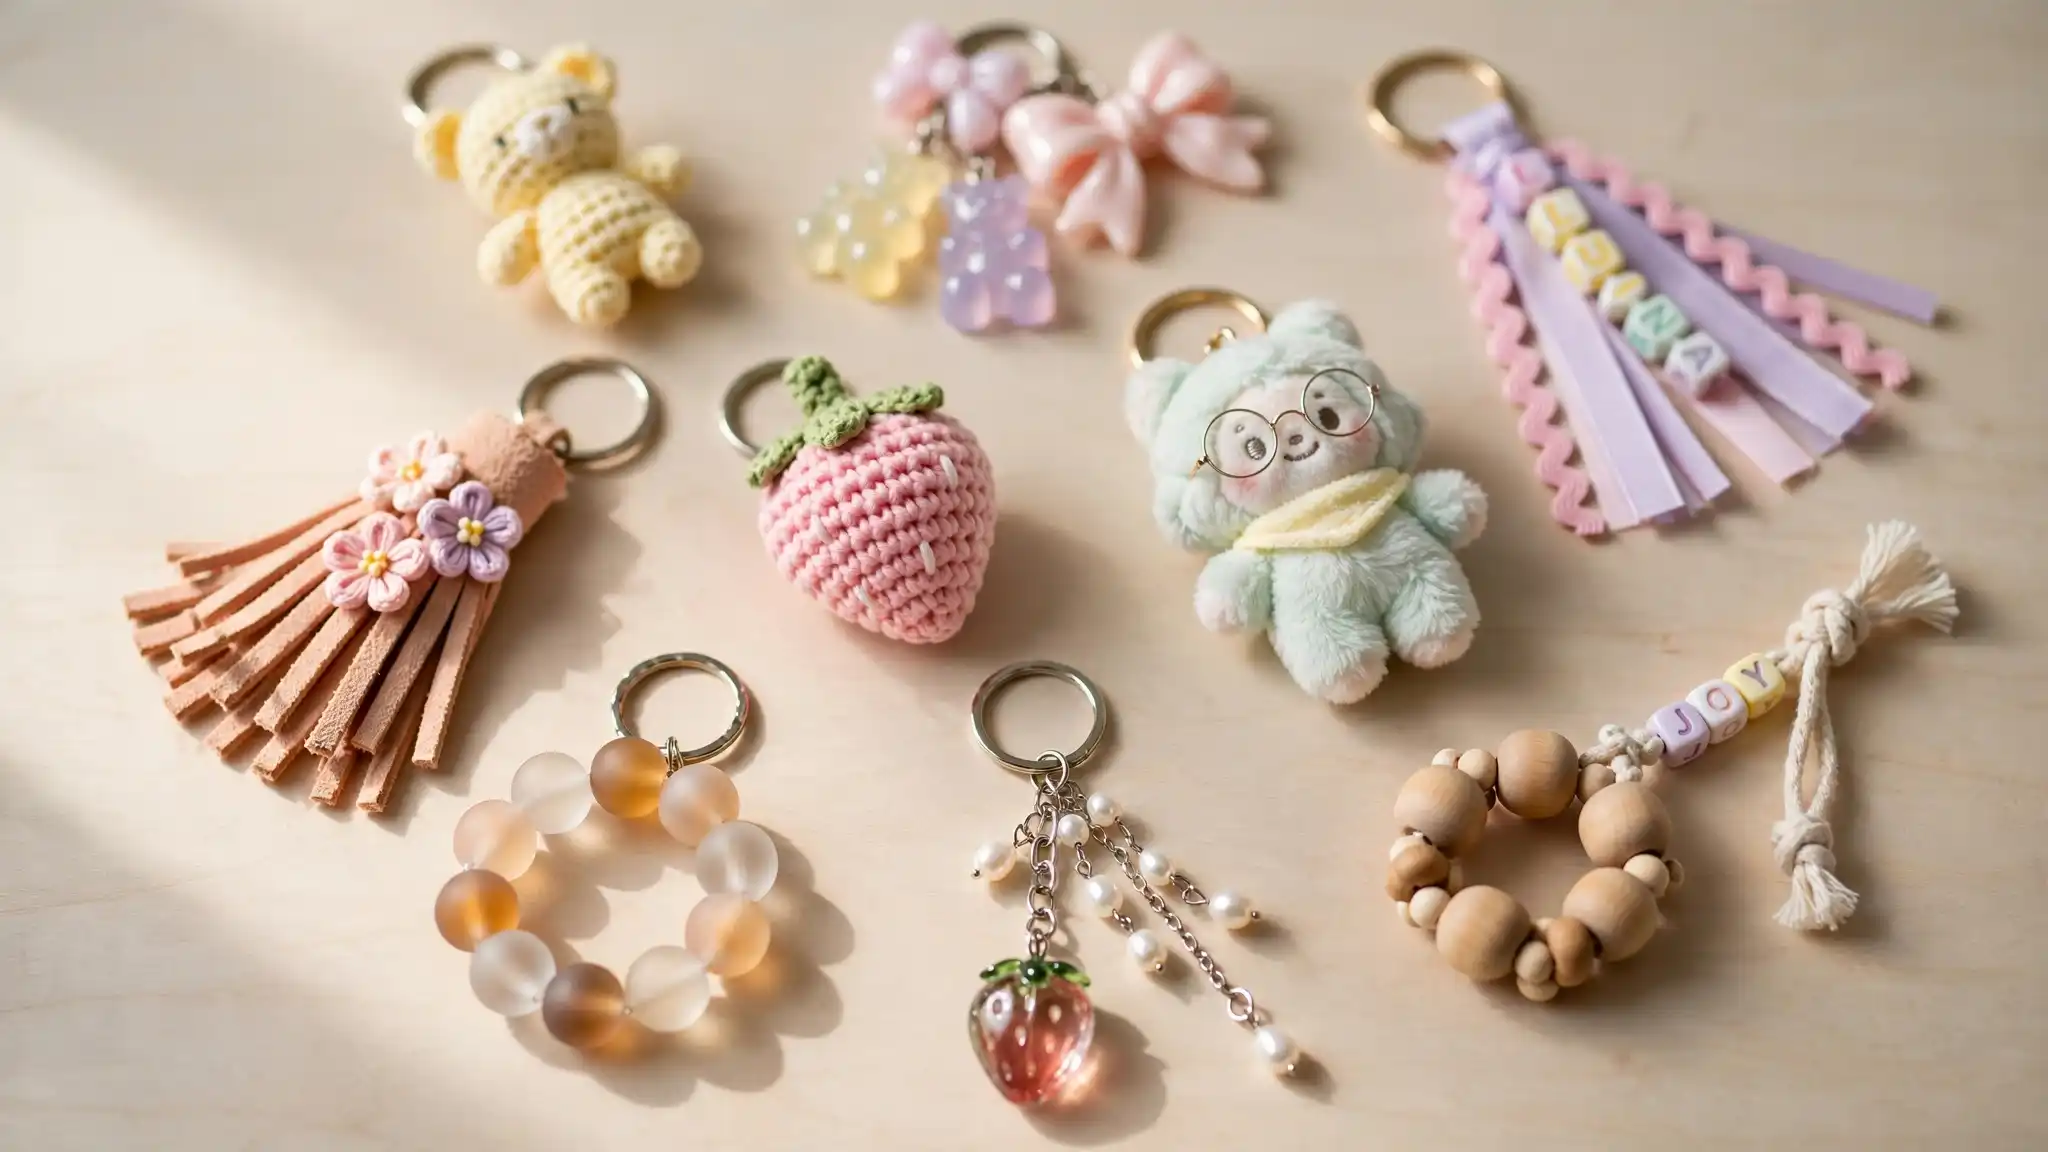
You know that moment when you’re grabbing your bag off a hook full of identical ones and you have to actually check which is yours. That’s the whole reason backpack charms exist.
Once you start looking closely at the good ones, you realize the difference between a charm that looks homemade and one that looks like it came from a boutique usually comes down to two or three small choices, not a long supply list.
This roundup pulls together fifteen real ideas, pulled straight from bags people have actually made: beaded rings, dangly Y2K chains, chunky wood bead clusters, suede fringe, crochet amigurumi, plush characters, ribbon tassels, and more.
Some lean simple, two pieces and done. Others build up in layers with five or six charms hanging together.
What ties them all together is intention, one color story, one clear pairing logic, one detail that does the personal touch instead of five competing for it.
Whether you’re stringing your first beaded charm or looking to switch up a whole collection, there’s a starting point here for every skill level and every bag.
15 Backpack Charm and Keychain Ideas
1. Beaded Ring Charms With Mixed Metal Hardware
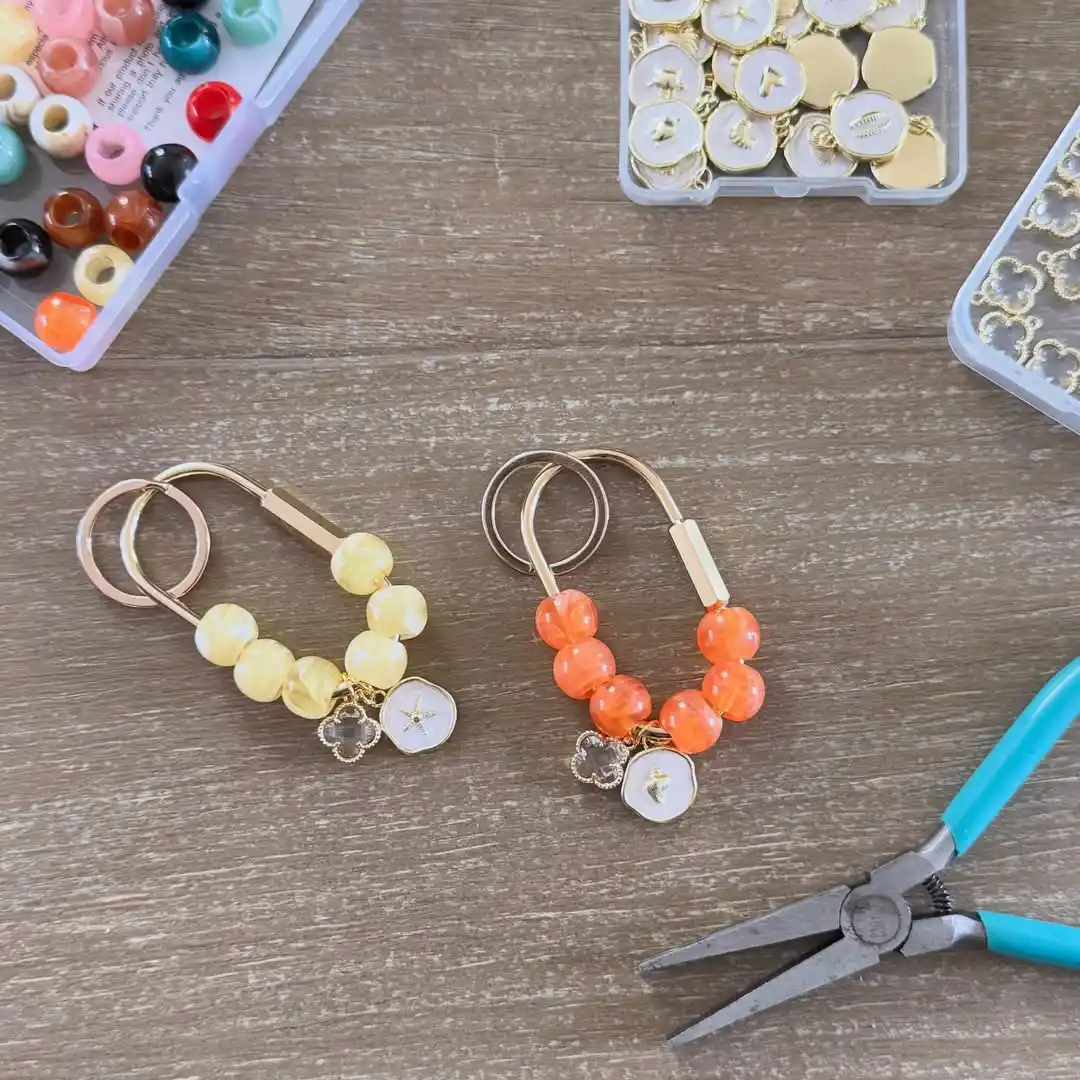
Two rings clipped together is the trick that makes this charm hang right instead of flopping to one side.
Frosted glass beads in one warm color family, like butter yellow or blush orange, keep the whole piece from looking busy.
The frosted finish scatters light instead of throwing off a hard shine, which reads as softer than clear glass would.
A short gold bar spacer separates the beads from the key rings and gives the eye a place to rest.
Small stacked charms at the bottom, a clover, a coin, a star, add personality without weighing the bag down.
The double key rings, one gold and one silver, make it easy to clip onto a zipper pull or bag strap, and mixing the two metal tones is what keeps the piece from looking too matched.
Round beads with a big enough hole for 20 gauge wire are the easiest to work with here. Flat nose pliers do most of the job, you barely need anything else on the table.
2. Dangly Y2K Charms Built On A Long Bead Chain
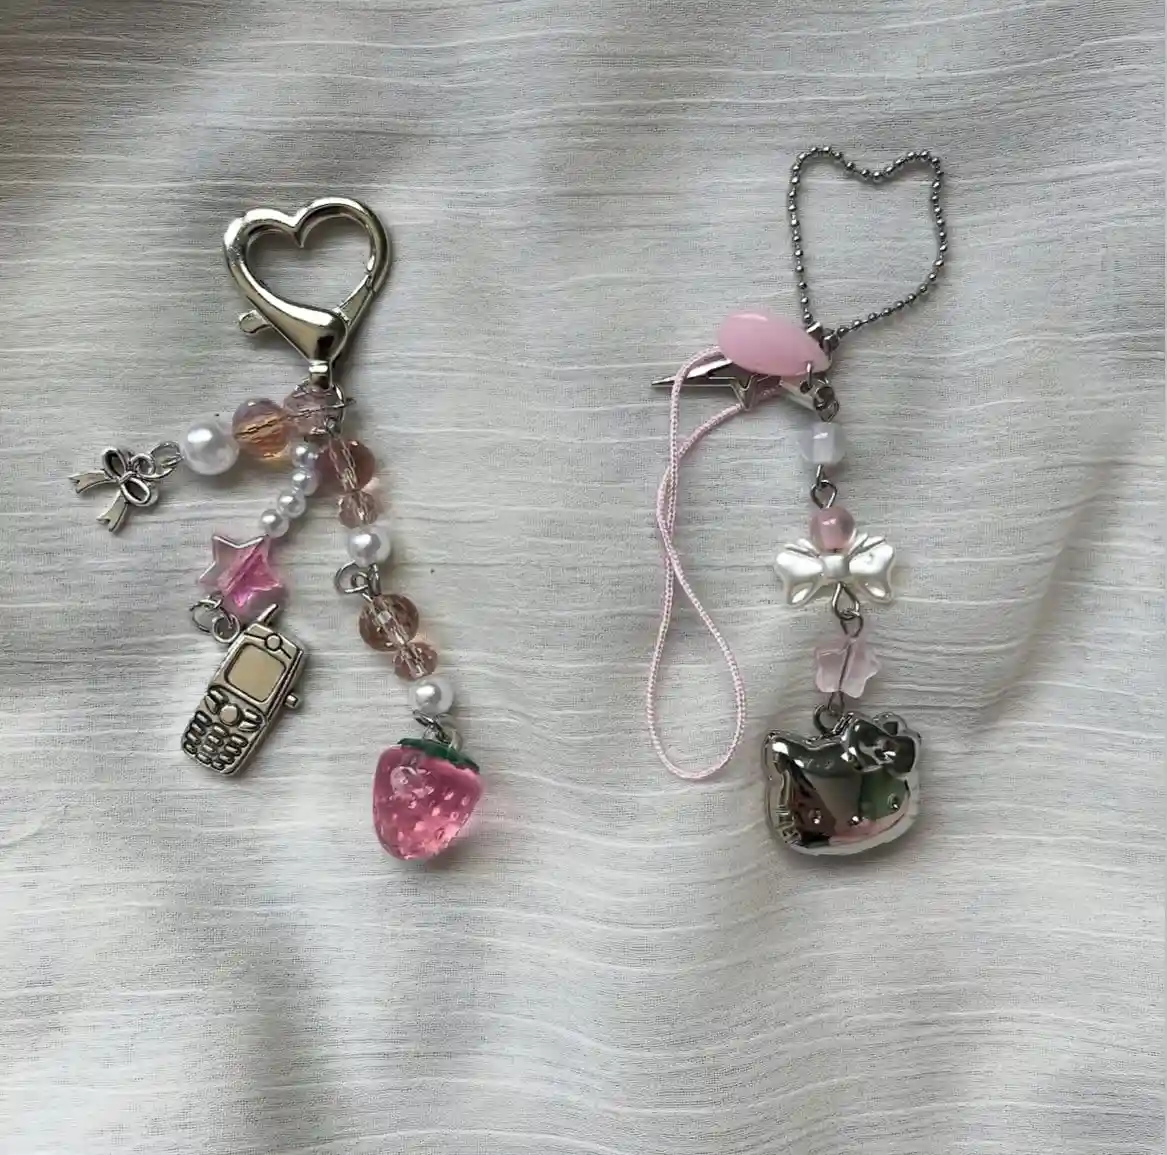
Length is doing a lot of work here. Instead of one charm sitting flush against the clip, these hang in three or four tiers so they swing and catch light when the bag moves.
Two ways to start the chain, both shown in this photo:
- A silver heart shaped lobster clasp, which clips onto a zipper pull the normal way
- A ball chain heart, which slides through a phone strap or wristlet loop instead of clipping
From there it is the same idea both times: alternate faceted glass beads with a pearl or two, add one small silver charm partway down (a bow, a tiny flip phone), and finish with a bigger glass charm at the very bottom, like the strawberry or the enamel animal face. That bottom charm should be the heaviest piece so the whole chain hangs straight.
3. Chunky Bead Cluster With A Personalized Name Tag
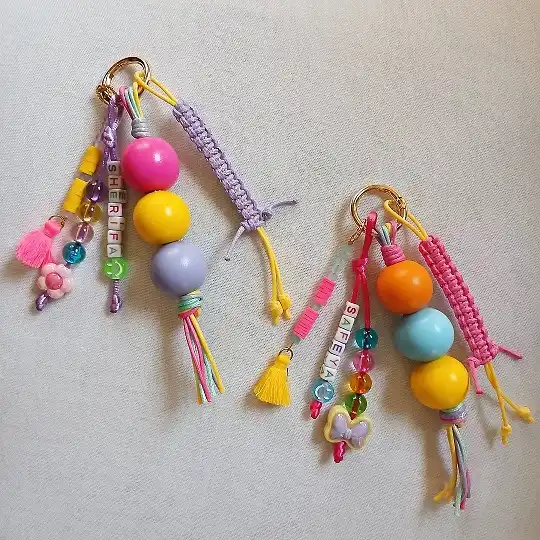
Big wooden beads and a name spelled out in letter beads turn a simple keychain into something that reads as a gift, not just a decoration.
A few things happening at once in this one:
- Three or four oversized round beads in a bold color mix, stacked directly on the jump ring so they take up real visual weight
- A thin strand of letter beads spelling a name, tucked beside the big beads rather than centered, which keeps it from looking like a bracelet
- A macrame wrapped cord as one of the strands for texture against all that smooth wood
- Mini tassels and a small enamel charm (a flower, a butterfly) tucked in low, almost hidden until you look closely
Pick two or three colors max for the big beads. More than that and the name tag stops standing out.
4. Suede Fringe Charm With Bright 3D Flowers
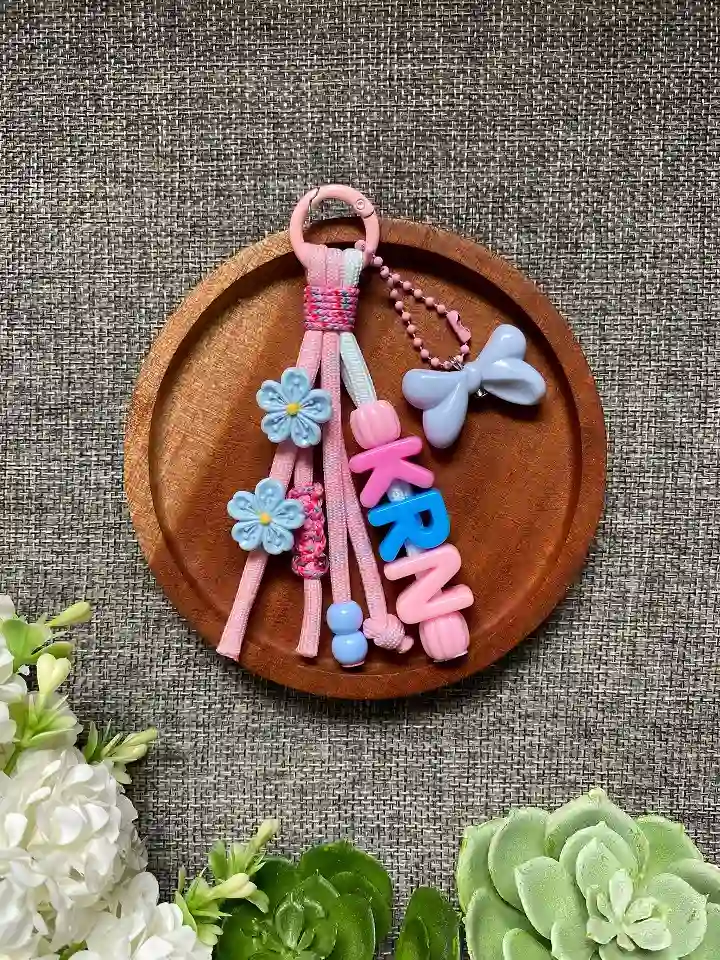
Flat suede cord instead of beads changes the whole feel, this one moves and swishes rather than clinking, and it gives you a wide flat surface to layer little charms against.
The layering order matters more than it looks:
- Suede fringe strands, three or four cut to slightly different lengths, form the base
- Two puffy enamel flowers sit low and off to one side, not centered, so the eye travels down the charm instead of straight across
- Letter beads spelling initials sit on their own single strand, stacked vertically instead of side by side, which fits more letters into less space
- A pastel bow charm on a small ball chain hangs separately near the top, giving the piece a second focal point besides the name
Suede holds up better than ribbon and does not fray the same way, worth the extra dollar or two at the craft store.
5. Textured Bead Stack With A Pom Pom And Acrylic Wings
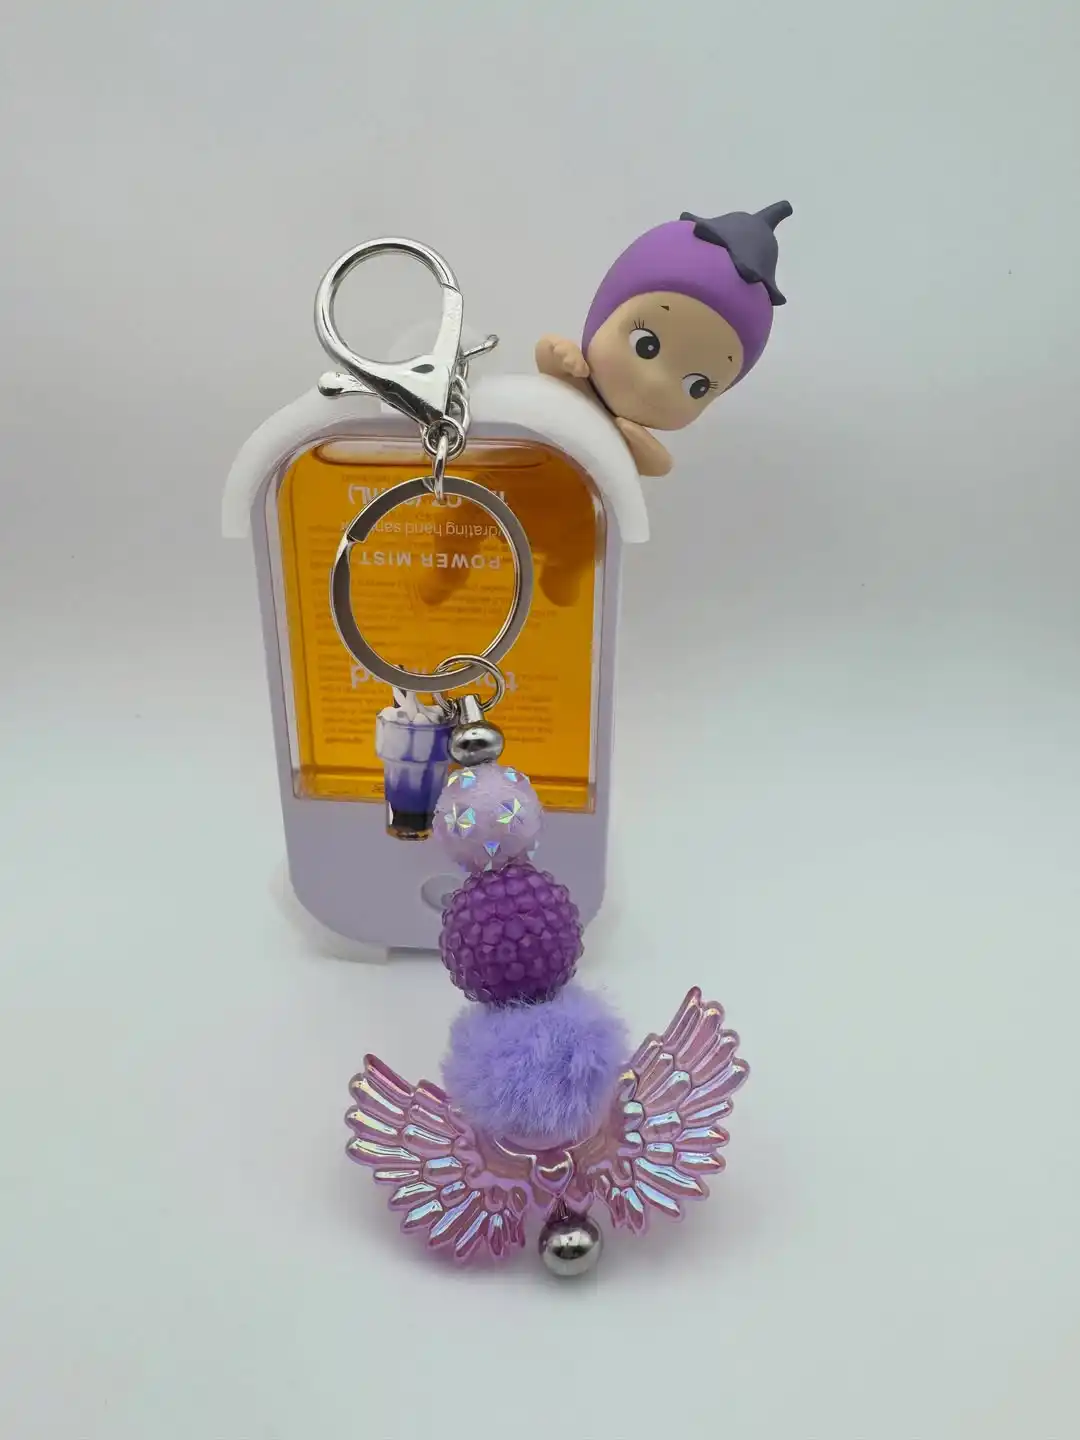
Mixing textures on one strand is the whole trick behind this charm. Smooth acrylic ball, rhinestone covered ball, fuzzy pom pom, glossy wings, four different surfaces in one short drop, and each one reads differently under light.
The build order from top to bottom:
Silver ball connector, then a small novelty charm (here a tiny drink cup), then a rhinestone pave bead, then a solid color resin bead, then a fur or faux fur pom pom, then the biggest element last, an iridescent acrylic charm like these angel wings.
Working from big to small on the bottom keeps it from feeling top heavy, and putting the shiniest bead right under the clasp catches light the moment someone picks up the bag.
6. Tiny Enamel Charms That Tell A Mini Story
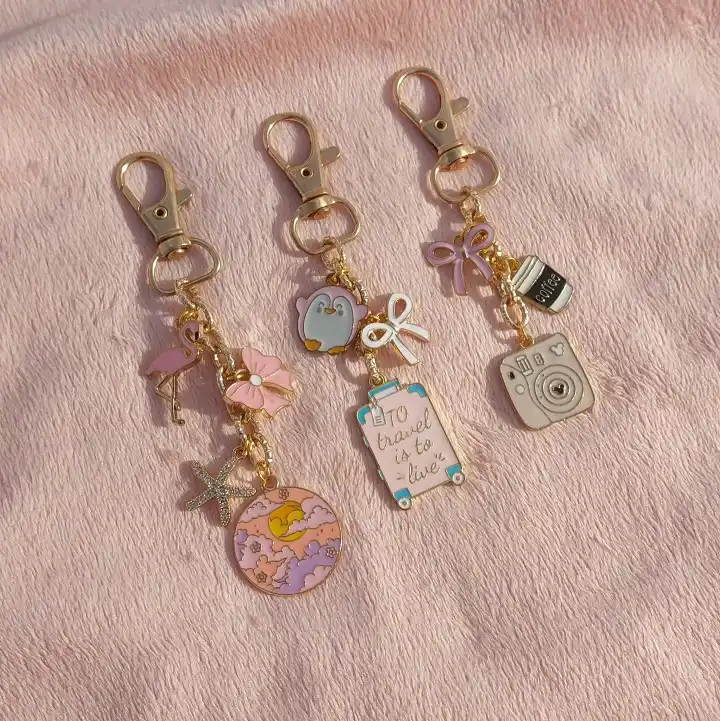
Three little icons stacked in order turn a plain charm into a theme, a flamingo plus a starfish plus a moon scene reads as “beach,” a penguin plus a suitcase reads as “travel,” instantly, without a single word needed.
Why the storytelling trick works:
- Each charm sticks to one clear theme, nothing random gets mixed in
- Icons are small, flat enamel pieces, so three or four stack without adding bulk
- A tiny bow or ribbon charm gets tucked between the icons as a soft break
- The bottom charm is always the biggest and most detailed, like the round moon scene, so the eye lands there last
Enamel pins made for keychains work well for this since they already come with a small loop attached, no extra jump rings needed for the icon itself.
Subscribe to DIY Craft Bloom
Get updates on the latest posts and more from DIY Craft Bloom straight to your inbox.
Beach, travel, or coffee shop, one clear idea holds the whole charm together.
Flat enamel charms keep the whole thing light and stop it from tangling.
A round scene charm or a phrase tag anchors the bottom and finishes the story.
7. Single Shape Amigurumi Charms In One No Frills Style
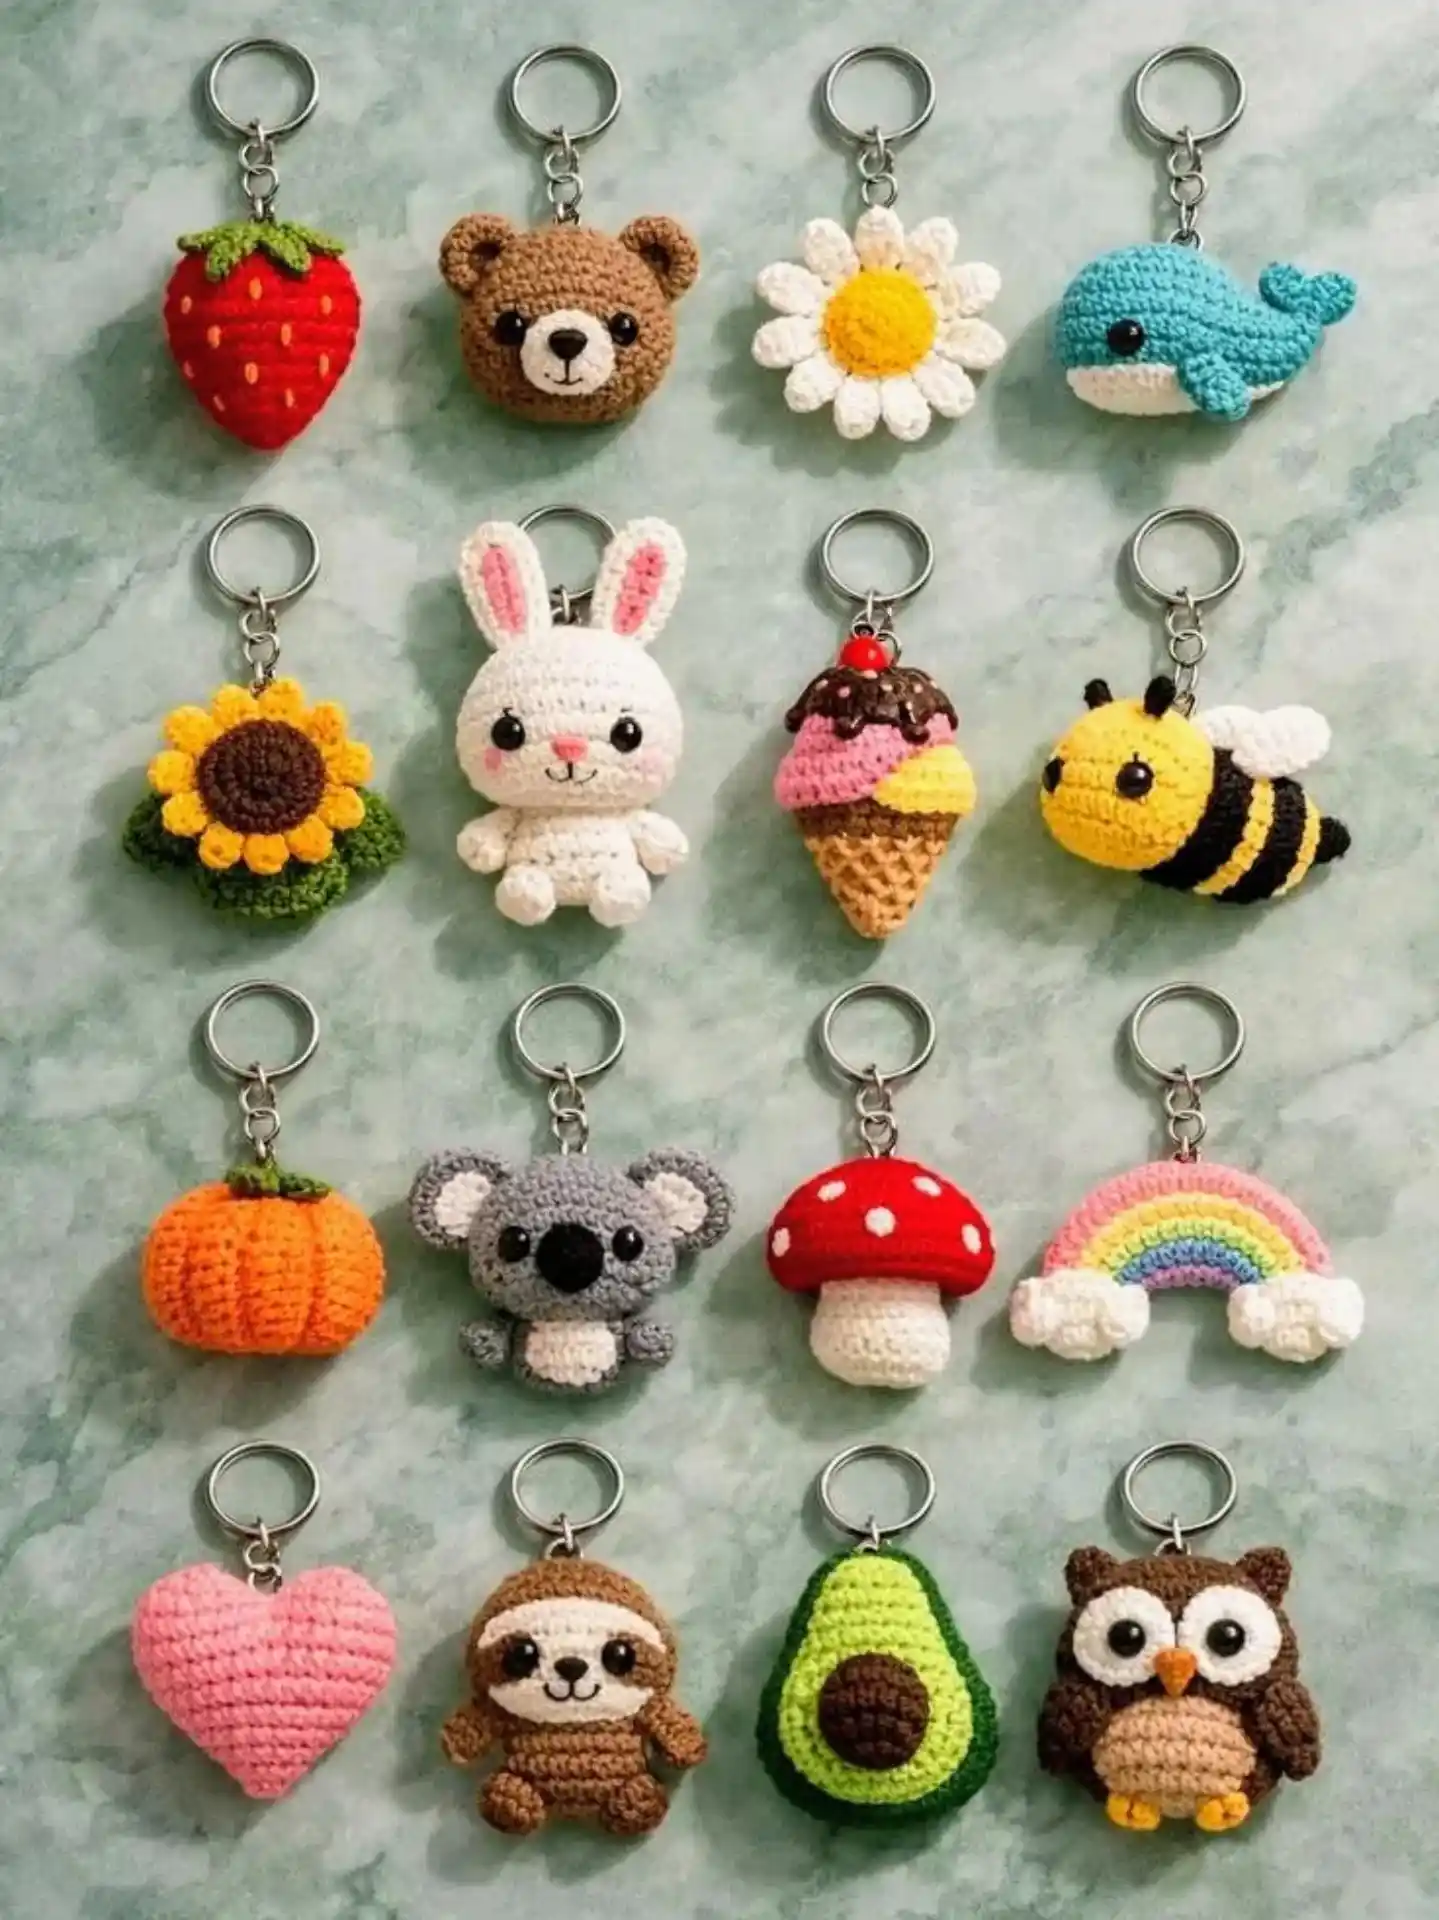
No beads, no chains, no mixed hardware, just one small crocheted shape on a plain silver keyring. The whole appeal is in the yarn work itself, so the shape has to read clearly from a few feet away.
What holds a whole set of these together:
A flat backed amigurumi style, worked small enough to finish in under an hour each, is the base for every version.
Food shapes (strawberry, ice cream cone, avocado), animals (bear, koala, owl, sloth), and simple icons (heart, rainbow, mushroom) all use the same rounded, slightly puffy silhouette so a whole collection still looks cohesive even though every charm is a different subject.
Safety eyes and a tiny bit of embroidery for the face are what make the animal ones feel expressive instead of blobby.
If you are making a set to sell or gift, stick to one yarn weight and one stuffing density across every shape.
That consistency is what makes sixteen totally different charms photograph like a matched collection instead of a pile of leftover scraps.
Keep every shape roughly the same size and puff.
Use safety eyes for a cleaner, more finished face.
Don’t mix glossy and matte yarn in the same batch.
Don’t overstuff, it distorts the flat backed shape.
8. Long Ribbon Tassel With A Wire Wrapped Top
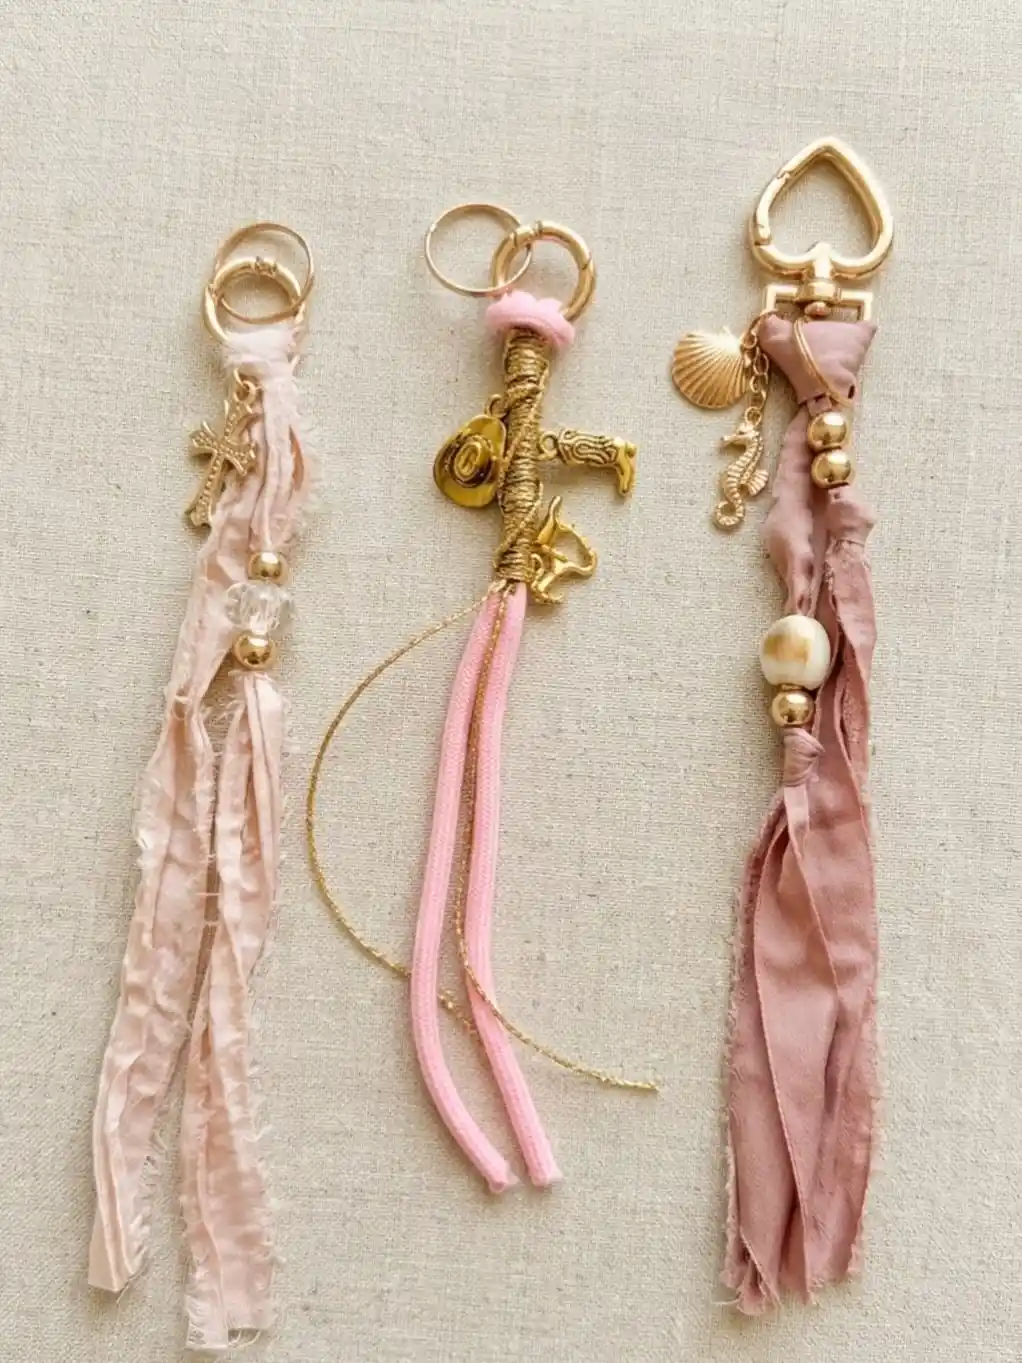
Length and drape are the whole point here. Torn fabric strips, cut two or three times longer than a normal charm, hang loose enough to move with every step instead of sitting stiff against the bag.
A closer look at what is holding the strips together:
- Gold wire wrapped tightly around the top of the fabric bundle, just below the ring, keeps the strips from sliding apart or fraying upward
- Two or three tiny themed charms (a cross, a horseshoe, a seashell) tucked into the wire wrap itself rather than dangling separately
- One or two round beads threaded onto a single strip partway down add a bit of weight and stop the fabric from tangling
- Raw, unfinished edges on the fabric ends are left on purpose, a clean hem would fight the loose, undone look
Torn strips of satin, chiffon, or cotton voile all fray a little differently, worth testing a scrap first if you want a specific texture.
9. Color Matched Sets Built Around A Candy Colored Bow
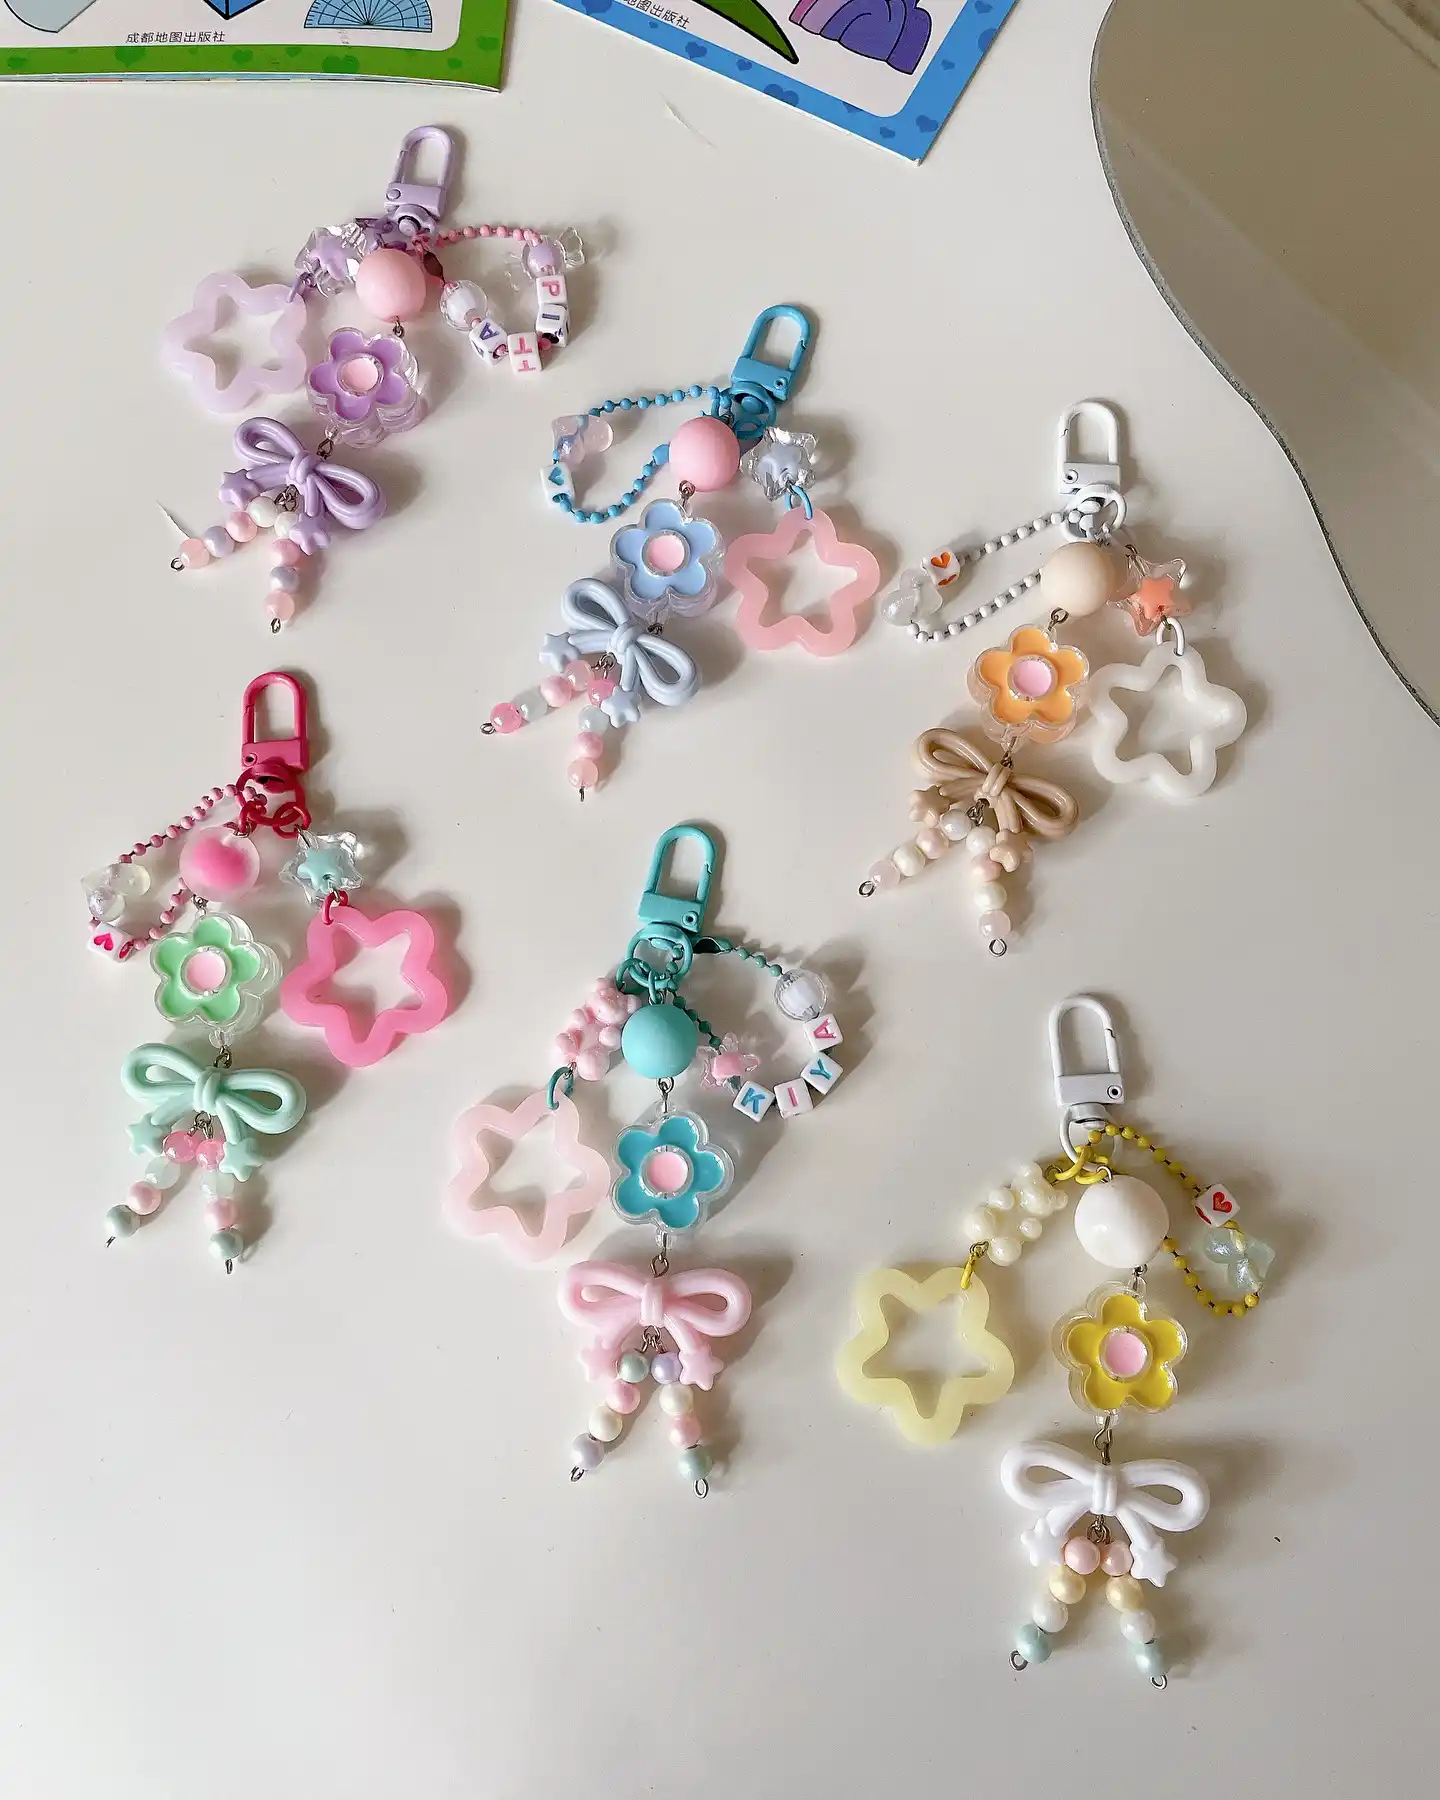
Six versions of the same formula, side by side, is basically a lookbook for how one structure can repeat without ever feeling copied.
Match the clip color to the beads, match the beads to the charms, and the whole piece reads as one deliberate color story instead of grabbed from a bead box at random.
The repeatable formula underneath all six:
- Colored lobster clasp or ball chain in the anchor color for that version (lilac, blue, pink, mint, teal, yellow)
- A short bead run mixing one large round bead with a few small faceted ones, sometimes with letter beads spelling a name
- Two jelly or acrylic charms side by side, usually a flower and a star or heart, both semi transparent so light passes through
- A puffy resin bow sitting just below the charms as the visual anchor
- Three or four small round beads dangling loose underneath as the finishing tassel
Once you land on a color formula that works, the fastest way to build a matching set is to just swap the anchor color and repeat every other step exactly.
10. Safety Pin Base With Draped Chain And Multiple Charm Drops
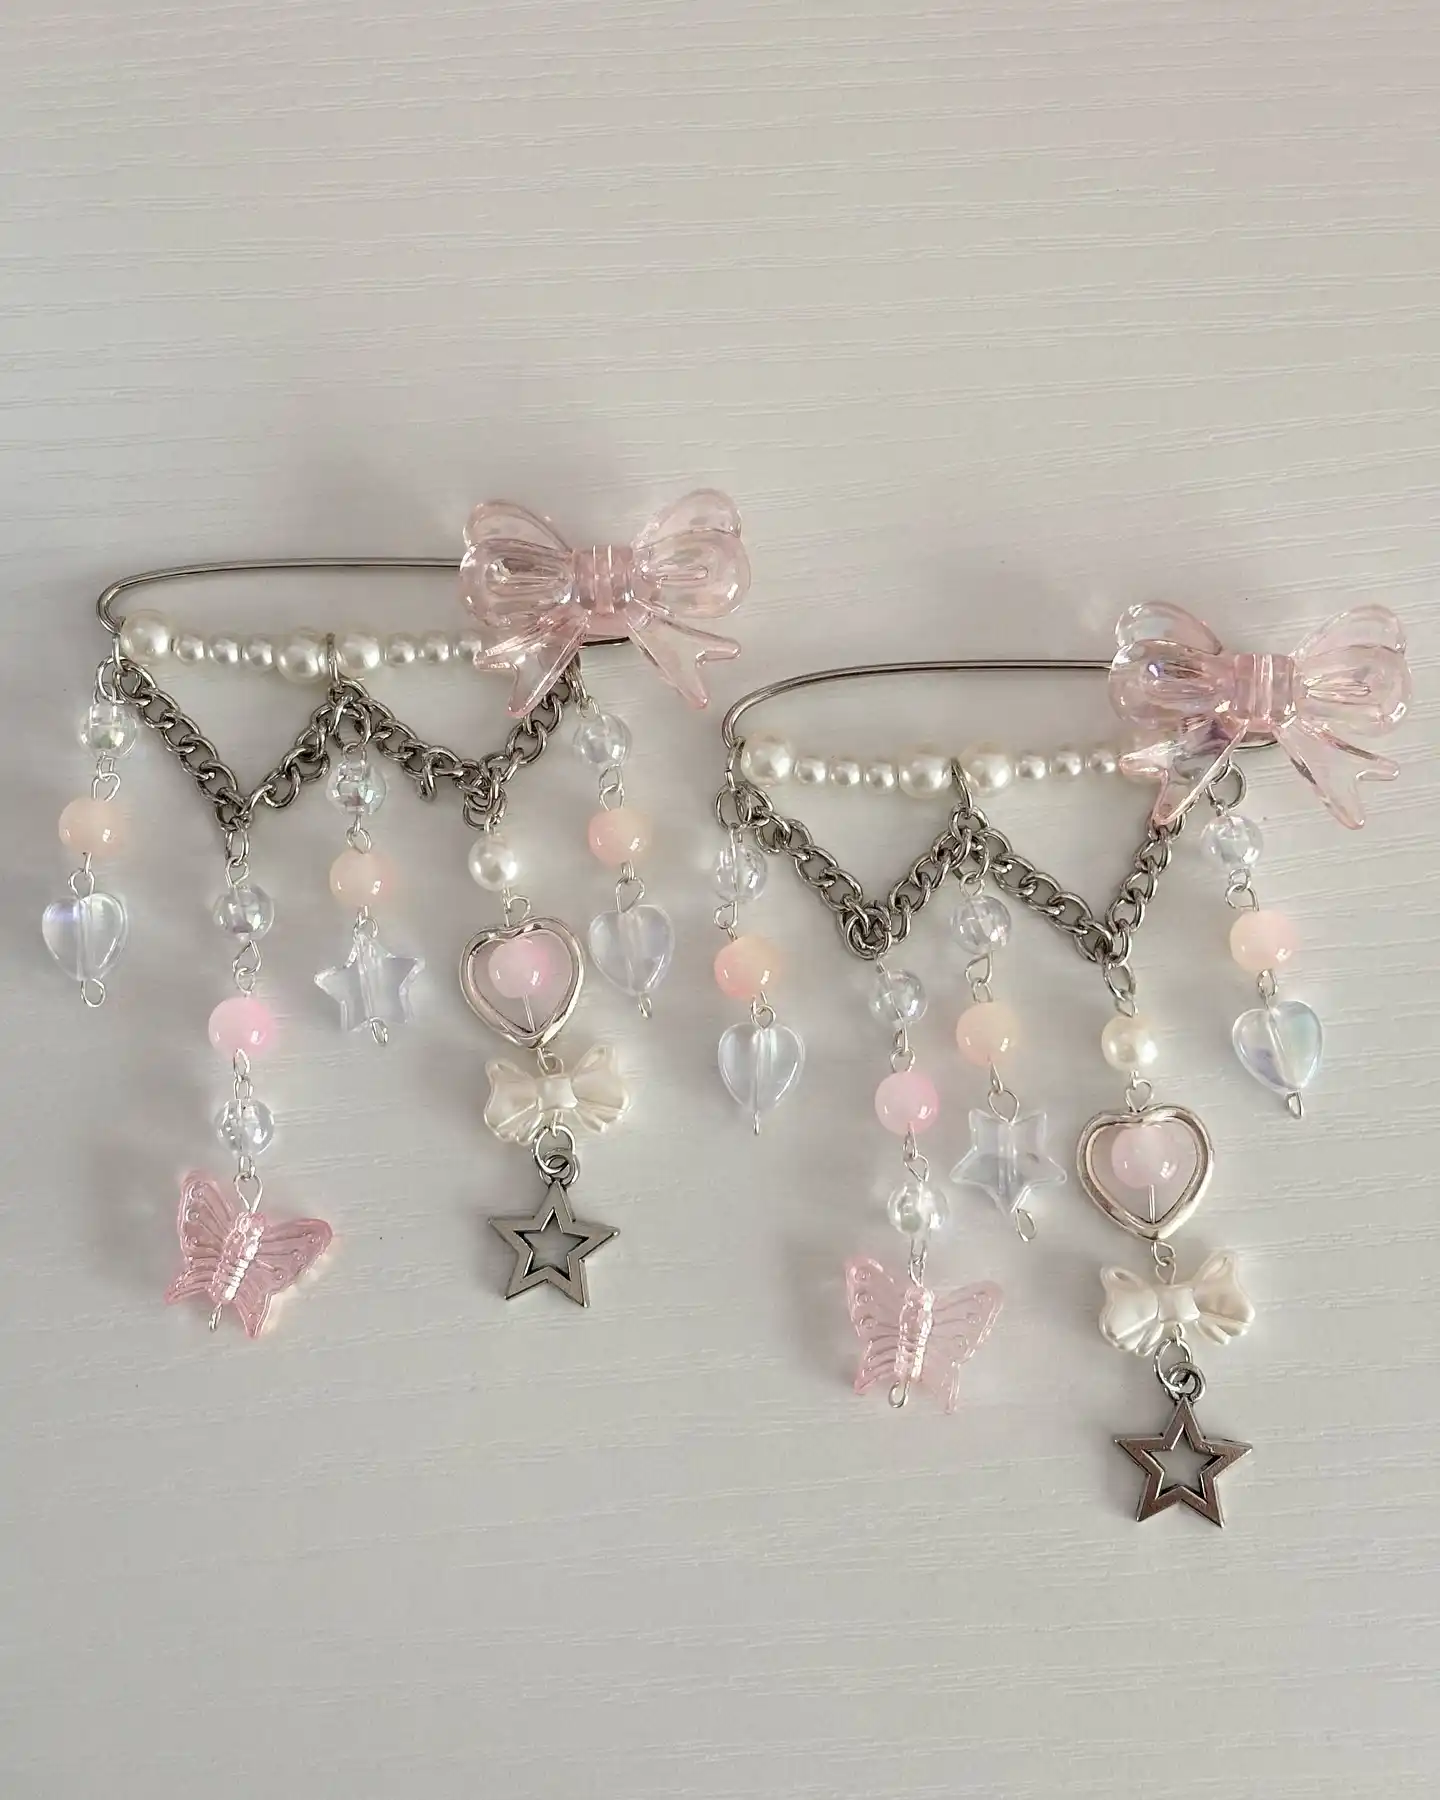
A curved safety pin instead of a keyring changes where the whole charm can go, it can clip onto a bag strap, a belt loop, or even a jacket lapel, not just a zipper pull.
Here’s what gives it that fuller, more finished look:
Pearls sit along the pin itself first, then two short chain swags drape below in a shallow V, and from those swags hang five or six individual drops on their own jump rings, hearts, stars, butterflies, in a repeating rhythm of pink and clear.
A glass bow sits at the very top as the anchor piece, big enough to balance out all that movement underneath.
Because every drop hangs from its own jump ring instead of one shared strand, nothing tangles even with this many pieces working at once, worth the extra few minutes of assembly.
Separate jump rings for each drop mean more charms without any tangling.
11. Fuzzy Character Plush Charms With Personality Props
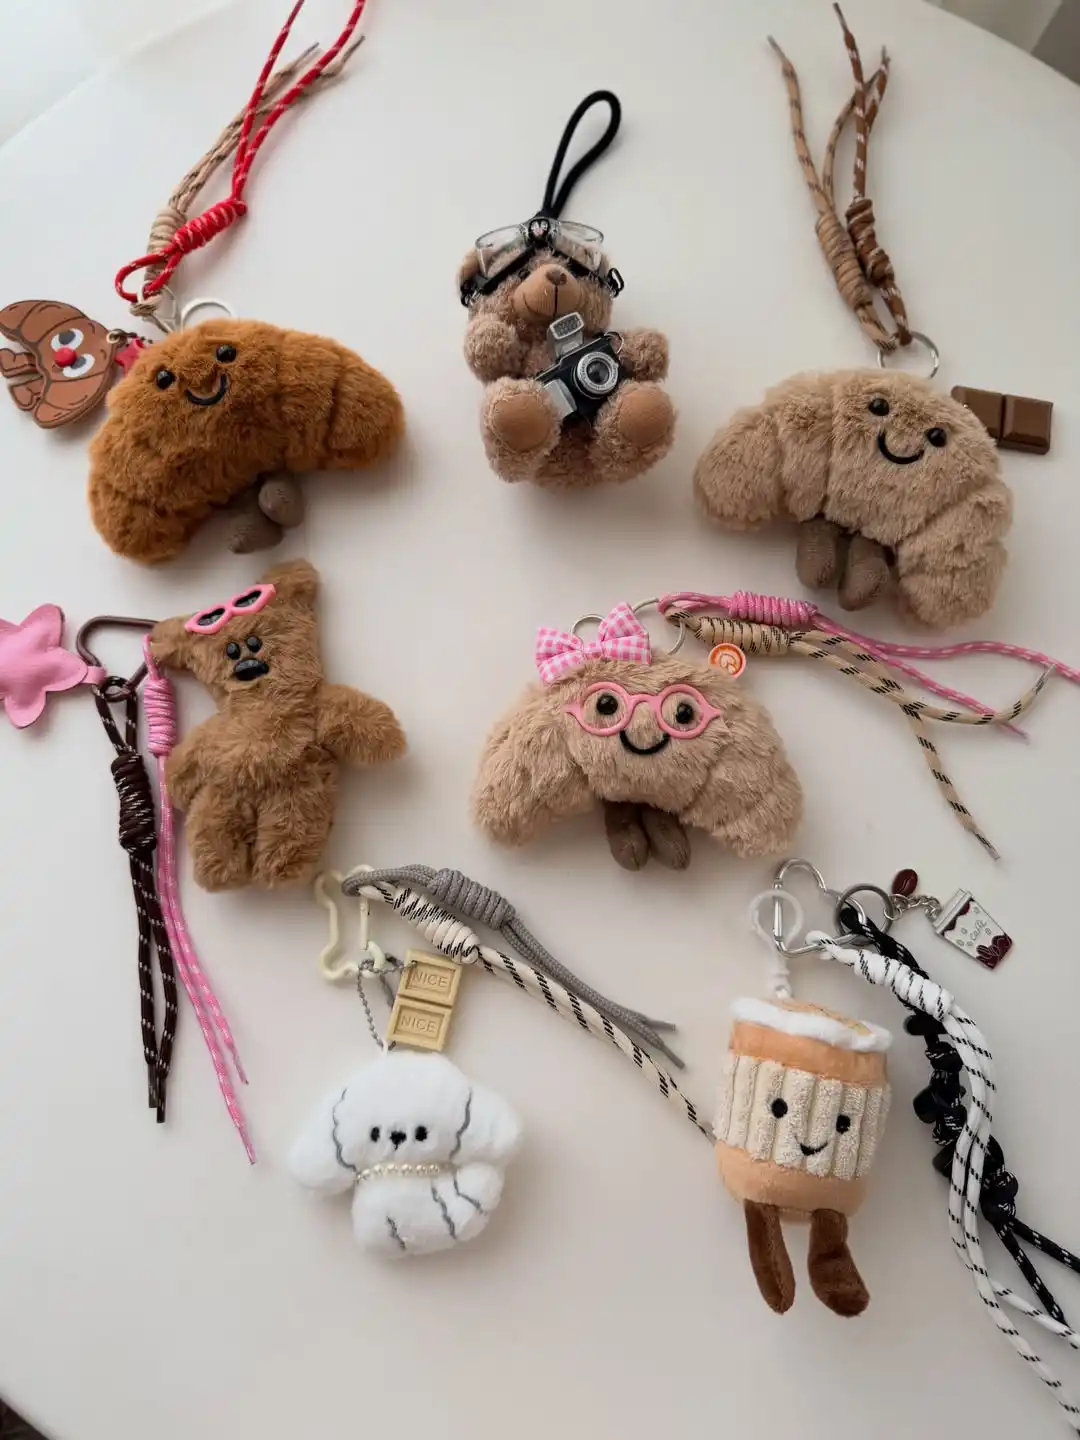
Plush wins on softness and expression that plastic charms cannot copy, and adding a tiny prop, glasses, a camera, a bow, turns a basic croissant or bear shape into an actual character with its own personality.
A few small choices that make the difference:
Subscribe to DIY Craft Bloom
Get updates on the latest posts and more from DIY Craft Bloom straight to your inbox.
- Embroidered faces instead of printed ones hold up to bag straps rubbing against them over time
- One tiny accessory per plush is enough, sunglasses or a bow, stacking more than one starts to look cluttered
- Braided or knotted paracord in place of a plain keyring cord matches the handmade, textured feel of the plush itself
- A few plain candy shaped charms (chocolate bars, dog bone treats) mixed in as smaller companions keep a themed set from feeling repetitive
Felt or minky fabric holds a face better than plush fur, worth keeping the actual face panel in a smoother material even if the body stays fuzzy.
One small prop per plush is the limit, glasses and a bow at once reads as costume, not character.
12. Storybook Character Figures Paired On One Ring
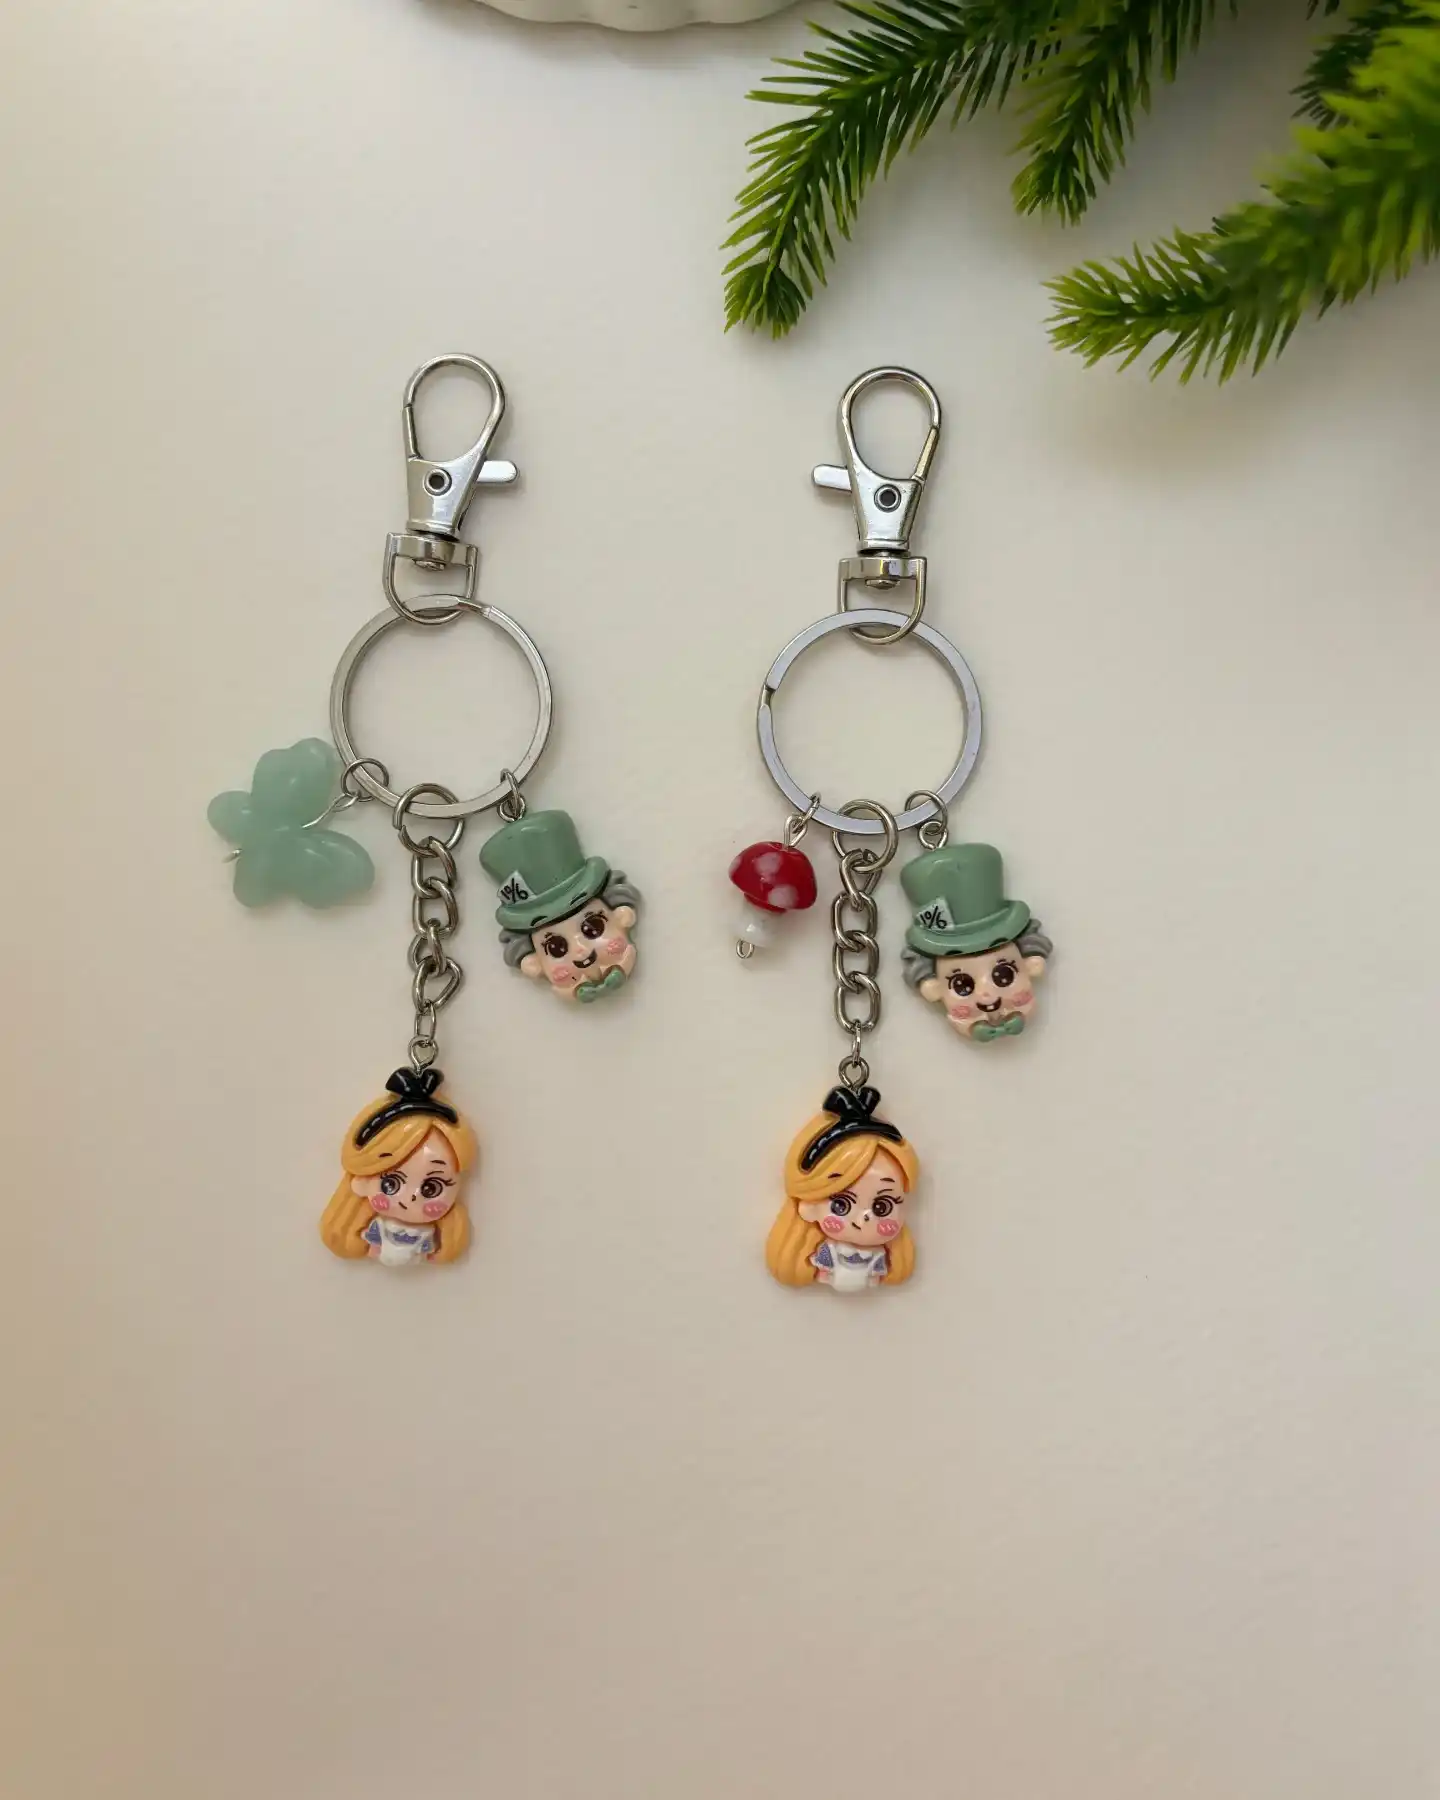
Two figures on one keychain instead of one tells a mini story if the pair actually relates, a character and a supporting face from the same tale reads as a set, not just two random charms sharing a ring.
What ties this pairing together:
A full figure charm (the girl in the blue dress) hangs lowest and takes center stage, while a smaller face only charm (the character in the green top hat) sits higher up as a supporting piece.
A single accent charm rounds it out, either a small lucky clover or a tiny mushroom, chosen to nod at the story world rather than match any color scheme.
Keeping the figures resin or vinyl, not flat enamel, gives them enough dimension to actually look like little collectible toys rather than jewelry.
If you are working from a favorite book, movie, or fairy tale, pull two characters who actually appear on the page together, that connection is what makes the pairing feel intentional instead of random.
A full character figure, dressed and detailed, sits lowest on the chain.
A smaller face charm from the same story sits higher, balancing the ring.
13. Five Ways To Build A Small Charm From Just Two Or Three Pieces
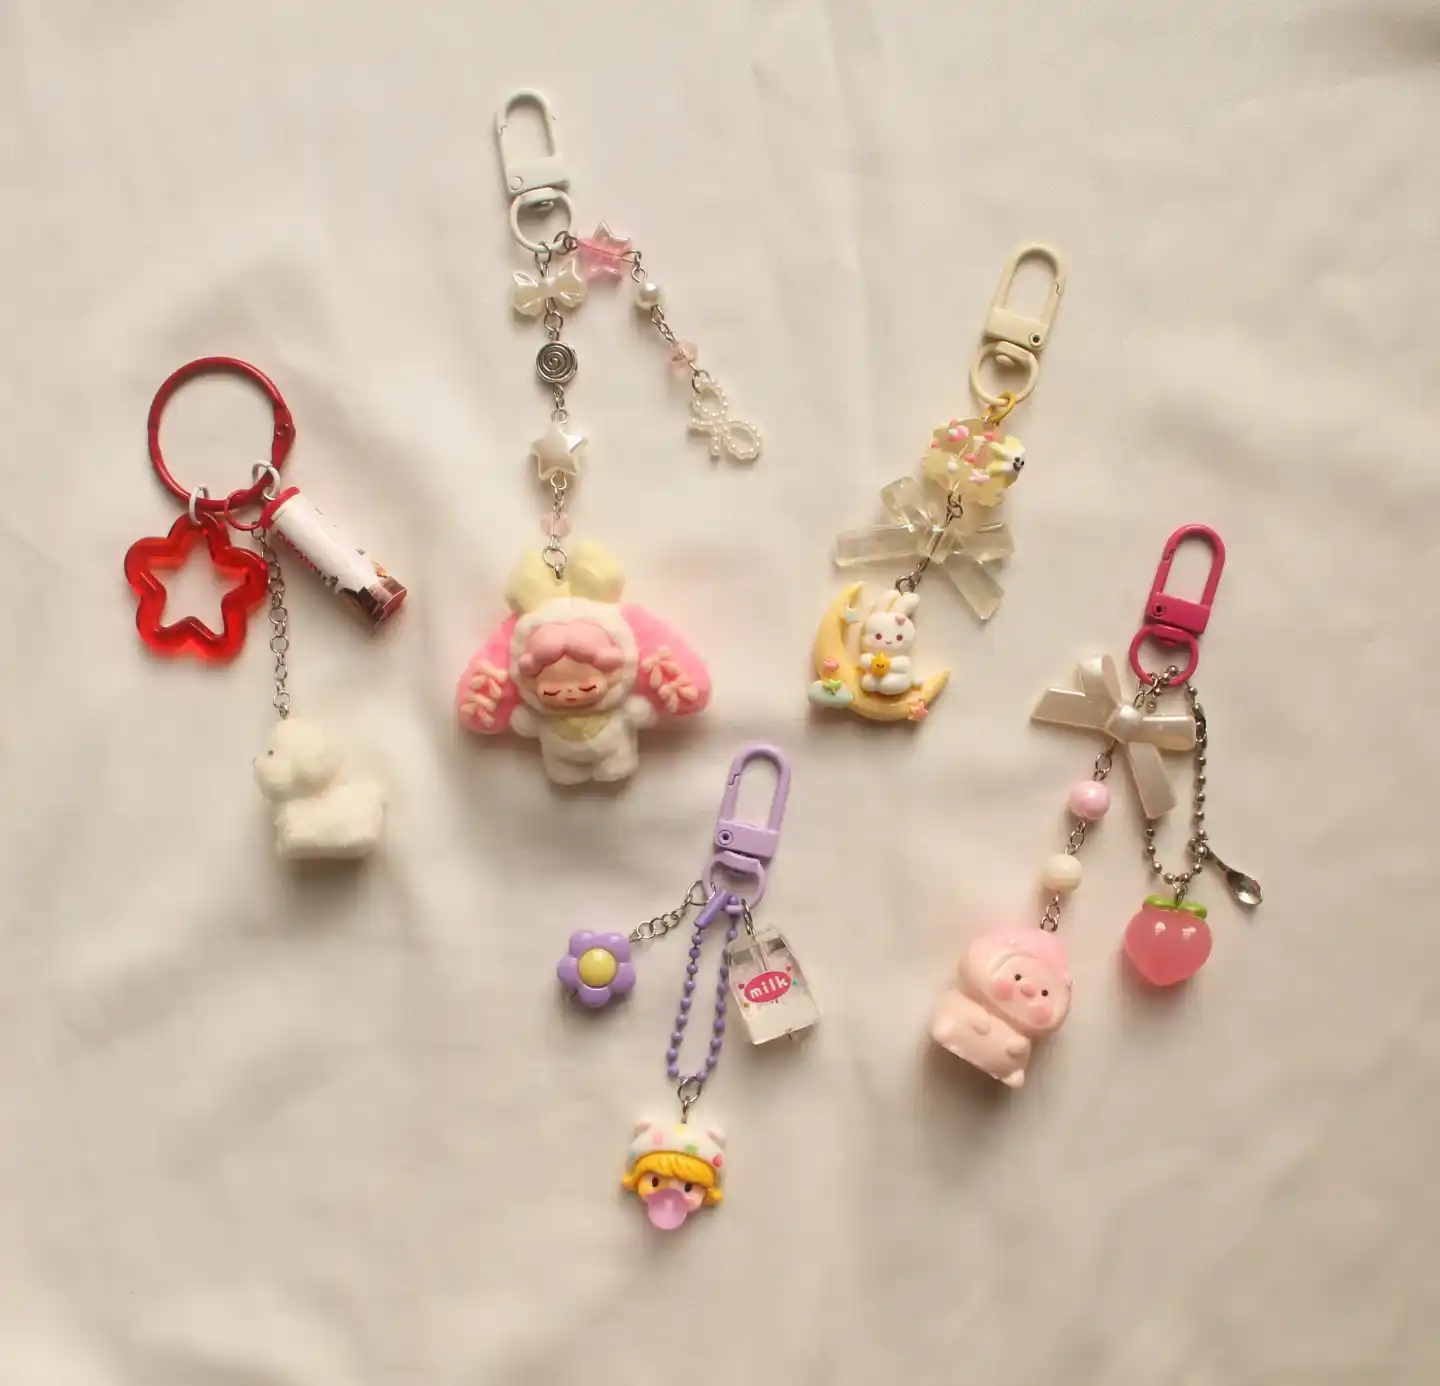
Lined up together, these mini charms are basically a cheat sheet for how little it takes to make a finished piece. None of them use more than three elements, and every one still reads as complete.
A few formulas worth borrowing:
- Bold shape plus one soft object: a bright acrylic star paired with a single fuzzy plush cube, nothing else needed
- Chain of small shapes leading to a character: a bow, a spiral coil, a star, then a full costume plush at the bottom, each link a different silhouette
- One scene charm plus one sparkle charm: a moon and bunny for the story, a glittery bow above it for shine
- Face plus food item: a tiny hooded character next to a mini milk carton, instant theme
- Color matched mini set: a bow, a few pastel beads, a small plush figure, a strawberry, and a tiny spoon, all in one soft pink and cream palette
The lesson across all five is the same, pick a clear pairing logic (texture contrast, color match, or a small story) and stop once it lands, adding a fourth or fifth piece for the sake of it usually makes a small charm look busier instead of better.
14. Ribbon And Letter Bead Tassels Spelling Out A Name Or Word
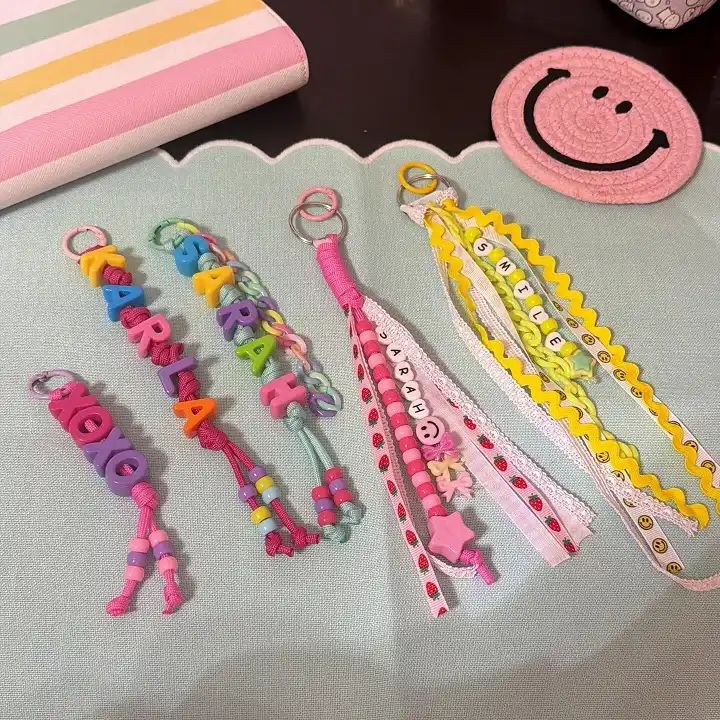
Wide grosgrain and rickrack ribbon in place of cord gives these a completely different texture from bead or chain charms, flatter, printier, and easy to personalize with a name or a single word like a mini banner.
What makes the personalization actually work here:
- Letter beads threaded on colored cord spell the word, one letter per bead, with small plain beads as spacers between letters so the word stays readable
- Patterned ribbon strips (strawberries, smiley faces, rickrack zigzag) run alongside the lettered strand rather than replacing it, adding pattern without competing with the letters themselves
- A small charm, a star or a flower, gets added at the bottom of just one strand, never every strand, so it stays a subtle finishing touch
- Multiple thin ribbon strips bundled together at the top, rather than one wide piece, is what gives the tassel its movement
Grosgrain ribbon frays less at the cut edge than satin, which matters since these ends stay raw and exposed the whole time you use the bag.
Space letter beads with plain spacer beads so the word stays readable.
Bundle several thin ribbon strips instead of one wide piece for movement.
Don’t add a charm to every strand, it crowds the bottom fast.
Don’t use satin ribbon if you’re leaving the edges raw, it frays too much.
15. Team Color Beads Looped Onto A Gold Paperclip Frame
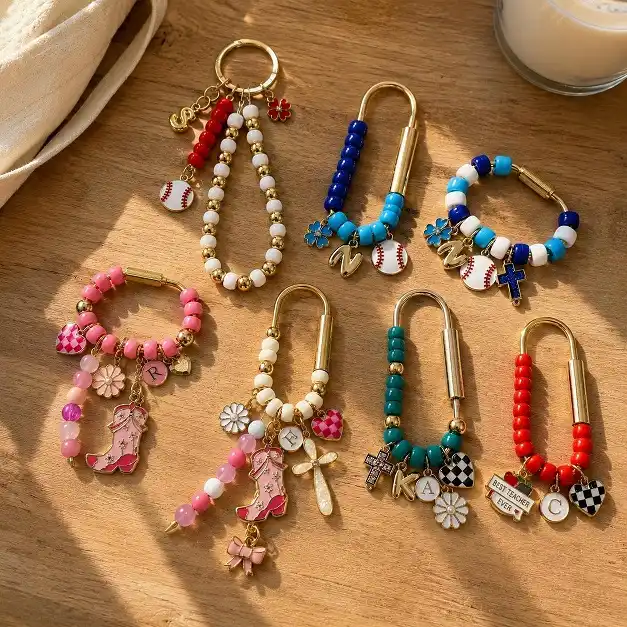
The paperclip shaped clasp is the real star of this batch, it swaps out the usual round ring for an elongated U shape, so beads sit along a straight line instead of curving around a circle, giving the whole charm a cleaner, more graphic look.
The formula that repeats across every color here:
Pick one bold team or theme color (navy, red, teal, hot pink) and string it solid along the gold frame, sometimes broken up with a few white spacer beads for contrast.
One enamel letter charm anchors the bottom every time, paired with a matching small icon, a baseball, a cross, a cowboy boot, a checkered heart, that ties back to the color or the occasion.
A tiny word charm like “best teacher ever” turns one of these from decoration into an actual gift.
Gold filled paperclip clasps hold their shape better than plated ones and will not turn the beads green over time, worth the small upgrade if you are making these to sell.
conclusion
Fifteen charms, fifteen different starting points, and not one of them needs a huge supply box to pull off.
Some days you’ll want the five minute version, a bold bead and a single plush cube clipped together. Other days you’ll have the patience for a full layered chain with six charms and a name spelled in letter beads.
Either way, the trick is always the same, pick one clear idea and let everything else support it instead of compete with it.
Keep this list handy the next time you’re staring at a pile of loose beads wondering where to start, or shopping for a gift that needs a personal touch without a big price tag.
Save this for the next time you want fresh backpack charm ideas.