16 DIY Earrings Ideas for Beginners

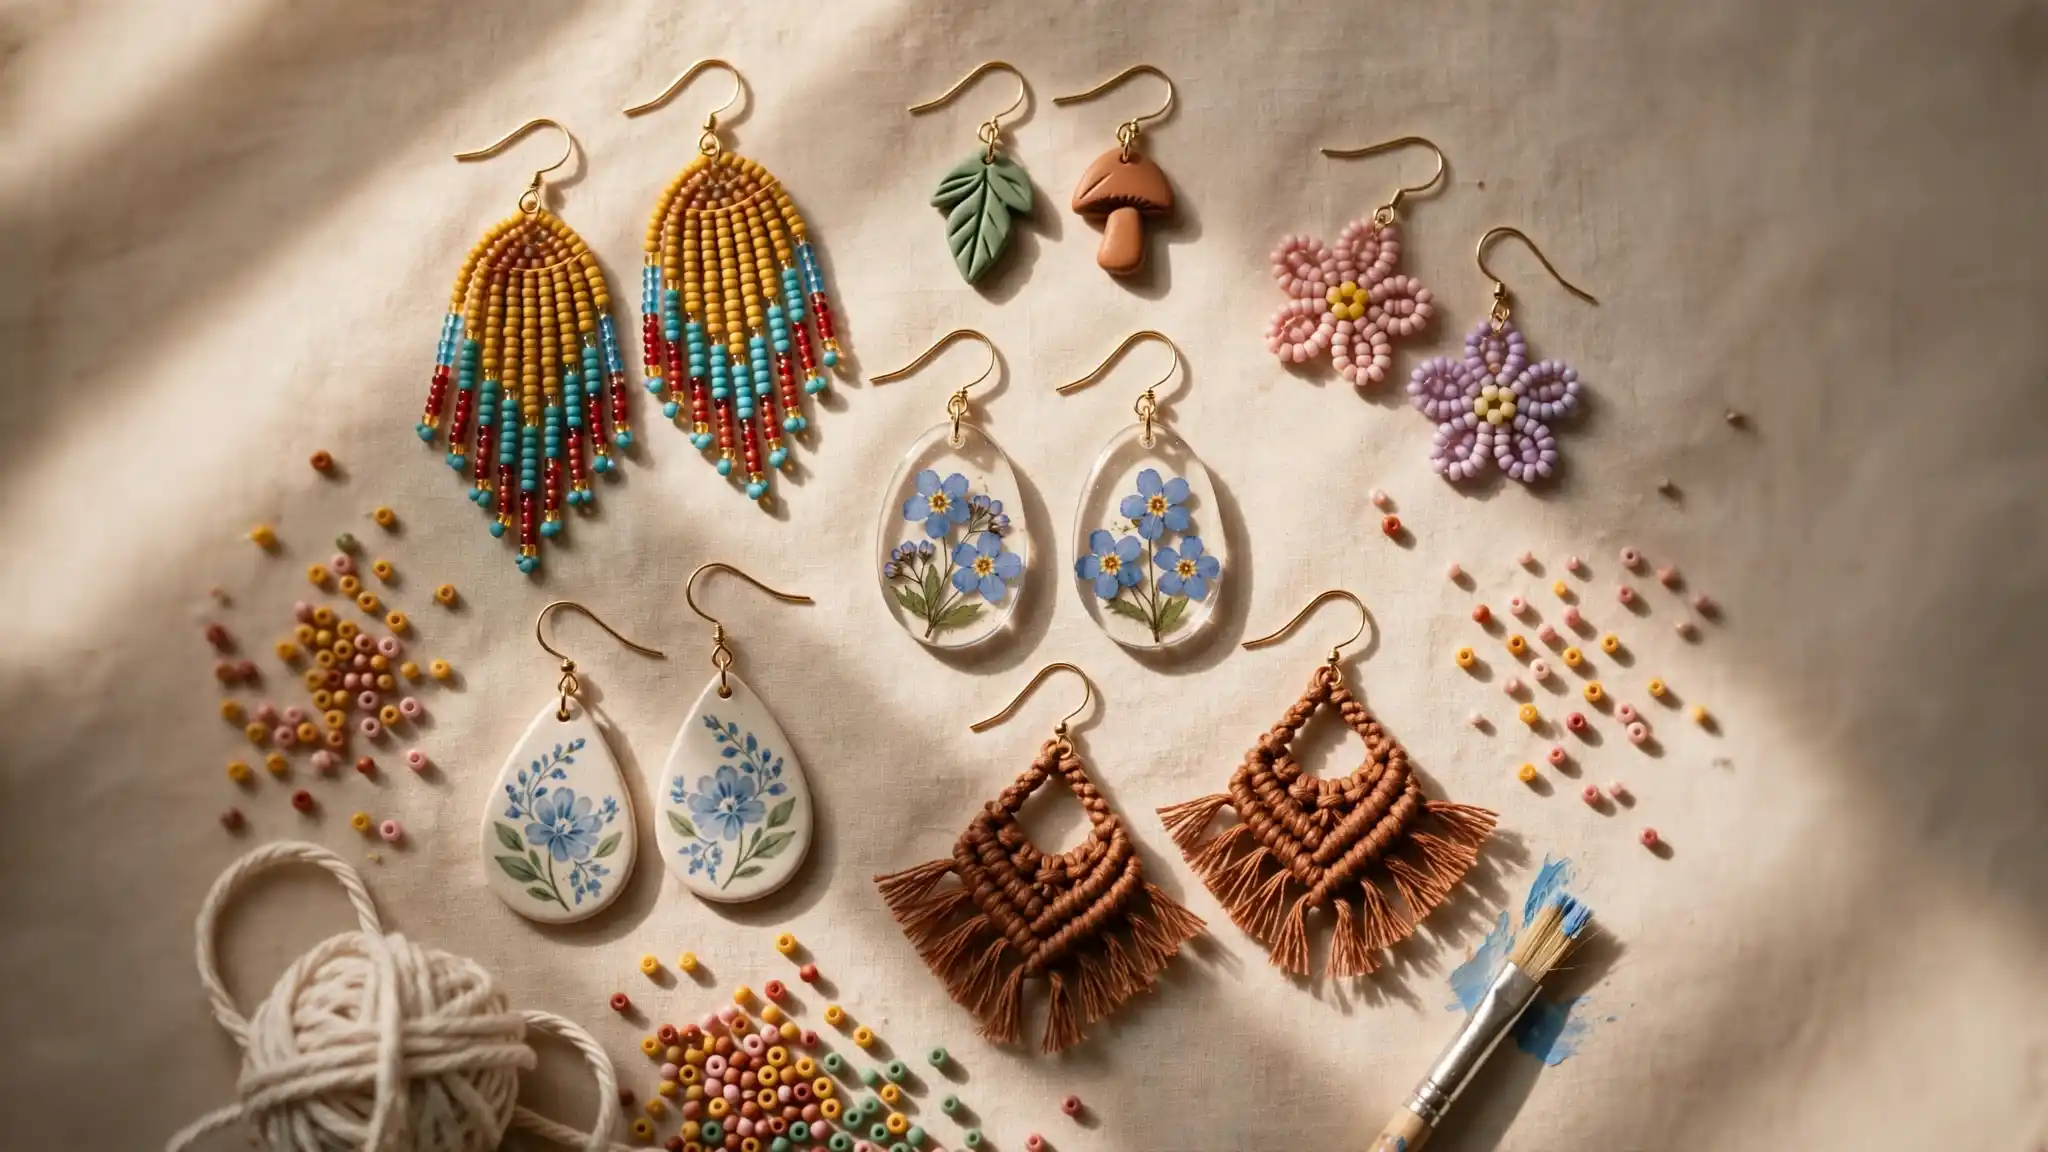
Store bought earrings start to feel the same after a while, and that is usually the moment people start looking up DIY earrings ideas for beginners.
The good news is you do not need a full craft room or years of practice to make something worth wearing.
A few seed beads and a pair of pliers gets you fringe earrings. A block of polymer clay gets you tiny sculpted charms.
Even scrap fabric or leftover leather can turn into a finished pair by the end of an afternoon.
This roundup pulls together sixteen real handmade styles, from simple beaded fringe and painted ceramic drops all the way up to layered chandelier earrings and hand knotted macramé.
Some take an hour, some take a weekend, and each entry breaks down exactly what makes that style work, plus what supplies to grab before you start.
Pick whichever technique matches the materials you already have on hand, or use this as your shopping list for a new hobby altogether.
16 DIY Earrings Ideas for Beginners
1. Beaded Fringe Triangle Earrings
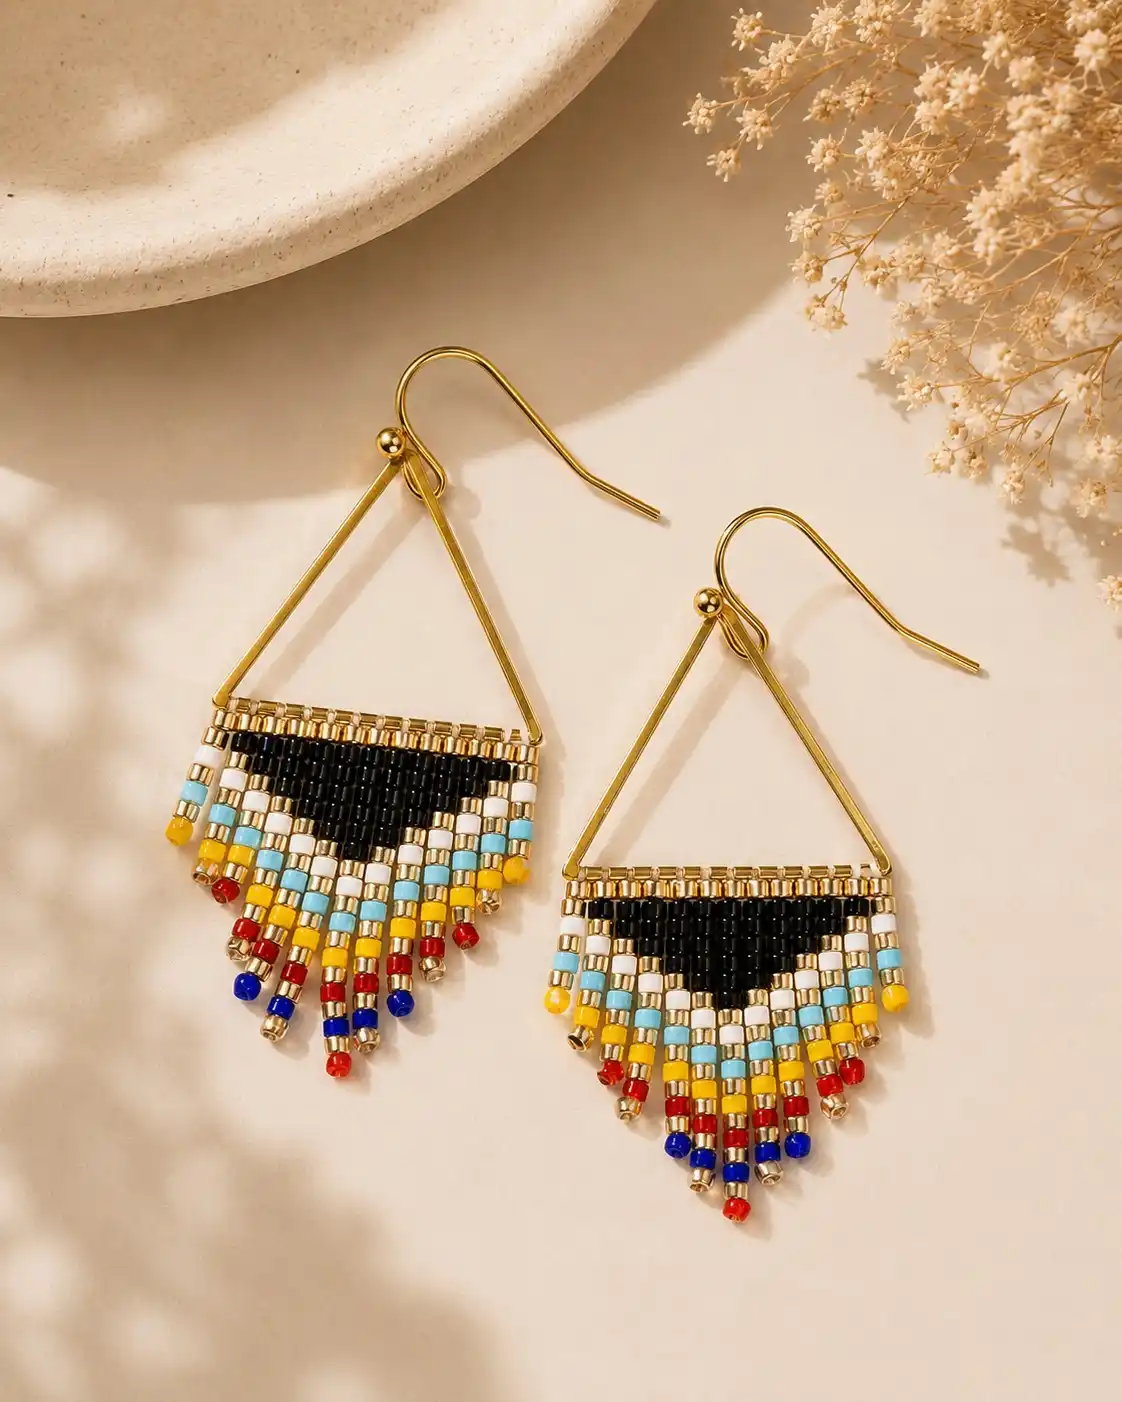
Open wire triangles turn into a woven bead curtain here, and that’s the trick worth stealing for a first project.
The top few rows lock into a tight herringbone stitch, so the black chevron shape stays crisp, then the pattern loosens into loose fringe strands that swing when you move.
A few things make this one forgiving for a first attempt:
- The gold triangle wire does the structural work, so your bead weaving only has to be flat and even, not shaped
- Seed beads in one size (11/0 works well) keep the rows lining up without much thinking
- Uneven fringe lengths actually look intentional, so there’s no pressure to trim perfectly straight
2. Polymer Clay Charm Earrings
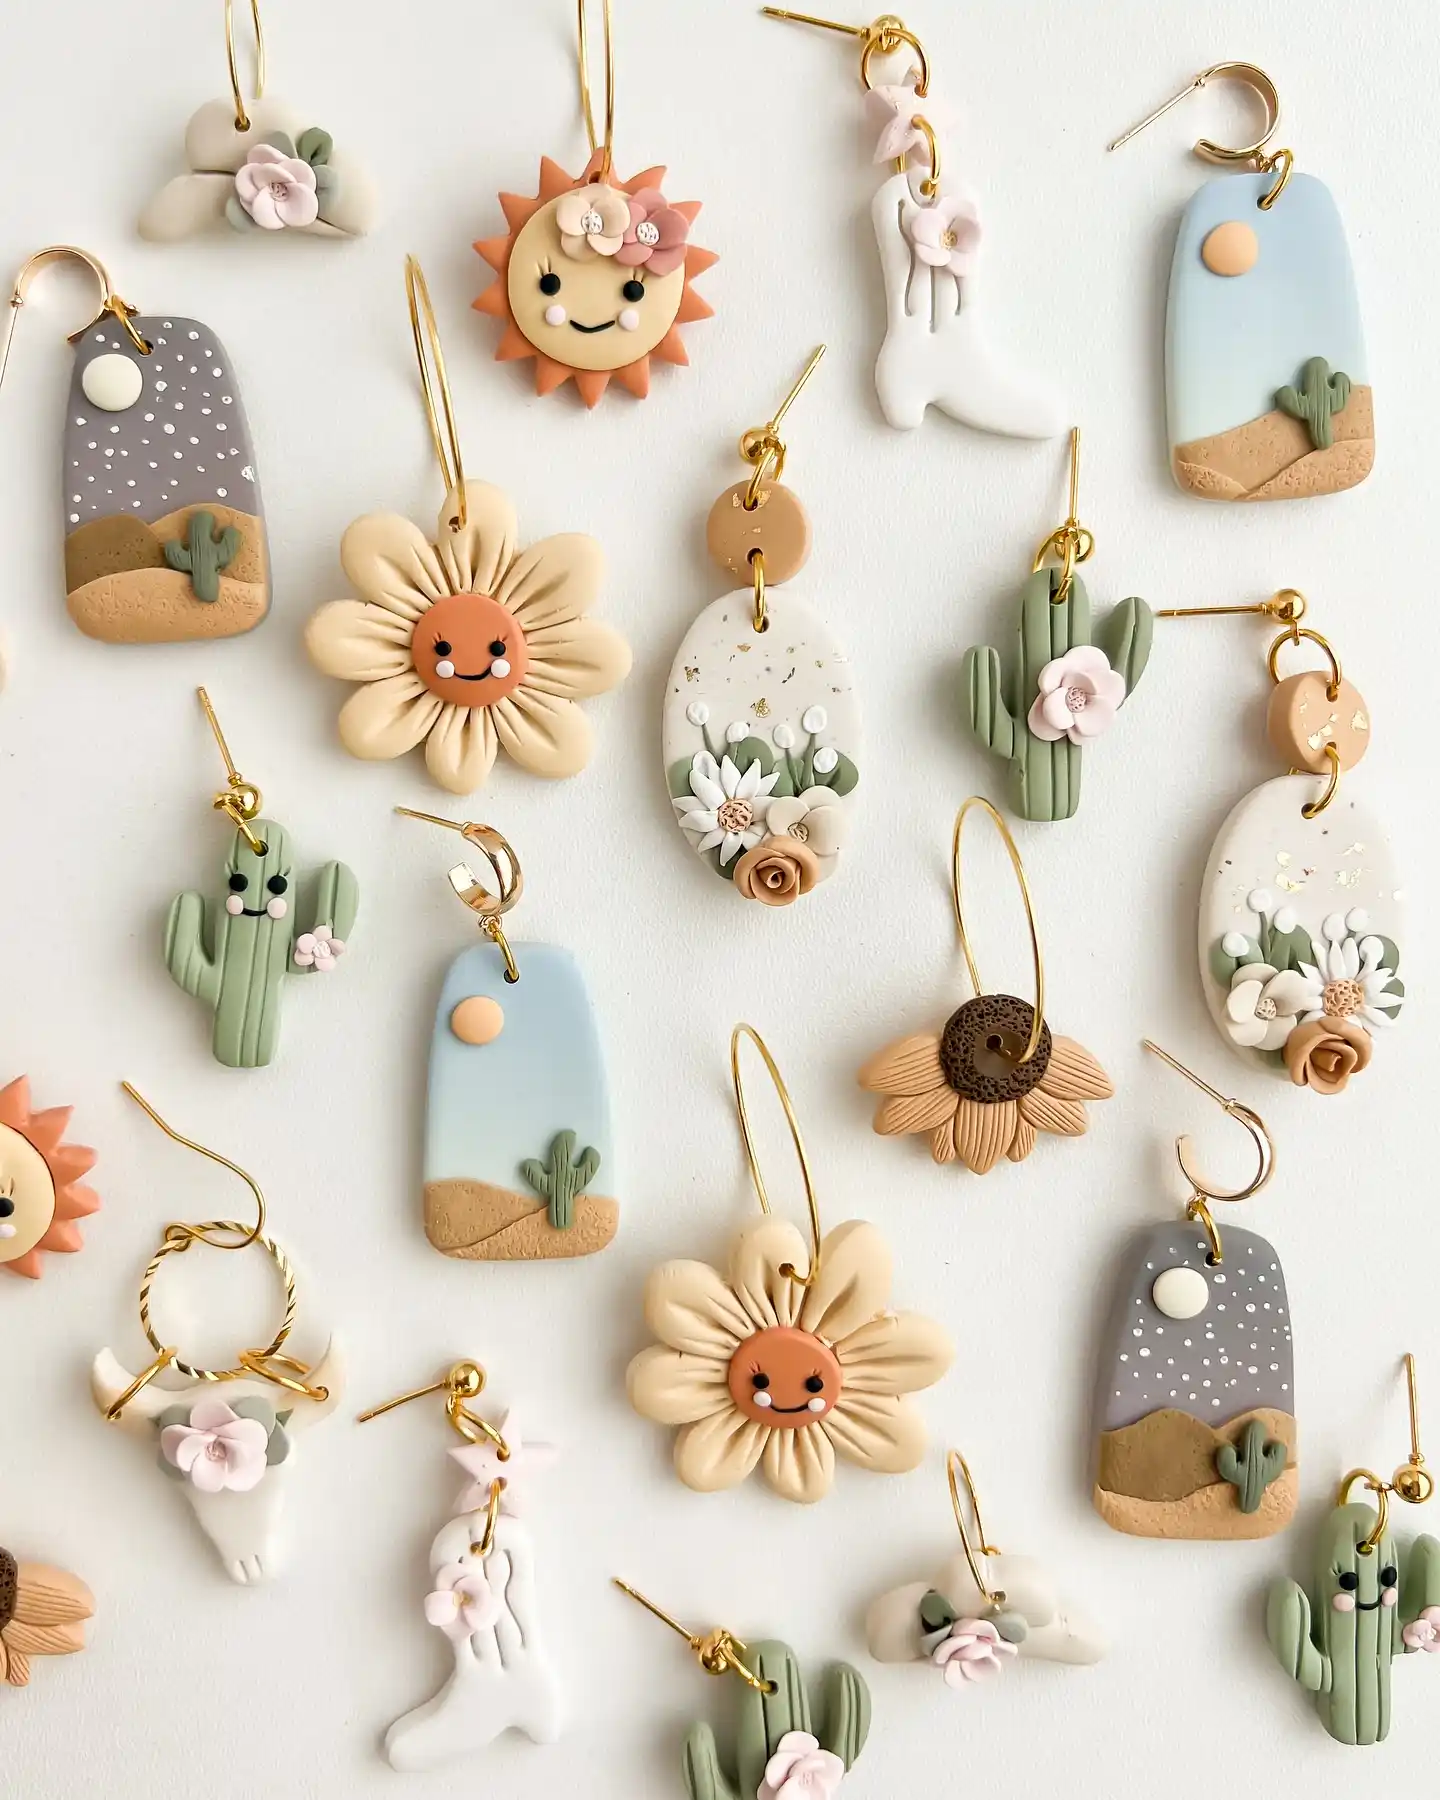
Polymer clay opens the door to shapes you just can’t get with beads or wire, and this flat lay shows how far that can stretch.
Tiny cactus figures, sun faces with hand pinched features, and layered desert scenes with a bit of sand texture pressed into the surface all sit side by side, tied together by one soft palette of sage, terracotta, cream, and dusty blue.
Here’s how to work toward a set like this:
- Start flat and simple
Cut basic shapes first, an oval, a rounded rectangle, a teardrop, before attempting anything with texture or layers. - Build up with thin layers
Press a second thin sheet of clay on top to create the horizon lines and sand dunes seen in the desert pieces, then bake. - Add tiny sculpted details last
Roll small clay balls for eyes, moons, and flower centers, and press them on gently before the final bake so they hold their shape. - Finish with gold hardware
A simple jump ring and ear wire turns any flat clay piece into a finished earring, no extra tools needed.
3. Daisy Chain Fringe Earrings
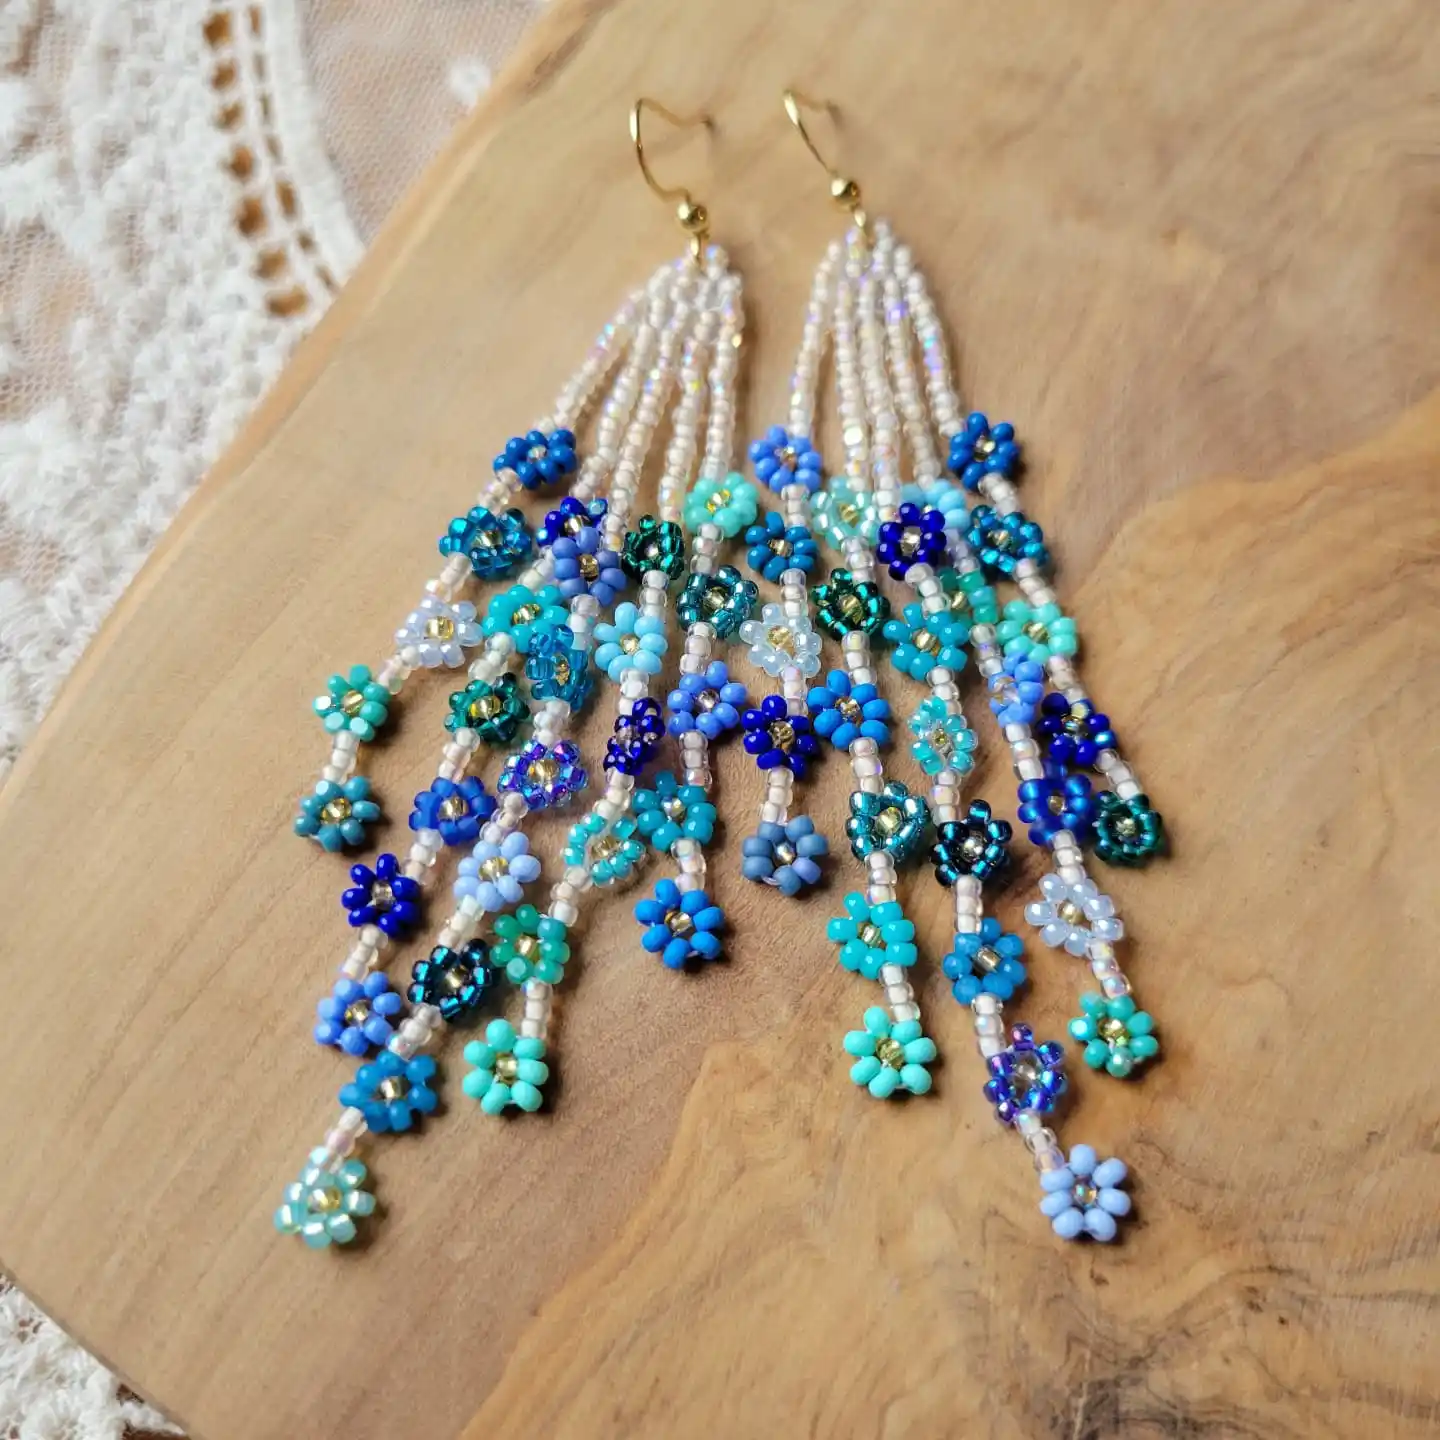
Every single flower on these two earrings is its own tiny beaded unit, made by circling six or eight beads around a center bead and pulling them into a flat blossom shape.
Multiply that by dozens of flowers stacked along multiple strands, and you get this waterfall effect that photographs beautifully but takes real patience to finish.
This one is not a first hour project, and that is worth saying plainly. Save it for after you have made a few simpler pieces and your fingers know the basic peyote or daisy stitch without you having to think about it. Once you get there, this style is one of the most rewarding to actually wear.
Cut your thread twice as long as you think you need. Running out mid flower means unpicking work you already finished.
4. Pressed Flower Resin Earrings
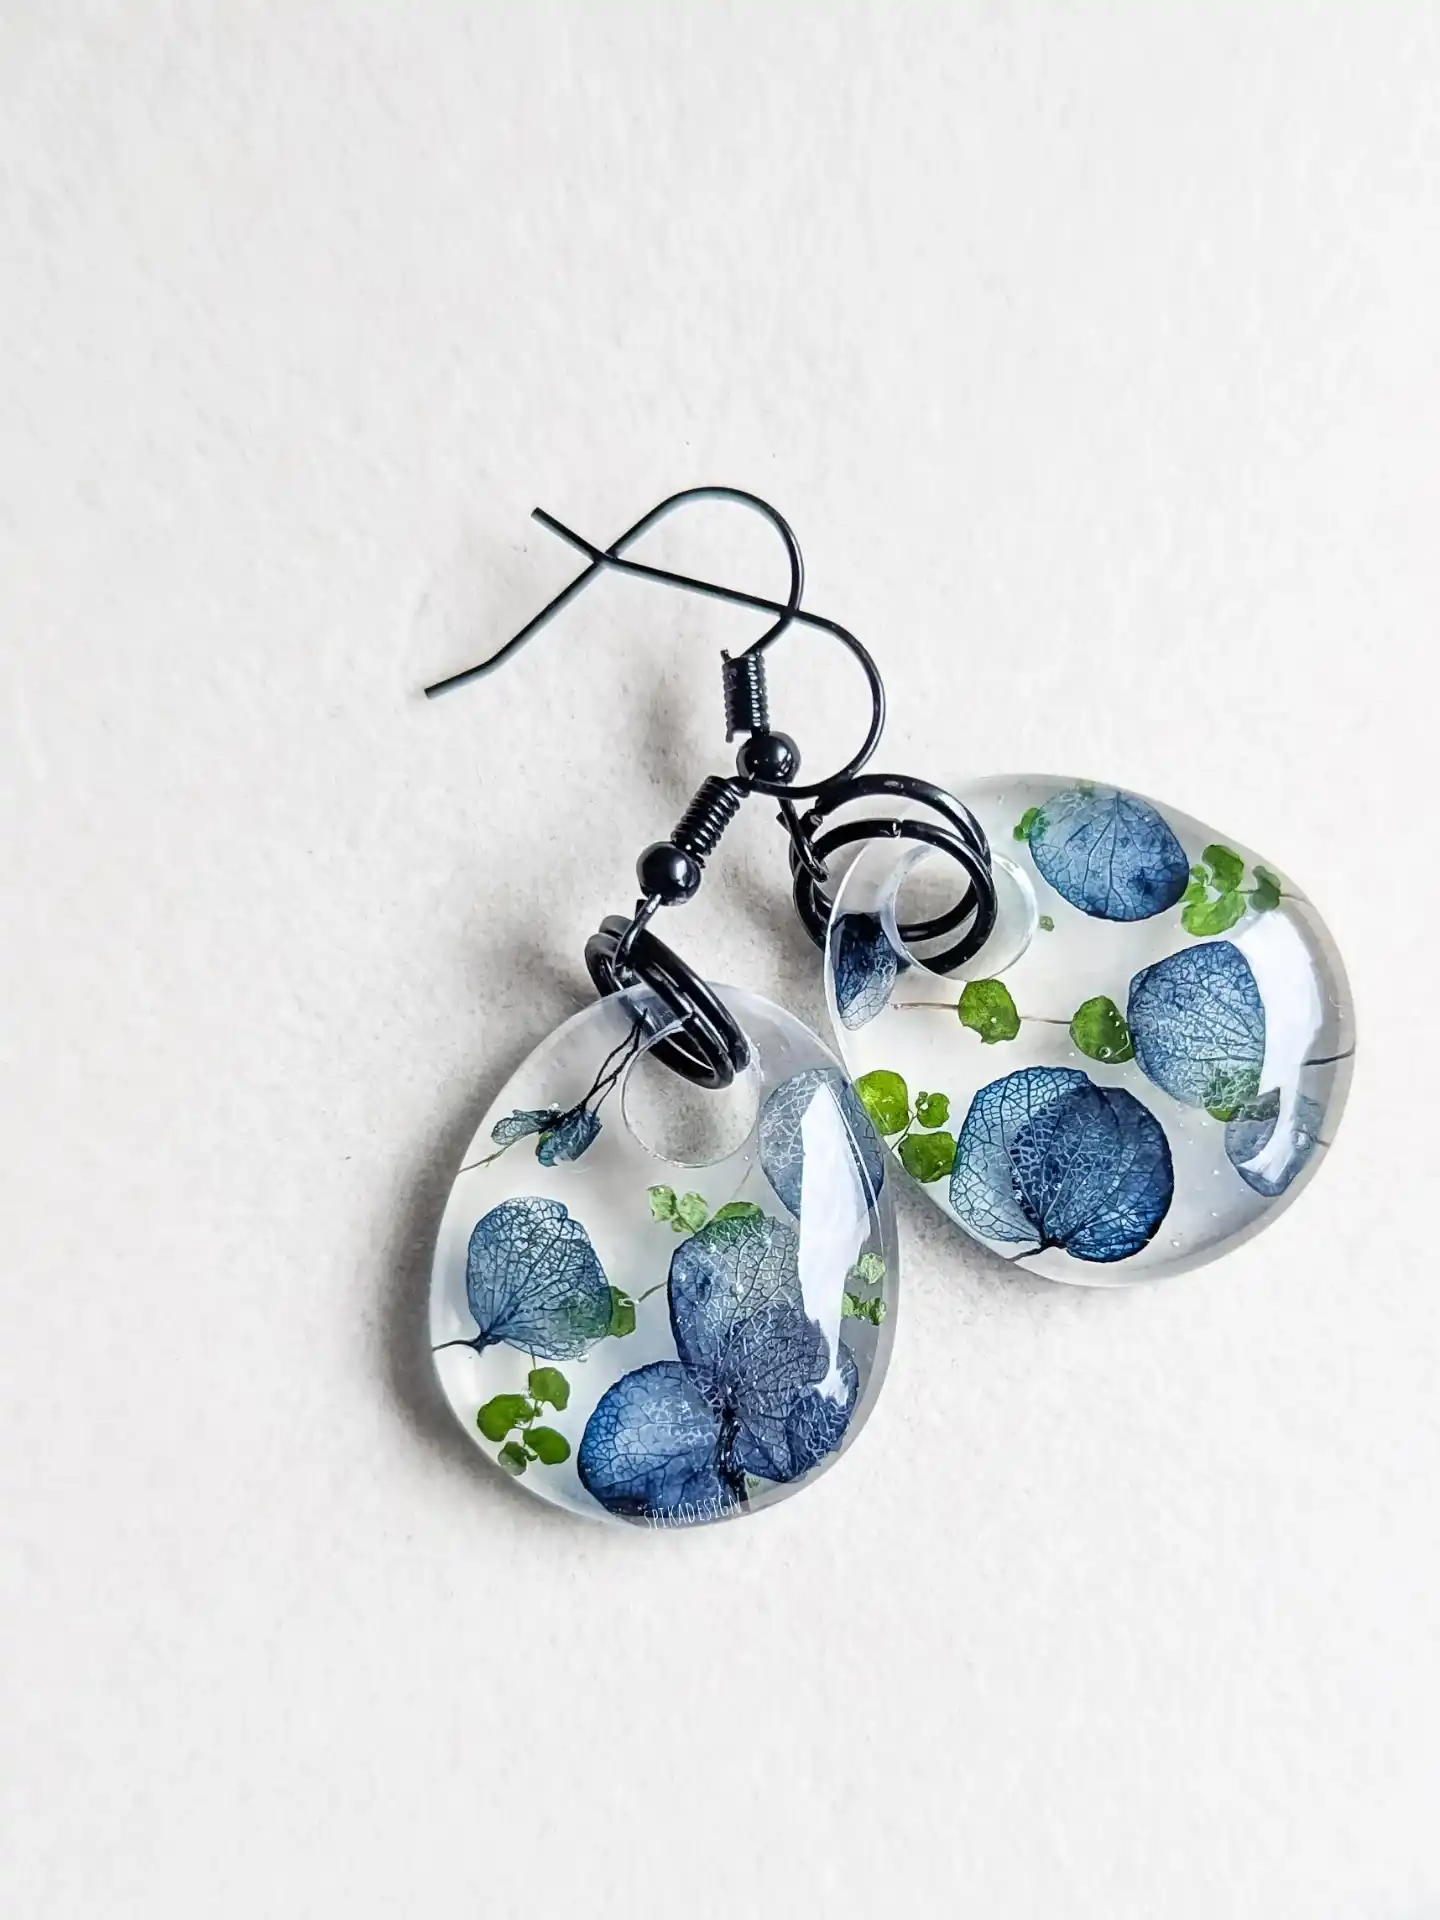
Real botanicals suspended in clear resin give these teardrops a genuinely different texture from anything beaded or clay based on this list.
Blue hydrangea petals, chosen for their papery, vein heavy look once dried, float alongside tiny greenery, and the black wire hardware keeps the whole thing feeling modern instead of country craft fair.
Getting a clean pour takes a bit of trial and error, so here’s where beginners tend to go right or wrong.
Fully dry your flowers first, either pressed for a week or silica dried, so no moisture gets trapped in the resin.
Pour in thin layers and let each one cure before adding the next.
Working near a fan or vent, since stray dust settles into wet resin fast and ruins the clarity.
Rushing the demold, resin needs its full cure window even if the surface feels dry.
5. Bead Embroidered Flower Earrings
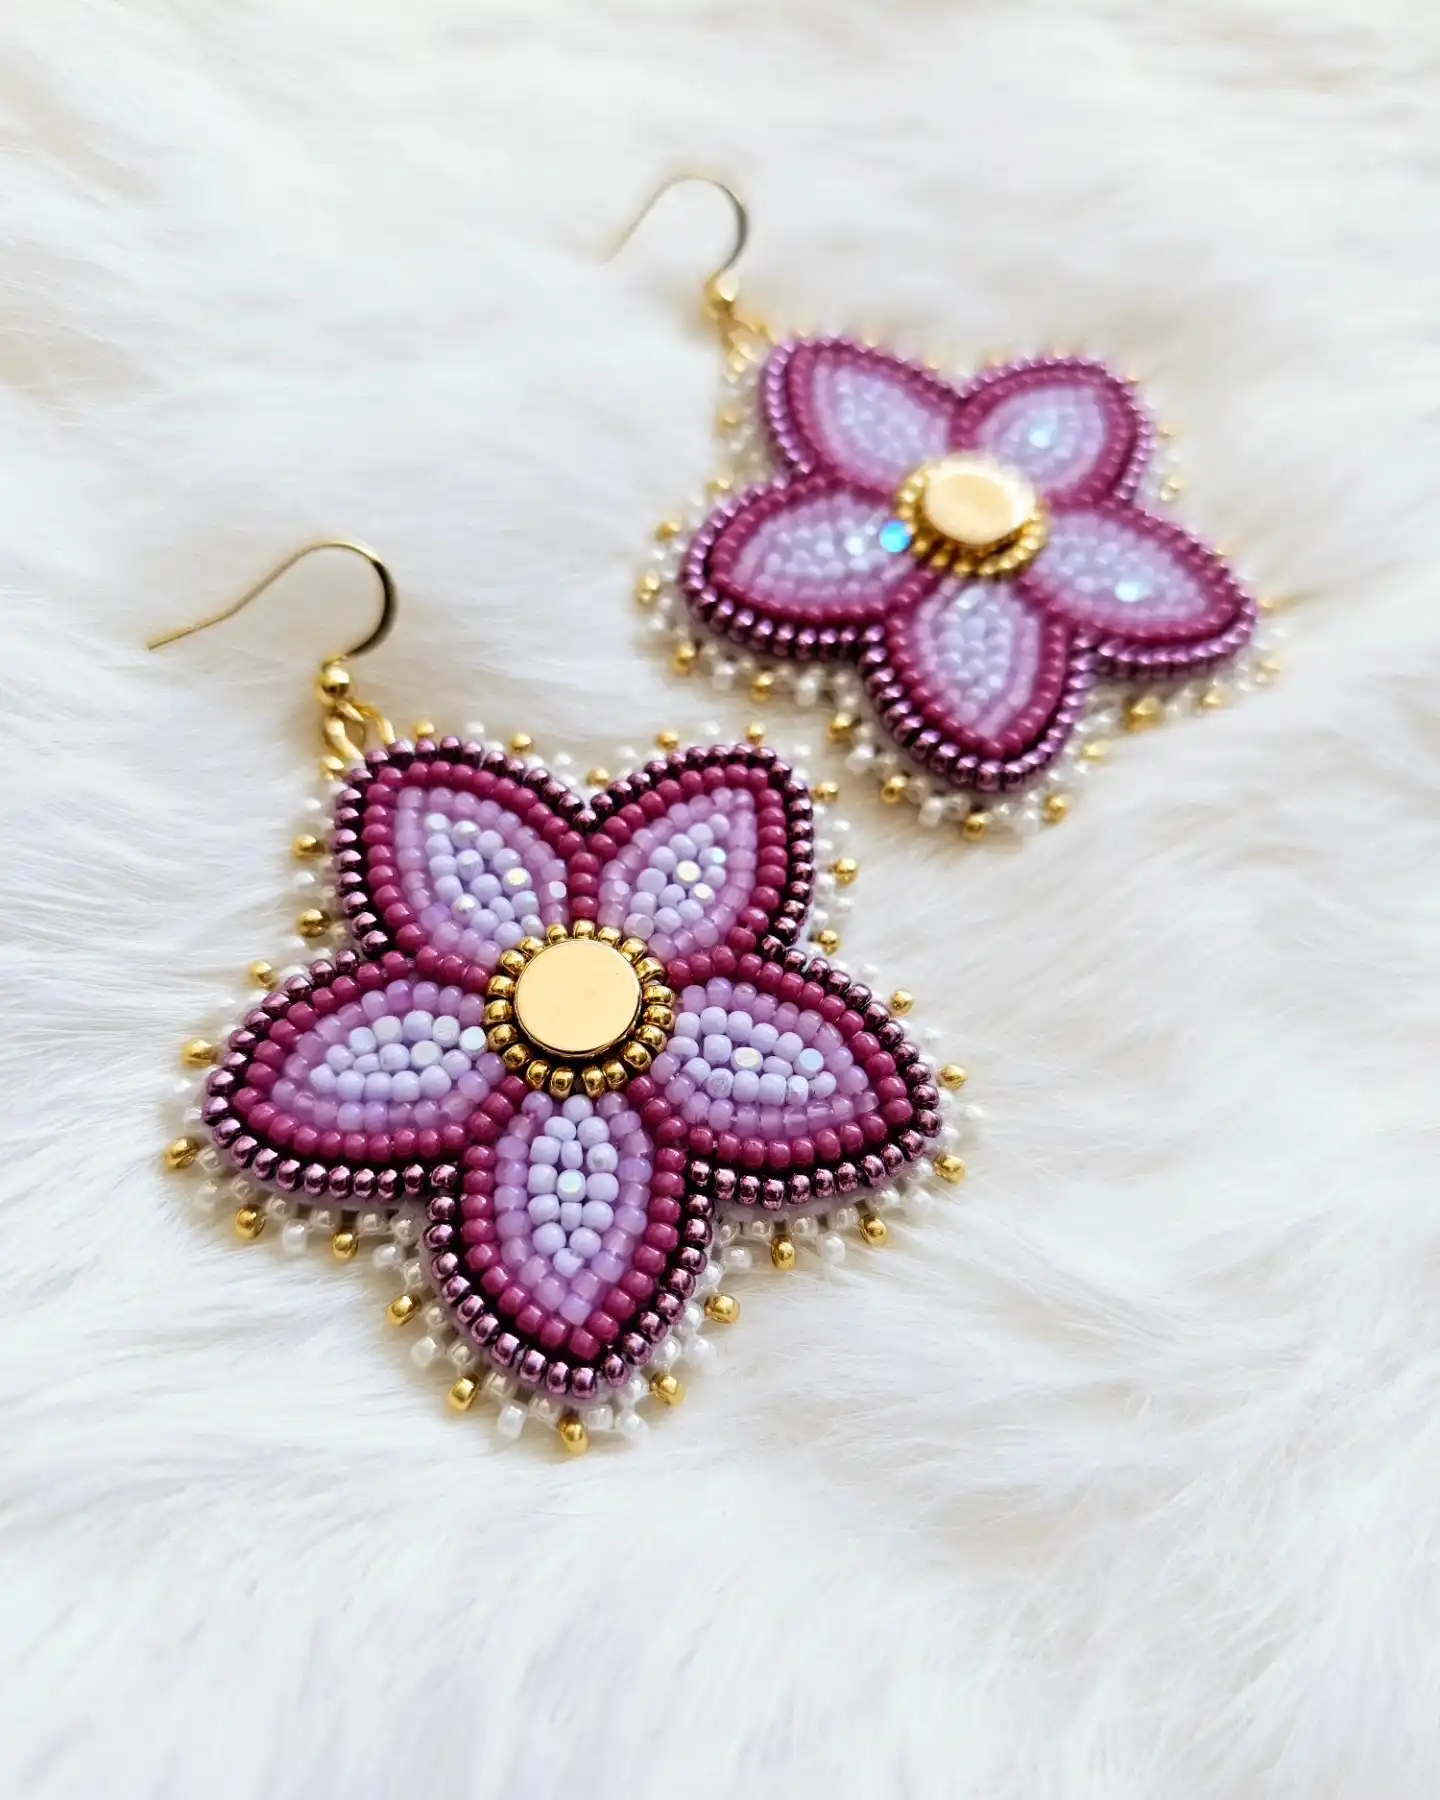
A backing material, likely felt or faux leather, is what separates this technique from the loose fringe styles already covered.
Subscribe to DIY Craft Bloom
Get updates on the latest posts and more from DIY Craft Bloom straight to your inbox.
Each bead gets stitched down individually onto a stiff surface, which is why the five petal flower holds such a crisp, dimensional shape instead of hanging loose.
The ombre shift from deep plum at the outer edge into soft lavender near the center took real planning before a single bead went down.
Three choices make this design work as well as it does.
Three shades of one color, planned before stitching starts, is what makes each petal look shaded instead of flat.
A flat gold button sewn on last covers the point where all five petals meet, hiding any messy stitching underneath.
Tiny white and gold beads stitched around the outer border give the whole flower a finished, framed look.
6. Rainbow Fringe Charm Earrings
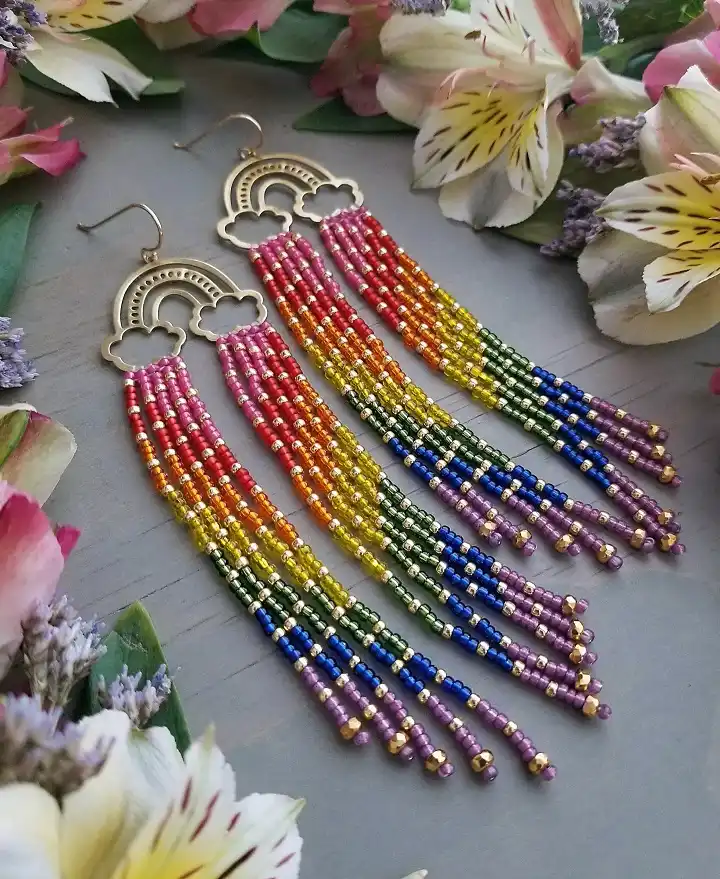
Rainbow arcs cross the top of these earrings as a laser cut metal charm, and everything below strings straight off that shape in gradient order, pink through purple, following the actual color spectrum instead of a random mix.
Six or seven strands per earring, each one carrying the same color sequence, is what gives the fringe its full, layered look rather than a thin scattered one.
Stringing in the right order matters more than any other step here.
A rainbow, cloud, or arch charm with multiple loops along the bottom edge gives you a place to hang each fringe strand evenly.
Line up your seed bead colors on a bead mat in spectrum order before you string a single strand, so every fringe matches.
Keep a count of beads per color so all your fringe strands drop to the same point, then finish each tip with a small metal bead.
7. Layered Chandelier Earrings
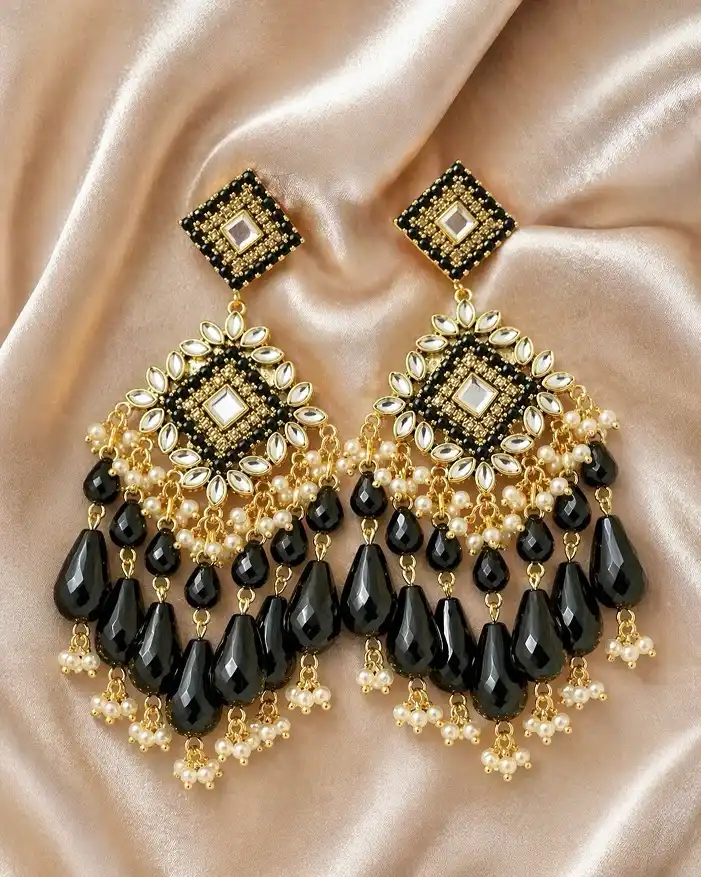
Three separate materials working together is what turns this pair into a true statement piece rather than a simple dangle.
Faceted glass drops carry the visual weight, delicate pearl clusters soften the bottom edge, and a mirror inset diamond stud anchors the whole thing at the top, all connected by fine gold chain instead of solid metal, so every layer moves independently when worn.
This style borrows heavily from South Asian bridal jewelry traditions, and that layered chain construction is the actual skill to learn from it.
Attach each fringe row to its own small jump ring on the chain rather than crowding several rows onto one ring, so the tiers stay separated and swing freely instead of tangling.
8. Beaded Pearl Rainbow Earrings
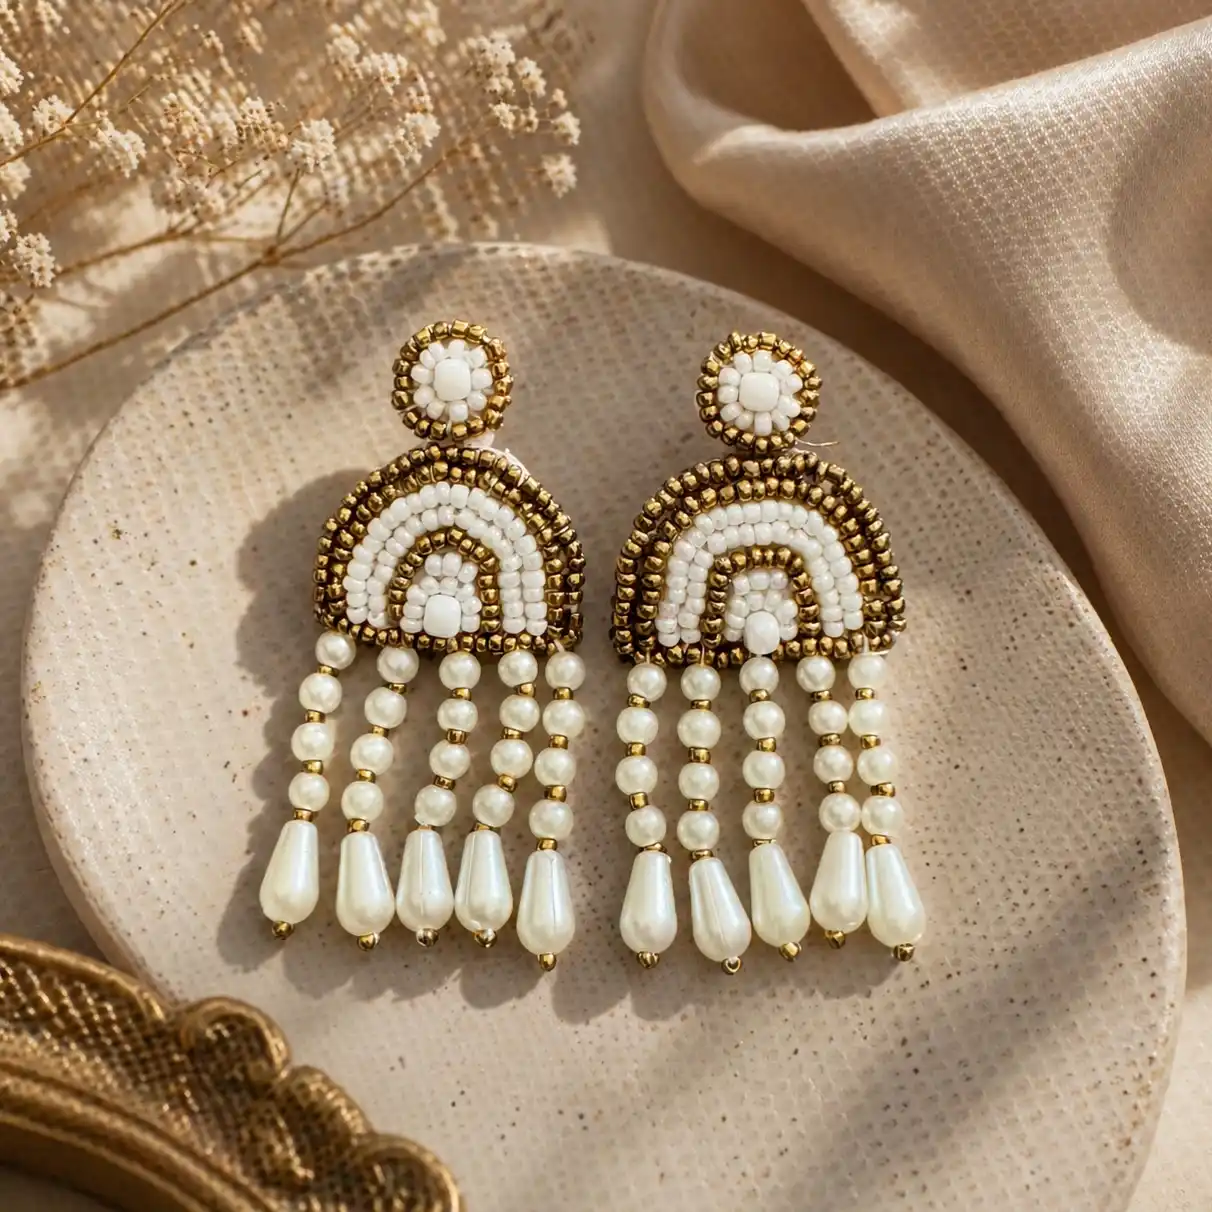
White and gold seed beads build a small arched rainbow at the top of this pair, worked in the same bead embroidery technique from earlier but in a completely different palette and mood.
Below the arch, freshwater pearls take over entirely, strung in graduated sizes from tiny round pearls down to teardrop pearls at the very bottom, giving the fringe a soft, bridal feel instead of a bold statement one.
Pearls this size are forgiving to work with since their holes are drilled large and consistent, so stringing goes fast once the arch itself is finished.
9. Leather Tassel Drop Earrings
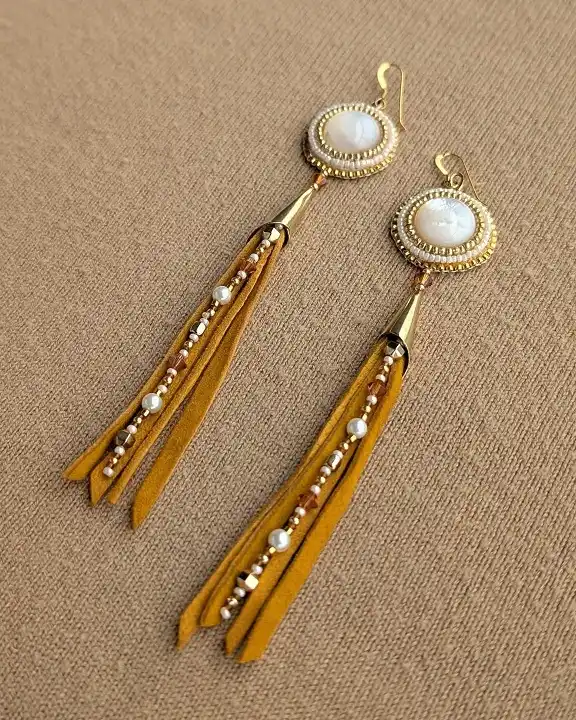
Suede cord takes center stage here instead of beads or clay, cut into long thin strips and gathered under a round bead embroidered cap.
A twisted metal cone pinches all the strips together at the top, which is the small hardware trick that keeps this whole tassel from looking floppy or falling apart with wear.
Here’s what to gather before starting:
- Round bead embroidered cabochons or purchased pearl button caps for the top
- Suede cord or thin leather lacing, cut into four or five equal strips per earring
- A metal cone or bead cap to gather the strips
- A short strand of small beads to thread through the center for extra shine
Cut your leather strips a bit longer than you want the finished tassel, since trimming after assembly gives cleaner, more even ends than trying to cut them to length beforehand.
10. Charm Cluster Hoop Earrings
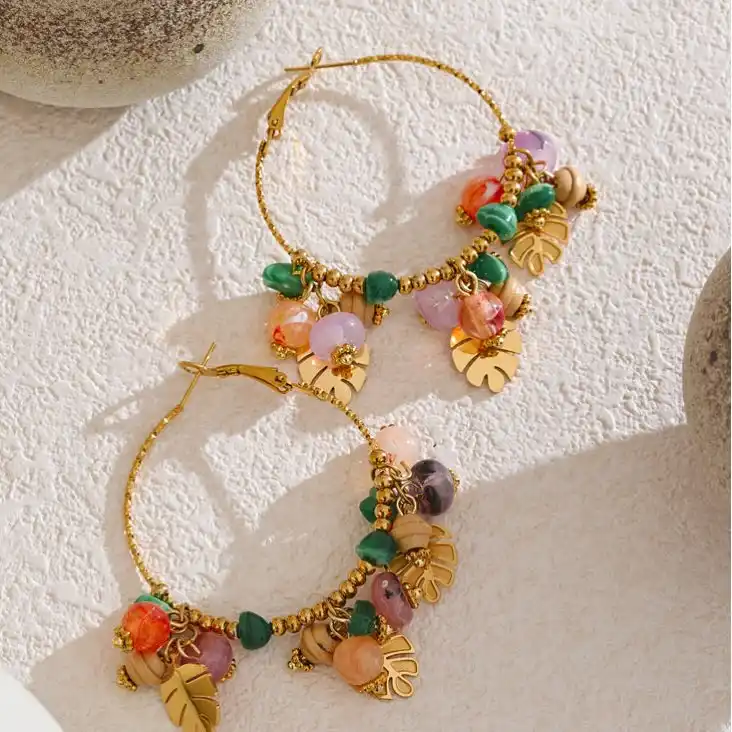
A plain gold hoop turns into a whole tropical garden once you start clipping things onto the bottom half.
This pair mixes gemstone chip beads in coral, lilac, and green, small wooden discs, and tiny gold monstera leaf charms, all attached with individual jump rings so the cluster hangs loose and shifts around as it’s worn instead of sitting stiff in one spot.
Subscribe to DIY Craft Bloom
Get updates on the latest posts and more from DIY Craft Bloom straight to your inbox.
Store bought hoops with an open hinge make this one genuinely doable in an afternoon:
- Buy plain lever back or click close hoops sized to your liking, gold filled or stainless holds up well against everyday wear
- Cut short lengths of head pins or eye pins for each charm, then string one or two beads on each before forming a wrapped loop
- Space out three or four material types, stone, wood, metal leaf, so no two neighboring charms feel repetitive
- Attach everything along the lower curve of the hoop using small jump rings, clustering some charms closer together than others for a natural, not perfectly even look
| Plain hoops | Charm clusters |
|---|---|
| Ready to wear in minutes, no assembly required | Takes an afternoon of wire wrapping and attaching |
| Simple, low key, easy to layer with other jewelry | Bold, one of a kind, becomes the focal piece of an outfit |
| Nothing to personalize beyond the metal color | Fully customizable colors and materials to match anything |
11. Macramé Wing Earrings
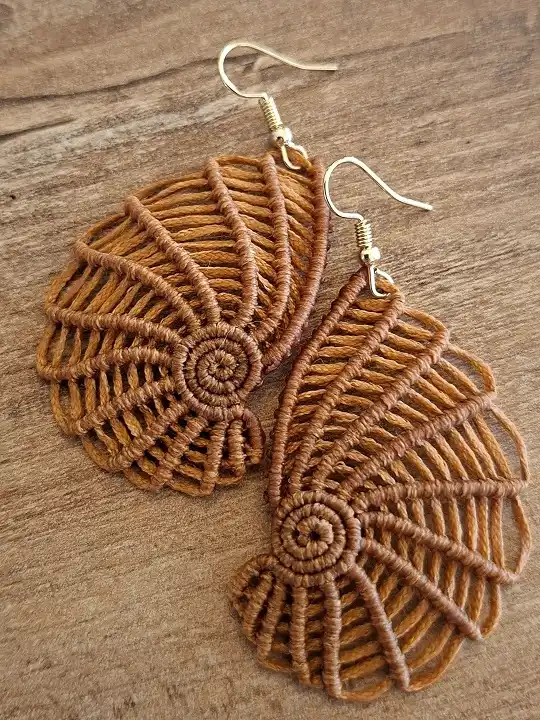
Cotton cord knotted in tight rows fans outward from a coiled center spiral, building a shape that looks almost like a feather or a shell wing depending on the angle you catch it.
This is knot work rather than beading or sculpting, done entirely with cavandoli or half hitch knots repeated dozens of times in a widening arc, and the rust brown cord color lets every ridge and shadow in the pattern show clearly.
Cord tension is what separates a crisp macramé piece from a saggy one, more than knot choice ever will.
Pull every knot the same amount, or the fan will curl instead of lying flat.
12. Gemstone Cabochon Moon Earrings
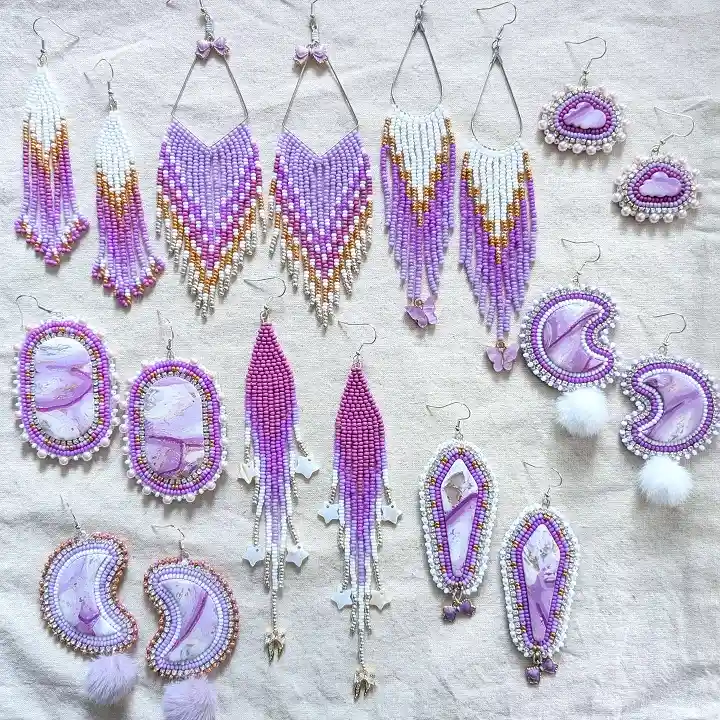
This flat lay is really a whole beading collection, but the moon shaped cabochons tucked in the corners deserve their own spotlight.
Polished stone slices, cut into crescent and oval shapes, sit bezeled inside a ring of tightly packed seed beads, and a small white fur pom-pom hangs off the bottom point for texture the beads alone can’t give.
A few things set this style apart from the flower embroidery covered earlier:
- The stone itself is the star, so the beadwork stays narrow and even, just a simple border instead of a full pattern
- Bezeling around an irregular crescent shape takes more patience than a round cabochon, since the bead count has to shift slightly with the curve
- The fur pom adds movement and softness that pure beadwork can’t replicate on its own
13. Sculpted Bow Clay Earrings
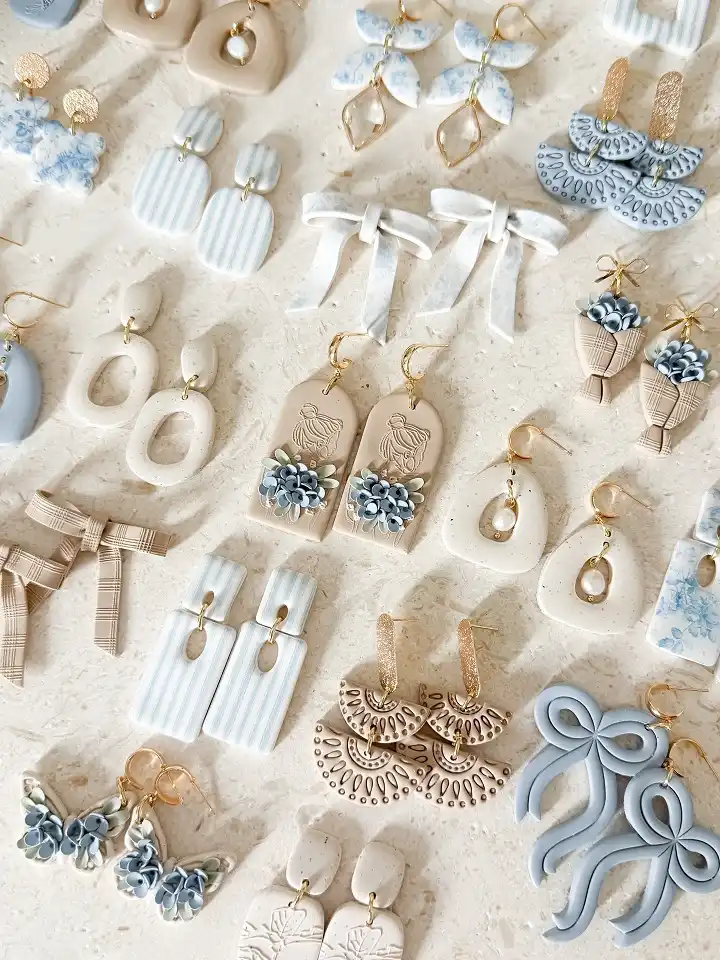
Soft ribbon bows knotted right into the clay before baking are the standout detail buried in this larger flat lay, sitting alongside a dozen other clay shapes from florals to open oval links.
Getting a bow to hold its loops through the baking process is a different skill than the flat cutout shapes covered earlier, since the clay has to be draped and pinched into place rather than pressed flat.
Watch for the shift from a flat slab into a dimensional shape.
A thin, flat strip of soft clay, cut with a straight edge blade.
Folded, pinched, and propped with tissue paper until it holds a bow shape through baking.
14. Felt and Leaf Charm Hoops
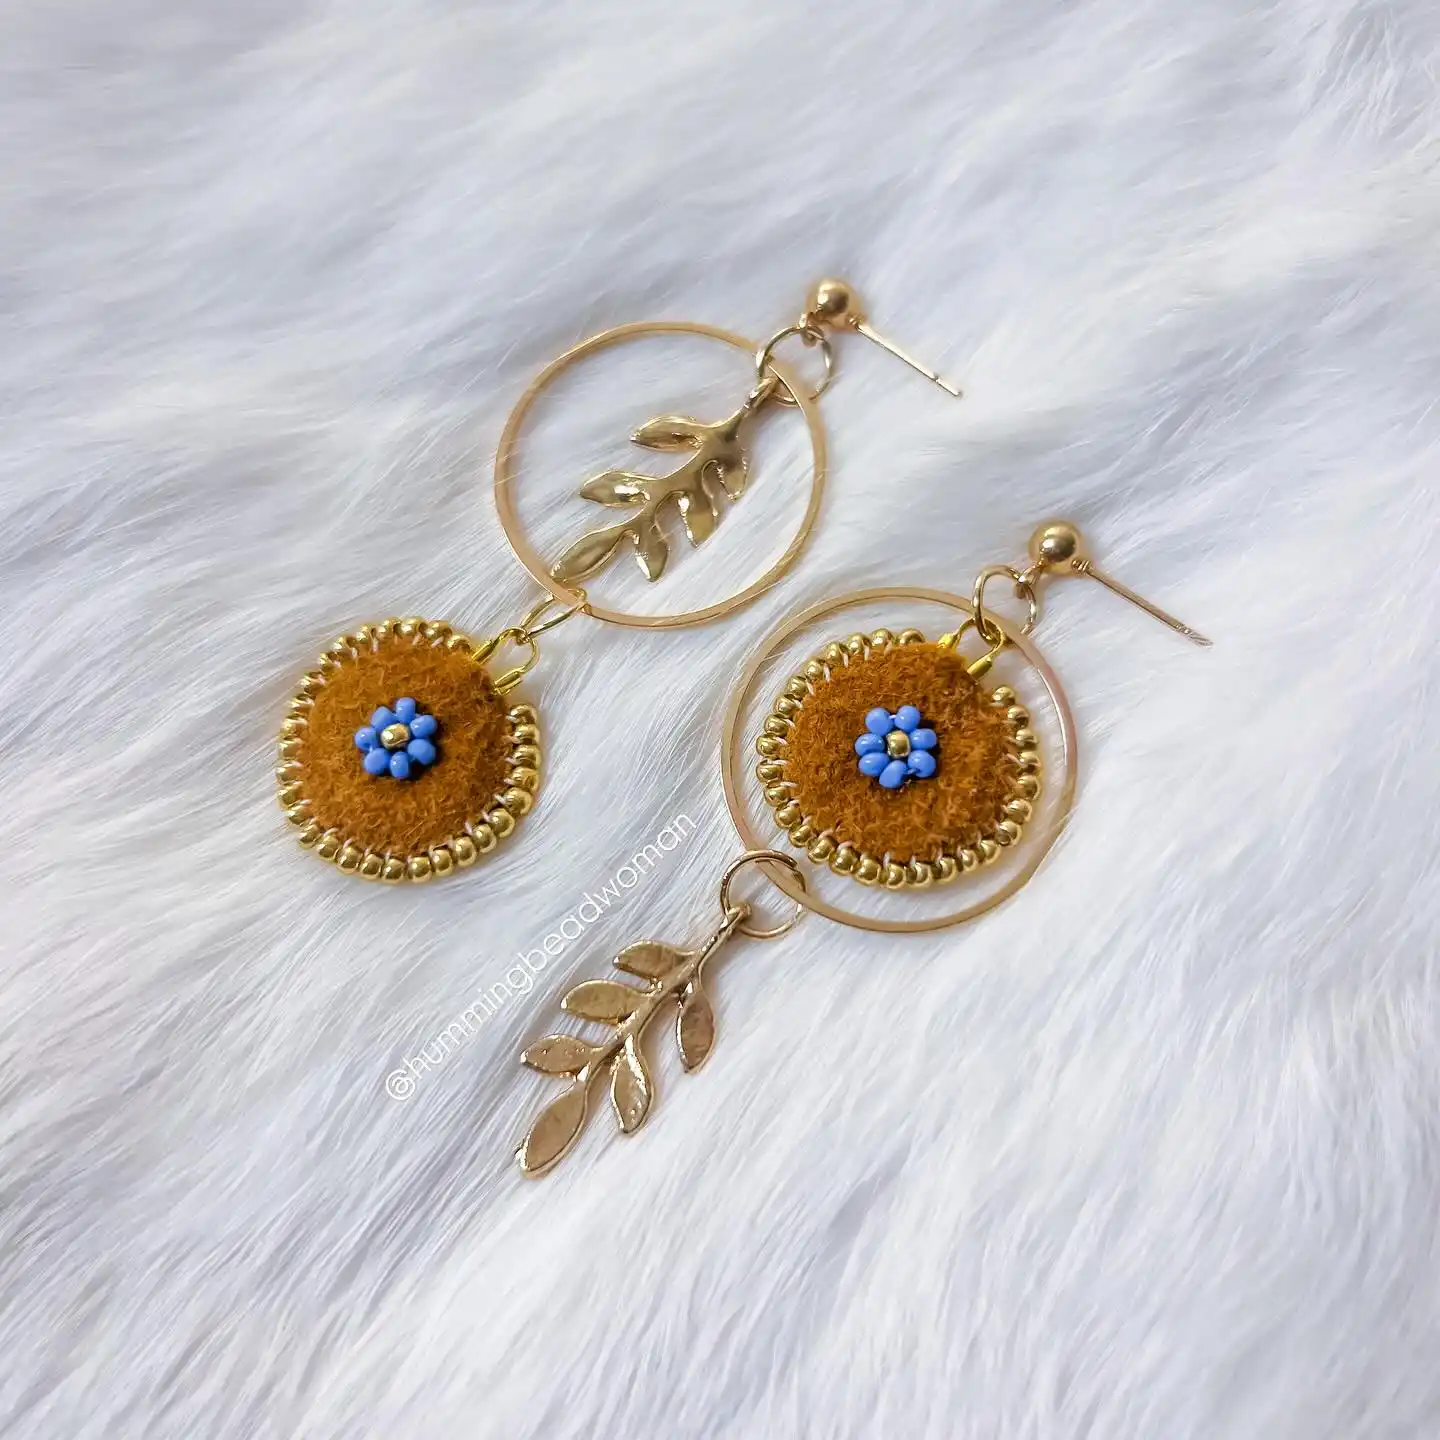
A round felt disc, edged all the way around in tight gold seed bead trim, is the unexpected base material in this pair, worn as a pendant inside an open gold hoop.
A single small daisy stitched dead center in sky blue keeps the mustard felt from feeling plain, while a delicate gold leaf branch dangles below the hoop as a second moving element.
Felt is worth trying if hard materials like clay or wire have felt limiting so far. Here’s what makes it work:
15. Printed Fabric Teardrop Earrings
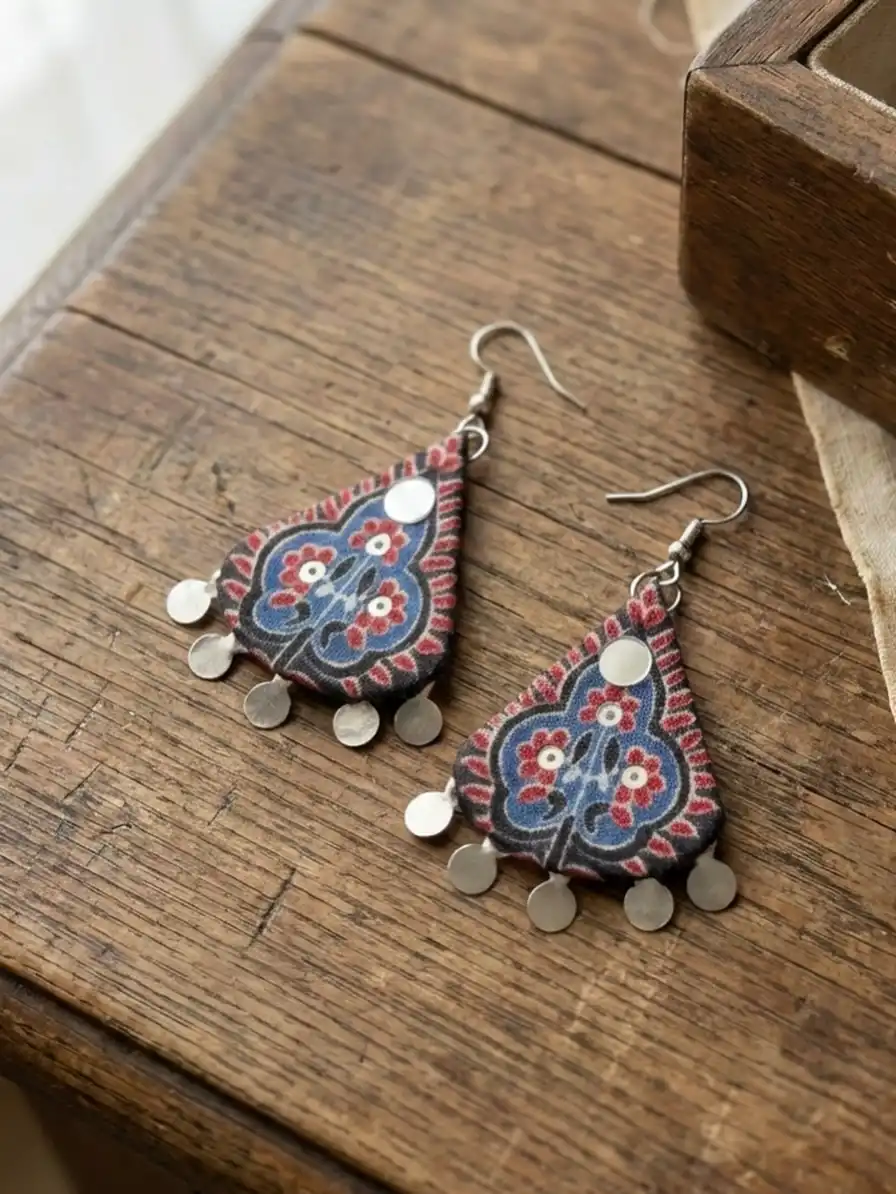
Printed cotton or canvas backed with a stiff interfacing gives this teardrop its structure, block printed in indigo and rust with a folk floral motif before ever being cut into shape.
Small hammered silver coins dangle along the bottom edge on tiny jump rings, catching light and adding sound, a small detail borrowed straight from tribal and vintage textile jewelry.
Fusible interfacing is the material that makes fabric earrings possible at all, since raw cotton alone would flop and fray within a day of wear.
Iron on a double layer of fusible interfacing before cutting, and even a printed cotton scrap holds a crisp edge for years.
16. Painted Ceramic Trio Drop Earrings
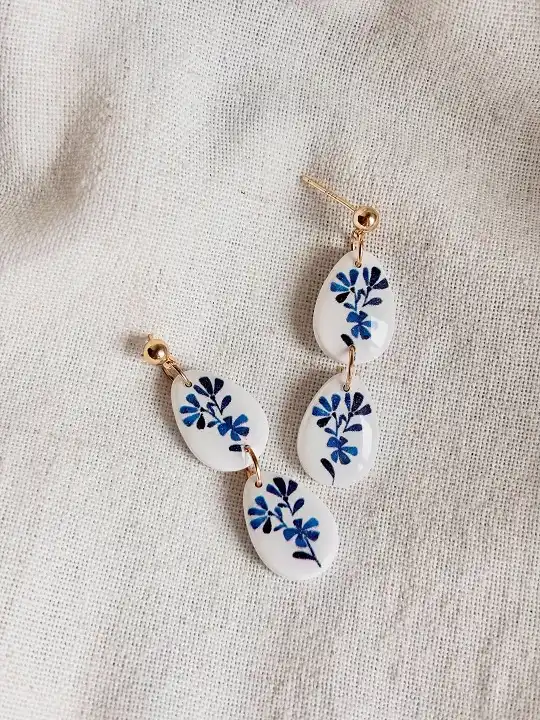
Three small teardrop shaped ceramic pieces link together vertically here, each one hand painted with the same delicate blue floral motif so the whole drop reads as one continuous design rather than three separate charms.
White glazed clay gives the paint a clean, bright surface to sit on, and the asymmetry between the two earrings, one with the stud sitting higher, one lower, is a deliberate styling choice rather than a flaw.
Conclusion
Sixteen styles, sixteen totally different skill sets, and not one of them requires a jewelry making background to get started.
The best way in is usually to pick whichever technique used materials you already own, whether that is a spare bead stash, a bag of polymer clay, or scrap fabric sitting in a drawer.
Start with one pair, get comfortable with the basic steps, and the rest of this list becomes a lot less intimidating.
Save this for the next time you need a fresh DIY earrings idea for beginners.