14 Washi Tape Craft Ideas for Cards, Journal Spreads and Tiny Paper Art


Most washi tape stashes start with one cute roll and end up as a shoebox full of patterns you were saving for something special. Then the something special never comes, and the tape just sits there looking pretty.
These ideas give every roll a job. Some are quick enough for a weeknight, like stripes that fill a Christmas tree window or a strawberry basket cut straight from the tape. Others need a slow Sunday, like a full bookshelf spread where every strip turns into a book spine.
You’ll find handmade cards for birthdays, babies and the holidays, plus journal pages that double as a record of what you own. There’s even a way to make your own vintage tape when the kind in stores doesn’t match your style.
Every one of these washi tape craft ideas comes from a real maker’s desk, so you can see exactly how the tape looks once it’s down on paper. Grab a few rolls, small scissors and a cutting mat. Then pick the project that fits the time you have today.
Before You Start: How to Get Washi Tape to Behave
Washi is a thin paper tape with a gentle glue, so it lifts and moves without ripping most papers. That low tack is the whole charm, but it also means a few small habits make your projects last much longer.
- Press every strip down with a fingernail or bone folder, especially the ends. The edges are where tape lifts first.
- Cut tiny motifs on a cutting mat with a craft knife. Small scissors work too, but a blade gives cleaner corners.
- Keep a sheet of baking parchment nearby. Tape peels right off it, so you can park cut pieces there until you’re ready to place them.
- Sheer tapes show whatever sits underneath. Lay them on white or cream paper when you want the print to look bright.
- For cards going through the mail, add a dot of glue under each end so nothing peels on the way.
1. Vintage Collage Mini Cards With Film Strip Washi

Black, cream and coffee brown are the only colors on these six small note cards, and that tight palette is why the busy layers still look calm.
Each card follows a loose recipe you can repeat:
- A scrap of text print tape or old book paper as the base layer
- A film strip or frame tape laid across it at a slight angle
- A black label strip with a short message like “Happy Day” or “Thankful for you”
- One botanical sticker or stamp, like a hydrangea or a glass jar, sitting on top
Notice how the frames overlap the flowers instead of boxing them in neatly. That off center placement makes each card look layered by hand.
Make six at once. Lay out all the bases first, then the frames, then the labels. Working in batches keeps the set looking like it belongs together.
2. Baby Card With Rolling Floral Washi Hills

Look at the bottom of the bigger card. Three strips of pink floral washi run across it in soft waves, and together they read as a little meadow under the hanging baby clothes. A tiny white bunny sits on the last hill, which turns the whole card into a small story.
The trick is cutting the top edge of each strip into a gentle curve before you stick it down. The second card and the matching gift tag repeat the same tiny outfits, so the present and its card look like a set.
Lay the tape on baking parchment and trim one long edge into a slow wave with small scissors.
Place the lowest strip first, then let each new hill sit slightly above the one before it.
Pink and blush keep it soft, but the same hills look just as sweet in pale blue or mint for a different shower theme.
3. Window Cutout Christmas Tree Card With Washi Stripes
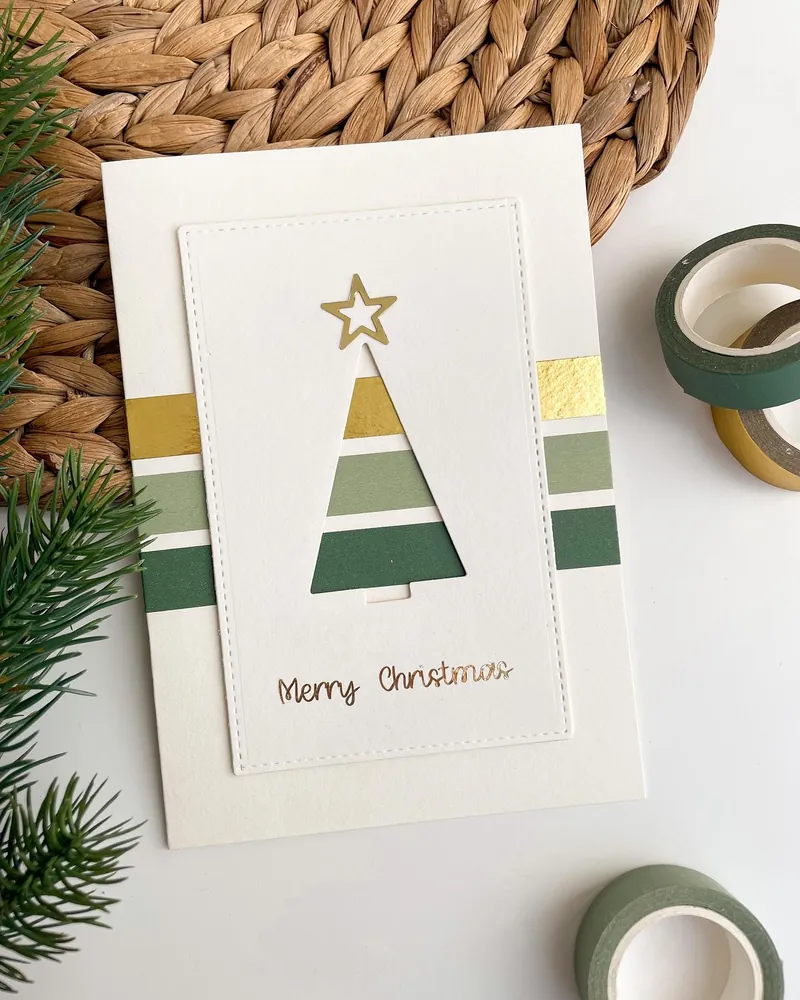
The tree isn’t drawn at all. It’s a triangle cut out of a stitched white panel, and the washi stripes behind it show through the opening. Gold, sage and deep green tape run straight across the base card, so the same stripes peek out on both sides of the panel too.
That repeat is what makes the card look planned. Your eye sees the stripes inside the tree, then finds them again at the edges.
A gold star on top and a short gold greeting finish it without crowding all that white space.
Lay the stripes with a ruler. Even a small tilt shows up inside a tree that narrow.
4. Pastel Washi Strips That Mix Patterns Without Clashing
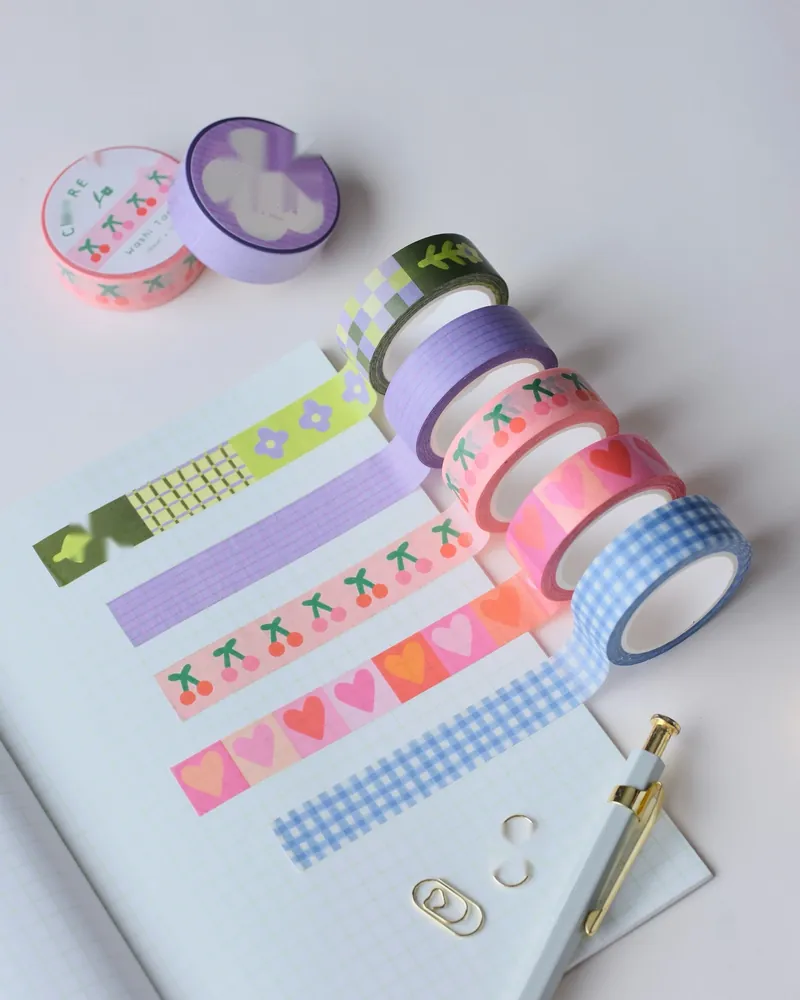
Cherries, hearts, a lavender grid, blue gingham and a lime checker should fight each other. On this grid notebook, they don’t. Every print shares at least one color with its neighbor, so the strips read like a planned set instead of a random pile.
Laying test strips like this before a project is a smart habit. It shows you which tapes look good side by side before you commit them to a card, a gift wrap or a planner page.
Subscribe to DIY Craft Bloom
Get updates on the latest posts and more from DIY Craft Bloom straight to your inbox.
| Tape print | Pairs with | Shared link |
|---|---|---|
| Cherries on pink | Heart blocks | Warm pink base |
| Lime checker with flowers | Lavender grid | Purple flower accents |
| Blue gingham | Lavender grid | Cool pastel tone |
Pick one color thread, and the patterns can be as loud as they like.
5. Make Your Own Vintage Postcard Washi Tape
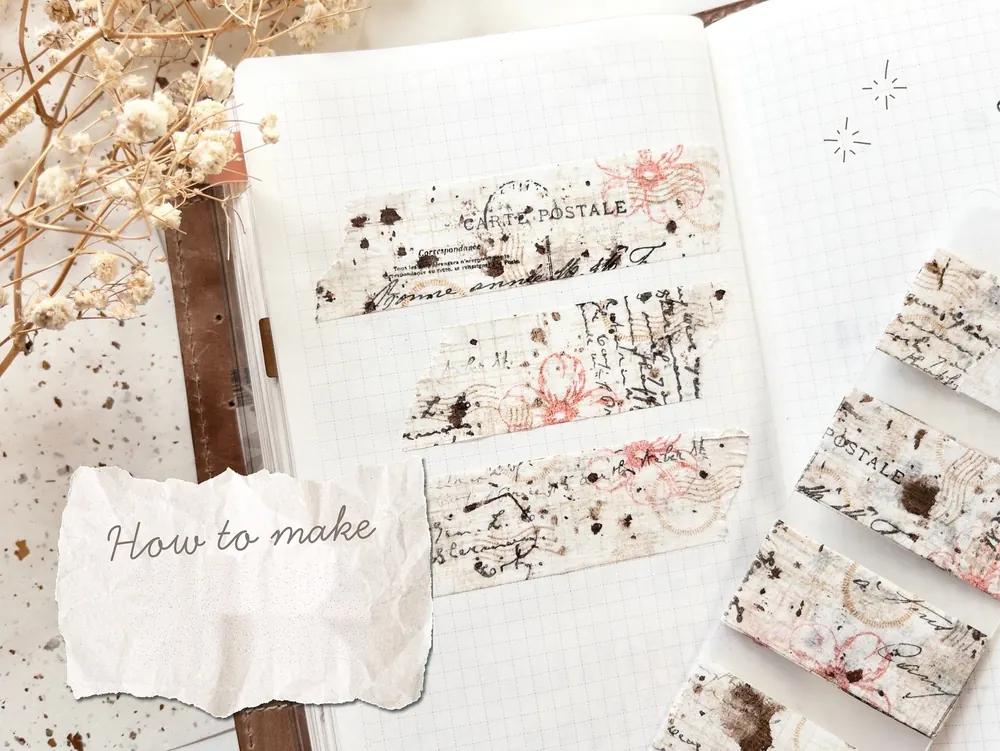
The “How to make” note in this photo hints that these strips started out as plain paper. Faded French script, postmarks, coffee colored splatters and pink line flowers cover each piece. Extra strips wait on a slick backing at the side, ready for the next page.
Homemade tape lets you match any theme you like. Here’s a simple way to do it:
- Tape a sheet of tissue paper onto printer paper and print a vintage design on it.
- Press strips of double sided tape onto the back of the printed tissue.
- Cut it into pieces, then tear the short ends for a soft, worn edge.
- Store the pieces on baking parchment until you need them.
Thin paper matters most here. Thick paper makes stiff tape that won’t lie flat on a journal page.
6. Strawberry Basket Doodle Cut Straight From Washi

Two rolls made this whole picture: one with red strawberries on blue, and one in a cloudy blue watercolor print. The berries were cut out one by one and tucked behind folded pieces of the blue tape, which acts like a little cloth bag holding them.
Stick the tape on baking parchment before you cut out tiny motifs. The pieces peel off cleanly and keep their sticky backs.
The folds and crinkles in the blue tape are part of the charm. Washi looks a lot like fabric when it wrinkles, so a bag or basket shape doesn’t need to be neat. Tuck the fruit in so only the tops peek out, and the scene looks like it’s about to spill over.
Any tape with a clear motif works the same way. Lemons, flowers or little stars can fill a jar, a pocket or a bowl.
7. Paint Roller Washi Doodles for a Tape Sample Page
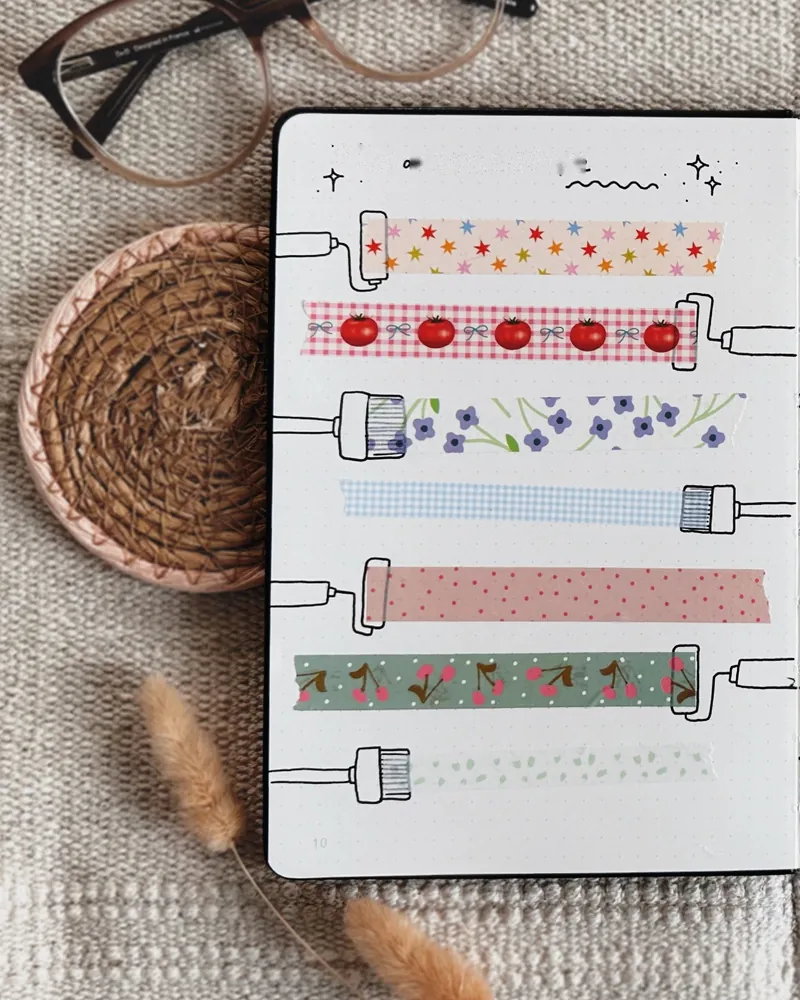
Every strip on this page looks like it was just rolled on with paint. A few black pen lines do all the work:
- A roller handle drawn at one end of the strip, so the tape becomes the painted stripe
- Small brushes on the shorter strips for variety
- Tools that switch sides, left then right, so the page doesn’t feel lopsided
- A few sparkles and a wavy line at the top to frame the page
The prints include stars, tomato gingham, violet florals, blue gingham, pink dots, cherries on sage and a pale speckle. That mix makes the page a handy record of the tapes you own.
Draw the handles after the tape is down, so each roller lines up with the strip’s real edge.
8. Washi Tape Bookshelf Spread With Strips as Book Spines
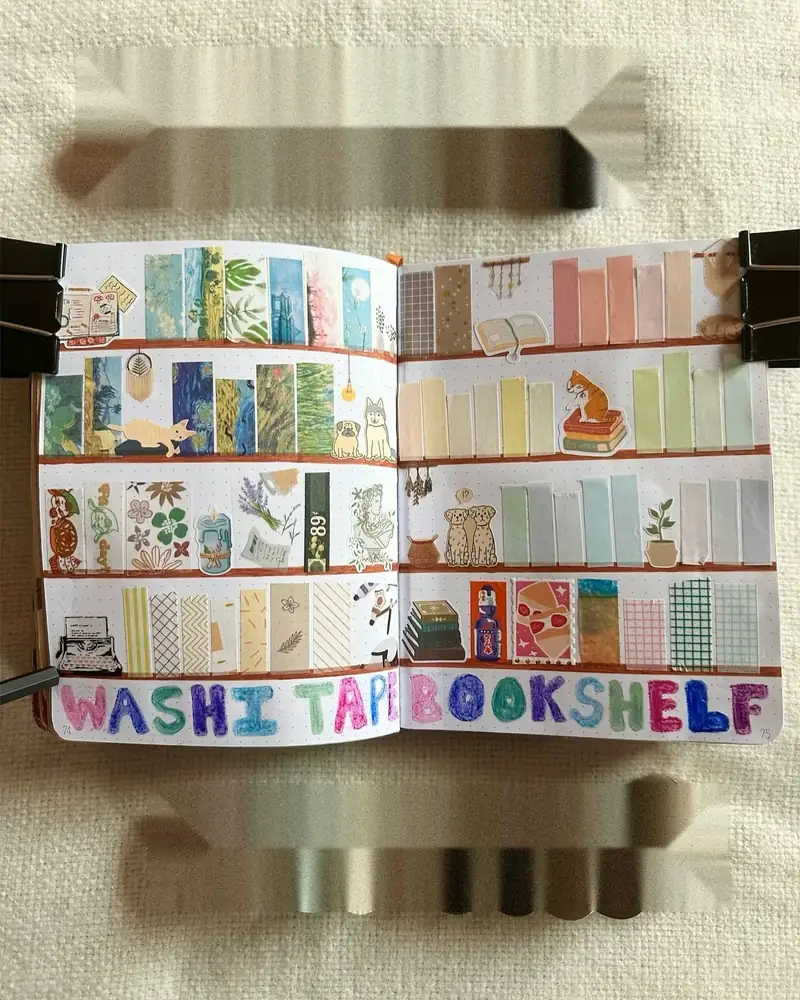
Each short piece of washi stands upright on a drawn shelf and becomes a book spine. Across this two page spread, the tapes are grouped by mood. Painterly greens and blues fill the upper left, while the right page runs in rainbow order through soft pinks, yellows, greens and grays.
Stickers do the decorating between the books. A cat lounges along one shelf, and a typewriter, little plants and a pile of tiny books fill the gaps. Big bubbly letters across the bottom name the page.
Rainbow order makes a busy page look tidy and shows you which shades your stash is missing.
Some spines are cut taller than others, just like books on a real shelf.
Small figures break up long rows of tape so the eye has a place to rest.
Clip the pages flat while you work. The binder clips in the photo hold the spread open, which keeps every strip straight.
9. Washi Tape Swatch Spread With a Pop Out Title
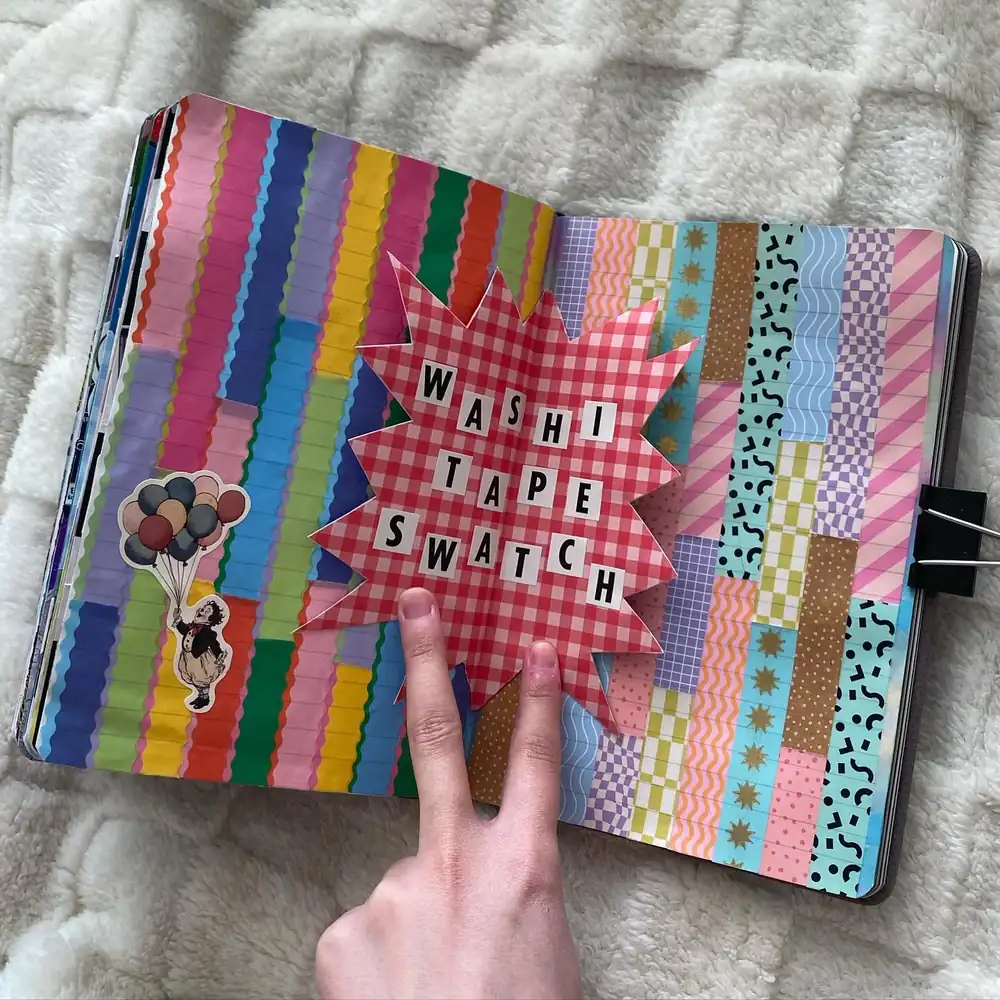
Full coverage is the whole point of this page. Strips run edge to edge in bright rows, with scalloped tapes on the left and checks, waves, dots and stars on the right. In the middle sits a red gingham starburst with “Washi Tape Swatch” spelled out in black letter stickers. It lifts like a flap, so the title never hides any tape for good.
Why a swatch page earns its spot in your journal:
- You see every pattern at a glance before buying a near copy
- Rows of bright and pastel tape show which colors you reach for most
- A flap or pocket adds a fun surprise without taking up space
Glue only the bottom edge of the starburst so the rest can lift.
10. Cozy Shelfie Spread With Stacked Washi Books and Cutout Letters
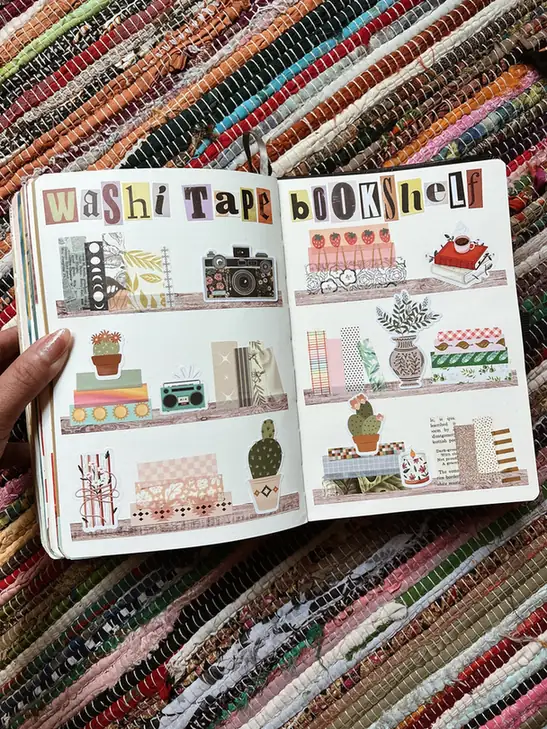
Here’s a second bookshelf, and it shows how much one idea can change. Instead of tall spines in neat rows, many of these books lie flat in short stacks. The shelves themselves are strips of wood grain tape, and the title is a ransom note mix of letters cut from scraps.
Subscribe to DIY Craft Bloom
Get updates on the latest posts and more from DIY Craft Bloom straight to your inbox.
Small props fill the gaps: a camera, a radio, potted cacti and a vase of leaves. The space between objects matters just as much as the books do.
Mix flat stacks with a few upright books on every shelf.
Leave a little breathing room around each sticker.
Filling every inch of shelf with tape.
Cutting every book to the exact same size.
Wood grain tape for the shelves means you never have to draw a single straight line.
11. Autumn Memory Page Framed With Grid and Floral Washi
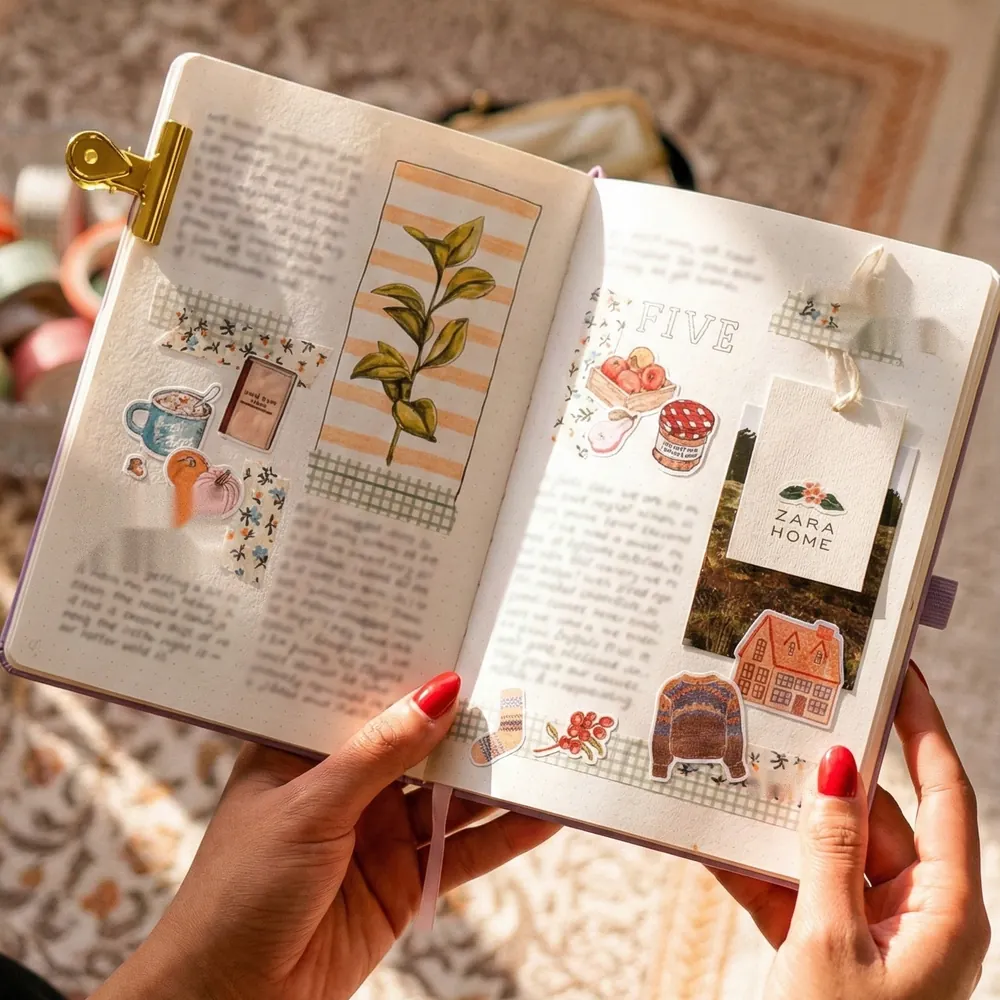
On this spread, washi works as the frame, not the star. Thin sage grid tape and tiny floral tape hold down a photo, a paper shopping tag tied with string, and a striped panel behind a leaf drawing. Cozy stickers like a sweater, socks, jam and a crate of apples line the edges, and handwriting fills the space in between.
A memory page like this is a lovely way to save small things from a good day. Tags, tickets and receipts all fit.
Keep these tapes quiet and small so your handwriting stays easy to read.
12. Plaid Washi Skyline for a Monthly Cover Page
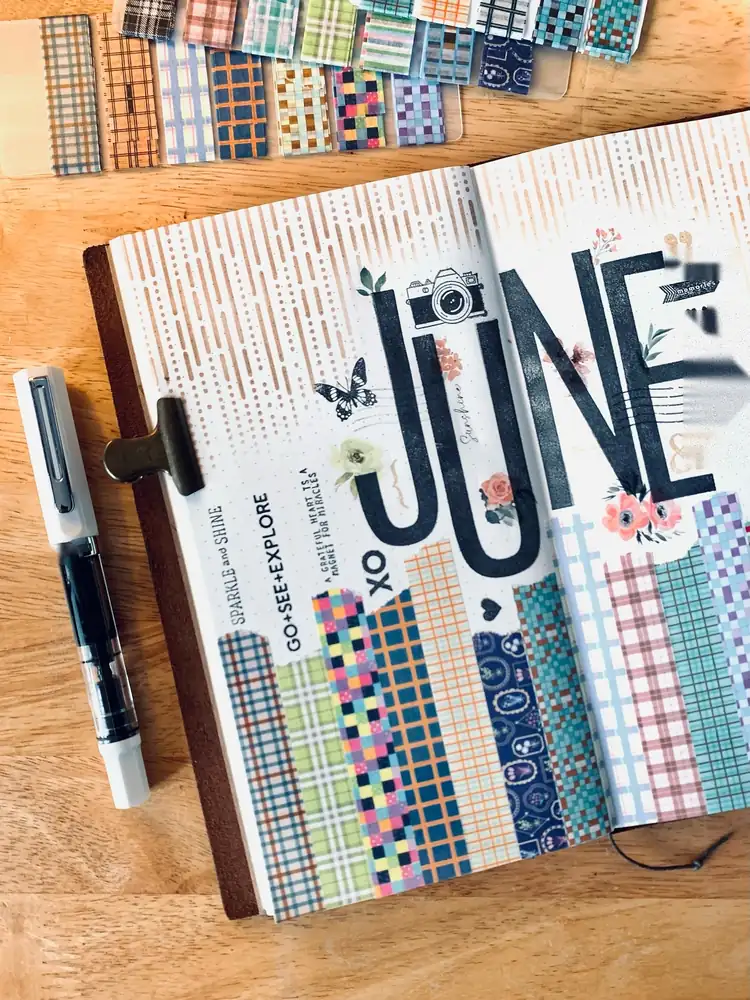
Strips of plaid washi rise from the bottom of this June page at uneven heights, a bit like a city skyline. Navy, mint, pink, lime and orange plaids stand side by side, and their tops stop at slightly different levels. Big stamped letters for the month sit above them, with a camera, a butterfly and a few flowers scattered around.
A dotted stencil pattern fills the top of the page. So the bottom is busy, the middle is bold and the top stays light. The sample strips at the top of the photo show how the plaids were tested together before they went down.
Swap the plaids each month, and your planner gets a fresh cover every time.
13. Grid Washi Turned Into a Knitted Scarf Illustration
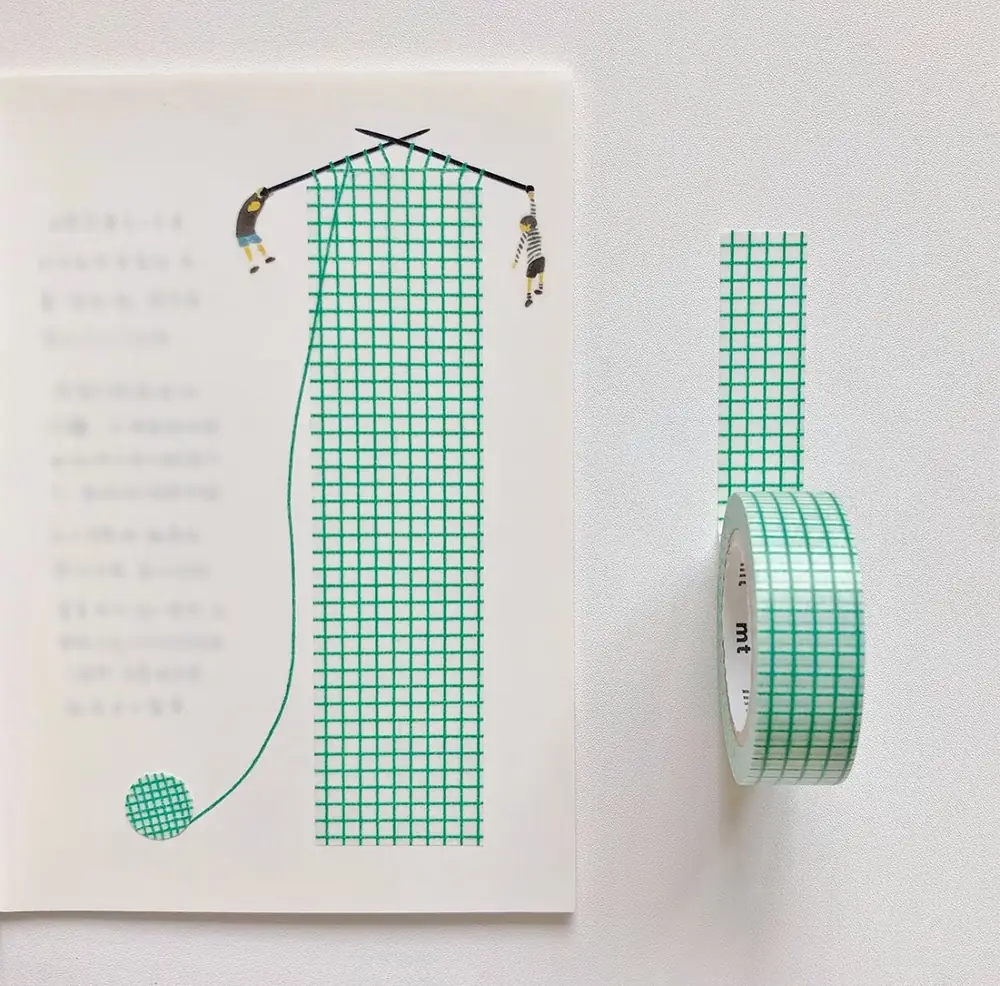
Two tiny figures hold crossed knitting needles at the top of the page. Below them hangs one long strip of green grid washi, and suddenly that grid looks like rows of stitches on a scarf in progress. A thin green line drawn down the page leads to a small circle cut from the same tape, which becomes the ball of yarn.
The tape’s own pattern tells the story. A grid already looks like knitting, so one strip and a few pen lines finish the picture.
To plan your own:
- Look at a roll and ask what the pattern already looks like.
- Draw or stick on the hands, people or tools that would use it.
- Cut one small shape from the same tape to tie the scene together.
Striped tape could hang as a towel on a clothesline, and wavy blue tape could be a river under a paper boat.
14. Wide Storybook Washi as Bookmarks and Mini Wall Art

Some tapes are too pretty to chop into small bits. These wide rolls carry full scenes in an old storybook style, with unicorns, dragons, sea creatures, a rabbit and starry night skies. One roll is even shaped like a row of stamps with perforated edges.
Ways to show them off:
- Stick a long piece onto cardstock and trim it into a bookmark
- Lay three or four strips on a cream sheet and frame it for a shelf or desk
- Use a single stamp shaped piece as the focal point on a gift tag
Wide tape wrinkles more easily than thin tape. Peel it slowly and smooth it from the middle outward.
Pick One Roll and Start Tonight
Fourteen ideas, and not one of them needs more than tape, paper and a few pen lines to get started. Some are quick wins, like the Christmas tree window or a strawberry basket you can finish before dinner. Others, like the bookshelf spreads or your own vintage tape, are worth saving for a slow weekend.
The best part of these washi tape craft ideas is that nothing has to be perfect. Washi peels right back up, so you can move a strip, try again and keep going until it looks right to you.
Save this for the next time your tape drawer needs a reason to open.