14 Newspaper Craft Ideas for Preschoolers: Roosters, Hats, Tiny Towns and More

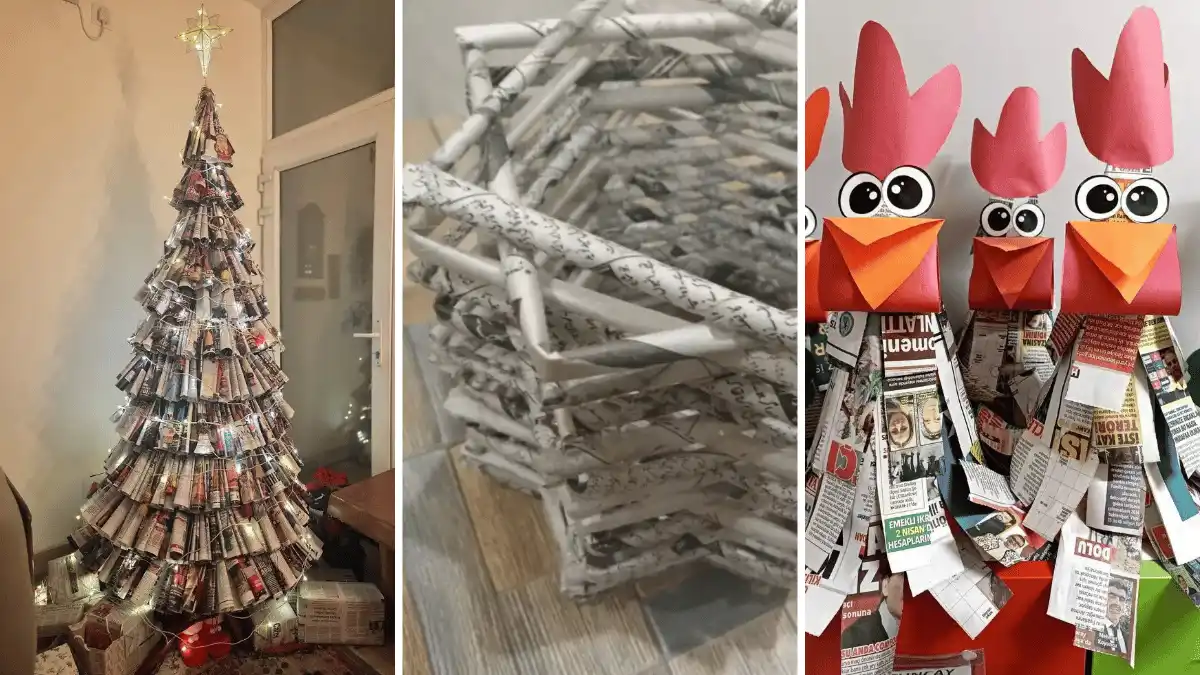
That stack of old newspaper by the door is about to become a rooster, a superhero city, and a hat your kid won’t take off at dinner.
Newsprint may be the most underrated art supply for little kids. It tears without scissors, rolls without much fight, and costs nothing. Nobody gets upset when a page goes wrong, because there’s always another one underneath.
The catch is that most newspaper crafts online are made by grown-ups, for grown-ups. They call for tight tubes, tiny folds and hours of patience. A three year old has none of that, and they shouldn’t need it.
So every idea in this list of newspaper craft ideas for preschoolers comes with a version small hands can actually do. You’ll find torn paper collages, fringe to snip, coils to wind, a letter hunt, a learning clock and a few gifts worth giving away.
Each one notes which steps your child can handle and which ones are yours. Grab a glue stick, cover the table, and let them get messy.
1. Over Under Newspaper Weaving Tote for Little Treasure Hunts

Look closely at the front of this little bag. Every square is a folded strip of newsprint going over, then under, the strip beside it. That over-under rhythm is great fine motor practice for a four year old, and here it’s hidden inside something they get to carry around.
The bag in the photo is folded and woven on all four sides, which is a grown-up job. Preschoolers can do the fun middle part:
- Cut wide up-and-down slits in the front of a small paper lunch bag. Leave the top and bottom uncut.
- Fold newspaper into strips about two fingers wide so they stay stiff.
- Let your child weave each strip across, over one slit and under the next.
- Glue the ends down and staple on a folded newspaper handle.
Then take it on a nature walk. Pinecones and leaves feel very important in a bag they wove themselves.
2. Superhero City Skyline With Newspaper Buildings
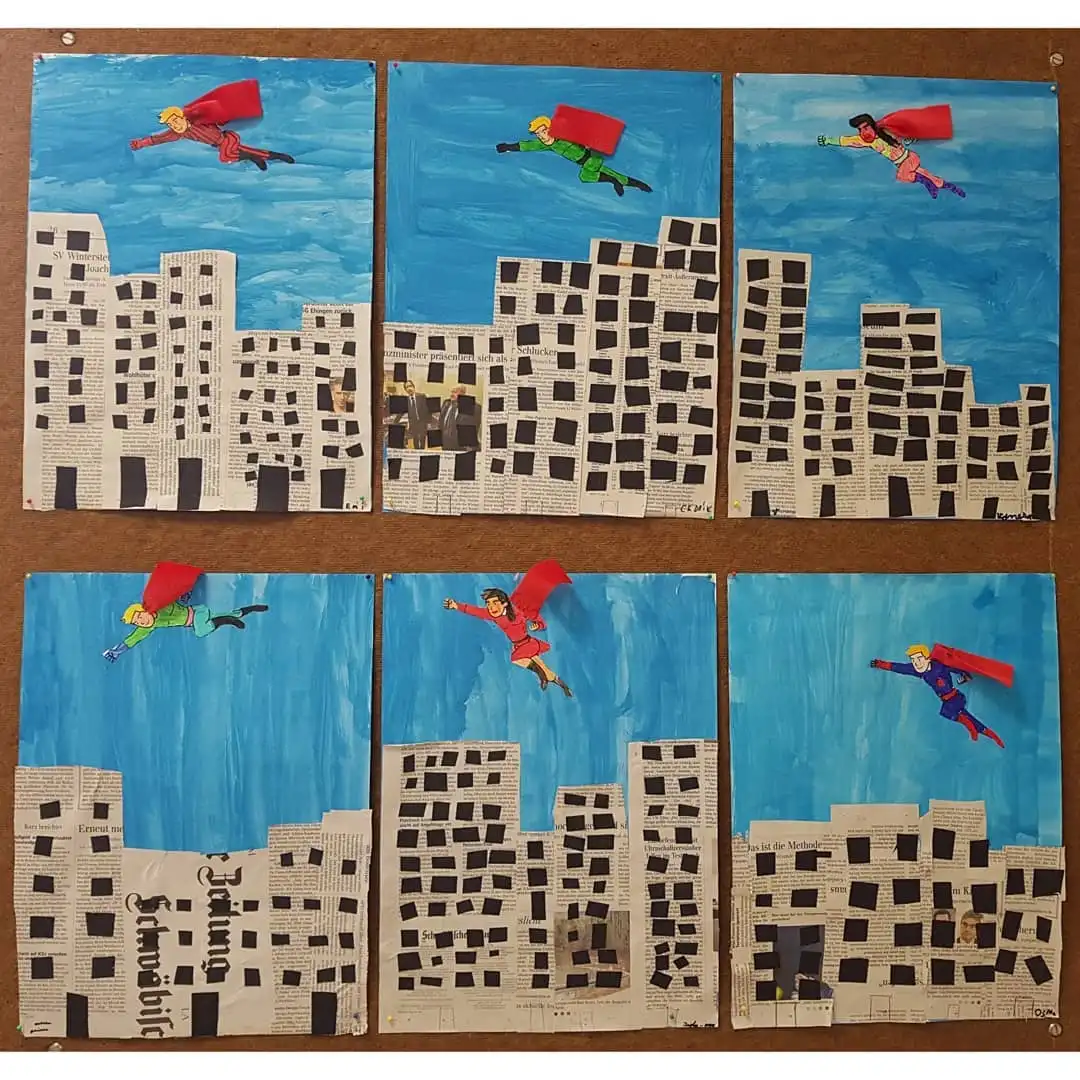
Six kids made the same project, and no two skylines look alike.
What makes these work:
- A bright blue painted sky behind plain grey newsprint, so the buildings stand out
- Black paper squares for windows, stuck on a little crooked
- A tiny flying hero with a red cape that lifts off the page
The black windows are where preschoolers shine. Pre-cut a big pile of squares and let your child place them one at a time. It doubles as sticky counting practice, and crooked windows only make the city look busier.
For the hero, swap the drawing for a cutout photo of your child with their arms stretched out. Kids grin from ear to ear when they spot themselves flying over a newspaper city.
Brush blue watercolor or thinned paint over the whole page. Let it dry fully.
Cut newspaper rectangles in tall and short sizes. Your child glues them along the bottom edge.
Stick on pre-cut black paper squares with a glue stick, one window at a time.
Glue the hero high in the sky. Attach a red paper or fabric cape at the neck only, so it can flap.
3. Log Cabin Newspaper Tube Basket for Crayons

Stacked tubes, each layer turned a little, glued where they cross. That’s the whole trick behind this hexagon basket, and it plays out almost like a block-building game.
Now the honest part. Rolling tight, skinny tubes takes strong fingers. Most three and four year olds will roll something loose and squishy. So pick one of two ways to share the job.
You roll, they stack. Make a bundle of tubes ahead of time. Your child dabs glue on each corner and lays the next layer on top. It’s slow, careful work that builds patience.
They roll, you trim. Wrap a sheet around a thick marker or a wooden spoon handle so they have something firm to roll against. Slide it out, tape the end, and cut all the tubes to the same length.
Make a square instead of a hexagon. Four corners are easier to line up than six, and the finished basket still holds a whole box of crayons.
4. Handprint Tree Silhouette on a Newspaper Page
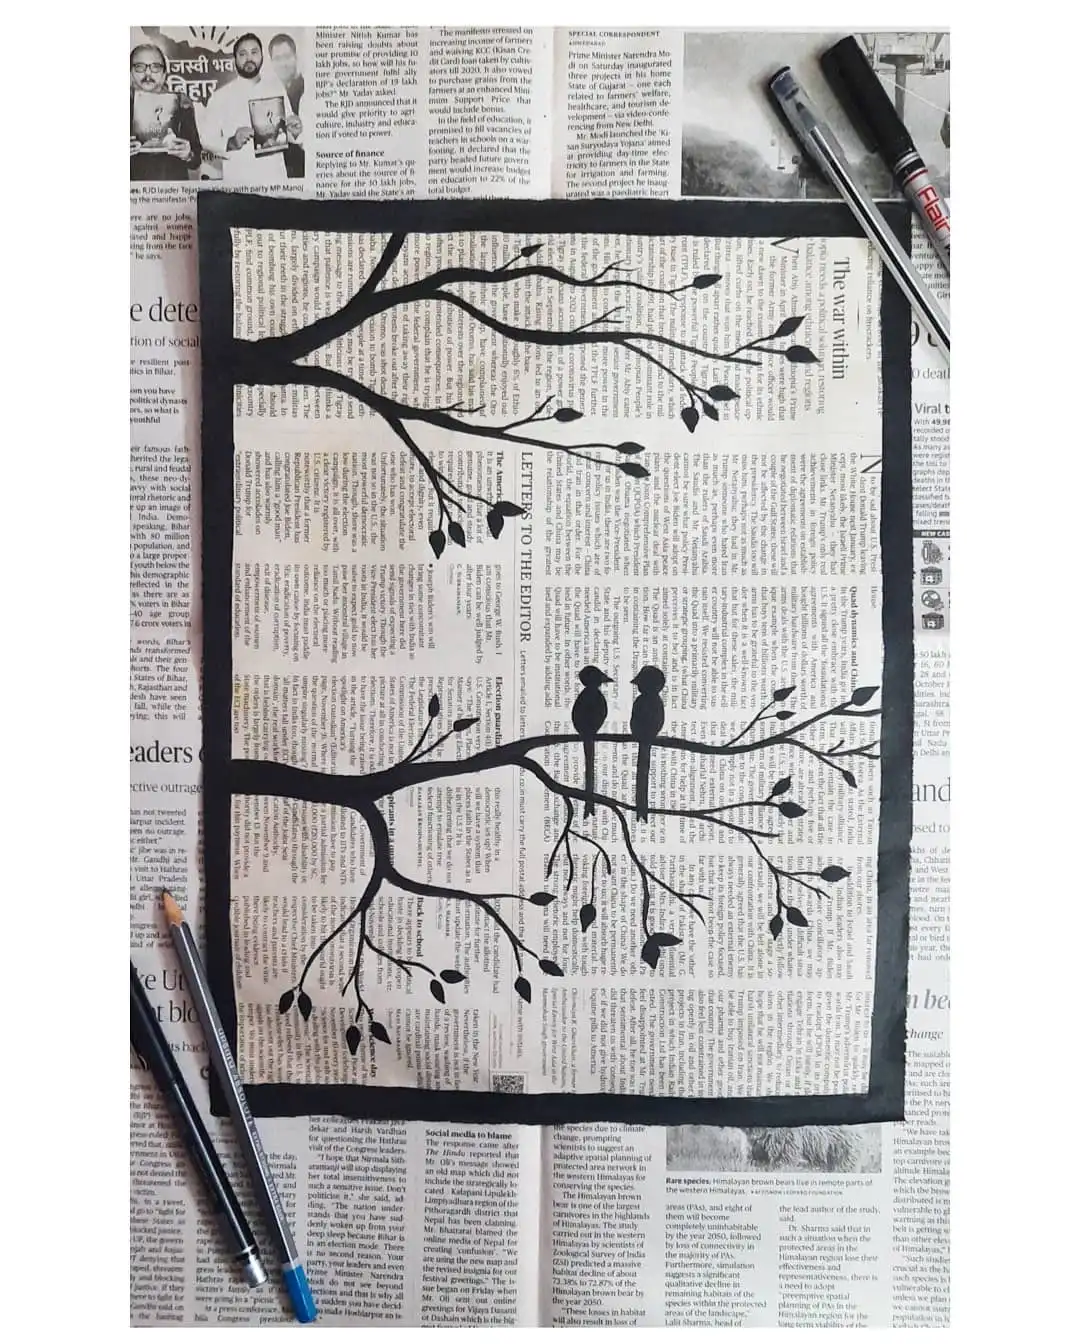
Black paint on newsprint looks striking, even when the painter is four. The printed text turns into a soft grey background, so any dark shape on top looks bold and finished.
What the photo gets right:
One color only. Everything is black, so there are no color choices to stall on.
Branches from the sides. The tree grows in from the edges and leaves the middle open.
Two tiny birds. A small surprise that makes people look twice.
For preschoolers, skip the thin brush. Paint your child’s forearm and hand with washable black paint and press it onto the page.
The arm becomes the trunk and the spread fingers become branches. Fingertip dots make leaves, and a thumbprint with a drawn-on beak becomes a bird.
Glue the page onto black paper so it has a border like the one in the photo. It hides wobbly edges and makes the painting look framed.
5. Tabletop Newspaper Cone Christmas Tree

Rows and rows of rolled paper cones, layered tier by tier, with fairy lights tucked in between. The tree in this photo stands taller than a child, and the size is the part to shrink.
Notice how many cones are rolled from magazine pages. Those colored cones are what give this tree its warmth. Plain newsprint on its own would look grey, so mix in a few glossy pages.
Subscribe to DIY Craft Bloom
Get updates on the latest posts and more from DIY Craft Bloom straight to your inbox.
Here’s how a preschooler builds a mini one.
Start with a cardboard cone base. A paper party hat works well. Cut newspaper and magazine pages into squares, and show your child how to roll each one into a little cone. A dot of glue holds it shut.
Then they stick the cones onto the base row by row, starting at the bottom so each new row overlaps the one below.
Save the battery fairy lights for the end. The paper is the kid job, and the lights are yours.
| In the photo | Preschool version |
|---|---|
| Floor tree, taller than a child | Tabletop tree, party hat size |
| Cones stacked in wide tiers | Cones glued onto a cardboard cone |
| Newspaper and magazine pages | Pre-cut squares, rolled by your child |
| Fairy lights, small ornaments, star | Stickers, pom poms, a paper star |
6. Rolled Newspaper Learning Clock for Number Practice

Every number on this clock is a bent newspaper tube. That one detail turns a home decor project into a number lesson for small hands.
The clock in the photo has a real working mechanism and a framed face made of tubes, which is too much for preschool. Keep the idea and change the base.
Use a paper plate as the face, and glue rolled newspaper strips across it in rows so it looks like the striped background in the picture.
Then comes the counting. Twist thin strips of newspaper into soft ropes. Your child lays them on the plate in the shape of each number, following light pencil guides you draw first.
Straight numbers like 1, 4 and 7 are quick wins. Curvy ones like 3 and 8 need more help, so make those a team job.
Cut two hands from cardboard and attach them with a paper fastener so they really spin.
Paper fasteners have sharp prongs, so push that one through yourself.
Rows of rolled strips give the face a bumpy texture kids love to run their fingers over.
Bending a paper rope into a 2 or a 5 shows kids how each number is built, line by line.
Spinning hands turn it into a toy for games like “show me snack time.”
7. Fringed Newspaper Roosters With Big Paper Eyes
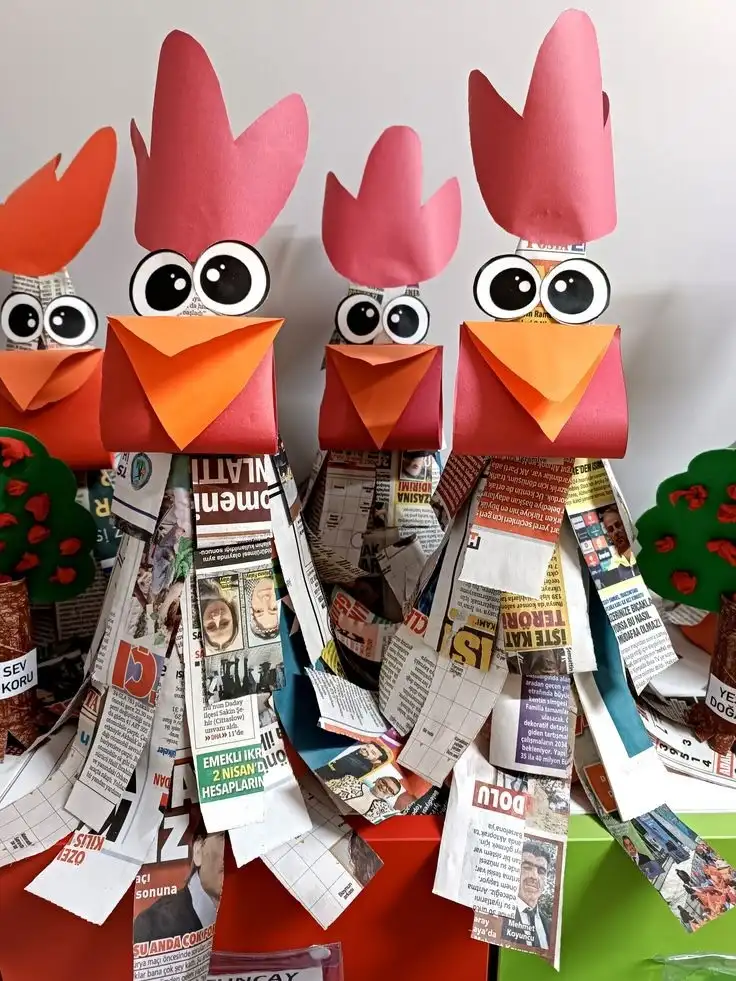
Fringe is the secret here. Each rooster wears long, loose strips of newspaper that hang down like messy feathers, and messy is exactly the look you want.
Cutting fringe is also great scissor practice. Hand your child a strip of newspaper and let them snip in from one edge, over and over.
Newsprint is thin and soft, so even first-time cutters get results fast. A ragged fringe still looks like feathers.
The heads are where the color lives. A folded red paper square makes the face, an orange triangle makes the beak, and a pink paper comb stands up on top.
The eyes in the photo are paper circles with black centers, which is a safer pick than plastic googly eyes if toddlers are around.
Line a few up on a shelf. A whole flock looks far better than a single bird.
8. Newspaper Tube Town for Small World Play

Someone spent a very long time on this tiny town. Your preschooler doesn’t need to.
Look past the size and you’ll see three simple building moves. Walls are tubes lined up side by side. Roofs are flattened tubes. Wheels are strips coiled tight like a snail shell. Each one shrinks down to a preschool job.
Pull small cereal boxes and cardboard tubes from the recycling bin. Your child glues newspaper strips around them until no cardboard shows. You cut the doors and windows, and they draw everything else.
The little car in front is the best part to copy. Its wheels are coiled newspaper strips, and coiling is something kids can manage with a dab of glue at the end.
Set the finished town on a big flat sheet of newspaper. It becomes the road, the park and the play mat all at once.
9. Torn Newspaper Squirrel Collage
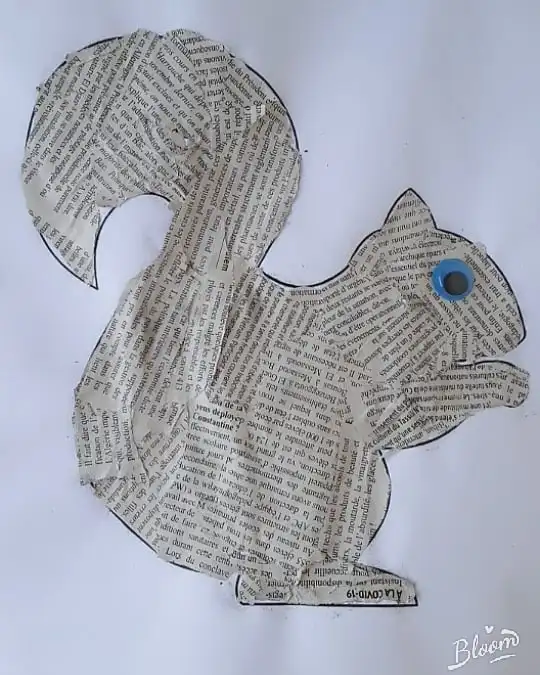
Of all the ideas on this list, this one asks the least from you and gives kids the most to do.
All it takes is a squirrel outline, a pile of torn newspaper and a glue stick. In the photo, the torn pieces overlap and poke past the lines in spots, and it still reads as a squirrel because the outline does the heavy lifting.
Set it up like this:
- Draw a big, chunky animal outline on white paper. Bold shapes with one fat tail are easiest.
- Tear a stack of newspaper together. Tearing is great finger work, and there are no sharp edges.
- Let your child rub glue inside the lines, then press the paper pieces on top.
Add the eye last. The photo uses a googly eye, which brings the whole squirrel to life. Use a marker dot instead for kids under three.
Draw the outline thick and dark so it still shows after the paper goes on.
Put glue on the drawing, not on each scrap. Little hands manage big areas better.
Subscribe to DIY Craft Bloom
Get updates on the latest posts and more from DIY Craft Bloom straight to your inbox.
Tiny scraps the size of a stamp. They take forever and frustrate small fingers.
Scissors. Torn edges look soft and furry, just like a real squirrel.
10. Stuffed Newspaper Fish With Letter Hunt Scales

These fish are gallery art, built from paper mache and covered in cut newspaper letters, bright paper scraps and button eyes. They’re beautiful, and far too slow for a preschool afternoon.
The part worth borrowing is the letters.
Hand your child a newspaper page and a highlighter. Ask them to find the letters of their own name in the big headlines.
Cut those letters out together, and they become the fish scales. The craft turns into a letter hunt, and kids are thrilled to spot their own first letter.
For the body, skip the wet paste. Cut two matching fish shapes from a brown paper bag and staple most of the way around the edge.
Then let your child stuff the inside with crumpled newspaper. Scrunching paper is loud, easy and very satisfying. Staple the gap closed.
Glue on the letters, some colored tissue scraps and one big paper eye. Hang a whole school of them in a window.
11. Folded Newspaper Hat With a Bird on Top
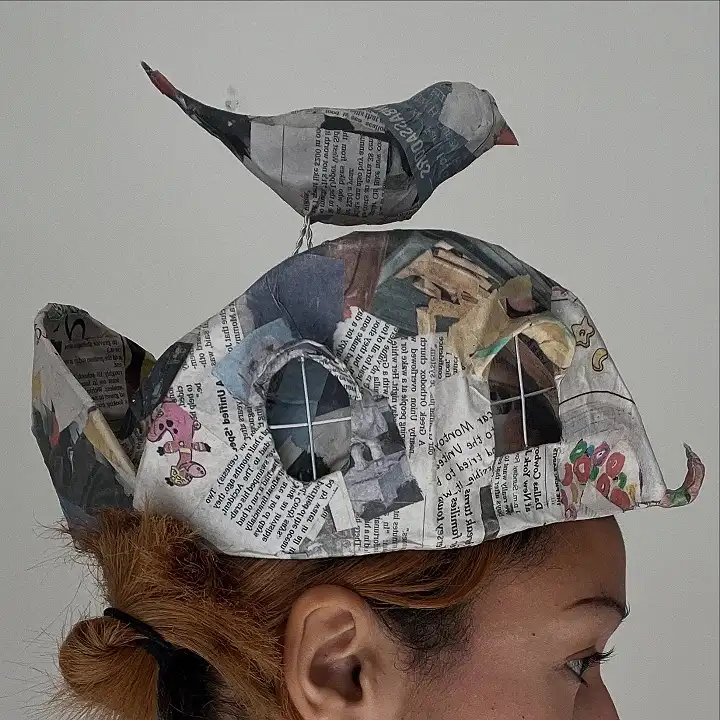
Wearable crafts win with preschoolers every time. They make it, they put it on, and the pretend play starts right away.
The hat in this photo is collaged paper mache, but its shape is close to the classic folded newspaper hat lots of us made as kids. Fold one from a double sheet of newspaper, then hand it over for decorating.
Details to borrow from this one:
- Cut-out comics and cartoon scraps glued on, for color against the grey print
- Round windows drawn on the sides, so the hat looks like a little house
- A small bird standing on top, held up on a thin wire
For kids, fold or cut a bird from paper and tape it to a pipe cleaner. Poke the pipe cleaner through the top of the hat and bend the end flat on the inside, so nothing scratches their head.
Expect it to be worn to dinner.
12. Black and White Torn Newspaper Process Art

No animal, no house, no right answer. Just torn paper, black paint and loops of scribbled ink. This abstract piece is an adult artwork, but the way it was made fits preschool beautifully.
Little kids usually care more about the doing than the finished picture. Ripping, gluing and scribbling are the fun parts. A collage like this lets them stay in that happy place without anyone asking “what is it?”
Keep it to two colors, just like the photo. Set out torn newspaper, a few strips of black paper and one fat black crayon or marker. Thick paper or a piece of cardboard makes a sturdy base.
Let them layer, overlap and rip things in half. When they’re finished, drip a little white paint across the top with a spoon. That last splash is what makes it look like the picture.
With only two colors and no subject to copy, every choice your child makes looks on purpose.
13. Newspaper Flower Cart With Coiled Wheels

Those wheels are the star. Each one is a long newspaper strip wound around and around into a flat coil, like a snail shell, and it’s a job preschoolers can really handle.
Roll the first few turns yourself to get it started. Then your child keeps winding while you hold the center steady. Glue the loose end down and press the coil flat. Make three of them, and the hardest part is done.
The planter on the back of this bike is built from tubes standing upright around a pot. A small yogurt cup wrapped in newspaper strips does the same job with far less fuss.
Fill it with flowers your child makes. Scrunched balls of pink tissue paper on green pipe cleaners look a lot like the little roses in the photo.
Park it on a windowsill where everyone walking by can see it.
14. Paper Sunflower Bouquet Wrapped in Newspaper

Florists wrap flowers in newspaper-style paper for a reason. It makes any bunch look like a gift.
The bouquet in this photo is real sunflowers and red roses in printed kraft paper, tied with raffia. Preschoolers can make a paper version, and the wrapping turns out to be the easy part.
For the sunflowers, have your child paint or color small paper plates yellow. Glue a ball of crumpled newspaper in the middle and color it brown for the seeds.
Tape each flower to a green straw. Scrunched red tissue paper makes quick roses to tuck in between.
Now the wrap. Lay a full sheet of newspaper flat, set the flowers in the middle, and fold the sides around them into a cone. Tie the bottom with yarn or string.
Hand it over on Mother’s Day or the last day of school. It will last far longer than the real thing.
Wrap with a big headline facing out. Large bold letters on the outside give it the same printed look as the florist paper in the photo.