14 Aesthetic Craft Ideas for Teens Using Stuff You Already Own

Most craft posts start with a shopping list. Ignore that for a minute and look around your room instead.
There is probably a jar in the kitchen, a plain notebook with a boring cover, a phone case you stopped liking in March. Half the supplies for a good project are already sitting there doing nothing.
That is the rule behind these aesthetic craft ideas for teens. Everything here starts with something you have, or something cheap enough to grab on the way home. No power tools. No expensive kits that sit in a closet after one use.
Some of these are quiet ten minute projects for a school night. Others take an afternoon and end up on your wall for a year. A few make solid birthday gifts, since handmade beats a gift card when the person actually knows you made it.
Read the supply note under each one before you start. That is where the part nobody tells you usually hides.
Here are the three new entries, slotted at the start. File names sit above each heading as before.
1. Cotton Swab Basket With a Ribbon Bow
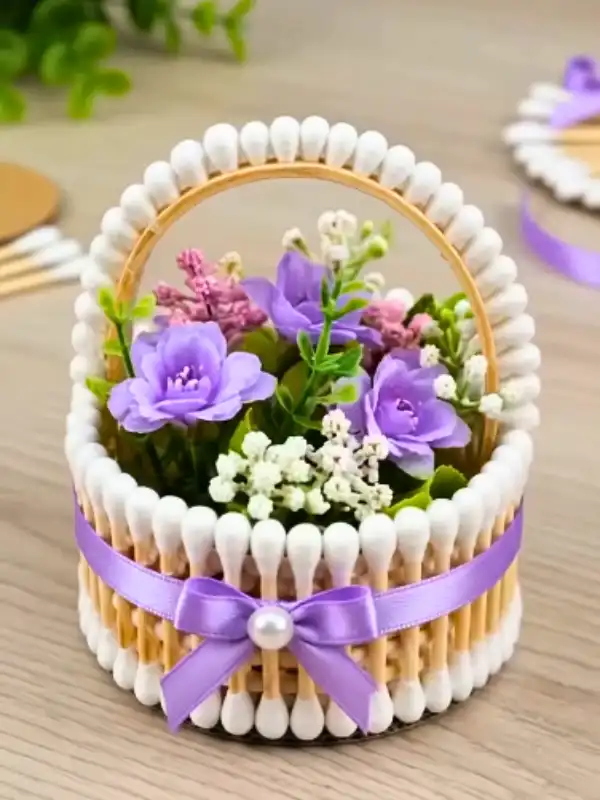
What it takes: a small round tin or box, a full pack of wooden cotton swabs, glue, and one length of ribbon.
Swabs stand upright around the outside of the base, packed tight so the white tips form an even line along the top.
Working in short sections keeps them from drifting out of line while the glue sets. A thin bamboo hoop bent over the top makes the handle.
Ribbon covers the join where every stick meets the base, which is the messiest part of the build. Tie the bow off center rather than dead middle, and add a pearl bead or button at the knot.
Supply note: Use the wooden stem kind. Plastic swabs bend under glue and the whole row leans.
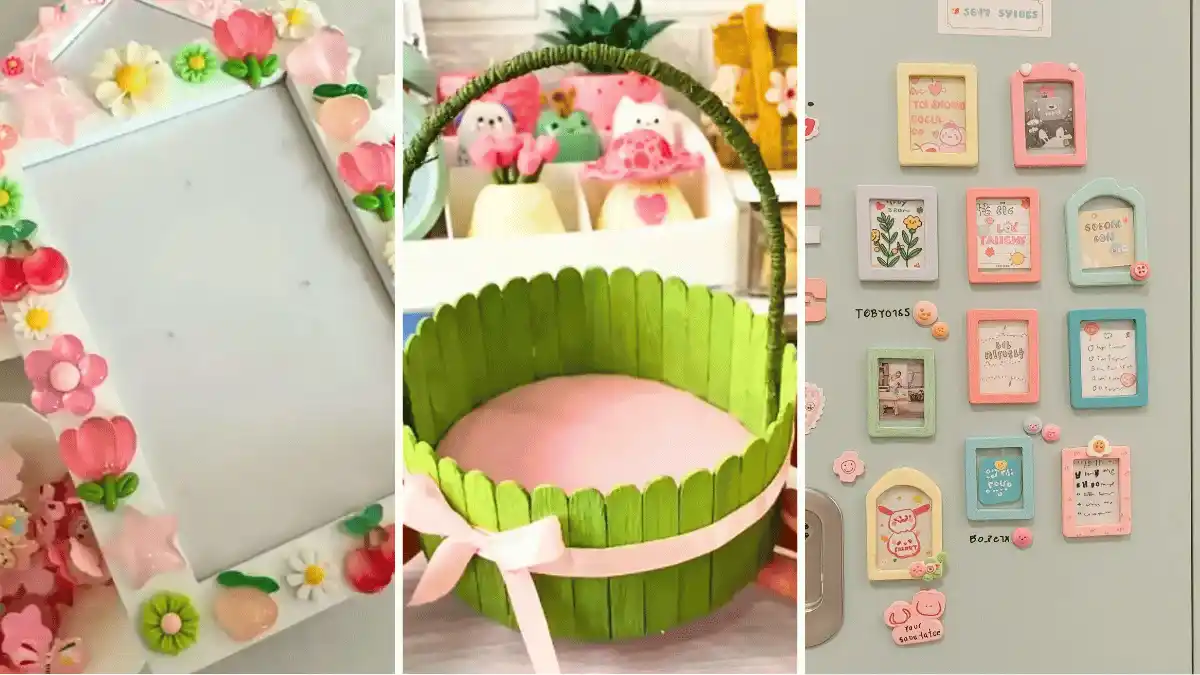
2. Decoden Photo Frame Covered in Resin Charms
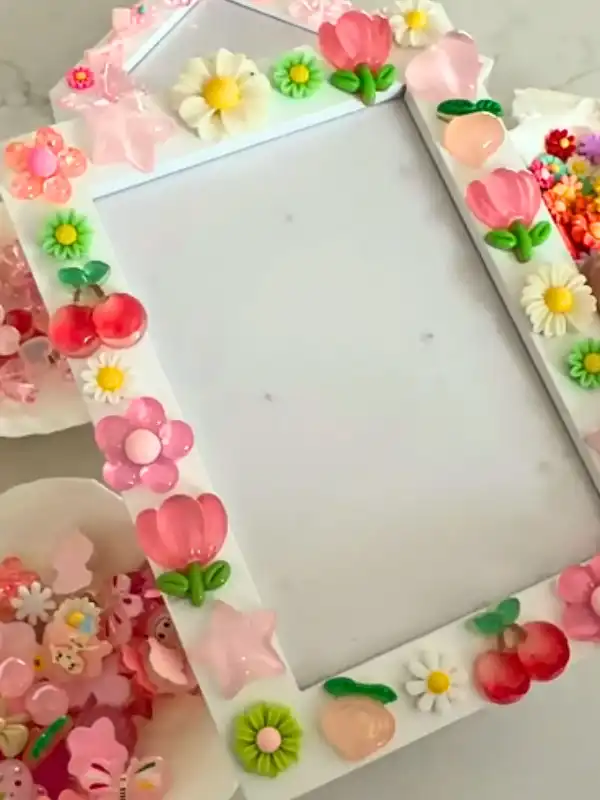
Plain white frames from a discount shop turn into something else entirely once charms cover the border. Tulips, daisies, cherries, and little stars crowd the edges here, packed close enough that hardly any white shows through.
Why it works:
- Repeating three or four shapes looks planned, not random
- Sticking to one color family keeps a busy surface calm
- Charms overlapping the inner edge frame the photo properly
Place every piece dry before any glue touches the frame. Shuffling them around takes ten minutes and saves you from a crooked border you cannot undo.
Budget swap: Buttons, beads, and broken earring pieces fill gaps between the larger charms. Nobody looks that closely at the small ones.
3. Craft Stick Basket With a Wrapped Handle
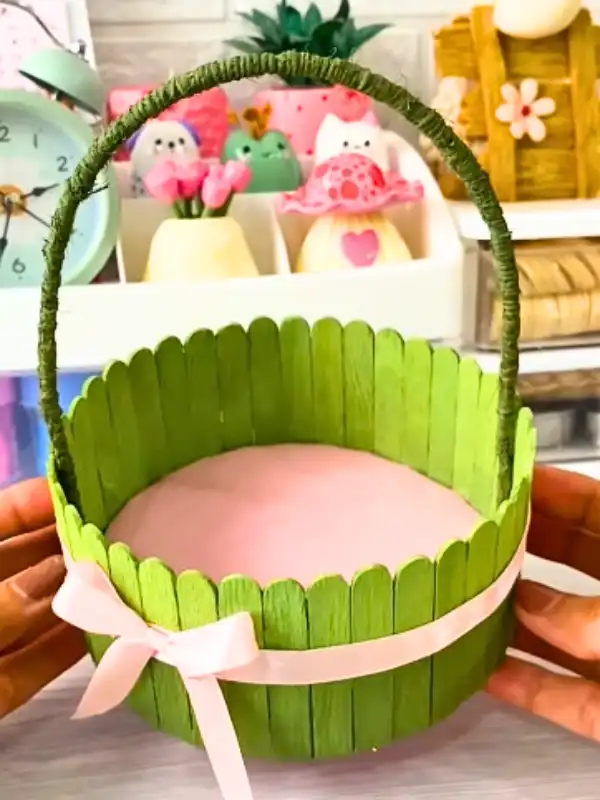
Painted craft sticks stood on end around a circle of cardboard make a basket sturdy enough to actually carry things. Green reads fresh here, though the rounded tops are what soften it.
Cut a card circle for the bottom, glue the sticks around the rim one at a time, then press a second circle inside to hide the raw edges.
Paint note: Color the sticks flat on newspaper before building. Painting a finished basket leaves streaks down in the gaps.
Placement note: Wrap the handle in yarn or embroidery floss from end to end. Bare wire or bare card looks unfinished next to a painted body.
Make it easier: Trim the sticks all to one height with scissors before gluing. Uneven tops are the difference between handmade and homemade.
4. Clay Trinket Dish

The build: a ball of air dry clay, a rolling pin, and one round object to trace.
Roll the clay to roughly the thickness of a coin. Cut a circle, then pinch the outer edge upward all the way around until it holds a shallow curve. Smooth any cracks with a damp fingertip as you go.
Subscribe to DIY Craft Bloom
Get updates on the latest posts and more from DIY Craft Bloom straight to your inbox.
Drying takes a full day, sometimes two in cold weather. Rushing it with a hair dryer causes splits across the base.
Finish note: Paint the inside a solid color and leave the outside raw. That contrast is what makes a handmade dish look deliberate rather than unfinished.
5. Locker Magnets From Bottle Caps
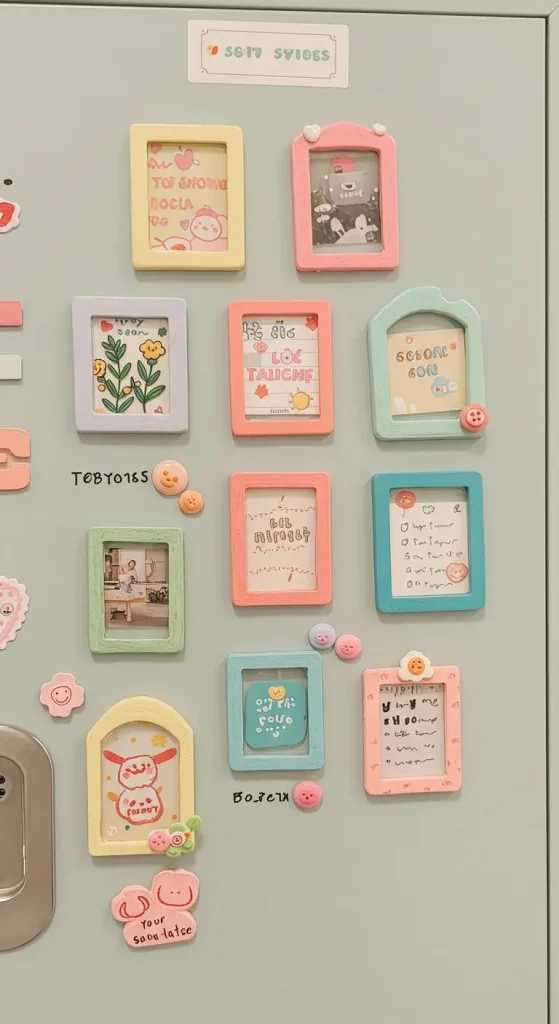
Bottle caps, wooden circles, and flat buttons all take a magnet strip on the back without any fuss. Decorate the front with paint, stickers, or a tiny photo trimmed to fit inside the rim.
Supply note: Strip magnets peel off old fridge magnets and freebies from takeaway menus. Cut them down with old scissors, not your good pair.
Try instead: Fill a bottle cap with clear glue and drop in glitter or a dried flower. Left overnight, it sets glossy and looks like resin for none of the cost.
One small change: Make them in odd numbers. Five small magnets clustered together look better than four in a row.
6. Custom Notebook Covers

Plain notebooks cost less than decorated ones, which is the entire trick here. Cover the front with scrapbook paper, fabric, or a sheet you painted yourself, then wrap the edges around and glue them inside the cover.
Why it works:
- Wrapping the edges hides every rough cut
- Matte paper photographs better than glossy for Pinterest
- A blank label space keeps the notebook actually usable
Seal the finished cover with Mod Podge so it survives a term in your bag. Two thin coats beat one thick one, which dries streaky.
7. Clay Keychains

Leftover clay from the trinket dish makes four or five keychains. Roll it flat, cut shapes with a cookie cutter or a knife, and push a straw through the top to make the hole before it dries.
Forgetting that hole is the classic mistake, and drilling one afterward usually cracks the piece.
Stars, hearts, and single initials hold up better than detailed shapes. Thin arms snap the first time your keys hit the floor.
Paint once dry, then seal. Unsealed clay picks up dirt from your bag within days and never fully cleans up.
8. Glass Jar Lanterns

Good for: a room that only has one harsh ceiling light.
Empty jam jars and pasta sauce jars work best because the glass is thick. Soak the labels off in warm water, then rub the sticky patch with a little oil.
Twine wrapped around the neck, a band of paint across the bottom third, or nothing at all. Battery fairy lights coil inside and the whole thing glows on a shelf.
Skip this: Real candles. Glass and an open flame near your curtains is a bad trade for a slightly warmer light.
9. Fabric Wall Art in Embroidery Hoops

Four parts to copy:
- Frame: a wooden embroidery hoop, any size
- Fabric: a patterned scrap, old pillowcase, or scarf
- Tension: pull the fabric tight before tightening the screw
- Trim: cut the excess to roughly two centimeters, then glue it to the back
Hanging three hoops in different sizes reads as a set. Matching sizes read as a mistake.
The detail to steal: Pick fabrics that share one color across all three, even when the patterns are completely different. That single repeated shade is what ties the group together.
10. Hand Painted Plant Pots

Terracotta soaks up paint fast, so wipe the pot with a damp cloth first and let it dry. Damp clay takes color more evenly than dusty clay.
Paint note: Two coats minimum. One coat over terracotta always looks patchy, no matter how thick you load the brush.
Subscribe to DIY Craft Bloom
Get updates on the latest posts and more from DIY Craft Bloom straight to your inbox.
Placement note: Leave the inside bare. Sealed interiors trap water and the roots suffer for it.
Beginner version: Paint the pot one solid color, then add a single stripe near the top with a steady hand. Simple stripes look sharper than a shaky pattern.
11. Dreamcatcher From an Embroidery Hoop

Start with the outer ring of a hoop, since the inner ring is not needed here. Wrap it fully in twine or yarn, gluing the start and finish so nothing unwinds.
Web weaving sounds harder than it is. Loop the string around the ring at even spaces, then loop through the middle of each previous loop on the next round. Keep going inward until the hole at the center is small.
Beads slide onto the string as you weave. Feathers, ribbon, and leftover yarn hang from the bottom.
Care tip: Hang it away from an open window. Rain and feathers do not recover well together.
12. Washi Tape Phone Case

Copy this:
- Base: a clear or plain case, ideally one you already stopped liking
- Tape: two or three washi patterns that share one color
- Layout: diagonal stripes, or a checkerboard across one corner
- Seal: a thin coat of Mod Podge over the whole surface
Pressing each strip down from the middle outward stops bubbles forming underneath. Overlap the edges slightly so nothing peels up in your pocket.
Sealing is the step people skip. Bare tape lifts within a week, especially along the camera cutout.
Budget swap: No washi tape around? Cut thin strips from a magazine page and glue them down instead. Same look once it is sealed.
13. Desk Organizer From Boxes and Tin Cans

Best for: a desk you avoid sitting at because of the clutter.
Empty tin cans, a shoebox lid, or thick cardboard all work as the base. Wash and dry the cans properly first, then run a strip of tape around any sharp rim.
Paint or paper goes on next. Soft neutrals read calmer than bright colors on a desk you stare at while studying, though one accent shade stops it looking dull.
Group three containers of different heights together rather than lining up matching ones. Pens in the tall one, sticky notes flat in the short one.
Scale note: Measure your tallest pen before choosing a can. Nothing looks worse than markers tipping out over the edge.
14. Hanging Photo Display

Twine strung between two nails holds more than you think. Clip photos along it with mini clothespins, or fold small pieces of tape into loops if you have no clips.
Fairy lights work the same way and add light to a dark corner. Run them in a loose zigzag rather than a straight line so the shape looks intentional.
Mix in postcards, ticket stubs, and printed screenshots between the photos. Pure photos alone tend to look thin, while a few different shapes fill the wall properly.
Final Thoughts
Pick one project and start tonight rather than saving all ideas for a free weekend that never arrives. The jar lantern or the notebook cover takes twenty minutes and gives you something finished to look at.
Everything on this list gets better the second time you make it, so treat the first attempt as practice. Swap colors, change the sizes, use whatever you actually have in the drawer.
Save this post for the next time your room feels a little flat and you want fresh aesthetic craft ideas for teens that work with what is already sitting in front of you.