17 Tin Can Upcycling Ideas That Cost You Nothing

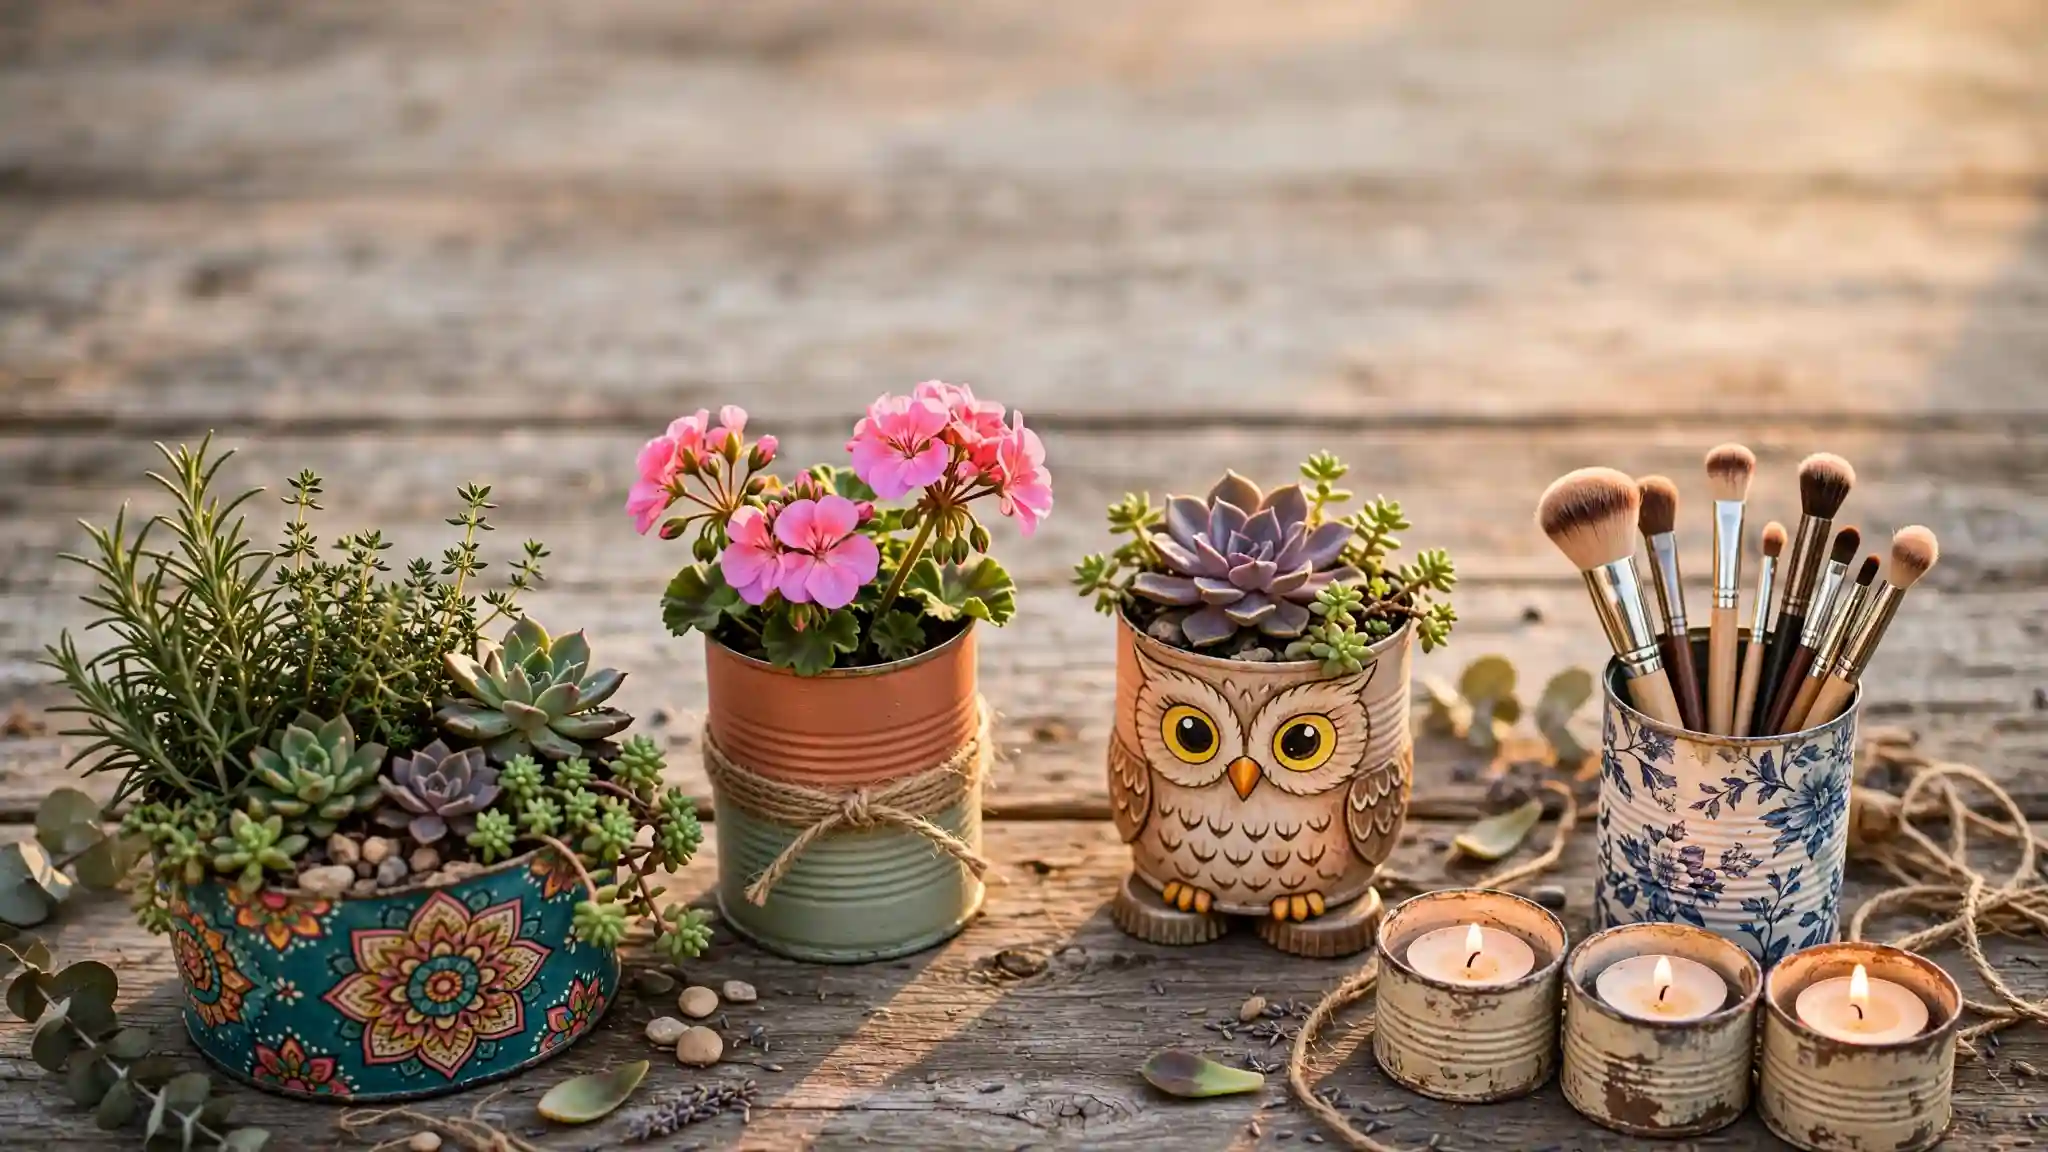
Every kitchen has a small pile of cans waiting to hit the recycling bin, and most people never look twice before they toss them.
That pile is actually a stack of free planters, candle holders, desk organizers, and garden decor waiting for a coat of paint.
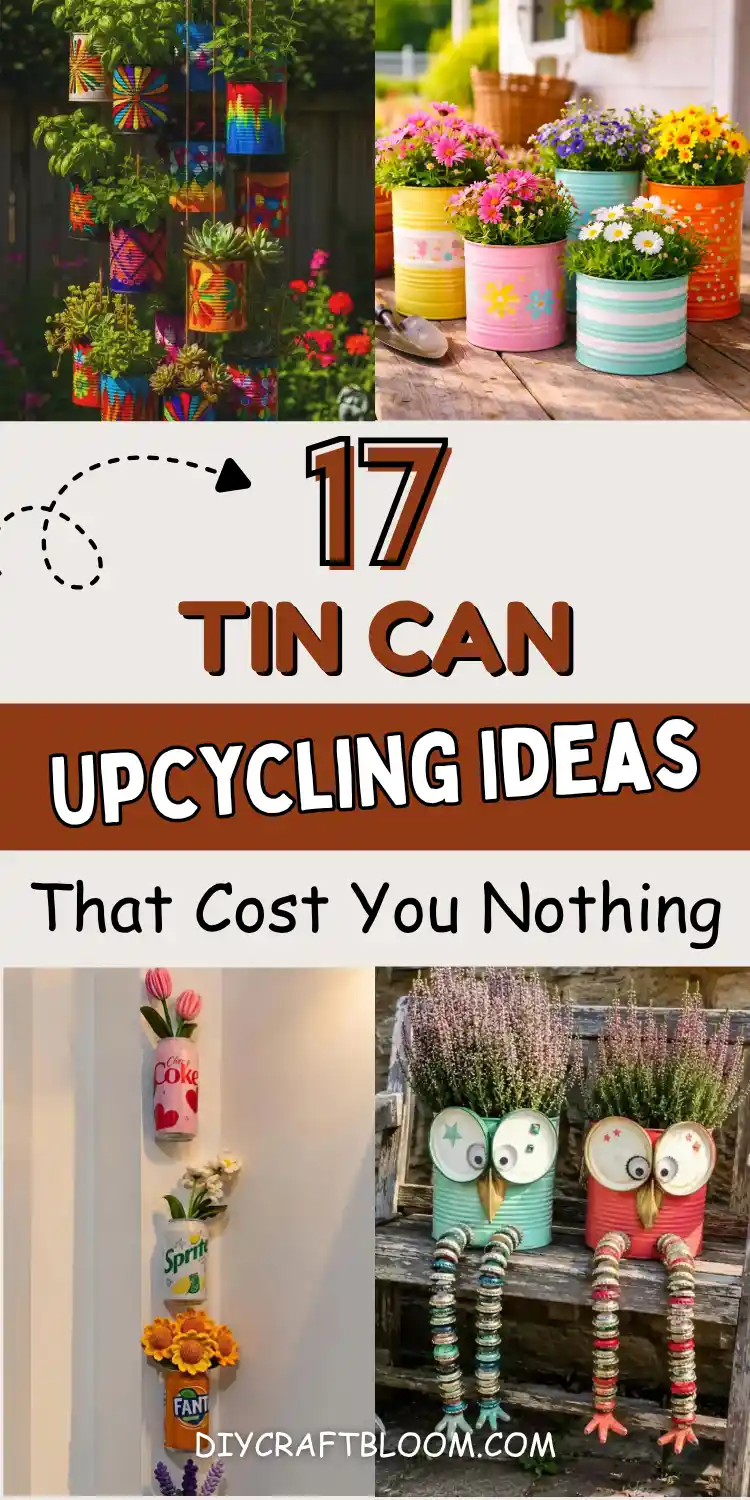
These tin can craft ideas range from a five-minute wrap job with leftover wrapping paper to a full painted mandala that takes an afternoon, so there is a project here whether you have ten minutes or a whole Saturday.
Some lean rustic and distressed, some go bright and cartoonish enough for a kids’ project, and a few skip paint entirely in favor of decoupage or fabric. What ties them together is how little they actually cost to make.
A can, some paint or paper, and whatever is already in the craft drawer is usually enough.
Scroll through for the one that matches what is sitting in your bin right now, then save the rest for the next round of cans.
17 Tin Can Upcycling Ideas
1. Turn Tin Cans Into a Hanging Painted Herb Garden
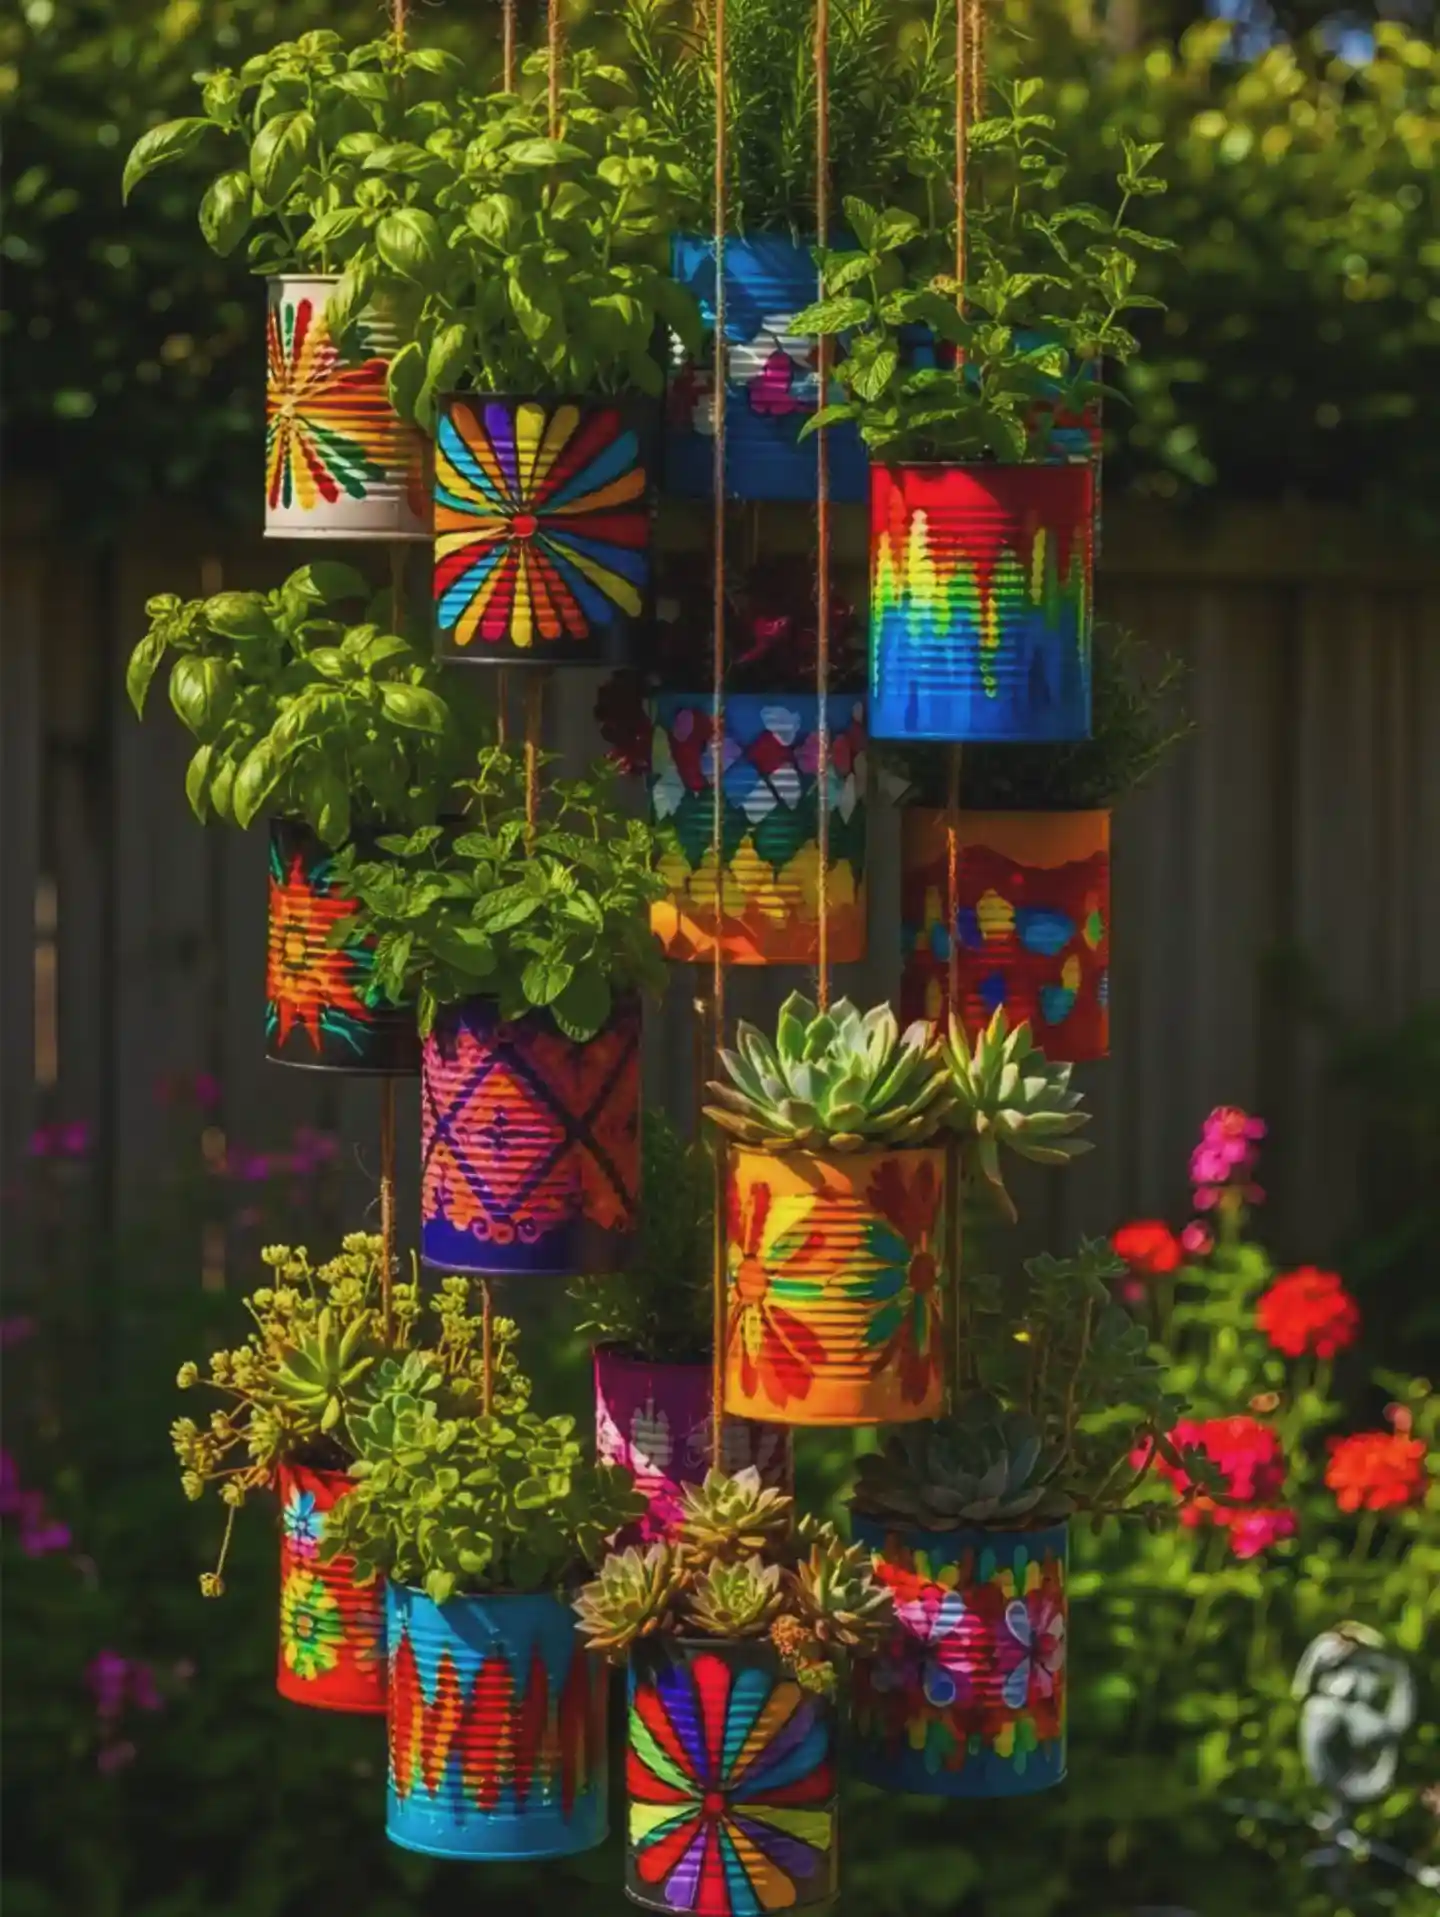
Punch two holes near the rim, run twine through, and a plain can becomes a planter that hangs at any height you want.
This cluster leans into bold, hand-painted patterns instead of a single color, and that variety is what makes the whole group work.
A few things to copy:
- Mix pattern styles across cans (mandalas, tie-dye drips, diamonds, floral bursts) so no two neighbors match
- Stagger the hanging lengths so lower cans catch light and upper ones frame the greenery
- Save the biggest, brightest cans for trailing herbs like mint or basil, and tuck smaller succulents into shorter cans near eye level
- Use acrylic paint sealed with a matte spray so the color holds up outdoors
2. Turn Two Cans and Bottle Caps Into a Garden Owl Planter
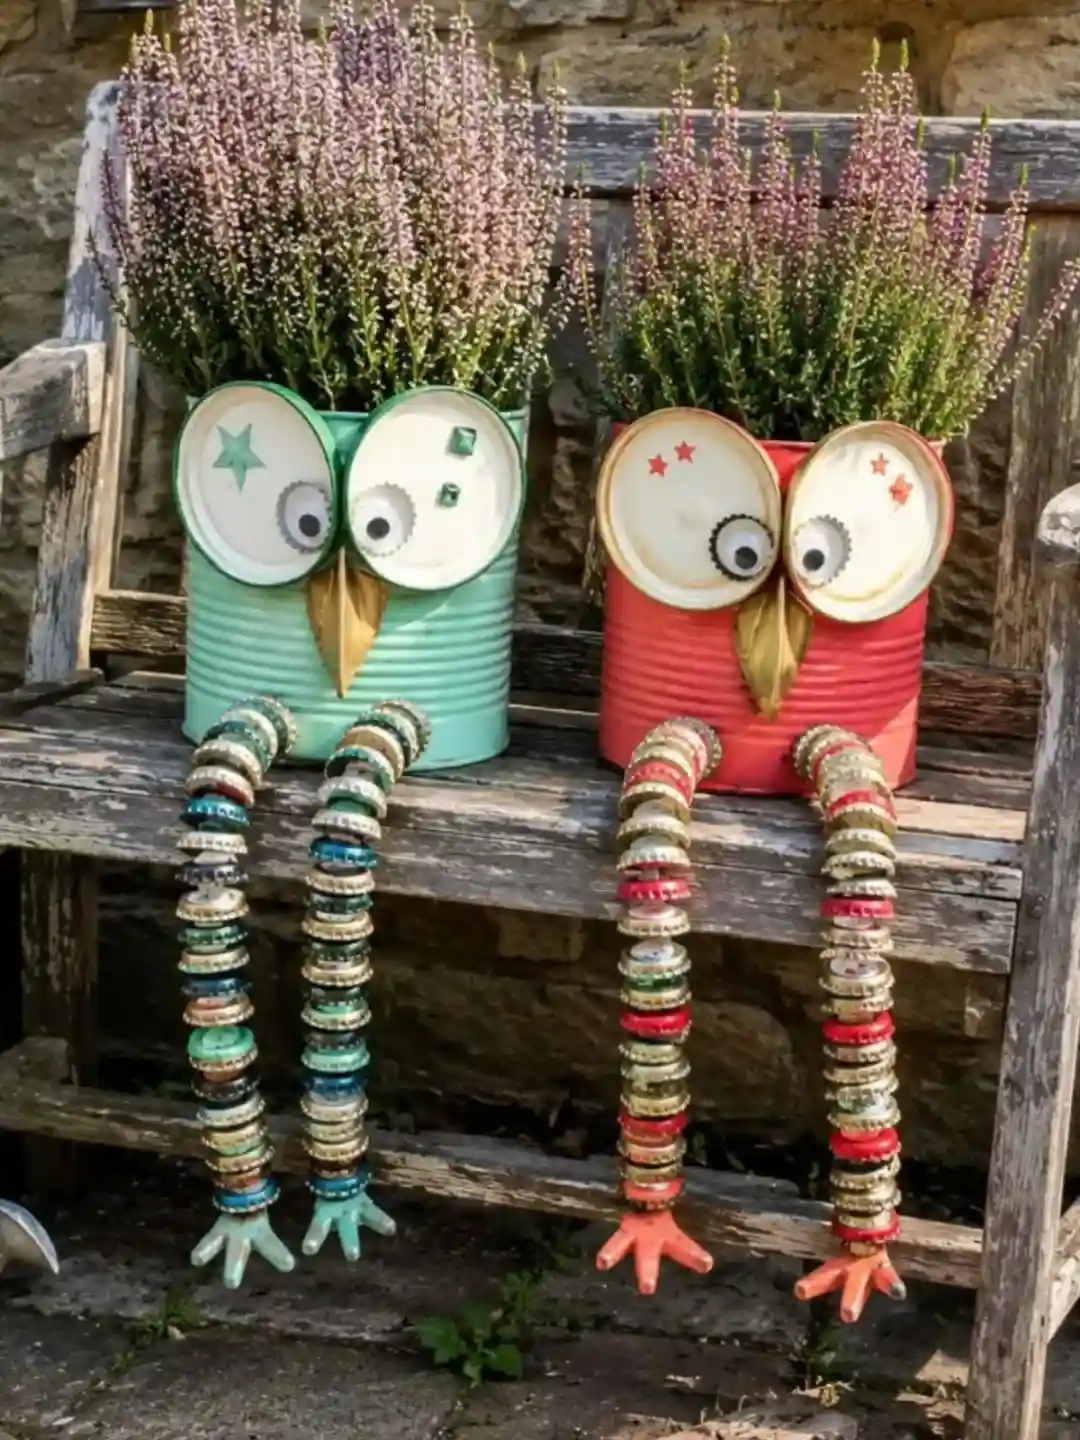
These two cans stopped being cans the moment somebody added eyes.
Both lids stay attached and become oversized owl eyes, dressed up with a star, a couple of gems, and a googly eye glued off center for personality.
The real trick is down below: strings of bottle caps threaded onto wire form dangling legs, finished with small painted clay feet.
It is a project built almost entirely from things people usually toss out, which makes it a good one for using up a bottle cap collection.
Clean a large can, prime it, then paint it a solid color. Let it cure fully before gluing anything on.
Leave both lids attached at an angle for eyes, glue on googly eyes off center, and fold a small triangle of card or metal for the beak.
String bottle caps onto sturdy wire, bend a small foot shape at the end, and paint the feet to match the body before attaching underneath.
3. Paint a Mismatched Set of Solid Color Porch Planters
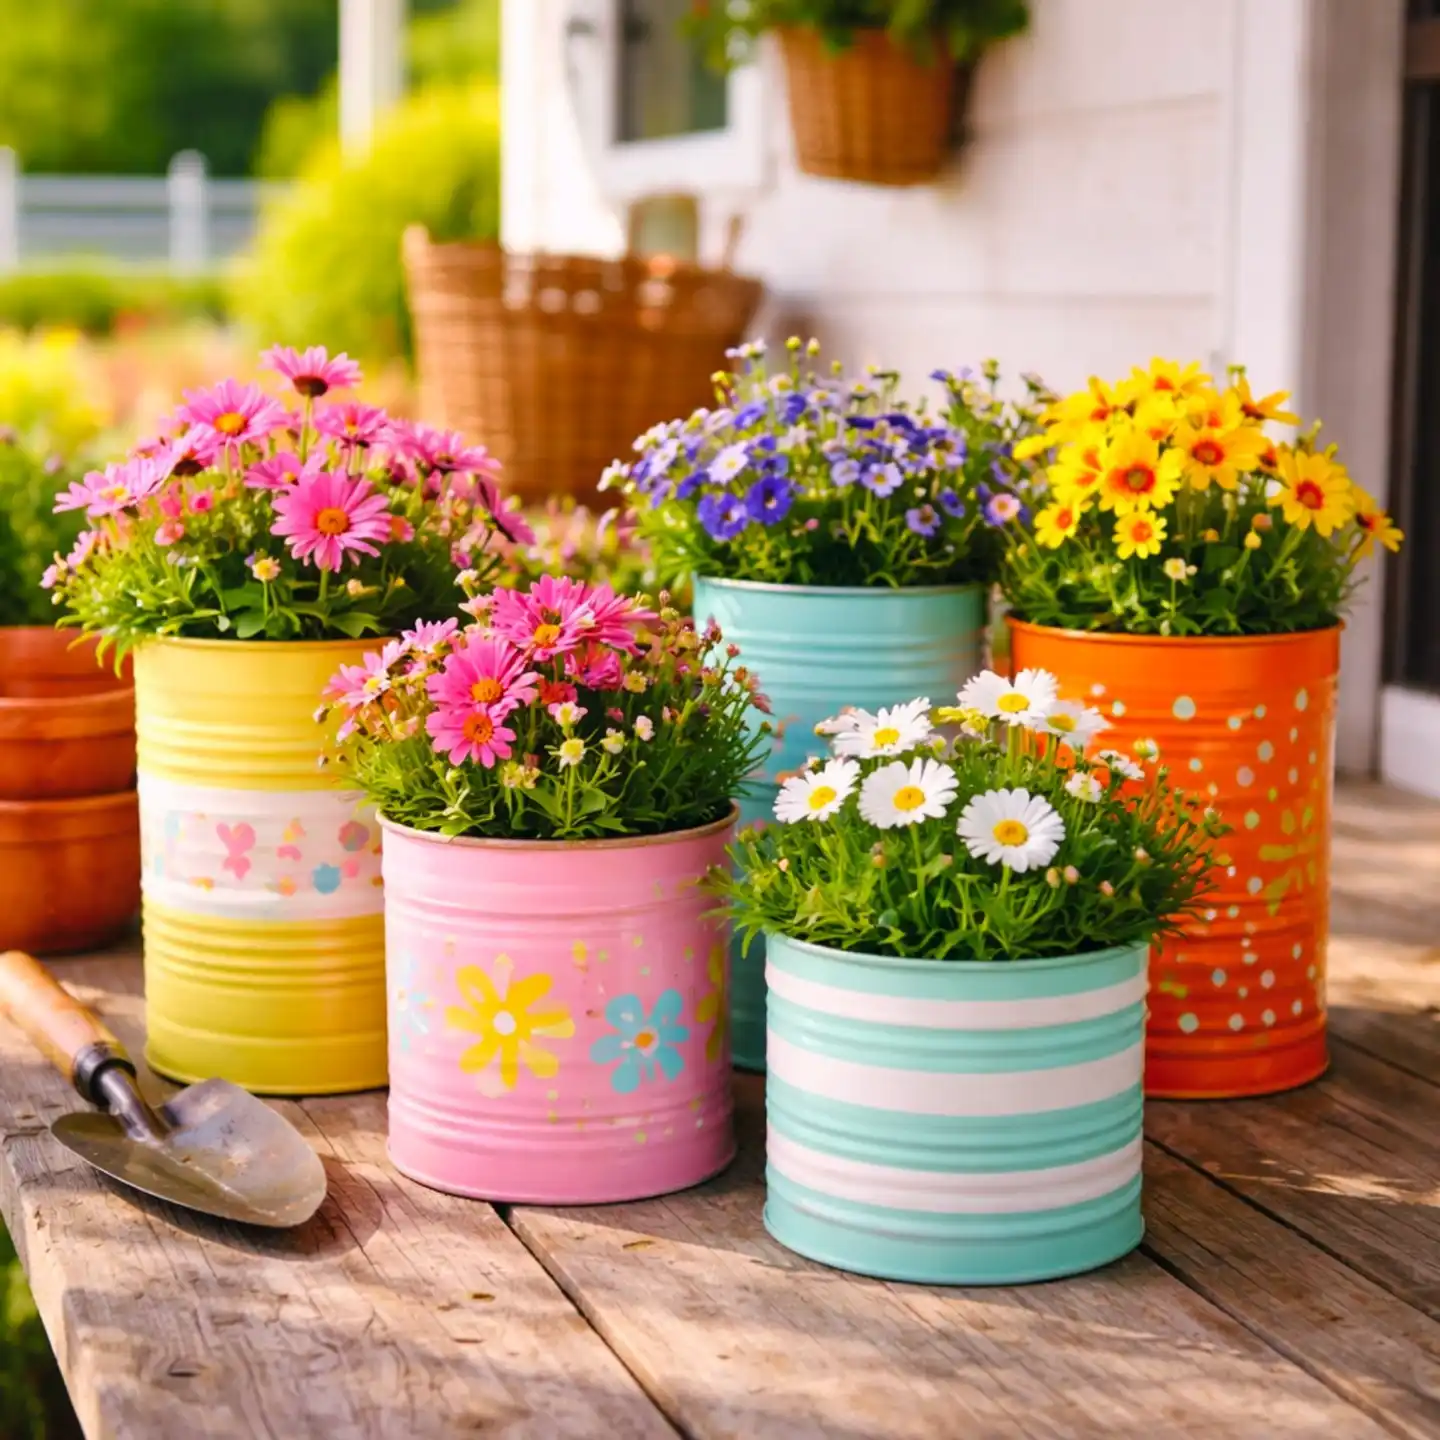
Not every can needs a mandala or a face.
This lineup keeps it simple: spray paint in five different solid colors, then a light second layer of decoration on top, a washi tape stripe here, a stenciled daisy there, a scatter of polka dots on the orange one.
The mix of sizes does most of the visual work, so the decoration can stay minimal.
This is the version to try first if painting freehand feels intimidating. Solid color plus one small pattern still reads as intentional, not unfinished.
Group different heights together on a step or ledge so the eye naturally travels from tallest to shortest, and pick colors that already sit next to each other in a garden, yellow, pink, and coral all read as one family once the flowers go in.
If a can looks flat on its own, it almost never looks flat once it is standing beside four others.
Punch a few drainage holes in the bottom before painting. It is much easier to drill through bare metal than through a coat of dried paint.
4. Skip the Paint and Mount Soda Cans as a Floral Wall Sconce
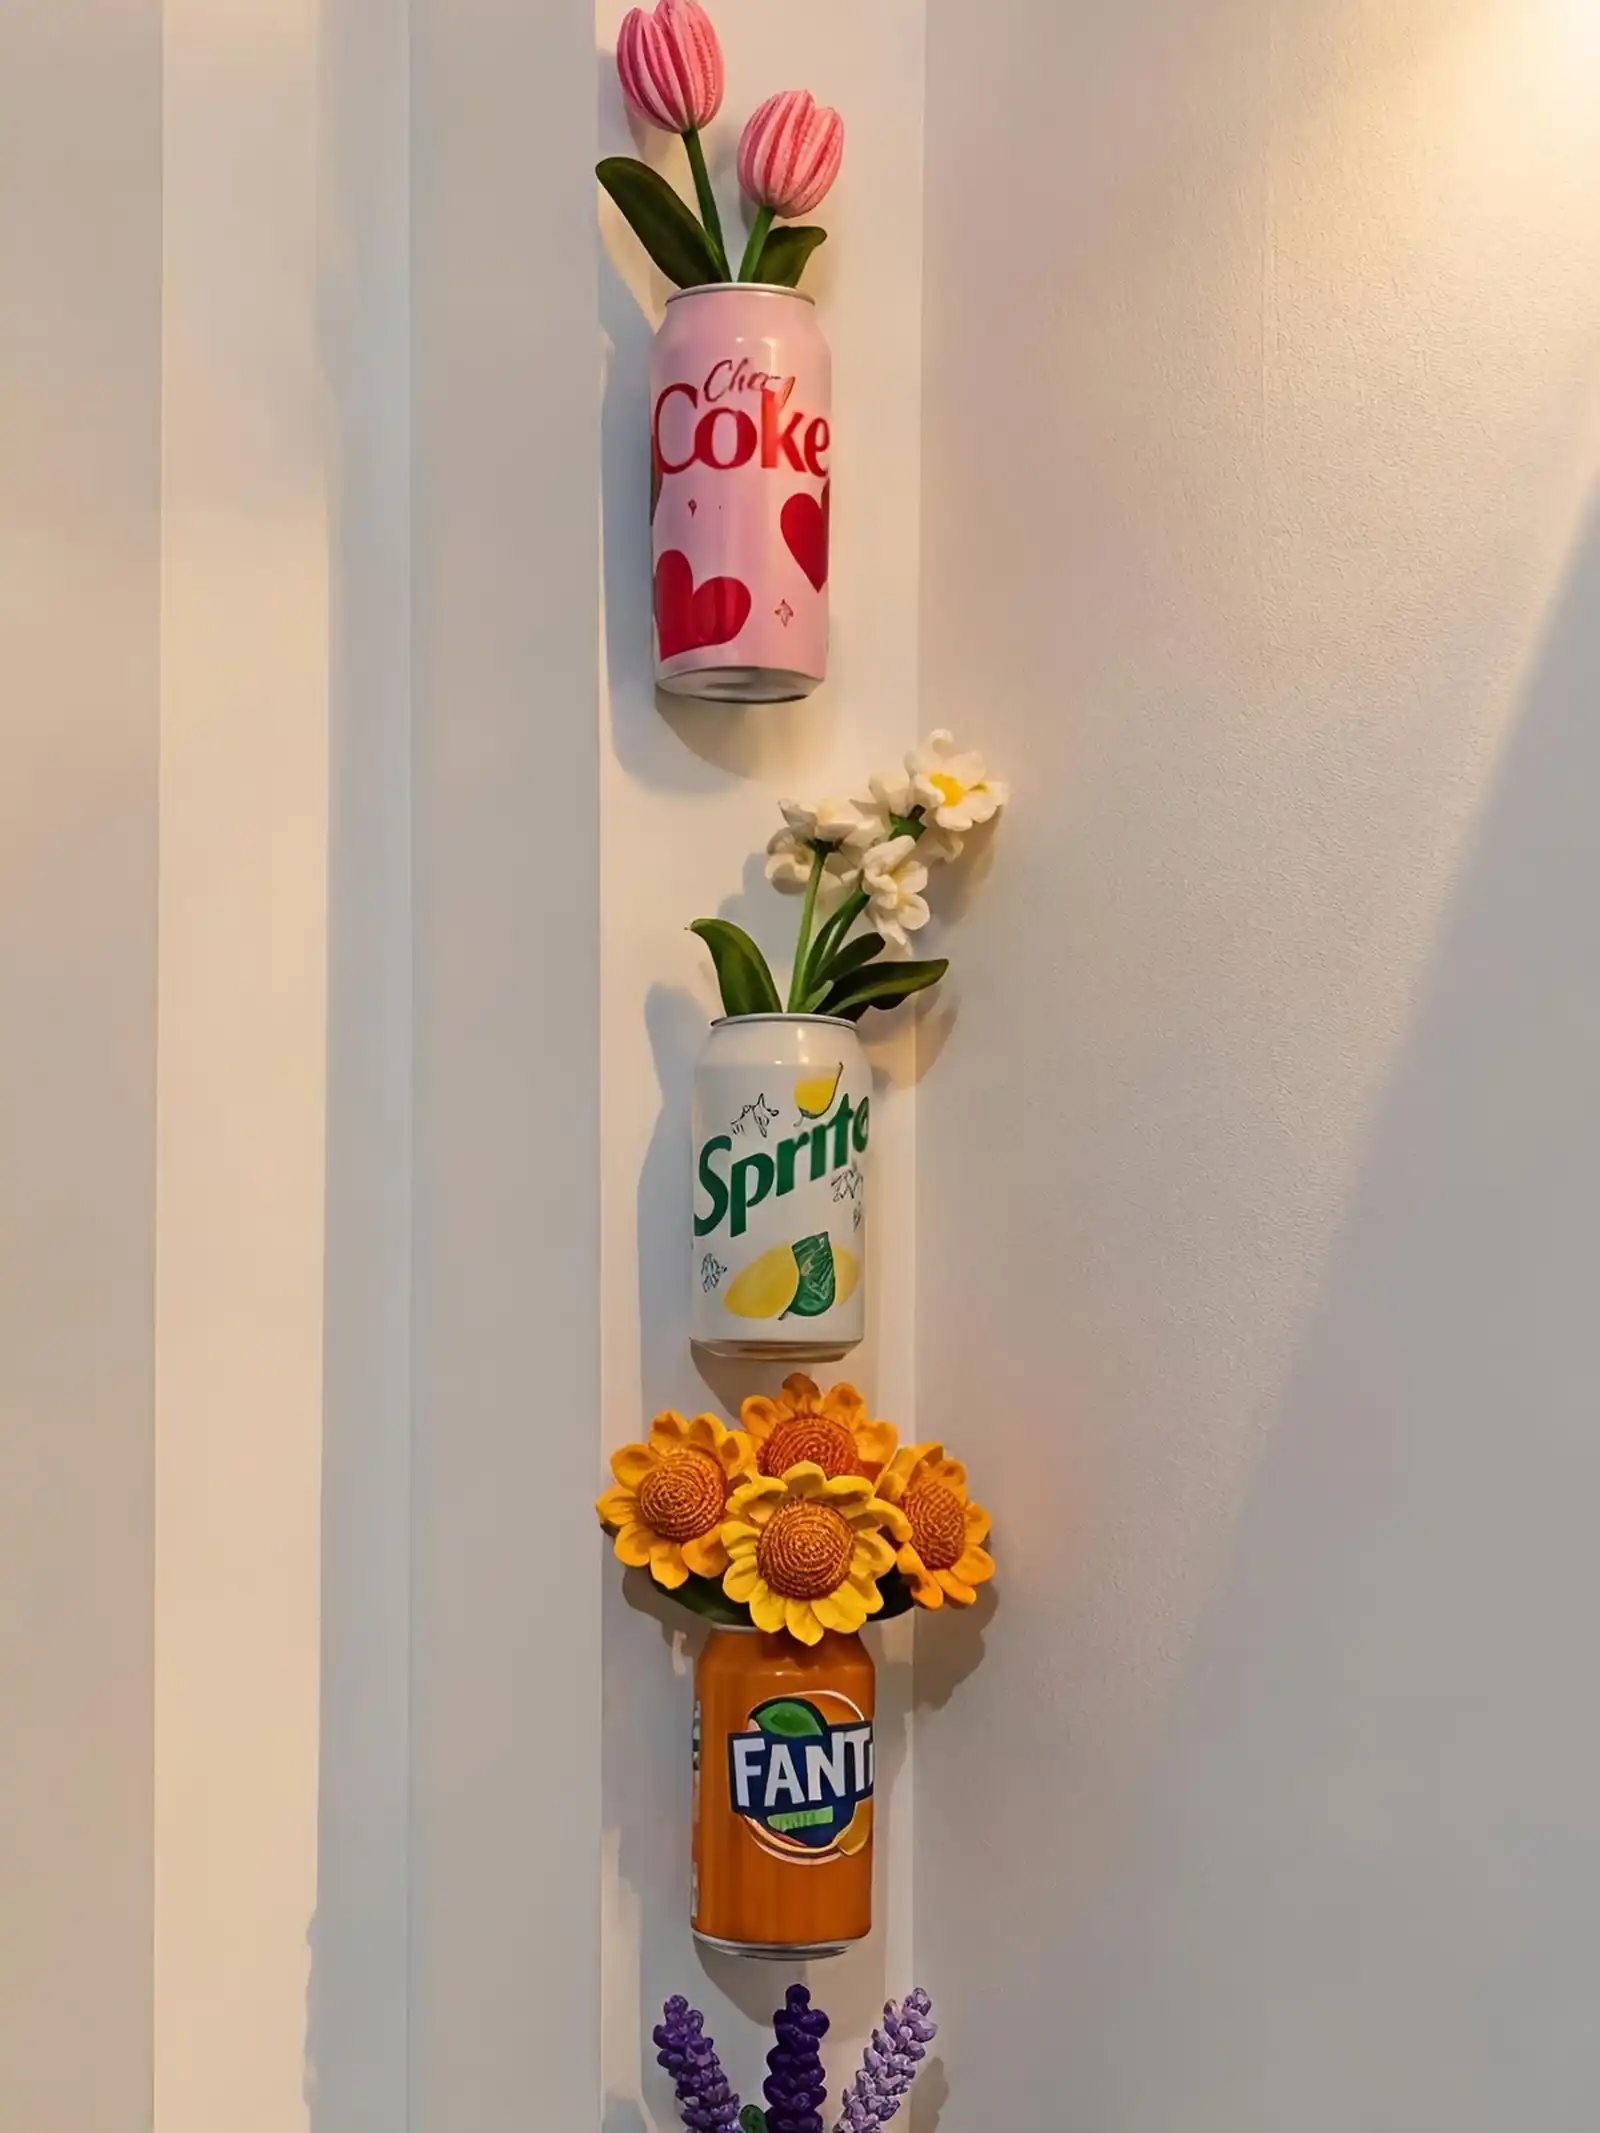
This one is proof you do not have to paint anything.
The original labels stay put, the cans get mounted flat against the wall in a vertical row, and each one holds a single stem or a small cluster of flowers, real or faux.
It works because the wall itself does the styling, three small pops of color running down a plain hallway instead of one big arrangement.
Leaving the branding visible is actually part of the charm here, a familiar can shape in an unexpected spot catches the eye faster than a plain painted one would.
This idea works best in a narrow hallway, a stairwell, or any awkward vertical gap that never quite fits a normal shelf.
Since nothing needs to dry or cure, it is also one of the easiest entries on this whole list to redo seasonally, just swap the stems when the flowers fade.
No painting means zero drying time, so this is a same-day project from start to finish.
A small screw or strong wall clip behind each can turns it into a sconce instead of a tabletop planter.
Keeping each can to a single small bloom stops the wall from feeling cluttered.
5. String Painted Cans and Beads Into a Pergola Curtain

Hang enough of these together and they stop reading as tin cans and start reading as a beaded curtain.
Subscribe to DIY Craft Bloom
Get updates on the latest posts and more from DIY Craft Bloom straight to your inbox.
Each can gets floral or leaf patterns painted on, a small hole punched near the top rim, and a beaded cord threaded through so it dangles at a slightly different height than its neighbors.
Strung along a pergola beam or porch rail, the metal catches light and the color beads carry the eye down.
- Mix bead colors freely, the cans provide enough visual anchor that the strands can go wild
- Vary can sizes so the curtain has a natural rhythm instead of a flat line
- Leave the bottoms open so rain drains straight through if this hangs outdoors
A single painted can looks like a craft project, but a whole row of them hung at different heights reads as a finished piece of outdoor decor.
6. Paint Cans in Two Tones and Add a Fruit Motif Below the Rim
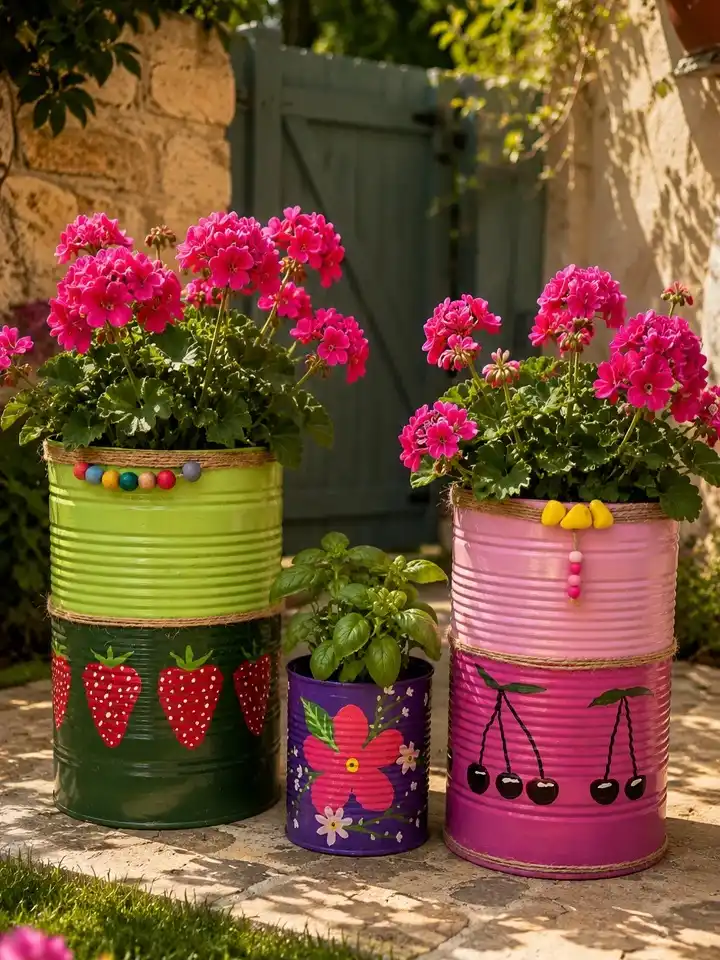
Each of these splits into a light color up top and a darker shade below, with hand-painted strawberries, cherries, or a single flower sitting right on that dividing line.
A wrap of jute twine covers the seam between colors, and a few wooden or clay beads knotted onto the twine hang down like a tiny bracelet.
The fruit paintings do not need to be perfect. Slightly wobbly strawberries and cherries actually read as more charming, more like folk art than a printed label.
Pick a fruit that matches what is actually growing in the pot, strawberries for a strawberry plant, cherries for a small tree, and the whole thing feels less like random decoration and more like a hint of what is inside.
The twine seam is also doing practical work, it hides the harder line where two paint colors meet, so even a slightly uneven brush stroke disappears under the wrap.
7. Decoupage Vintage French Labels Onto Plain Cans
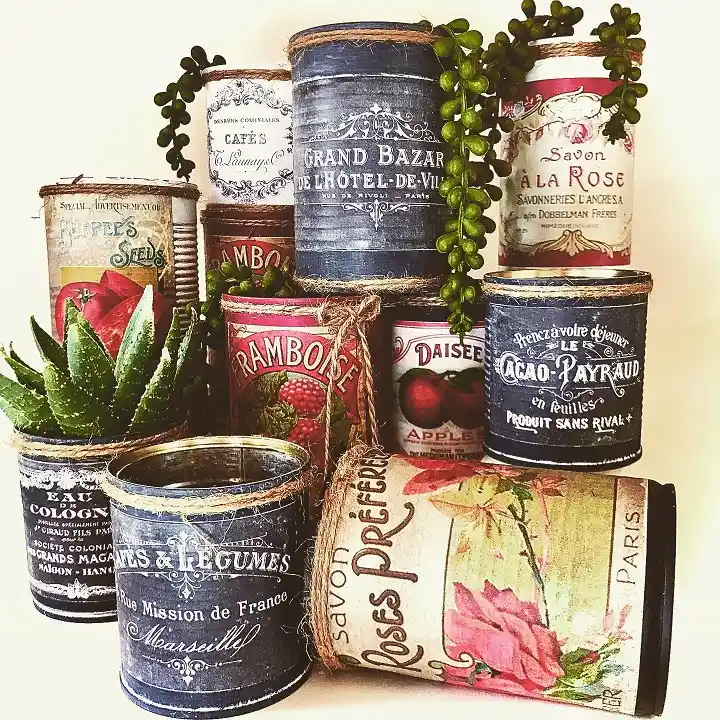
Not a drop of paint touches these.
Instead, printed labels in sepia tones and old script fonts get glued flat against the metal with decoupage medium, then sealed and finished with a twine tie at the rim.
The result looks pulled from a Provençal pantry rather than a recycling bin, right down to the mismatched heights stacked like a still life.
This works especially well for anyone who wants the upcycled look without freehand painting skill. Print, cut, glue, done.
8. Bring the Painted Can Indoors as a Desk Pencil Holder
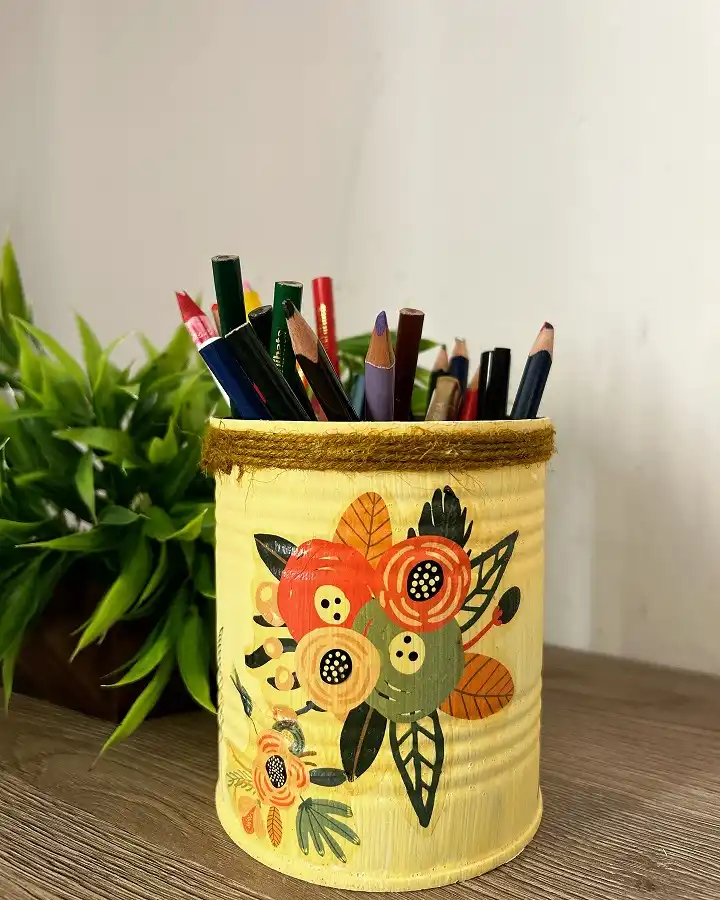
Pale yellow paint and a stylized floral bouquet turn this one into desk decor instead of a garden piece.
The flowers are painted with simple circles and dots rather than realistic petals, which keeps the whole thing looking hand done and a little folk art, and the jute wrapped rim softens the metal edge right where hands touch it most.
It holds pencils here, but the same can works for brushes, scissors, or that pile of loose pens that never has a home.
9. Mask a Metallic Stripe Between Two Paint Colors
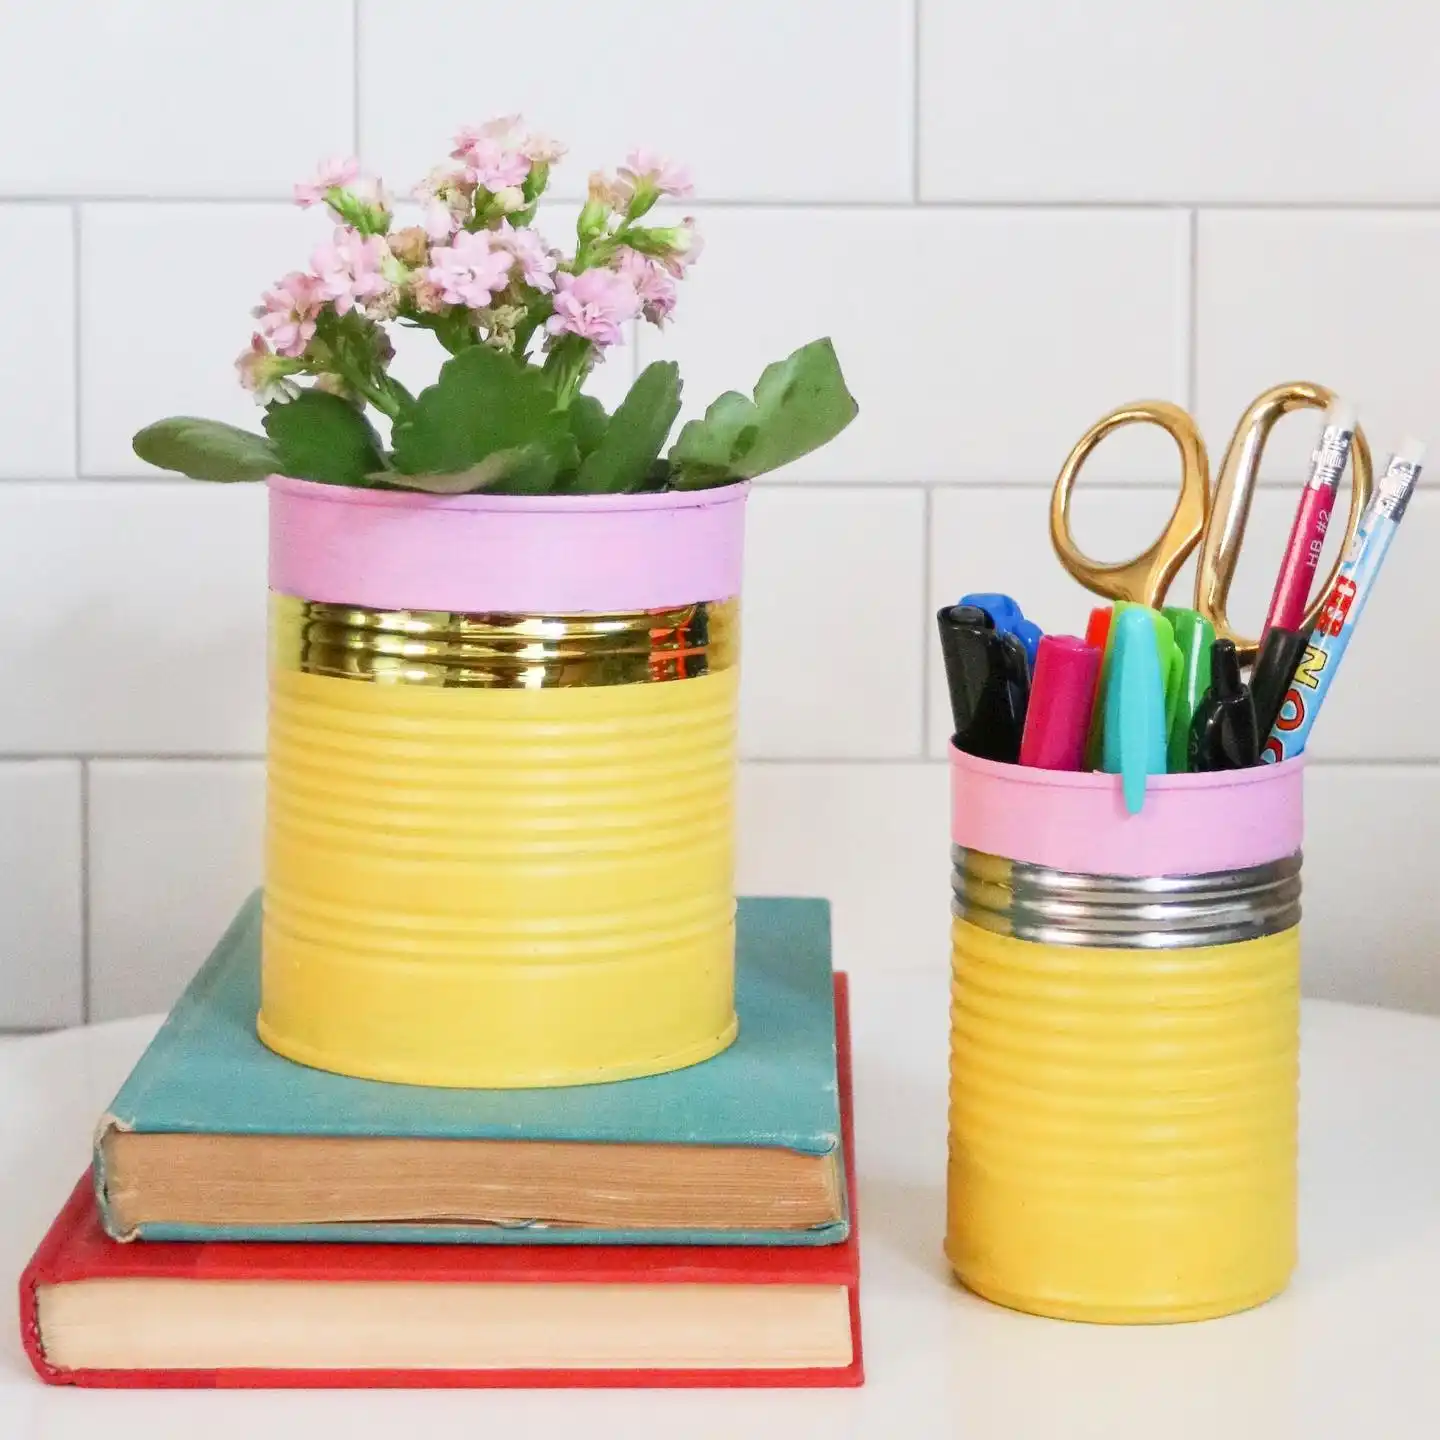
Painter’s tape run around the middle of the can before spraying is the whole secret here.
Pink on top, yellow on the bottom, and a bare strip of the can’s original shiny metal left exposed in between like a thin gold belt.
It is a small trick that makes a plain spray paint job look intentional and layered instead of flat.
The same two-can technique works at two different sizes, and each size earns its own job on a desk.
| Tall can | Short can |
|---|---|
| Stacked on books for height, holds a small potted flower. | Sits flat on the desk, holds pens, pencils, and scissors. |
| Wide metallic band since the can is bigger. | Narrower band scaled to the smaller size. |
| Reads as a decor piece. | Reads as a desk tool. |
10. Add Wooden Dowel Legs So the Can Looks Like Furniture
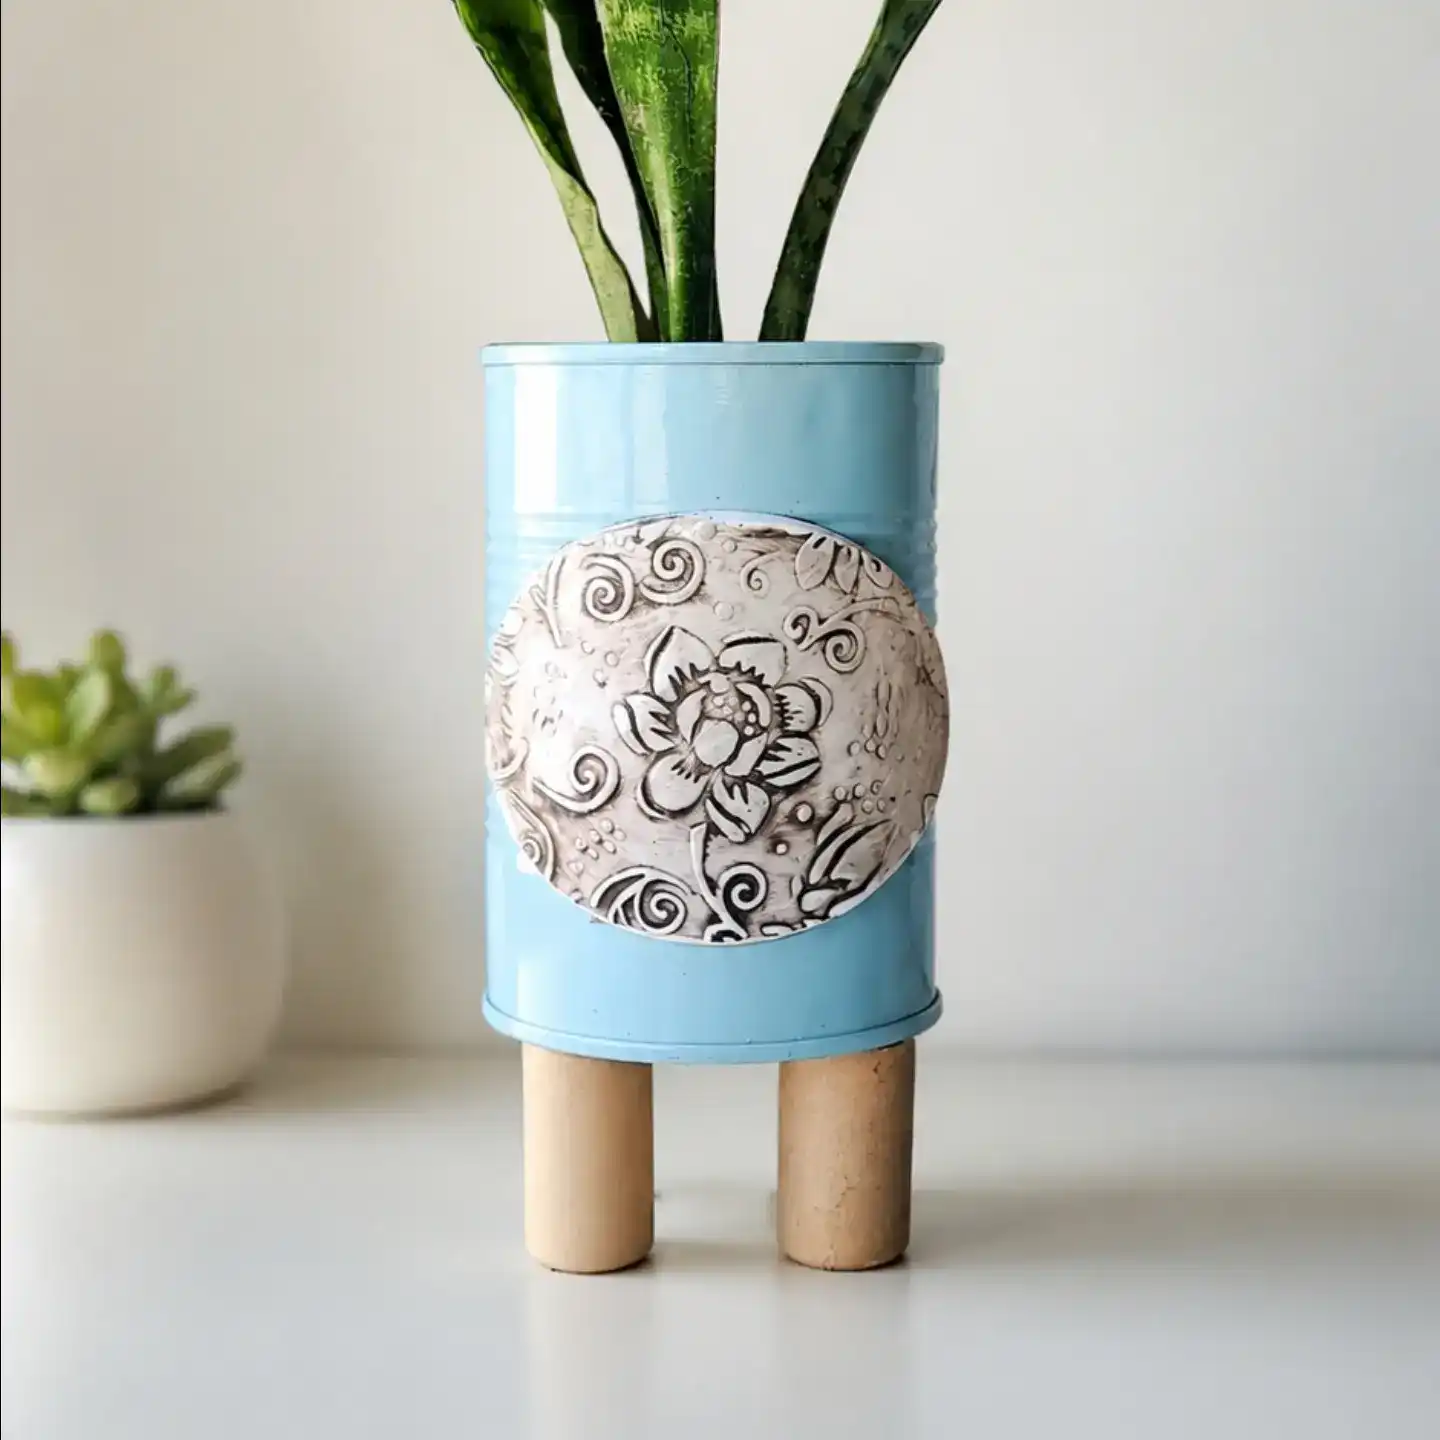
Two short wooden dowels glued flat to the bottom is the detail that separates this one from every other painted can on this list.
Raised half an inch off the table, a plain cylinder suddenly reads as a piece of small furniture instead of a repurposed container.
The medallion on front, a hand painted floral scroll in black and white, adds a ceramic look without any actual clay work.
The legs are optional if you are short on time, but they are the cheapest upgrade on this whole list.
Cut dowels to the same length so the can sits level.
Use wood glue and let it cure a full day before adding weight.
Thin dowels that can not support the can once it is full of wet soil.
Skipping a saucer underneath, since the legs leave a drainage gap.
11. Distress the Paint and Trim the Rim With Lace or Gingham
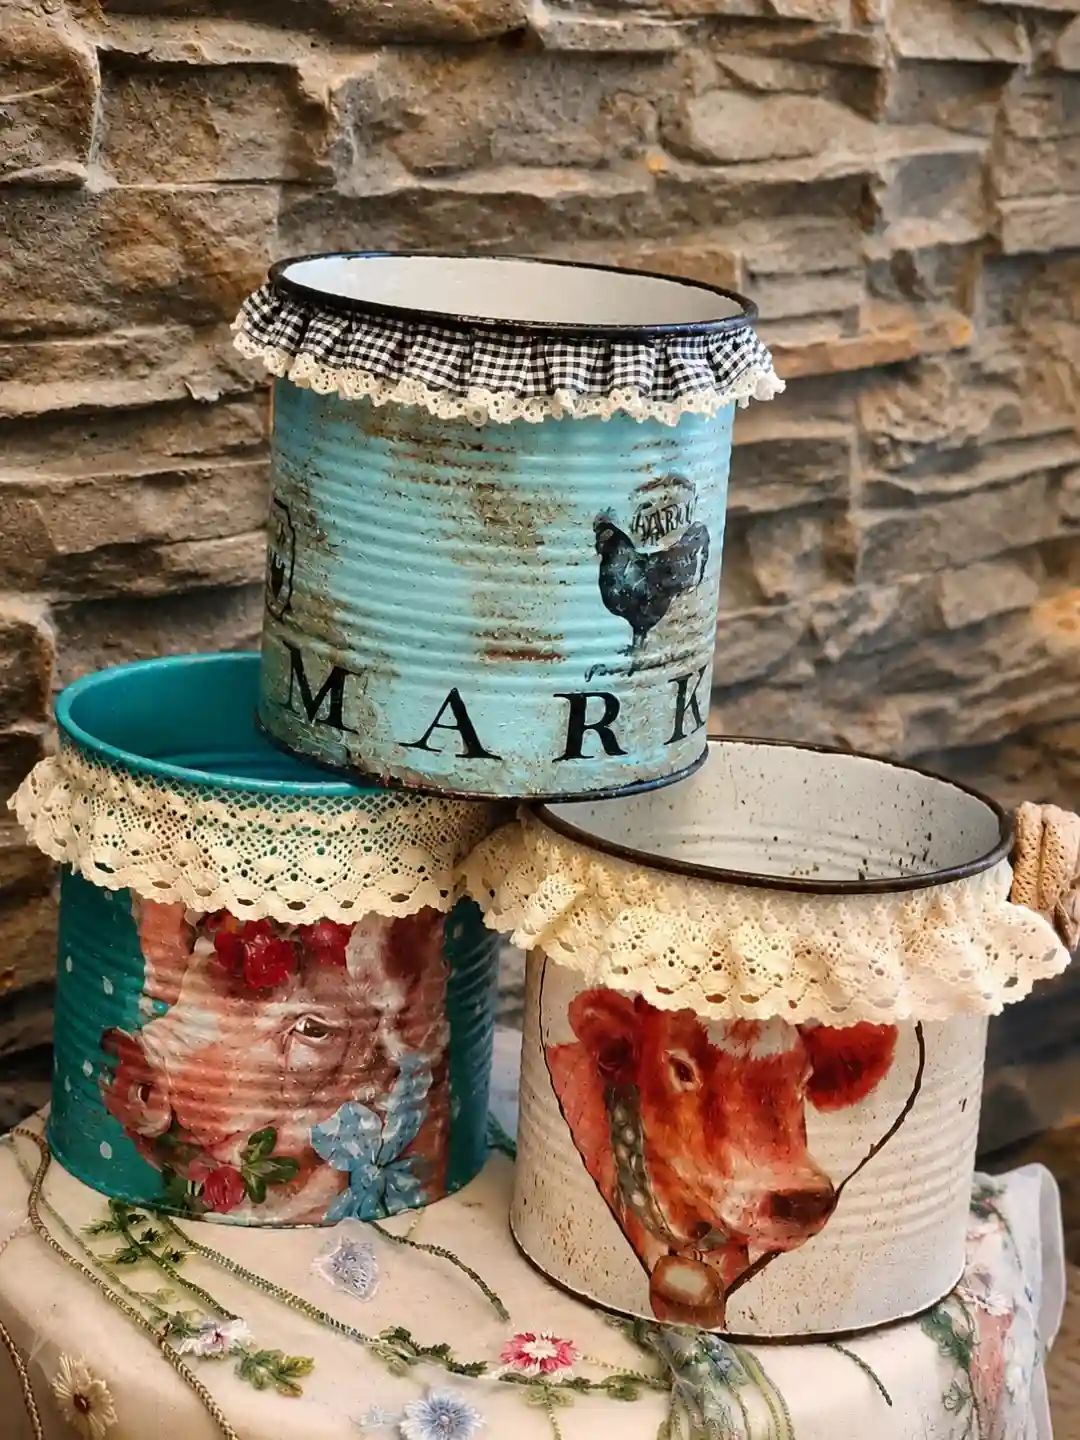
Farmhouse kitchen energy comes from three things stacked together here: paint sanded back in spots so the metal peeks through, a decoupaged animal portrait or lettering on the front, and a ruffled trim glued around the rim, eyelet lace on two, black and white gingham on the third.
Nothing about these looks new on purpose.
The trim is doing more work than it looks like. Pull it off and these are just painted cans. Add it and they look like something found at an antique market.
12. Wrap Cans in a Single Floral Print for a Matching Set
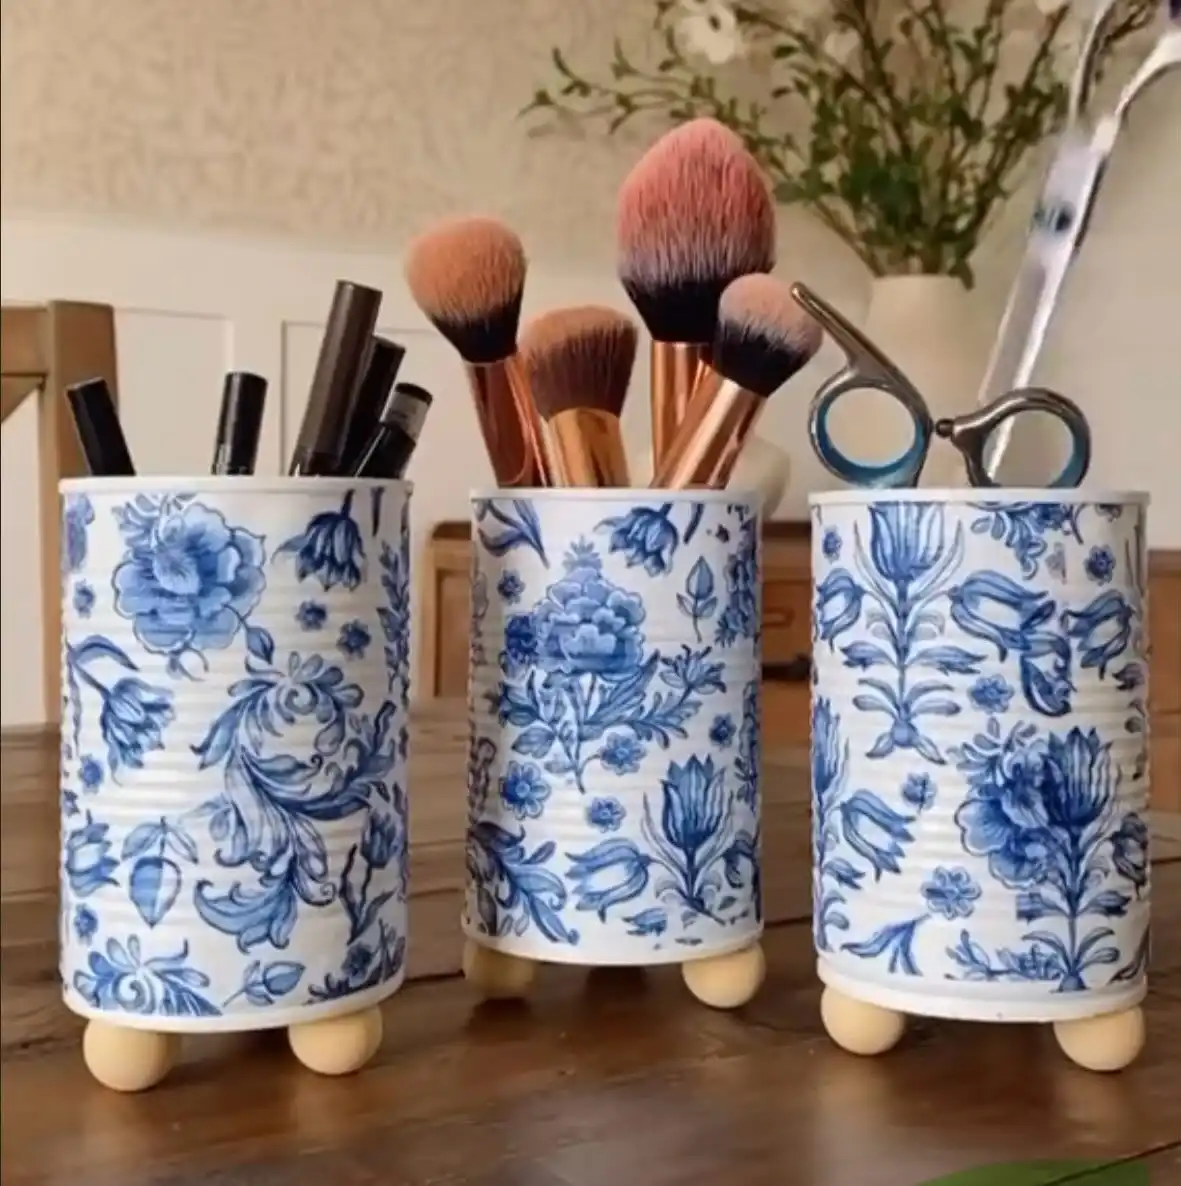
Same pattern, three different sizes. That is the trick that turns individual cans into a matching set worth displaying on a vanity or dresser.
The blue and white floral wrap goes on with decoupage medium, wraps fully around with no visible seam, and gets finished with tiny wooden ball feet instead of dowels for a daintier look.
Buying one roll of patterned paper or fabric and using it across every can in the set is what makes this look put together rather than thrown together, mismatched patterns on the same shelf tend to compete instead of coordinate.
Subscribe to DIY Craft Bloom
Get updates on the latest posts and more from DIY Craft Bloom straight to your inbox.
Smoothing the paper down with a credit card edge before it dries helps avoid the little air bubbles that give away a rushed decoupage job.
Once finished, the set reads less like recycled cans and more like a matching ceramic collection someone bought on purpose.
13. Paint a Whole Set With the Same Silly Cartoon Face
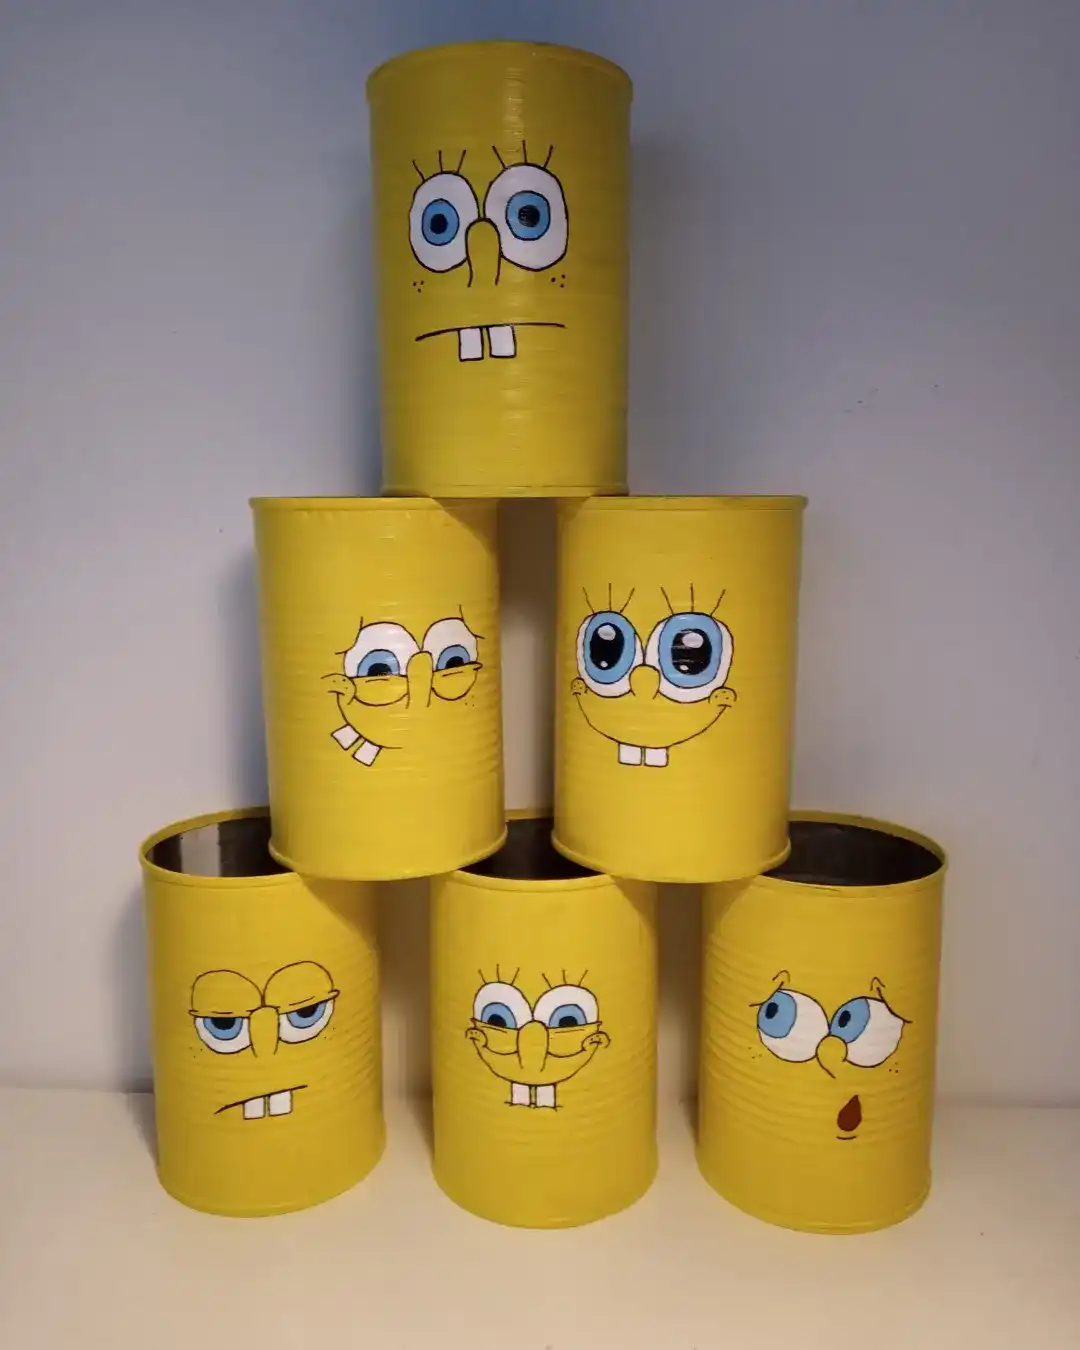
Six cans, six expressions, one shared bright yellow base coat.
Big white eyes with oversized pupils, a couple of buck teeth, and raised eyebrow lines are all it takes to give each can its own personality, some sleepy looking, some surprised, one even winking.
Stacked in a small pyramid, the whole group looks less like garden decor and more like a party prop.
That is actually the smartest use for this batch. Painted this bright and this playful, these cans are built for a kids’ birthday toss game, not a windowsill.
14. Wrap a Can in Patterned Paper for an Instant Party Favor
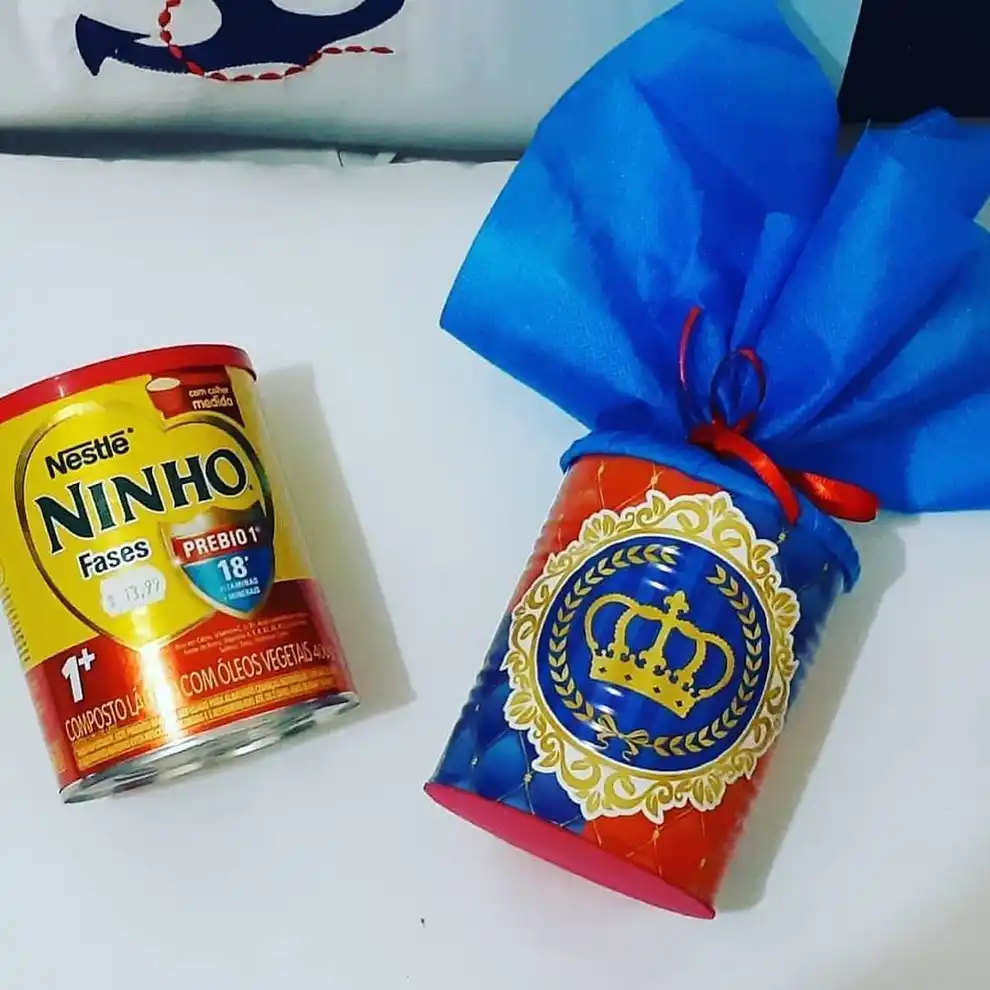
A plain formula can sits next to its makeover, and the transformation happens without a single drop of paint.
Patterned wrapping paper covers the whole body, a round emblem sticker gets glued front and center, and a puff of tissue paper stuffed into the open top gets cinched with ribbon like the world’s cutest gift wrap.
No drying time, no mess.
This is the fastest entry on the whole list. Wrap, glue, stuff, tie, and it is ready for a party table in under twenty minutes.
A leftover formula or coffee can, label and all, straight from the recycling bin.
Wrapped in patterned paper, topped with a tissue poof, and finished with a ribbon and a printed emblem.
15. Give Hanging Planters Faces Using 3D Eyes and Bottle Cap Feet
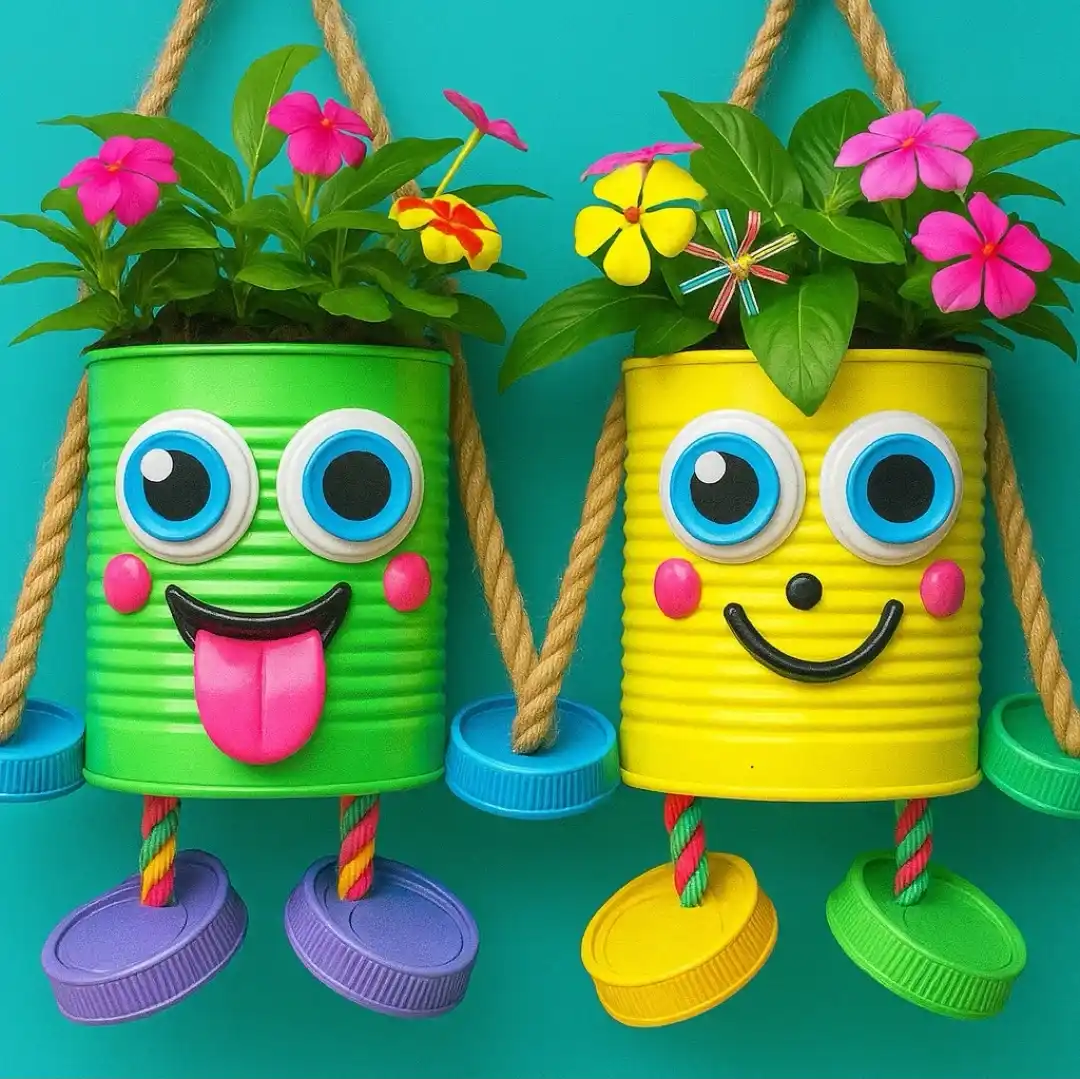
These characters swap flat painted eyes for real dimension.
Plastic bottle caps get glued on in pairs, a smaller dark cap centered inside a bigger light one, so the eyes actually stick out from the can instead of sitting flat against it.
Twisted cord legs dangle down and end in mismatched bottle cap shoes, and thick rope threaded through the top doubles as both arms and the hanger.
The rope detail matters more than it looks. It is load bearing, holding the full weight of the can, soil, and flowers, not just decorative trim.
16. Turn Mismatched Cans Into a Staggered Candle Trio
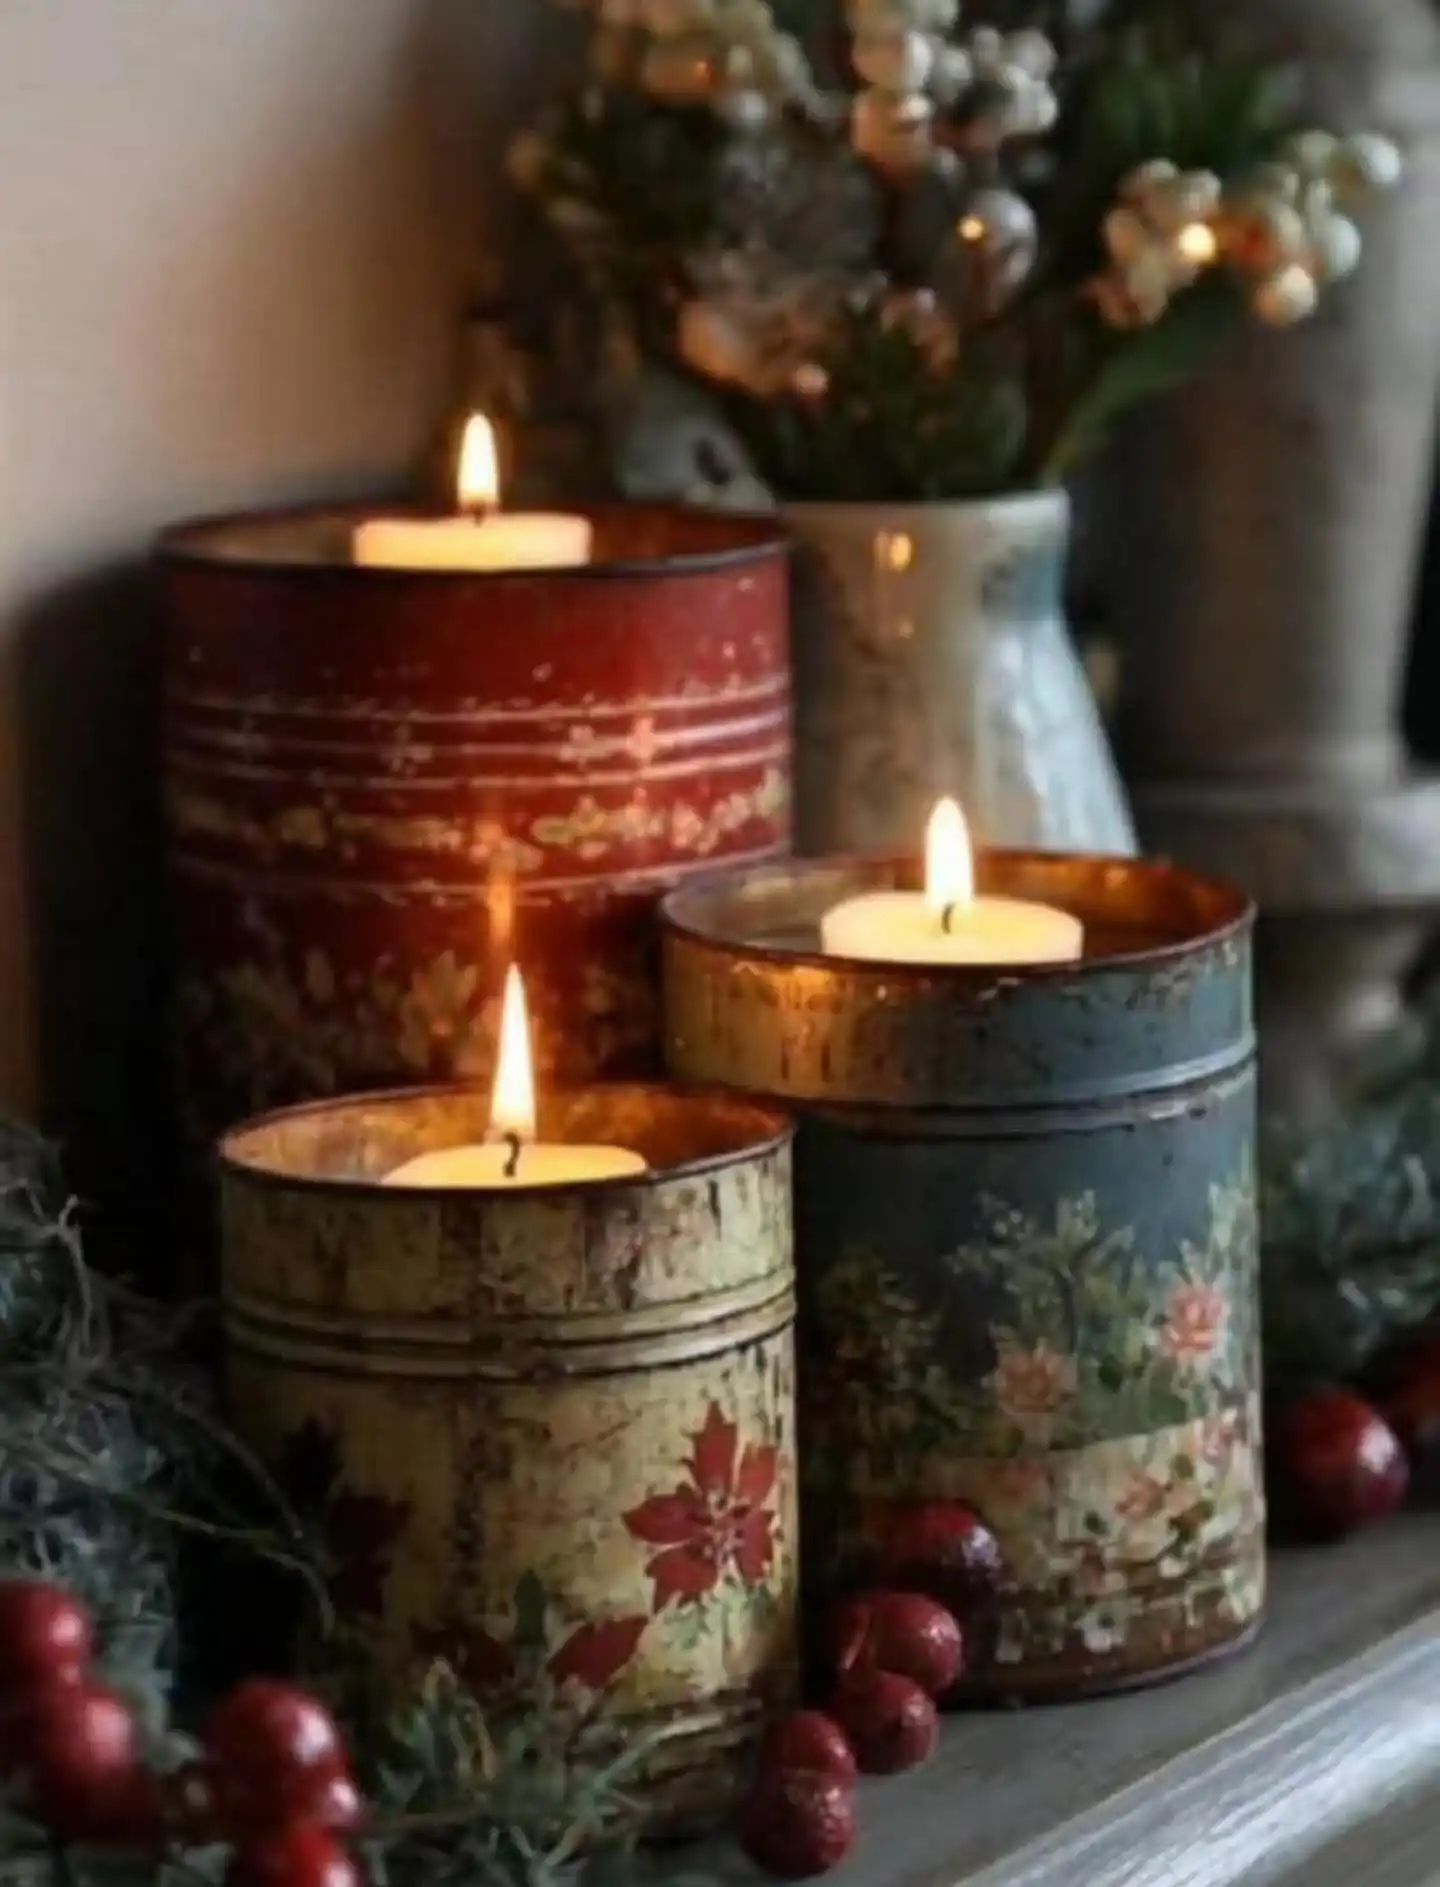
Three different heights, three different finishes, one tealight each. That is the whole formula for this mantel arrangement, and it works because nobody had to match anything.
A distressed red can, an aged bronze one, and a cream can with a stenciled poinsettia all sit at slightly different levels so each flame is visible from across the room.
Staggering the heights also solves a practical lighting problem, a single row of same-height candles tends to blur into one glow, but three different levels each catch shadow and light differently as the flames flicker.
This trio works especially well grouped with real greenery or a few faux berries tucked around the base, since the aged metal finishes already lean toward a natural, weathered look.
Swap the poinsettia stencil for a plain rustic finish and the same three cans carry easily from a holiday mantel into everyday use.
Three sizes stacked front to back means every flame stays in view.
Uneven wear patches near the rim read as decades old rather than sanded.
A tealight drops right in, no chimney or shield required since the can walls block the wind.
17. Build Felt Cow Faces Around a Painted Can
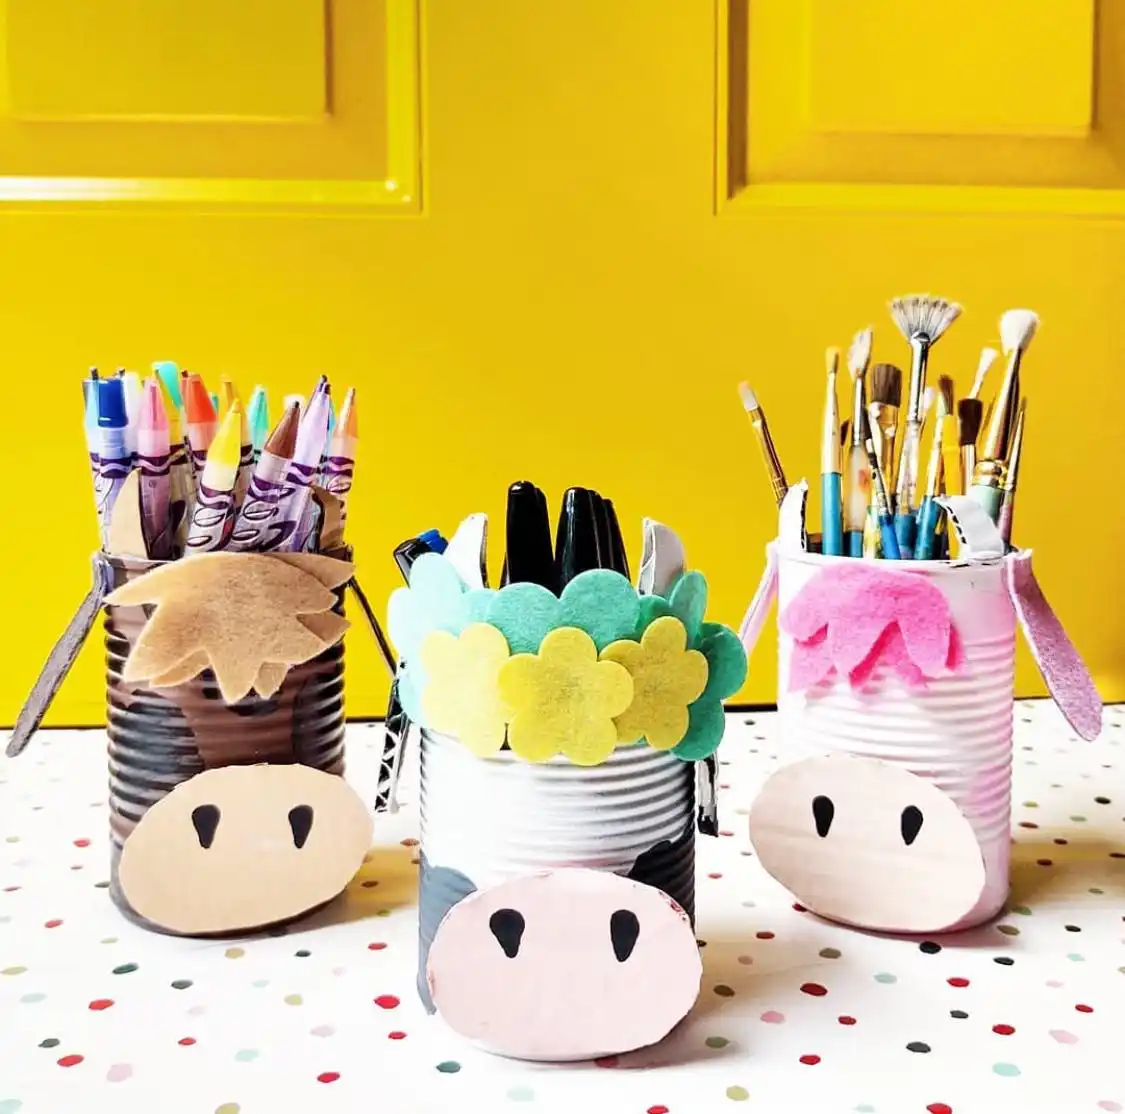
Felt is the star of this one instead of paint.
A cut felt snout with two black almond eyes leans against the front of the can, felt ears poke out the sides held on with a little glue, and a felt mane in a contrasting color runs across the rim like hair.
Each can holds a different craft supply, so this doubles as both decoration and cleanup system.
The wooden oval nose is a nice touch if you have scrap wood on hand, but cardboard cut to the same shape works just as well for a kids’ craft night.
Conclusion
Seventeen ideas in, and the same lesson shows up again and again: a can does not care whether it is holding soup or a succulent, it just needs a little paint, glue, or fabric to switch jobs.
Start with whatever feels easiest, a wrapped can or a solid color planter, then work toward the ones with more steps once you find your rhythm.
Keep a shelf or a box for empty cans as they pile up so the next project is ready whenever the mood hits.
Save this for the next time you are about to toss a can instead of transforming it.