15 Craft Ideas for Adults with Dementia That Bring Calm and Joy


Finding an activity that fits a loved one with dementia can feel harder than it should. Puzzles get pushed away. TV fills the hours but not much else. And a lot of craft ideas online look like they were made for a kindergarten class, which can feel insulting to a grown adult.
The right craft does something different. It keeps hands busy, gives the mind one calm thing to focus on, and ends with something real to show off. It can also open the door to old memories, like a button tin, a garden, or laundry drying on the line.
This list gathers craft ideas for adults with dementia that caregivers and activity staff are actually using.
You’ll find painting with cotton swabs and tape, paper mosaics and collages, shiny foil tiles, woven cardboard flowers, a fidget quilt, and a few sweet keepsakes for family.
Each idea comes with tips that make setup easier and ways to adjust for different stages.
Pick one, gather the supplies, and sit down together. The finished piece matters less than the time you spend making it.
Crafts That Bring Calm & Joy
Simple, grown-up projects where the time spent together matters more than the finished piece.
- 01 · Dignity first
Made for Grown-Ups
Skip anything that looks like a kindergarten worksheet. Line paintings, mosaics and keepsakes feel like real art and keep the activity respectful.
- 02 · Easy setup
Do the Hard Parts First
Pre-cut the squares, tape off the shapes and print big, open outlines. Your loved one then meets only the good parts: pressing, painting and peeling.
- 03 · Familiar motions
Hands That Remember
Clipping clothespins, sorting buttons and weaving yarn echo lifelong routines and can spark old stories about gardens, button tins and laundry lines.
- 04 · Every stage
Match the Stage, Treasure the Time
Offer one piece at a time, keep sessions short and praise effort over results. The time together matters more than the finished piece.
1. Hanging Butterfly Frame Made with Skewers and Yarn

Four wooden skewers, a bit of red yarn and one paper butterfly make up this whole project. The finished frame is light enough to hold up proudly, just like the maker in the photo is doing.
The butterfly is the calm part. Coloring its small sections keeps hands busy and the mind focused, with no right or wrong answer.
- Snip the sharp tips off the skewers before you begin, or use craft sticks instead.
- Tie the corners yourself, then let your loved one wrap extra yarn around each joint. The wrapping is soothing and hides any messy knots.
- Print a butterfly with big, open sections. Tiny shapes can feel frustrating.
- Hang the butterfly from the top bar on a single strand so it can turn.
Tape it to a window afterward. Every time it spins in the light, it’s a small reminder of a good afternoon.
2. Cotton Swab Line Painting with Waves and Zigzags
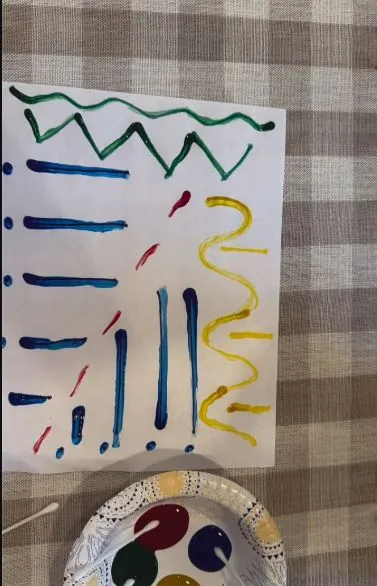
Look closely at the page and you’ll see small blue dots along the edges. Those dots are starting points, and they make all the difference.
Each dot tells the painter where to begin. From there, a cotton swab dipped in paint pulls a line across the paper. Some lines run straight, the green one zigzags, and the yellow ones curl into soft waves.
Cotton swabs are easier to control than brushes for shaky hands, and they don’t drip. A paper plate holds just four colors, which keeps choices simple.
Call it a line study, not a worksheet. Simple lines and repeated marks show up in plenty of modern art, and naming it that way keeps the activity dignified.
Keep a damp cloth close by. Painted fingertips are part of the deal.
Before you sit down, place a row of marker dots along one or two edges of the page.
Show one slow, straight line while they watch. Showing works better than explaining.
Let them copy your line, then try waves or zigzags in a new color whenever they’re ready.
3. Patchwork Paper Pumpkin with a “Thankful” Word

Scraps of soft patterned paper turn into a fall keepsake worth framing.
The pumpkin in this photo is built from pieces of floral, striped and solid paper in peach, pink and butter yellow. Nothing matches exactly, and that’s why it works. Patchwork forgives every uneven edge.
- Draw a large pumpkin outline on a sheet of kraft board.
- Pre-cut a pile of paper squares and strips, or let your loved one tear them by hand.
- Swipe a glue stick over one small area at a time and press pieces down until the shape is full.
- Finish with a cut-out word like “thankful” and a few white paint dots around the edge.
The word on top matters most. It turns a simple craft into a message, one that’s worth giving to a grandchild or hanging beside the bed.
4. Dried Corn Kernel Picture on a Printed Outline

Picking up kernels one at a time is slow, steady work, and that’s the point.
In the photo, a woman leans in close and sets dried corn kernels inside a printed corn cob. A bowl of kernels sits within easy reach. Her focus says it all.
Why it holds attention:
- The material matches the picture, so the goal is clear without much explaining.
- Pinching small pieces keeps fingers moving and working together.
- Many older adults grew up around gardens or farm kitchens, and corn can spark a story or two.
Brush a thin layer of white glue inside the outline first. The kernels stay put, and any strays are easy to nudge back into place.
For a fall version, swap the corn for a pumpkin outline and fill it with dried beans or lentils.
Kernels and beans look like food. Skip this craft for anyone who tends to put small objects in their mouth, and stay at the table the whole time.
Subscribe to DIY Craft Bloom
Get updates on the latest posts and more from DIY Craft Bloom straight to your inbox.
5. Clothespin Color Rim Bucket

Pastel clothespins and a plain plastic tub make one of the calmest setups on this list.
Here, a woman clips pins in pink, lavender, mint, yellow and blue all the way around the rim. The squeeze and release motion feels familiar to anyone who once hung laundry, so it rarely needs much explaining.
Hand over pins one color at a time if a full pile feels like too much. Or let her sort them into a pattern of her own.
When the rim is full, there are two ways to go:
- Unclip everything and start again. It can be repeated as often as she likes, which helps on restless days.
- Glue the pins in place with strong craft glue and turn the tub into a colorful caddy for yarn, brushes or garden gloves.
Look for pins with a light spring. Stiff ones tire sore or arthritic fingers fast.
6. Button Flower Art for a Group Table

Bright buttons scattered across a dark table pull people in before anyone says a word.
Four women gather around printed flower and mandala outlines in this photo, filling each petal with buttons in teal, orange, red and green. One sheet is packed edge to edge. Another is just getting started. Both look good.
Buttons carry memories too. Plenty of people grew up with a button tin in the house, and sorting through a pile can bring that right back.
Glue isn’t required. Arranging and rearranging buttons is calming on its own, and the pieces can be reused next week. If your group wants something to keep, add a dot of tacky glue under each button.
Stick to larger buttons, about the size of a coin or bigger, and count them back into the jar at the end.
7. Painter’s Tape Resist Painting on a Canvas Board

Blue painter’s tape does the hard part of this painting.
Before the session, strips of tape go across a small canvas board, creating triangles and open shapes. Then the painter fills the spaces with any colors they like. In the photo, a hand spreads mint and white paint with a short brush while hot pink and purple wait in a muffin tin palette.
Why it works so well:
- The tape makes clean edges, so there’s no worry about staying in the lines.
- Paint can go right over the tape without ruining anything.
- Small shapes feel finishable, which keeps frustration low.
Save the best moment for last. Once the paint is dry to the touch, peel the tape off slowly together and watch crisp white lines appear. That reveal is the payoff.
A blank canvas board crossed with strips of blue tape, leaving a handful of small open shapes to fill.
Tape peeled away, leaving bold colored triangles split by sharp white lines. It looks ready to hang.
8. Paper Mosaic Sun with Bright Squares

Small paper squares in red, yellow, orange and blue fill this sun one tile at a time.
The setup is simple. A large sun outline is printed on white paper, a glue stick sits nearby, and a pile of precut squares waits on the table. The woman in the photo pinches each square with care and presses it into the circle. At the next seat, a finished sun shows how full and cheerful the result can look.
Mosaics suit memory loss well because each square is its own small win. There’s no plan to remember, just the next piece.
Cut all the squares before anyone sits down. Snipping tiny pieces is tiring and can turn a calm hour into a frustrating one.
A sun works any time of year, and it brightens whatever wall it lands on.
| Glue stick method | Sticky contact paper |
|---|---|
| Each square gets glued down by hand. | Squares stick the moment they touch. |
| Good for fairly steady hands. | Easier for a weak or shaky grip. |
| Flat finish that’s easy to frame. | Tissue squares let light through on a window. |
9. Striped Magazine Pumpkin Collage

Old calendars and magazines finally have a job.
This pumpkin is covered in horizontal strips. Some are cut from photos of real pumpkins and fall leaves. Others are plain orange. A little plaid scrap makes the stem. Pinned to a bulletin board, it looks far more polished than the effort behind it.
Strips are kinder than tiny pieces. They’re easy to pick up, easy to line up and easy to glue. Cut them ahead of time, about two fingers wide, and lay them out in order so your loved one can work from the top down.
Flipping through magazines first can be part of the fun. Ask which pictures feel like fall to them. You might hear about a farm, a harvest, or a favorite pie.
Trim the extra edges at the end, and nobody will ever know which strips went on crooked.
The theme is obvious at a glance, which makes the goal easy to follow.
The solid orange bands give the eye a place to rest.
One patterned scrap finishes the piece like a bow on a gift.
10. Painting a Row of Outlined Cats

Cats sitting shoulder to shoulder give this painting a quiet sense of humor.
At a long table, residents fill in outlined cats with orange, yellow and gray paint. Each cat already has its face and shape drawn in, so the painter only has to pick a color and fill the space. Finished pieces sit on red or orange paper, which makes them look framed right away.
Ready-made outlines remove the hardest step. Drawing from scratch can feel like a test. Filling in a shape feels like play, with a clear finish line.
Subscribe to DIY Craft Bloom
Get updates on the latest posts and more from DIY Craft Bloom straight to your inbox.
Animals are a smart subject for adults with dementia. Lots of people have loved a pet at some point, and a row of cats can lead to stories about one that once lived in their own home.
Ask them to name each cat once the paint dries. It’s a small thing, and it makes the piece theirs.
11. Fidget Quilt Made Together

Sixteen fabric squares, each with something to touch, turn this quilt into a busy board for restless hands.
Look at the details. There’s a zipper sewn on the diagonal, a mesh panel, soft dotted fabric, a fluffy chenille patch, a buckle strap on a map print, laces through white loops, and beads on an elastic cord.
Fidget quilts are usually made for someone with dementia, but they can be made with them too:
- Your loved one picks the fabrics and sorts ribbons by color.
- They help lay the squares on a table and decide the order.
- You or a friend handle the sewing.
Once it’s finished, it becomes a comfort item. It rests on a lap during TV time or a car ride and gives fidgety fingers a safe job.
Stitch every piece down tightly. Nothing should twist off or pull loose.
12. Shiny Foil Art Tiles

Aluminum foil and a few markers make tiles that shine from across the room.
Each one starts as a square of cardboard with a simple design drawn in thick glue lines. Once the glue dries, a sheet of foil is smoothed over the top, and the raised lines show through. Then come the markers. In the photo, hearts, rainbows, flowers, a fish and a spiral are colored in hot pink, gold, teal and purple.
The raised edges act like little walls, so colors stay inside their sections. That’s a real help for anyone who worries about making mistakes.
Smoothing the foil with fingertips is a nice sensory moment too. It’s cool, crinkly and a little bit noisy.
Use permanent markers in a room with good airflow. They show up best on foil.
Sketch a heart, rainbow or flower on cardboard, then trace the lines with a thick bead of white school glue.
This part is yours. The glue needs to harden fully before the foil goes on.
Fold foil over the front, tape it on the back, rub gently around the lines, and hand over the markers.
13. Cardboard Flowers with Woven Yarn Centers

Cereal boxes and shipping cartons become flowers here, and no two look alike.
The petals in the photo are cut from brown cardboard and colored with markers in deep red, plum and green. Small slits around each center hold yellow string like spokes on a wheel. Yarn goes over and under those spokes in a spiral until the middle fills up.
Weaving has a steady rhythm that many people find relaxing. Over, under, over, under. Adults who once sewed or knitted may find their hands pick up the motion faster than you’d expect.
Not ready to weave? Coloring the petals is a full activity on its own. A few flowers in this photo skip the yarn completely, and they still look lovely.
Pin a handful to a corkboard and you have a garden that never needs watering.
14. Foam Flower Heart Wreath
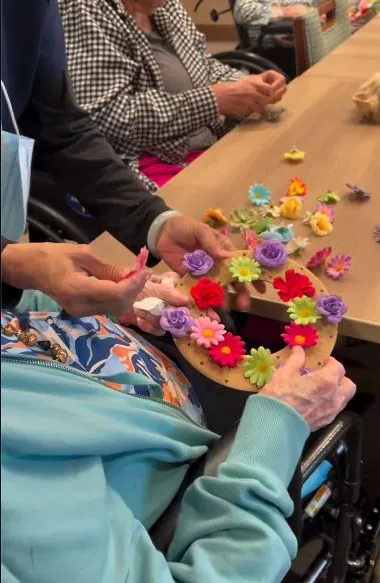
Layered foam flowers in purple, red, pink, yellow and green cover this heart-shaped wreath.
A resident holds the heart base on her lap while a helper’s hand steadies it. More flowers are spread across the table in a loose rainbow, so there’s always one within reach.
Three small tips keep this craft easy:
- Offer one flower at a time if a big pile causes stress.
- Put a dot of tacky glue on the base yourself, then let her press the flower down. She still decides where it goes.
- Rest the wreath on a pillow or tray so both hands stay free.
Hang it on their bedroom door when it’s done. A familiar, handmade decoration can make the room easier to recognize, and visitors always have something to ask about.
There’s no wrong spot for a flower on a wreath, so every choice turns into a small success.
15. Foam Heart Picture Frame for a Family Photo

Peel, press, repeat. That’s the whole method behind this frame.
A plain white frame is covered in self-adhesive foam hearts in pink, coral and pale lilac. Small sequins sit on a few of them for a little sparkle. Some hearts overlap and some sit alone, and the mix looks cheerful rather than messy.
Sticky-back foam is one of the easiest supplies for memory care crafts. There’s no glue bottle to squeeze and no drying time. If the backing is hard to peel, lift each corner ahead of time so it’s ready to grab.
The real power is what goes inside. Slip in a photo of a grandchild, a spouse or a beloved pet. The frame becomes a daily reminder of the people who matter, made with their own hands.
Make two. One to keep, one to give.
Conclusion
Crafts for someone with dementia don’t need to be impressive. They need to feel safe, simple and a little bit joyful. Every idea above works because the hard parts happen ahead of time, so your loved one only meets the good parts: pressing, painting, sorting and weaving.
Start with one craft that fits their stage and interests. Keep the session short, stay close, and praise the effort more than the result. If something isn’t clicking, set it aside and try again another day. That’s normal.
Some of these craft ideas for adults with dementia will turn into favorites you come back to again and again. Save this list for the next time you need a calm, meaningful way to spend an afternoon together.