16 DIY Craft Ideas For Teens That Use Stuff You Already Own

Boredom hits differently when you have got a pile of stuff in your room and nothing to do with it. Empty bottle caps.
A cardboard box from a delivery. Half a bag of craft sticks left over from something you finished months ago.
That is where this list starts. Every idea here uses things most teens already own or can grab for a couple of dollars, and none of them need a workshop, a sewing machine, or skills you do not have yet.
Some are quick wins you can knock out in one afternoon, like glitter umbrellas cut from plastic cups or a jewelry box built from two bottle caps.
Others, like the mini canvas grid, are the kind you add to slowly over a few weeks until a bare wall finally looks like yours.
You will find storage that actually solves a mess, wall decor that costs almost nothing, and small handmade pieces worth giving away.
These DIY craft ideas for teens are the ones that hold up after you make them, not the ones that fall apart by Friday.
1. Cardboard Tomato Shelf That Holds Your Bathroom Clutter
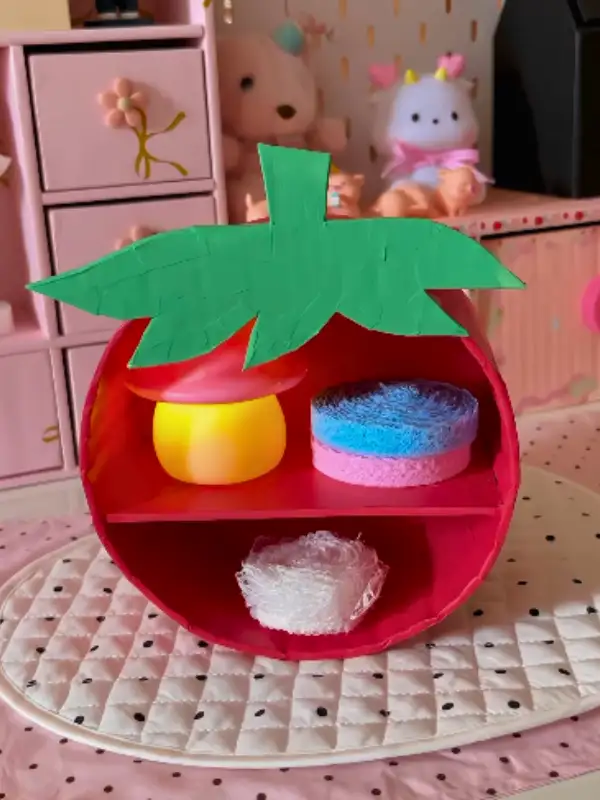
Two cereal boxes and a round lid gave this one its whole shape.
The body is a circle of cardboard painted deep red, with a second flat piece slotted across the middle to make two levels, so sponges and a small pot sit upright instead of rolling around the counter.
What sells it is the leafy green top. It is cut freehand with jagged edges, not a neat symmetrical shape, and the little brush strokes running through the green keep it from looking flat.
A few things worth copying:
- Score the fold lines with a butter knife first so the cardboard bends without cracking
- Paint two thin coats instead of one thick one, or the brown bleeds through
- Leave the bottom shelf taller for bulkier items
Seal it with clear tape or mod podge if it lives anywhere near water.
Cut two matching circles from a flat box, then glue them together for a sturdy back panel.
Add a curved strip around the edge to build depth, taping it in short sections so it bends smoothly.
Slide one flat rectangle across the middle and glue the ends to create the divided shelf.
Paint the body red, cut a jagged green leaf topper, and glue it behind the top edge.
2. Yarn String Art Heart On A Scrap Wood Board
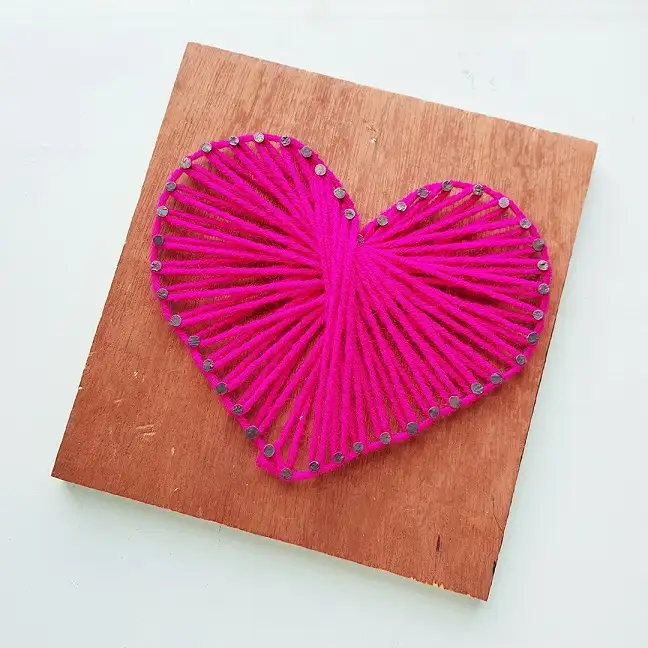
Hot pink yarn wrapped around a ring of small nails, and that is the entire project.
The wood underneath is left raw with visible grain and a few marks, which is exactly why the bright yarn pops the way it does.
Notice the wrapping pattern. Lines cross the center at different angles rather than following one neat path, so the middle builds up thicker and darker while the edges stay open.
That density difference is what makes it look finished instead of messy.
Yarn also forgives beginners better than thin embroidery thread. It is thicker, covers ground fast, and hides a wobbly nail line.
Cost: almost nothing. A scrap board, a handful of nails, and one skein you already have in a drawer.
Draw your shape on paper, tape it down, and hammer nails through the outline.
Space nails evenly, about a finger width apart.
Wrap in random directions so lines cross and fill the middle.
Hammering nails all the way flush, you need the head to catch the yarn.
Pulling the yarn tight enough to bend the nails.
Painting the wood, the raw grain is doing real work here.
Tie off the loose end behind a nail at the back and dab it with glue so it never unravels.
3. Mini Painted Canvas Grid For A Blank Bedroom Wall
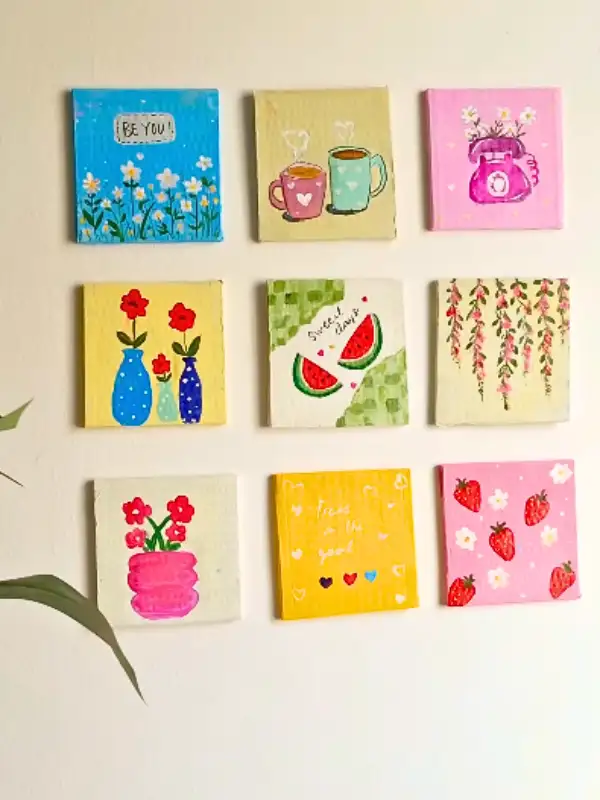
Nine small squares, painted one at a time, hung in a tidy three by three grid.
Each one carries a single simple subject: two mugs, a watermelon slice, a pink phone with flowers in it, strawberries scattered on pink.
Subscribe to DIY Craft Bloom
Get updates on the latest posts and more from DIY Craft Bloom straight to your inbox.
The trick is not painting skill. It is the repetition.
Nothing here is complicated, but nine of them together fill a wall the way one big piece would, and you can add squares over weeks instead of finishing in one sitting.
Look at how the backgrounds vary between blue, yellow, cream and pink while the subjects stay small and centered.
That mix keeps it lively without turning into visual noise.
Cardboard works fine if you do not want to buy canvases. Cut squares, glue two layers together for stiffness, then prime with white acrylic so colors sit bright on top.
Hang them with removable strips and measure the gaps once, then reuse that spacing for every row.
4. Halloween Character Jars With Tea Lights Inside
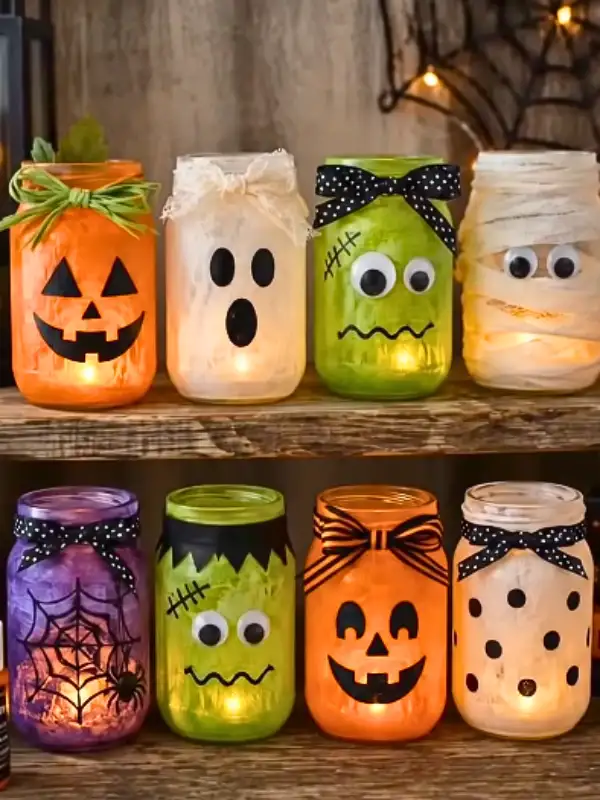
Old pasta sauce jars turned into a lit-up lineup: jack-o-lanterns, ghosts, a green monster with stitches, a purple spiderweb jar, and one wrapped in gauze strips for the mummy.
The glow is the whole point.
Each jar is painted with a thin, streaky coat rather than solid color, so light from the tea light inside pushes through and the brush texture shows up.
Solid paint would kill that completely.
| Character | What makes it |
|---|---|
| Pumpkin | Orange base, black triangle eyes, ribbon at the neck |
| Ghost | White base, two ovals and a wide open mouth |
| Monster | Green base, googly eyes, jagged stitch marks |
| Mummy | Gauze wrapped in overlapping strips, eyes peeking out |
Googly eyes do a lot of heavy lifting here. They cost almost nothing and instantly make a jar read as a face.
⚠️ Watch Out
Use battery tea lights, not real flames. Painted glass and gauze wrapping are a bad mix with an open candle, and the plastic eyes will warp.
Mix a little water into acrylic paint before the first coat if you want that frosted, uneven finish instead of opaque blocks of color.
5. DIY Aesthetic Collage Wall
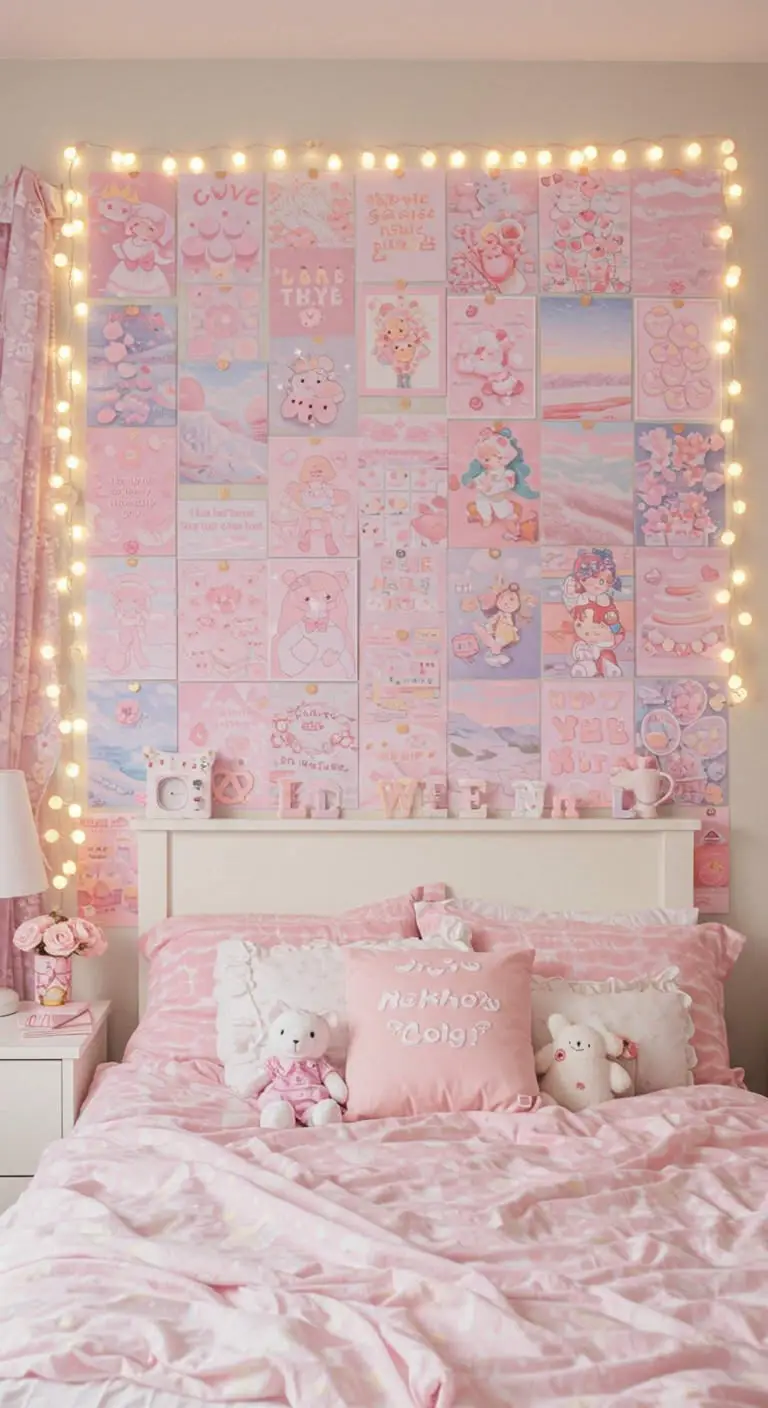
A personalized collage wall is an easy and stylish way to decorate your space.
How to Make It
- Gather magazine cutouts, printed photos, and aesthetic stickers.
- Arrange them on your wall in a pattern you love.
- Use double-sided tape or washi tape to secure them.
- Add fairy lights or decorative elements for extra charm.
Picture This: A stunning, customized collage wall filled with your favorite themes, making your room feel cozy and unique.
6. DIY Painted Mason Jars
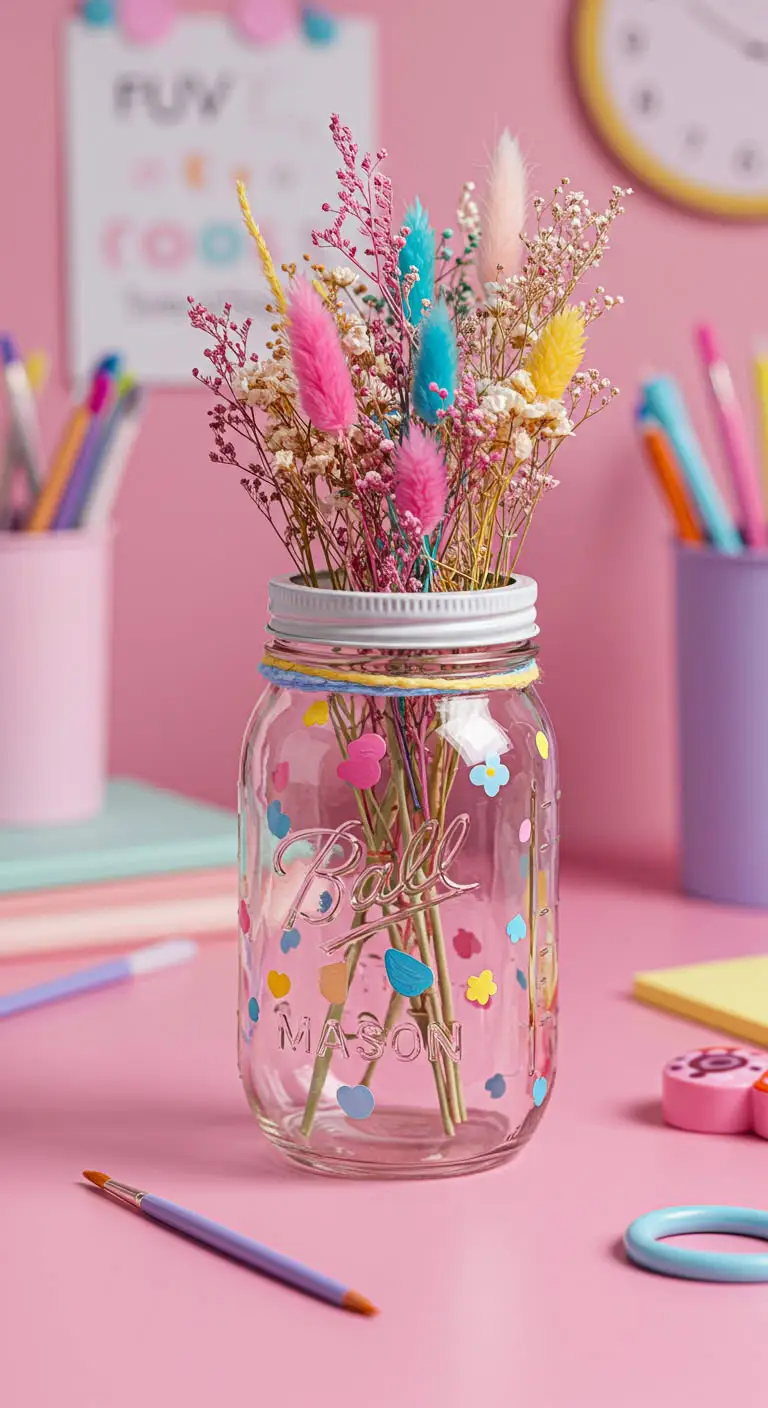
Transform mason jars into beautiful storage or decorative pieces.
How to Make It
- Clean a mason jar and dry it completely.
- Use acrylic paint to create fun designs or patterns.
- Let it dry and seal with a clear coat.
- Use it as a pen holder, flower vase, or decor piece.
Picture This: A vibrant, hand-painted mason jar sitting on your desk, adding a touch of creativity to your space.
7. Tiny Glitter Umbrellas Made From Clear Plastic Cups
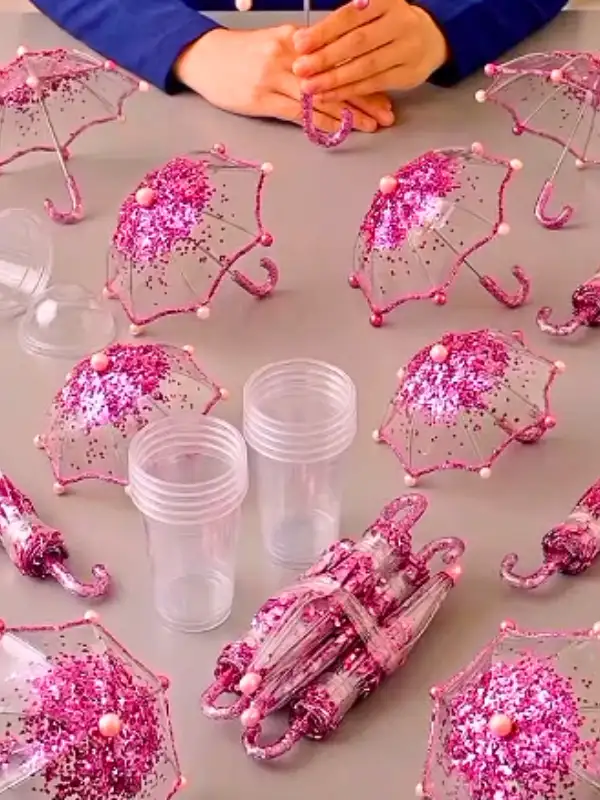
Clear disposable cups, cut down and reshaped into little umbrella canopies.
The domed lids in the corner of the photo look like they became the curved tops, and thin wire runs from the center out to each pointed edge like real umbrella ribs.
Pink glitter sits on the outer rim and in a scattered patch near the top, never covering the whole surface.
That restraint matters. Leaving the plastic clear in between is what keeps them looking like umbrellas instead of glitter blobs.
Small pearl beads cap the end of every rib, and the handles are bent wire coated in the same glitter and curled into a hook.
Where these actually get used:
- Strung on thread as a bedroom garland
- Glued to gift boxes or card fronts
- Propped in a jar as a desk display
- Party or shower table decor
Cheap throwaway plastic reads as expensive the second you keep part of it clear and let the glitter catch light through it.
Cut the cups with sharp scissors in one smooth motion. Sawing at the plastic leaves rough white stress marks along the edge.
8. DIY Phone Cases
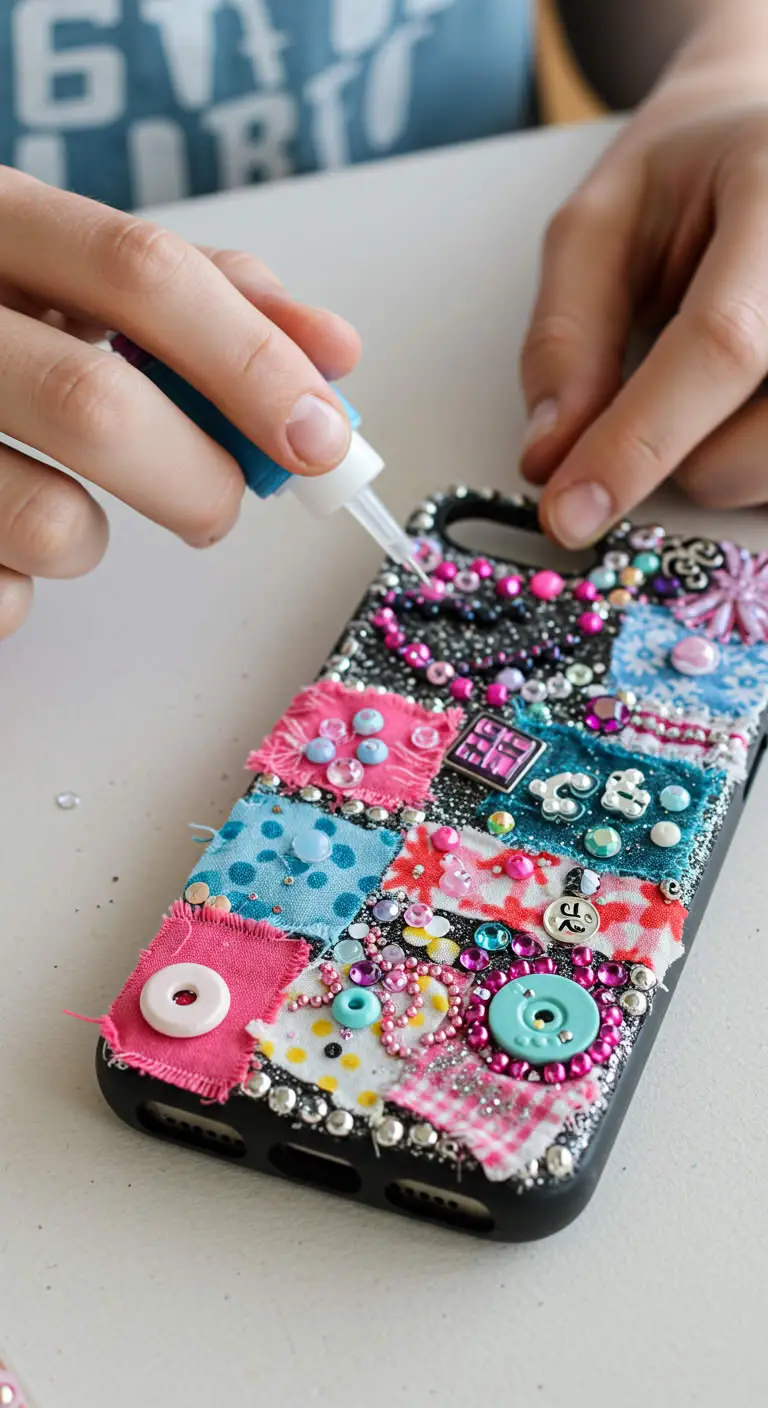
Create a unique phone case with stickers, paint, or pressed flowers.
How to Make It
- Start with a clear phone case.
- Decorate with acrylic paint, stickers, or washi tape.
- Seal with a clear topcoat for durability.
Picture This: A customized phone case that perfectly reflects your personality and style.
Subscribe to DIY Craft Bloom
Get updates on the latest posts and more from DIY Craft Bloom straight to your inbox.
9. Rainbow Popsicle Stick Pen Holder On A Bottle Base
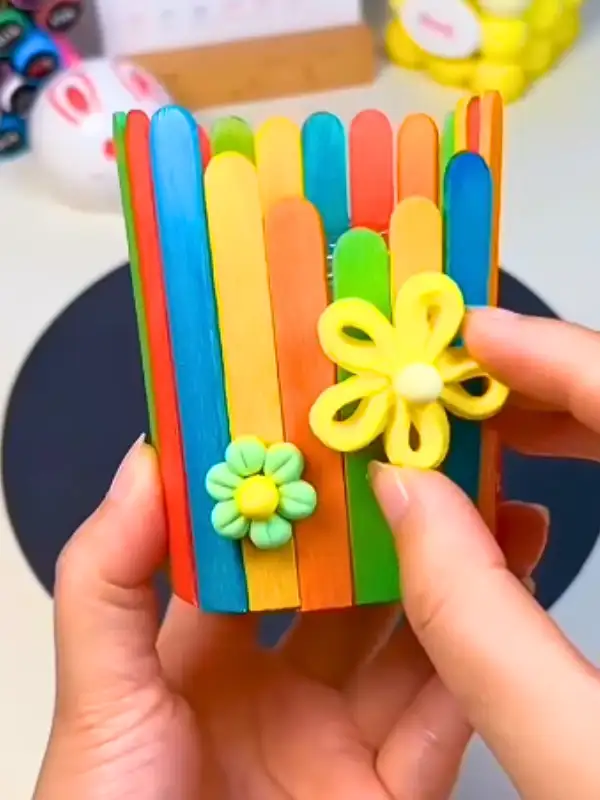
Cut the bottom off a plastic bottle, then glue colored craft sticks upright around the outside until the plastic disappears completely. That is the build.
Two details stop it from looking like a kindergarten project. First, the colors are scattered rather than arranged in a neat rainbow order, so no repeating pattern draws the eye.
Second, the sticks are not all the same height. Some sit slightly taller, giving the rim an uneven line that looks intentional.
The flowers on the front are simple clay loops pressed flat, each with a small ball pushed into the center.
Recreate it with:
What you need
Sand that cut edge before you start gluing. It is sharp, and once the sticks are on you cannot reach it anymore.
10. DIY Clay Keychains
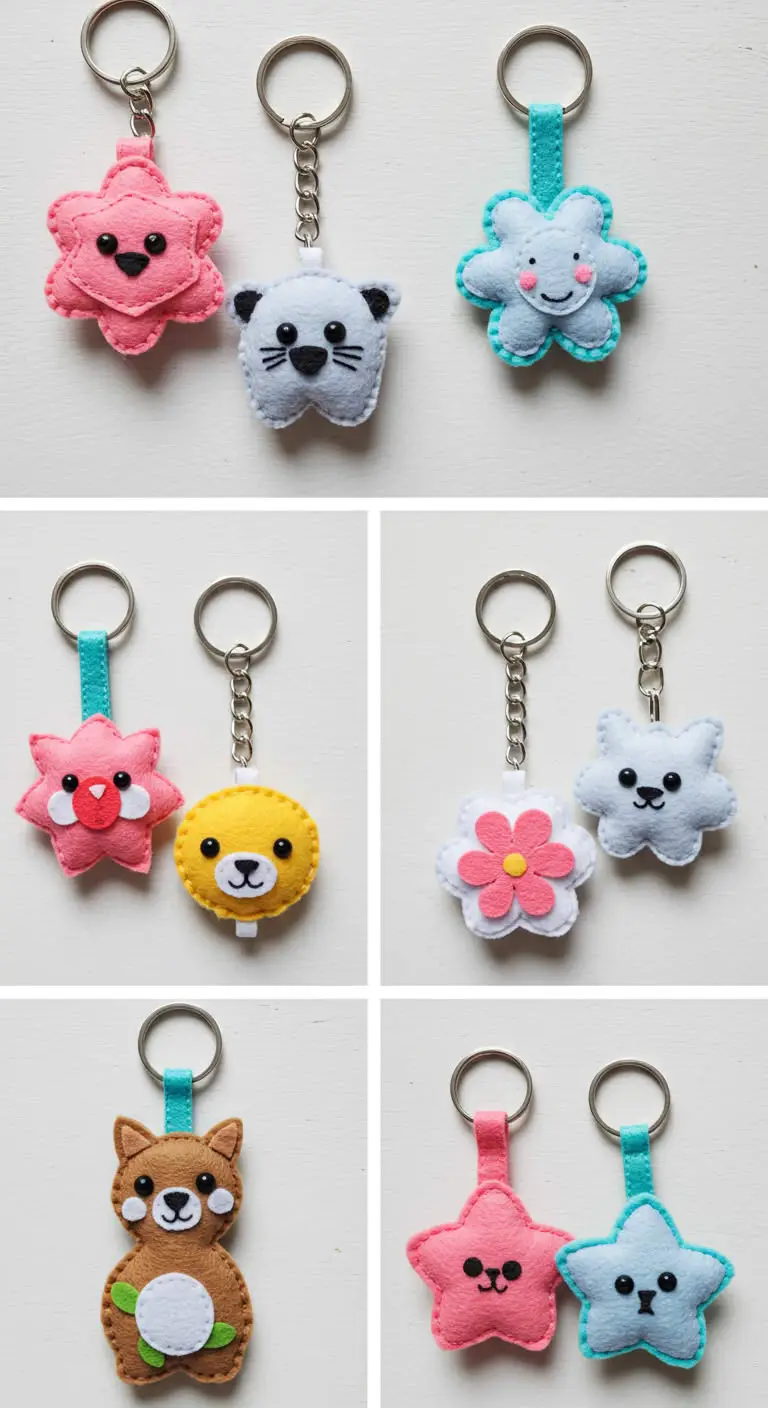
Design cute and functional keychains using air-dry clay.
How to Make It
- Roll out air-dry clay and cut into shapes.
- Use stamps or carving tools for designs.
- Let it dry completely before painting.
- Attach to key rings.
Picture This: A collection of adorable, handmade keychains adding personality to your backpack or keys.
11. Bottle Cap Jewelry Boxes That Fit In Your Palm
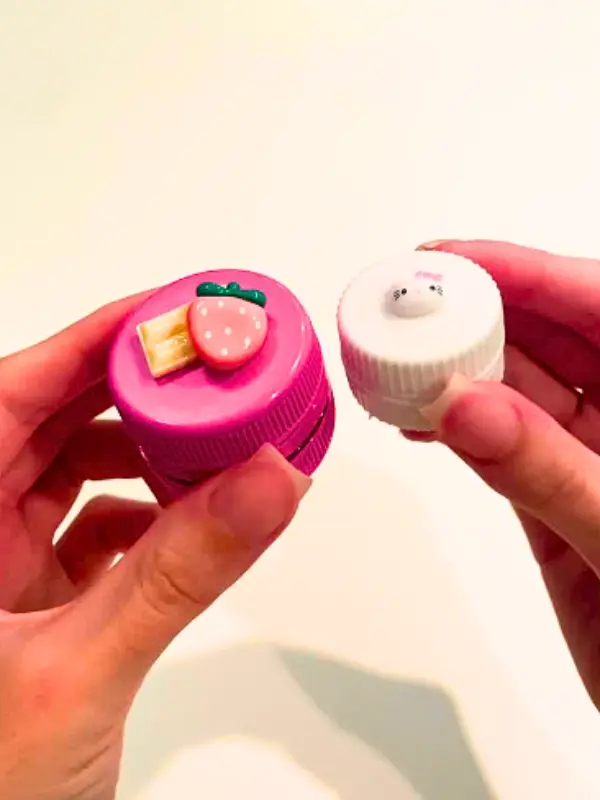
Two plastic bottle caps, one glued on top of the other, and you have a container the size of a coin.
The pink one is decorated with a small strawberry and a wafer-style charm on the lid. The white one keeps it minimal with one tiny face and a stamped word.
These solve a real problem. Stud earrings, a spare ring, a hair tie, or a single charm always end up loose at the bottom of a bag. This gives each one a home that costs nothing.
The build depends on getting a snug fit, so the two caps need to be roughly the same diameter. Wide-mouth juice or milk caps work better than narrow water bottle ones because there is actual room inside.
Two caps headed for the bin, and studs rolling around loose in your bag lining.
A pocket-sized box with a lid that lifts off, one small charm on top, and nothing lost.
Line the inside with a circle of felt cut to size. It stops metal from rattling and makes the whole thing feel more like a real box.
12. DIY Tie-Dye T-Shirts
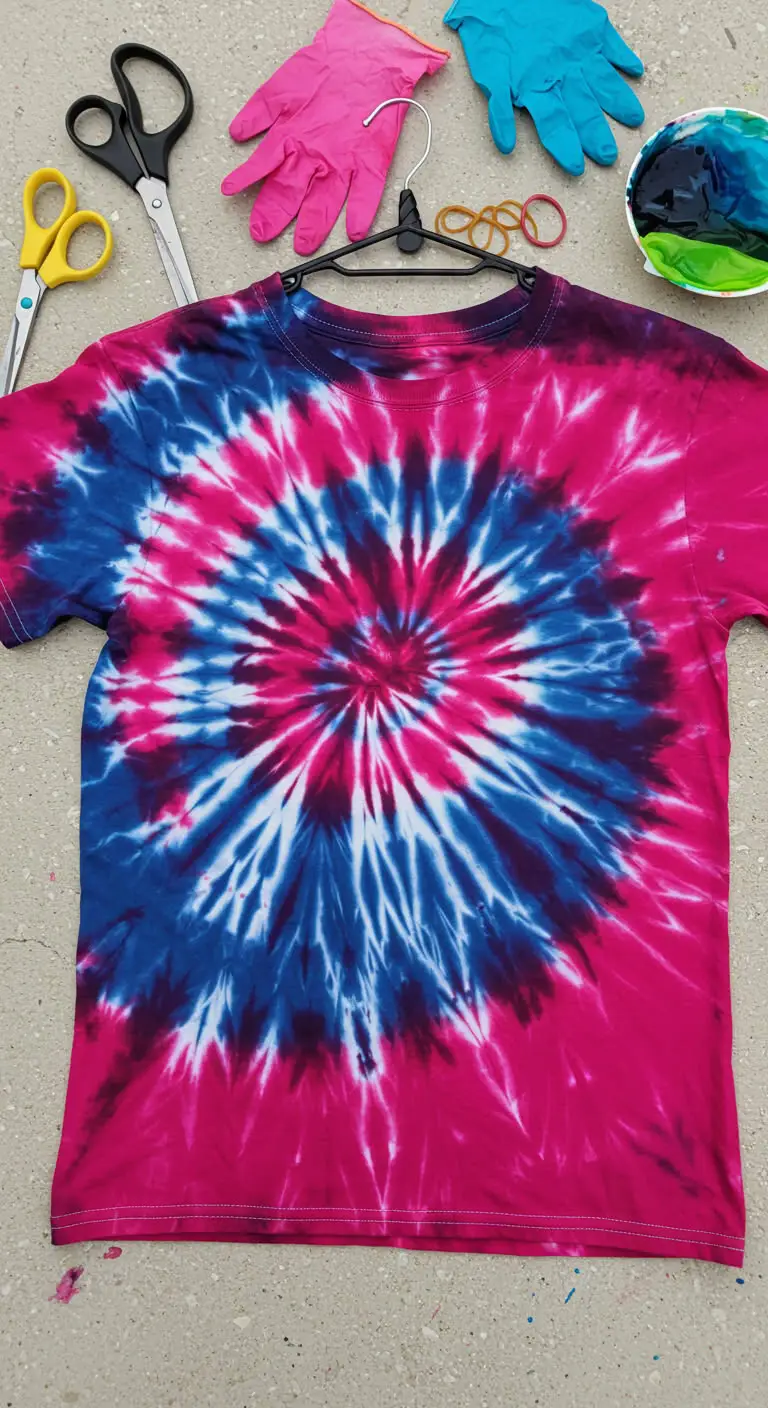
Create unique tie-dye shirts with fun colors and patterns.
How to Make It
- Start with a white cotton t-shirt.
- Twist and tie it with rubber bands.
- Apply different tie-dye colors.
- Let it set before rinsing and drying.
Picture This: A colorful, unique tie-dye shirt that adds a fun pop of color to your outfit.
13. DIY Wall Hanging
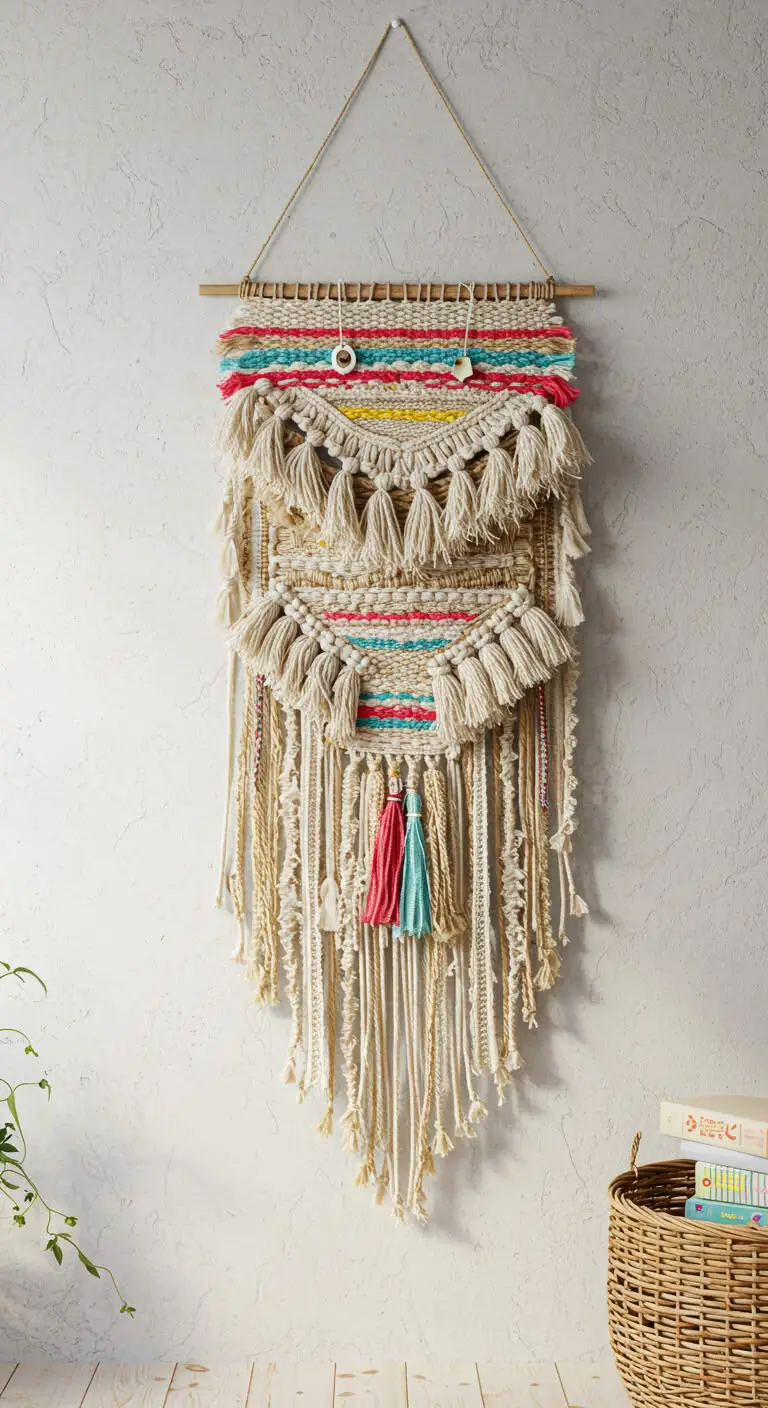
Make an aesthetic wall hanging using yarn and a wooden dowel.
How to Make It
- Cut yarn in different lengths and tie them to the dowel.
- Use different colors to create an ombre effect.
- Trim the bottom into a V-shape for a neat finish.
- Hang it on your wall with a hook or nail.
Picture This: A handmade, boho-inspired wall hanging adding texture and warmth to your space.
14. DIY Resin Keychains
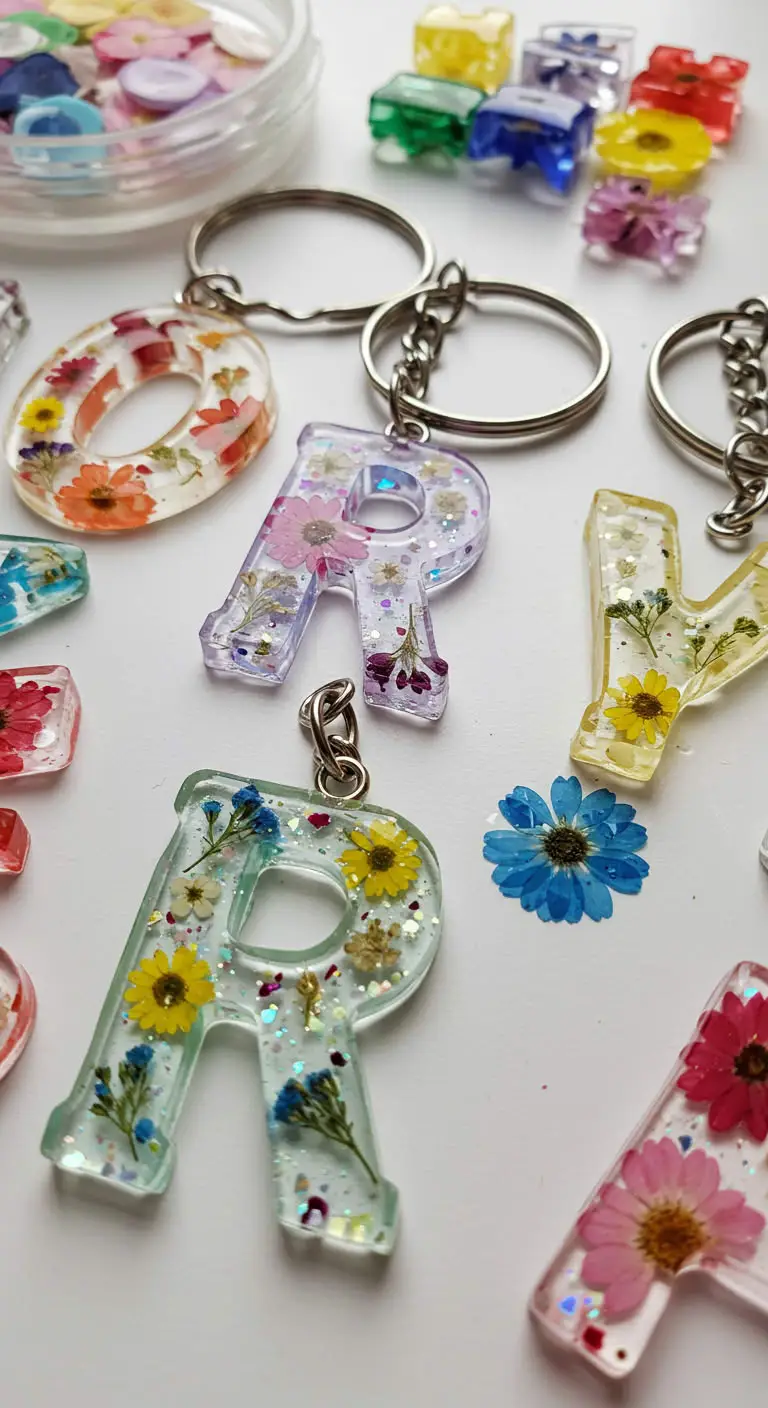
Resin crafts are trendy, and making custom keychains is easy and fun.
How to Make It
- Mix resin and pour into silicone molds.
- Add glitter, dried flowers, or initials.
- Let it cure before attaching to key rings.
Picture This: A set of shimmering resin keychains featuring initials and pressed flowers, ready for gifting.
15. DIY Painted Flower Pots
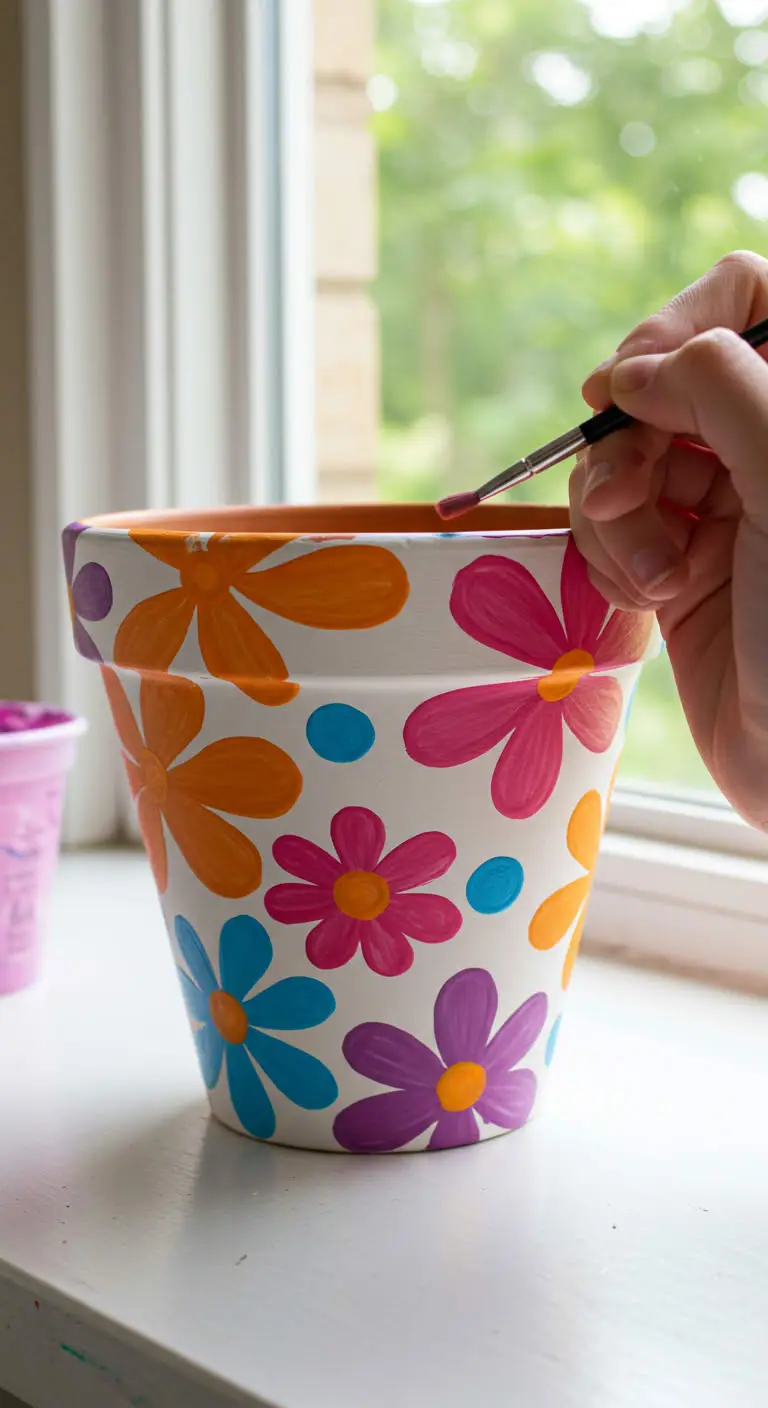
Personalize flower pots with creative designs and colors.
How to Make It
- Use acrylic paint to decorate plain flower pots.
- Add fun patterns, quotes, or images.
- Seal with a clear coat for durability.
Picture This: A hand-painted flower pot brightening up your windowsill or garden.
16. DIY Fabric Scrunchies
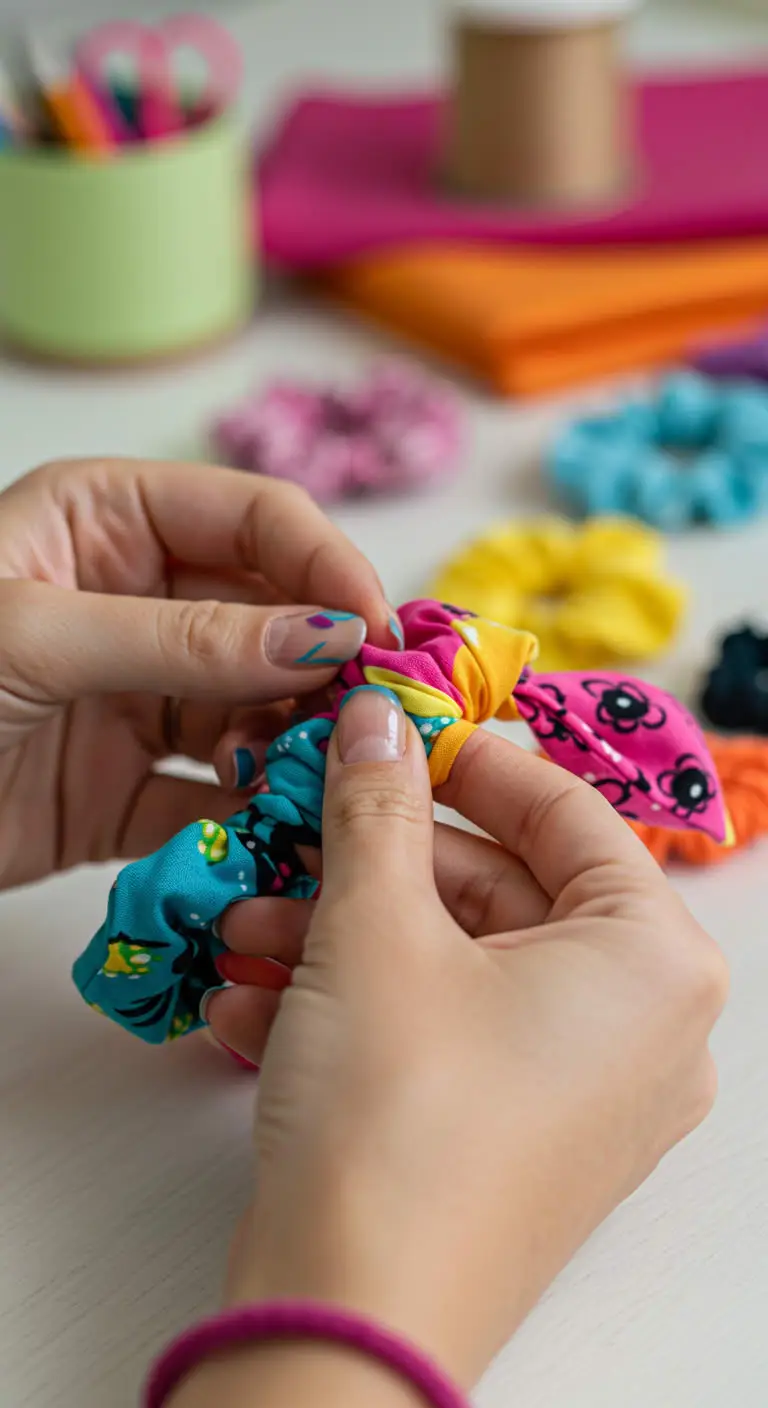
Make stylish scrunchies with fabric and elastic.
How to Make It
- Cut a strip of fabric and fold it lengthwise.
- Sew the edges and insert elastic.
- Stitch the ends together to complete the scrunchie.
Picture This: A trendy, handmade scrunchie that adds a fashionable touch to any hairstyle.