17 Colorful Leaf Crafts Kids Will Love Making This Fall Season

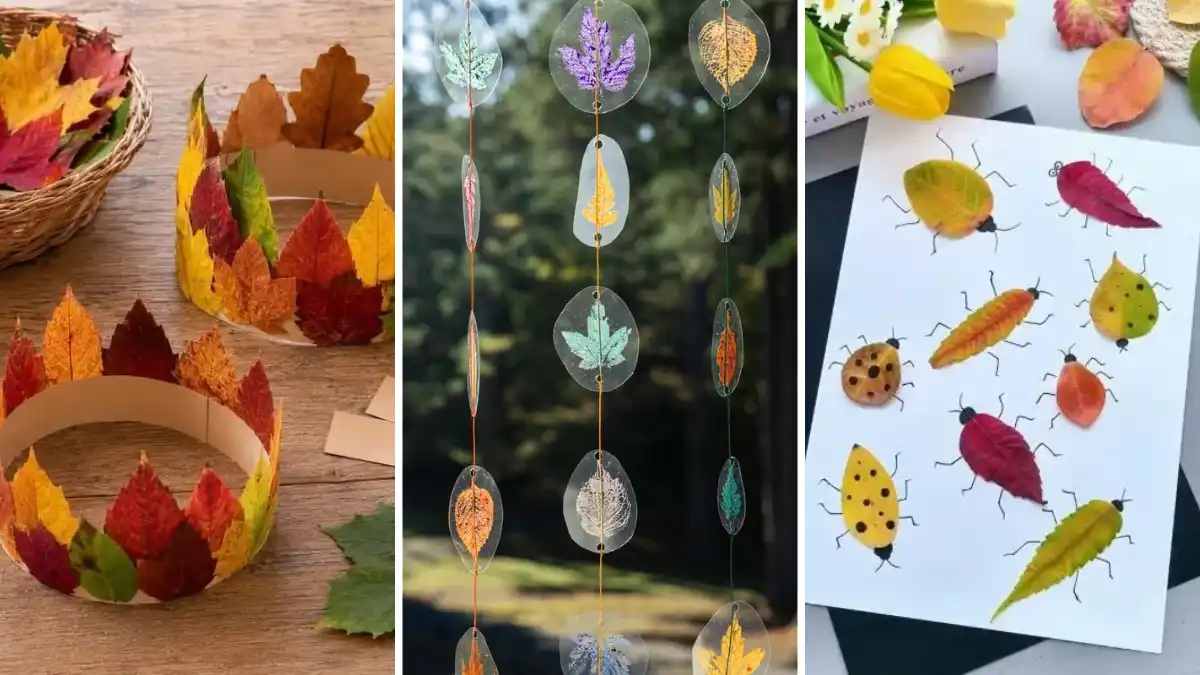
Kids never come home from a fall walk empty handed. There’s always a fistful of leaves, a crumpled red one in a coat pocket, a yellow one tucked behind an ear for safekeeping.
Most of them land on the kitchen counter, and a few days later they’re crunchy, brown, and headed for the trash.
This list gives those leaves a better ending.
Below you’ll find 17 leaf crafts kids can make with what they gathered, plus some glue, paper, and a marker or two. A few are quick wins, like turning one red leaf into a spotted bug with six marker legs.
Others become something kids keep using for days: a crown to wear around the house, a suncatcher that glows in the window, a little leaf person that actually stands up on clay feet.
There are easy picks for toddlers who just want to stick things down, and puzzle style projects for older kids who like a challenge.
Each idea comes with notes on which leaves to grab, what to skip, and how to keep the mess under control.
So grab a bag, head outside, and fill it with every color you can find.
How to Pick and Prep Leaves Before You Start Crafting
A craft is only as good as the leaves that go into it. A little prep keeps them colorful, flat, and easy for small hands to glue. Here’s what makes the biggest difference:
- Gather leaves that fell recently. They’re still soft and bend without cracking, which matters for curved projects like crowns and leaf people.
- Press them flat for a few days. Lay leaves between sheets of paper inside a heavy book so they dry flat and hold their color.
- Collect lots of shapes. Round, long, pointy, and wavy edged leaves give kids more ideas than a pile of one kind.
- Match the glue to the job. A glue stick handles thin leaves, white school glue holds thick or curled ones, and clear contact paper works best for suncatchers.
- Skip anything wet, moldy, or unknown. Teach kids the old saying “leaves of three, let it be” so poison ivy never ends up on the craft table.
1. Maple Leaf Foxes and Their Woodland Friends
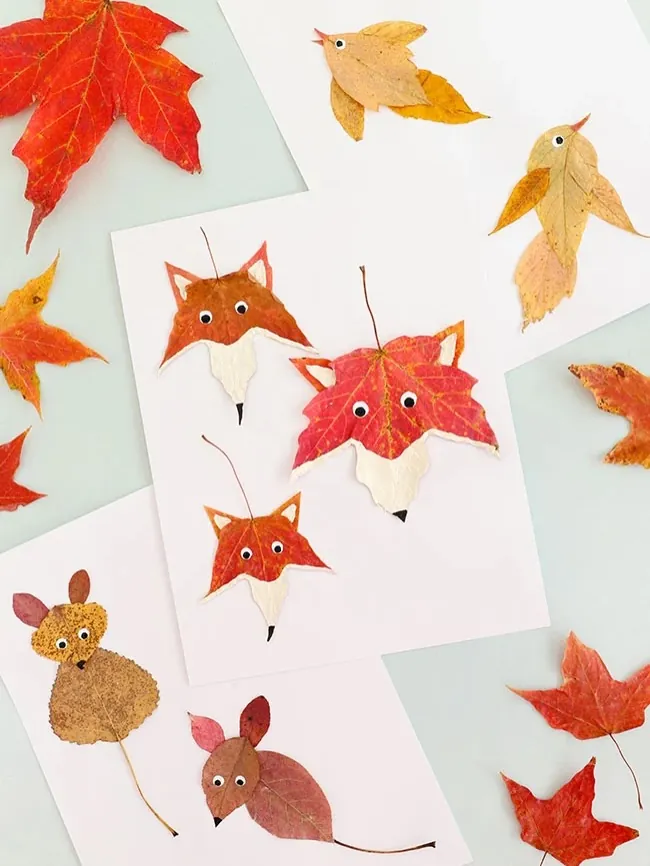
Look closely at the foxes and you’ll spot the trick. Each one is a single red or orange maple leaf turned upside down. The two side points become the cheeks, and the stem sticks up like a silly tuft on top of the head.
A pale piece tucked under each leaf makes the white muzzle, and a tiny black tip turns into the nose. Small white triangles fill in the ears, and two dot eyes finish the face.
The other cards use the same idea with new leaves:
- Birds: long yellow leaves layered for the body, wing, and tail.
- A mouse: an oval leaf body with small leaves for ears, and the stem left on as a skinny tail.
- A little bear: two round, speckled leaves stacked as the head and body.
Before anyone grabs the glue, have kids hold each leaf up and ask, “What animal does this shape remind you of?” That one question does half the design work.
| Leaf shape | It turns into |
|---|---|
| Pointy maple leaf | A fox face, with the stem as a tuft of fur |
| Long, narrow leaf | A bird body, wing, or tail |
| Oval leaf with a stem | A mouse, with the stem as its tail |
| Round leaf | A bear head or a round belly |
2. Hanging Leaf Garland on Clear Plastic Ovals
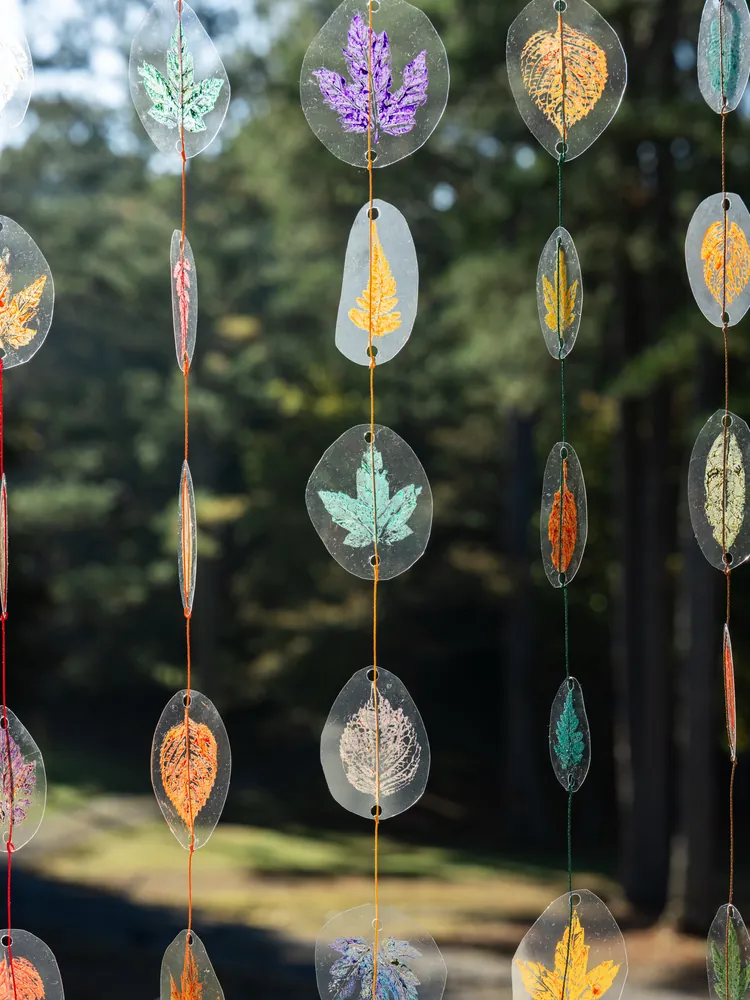
Sunlight is the secret ingredient here.
Each oval is a clear plastic piece with one leaf drawn on it in a bright color, like purple, mint, gold, or orange. Holes at the top and bottom let the pieces thread onto colored string. The strands hang like a long curtain of leaves catching the light.
For a kid friendly version at home:
- Have an adult cut ovals out of clean, clear plastic packaging, like a berry box lid.
- Slide a real leaf under the plastic and trace its outline and veins.
- Punch a hole near the top and bottom of each oval.
- Tie the ovals onto yarn, one above the other, with a small gap between each.
The colors don’t need to match nature. A purple maple leaf looks great next to a gold one, and kids love that kind of freedom. Hang the strands in a window or on a porch where a breeze can turn them.
Use paint markers or permanent markers. They grip slick plastic and stay bright.
Trace over a real leaf so the shape and veins look natural.
Washable markers. They bead up and smear on plastic.
Letting little kids cut thick plastic. Cut the ovals ahead of time.
3. Leaf Bugs That Come to Life With a Black Marker
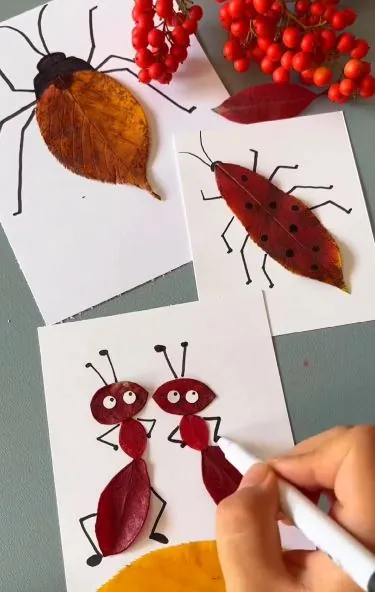
Three cards, three bugs, and almost no supplies. A brown leaf gets a drawn black head and long legs to become a beetle. A slim red leaf with black dots turns into a spotted crawler. Two tiny ants are built from small dark red leaves stacked in a row, with googly eyes on top. A cluster of bright red berries sits nearby, a nice reminder that whatever you found on the walk home is enough.
Here’s the order that works best:
- Glue the leaf down and let it set for a few minutes.
- Draw the head at the stem end with a black marker.
- Add six legs, three on each side, plus two antennae.
- Dot on spots or stripes if the leaf looks too plain.
Pick a thin marker over a thick one. The skinny legs are what make the bug look real.
A single red leaf glued flat on white card. Pretty, but it’s still just a leaf.
Six thin legs, two antennae, and a few black dots. Now it’s a bug with a name and a personality.
4. A Whole Page of Leaf Bugs, Like a Mini Field Guide
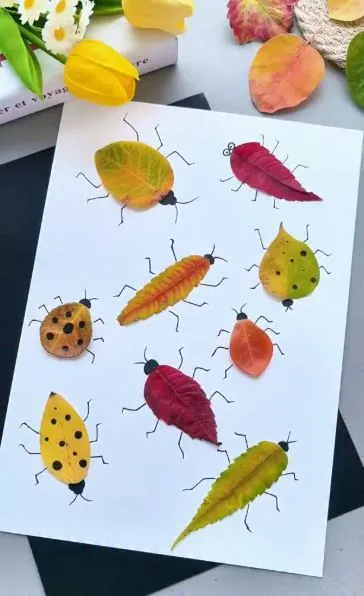
Here the bug idea grows into a full collection. Nine leaves cover one sheet, and no two match. There’s a speckled yellow ladybug with big black spots, a round brown bug, a long orange leaf with legs running down both sides, and a green and yellow leaf with a tiny black head.
Insects have six legs and two antennae. Ask kids to count on every bug. If someone draws eight legs, they just made a spider instead.
Turn the page into a little field guide. Give each bug a made up name and write it under the leaf. Then add one fun fact, like where it lives or what it likes to eat. Kids who are just learning to write get real practice, and it never feels like homework.
Lay out all the leaves before gluing so each bug has some breathing room on the page.
5. A Patchwork Butterfly Made From Many Kinds of Leaves
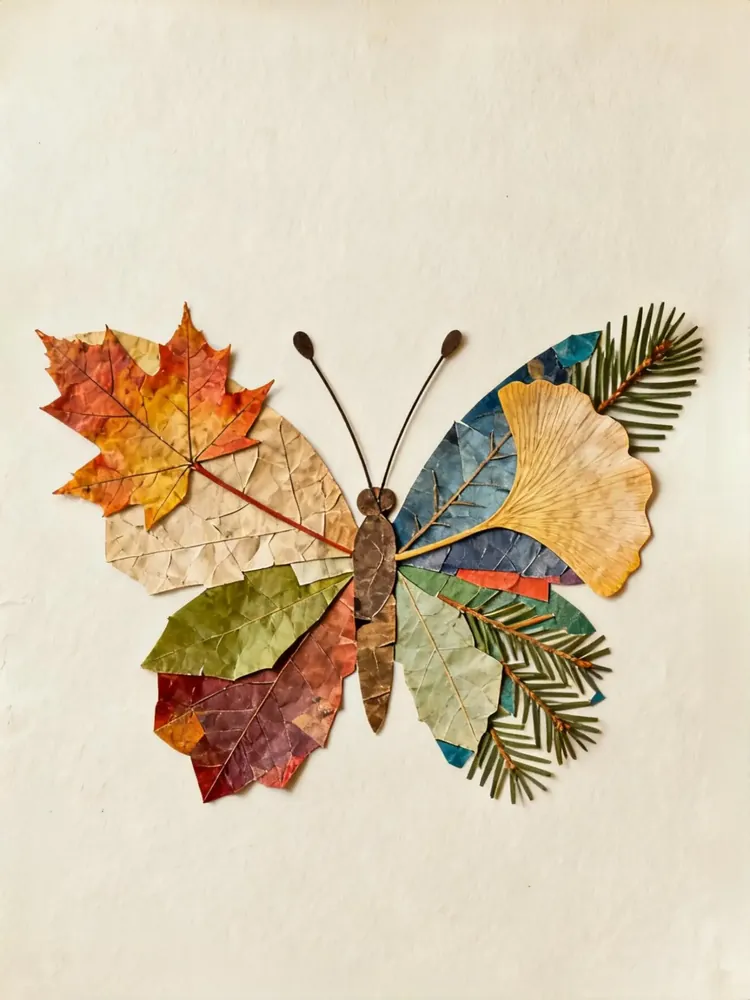
No two wings match on this butterfly, and that’s what makes it so fun to look at.
Subscribe to DIY Craft Bloom
Get updates on the latest posts and more from DIY Craft Bloom straight to your inbox.
The left side uses warm, flat leaves. A red and orange maple leaf sits on top with a pale cream leaf beside it, then a green leaf and a dark red one below.
The right side goes cooler and wilder. It has a leaf that looks brushed with blue paint, a yellow fan shaped ginkgo leaf, and sprigs of evergreen needles poking out like fringe.
Down the middle, small brown leaf pieces stack into a body, and two thin antennae with round tips curl up on top.
Fitting leaf pieces together like a puzzle takes patience, so older kids tend to enjoy this one most. Younger helpers can still join in by sorting the leaves into warm and cool piles first.
Real leaves rarely match, so mixing them on purpose looks planned instead of messy.
The veins look like wing patterns, so nobody has to draw any.
They add soft texture and a green that stays green after the other leaves fade.
6. A Floating House Lifted by Leaf Balloons
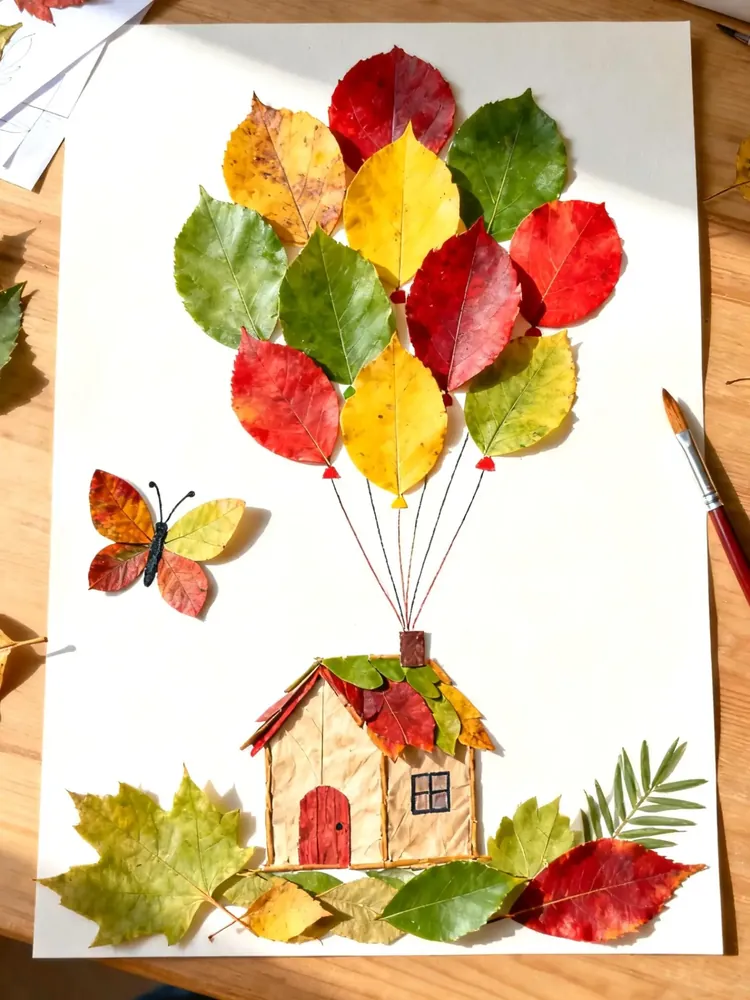
A big bunch of round leaves becomes a cluster of balloons in this sweet picture.
Red, yellow, and green leaves crowd together at the top of the page, each with a tiny drawn knot at the bottom. Thin lines run down from the knots to a little house below. The house is cut from a tan, crinkly leaf, with a leafy roof, a red door, a drawn window, and a small chimney where all the strings meet. A row of large leaves along the bottom makes the ground, and a leaf butterfly flutters off to one side.
The story is what keeps kids at the table. Ask them, “Where is this house flying to?” Most kids want to add more right away, like a cloud, a bird, or someone waving from the window.
Glue the balloons down first. That cluster sets the size of everything else on the page.
7. A Leafy Green Caterpillar for Little Hands
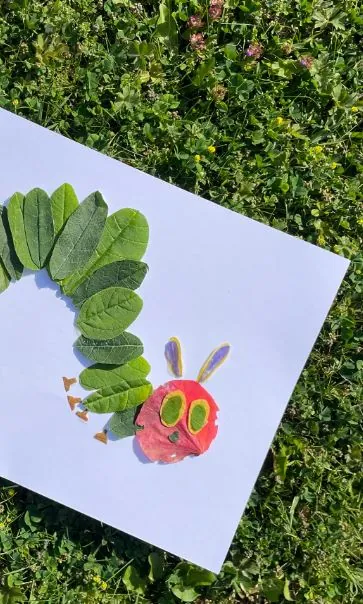
Toddlers and preschoolers can build almost all of this one on their own.
A curved line of green leaves, each one overlapping the next, makes a long caterpillar body. The head is a bright pinkish red leaf with two green leaf circles for eyes and two purple petals sticking up as antennae. Tiny brown bits along the bottom look like little feet. The whole thing sits on white card right on the grass, so it was clearly made outdoors.
Why it works so well for young kids:
- Every body piece is the same kind of leaf, so there are no tricky choices.
- Overlapping leaves in a row is a simple motion small hands can repeat.
- It pairs nicely with a caterpillar picture book at story time.
Crafting outside on a windy day? Set a small stone on each corner of the card while kids work.
8. A Leaf Parrot With a Grass Blade Tail
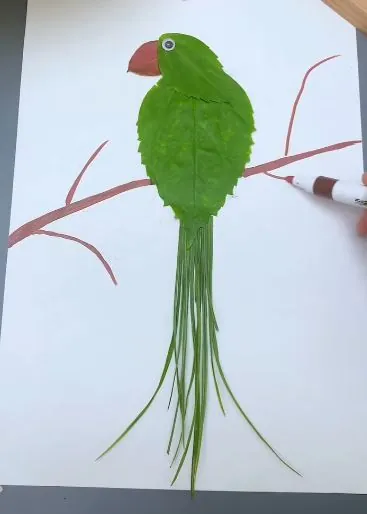
One big leaf does most of the work here. A bright green leaf with jagged edges forms the parrot’s body, and those jagged edges look a lot like ruffled feathers. A smaller green piece sits on top as the head, with a curved red beak and a single googly eye.
The tail steals the show. Long, thin blades of grass hang down in a loose bundle, much longer than the body. Then a brown marker draws the branch the parrot is perched on.
Two ways to make the tail:
- Grass blades look the most like real tail feathers and cost nothing. They can curl as they dry, so glue them flat right away.
- Thin strips cut from a long leaf stay flatter and are easier for younger kids to handle.
Draw the branch last so it runs right under the bird’s feet.
9. A Sunny Leaf Scene With a Bird, a Tree, and a Flower
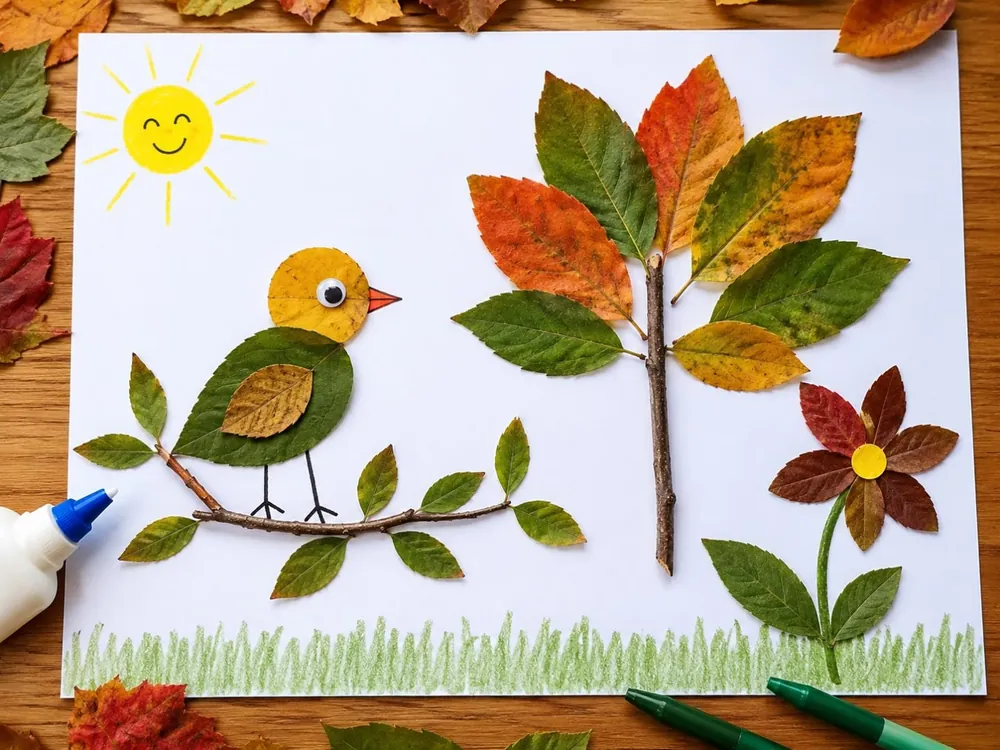
This page shows what happens when kids treat leaves like a box of art supplies.
The bird has a round yellow leaf head, a green leaf body, and a smaller tan leaf for the wing. It perches on a real twig with tiny leaves glued along it.
The tree is a straight stick with orange, green, and yellow leaves fanned out at the top.
The flower uses dark red leaves as petals around a yellow center, with green leaves along its stem.
A smiling crayon sun and a strip of crayon grass pull the whole picture together, so it feels finished instead of scattered.
Let kids start with just one of the three. They can add the others on another day, and the picture turns into a scene they keep coming back to.
10. Rainbow Leaf Sorting on Cardboard: Leaf Crafts Kids Can Do on a Walk
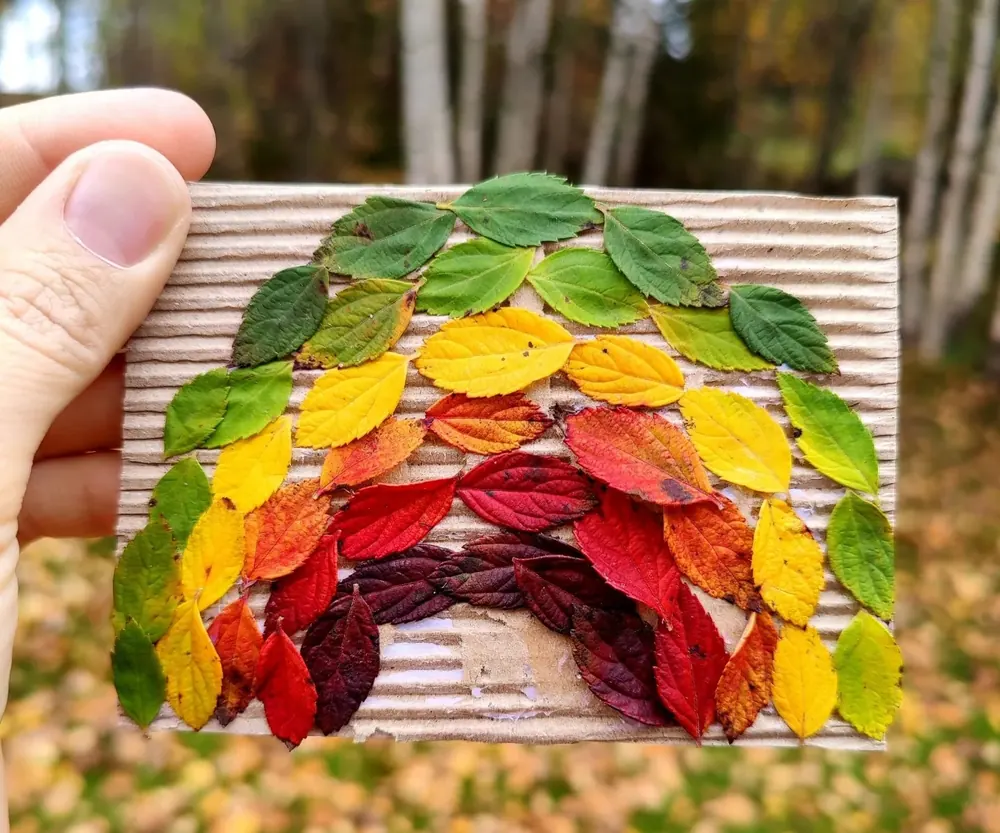
Color sorting and fall leaves make a great team in this small, bright piece.
A hand sized scrap of corrugated cardboard holds an arch of small leaves sorted by color. Green leaves form the outer ring, then yellow, then orange and red. Deep wine red leaves sit right in the center. The ridges of the cardboard peek through in the gaps, which gives it a rustic look.
How to run it on your next walk:
- Give each child a cardboard scrap with double sided tape already on it.
- Collect leaves in as many colors as you can find.
- Sort them into piles by color before sticking anything down.
- Press them on in rows, starting with the outer edge.
Small leaves make the cleanest rainbow, so check bushes and shrubs, not just big trees.
11. Leaf Crowns for a Fall King or Queen
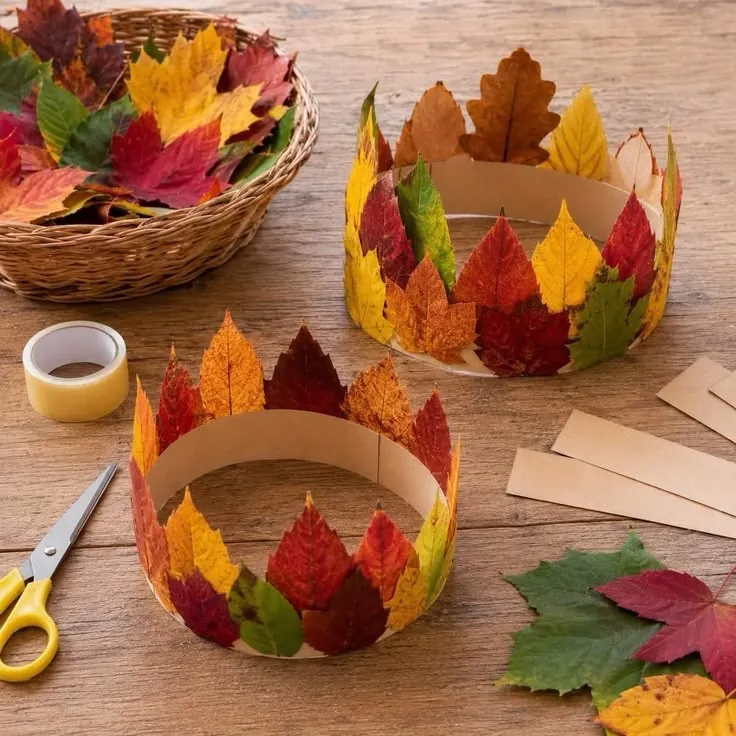
Kids don’t just make this craft. They wear it for the rest of the afternoon.
Each crown starts as a plain strip of brown kraft paper bent into a ring. Leaves are fixed along the band with their pointed tips sticking up above the top edge like crown points. Red, orange, yellow, and a few green leaves are mixed together, which keeps every row lively. On the table you can see tape, kid scissors, spare paper strips, and a basket of leaves, so the setup is about as simple as it gets.
Subscribe to DIY Craft Bloom
Get updates on the latest posts and more from DIY Craft Bloom straight to your inbox.
A few leaf tips before you start:
- Choose leaves with a pointed tip, like maple, so the crown gets real points.
- Use soft, freshly fallen leaves. Dry ones crack when the band bends.
- Spread the colors around the ring so one side isn’t all red.
Wrap a paper strip around the child’s head, add a little overlap, and mark it.
Lay the strip flat and tape the leaves on, tips pointing up, while it’s still easy to reach.
Curl the strip into a circle at your mark and tape the ends together on the inside.
12. Window Leaf Frames That Glow in Daylight
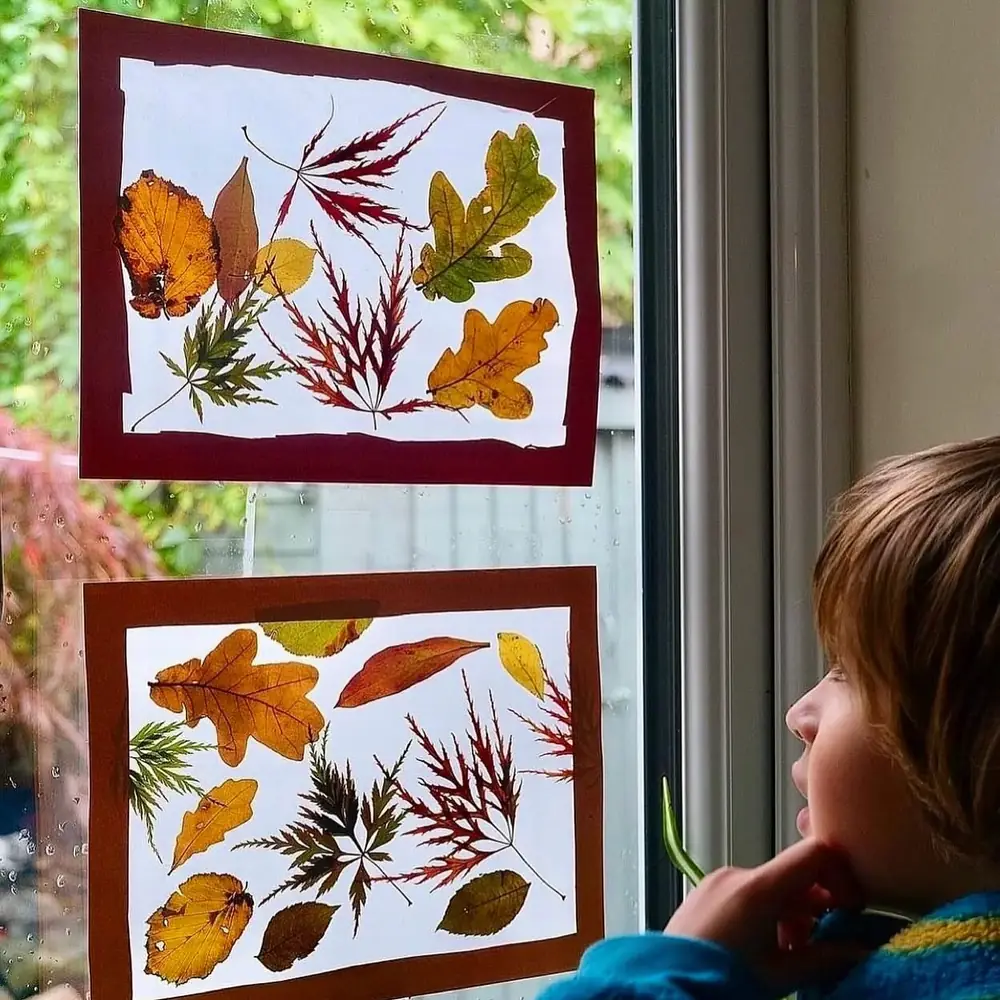
A child sits by the window in this photo, chin in hand, just looking. That says a lot about this craft. Kids make it once, then check on it every day.
Two framed panels hang on the glass. Inside each one, pressed leaves lie flat: lacy red leaves, yellow and green oak leaves, a feathery green sprig, and a few plain brown ones. The leaves look sealed under a clear layer, and a strip of dark red or brown paper borders each panel like a picture frame.
To make your own, peel a sheet of clear contact paper and lay it sticky side up. Let kids place their leaves, then cover them with a second sheet and smooth out the bubbles. Tape a paper frame around the edges and stick it to a sunny window.
Thin, lacy leaves glow the most when light comes through. Save the thick ones for other crafts.
Daylight does the decorating. The leaves glow, and the paper frame simply tells the eye where to look.
13. Round Leaf Suncatchers in Cardboard Rings
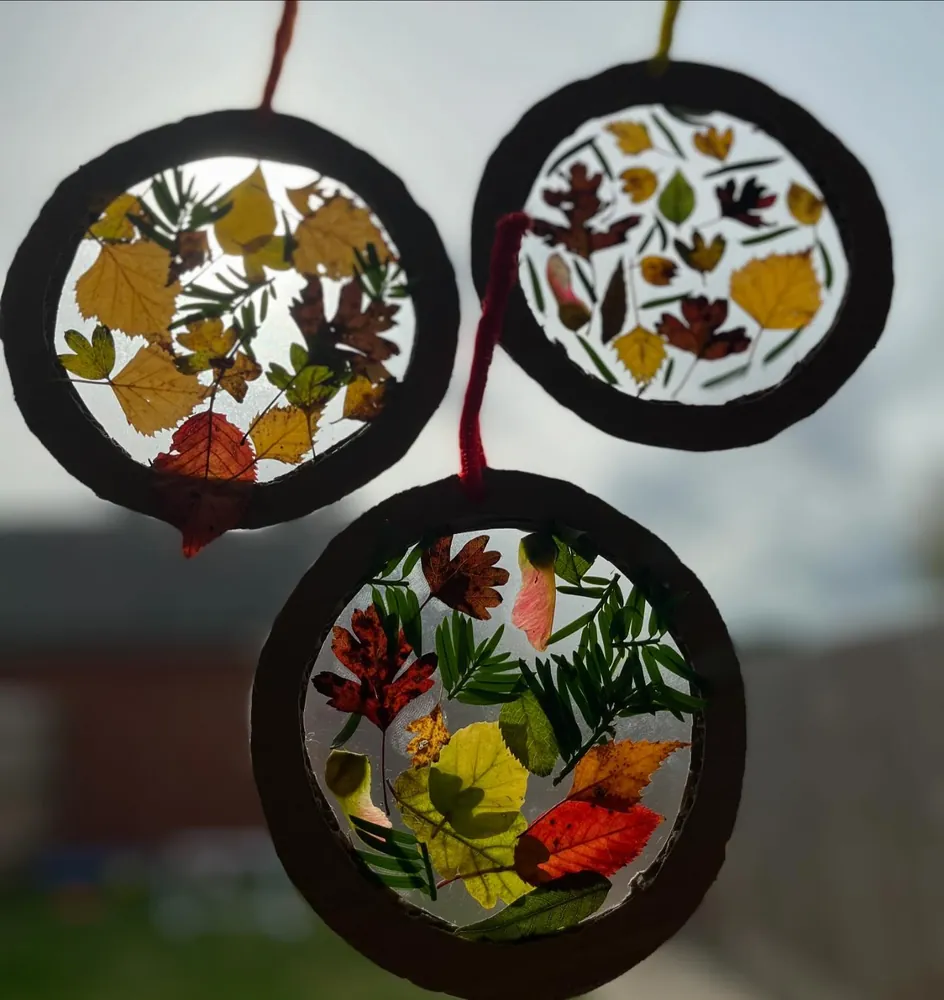
These little circles can hang just about anywhere, not only on a window.
Three dark cardboard rings hold leaves pressed behind a clear layer, and each one hangs from a fuzzy pipe cleaner loop. One ring is packed with yellow and red leaves. Another has tiny leaves spaced out with lots of open light between them. The bottom ring mixes red maples, yellow green leaves, and sprigs of evergreen needles.
What stands out is how different they look with the same supplies. The roomy one feels calm and neat. The packed ones look like a patch of forest floor.
Give each child their own ring and let them choose full or spaced out. Cut rings from a cereal box or the rim of a paper plate, then color them dark so the leaves stand out against the sky.
14. A Leaf Mosaic Jack-o’-Lantern
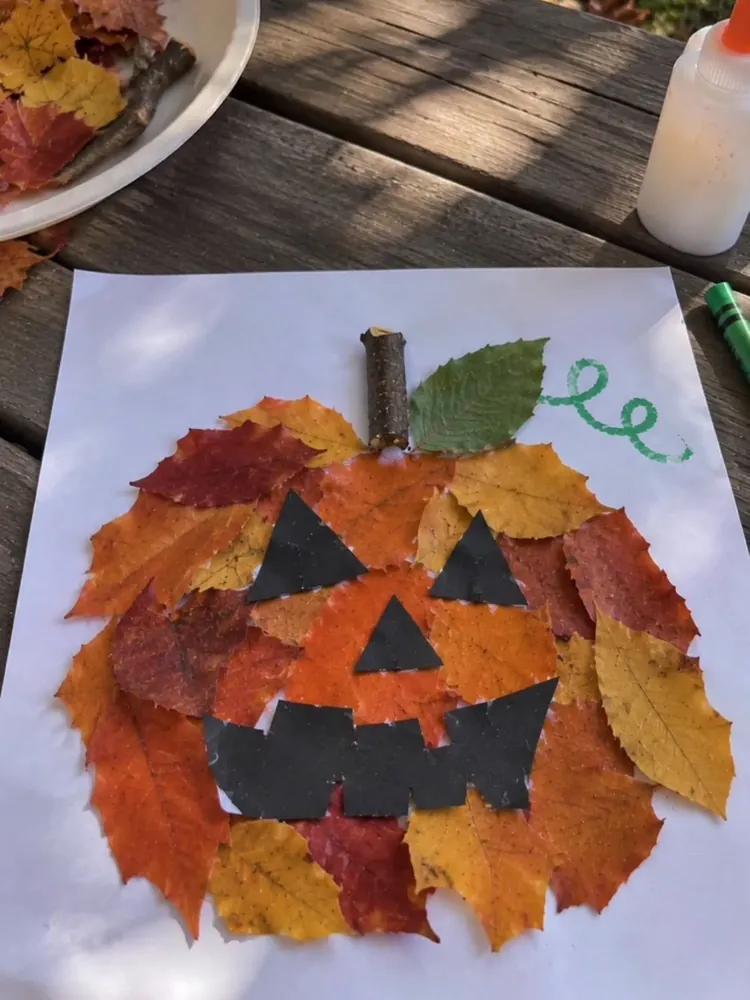
Halloween and leaf season arrive together, so this craft almost plans itself.
Orange, red, and yellow leaves overlap into a big round pumpkin on white paper. Black paper triangles make the eyes and nose, and a wide black mouth has square teeth cut into it. A short twig is the stem, a green leaf sits beside it, and a curly vine is drawn in green crayon. The glue bottle and a plate of leaves on a picnic table show it was made outside on a sunny day.
Tips to keep it tidy:
- Lightly draw a circle first so kids know where to fill.
- Start at the outside edge and work toward the middle.
- Let leaves hang past the line a little. Ragged edges look more like a real pumpkin.
For younger kids, cut the black face shapes ahead of time and let them choose the expression.
15. Standing Leaf People With Pipe Cleaner Arms and Legs
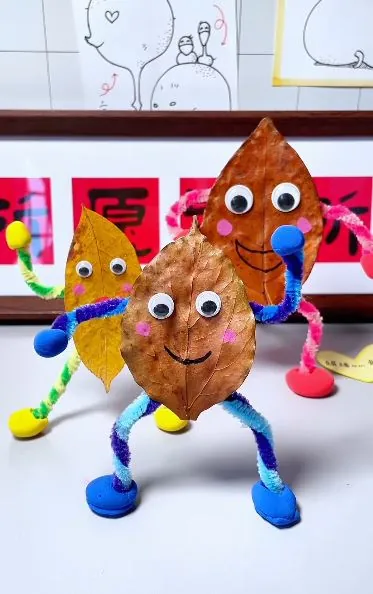
These little leaf people actually stand up on their own, which means kids can play with them once the glue dries.
Each body is a single dried leaf, two brown and one gold. Googly eyes, pink cheek dots, and a drawn smile turn each leaf into a face. Fuzzy pipe cleaners twist into bendy arms and legs, and round blobs of modeling clay make the hands and chunky shoes. Those clay shoes are the clever part. Their weight keeps each figure upright.
How they come together:
- Tape pipe cleaners to the back of the leaf, or let an adult use hot glue.
- Bend the legs so the feet point forward.
- Press a ball of clay onto each foot and flatten the bottom on the table.
- Add the face last.
Dry, stiff leaves hold their shape better than soft fresh ones here.
16. A Smiling Leaf Family Tree
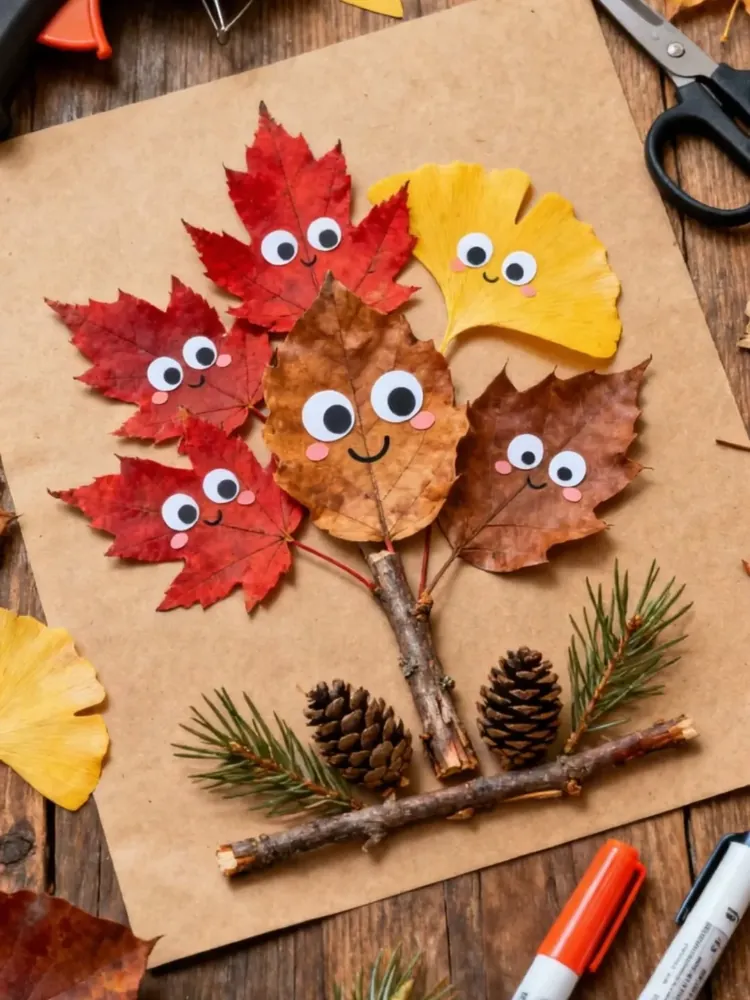
Every leaf on this tree has a face, and every face looks happy to be there.
A thick twig forms the trunk on brown kraft paper, with a second twig laid across the bottom. Three red maple leaves, a yellow ginkgo leaf, and two brown leaves fan out at the top. Each one gets round paper eyes, pink cheeks, and a little drawn smile. Pinecones and evergreen sprigs fill in around the base.
It makes a sweet family tree, with one leaf for each person in the house. The biggest leaf can be a grown up and the smallest one the baby. A few easy ways to make it personal:
Kraft paper hides glue smudges better than white paper, which is a quiet win for shaky little gluers.
17. A Fluffy Leaf Chick Made From Wavy Edged Leaves
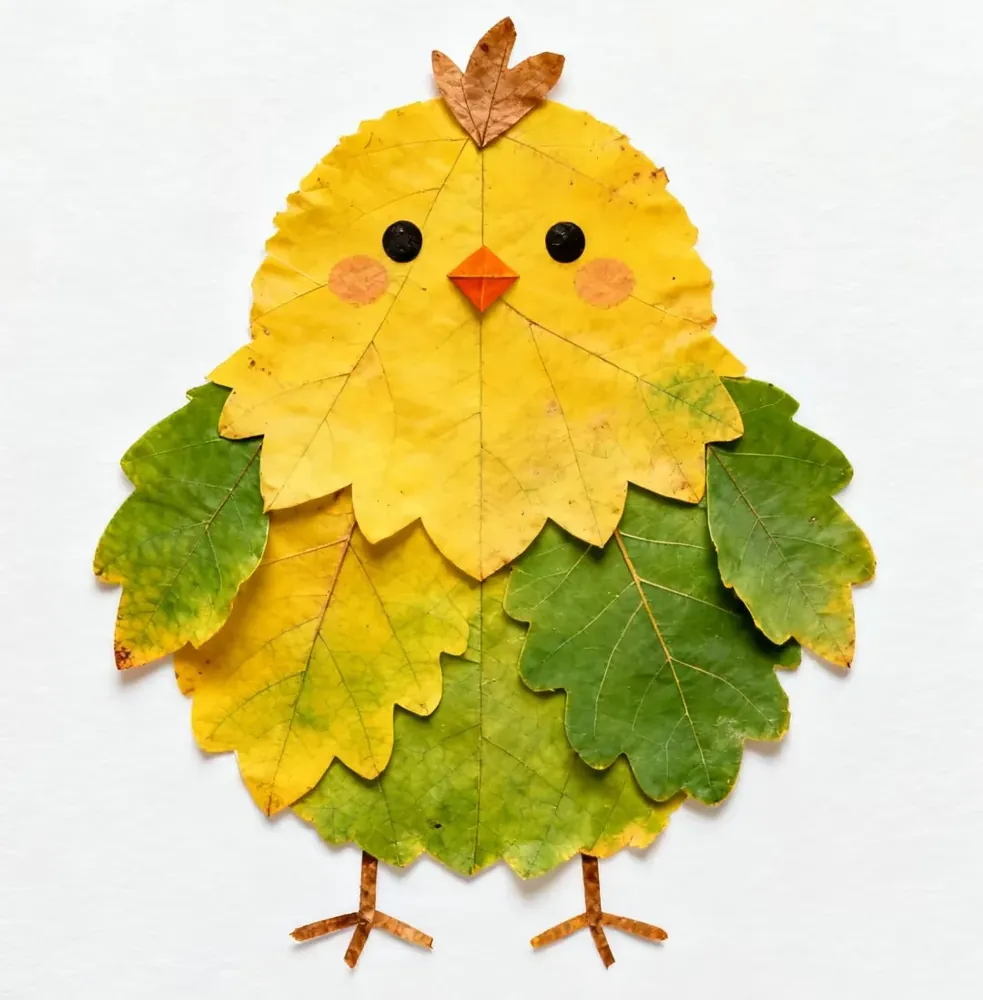
Leaves with wavy, lobed edges look a lot like fluffy feathers, and this chick proves it.
A big yellow leaf forms the head and chest, turned so its scalloped edge hangs down like a soft bib. Behind it, green and yellow green leaves overlap to make the round lower body and two wings sticking out at the sides. A small brown leaf sits on top as a tuft, and thin brown leaf strips become the feet.
The face stays tiny and simple: two black dots, an orange paper beak, and soft peach cheeks.
Leaf jobs to hand out when siblings craft together:
- One child finds the big yellow leaf for the head.
- Another collects green leaves for the wings.
- Someone hunts for a crunchy brown leaf to cut into feet.
Everyone has a job, and nobody fights over the glue.
Let the leaf’s own edge be the feathers. Pick wavy leaves and you’ll barely need scissors.