17 DIY Bookmark Ideas for Beginners

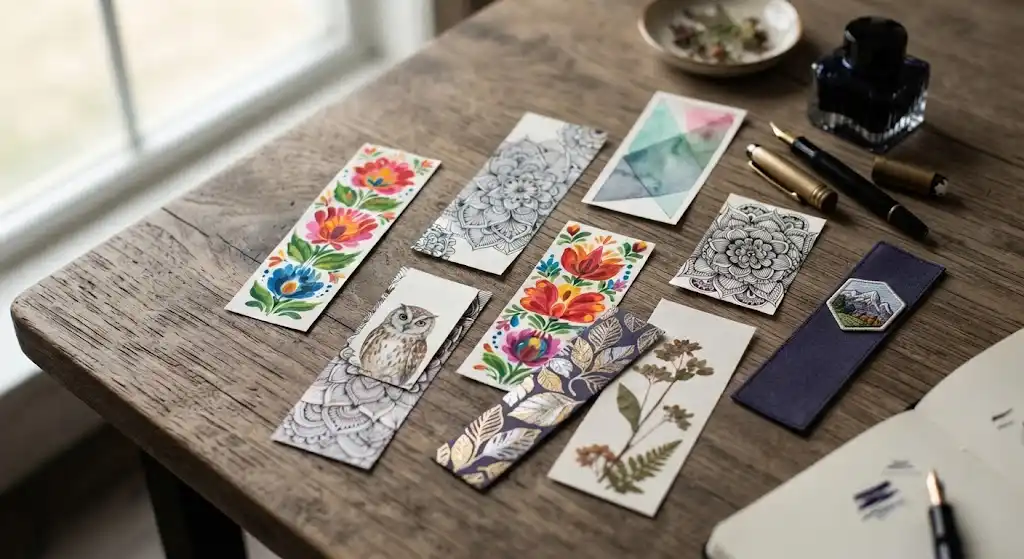
There is something uniquely special about holding a physical book and turning its pages.
Enhancing that reading experience with a handmade bookmark brings an extra touch of personal charm and creativity.
Whether you are an avid reader or a passionate crafter looking for your next quick weekend project, DIY bookmarks offer endless possibilities.
From vibrant painted folk art on textured paper to intricate zentangle ink patterns, these miniature creations are both practical tools and stunning works of art.
Explore these simple, step-by-step designs to find inspiration for your next crafting session.
17 DIY Bookmark Ideas for Beginners
1. Simple Quilled Florals on Textured Cardstock
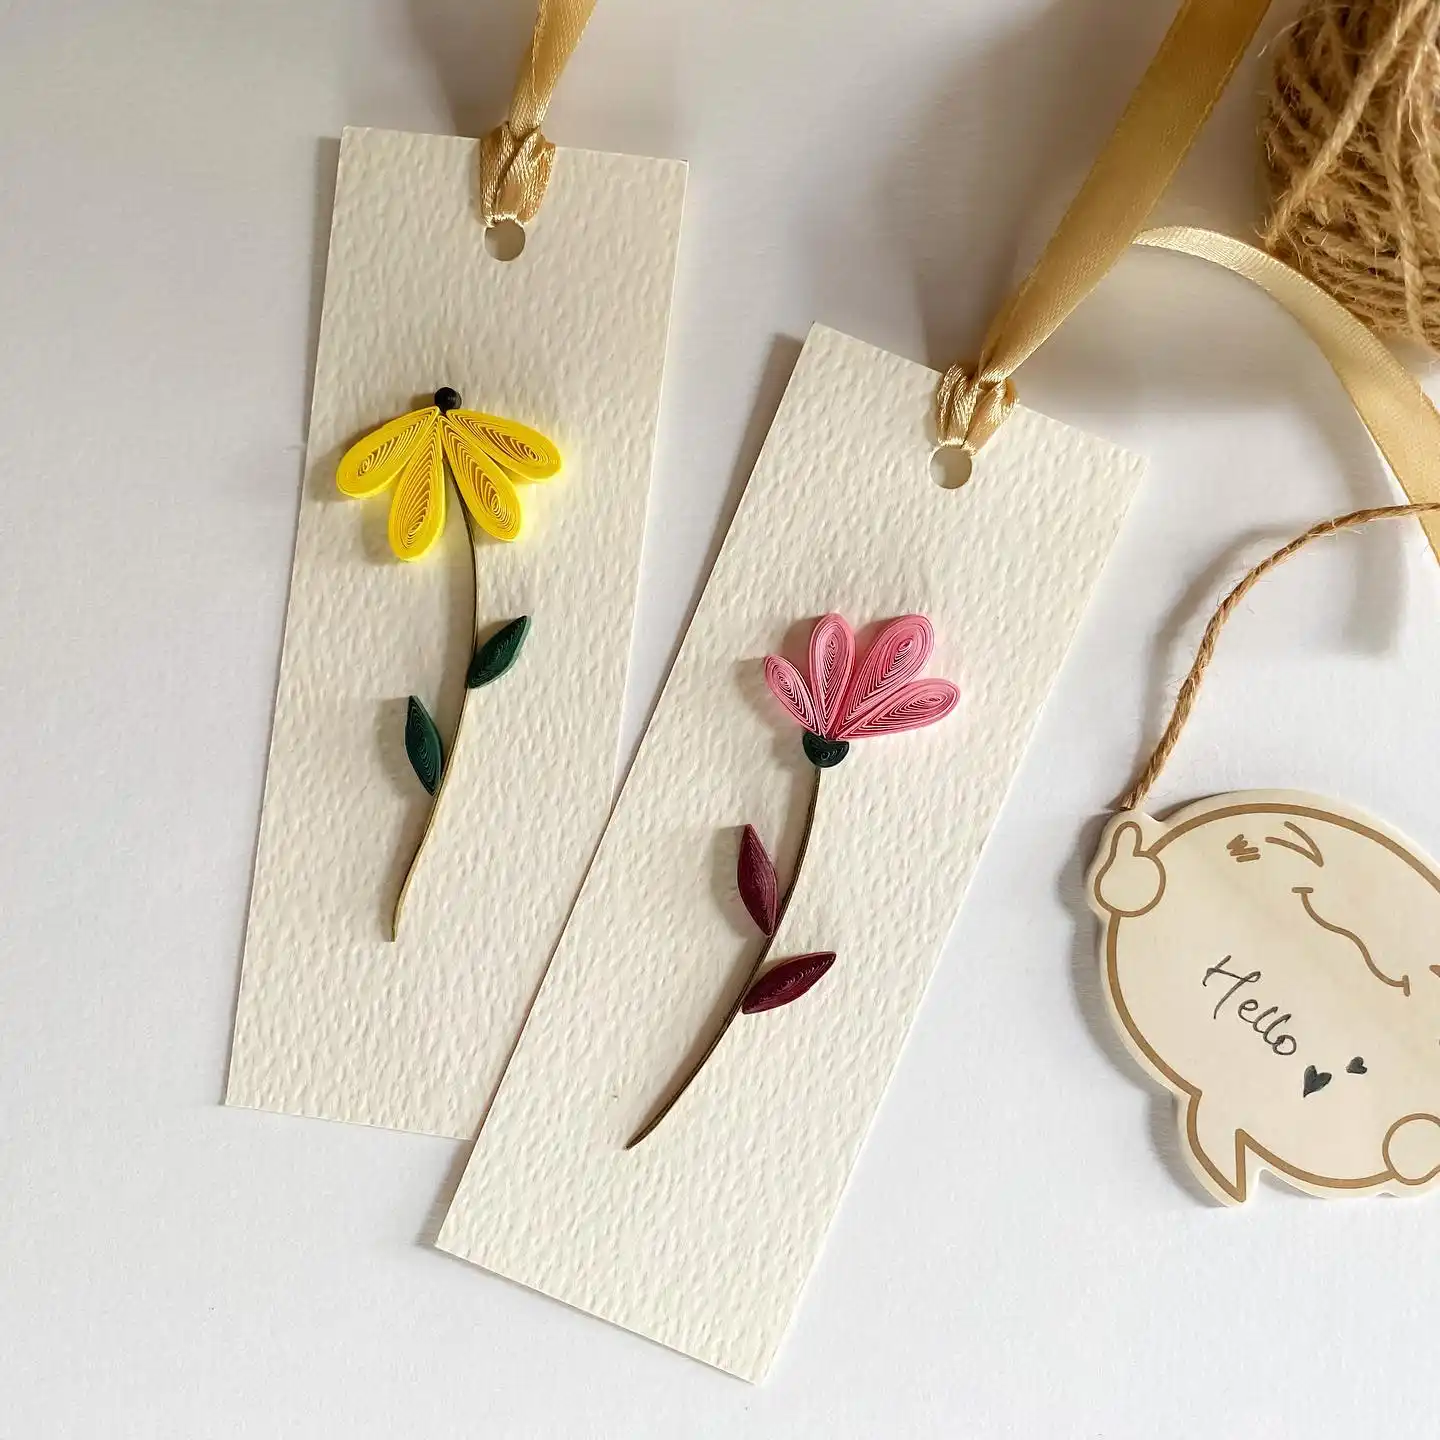
Paper quilling transforms flat paper strips into beautiful 3D shapes, and it is a perfect technique for bookmark art.
In this example, rolling simple teardrop shapes creates delicate petals and leaves, which are then glued to a sturdy backing to form minimalistic stems.
The smartest design choice here is not just the neat quilled coils—it is the base material.
Using a thick, heavily textured paper (similar to cold-pressed watercolor paper) instead of standard smooth cardstock instantly elevates the final piece.
The tactile background contrasts beautifully with the smooth, bright quilling strips, making the bookmark feel more like a premium boutique gift than a basic weekend craft.
Punching a single hole and threading a soft gold ribbon finishes the elegant look without distracting from the paper art.
Heavy, cold-pressed paper provides a tactile canvas that highlights the smooth 3D quilling strips.
Pinching simple rolled coils at one end naturally forms beginner-friendly petals and leaves.
Using a soft gold ribbon matches the elegance of the design without overpowering the delicate florals.
2. Blended Gradients and Black Silhouettes
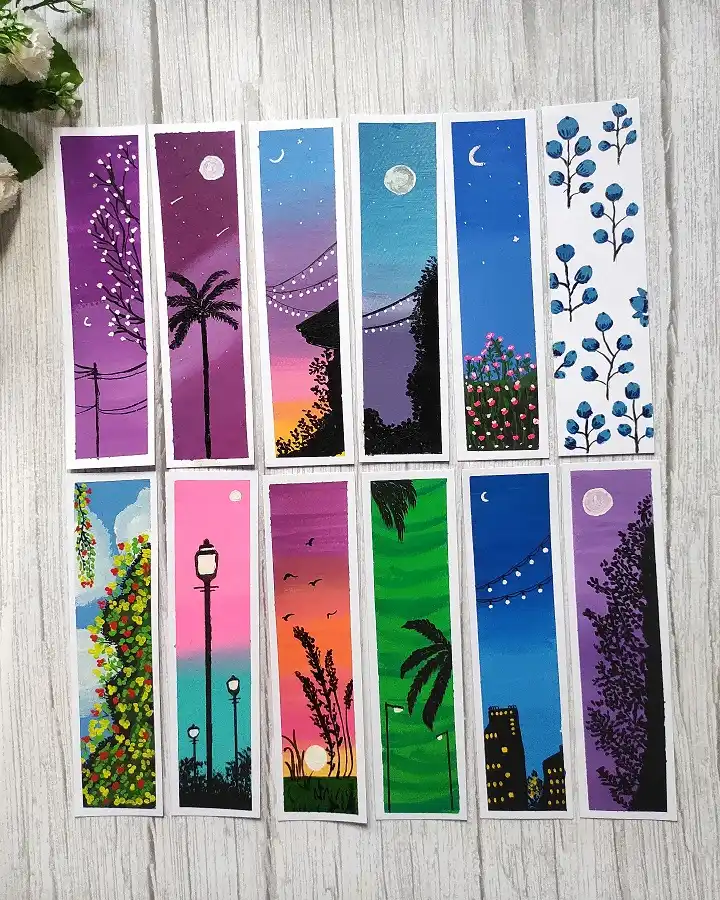
Alcohol markers excel at creating seamless color transitions, making them ideal for vivid mini landscapes.
The striking contrast in this collection comes from layering solid black silhouettes—like palm trees, telephone wires, and cityscapes—directly over richly blended sunset or night sky backgrounds.
A stark white border naturally frames each scene, giving the finished piece a polished, print-like quality.
To finish the look, opaque white gel pens are perfect for dotting in crisp stars, crescent moons, and draped string lights.
Tape down the edges with low-tack painter’s tape to get that crisp, clean white frame.
Wait until the marker gradient is 100% dry before adding the sharp black silhouettes.
Skip standard printer paper, which will pill and bleed under heavy marker blending.
Don’t rush the white gel pen details; applying them over wet ink causes the white to turn muddy.
3. Detailed Mini Paintings on Heavy Canvas
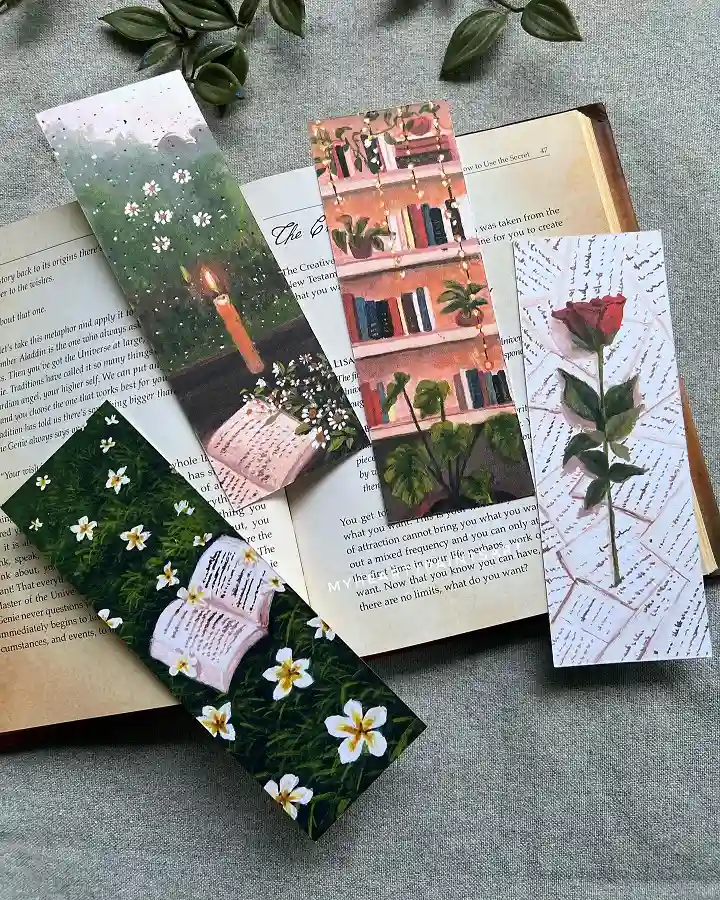
Treating a bookmark like a miniature canvas opens up a whole new level of detail.
These cozy scenes—featuring everything from a candlelit reading session in the grass to a trailing plant on a bookshelf—rely on opaque mediums like acrylic or gouache rather than sheer watercolors.
Working with opaque paint is forgiving. You can block in a deep, moody background first, let it dry, and then come back in with a fine liner brush to paint the delicate white daisies, the individual pages of an open book, or the tiny script on scattered envelopes.
Notice how the themes lean heavily into cottagecore and dark academia aesthetics.
Matching the painted scene to the genre of the books you love to read makes the final piece feel incredibly personal.
Opaque paints allow you to layer bright, crisp details—like a glowing yellow candle halo or white petals—directly over dark backgrounds without the colors turning muddy.
4. Sewn Vintage Florals with Typewriter Quotes
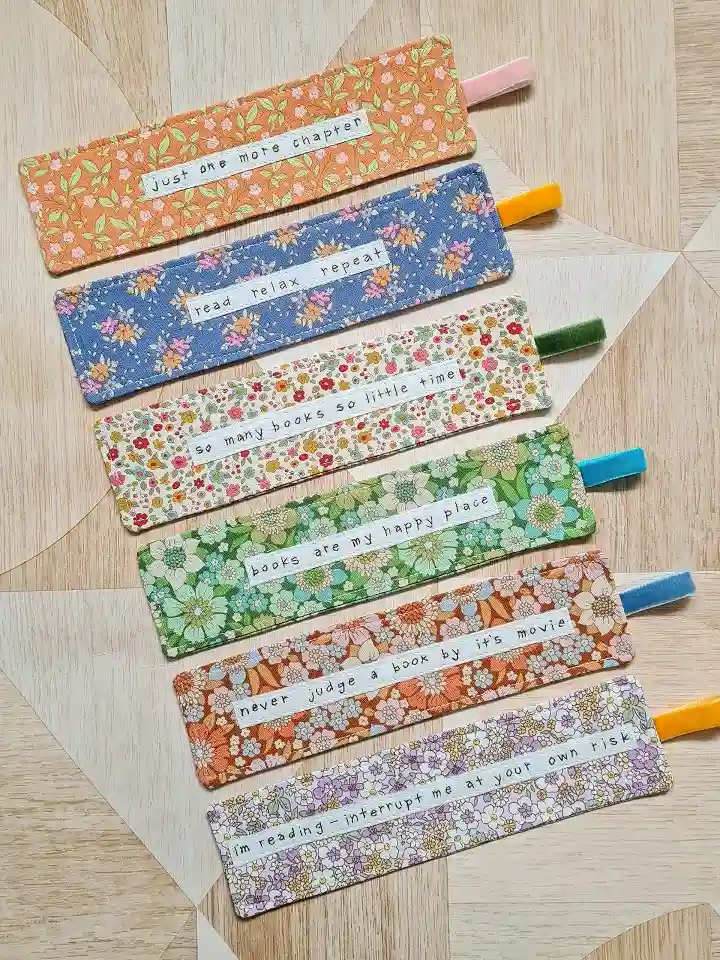
Scraps of vintage-inspired floral cotton find a perfect second life in this sewing project. The charm here comes from the contrasting textures.
A simple perimeter stitch gives the fabric structure, while a folded loop of plush velvet or smooth satin ribbon peeks out from the top seam, adding a tactile pop of solid color.
To keep the busy botanical patterns from swallowing the design, each bookmark features a stark white strip right in the center.
Stamping a cheeky reading quote (“just one more chapter,” “read relax repeat”) in a distressed typewriter font gives the whole piece a personalized, handmade, and slightly nostalgic feel.
5. Layered Scrapbook Collages on Notebook Backgrounds
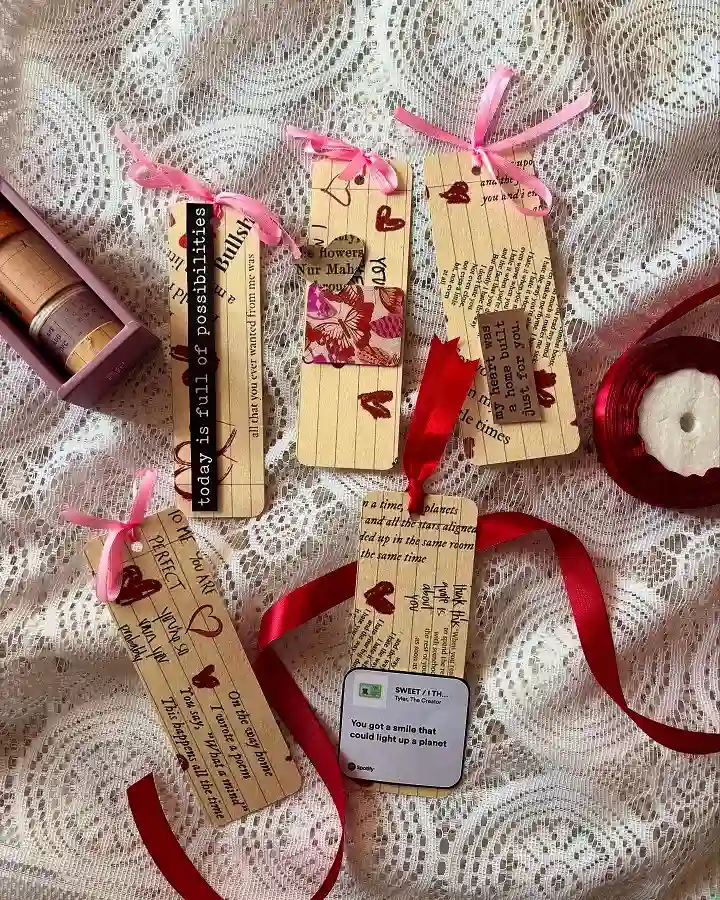
If you have a stash of leftover journaling supplies, this mixed-media approach is the perfect way to use them up.
Instead of starting with a blank white canvas, these bookmarks use a faux lined notebook paper background already covered in faint typewriter script.
Subscribe to DIY Craft Bloom
Get updates on the latest posts and more from DIY Craft Bloom straight to your inbox.
This clever choice instantly removes the pressure of having to fill every inch of empty space.
From there, the design is all about stacking contrasting textures. A glossy song lyric sticker, a rough kraft paper punch-out, and a rigid, embossed label-maker strip all sit together beautifully because the muted, uniform background anchors them.
Finishing the collage with a few sketchy, hand-drawn red hearts makes the whole piece feel wonderfully imperfect and heavily personalized.
6. Textured Crochet Bookmarks with Matching Tassels
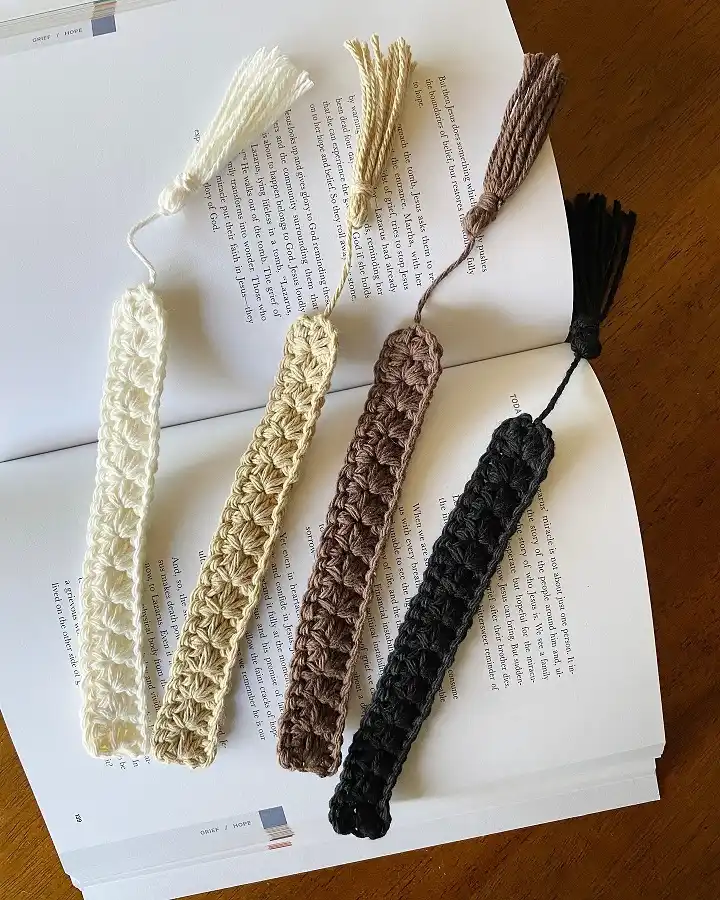
For crocheters looking for a fast, satisfying stash-buster project, minimalist bookmark strips hit the sweet spot.
Using a textured stitch—such as the star stitch, puff stitch, or a dense bean stitch—creates a rich, tactile surface that feels wonderful in the hand without adding bulky thickness to your book spine.
The key to keeping these bookmarks functional rather than cumbersome is choosing the right yarn weight.
Fingering or lightweight sport cotton yarn works best, as it stays flat between pages.
Attaching a simple matching tassel at the top via a delicate cord ties the whole monochromatic look together while making it easy to spot your page from across the room.
7. Beginner-Friendly Watercolor Washes and Book Signposts
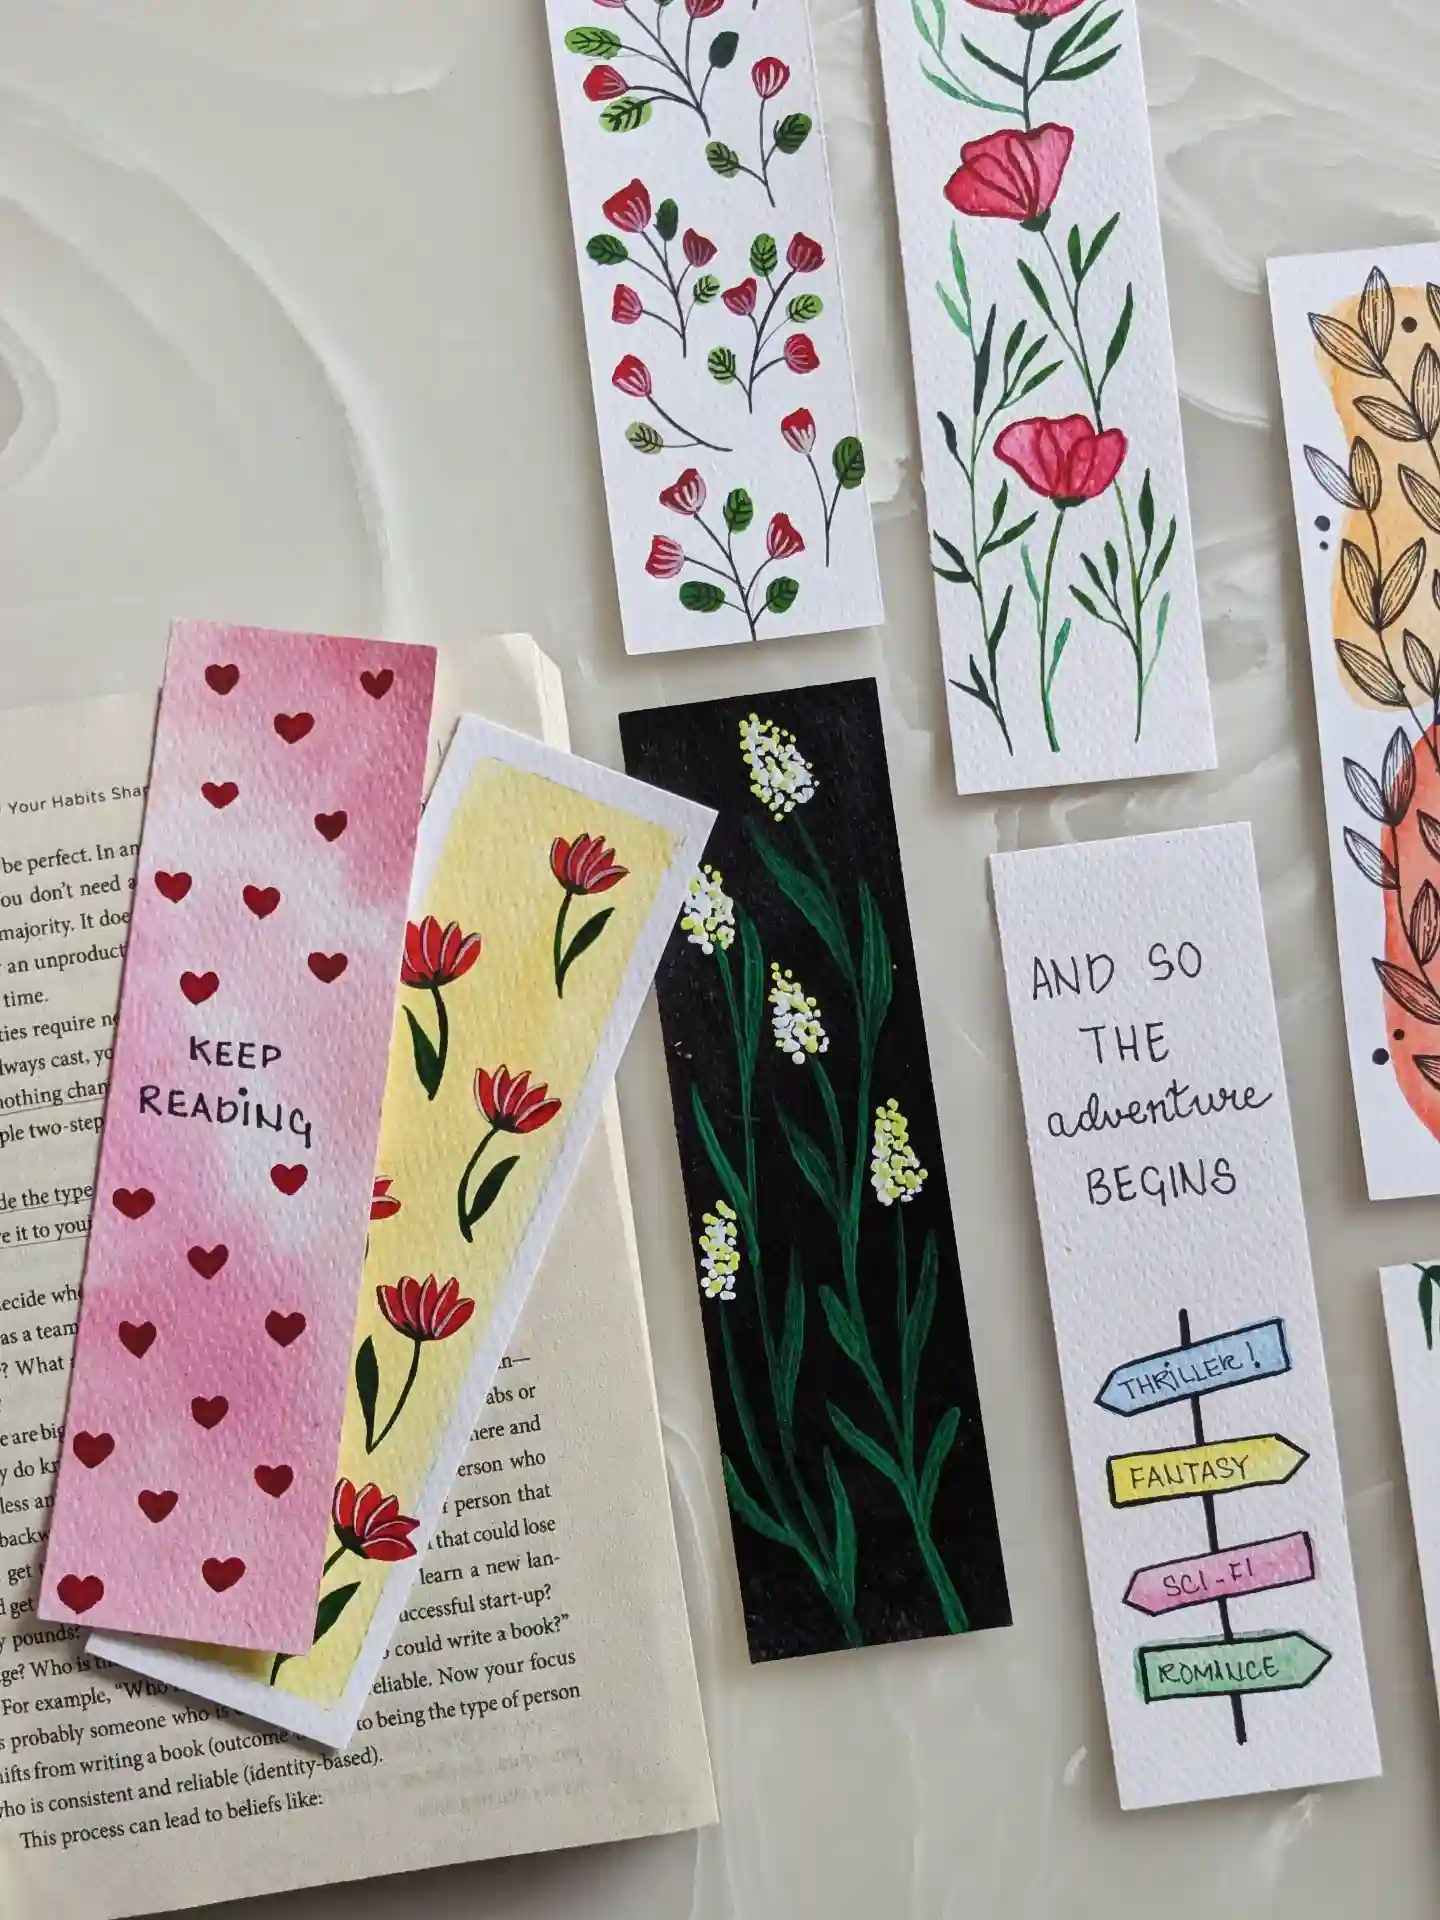
Watercolor painting can feel intimidating, but bookmark strips provide the ultimate low-pressure canvas to practice simple techniques.
Because each strip is narrow, you can experiment with quick wet-on-wet background washes—like a soft pink gradient dotted with tiny hand-painted hearts—without worrying about composition overload.
Another playful idea shown here is the reading signpost bookmark, featuring hand-lettered directional arrows pointing to favorite genres like fantasy, thriller, and romance.
Pairing loose floral stems with whimsical typography makes these beginner pieces look charmingly artisanal rather than overly polished.
Always tape down your watercolor paper edges with low-tack tape to prevent buckling and ensure clean, sharp borders once dry.
8. Mixed-Media Affirmations and Zodiac Themes
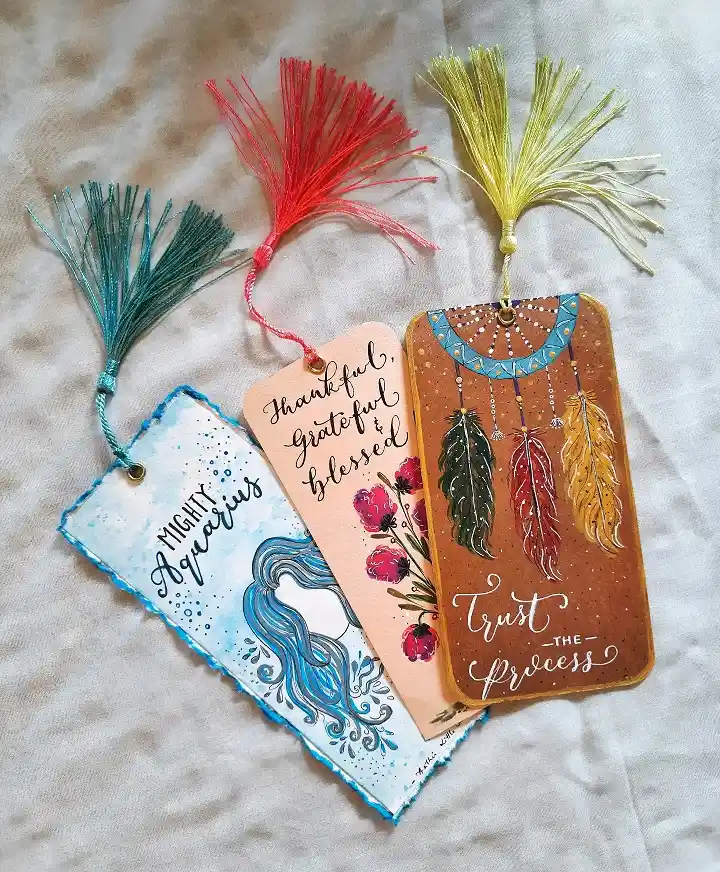
These bookmarks are a masterclass in blending different artistic styles on a single strip of paper.
Whether it is a soft, dreamy watercolor wash for a zodiac theme, delicate floral paintings paired with crisp calligraphy, or bold boho-inspired line art featuring dreamcatchers, variety is the name of the game here.
The common thread binding these disparate designs together is the use of high-quality embroidery floss tassels and gold-tone metal eyelets.
Adding hardware not only prevents the cardstock from tearing but also elevates these paper crafts into something that feels boutique and professionally finished.
The Hardware Advantage
Don’t skip the metal eyelets! Punching a hole directly into cardstock can weaken it over time, especially with the weight of a tassel. A simple eyelet protects the hole and makes the bookmark look polished and intentional.
9. Modern Minimalist Printables with Bookish Quotes
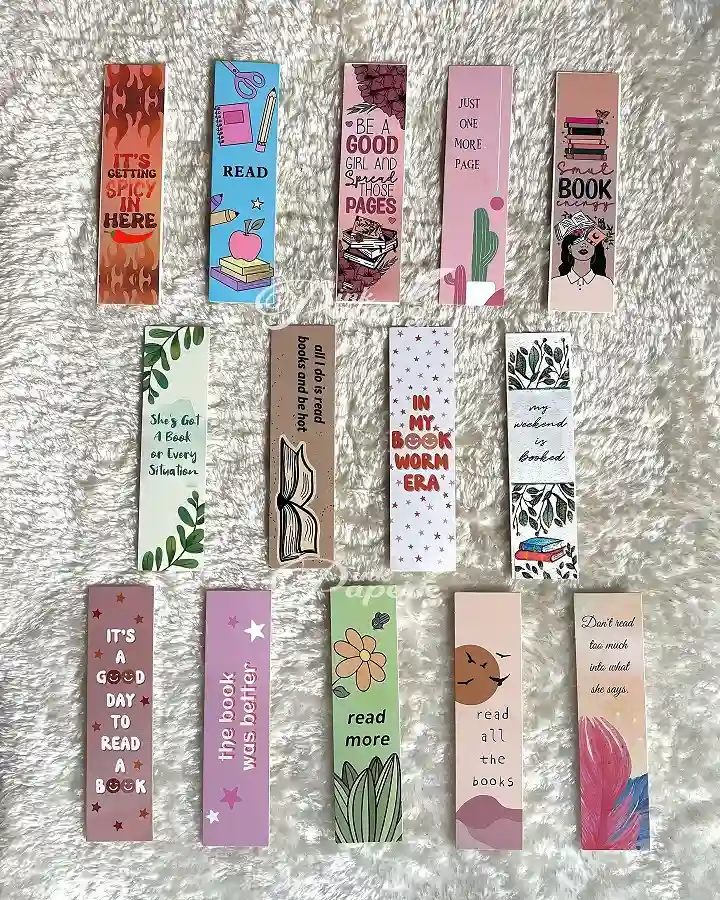
For a quick and budget-friendly crafting session, digital print-and-cut bookmark sheets are absolute game-changers.
Featuring a mix of pastel gradients, minimalist line art, and trendy bookish humor—like “It’s getting spicy in here,” “In my bookworm era,” and “The book was better”—these designs perfectly capture contemporary reader culture.
The beauty of this style is how accessible it is. You don’t need advanced painting or sewing skills; just arrange your favorite typography and graphics in a layout program, print on heavy cardstock, and run them through a home laminator to lock in that crisp, professional finish.
Running printed cardstock through a personal thermal laminator before cutting completely seals the paper edges, protecting your bookmarks from water spills and bent corners.
10. Hand-Embroidered Felt Bookmarks with Matching Tassels
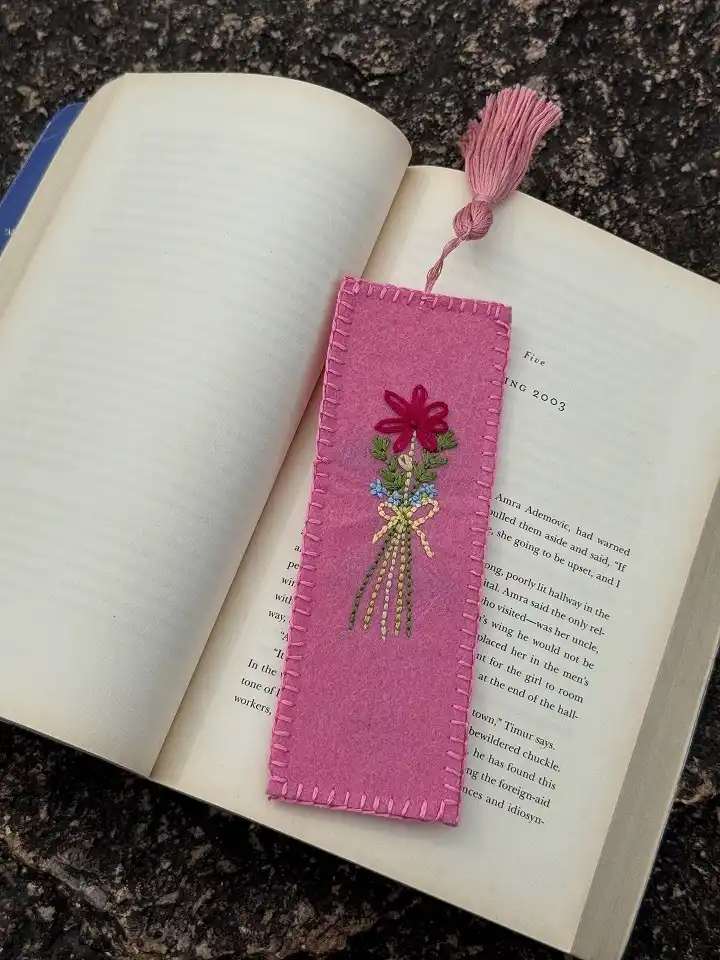
Combining textile crafts with delicate needlework creates bookmarks that feel like genuine heirlooms.
This design features a bright pink felt base edged with neat, visible blanket stitching that frames the entire piece.
The centerpiece is a charming hand-embroidered bouquet of wildflowers, complete with French knots, textured stems, and a tiny stitched bow.
A matching dusty rose tassel attached by a thin cord finishes off the piece, giving it a cozy, tactile feel that book lovers will adore tucking into their favorite novels.
Choosing the Right Felt
Opt for a wool-blend felt rather than cheap craft acrylic felt. Wool-blend holds its shape better, doesn’t pill over time, and provides a much sturdier foundation for detailed embroidery stitches.
11. Stitched Embroidery on Heavy Paper Bookmarks
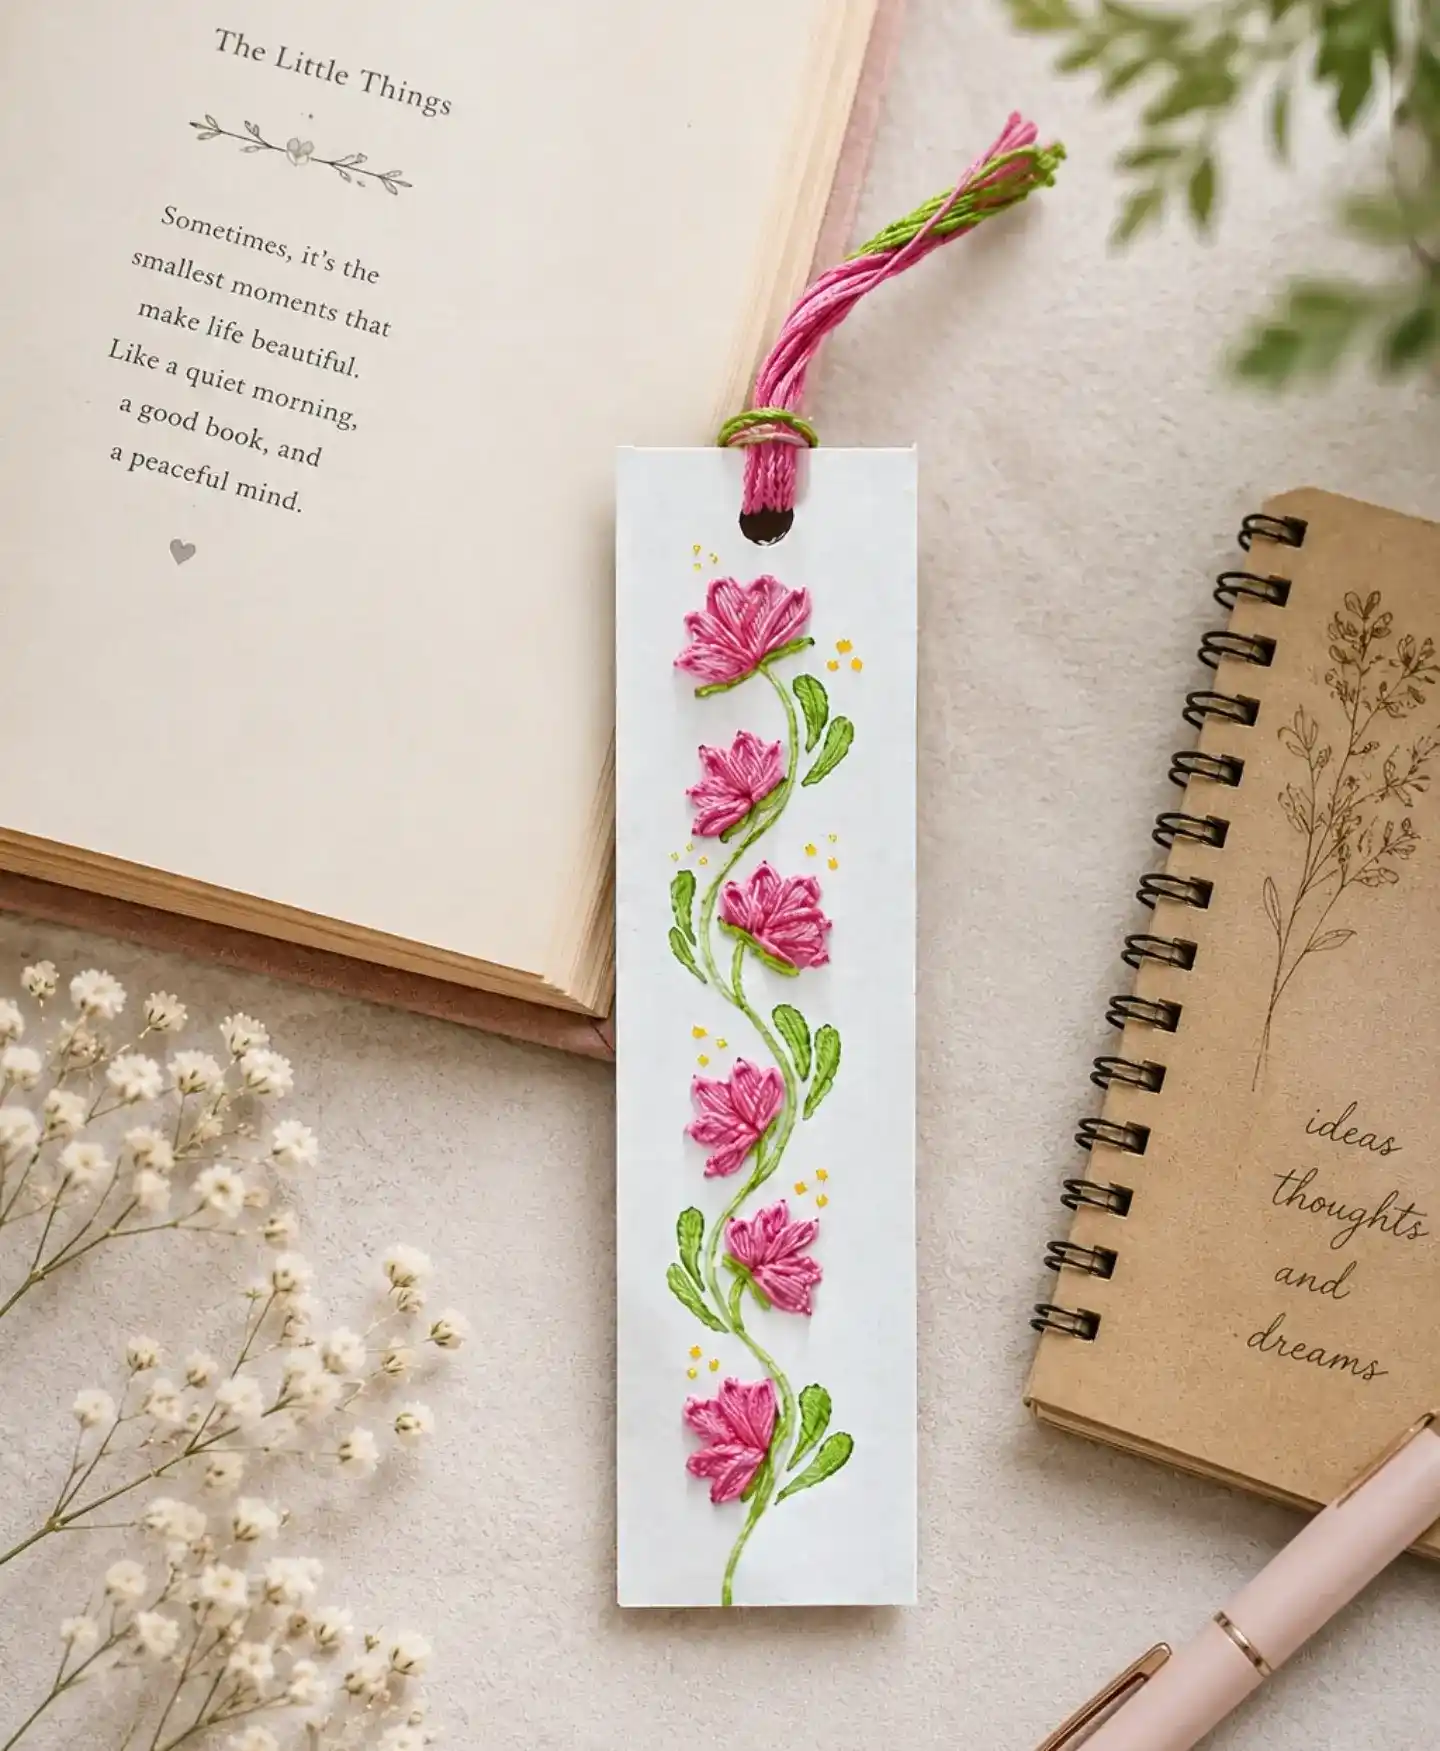
Taking thread art in a completely different direction, this design features intricate floral embroidery stitched directly through a thick sheet of cardstock or watercolor paper.
The delicate vine of vibrant pink blossoms and textured green leaves demonstrates how beautifully fiber and paper can combine without buckling the backing.
To finish the piece, a loop of contrasting pink and green embroidery thread wraps through the punched top hole, doubling as both a decorative accent and a functional ribbon pull.
It is a stunning project that bridges the gap between traditional papercraft and needlework.
Piercing Paper for Stitching
Use a sharp tapestry needle or a piercing tool with a cork mat underneath to pre-punch your pattern holes before sewing. This prevents the heavy cardstock from tearing or warping under tension.
12. Minimalist Ink Doodles and Watercolor Silhouettes
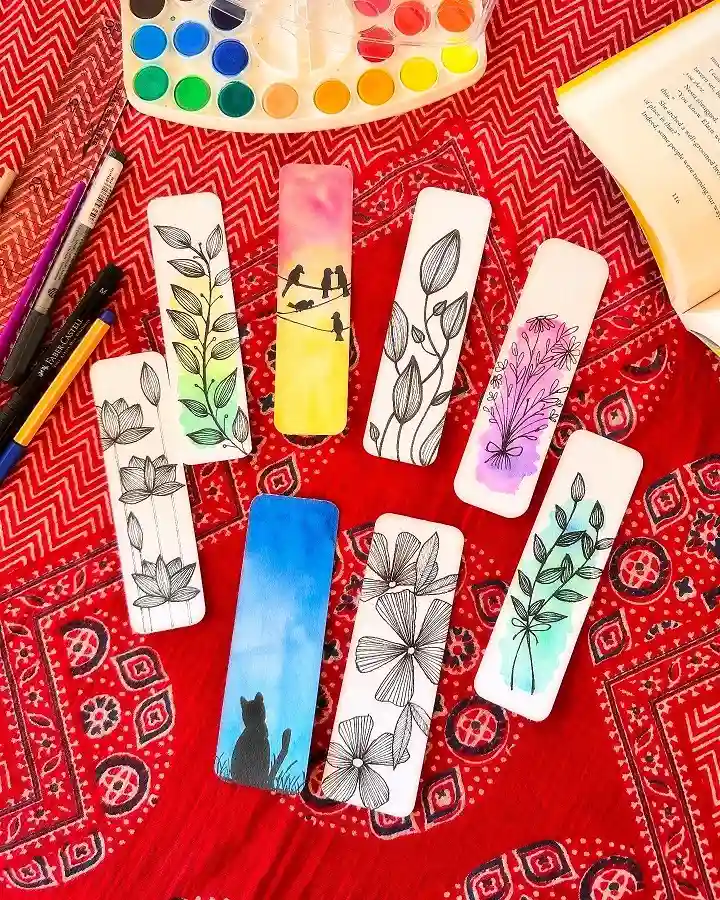
If you love clean lines paired with artistic expression, this style strikes the ultimate balance.
Using crisp white cardstock as the base, these bookmarks combine delicate black fine-liner botanical illustrations with vibrant pops of watercolor—ranging from bright blue washes featuring a silhouetted cat to warm sunset gradients dotted with birds on a wire.
Subscribe to DIY Craft Bloom
Get updates on the latest posts and more from DIY Craft Bloom straight to your inbox.
The secret to this look is letting your watercolor washes dry completely before drawing over them with a waterproof black ink pen.
This prevents any bleeding and keeps your silhouettes and leaf veins looking razor-sharp and professional.
Pro-Tip Title Here
Yahan apni main tip likhein. Is design mein dark mode ka istemal kiya gaya hai jo text ko highlight karta hai aur padhne mein bohot professional lagta hai.
13. Intricate Mandala Patterns on Craft Paper
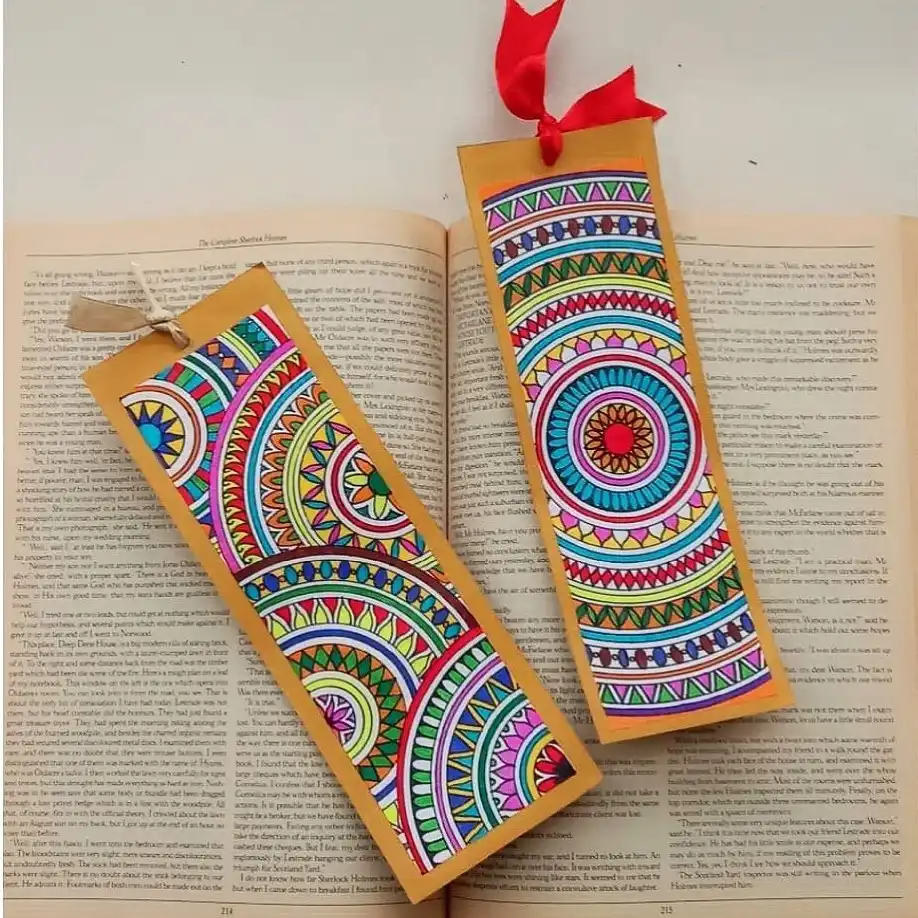
If you find coloring and geometric drawing relaxing, this style is an absolute joy to create.
Using a sturdy brown craft paper base creates a warm, rustic backdrop that makes vibrant neon and pastel markers pop with incredible contrast.
By layering concentric circles, intricate semicircles, and symmetrical mandala patterns, you turn a simple strip of paper into a stunning piece of meditative art.
Finishing the top with a neat satin ribbon loop completes the look, making it a wonderful gift for any avid reader.
Intricate Mandala Patterns on Craft Paper
Drawing complex circular mandalas and geometric arches on a sturdy brown craft paper base makes vibrant marker colors pop with incredible contrast, creating a deeply meditative piece.
14. Abstract Botanical Line Art Bookmarks
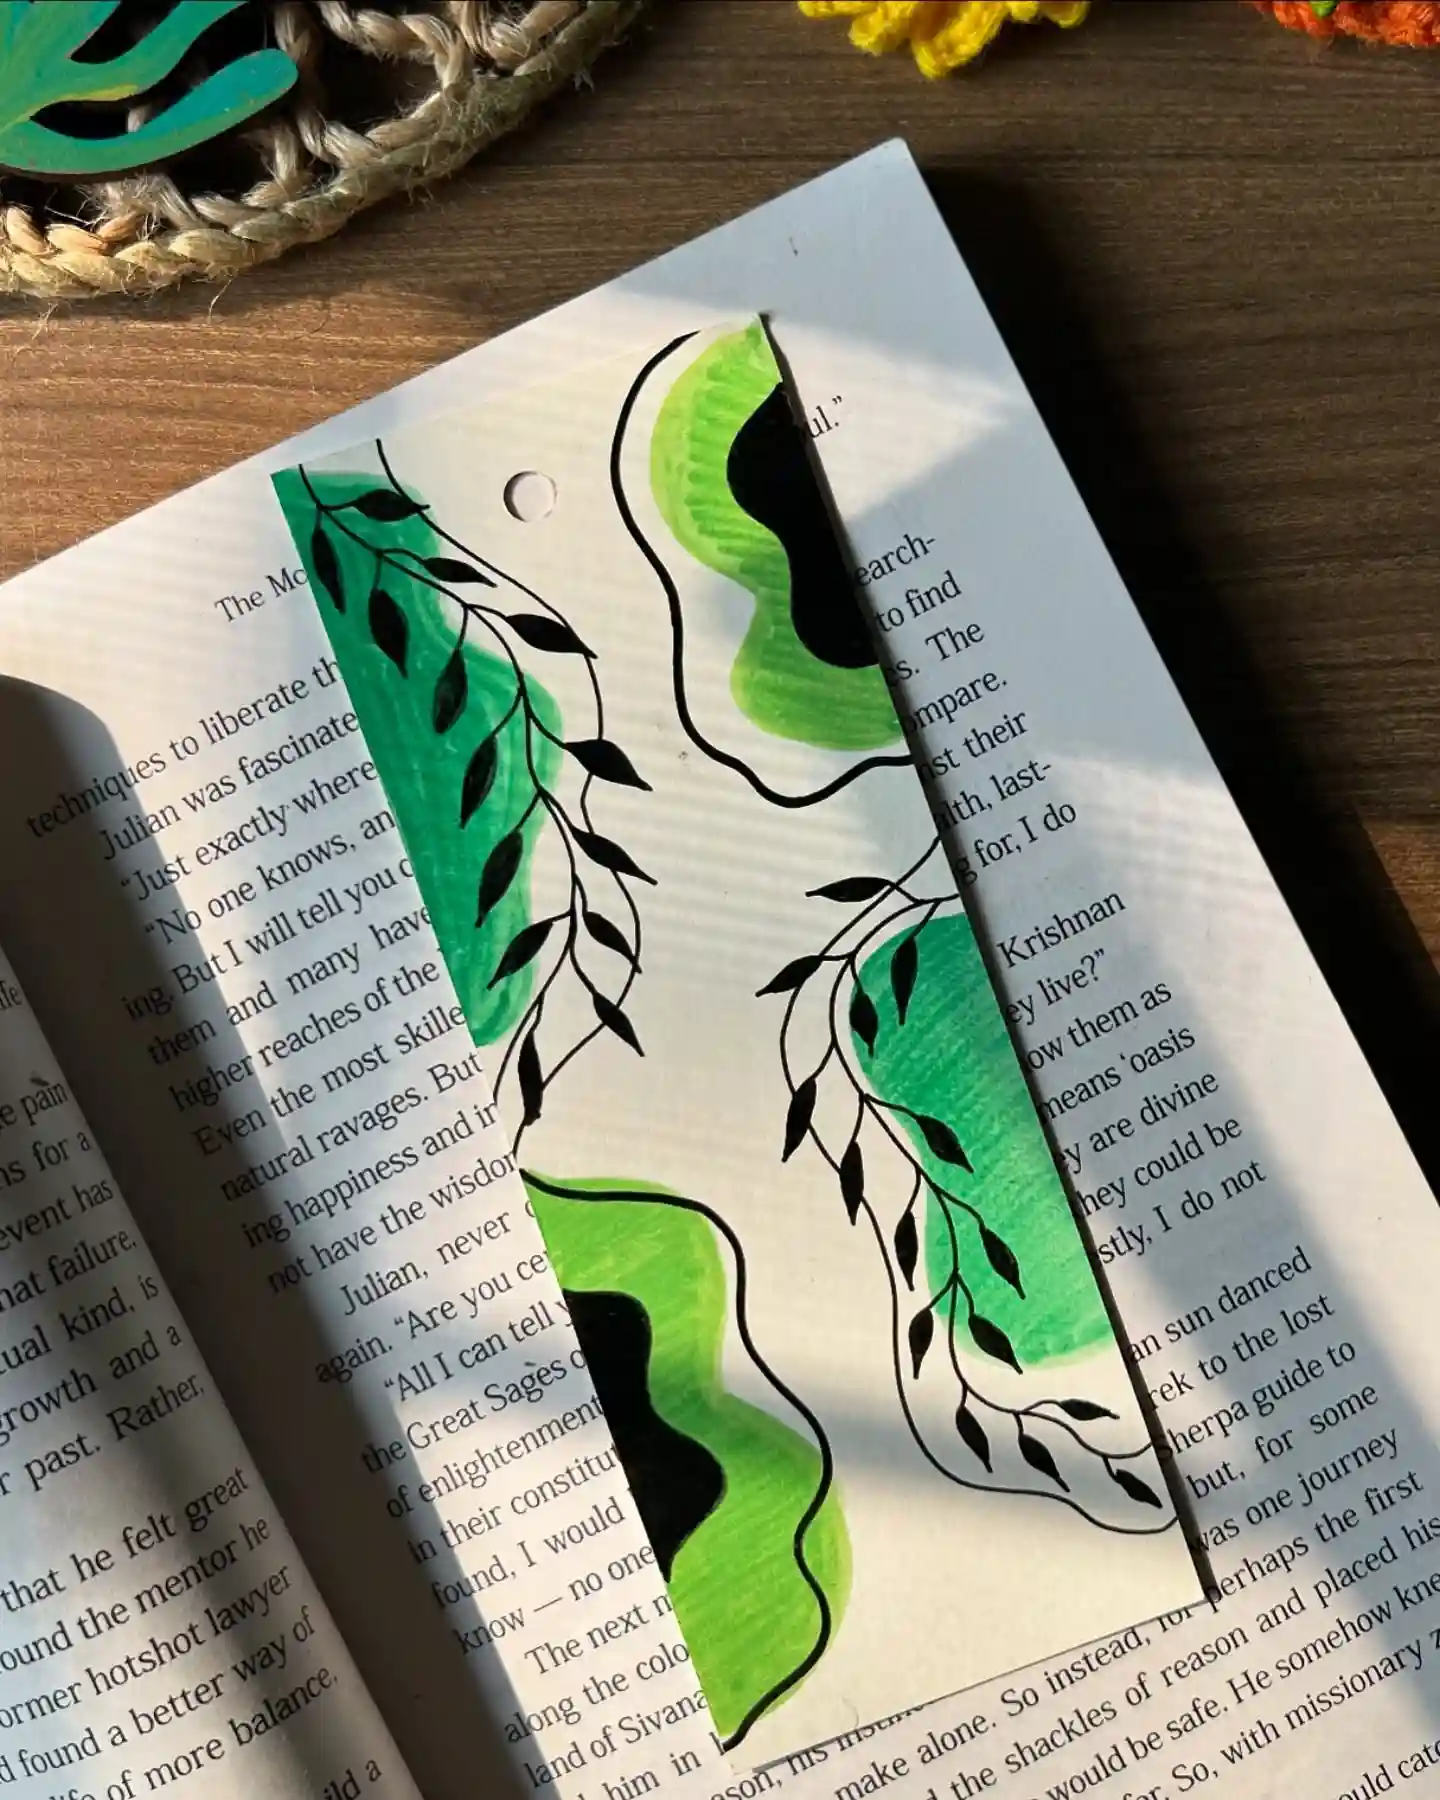
For a more contemporary and boho aesthetic, this design pairs organic color blocks with delicate botanical line art.
Using bright green and deep black markers, you can create fluid, freeform shapes on a crisp white cardstock base.
The real magic happens in the second layer. Once the base colors are down, use a fine-tip black pen to draw elegant, continuous-line vines and leaves overlapping the colored sections.
This overlapping technique creates depth and a modern, artsy vibe that looks incredibly stylish resting against the pages of your current read.
15. Laminated Splatter Art with Beaded Twine
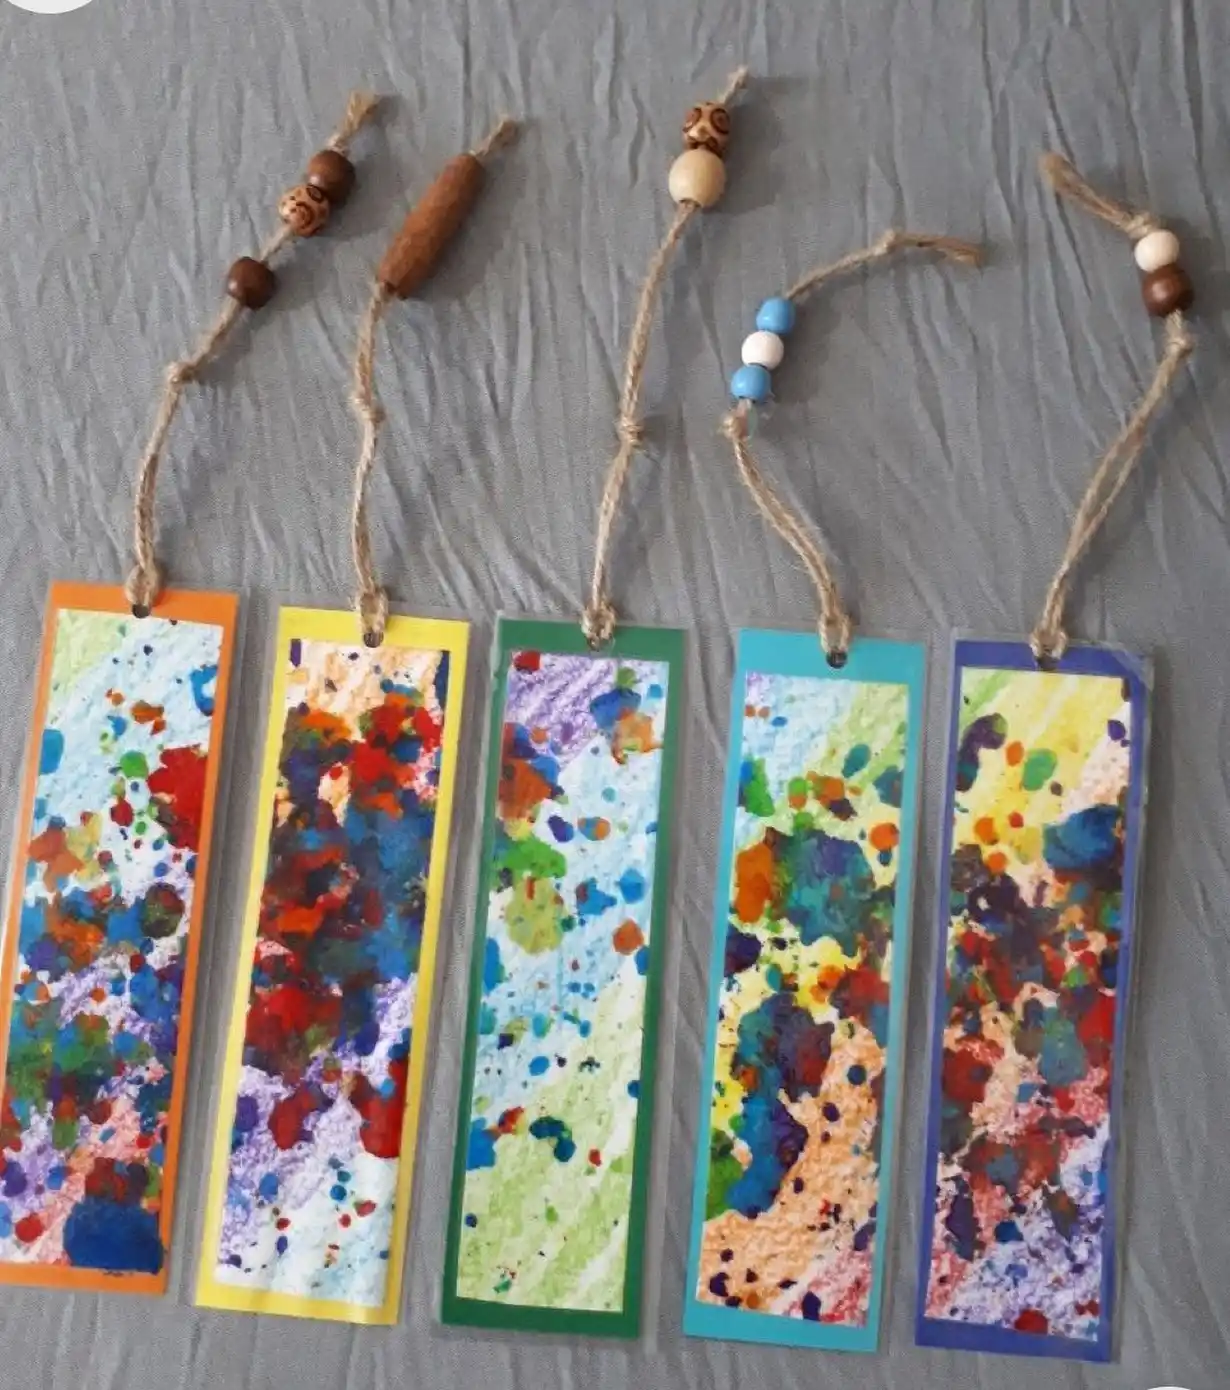
Crafting with children is all about embracing the beautiful mess, and these vibrant bookmarks do exactly that.
The core of this design is a playful, chaotic mix of paint splatters and colorful washes, proudly framed by solid, brightly colored cardstock borders like sunny yellow, vivid green, and bold blue.
To ensure these miniature art pieces survive being handled by little hands, the entire bookmark is thermal-laminated for a durable, glossy finish.
A piece of rustic jute twine is looped through a punched hole at the top, finished with a mix of wooden and colorful pony beads, giving kids a fun, tactile element to play with while they read.
16. Folk Art Painted Patterns on Textured Paper
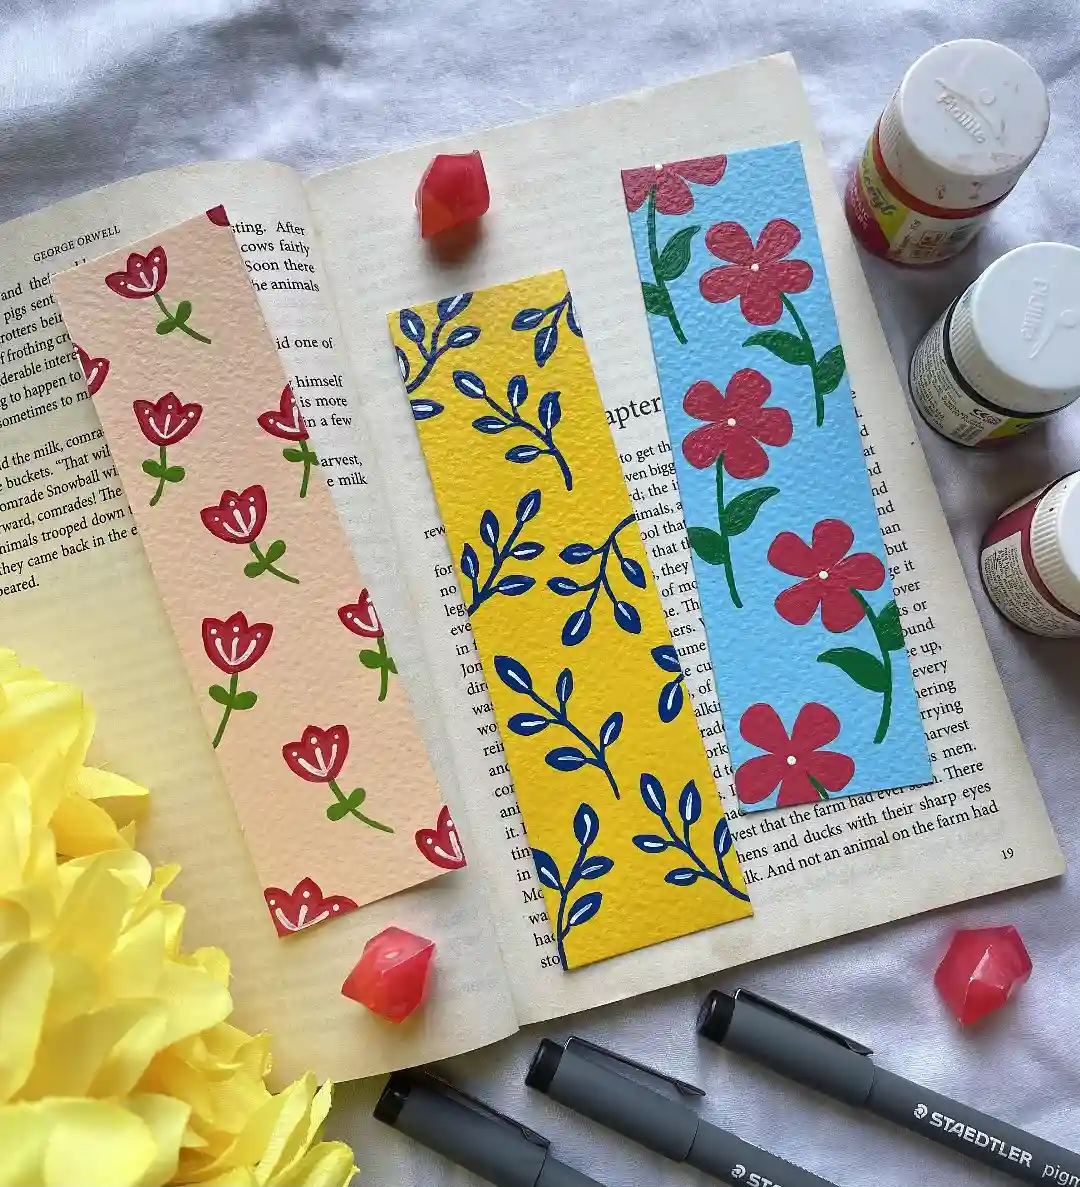
This technique is perfect for those who love bold, repeating botanical prints and a tactile feel.
By using thick, cold-pressed watercolor paper, you get a beautiful, rough grain texture that elevates the whole design.
The secret here is using opaque paints—like acrylic or gouache—to lay down solid, vibrant background colors such as sky blue, mustard yellow, or soft peach.
Once your base and simple floral shapes (like tulips or vines) are completely dry, grab your fine-liner pigment pens and white ink pens.
Adding crisp outlines, delicate leaf veins, and tiny highlight dots over the matte paint gives these bookmarks a charming, hand-crafted folk art vibe that stands out.
1. Solid Base
Paint an opaque background using acrylic or gouache.
2. Bold Florals
Add simple leaf and petal shapes in bright colors.
3. Fine Details
Draw crisp outlines, veins, and highlights with a pen.
17. Intricate Zentangle and Mandala Ink Patterns
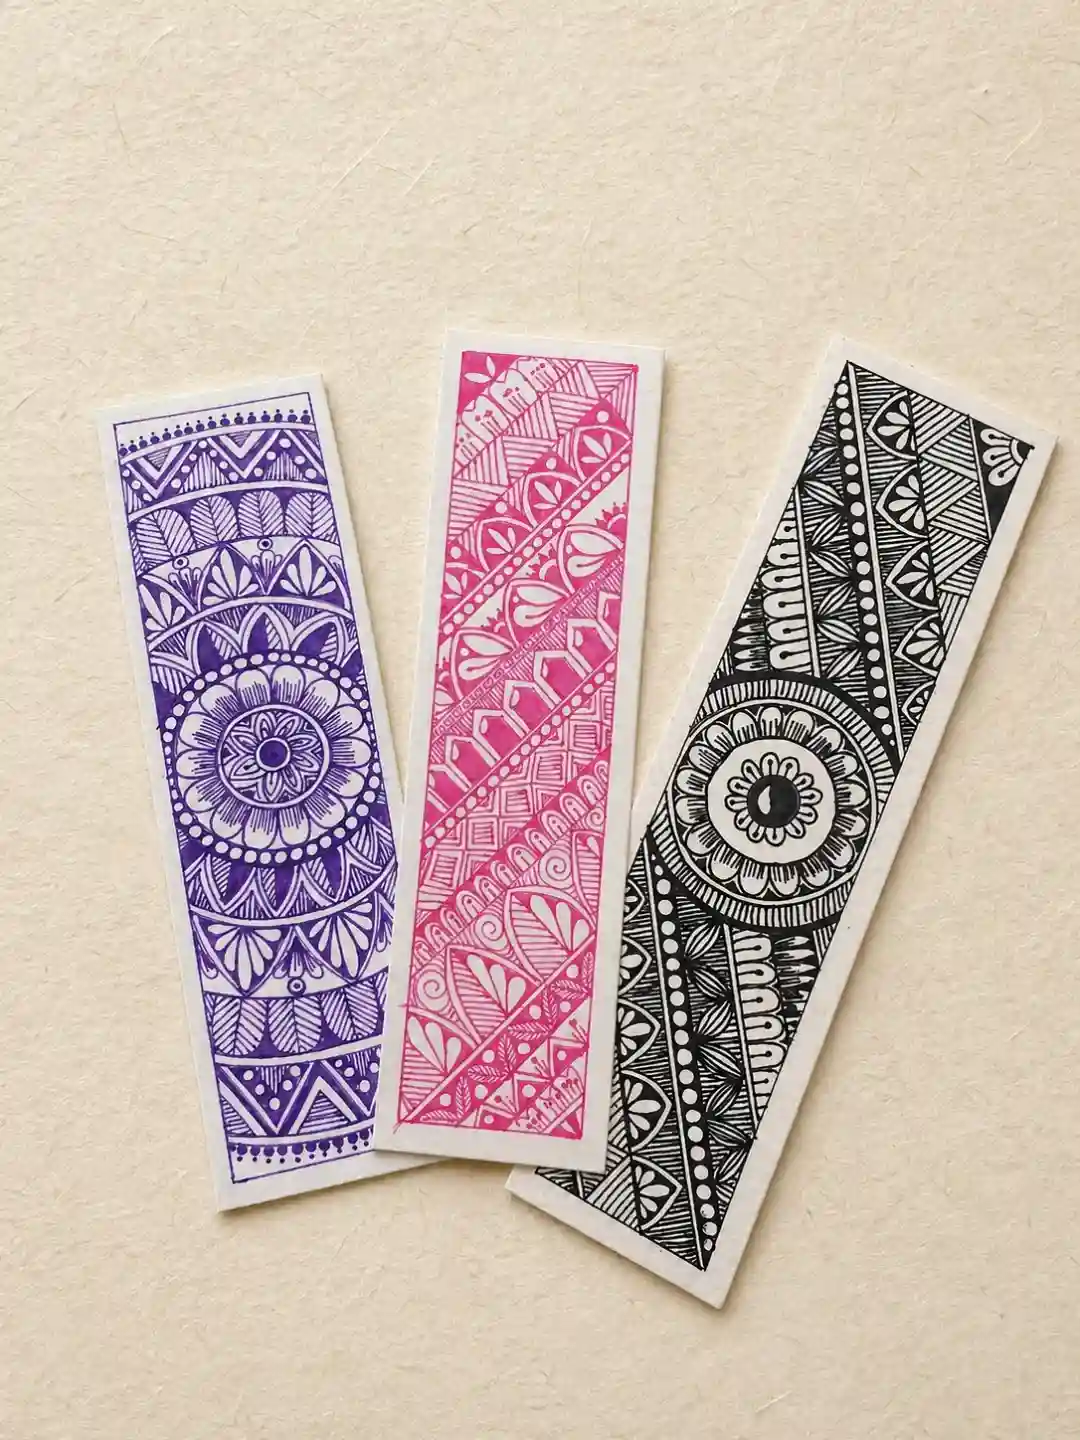
Taking pen-and-ink doodling to the next level, these bookmarks feature complex zentangle patterns and symmetrical mandala motifs.
Working with a single striking color per bookmark—whether rich purple, vibrant pink, or deep black—allows the detailed linework to truly shine on a clean cardstock base.
It’s a deeply relaxing, meditative craft that turns simple fine-liner pens into stunning miniature works of art.
1. Monotone Focus
Stick to a single ink color per bookmark for a clean look.
2. Sectioned Doodles
Divide the bookmark into geometric panels filled with patterns.
3. Fine-Liner Precision
Use sharp, fine-tip pigment pens to ensure crisp lines.
Conclusion
Across these 17 unique handmade bookmark designs—from vibrant folk art to intricate zentangle patterns—there is a style for every mood and skill level.
Crafting your own bookmarks makes reading even more enjoyable and creates thoughtful gifts for fellow book lovers.
Grab your supplies, pick a design that inspires you, and start creating your custom collection today.