15 Macrame Candle Holder Ideas

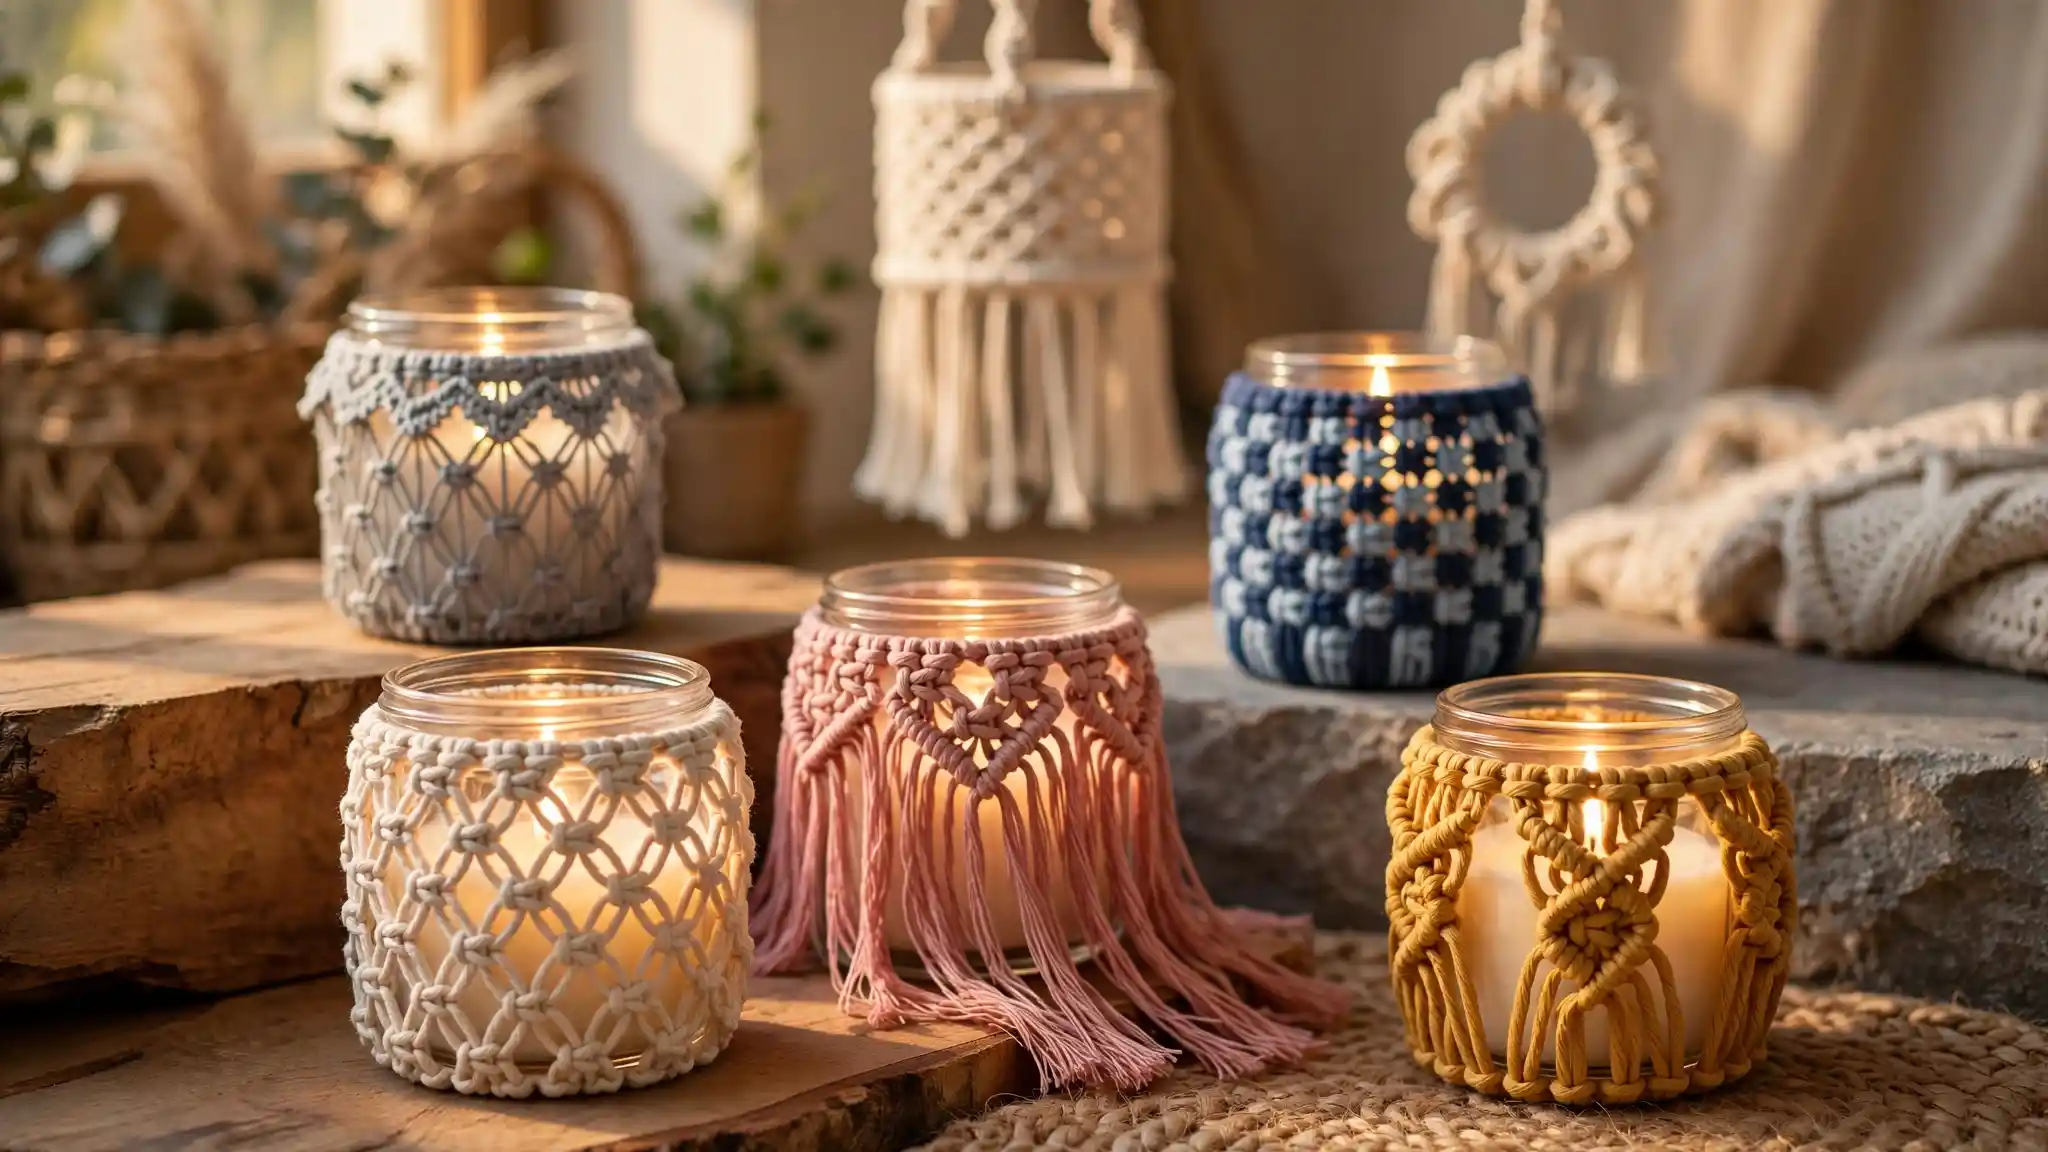
If you’ve got a stack of plain glass jars sitting around, a bag of cotton cord, and an evening free, this list will give you more than enough direction.
From tight diamond nets to loose scallop fringe, from single tabletop jars to full hanging lanterns, macrame candle holders are one of the most forgiving projects in the whole DIY and crafts world, since even a slightly uneven knot still looks intentional once a candle is glowing behind it.
This roundup pulls together fifteen real macrame candle holder diy ideas, each one photographed in its own setting, so you can see exactly how cord weight, knot density, and color change the finished look before you commit to a pattern.
Some of these lean rustic and outdoor ready, built to sit on a stone step or tree stump through a whole season.
Others are delicate enough for a coffee table centerpiece or a hanging spot by a window, swinging gently from a single braided handle or a wooden ring. A few even swap the candle out entirely and become vases instead.
Whether you’re a first-timer working your very first diamond lattice or someone ready to try a two-tone checkerboard pattern, there’s a version here worth trying.
Scroll through, pick a few that fit your space, and start with whichever one uses knots you already know.
15 Macrame Candle Holder Ideas
1. The Diamond Net Wrap That Turns Candlelight Into Shadow Art
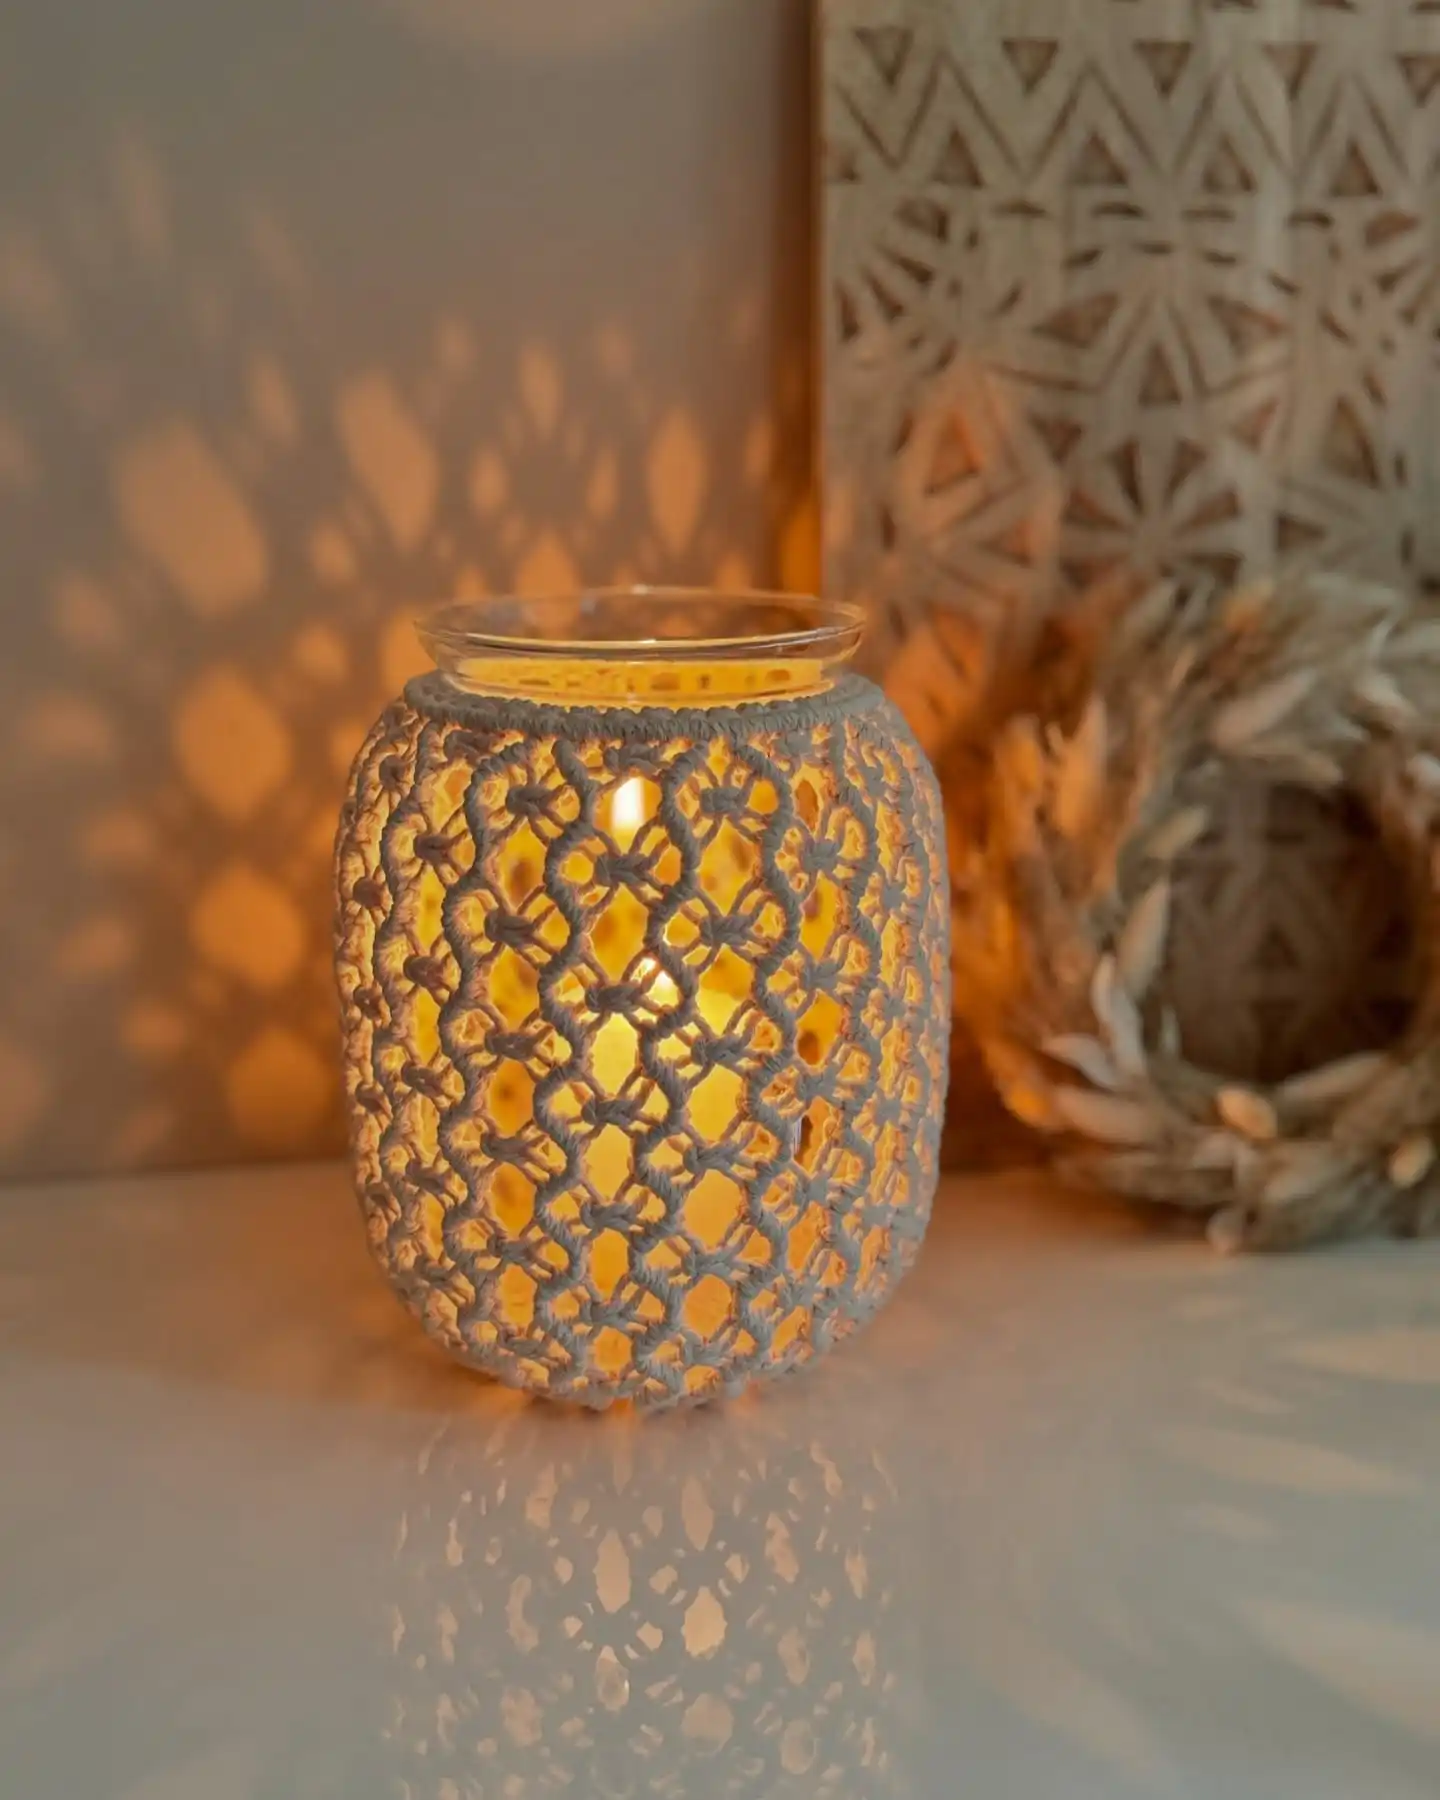
This one is all about the shadow play. A glass jar gets fully wrapped in a tight diamond-lattice macrame net, gathered snug just under the rim, and left loose over the rounded body.
Once a candle goes inside, the knots do double duty: they hold the glass and scatter the light into a wall full of little diamond shadows.
What makes it work:
- The lattice is knotted close and even, so the diamonds stay uniform all the way around
- The neckline is cinched tighter than the belly, which gives the jar a soft, rounded silhouette instead of a straight cylinder
- Cord color stays neutral and muted so the warm candlelight does the visual work, not the fiber
This is a solid first project if you have only worked flat panels before, since wrapping a curved jar teaches you to adjust tension as you go.
2. The Fringe-Bottom Style That Looks Twice As Full As It Actually Is
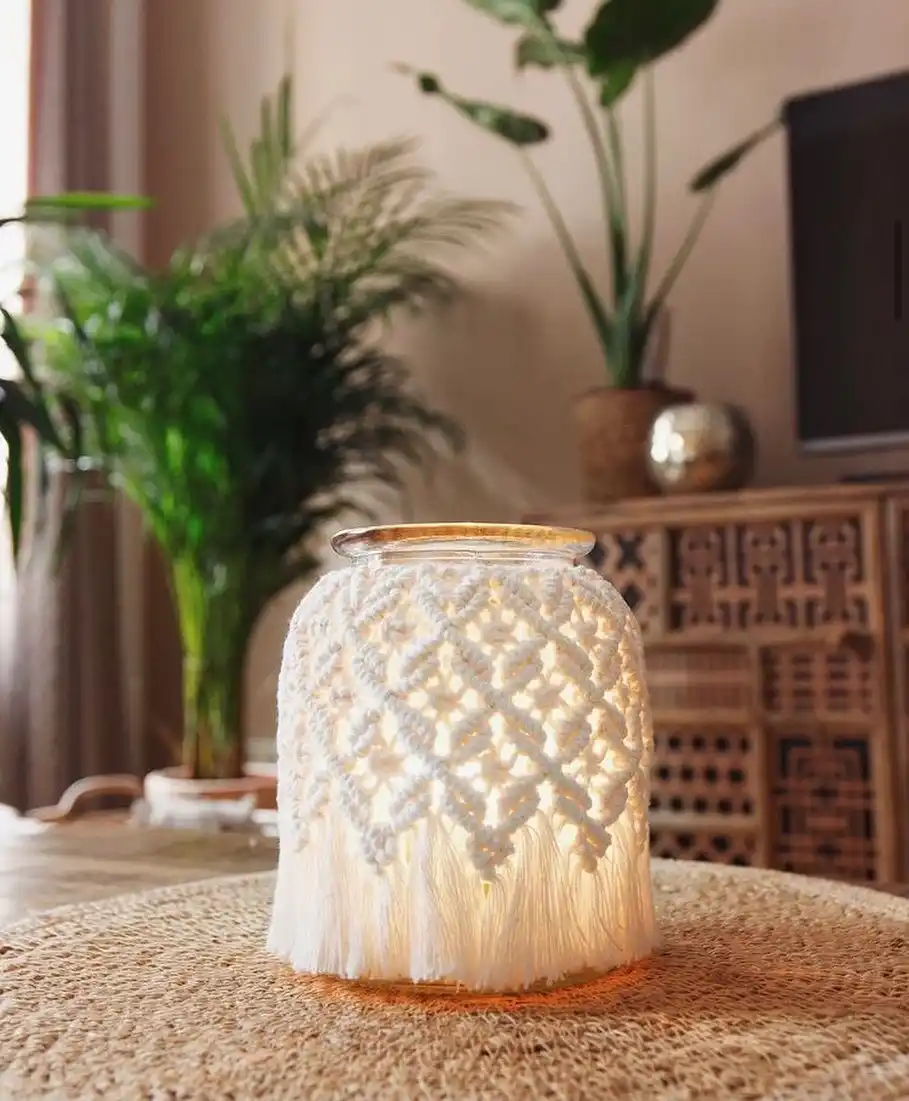
Cream cord, no dye, and a completely different weight distribution than a tight lattice: the top third carries an open diamond net, then every strand drops straight down into a thick curtain of fringe that swallows the whole lower half of the jar.
Lit from inside, the glow reads more like a soft lantern than a candle jar, because you cannot see the glass at all below the knots.
To build this one yourself:
- Mount your cords to the rim and work a short diamond net, four or five rows deep, just like a normal panel.
- Stop the knotting early. Let every cord run loose from that point down.
- Trim the fringe level with sharp shears once it’s hanging over the finished jar, or leave it uneven for a shaggier look.
One thing to watch for: loose fringe near an open flame is riskier than a fully knotted wrap, so this style works best with an LED tealight rather than real fire.
Work a shallow diamond lattice around the rim, four or five rows deep.
Stop knotting and let every strand drop loose down the jar.
Cut it level with the jar’s base, or leave it uneven for a shaggier finish.
3. The Scalloped Picot Border That Adds Texture Without Adding Bulk
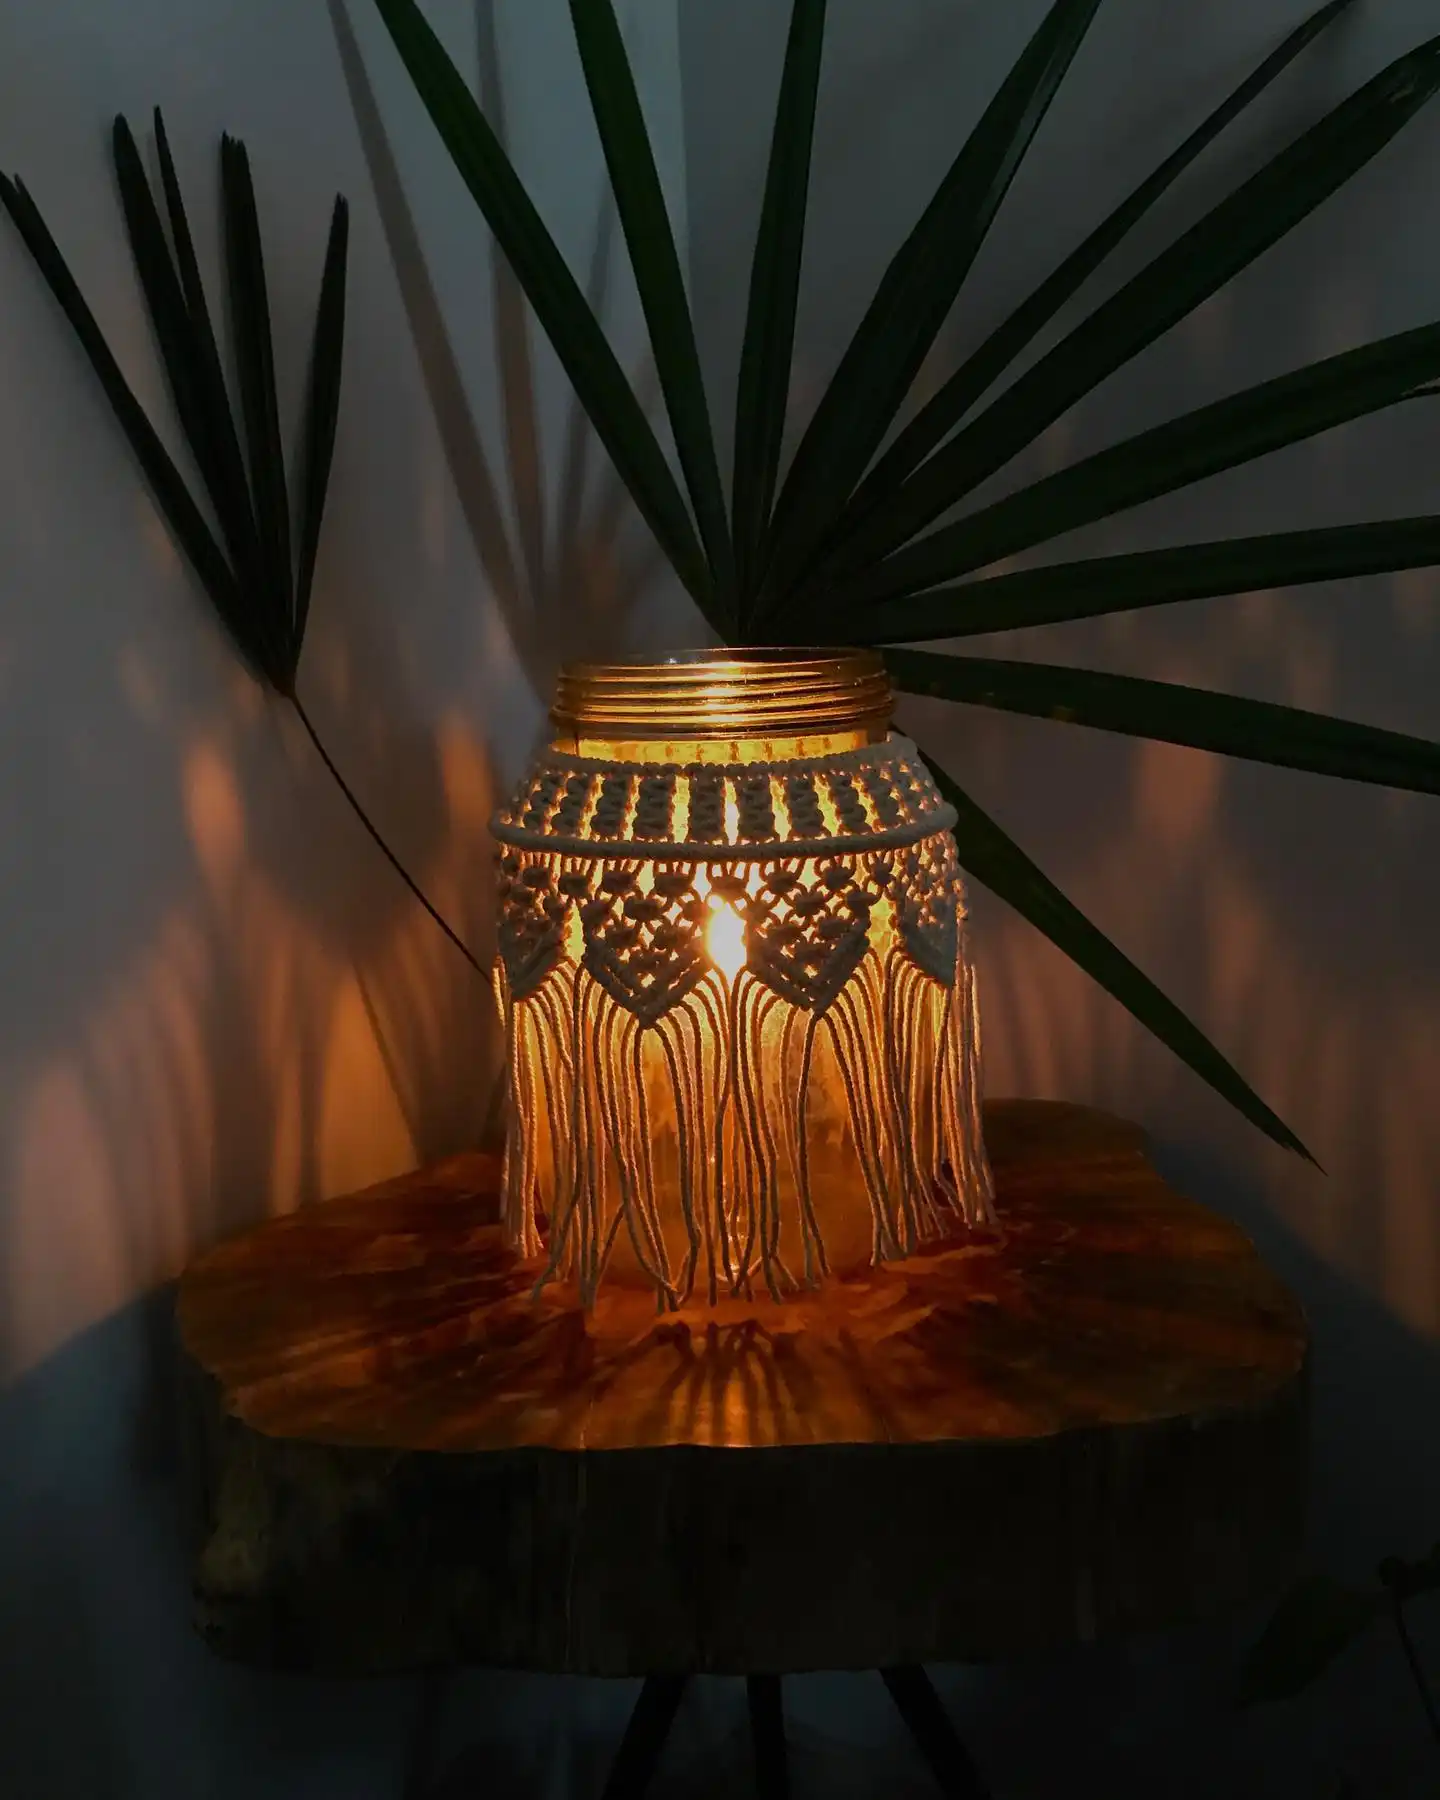
Set on a raw wood slab with a fan palm behind it, this jar takes a completely different construction approach: vertical half hitches run straight down from the collar first, then a row of scalloped picot loops breaks up the transition before the fringe starts.
That scallop row is the detail worth stealing. It turns a flat drop from knots into fringe into a shaped, almost lace-like edge, and it catches light differently than a straight fringe line does.
What’s actually happening in the layers, top to bottom:
- Collar band: tight double half hitches, close together, forming a ribbed texture right under the glass rim
- Scallop row: small picot loops worked side by side, creating the wavy border
- Fringe drop: cord ends released below the scallops, uneven lengths left natural rather than trimmed flat
A dark or dim room is genuinely this style’s best friend. The scallops throw tiny shadow crescents on the wall that a straight-fringe jar simply cannot produce.
Tight double half hitches worked right under the rim give a firm, textured band to grip.
Small loops worked side by side turn a flat edge into a wavy, lace-like border.
Cord ends drop free below the scallops, left uneven for a natural, undone look.
4. The Hanging Version That Skips The Table Completely
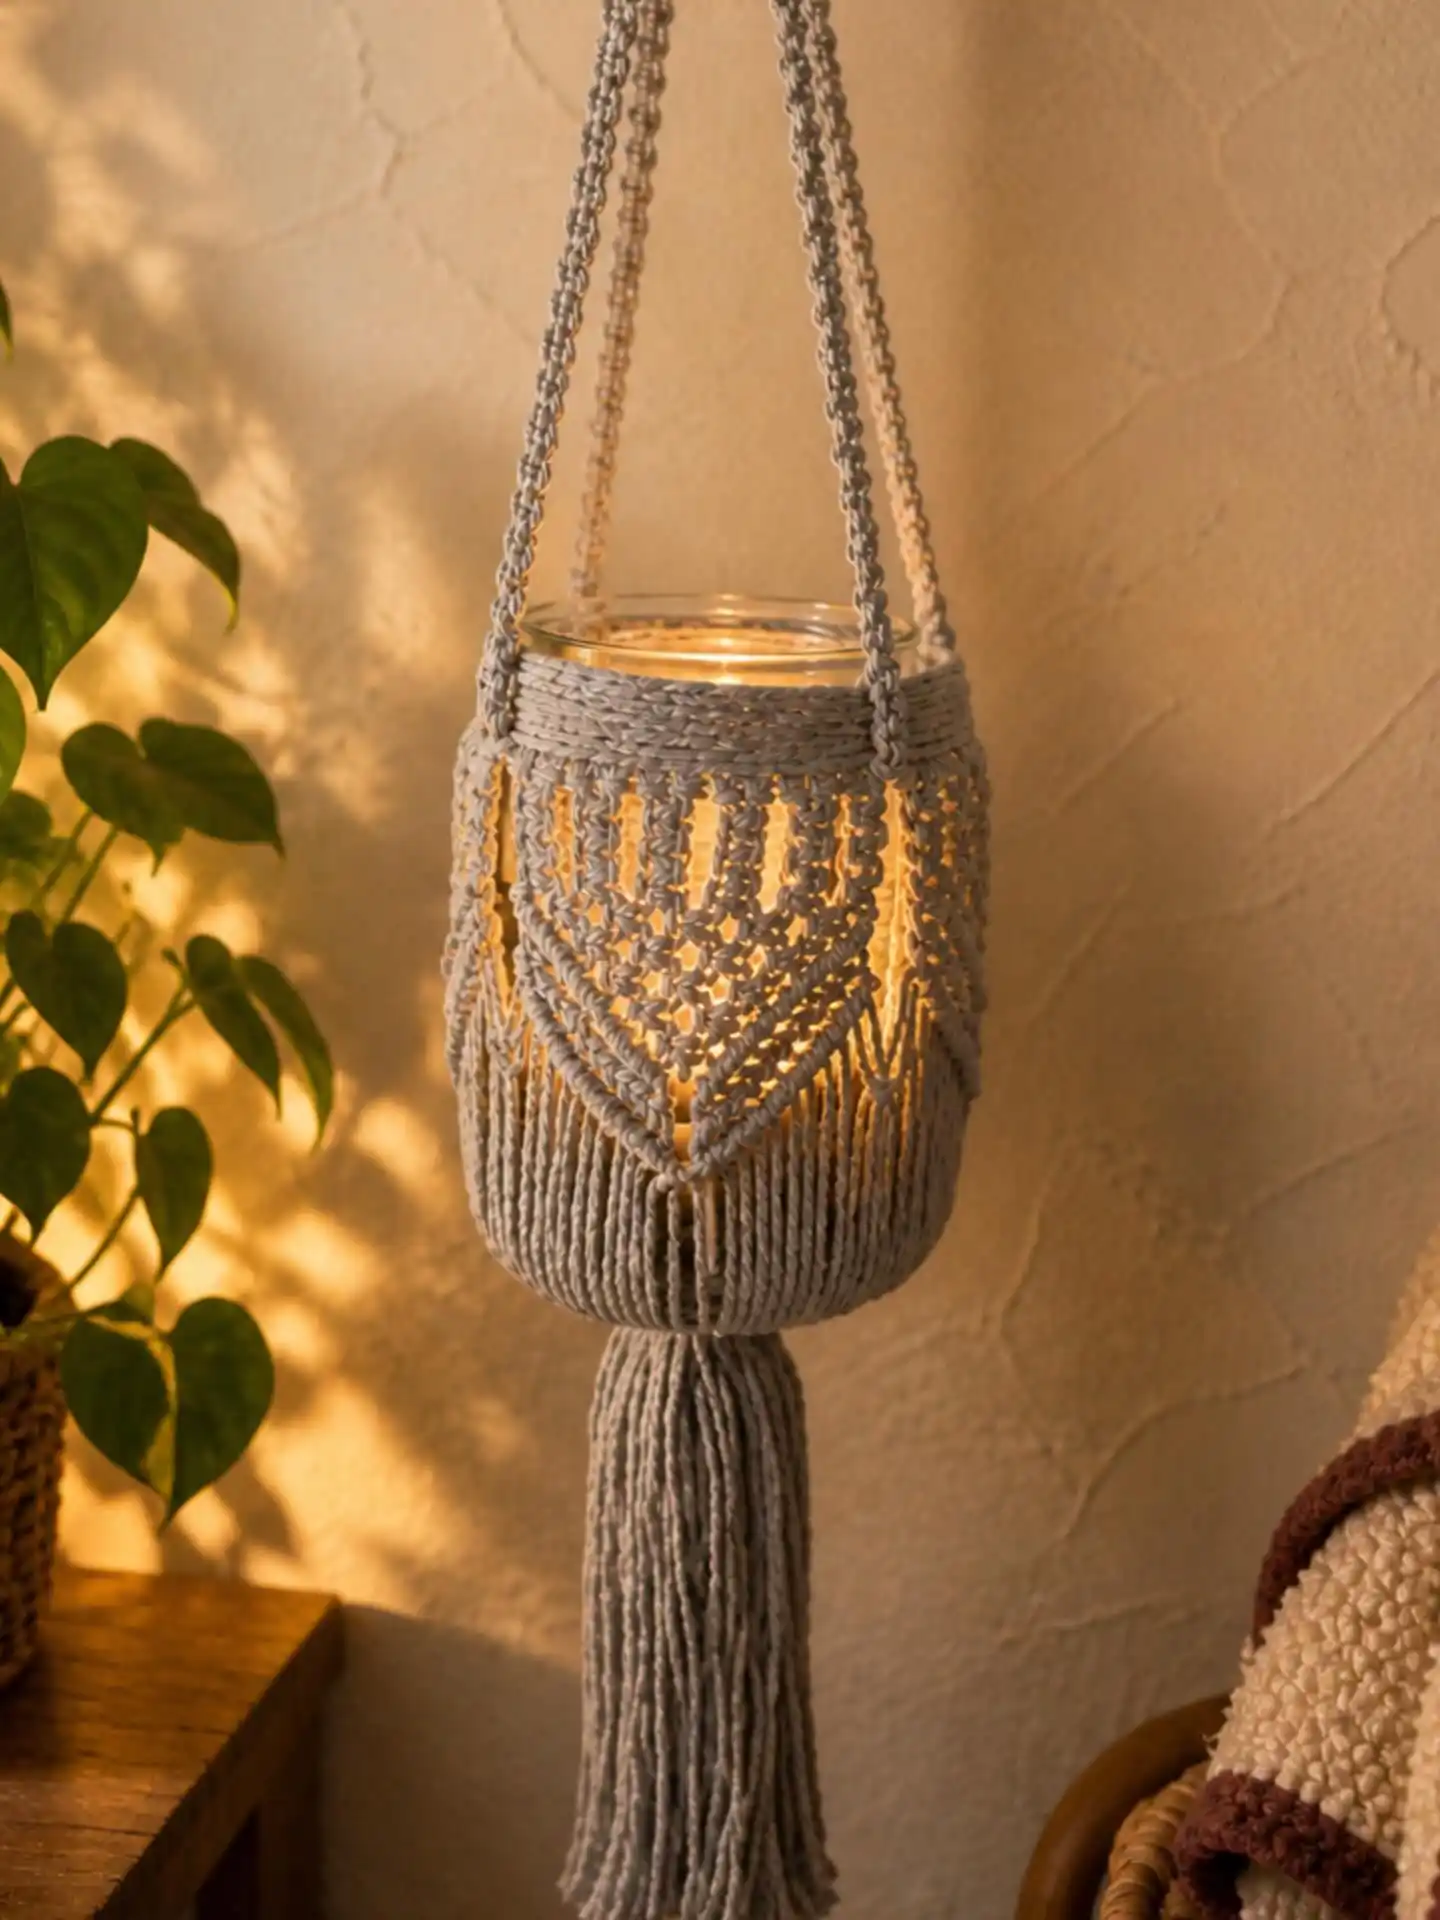
Gray cord this time, worked in a chevron pattern that narrows to a point before dropping into one long, dense tassel below the jar itself.
Two hanging cords run all the way from the top knot down through the whole design, which is what lets this piece swing free from a hook or a curtain rod instead of sitting on a surface. The chevrons do real work here too, guiding the eye down to that tassel like an arrow.
The tassel length is the detail most people underestimate. A short two-inch tassel would leave this piece looking unfinished.
Here it runs nearly as long as the jar itself, which is what gives the whole thing its drop and movement when it sways.
Subscribe to DIY Craft Bloom
Get updates on the latest posts and more from DIY Craft Bloom straight to your inbox.
Use a fixed glass votive, not a floating candle, since this piece moves when a door opens or a breeze comes through.
5. Two Scallop Weights Compared, Side By Side On The Same Table

Here’s a useful pairing: a tighter, more solid crochet-style scallop panel on the left next to a looser, airier open-knot version on the right.
Same jar size, same fringe finish along the bottom, but the amount of light that gets through is completely different.
The left jar keeps its knots close together, so the candle glow comes out in small warm dots rather than an open flicker.
The right jar spaces its diamonds wider, so more glass shows and the light spreads out freely across the table instead of staying contained.
Beyond the light difference, the two also take different amounts of patience. The tighter weave means more repetitive knotting start to finish, which is actually a good way to build consistent tension if you’re still new to the craft.
The looser weave uses fewer knots overall and comes together in a single sitting, so it’s the better pick if you want a finished piece the same afternoon you start it.
Neither one is more “correct,” it really just comes down to how much light you want spilling out and how much time you want to spend at the cord board.
| Tighter Weave | Looser Weave |
|---|---|
| Dense, almost solid scallop shapes with small peekaboo gaps. | Open diamond gaps, more glass visible through the pattern. |
| Light glows through in small warm dots rather than an open flicker. | Light spreads out and flickers more freely across the room. |
| More repetitive knotting, good for practicing consistent tension. | Fewer knots overall, quicker to finish in one sitting. |
6. The Wooden Ring Frame That Turns This Into A Full Pendant Piece
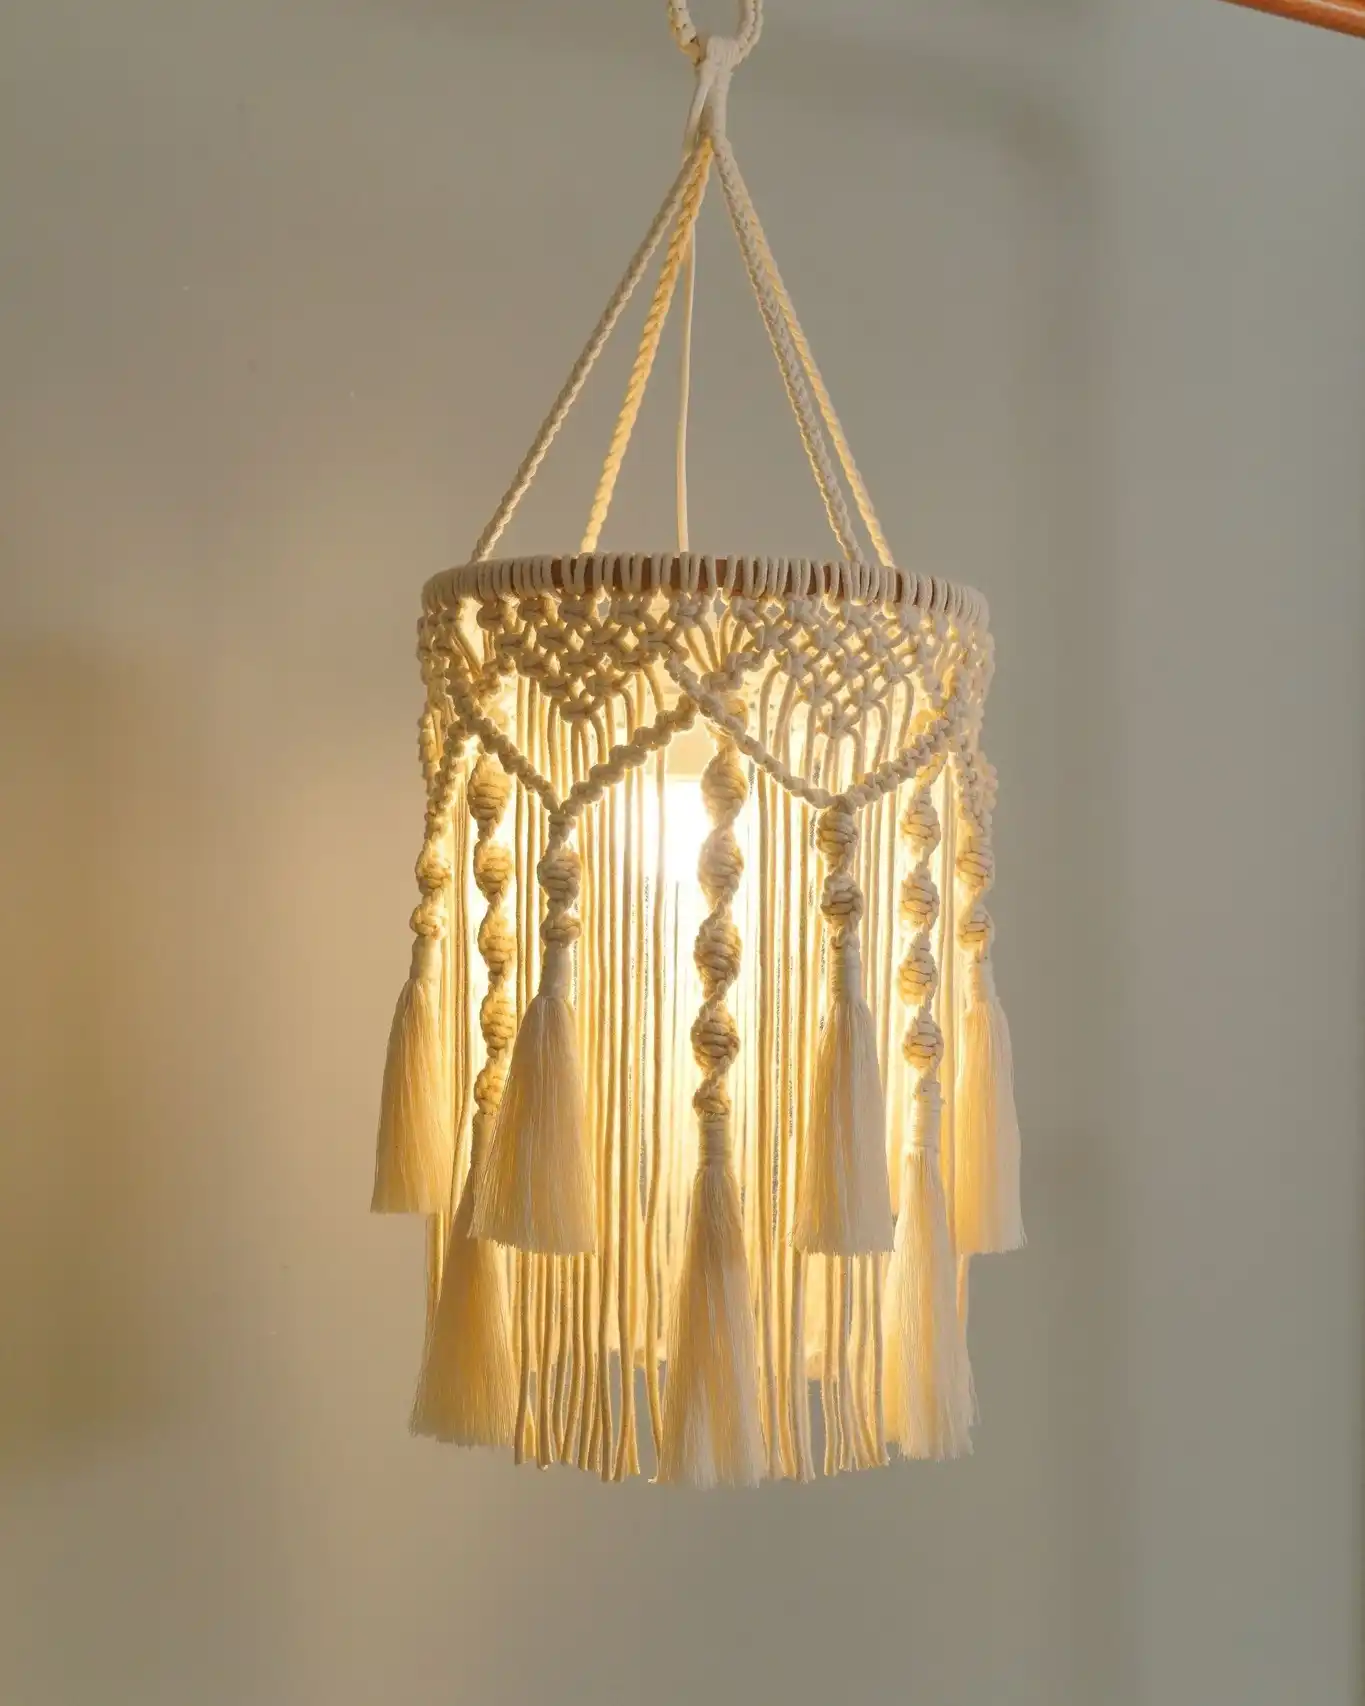
This one graduates from candle jar to genuine hanging lantern. A wooden embroidery-style ring anchors everything at the top, and instead of wrapping around a single jar, the cords fall as individual spiral-knotted strands, each one finished with its own small tassel.
No glass at all in this build, the light source sits bare in the center and the strands act like a cage around it rather than a wrap.
Three things carry this design:
- The ring: gives it a fixed, perfect circle instead of the slightly wobbly shape you get wrapping a jar by hand
- The spiral strands: each cord is twisted into a barber-pole spiral before the tassel, so the piece has texture even without a full knot pattern
- The gap: wide open spacing between strands lets the light spill out in bands rather than dots, which is what makes it read as a proper light fixture
Since there’s no glass shielding the flame, this build only works with an LED bulb or battery candle, never an open flame.
7. The Full Vignette That Shows These Pieces Don’t Have To Stand Alone

Two different candle jars sit next to a wrapped vase on a wood shelf, with a matching macrame mirror hanging above them, and the whole grouping is what makes this photo worth studying.
Nothing here uses the exact same knot pattern. The taller jar has an open chevron weave, the shorter one leans into dense little rosette-style knots, and the vase wrap is looser and more linear.
What ties them together is cord color and fringe length, kept consistent across all three pieces.
That’s the real lesson in this photo: you don’t need matching patterns to build a cohesive corner, you need matching materials.
Same cream or natural cord, similar fringe drop, grouped at slightly different heights so the eye travels.
Match the cord, not the pattern, and any mix of macrame pieces reads as a set.
8. The Three-Piece Trio That Doubles As A Centerpiece
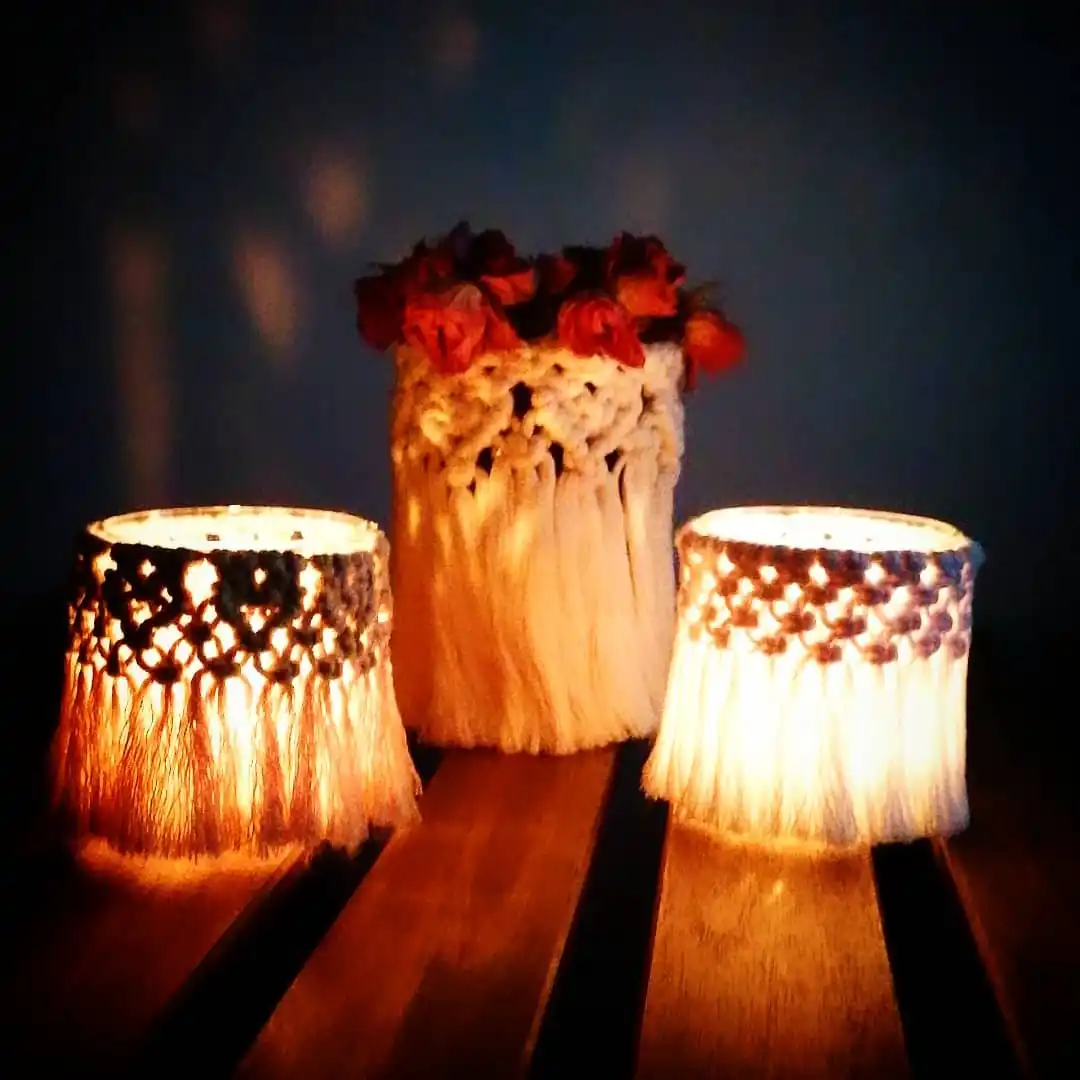
Same trumpet-shaped fringe silhouette shows up three times here, but the middle jar isn’t holding a candle at all.
It’s been repurposed as a vase, stuffed with dried roses instead of a tealight, which is a smart way to stretch one pattern across two different uses.
The two candle jars flanking it use a tighter openwork scallop at the collar, almost lace-like, while the center vase goes fuller and shaggier since it needs to support flower stems rather than just glow.
Grouping three pieces this way turns a single project into a full tablescape without extra design work, since the fringe length and cord tone already match.
9. Three Different Knot Patterns, One Photo, No Repeats
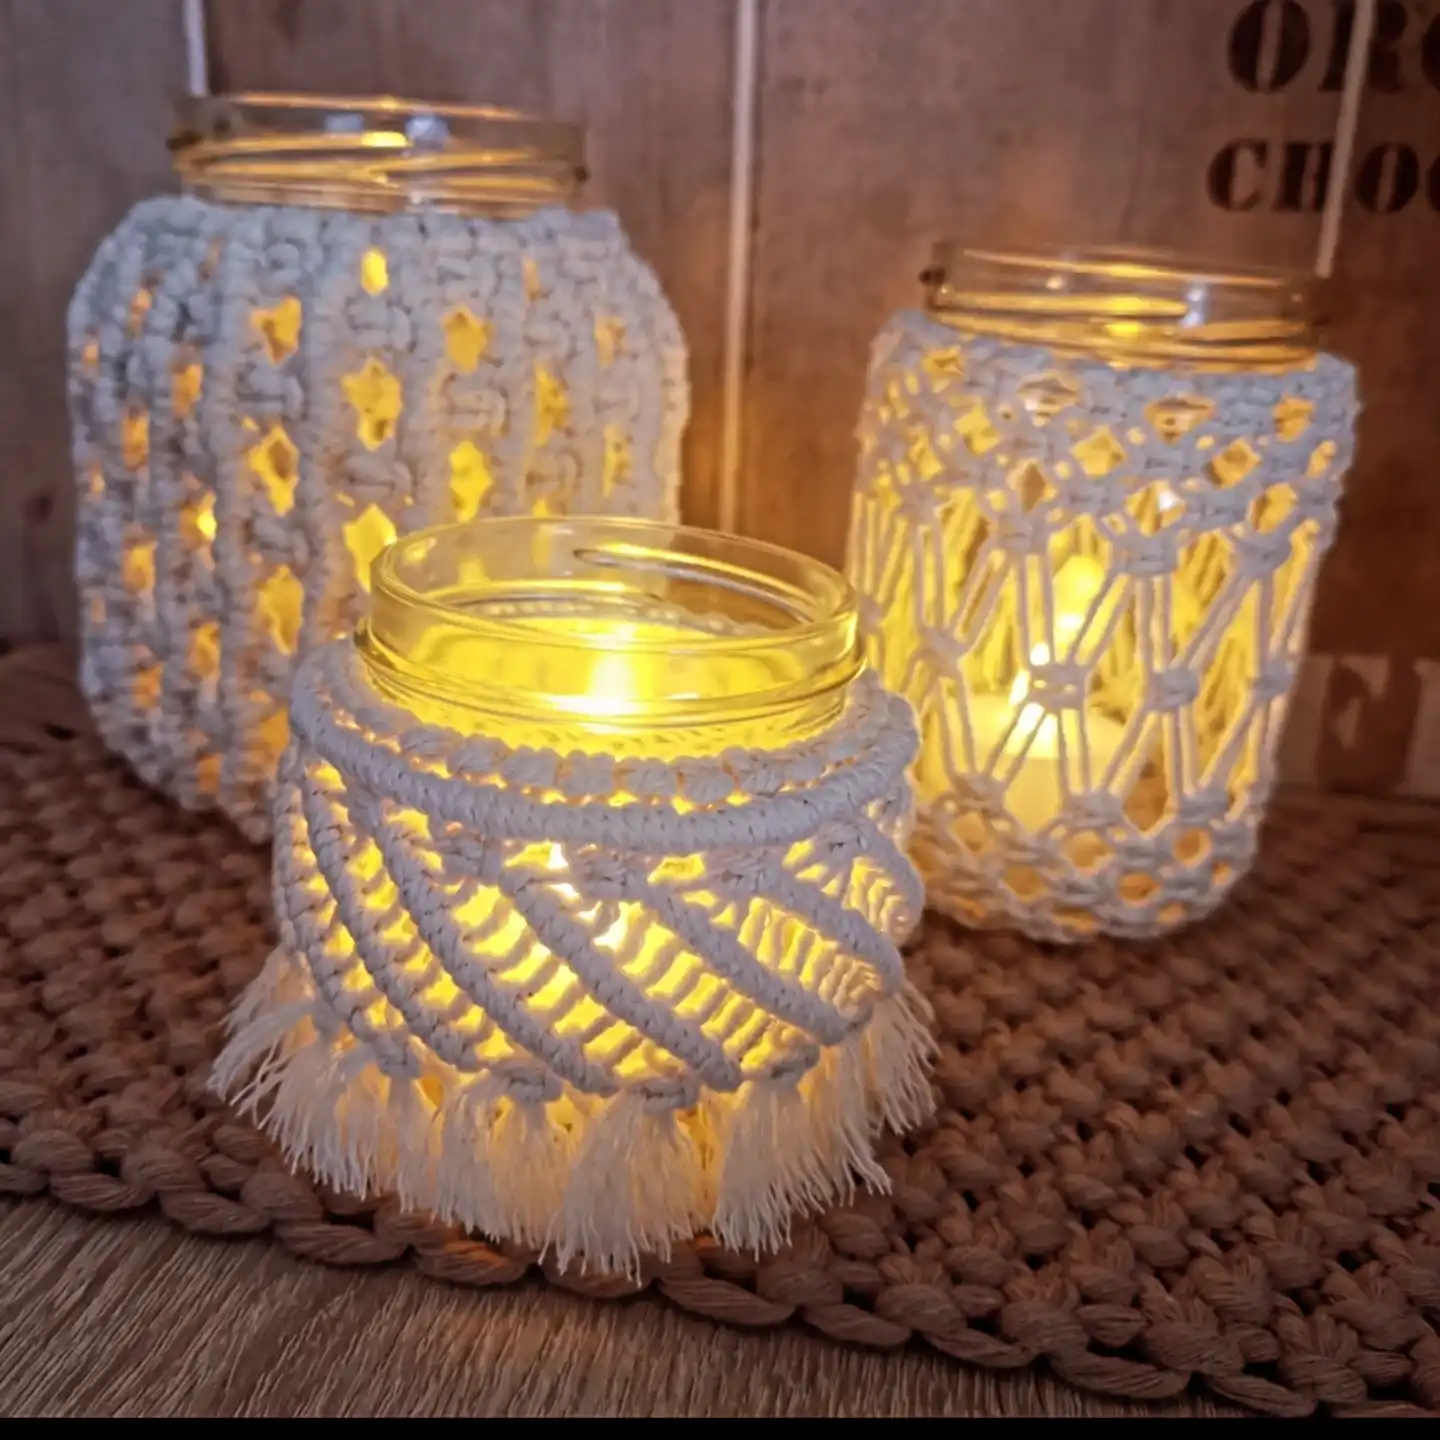
Three jars sit on a woven jute mat, and each one uses a completely separate stitch approach, which makes this photo worth bookmarking on its own.
The back left jar is worked in a dense crochet-style stitch with small diamond cutouts scattered irregularly rather than in a grid.
The back right jar goes fully geometric, a clean diamond net that’s almost identical spacing top to bottom.
The front jar breaks the pattern entirely with diagonal ribbed rows that spiral around the glass before dropping into fringe.
Dense crochet-style knotting with cutouts placed by feel, not a strict grid, for a more organic texture.
Consistent spacing top to bottom, the most beginner friendly of the three since the pattern repeats predictably.
Rows angle around the jar instead of running straight, giving movement even before the fringe starts.
Subscribe to DIY Craft Bloom
Get updates on the latest posts and more from DIY Craft Bloom straight to your inbox.
10. The Single Braided Handle That Doubles As A Hook
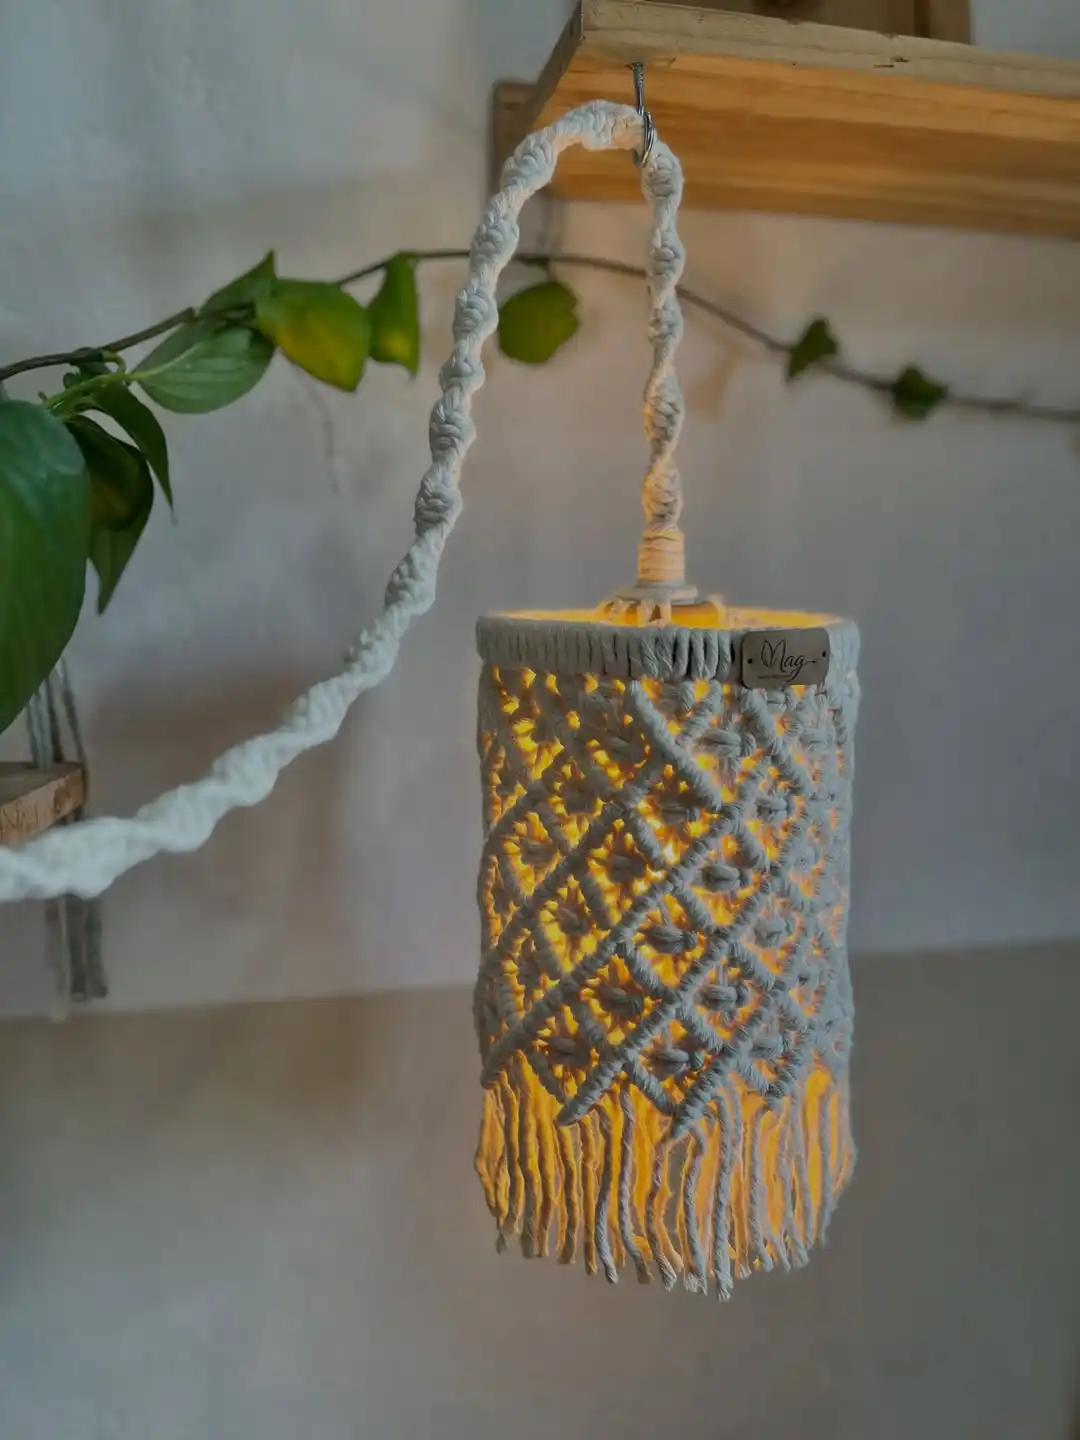
A tall cylinder jar hangs here, not from separate cords, but from one thick spiral-braided rope that loops directly onto a screw hook.
That single handle is the whole trick. Instead of gathering four or six thin cords at the top like most hanging designs, this build uses one dense braid that’s sturdy enough to bear the jar’s weight on its own, which also keeps the silhouette clean with nothing crossing or tangling near the hook.
Compare that to the earlier hanging lantern with the wooden ring and multiple cords:
- One thick braid instead of several thin strands means less setup at the mounting point
- A tall, straight diamond lattice runs the full body here, taller and narrower than a rounded jar wrap
- Fringe stays short and even at the base, letting the diamond pattern stay the visual focus instead of competing with a long tassel
This shape works well tucked into a plant corner, since the braid handle lets it swing slightly among leaves without looking out of place.
More strands to gather and knot evenly at the top.
Can twist or tangle if the piece spins while hanging.
One sturdy loop, quick to hang and unhang.
Stays steady with minimal twisting.
11. The Chunky Knot Style That Skips Fringe Almost Entirely
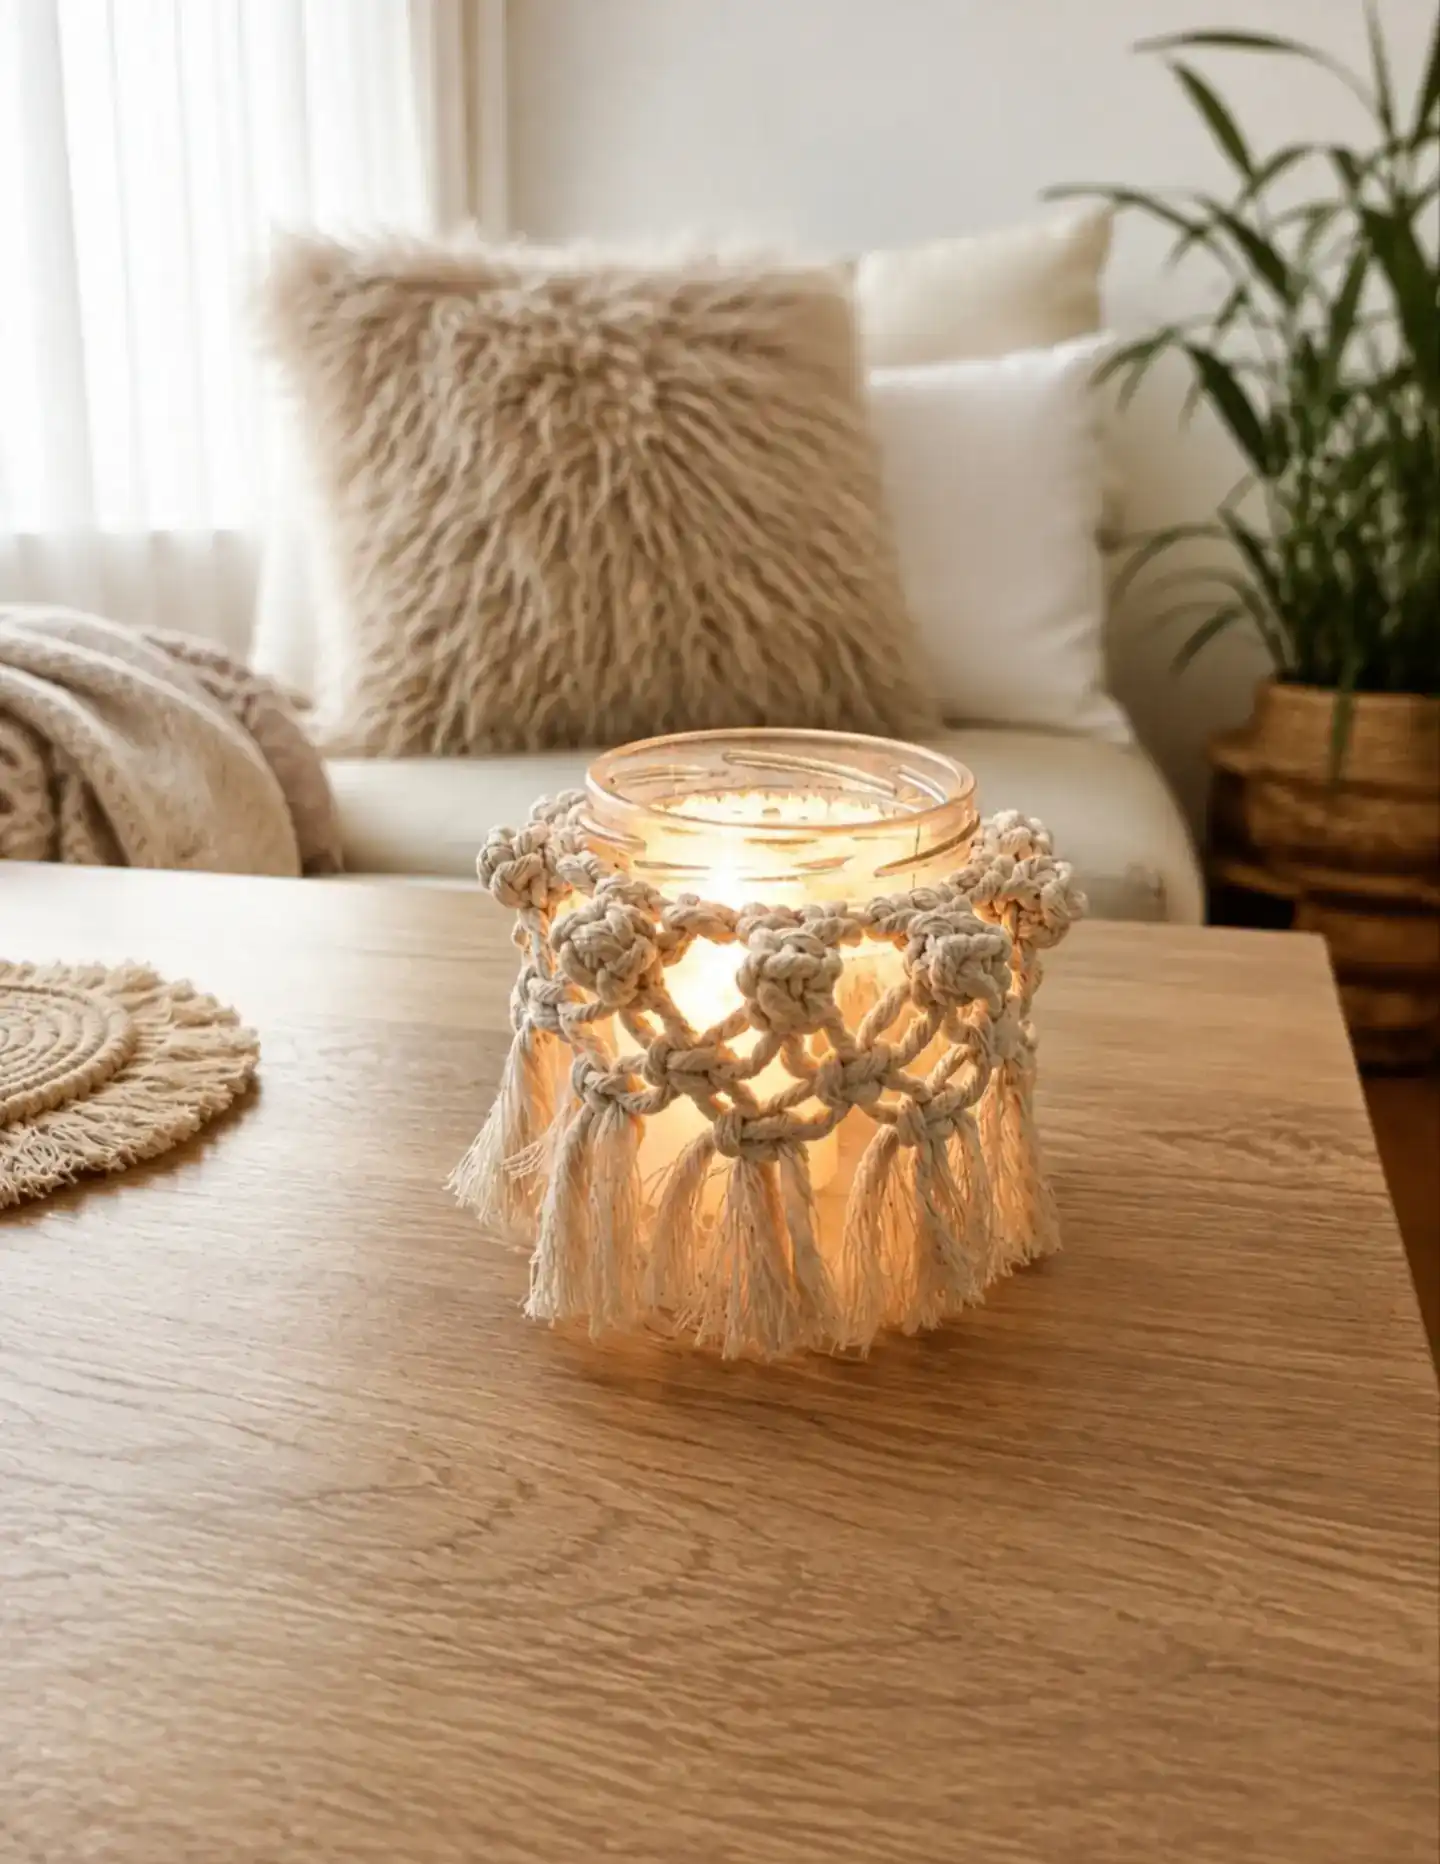
Set on a coffee table next to a cozy sofa scene, this jar takes a noticeably different approach to bulk.
Instead of tight small knots or long drape, the cord here is worked in big, visible square knots that sit almost like beads around the glass.
There’s barely any fringe hanging past the knotting, just a short uneven trim, which means the visual weight comes from the knot texture itself rather than movement below it.
12. The Proof That Color Changes Everything, Even With The Same Knot
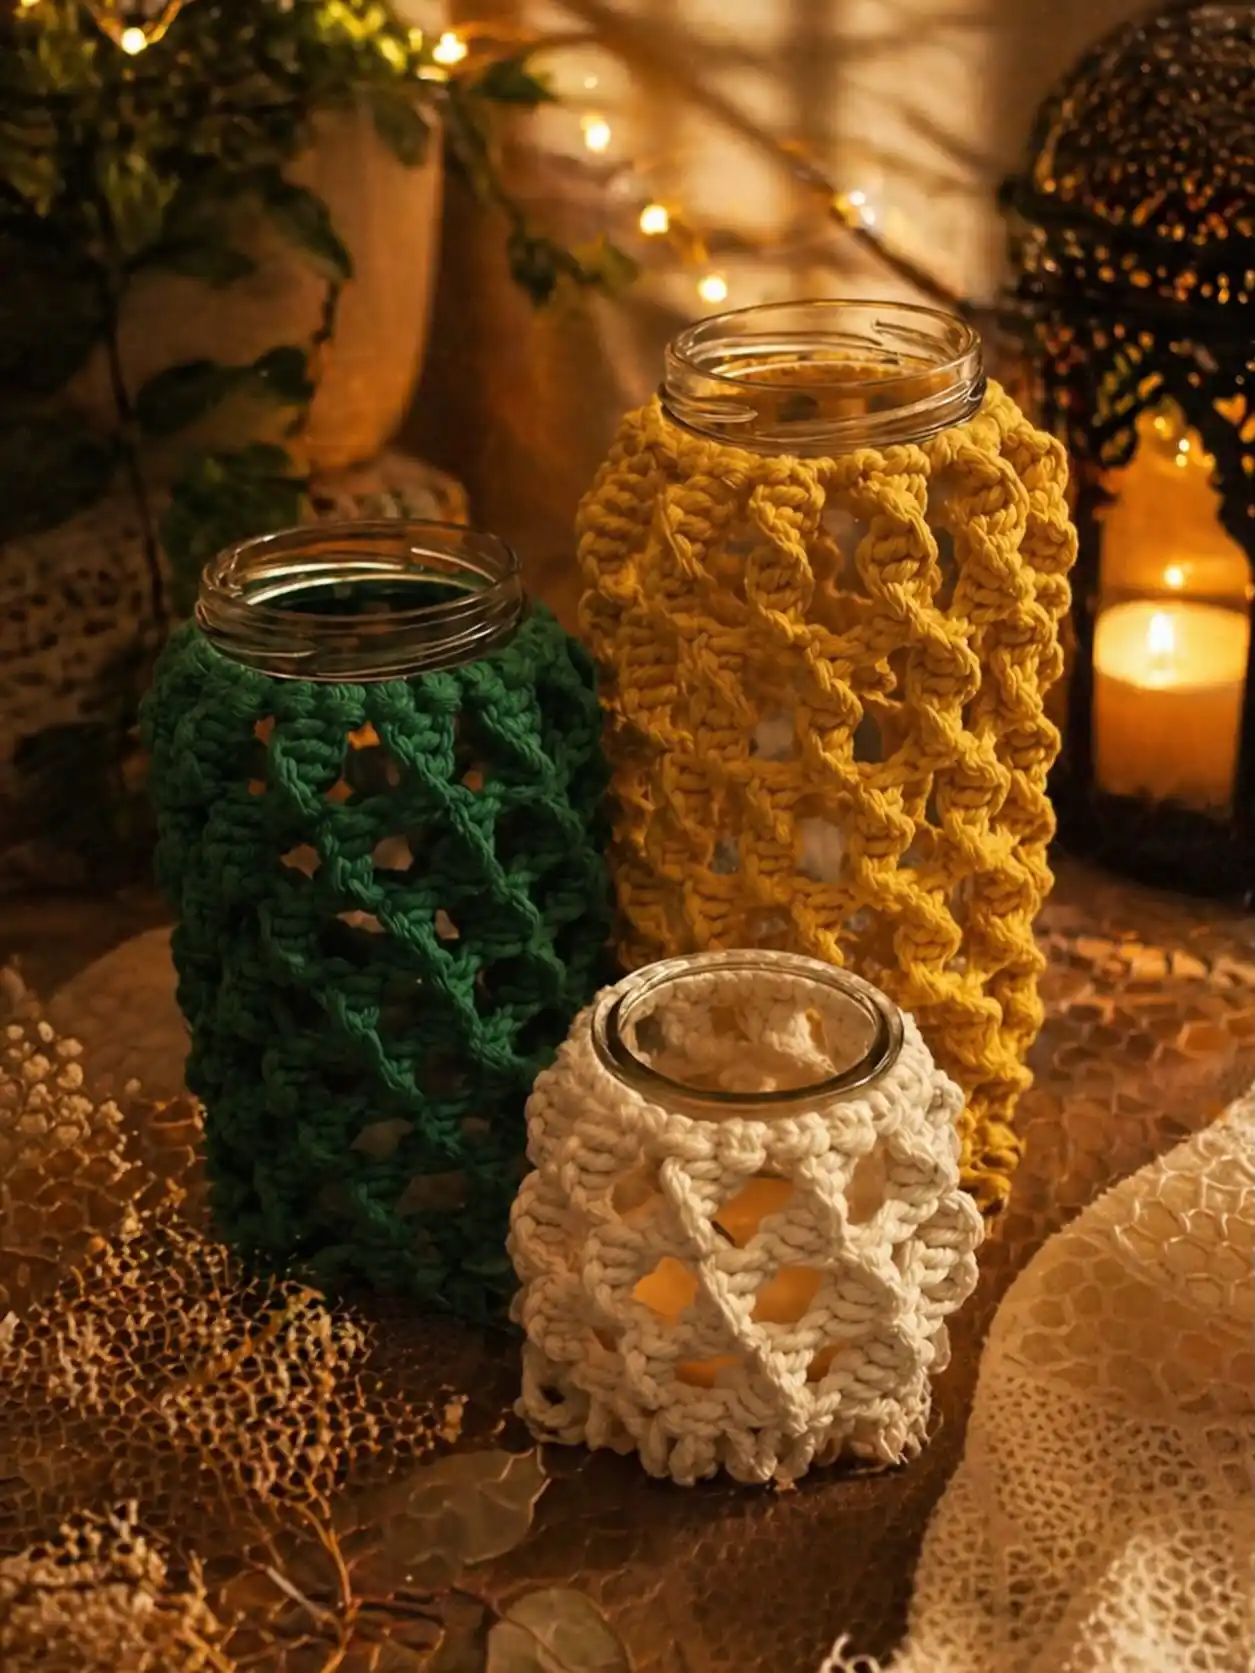
Forget style variety for a second, this photo makes the case for pure color. All three jars use nearly the same diamond crochet pattern, same density, same open cutouts, but they’re worked in forest green, mustard yellow, and undyed cream.
Grouped together next to string lights and a dark lantern, the color shift alone makes them read as three separate design choices rather than one repeated pattern.
Dyed cotton cord holds up fine for this kind of project since it never touches an open flame directly, only the glow reaches through.
If you already know one diamond pattern, this is the easiest way to multiply it into a whole set without learning anything new, just switch skeins between jars.
13. The Dusty Rose Wrap That Softens The Whole Look
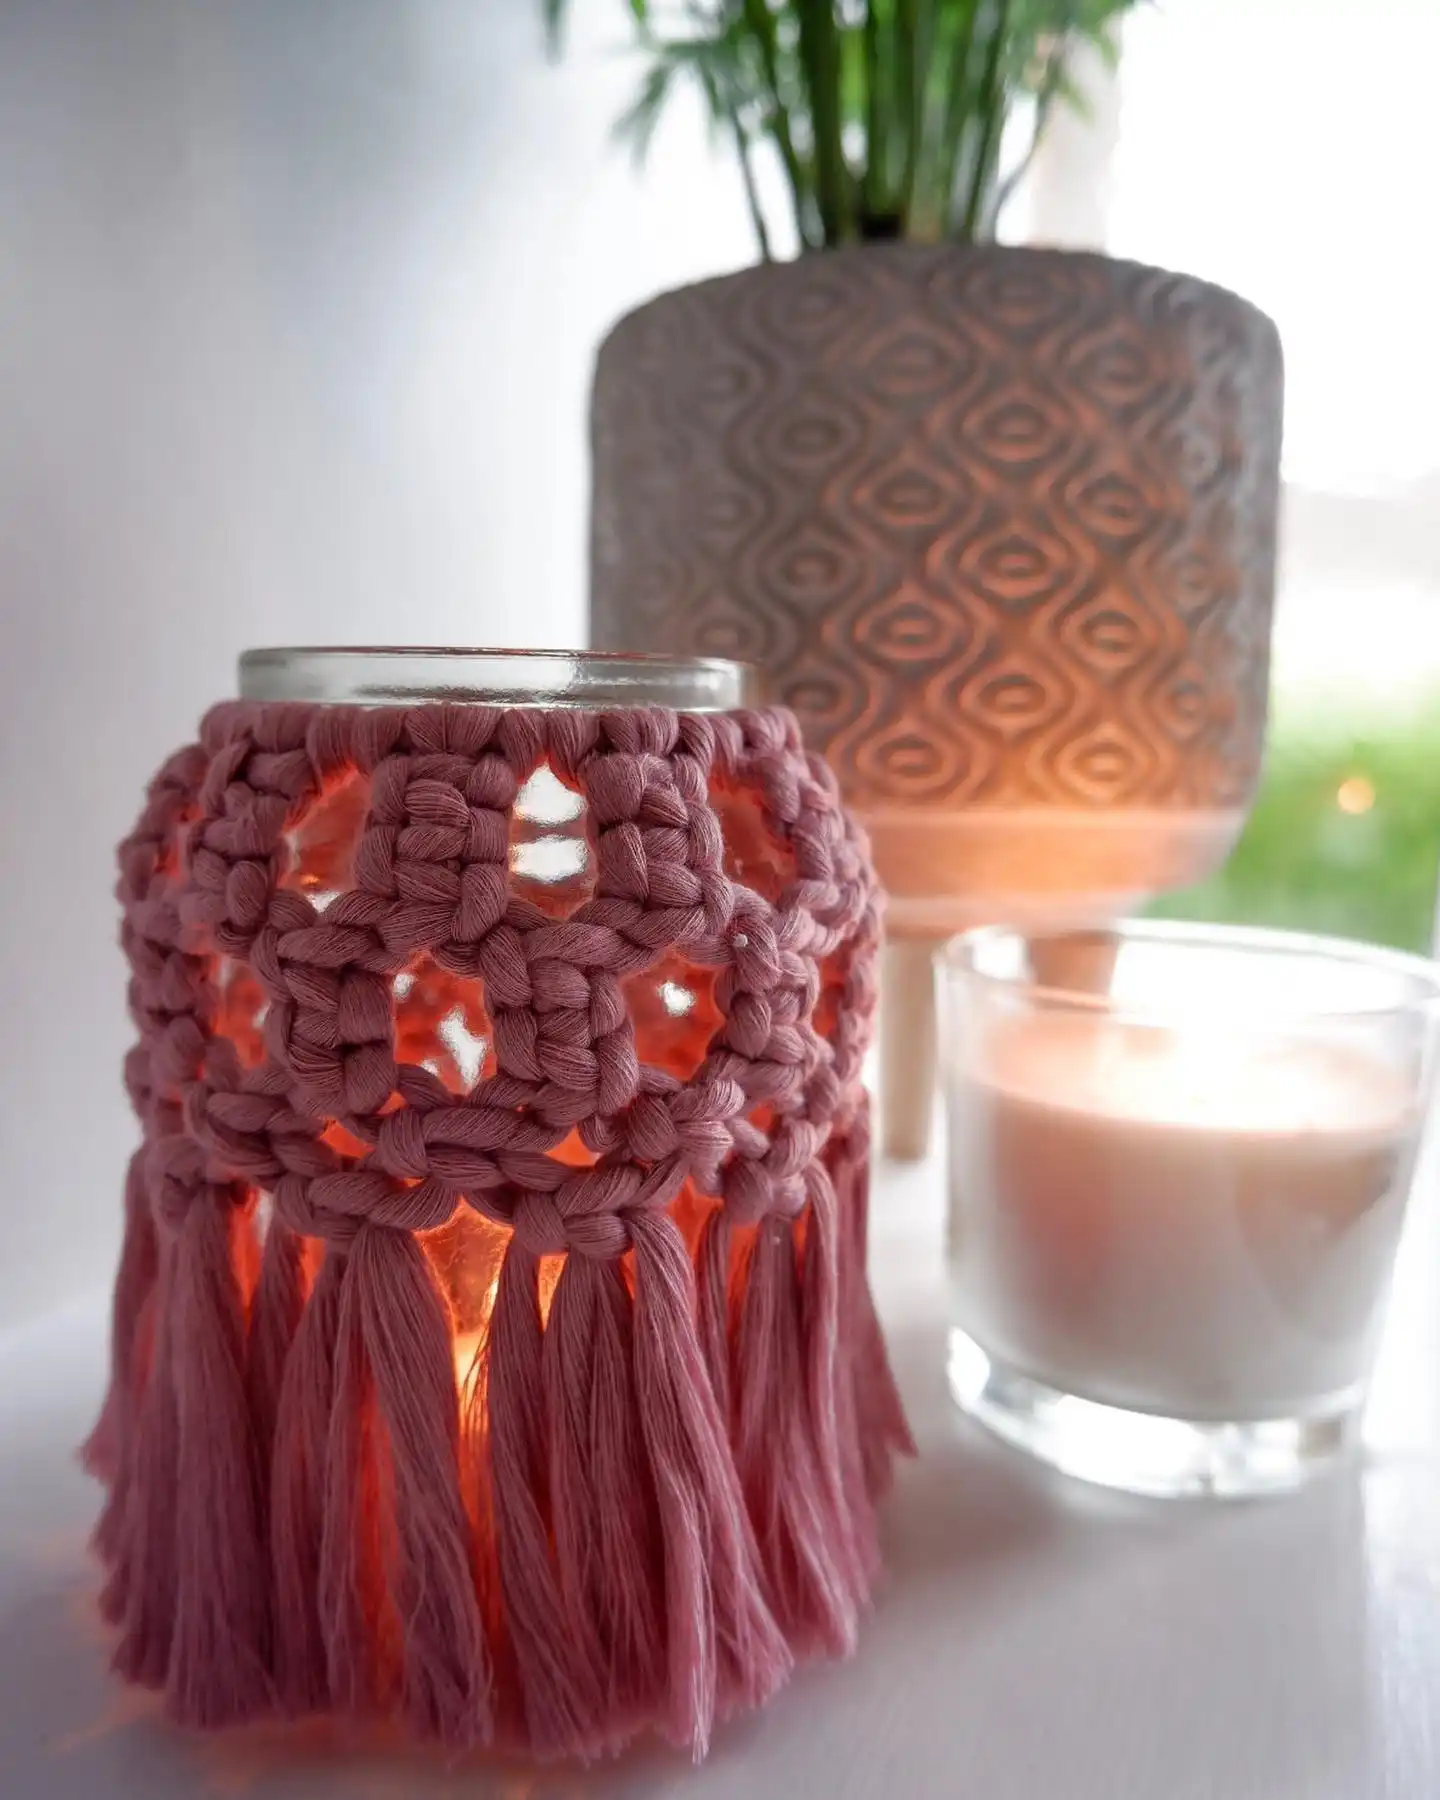
Muted mauve cord takes this jar somewhere the other entries haven’t gone yet, away from natural or bold tones and into something quieter and more romantic.
The knot pattern itself is a mid-density diamond crochet, similar in spirit to a few earlier jars, but the color does the heavy lifting, giving off a warm blush glow instead of the usual amber.
It sits in a soft-focus scene next to a textured stone lantern and a plain glass candle, which makes the pink read even more deliberate by contrast.
A few things worth noting on this one:
- Dusty rose or mauve cord photographs beautifully in daylight, softer and less saturated than the light shows once it’s lit
- The fringe here is left long and loose, almost matching the height of the knotted section above it
- This color pairs naturally with white, cream, or sage green decor rather than anything else bold or bright
Before dyeing or buying colored cord, hold a sample against your actual candle glow at home, since warm candlelight shifts a cool pink toward orange more than daylight ever will.
14. A Matched Pair That Turns A Patio Corner Into A Whole Scene

Two hanging jars, worked in the same dense knotting and finished with matching tassels, hang side by side over a rattan sofa strung with fairy lights.
Each jar carries its own single knotted motif on the front, a small leaf-like shape on one and a looser open diamond on the other, so up close they’re not identical twins, just close cousins.
That’s really the takeaway: hanging pairs don’t need to match knot for knot to feel coordinated, they just need the same tassel length and the same cord weight.
15. A Trio Staged Outdoors For A Rustic, Two-Tone Finish
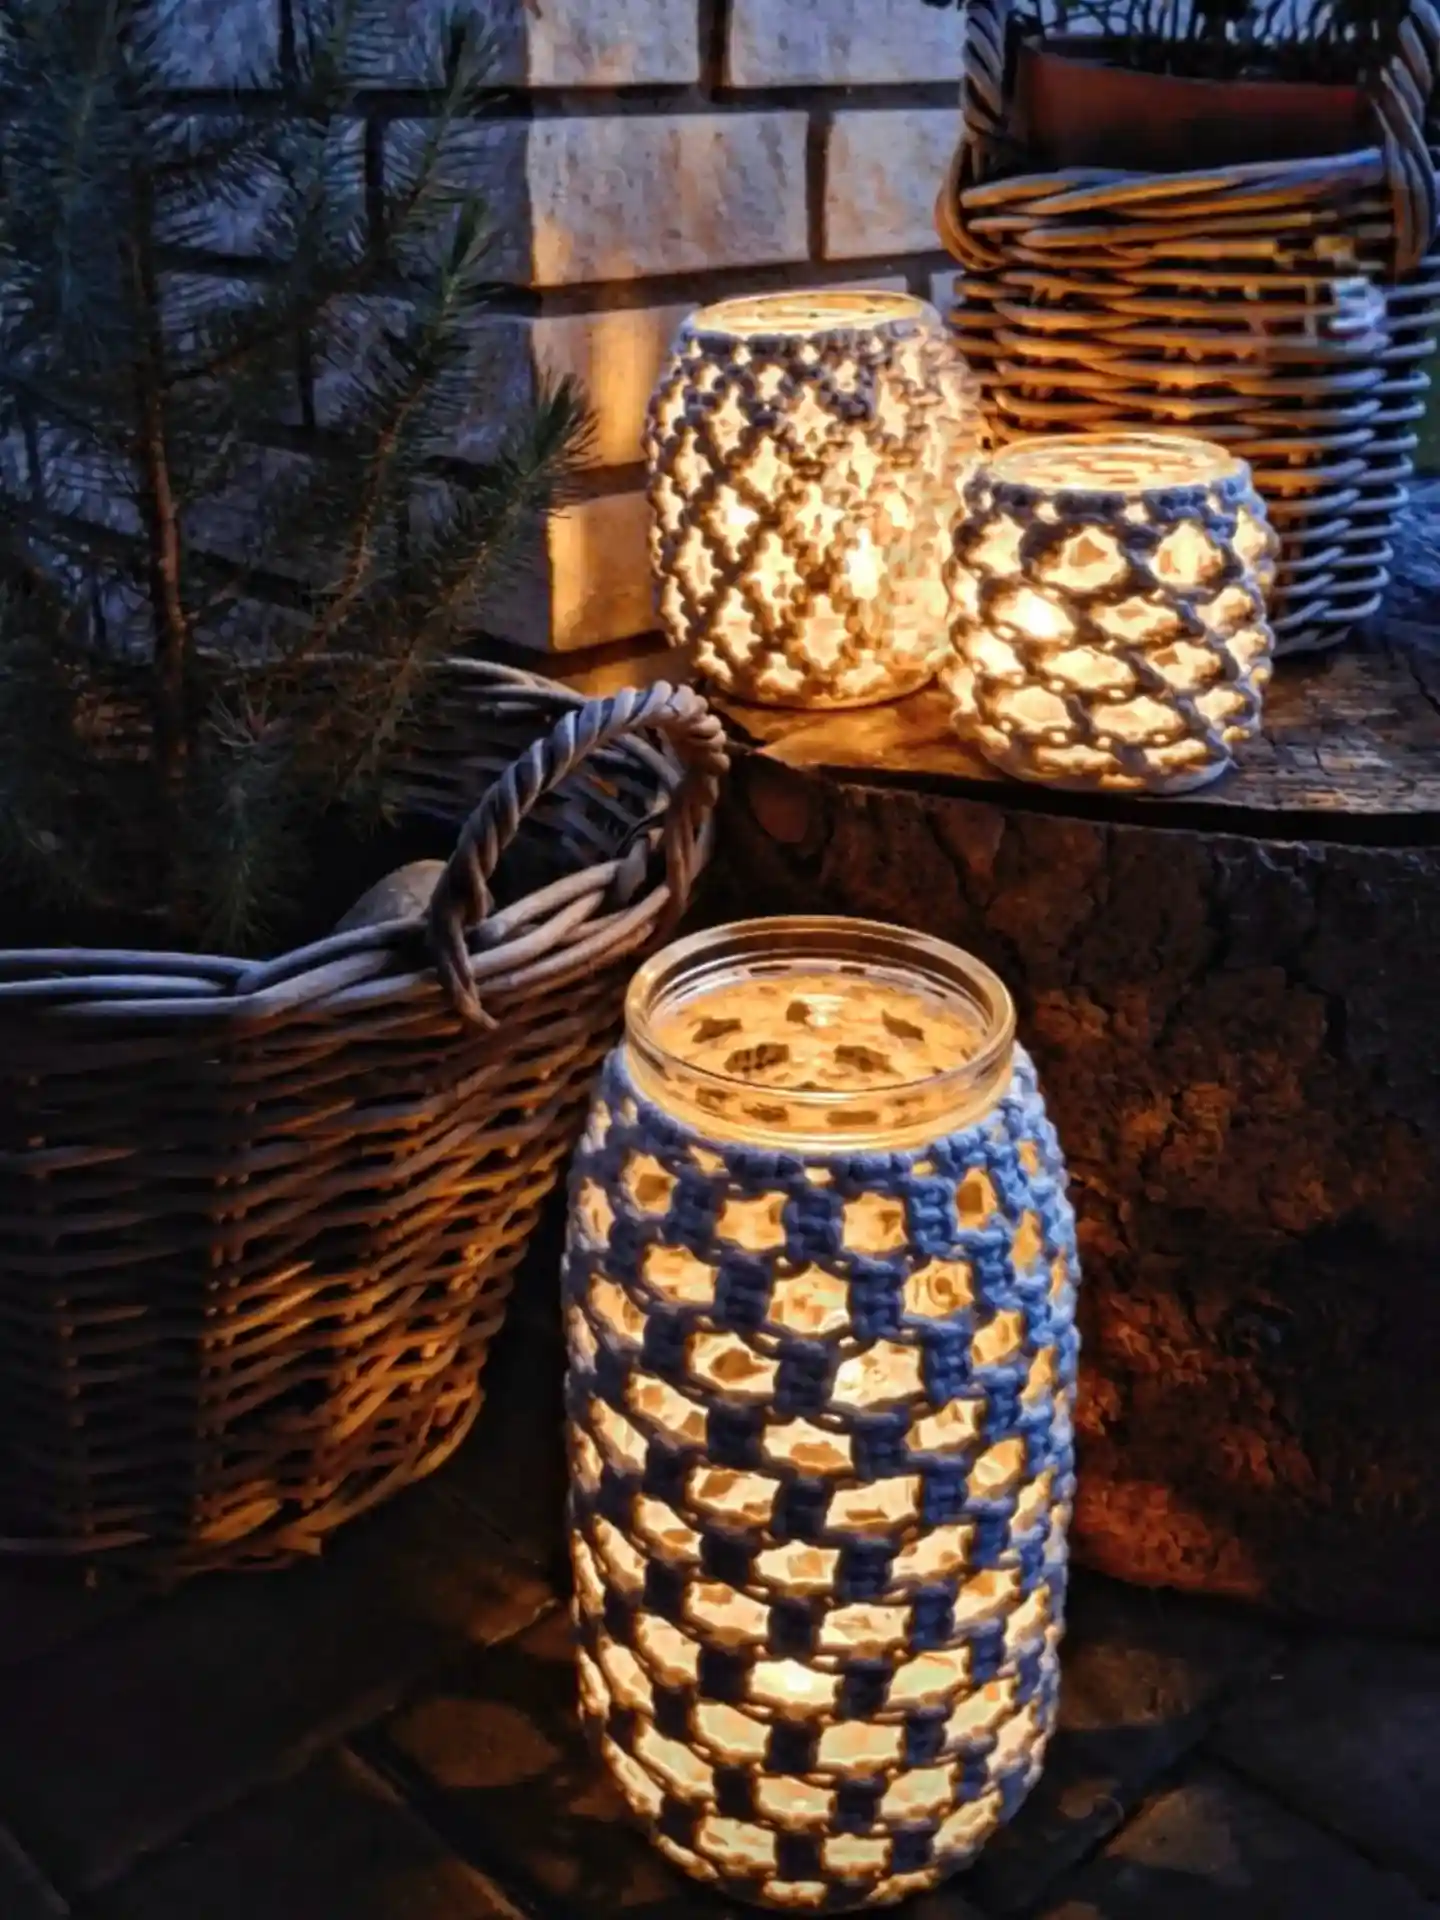
Three jars this time, set outside on a tree-stump ledge and a stone step, tucked among wicker baskets and pine branches.
The two-tone cord is what sets this batch apart from anything earlier on the list, navy and pale blue worked together in a checkerboard-style crossing pattern rather than a single shade throughout.
The tallest jar in front shows it best, alternating dark and light squares stacked in even rows all the way down.
This finishes the outdoor use case that a lot of the earlier jars only hinted at. A stone step or wood stump handles heat and weather better than any indoor surface, and the darker navy tone hides evening dirt and pollen far better than a plain cream cord would.
conclusion
Fifteen jars, fifteen totally different personalities, and not one of them needed anything more than cord, a pair of scissors, and a plain glass jar to start. That’s what makes this project worth coming back to again and again.
Once you’ve got one knot pattern down, whether it’s a simple diamond net or a chunkier square knot, you can rework it in a new color, stretch it into a hanging piece, or shrink it down for a tiny votive, and it’ll feel like a brand new idea every time.
Start with whichever style matches the skill you already have, and let the rest wait for a slower weekend.
Save this for the next time you want a warm, handmade glow in your space.