13 Personalized Keychain Ideas to Make

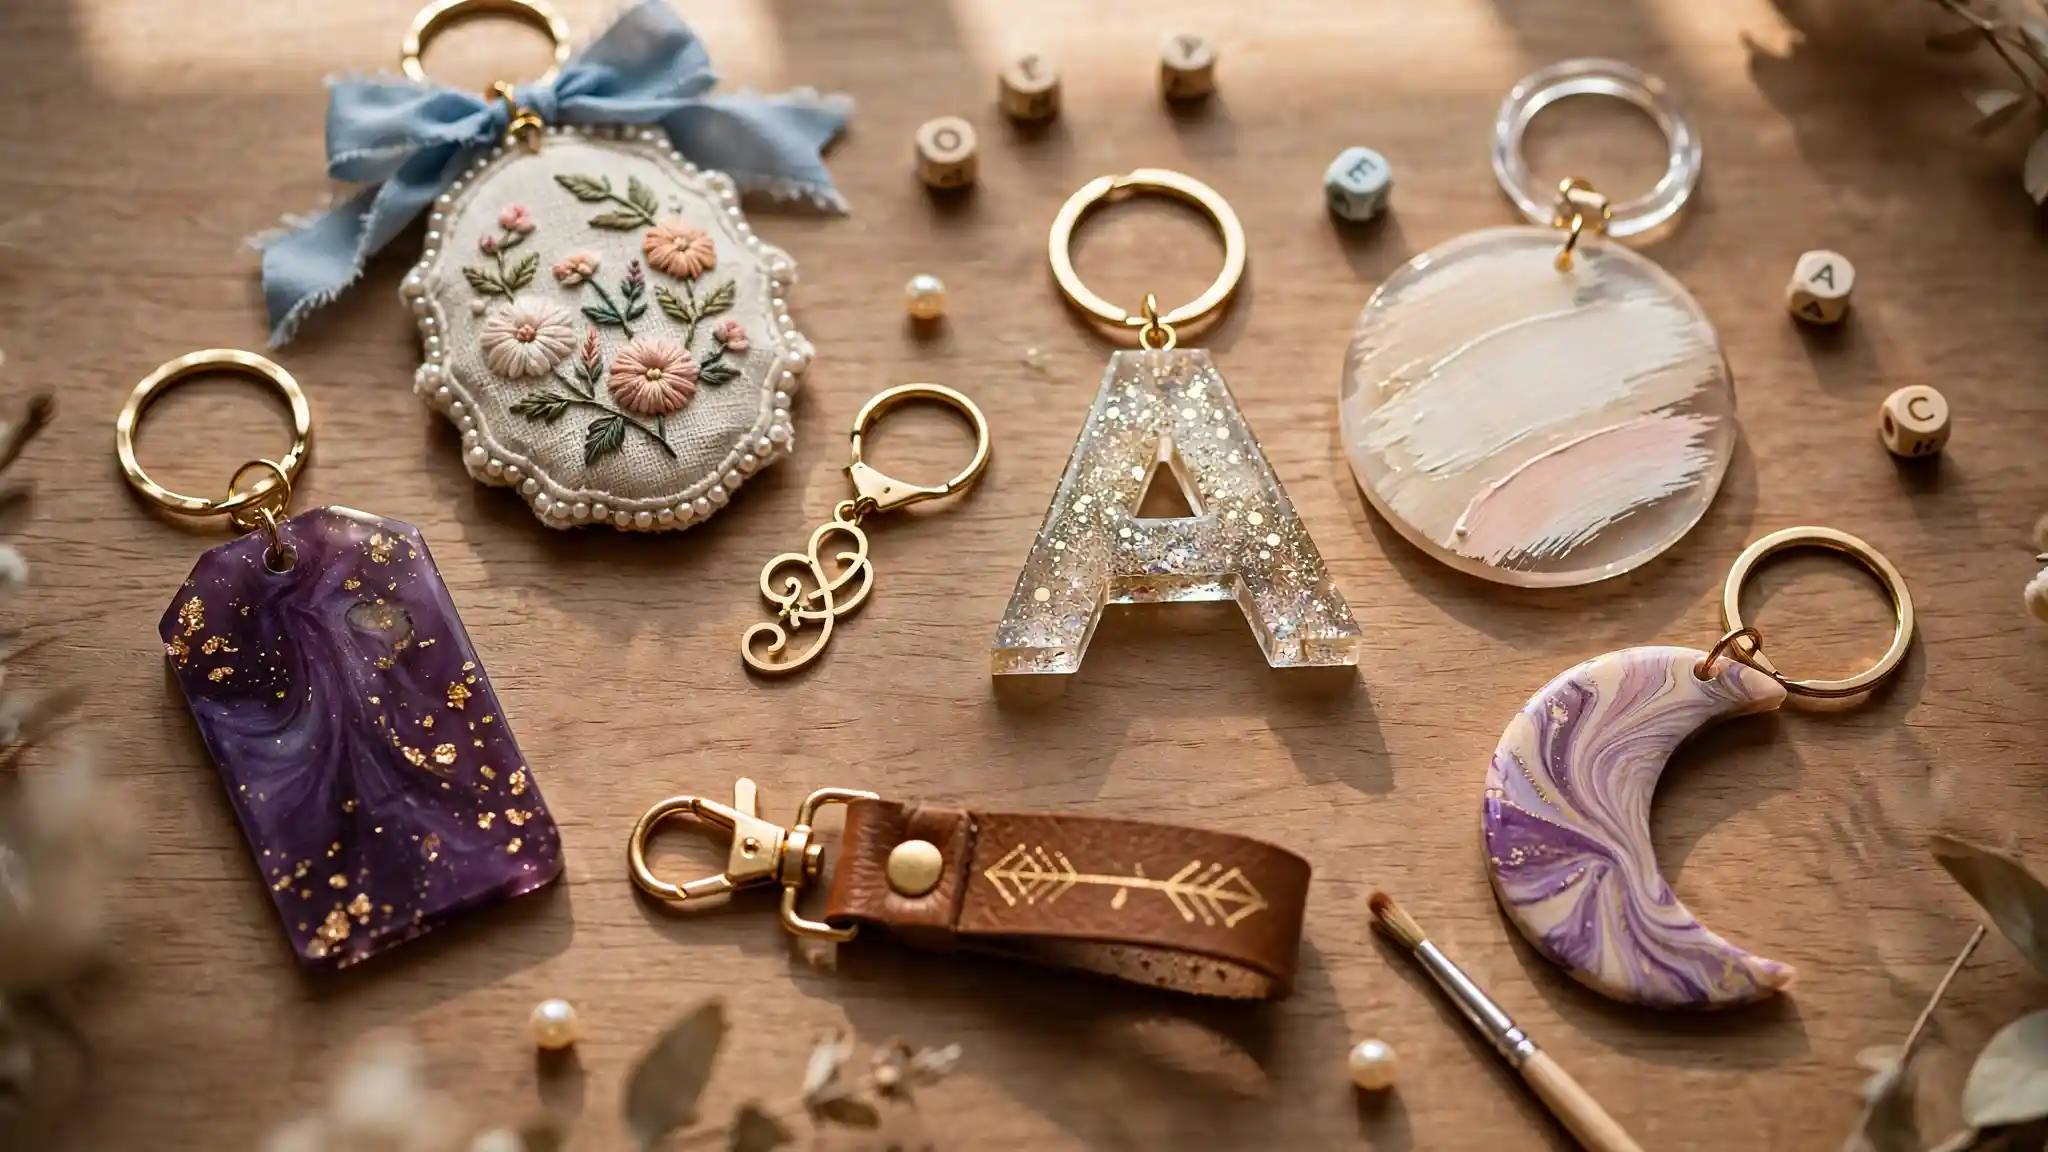
A keychain sounds like a small thing to make until you realize how many ways there are to get it wrong. Flat, boring, obviously store bought.
These 13 personalized keychain ideas skip that trap entirely, pulling from embroidery, resin, wire, beads, leather, and acrylic so there’s a technique here no matter what supplies you already have on hand.
Some take an afternoon with a bag of letter beads. Others need a laser cutter or a few rounds of curing resin.
What ties them together is the personal part, a name, an initial, a zodiac sign, or even a real photo, worked right into the design instead of stuck on as an afterthought.
Whether you’re making one as a gift or building a whole batch to sell, each idea below comes with the actual construction details, not just a pretty picture.
Pin the ones that match your skill level and supplies, then come back when you’re ready to try the next.
13 Personalized Keychain Ideas to Make
1. Hand Embroidered Name Keychain with Pearl Trim
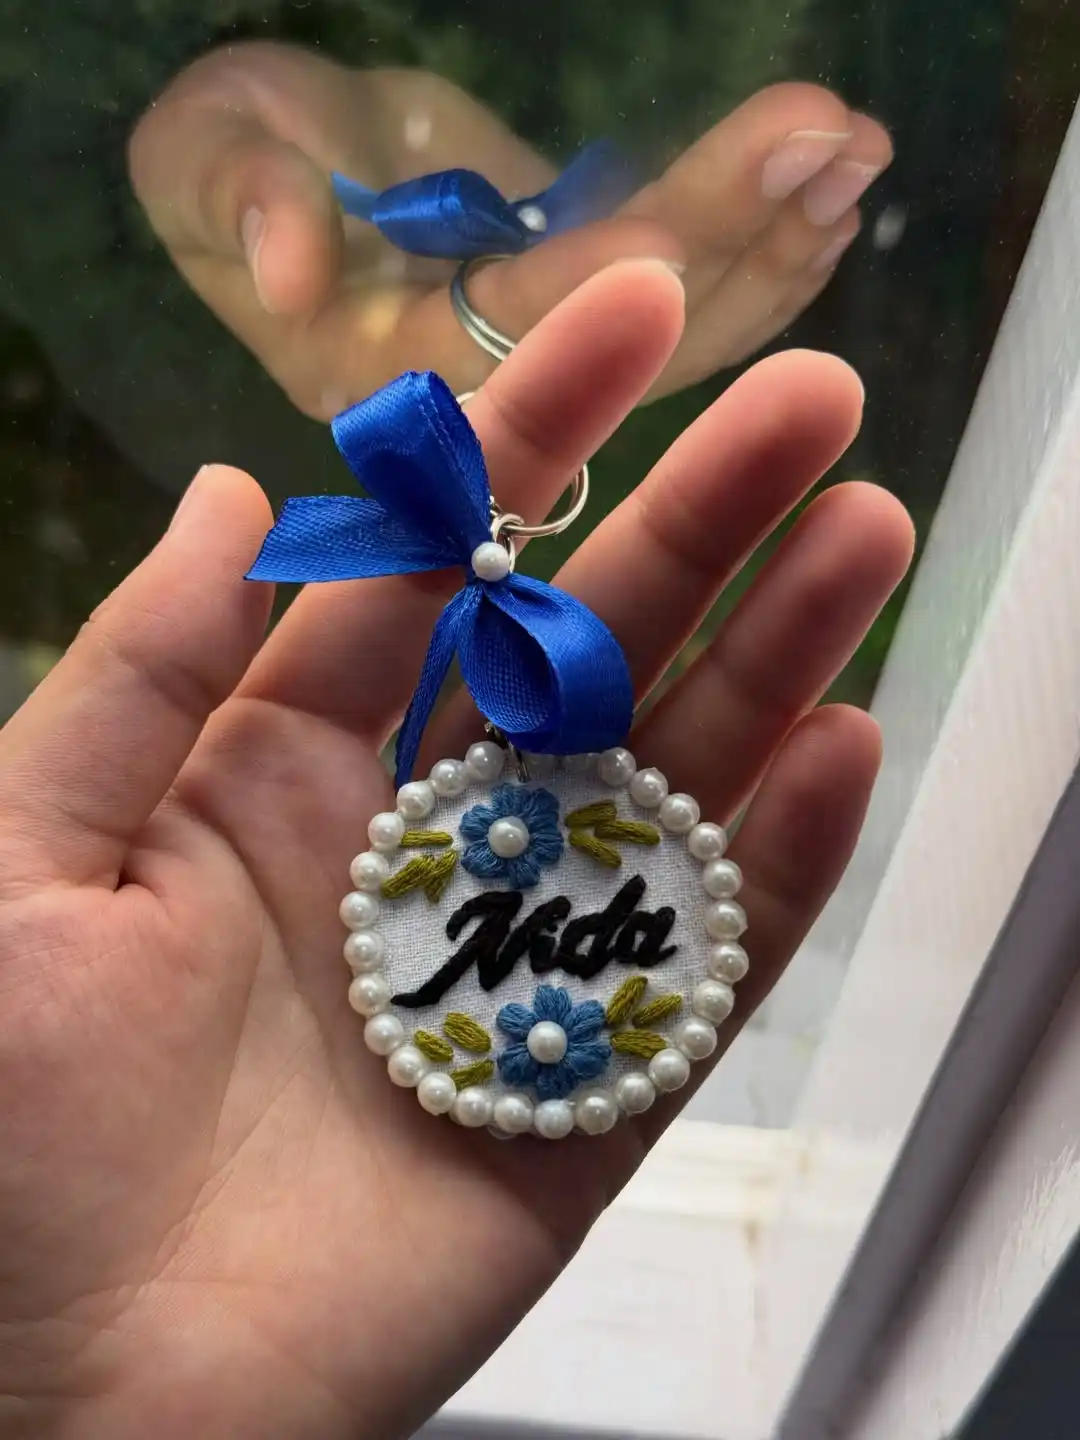
Stitching a name is one of the most personal ways to make a keychain, and this one shows exactly why.
The name sits in loose, flowing cursive across the center in black thread, framed by two small embroidered flowers in dusty blue with olive green leaf stitches on either side.
What makes this one stand out:
- A full ring of tiny pearl beads glued or stitched around the outer edge, giving it a finished, boutique look
- A satin ribbon bow threaded through the keyring instead of a plain jump ring
- Thread colors kept to just three: black for the name, blue for the flowers, green for the leaves
This style works best on a round felt or muslin base, since the fabric needs to hold a tight running stitch without fraying at the edges.
It’s slow work compared to the other ideas on this list, but it’s the one that looks the most handmade in the best sense.
2. Alphabet Bead Name Keychains with Charm Add-Ons
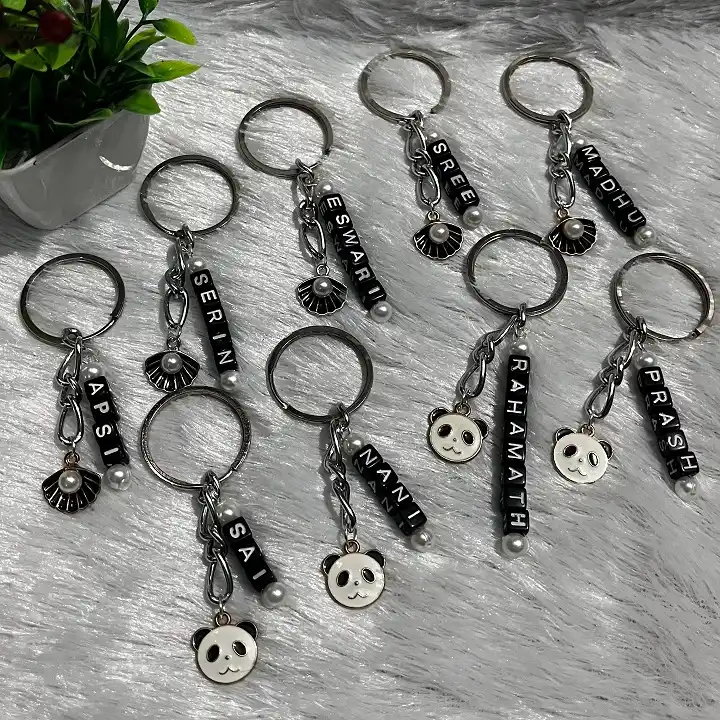
This batch shows the fastest way to personalize a keychain when you need more than one.
Black cube letter beads spell out each name, strung on a bent wire loop with a single pearl bead as a spacer at the bottom. No embroidery, no glue time, just beads and pliers.
Two charm styles show up across the set: a scalloped silver shell for a few of the names, and a small panda face for others.
Neither charm changes the technique, they just swap out at the very end once the name is finished.
This is the format to reach for when you’re making a whole batch, like party favors, teacher gifts, or a set for a friend group. One name takes minutes once you get the wire bend down.
Pre-cut all your wire lengths and pre-sort letter beads by name before you sit down. Assembly line style is what makes a batch like this go fast.
3. Resin Name Tag with Gold Leaf and Wire Lettering
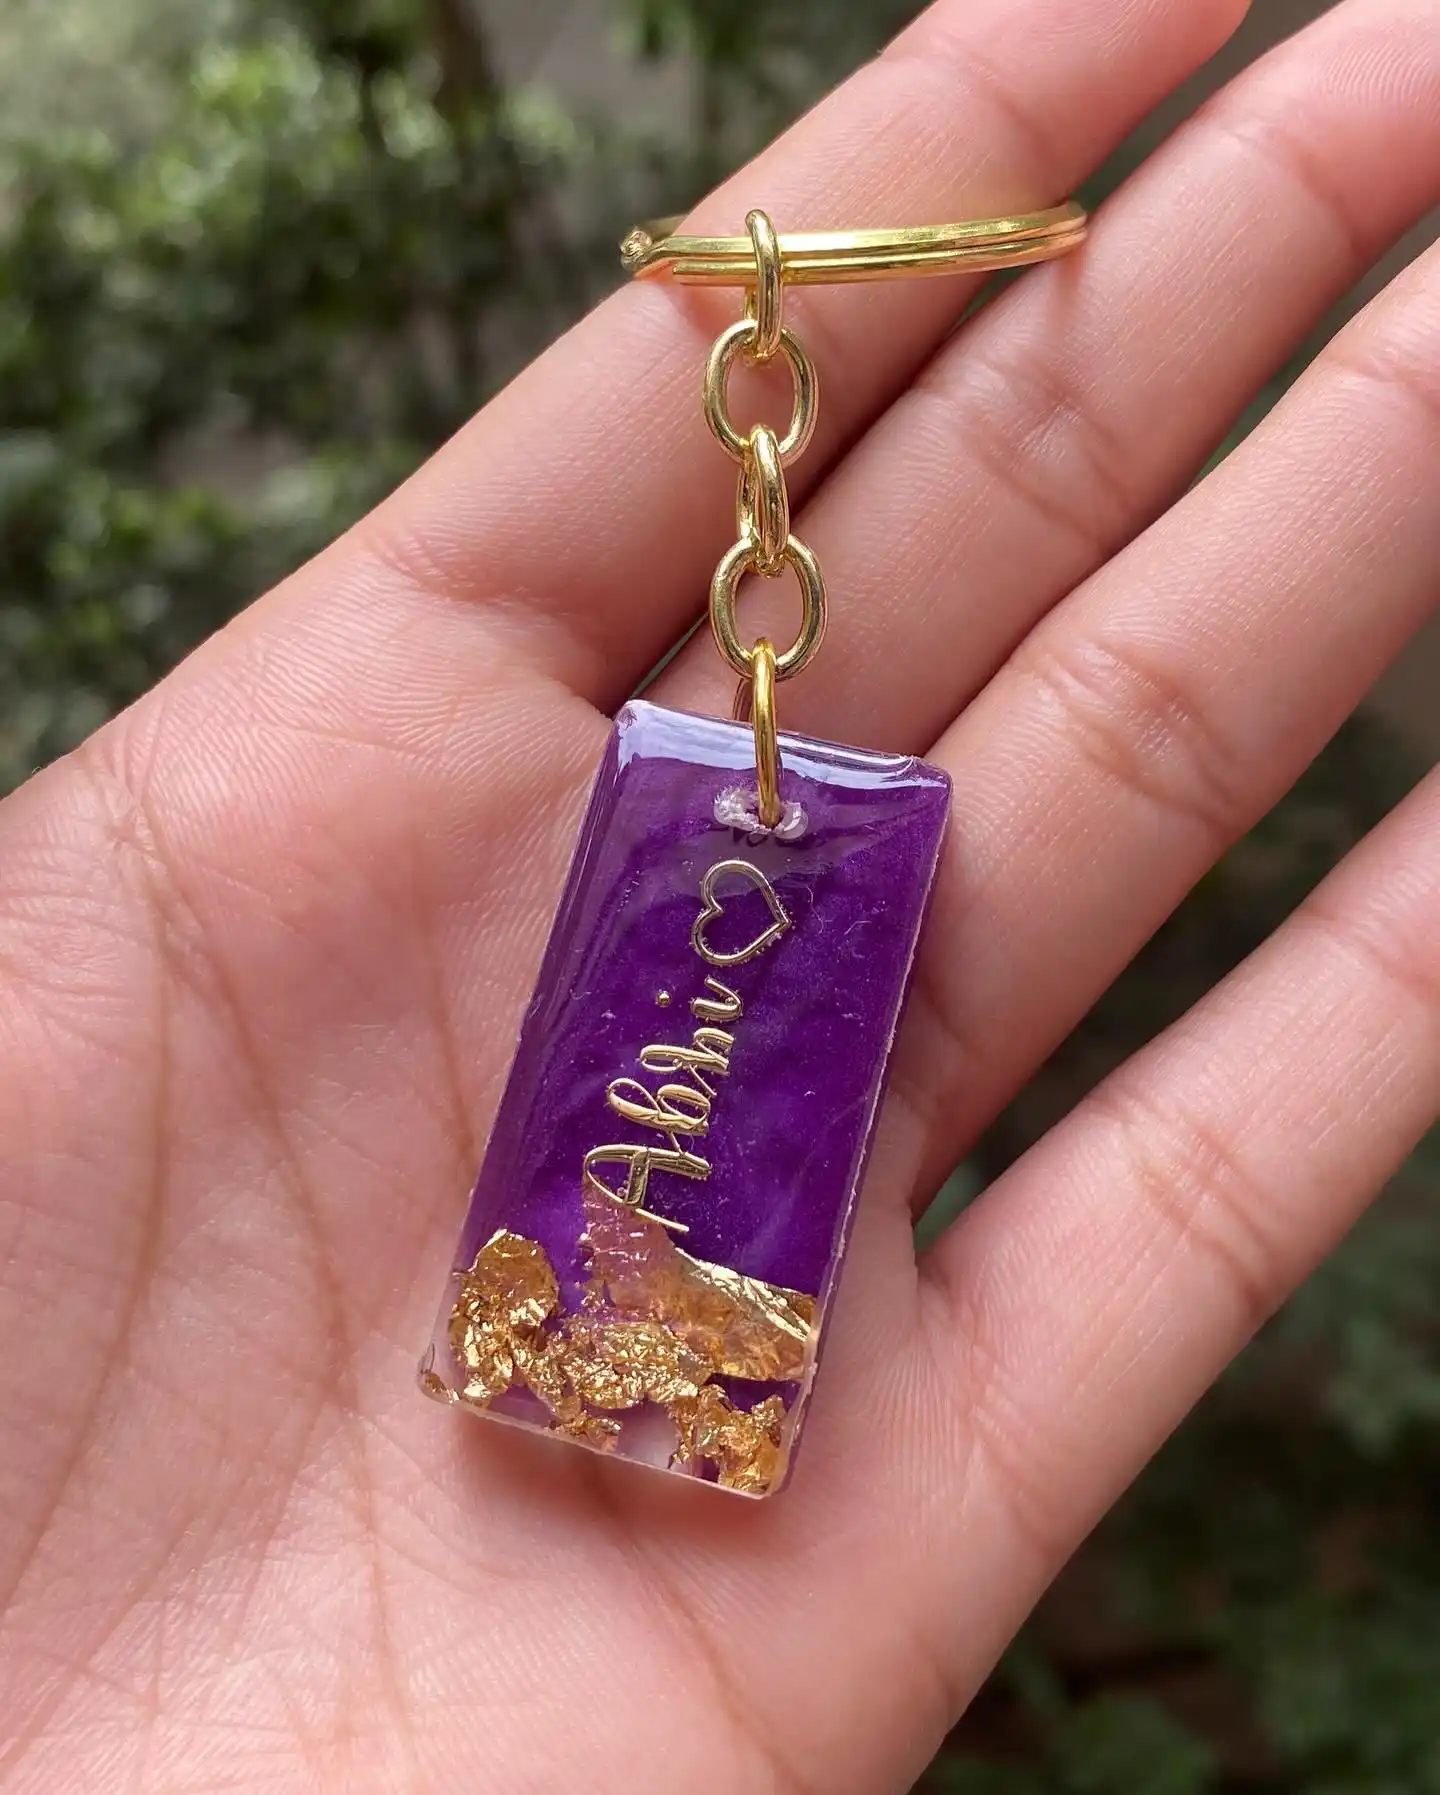
A rectangular slab of clear resin holds the real magic in this one. Deep purple pigment fills most of the tag, but the bottom third is left with loose flecks of gold leaf suspended right in the resin, like the color was poured and the leaf scattered before it set.
A gold wire name, bent into a cursive script, sits pressed into the resin itself, with a small open wire heart above it.
What works here:
- The purple to clear gradient inside the resin, which gives it depth instead of looking like a flat colored block
- Gold leaf flecks concentrated at the bottom instead of scattered evenly, which reads more intentional
- A bent wire name pressed in before curing, so it sits flush with the surface instead of sitting on top
This technique takes more setup than beads or embroidery, since it involves mixing pigment, pressing in leaf and wire, and waiting on cure time. But the payoff is a keychain that looks like it came from a small batch jewelry shop.
Purple fades toward clear at the base, giving the resin real depth instead of a flat tint.
Leaf flecks are pooled at the bottom edge instead of spread evenly, so the eye lands there first.
Bending the name in wire and pressing it into wet resin keeps it flush instead of raised on top.
4. Photo Keepsake Keychain with Pressed Flowers in Resin
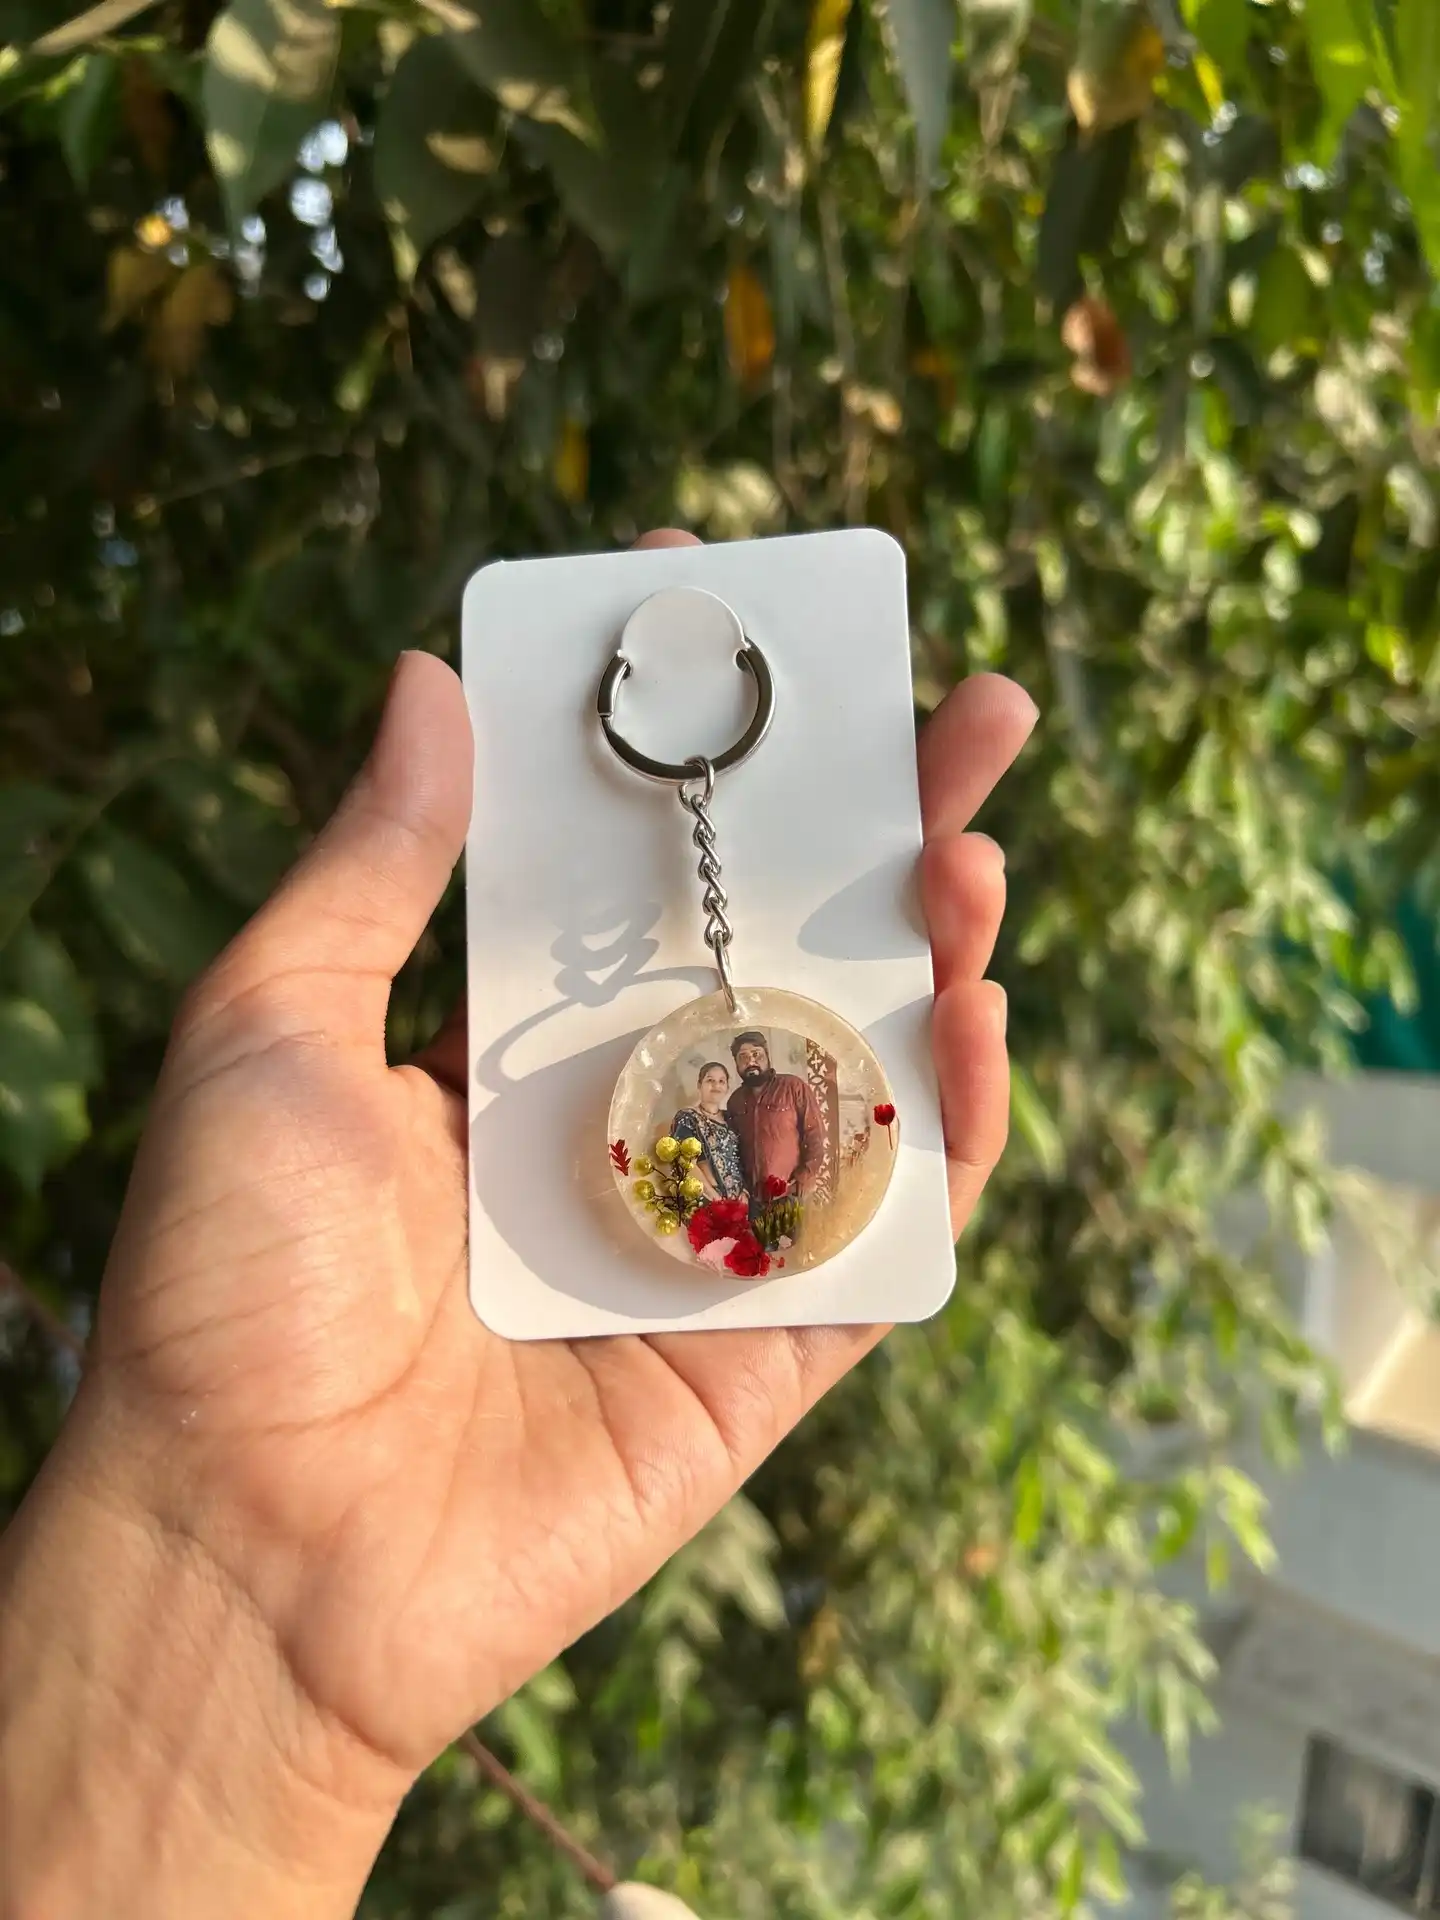
Turning an actual photo into a keychain takes this whole idea somewhere more personal than a name or initial.
A printed photo of a couple sits centered inside a round resin disc, and instead of leaving the rest of the space plain, the maker packed the edges with tiny dried flowers in yellow, red, and white.
A few things make this one read as a keepsake instead of a novelty item:
Subscribe to DIY Craft Bloom
Get updates on the latest posts and more from DIY Craft Bloom straight to your inbox.
- The photo is trimmed and sealed flat before the resin goes over it, so there’s no warping or bubbling across the faces
- Real pressed flowers fill the negative space, which adds texture without covering any part of the image
- A slightly cloudy, warm tone in the resin itself, likely from the flower dye bleeding a touch, which actually gives it a vintage feel instead of looking like a mistake
This one takes patience with layering, since the photo needs a sealed base layer before flowers and top coat go on. But for anniversaries, memorial gifts, or family keepsakes, it’s hard to beat.
5. Cut Metal Script Name Charm on a Plain Ring
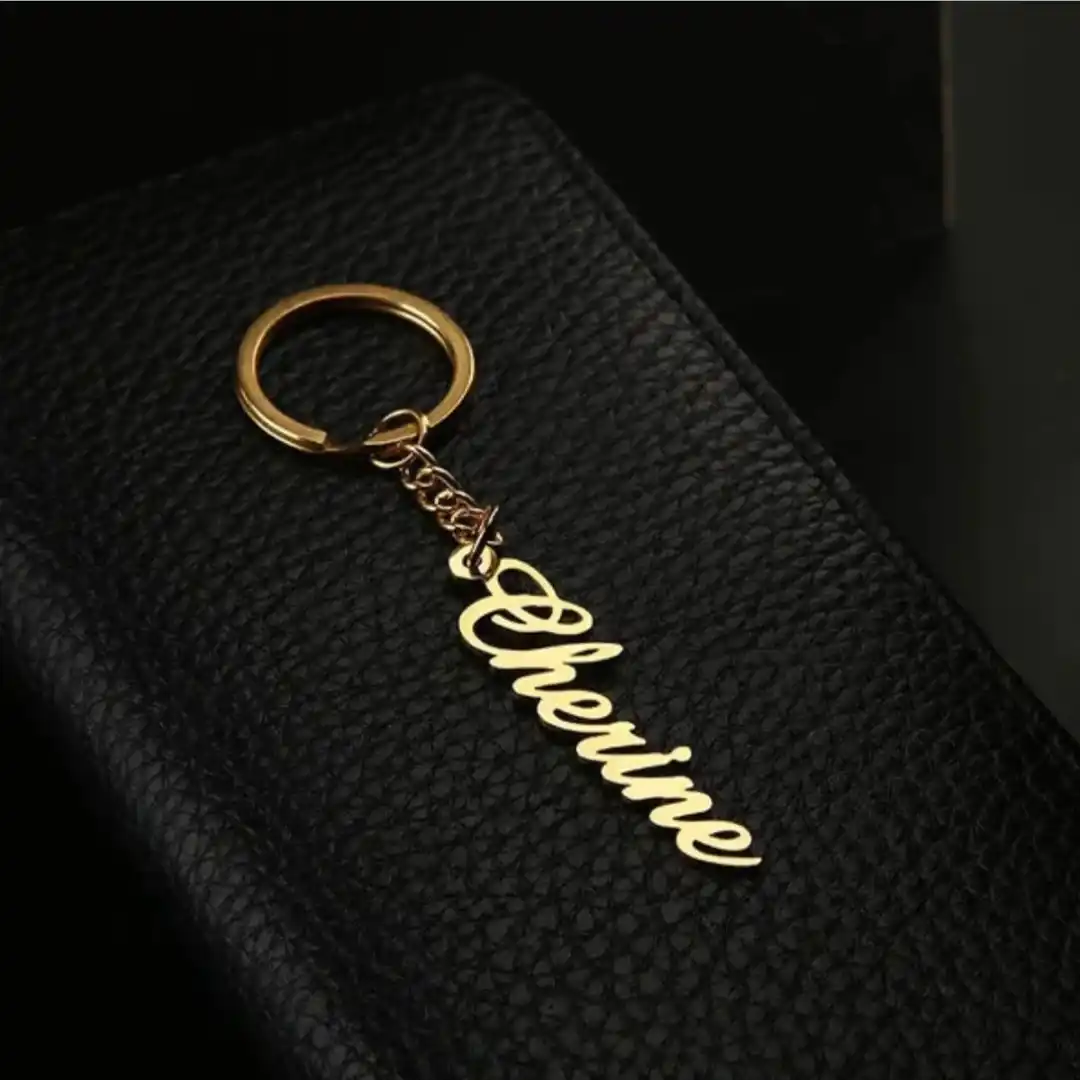
Cut metal keychains skip decoration completely and let the shape of the name do all the work.
This one shows a full name cut from a thin sheet of gold toned metal, connected to the ring by a short length of fine chain instead of a solid jump ring. No background, no charm, no extra beads, just the letters floating on their own.
Getting a clean cut like this at home usually means one of three routes:
- Order it laser cut. Send a script font file to a local laser cutting shop and get it back in metal within a day or two.
- Cut it by hand from metal blanks. Use a jeweler’s saw on thin brass or aluminum sheet, following a printed template glued to the surface.
- Cast it in metal clay. Roll out metal clay, cut the shape with a fine blade, then fire it in a kiln so it hardens into solid metal.
Whichever method you use, a light polish at the end is what gives it that warm gold shine instead of a dull cut edge.
Choose a connected cursive font so every letter touches the next, or the metal will fall apart when cut.
Send it to a laser cutter, saw it by hand from metal blanks, or shape it from metal clay before firing.
Buff the edges smooth, then link it to the ring with a short chain instead of one big jump ring.
6. Matching Initial Letter Keychains for Couples
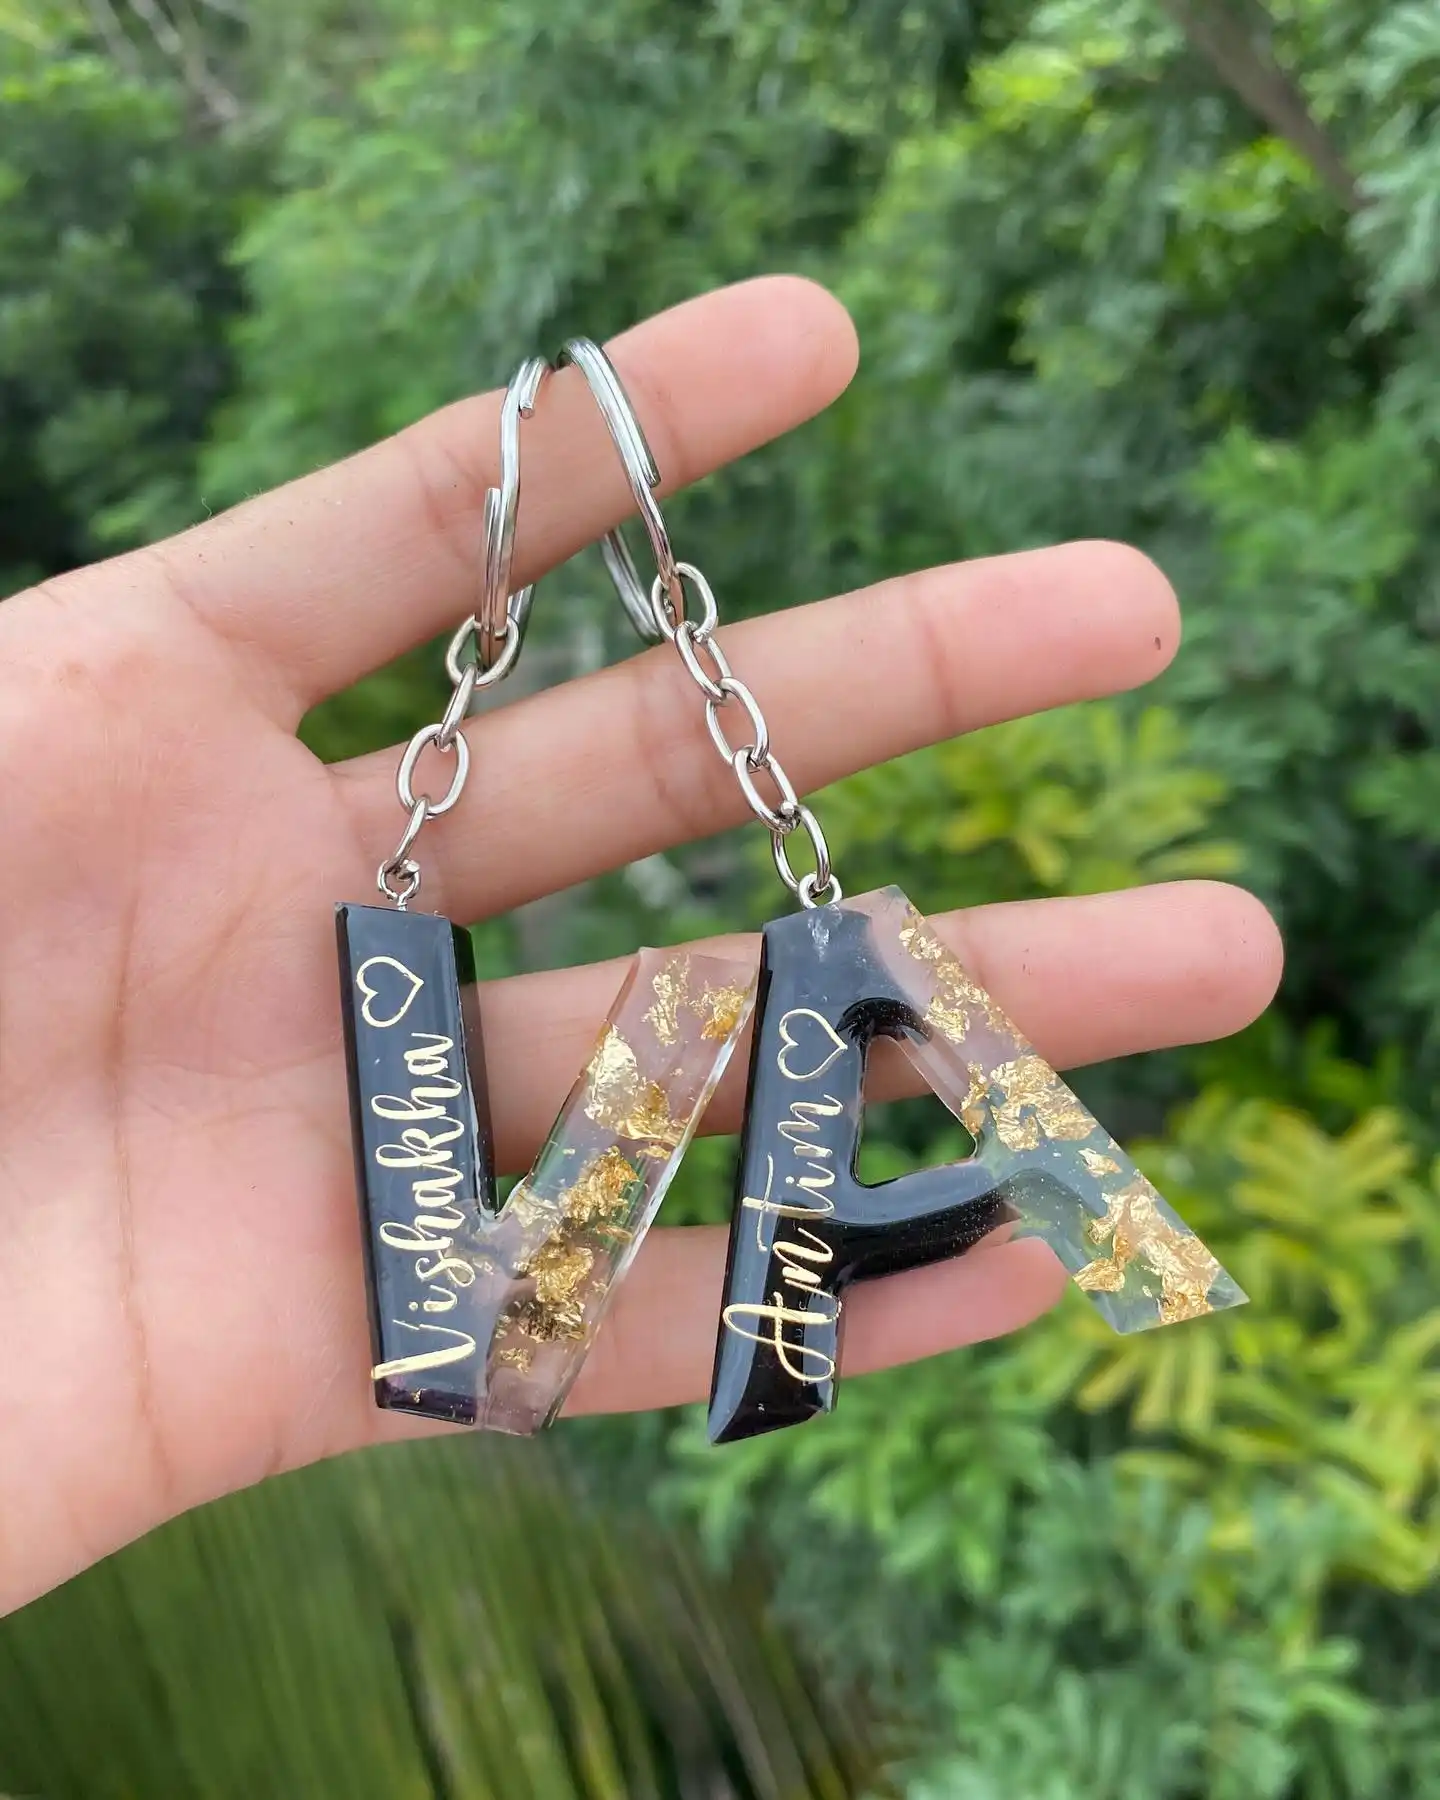
This one is built as a set, not a single piece. Each keychain is shaped like a large block letter, one V and one A, cast in black resin with the same gold leaf flecks running through both.
A first name is written in gold script across the front of each letter, with a small open heart tucked beside it.
The letter shape itself does double duty here. It’s a personalized name piece and a recognizable initial at the same time, so it reads clearly on a keyring from across a room, not just up close.
Making the pair match matters more than making either one fancy. Same resin color, same gold leaf density, same script style for both names, so they clearly belong together even though the letters and names are different.
| Keychain 1 | Keychain 2 |
|---|---|
| Shaped as the letter V | Shaped as the letter A |
| Name written in gold script | Name written in gold script |
| Black resin with gold leaf flecks | Black resin with gold leaf flecks |
7. Curved Bar Bracelet Style Keychain with Bow Charm
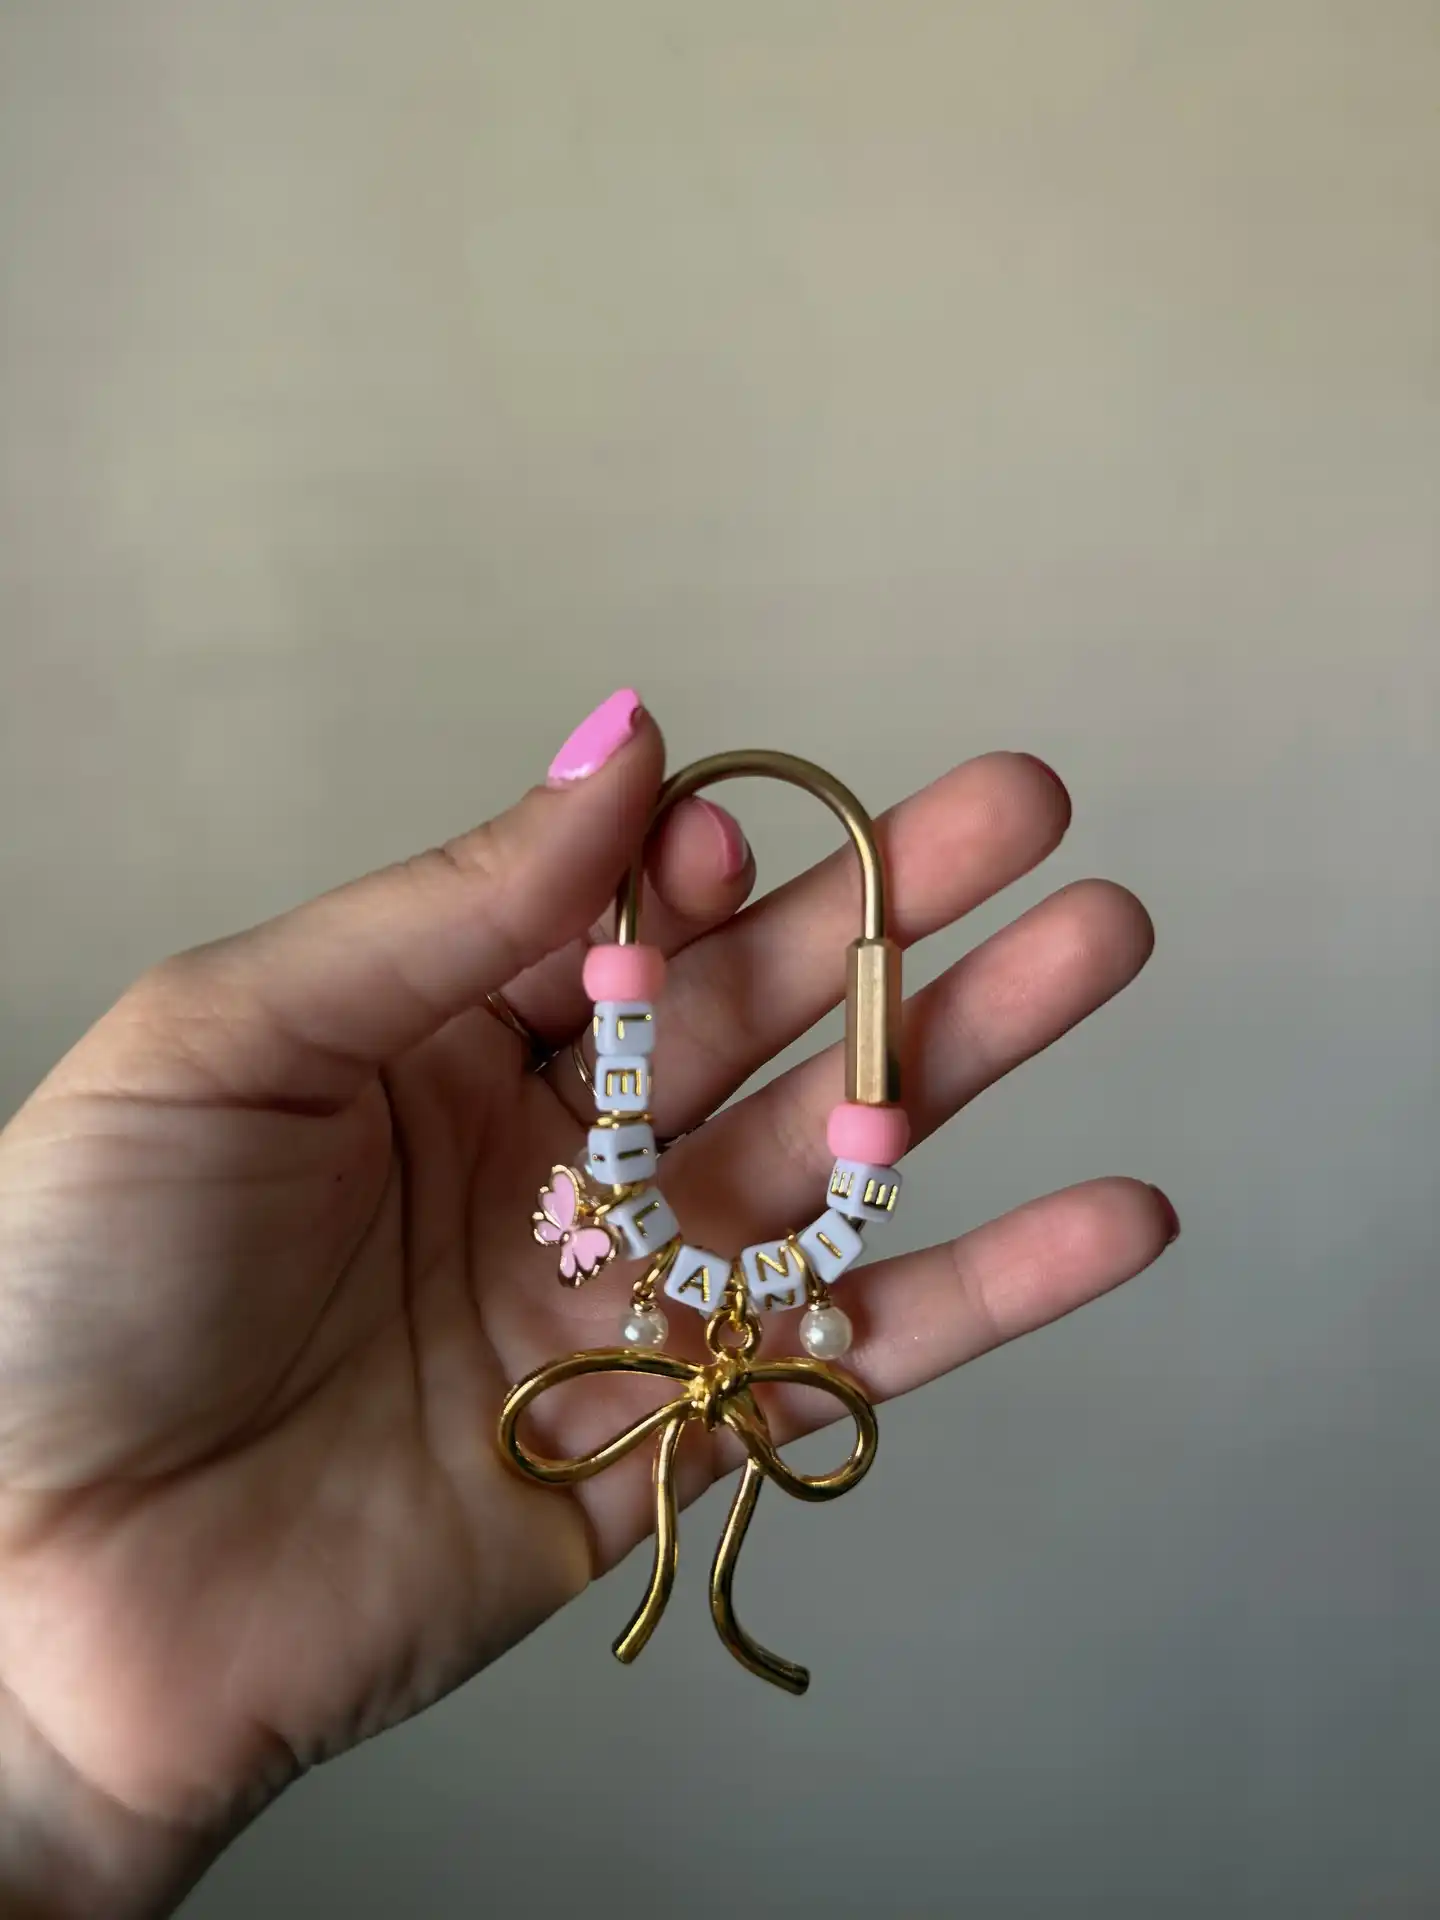
Pink and white sit at the center of this design, and the shape breaks away from a standard round ring entirely.
A gold curved bar takes the place of the keyring, styled more like a bracelet clasp than a typical keychain, with letter cube beads strung along soft pink spacer beads to spell out a name.
A small enamel butterfly charm and a gold bow dangle from the bottom, each hanging from its own tiny pearl bead.
A few details that separate this from a basic beaded keychain:
- The curved bar shape instead of a round ring, which makes the whole thing look more like jewelry
- Two charms layered at the bottom instead of one, so it has visual weight without feeling cluttered
- Pink spacer beads on either side of the name, which frame the letters instead of letting them float against bare metal
This style leans younger and softer than the other builds on this list, which makes it a strong pick for kids’ bag tags, birthday party favors, or anyone who wants pastel over gold or black.
8. Laser Engraved Acrylic Disc with Two Flower Outlines
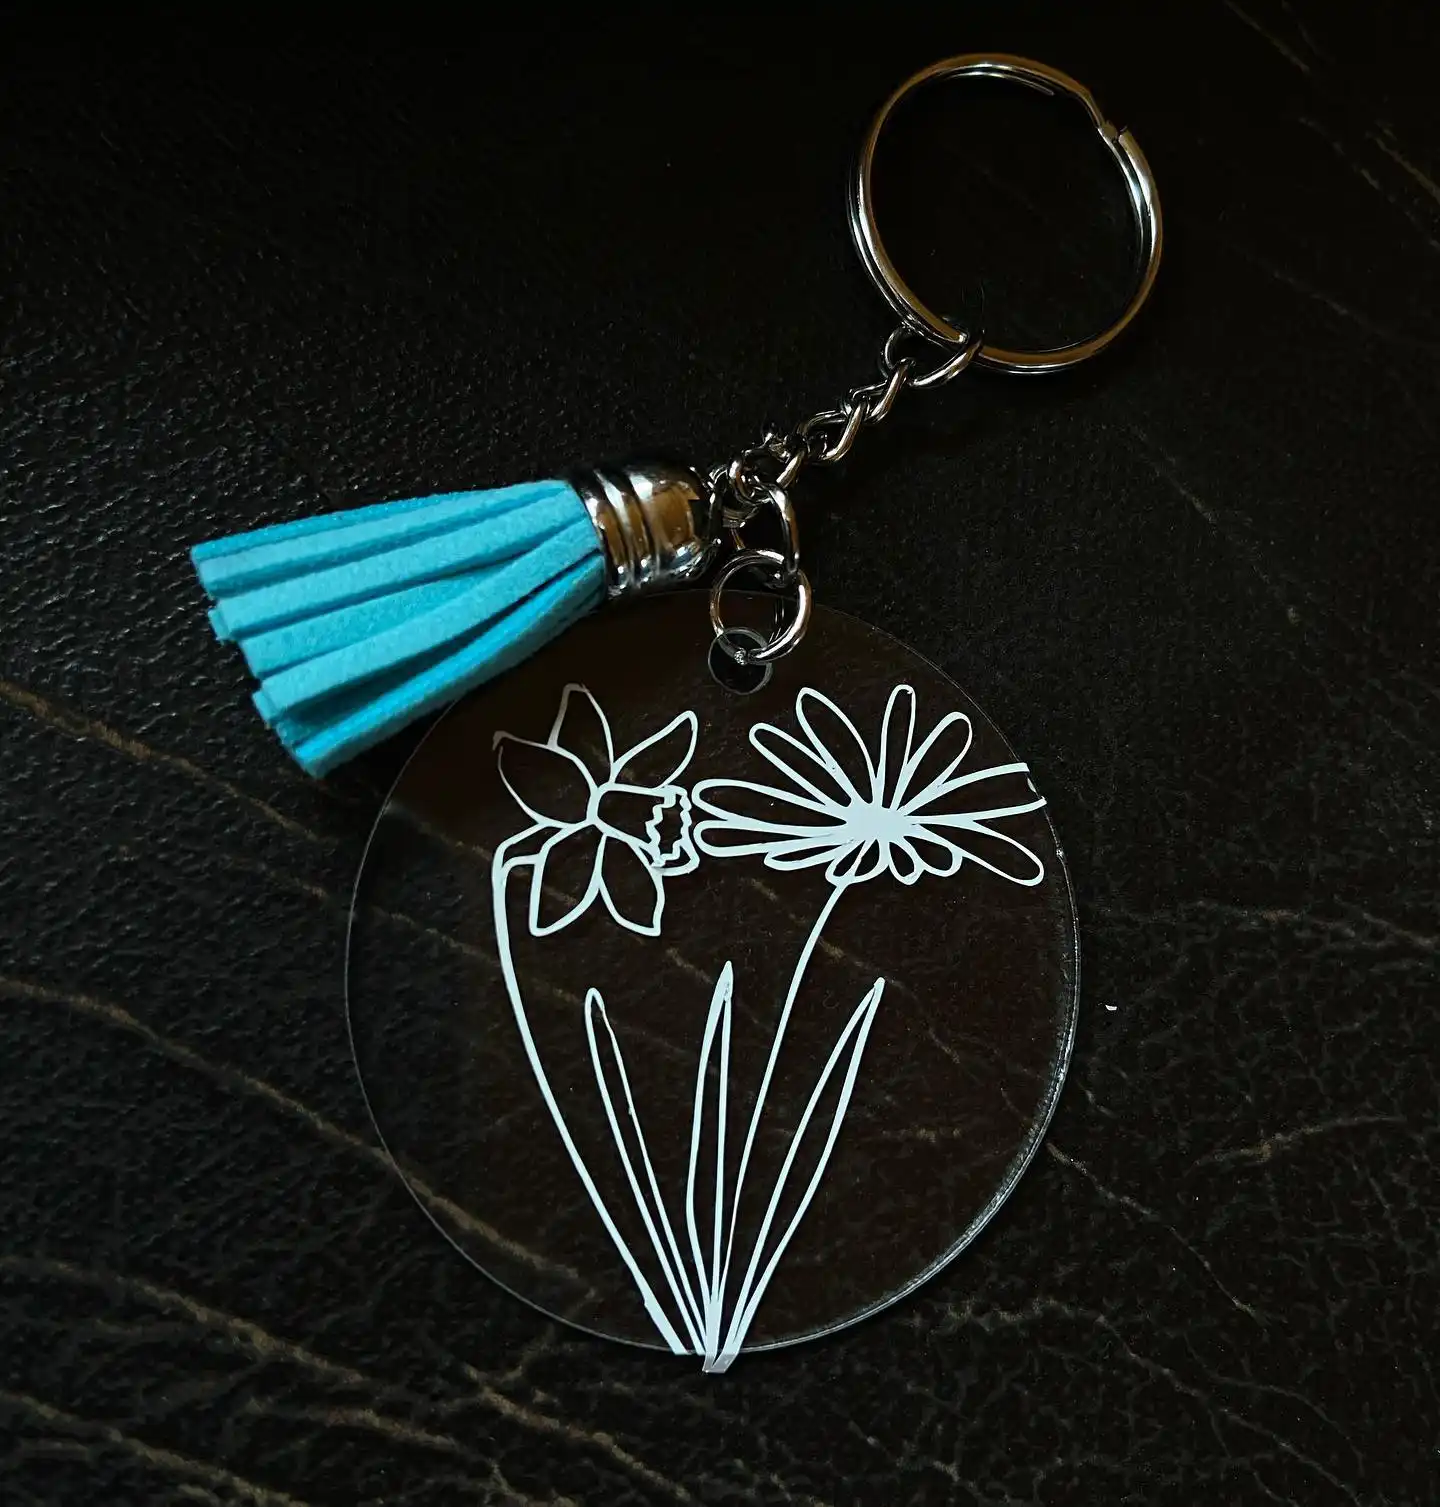
Clear acrylic takes personalization in a totally different direction than resin or beads. This disc has two flowers etched in a fine white outline, drawn together in one continuous line like a single ink sketch, sitting inside a vase shape made of long grass blades.
A teal suede tassel hangs above it, giving the whole piece a pop of color against the clear background.
The etching itself is what carries this design. No paint fills the lines, so the flowers only show up because the light catches the engraved edge, giving it a subtle glow depending on the angle.
Swap the flower pair for someone’s birth month flowers and this becomes a genuinely personal gift instead of a generic floral keychain.
9. Chunky Resin Initial Letters with Glitter and Star Charms
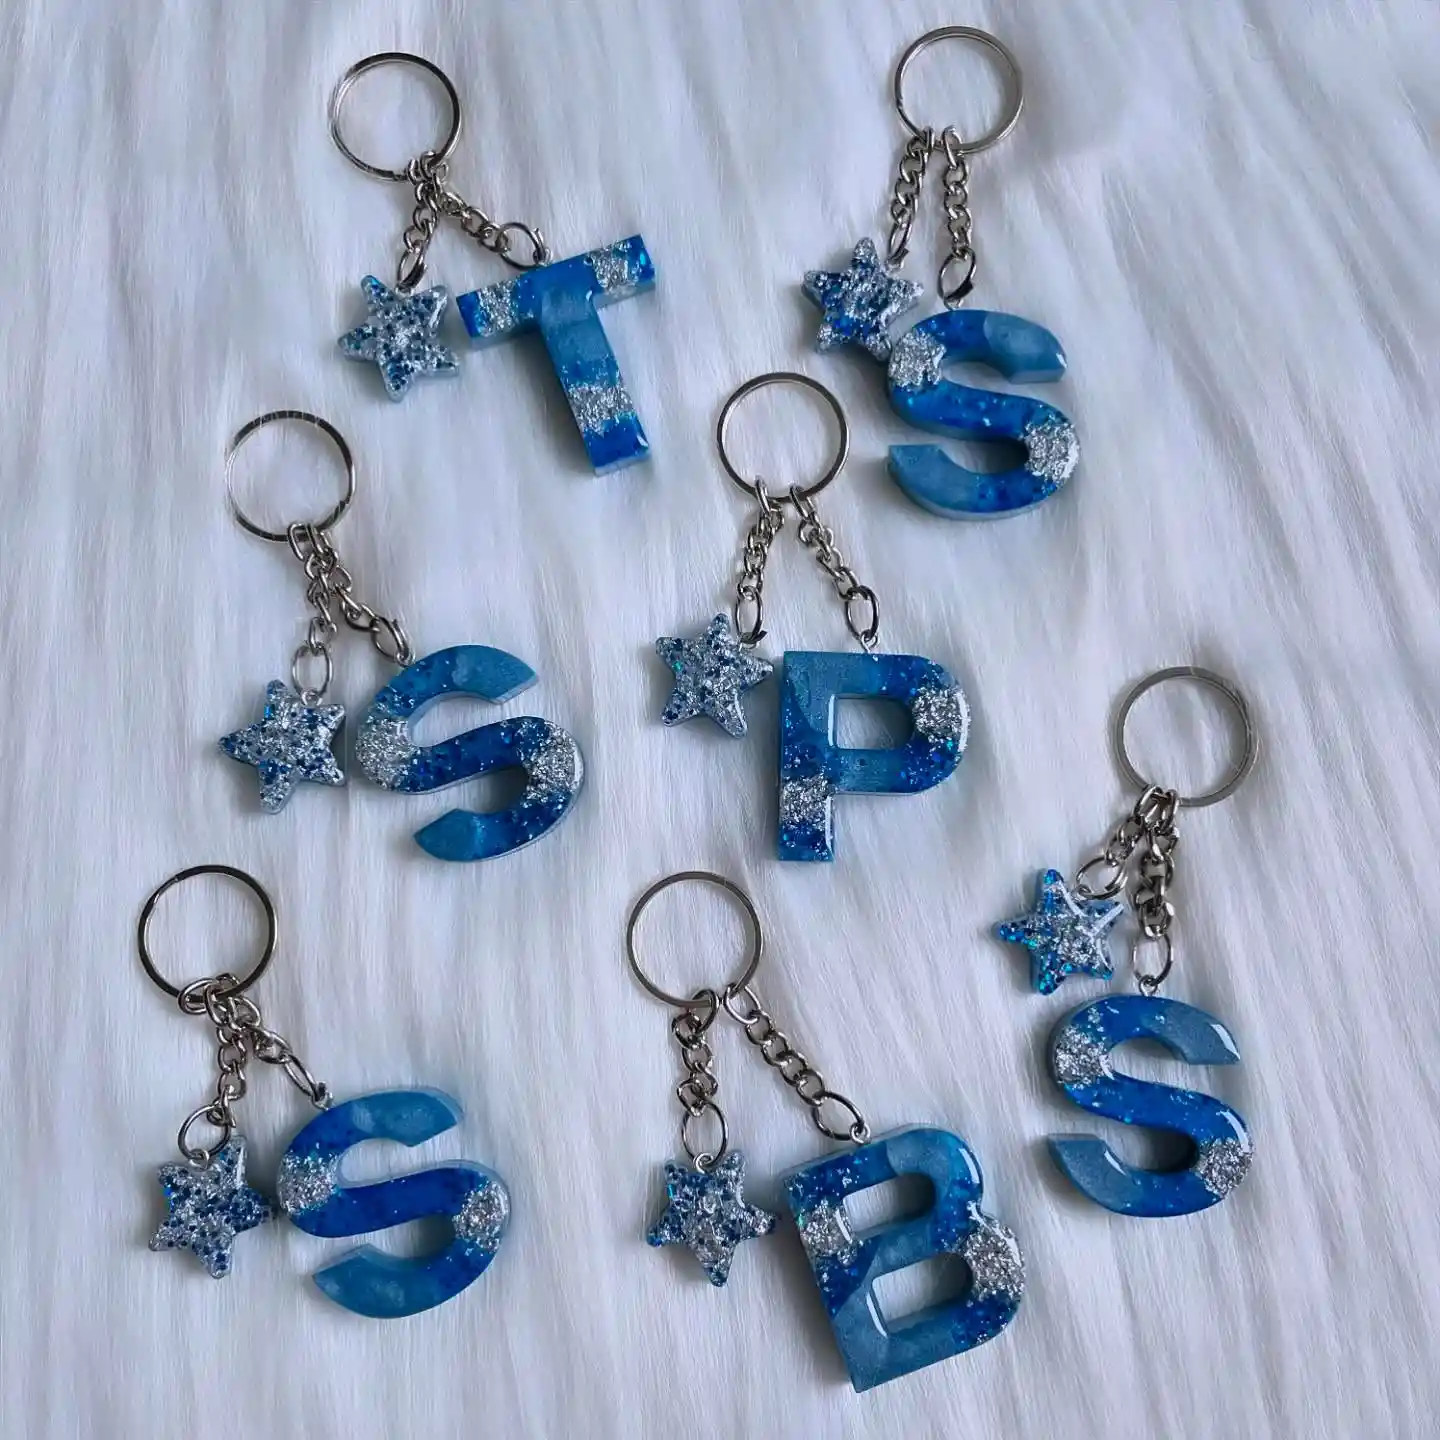
Seven keychains, same formula, seven different letters. Big block letter shapes, cast in a swirling ice blue resin with a band of chunky silver glitter running through part of each one.
A tiny glittered star charm swings beside every letter on its own length of chain, matching the letter in color but never quite matching in size or angle, which keeps the set from looking mass produced.
Making a batch like this comes down to consistency in three spots:
- Keep the resin color and glitter recipe identical across every mold pour, so the letters read as a matching set even though shapes vary
- Let the glitter settle unevenly on purpose, since a hard line of glitter across each letter looks more handmade than a smooth blend
- Attach the star charm at a slightly different angle on each keychain so no two hang exactly the same way
This is the format to lean on for a monogram shop, a school fundraiser, or any time someone wants “just the first letter” instead of a full name.
10. Layered 3D Puffy Name Charms with a Flower Topper
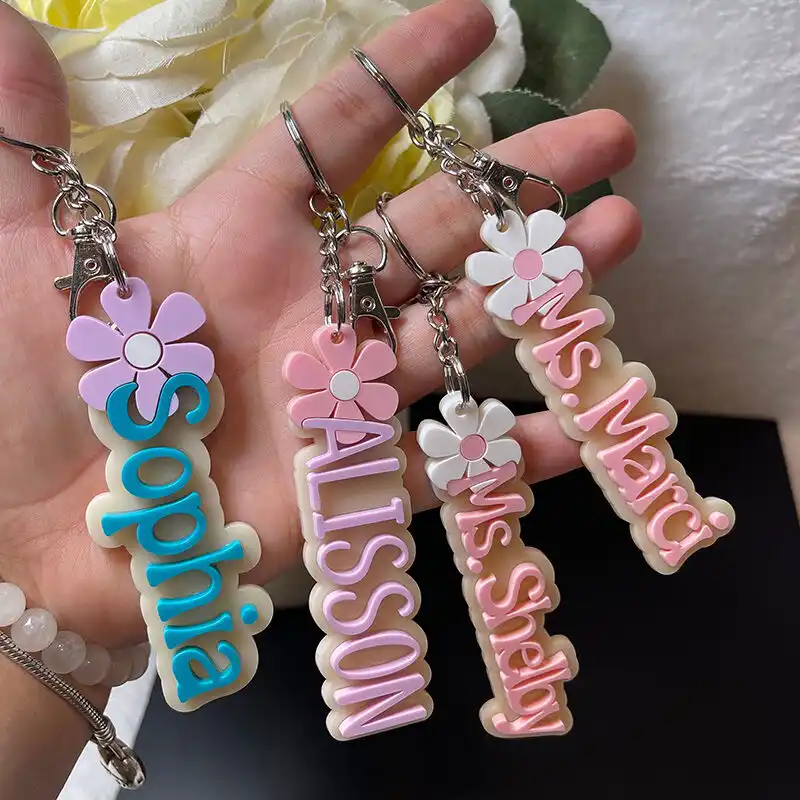
These four keychains use a puffed, raised lettering style instead of anything flat or engraved.
Each name sits on a cream colored base shaped like a tag, with bubble letters standing up in bold color, and a single daisy shaped flower charm clipped on above the name.
Subscribe to DIY Craft Bloom
Get updates on the latest posts and more from DIY Craft Bloom straight to your inbox.
Colors shift from piece to piece, purple and blue, pink and purple, white and pink, so even though the format repeats, no two feel identical.
The layered build is what gives these their toy like, tactile look:
- Cut the base tag. Shape a cream colored blank slightly larger than the name so there’s a visible border around every letter.
- Add the raised letters. Build up each letter with a thick paint, resin dot, or molded acrylic piece so it sits noticeably above the base.
- Attach a flower charm on top. Clip or glue a separate daisy shape at the top corner so it slightly overlaps the first letter.
The daisy charm is a small touch, but it’s what pulls the eye first and makes the whole thing feel finished rather than just a name tag.
11. Round Acrylic Discs with a Painted Brush Stroke Background
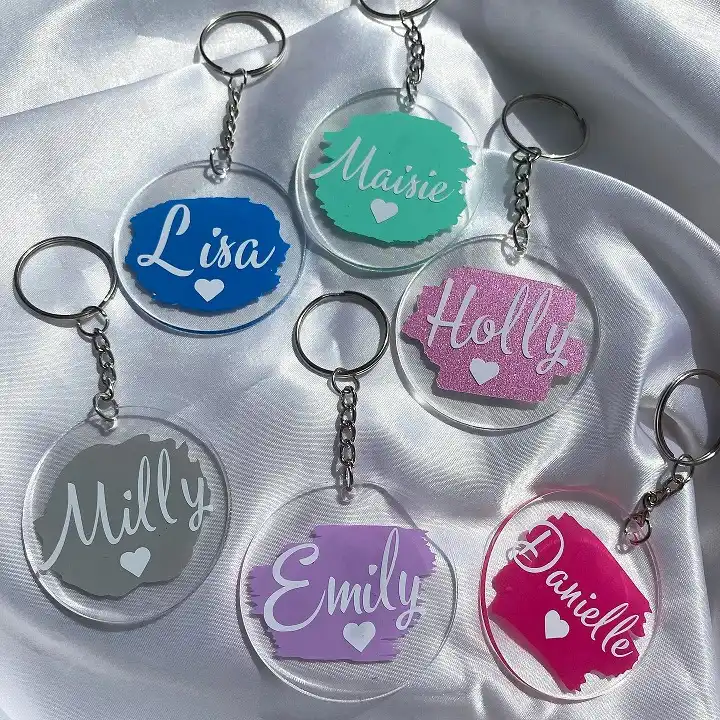
Six names, six colors, one repeatable format. Each keychain starts as a clear round acrylic disc, then gets a rough brush stroke shape painted behind the name in a different color for every piece, blue, teal, pink glitter, grey, purple, and hot pink.
The name itself stays white script across all six, cut or printed on top of the paint so it reads clean against every background color.
A tiny heart sits under each name as the one repeated detail tying the whole set together.
The brush stroke is doing more work than it looks like. A plain colored circle behind a name would look flat, but the uneven, torn edge of the paint stroke makes each keychain feel a little hand painted, even if the underlying process is templated.
Cut the acrylic first, then paint the background, then apply the name last so the white lettering sits crisp on top instead of getting lost in texture.
Clear acrylic plus a painted brush stroke lets one simple template look different every single time.
12. Alcohol Ink Resin Shapes with Gold Zodiac Script
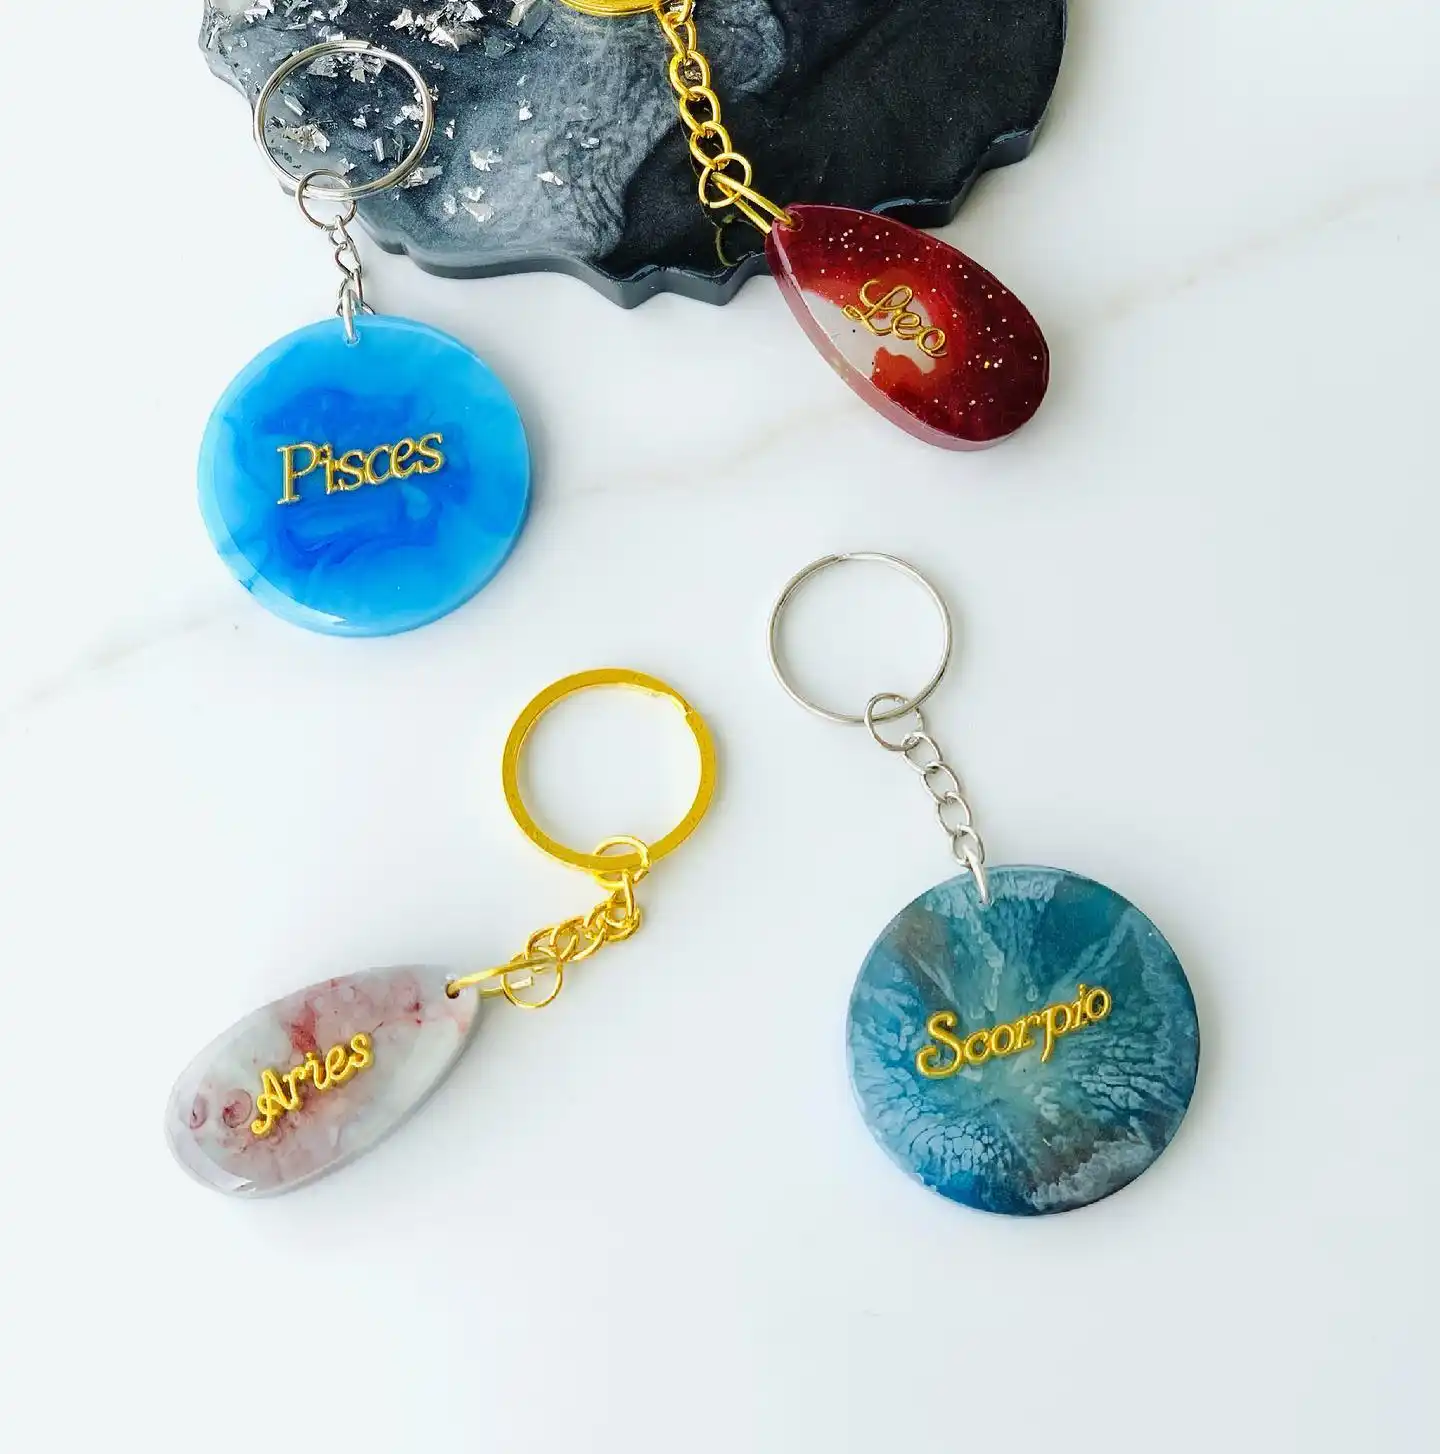
Four zodiac keychains, four totally different resin shapes and colors, but the same gold script name of each sign sitting across the front.
Alcohol ink is what creates the marbled, almost galaxy-like swirl inside each piece: a deep red and gold speckled teardrop for Leo, a milky white with red bleed for Aries, a sky blue swirl for Pisces, and a teal with white crackle texture for Scorpio.
What ties a mismatched set like this together isn’t the shape, since none of the four match.
It’s the gold cursive lettering applied the exact same way on every piece, sitting right at the center regardless of what color or pattern is happening underneath.
That consistency is what makes it read as a collection instead of four random resin blobs.
A quick note on the ink: alcohol ink spreads unpredictably in resin, so no two pours will ever look the same even with the same colors.
That’s a feature here, not a flaw, since each zodiac sign ends up with a one of a kind background.
Alcohol ink moves on its own in resin, so every pour comes out different even with the same colors. Keep the gold name placement consistent and let the background stay unpredictable.
leather personalized keychain
13. Foil Stamped Leather Loop Keychains with Custom Hardware
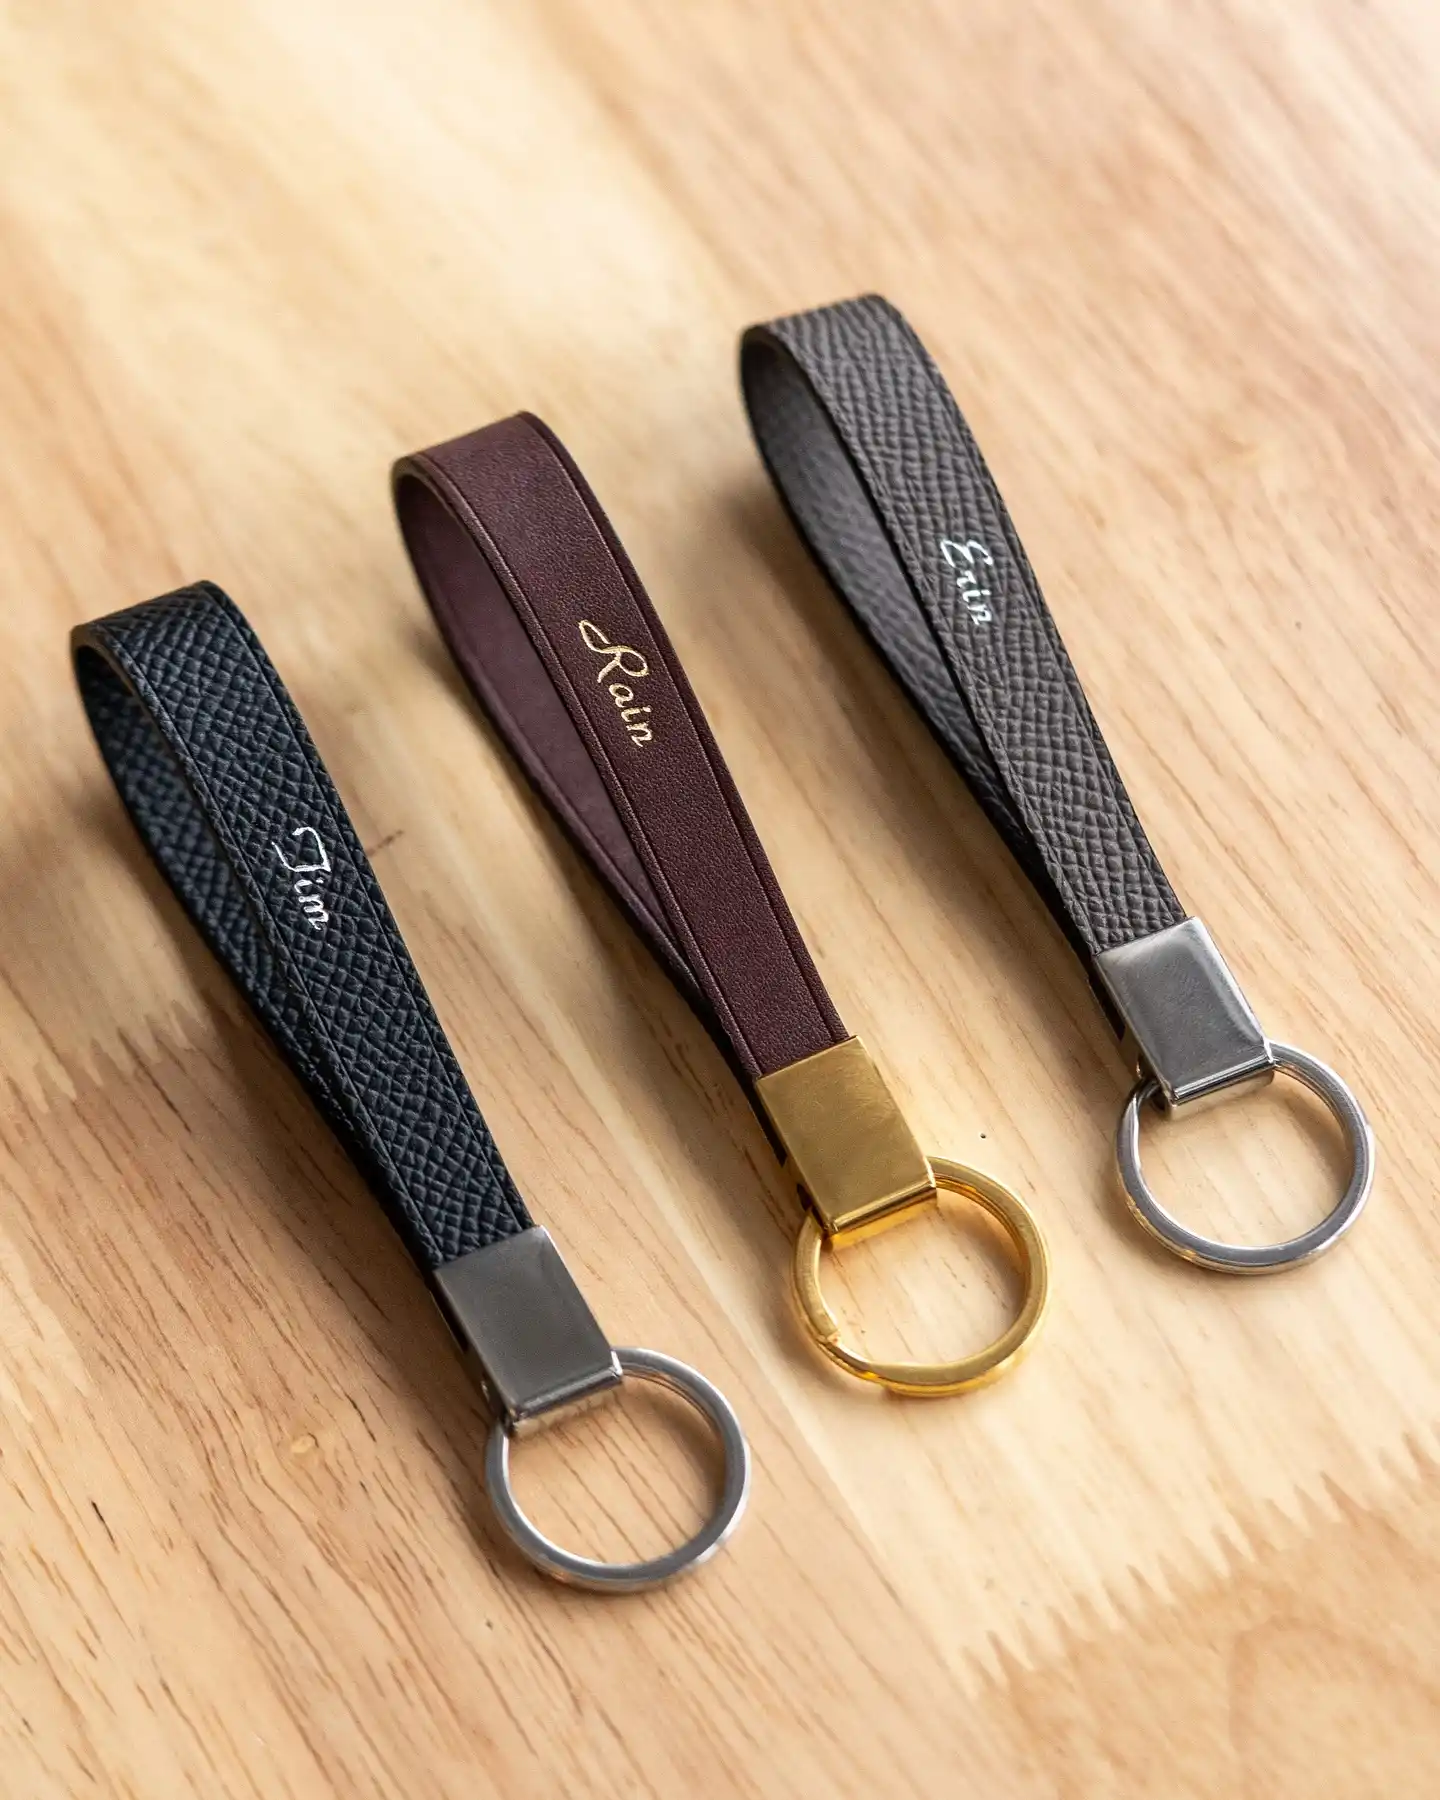
Everything on this list so far leans decorative, but this style strips it back down to something a guy would actually carry.
Three leather loop keychains, each in a different finish, black textured, deep brown smooth, and grey pebbled, with a name pressed into the strap in a thin foil script.
The hardware color changes per piece too, gunmetal, gold, and silver, so the metal matches the leather tone instead of defaulting to one finish across the board.
What makes a loop style like this work as a gift is the restraint. There’s no charm, no bead, no extra dangle, just a folded strip of leather, a hardware clasp, and one foil stamped name running along the length.
It reads more like a small leather good than a craft project, which makes it the pick for dads, brothers, or anyone who’d never wear a beaded keychain but would use a leather one every day.
| Loop A | Loop B | Loop C |
|---|---|---|
| Black textured leather | Deep brown smooth leather | Grey pebbled leather |
| Gunmetal hardware | Gold hardware | Silver hardware |
| Silver foil name | Gold foil name | White foil name |
conclusion
Thirteen ideas, thirteen totally different ways to turn a name into something someone actually wants clipped to their keys.
Start with whichever one matches the supplies already sitting in your craft drawer, whether that’s a handful of letter beads or a bottle of resin you’ve been meaning to use.
The best part about personalized keychains is how forgiving they are to experiment with, since a small size means a small mistake if a pour or a stitch doesn’t go perfectly the first time.
Save this for the next time you need a handmade gift in a hurry.