19 Easy Christmas Crafts for Kids to Enjoy During the Holiday Season


December brings a special kind of noise to the house. Kids get restless, the tree goes up, and everyone wants to make something with their own hands.
These 19 easy Christmas crafts for kids keep little fingers busy without turning your kitchen table into a disaster zone.
Supplies stay simple, and the steps stay short. Each project suits small attention spans, tight budgets, and the chaotic weeks before the holidays.
Parents get a calm hour, and kids get something they can proudly hang, gift, or show off all season. Grab the glue sticks, clear a table, and let the holiday making begin.
1. Snowman Peeking Through a Paper Wreath
- Materials: Blue, white, red, green, and orange cardstock, plus glue and a black marker.
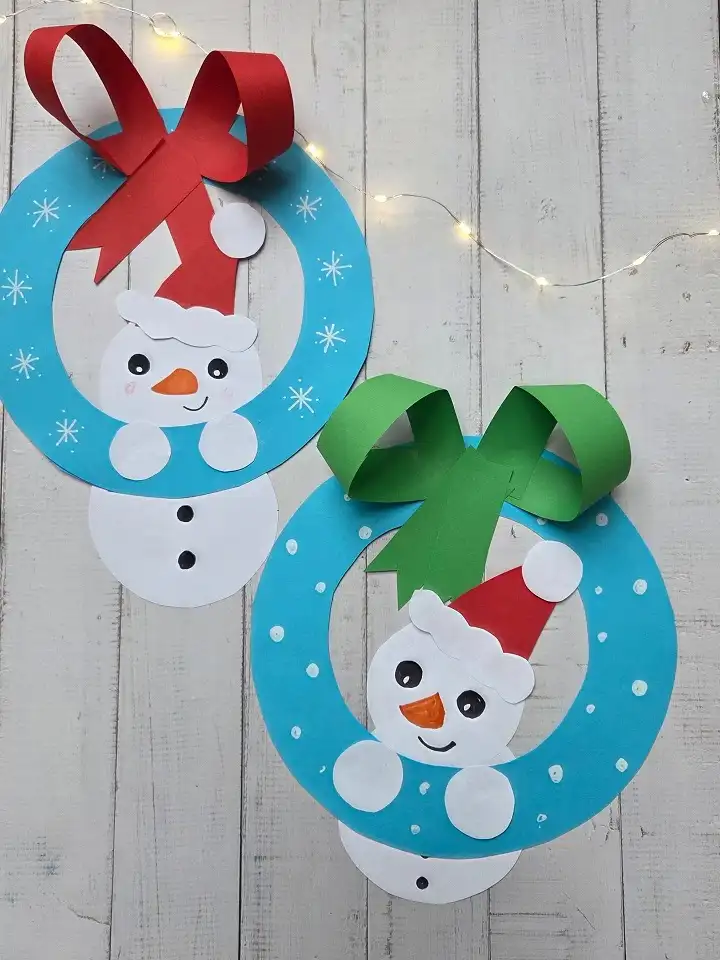
- Make: Cut a blue ring, then glue a white snowman behind it so his face fills the center.
- Finish: Add a Santa hat, round paper hands over the ring, and a looped paper bow on top.
- Display: Tape it to a door or window at kid height.
Little ones love how this snowman seems to hug the wreath. One ring has white snowflakes and the other has simple dots, so kids can pick a pattern. The bow is just paper strips folded into loops, with no ribbon needed.
Kid friendly: Draw the shapes for younger kids and let them handle cutting, gluing, and faces. Pair a red bow with snowflakes and a green bow with dots, like here, so siblings can tell theirs apart.
2. Clothespin Reindeer Ornaments
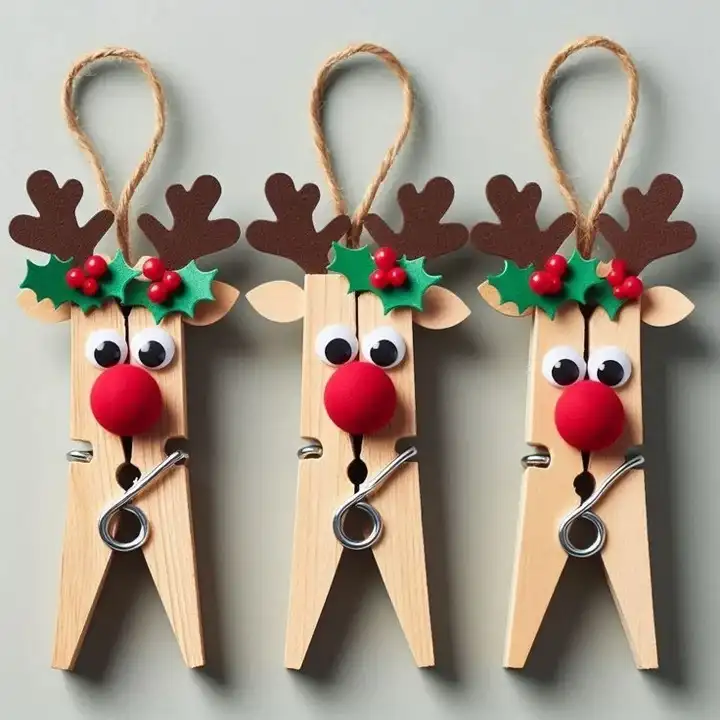
Wooden clothespins turn into reindeer faster than you’d think. Each one here has brown antlers, tan ears, two googly eyes, and a fuzzy red pom pom nose.
A small sprig of green holly with red berries sits between the antlers, and a twine loop at the top makes it ready to hang.
Kids can glue the face pieces on while you handle the antlers.
Craft foam or brown cardstock both work for the antler shapes, and a simple paper template keeps all three matching. Clip the pin shut while the glue sets so the parts don’t slide.
Expect about 15 minutes per reindeer once the pieces are cut.
These easy Christmas crafts for kids make sweet teacher gifts too, since they clip onto a card or gift bag as well as a branch. Make a whole herd and let each child name theirs.
3. Paper Plate Snowman

Best for: Preschool classrooms and toddlers who are still learning to glue.
Three plain paper plates make the whole body here. The top one wears a black paper hat with a red band, plus dot eyes, a dotted smile, and a little orange triangle nose.
A red paper scarf with snipped fringe wraps the neck, while brown paper branches stick out as arms.
Big round shapes are easy for small hands to line up. Overlap the plates slightly and glue them onto a sheet of colored poster board so the snowman stays in one piece. A hole punch makes quick work of the small black smile dots.
Accent upgrade: Swap the paper scarf for a strip of real fabric or felt, and glue on actual twigs for arms.
4. Craft Stick Santa Ornament

You’ll need: Wooden craft sticks, red and white felt, white pom poms, a red pom pom, googly eyes, glue, and twine.
Santa’s face starts with a row of craft sticks glued side by side. A red felt triangle forms the hat, edged with a line of fluffy white pom poms. Below the eyes and red nose sit a felt mustache and a tiny red smile.
Then comes the fun part. Kids press white pom poms onto the bottom half in rows until the beard looks full and round. Glue a strip of cardstock across the back first so the sticks stay together while kids work.
Glue tip: Tacky craft glue holds pom poms better than a glue stick. Let the beard dry flat for an hour or so before hanging it on the tree, or the pom poms may slide.
5. Paper Strip Reindeer and Smiling Tree
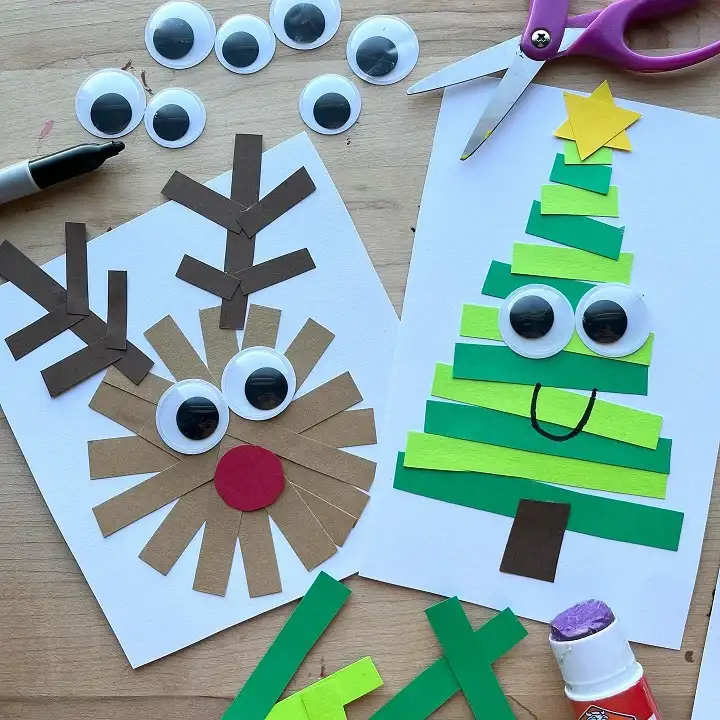
Paper strips do all the work in this simple Christmas craft for little ones. On one card, tan strips fan out in a circle to make a shaggy reindeer face with brown strip antlers and a red nose.
The other card stacks light and dark green strips into a tree, topped with a yellow star and finished with giant googly eyes and a marker smile.
Skill level: Beginner. Cutting straight strips is great practice for preschoolers learning to use scissors.
Make it easier: Precut a pile of strips and let kids focus on arranging and gluing. A glue stick keeps the mess low.
Color note: Alternating two greens gives the tree depth without any drawing. Kids can sort the shades first, which turns into a quick color lesson.
6. Cotton Ball and Fork Painted Santa
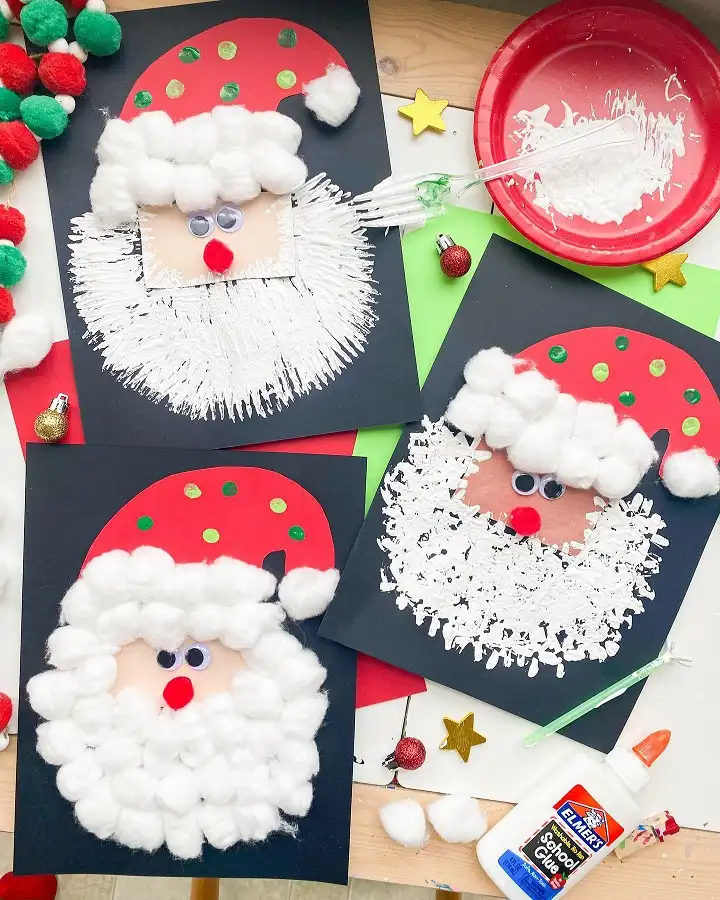
Black paper makes the white beards pop in this trio of Santas. Every one wears a red hat with green dots and has a peach face, googly eyes, and a red pom pom nose.
Cotton balls trim each hat, and the beards come two ways: more cotton balls, or white paint pressed and dragged with a plastic fork.
Why it works:
- Fork painting gives a fuzzy texture with almost no skill needed.
- Two methods let kids compare textures side by side.
- School glue and cotton balls cost very little and clean up with water.
What to avoid: Thick globs of paint take a long time to dry on black paper. Put a thin layer on the plate so the fork leaves crisp lines instead of puddles.
Subscribe to DIY Craft Bloom
Get updates on the latest posts and more from DIY Craft Bloom straight to your inbox.
7. Painted Wreath with Glitter Pom Poms

- Materials: Pink paper, green paint, a ready made glitter bow, and sparkly pom poms.
- Make: Trace around a bowl lightly in pencil, then paint a thick green ring with short outward strokes.
- Finish: Once dry, glue the bow at the top and dot pom poms around the ring.
- Display: Frame it, or tape it to a bedroom door as a mini wreath.
Bright pink paper gives this easy holiday craft for kids a fun, modern feel. The spiky edges hint at a fork or stiff bristle brush, so the exact tool is up to you. Glitter pom poms in red, pink, and green read like tiny ornaments.
Time needed: Around 20 minutes of work, plus drying time. Younger kids can finish it in two short sessions.
8. Magazine Mosaic Candy Canes

Old magazines get a second life in this candy cane collage. Small squares of red and white paper overlap in bands down a cane shaped cutout, and bits of printed text peek through. That mix of words and color gives each cane a playful, scrappy charm.
Hunt through junk mail and catalogs for red pages first. Kids can cut or tear them into small pieces, then glue them in alternating stripes. Leaving the edges a little uneven is part of the look, so nobody needs to stay inside the lines.
Cereal box cardboard makes a sturdy base that won’t curl under wet glue. Plan on about 30 minutes, and expect plenty of chatter while little hands sort colors into piles. Punch a hole at the top and add string if you want to hang the finished canes.
9. Painted Christmas Tree with Pom Pom Ornaments

Best for: A rainy afternoon at the kitchen table with kids ages four and up.
Green paint swept in layered strokes forms the branches, each row wider than the one above.
A brown trunk anchors the bottom, and a gold glitter star sits on top. Sparkly pom poms in red, blue, yellow, green, pink, and purple act as ornaments.
Start each tier at the center and pull the brush outward toward the edges. That motion creates the feathery pine look in just a few passes.
Kids who struggle with drawing a tree shape usually manage this one well, since the strokes do the shaping.
Seasonal swap: After the holidays, trade the pom poms for white paint dots and you have a snowy winter tree for January.
10. Folded Paint Ornament Art

You’ll need: White cardstock, paint in three colors, fine gold glitter, and scissors.
The mirrored pattern here looks like the classic fold and squish trick. Pink, turquoise, and deep blue paint spread into a matching design on both halves of a round ornament. A gold glitter cap with a loop finishes the top.
Fold the paper in half and open it back up. Kids squeeze blobs of paint along one side of the crease, fold it closed, and press with flat hands.
Opening it is the big reveal, and no two kids’ Christmas crafts ever turn out alike.
Paint tip: Use only three colors that look good together. Too many shades blend into brown once pressed, while pastel and blue tones like these stay bright.
11. Cardboard Gingerbread Ornaments

Plain brown cardboard already looks like a cookie, so half the work is done before kids start.
Both gingerbread figures get white squiggle icing lines, googly eyes, pink cheeks, and a red smile. Real sewing buttons run down the middle, and a folded paper bow tie adds personality, one pink and one green.
Upcycle idea: Shipping boxes and old notepad backs make free, sturdy blanks for tracing.
Tool tip: A white paint pen draws neater icing lines than paint and a brush. Puffy fabric paint also works and dries with a raised, frosted look.
Safety note: Small buttons are a choking risk for toddlers, so swap in paper circles or marker dots for the youngest crafters.
12. Craft Stick Triangle Trees

Triangles made from three craft sticks form the base of every tree in this set. One is painted red and strung with green tinsel stems and white pom poms.
Another keeps the bare wood wrapped in red sparkly pipe cleaner, while the green one is lined with red, green, and white pom poms.
Why it works:
- Kids decorate the same shape three different ways, which sparks fresh ideas.
- Pipe cleaners bend easily, so wrapping them needs no glue.
- Light materials keep the ornament from weighing down tree branches.
Grouping tip: Hang the three together on one branch or a doorknob so the different styles read as a set. Silver wooden stars and paper trunks on all three help tie them together.
13. Fingerprint Light Bulb Tree Ornaments
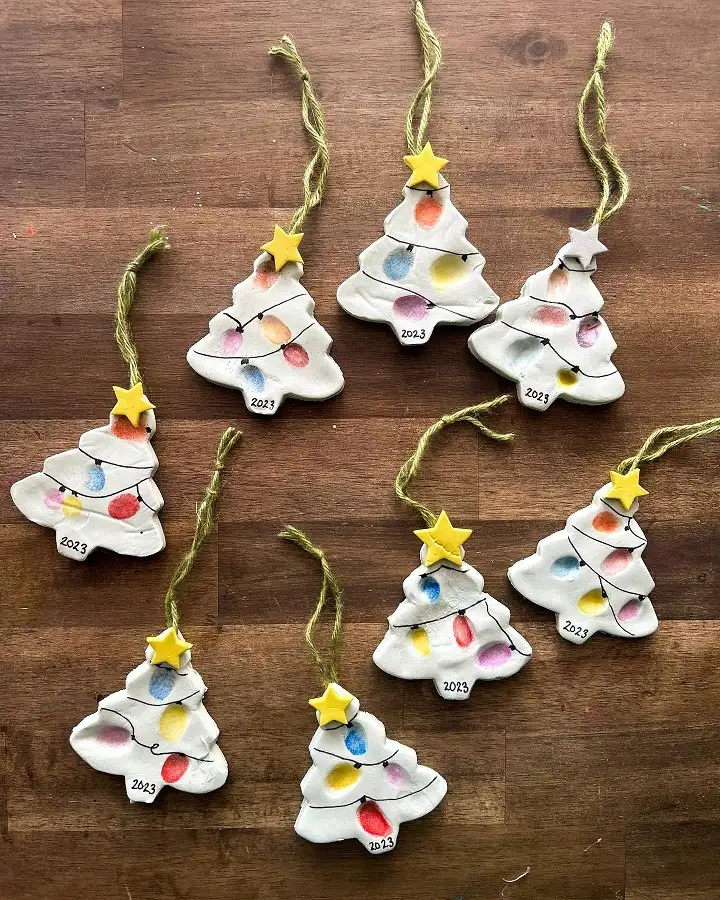
Tiny fingerprints become colorful string lights on these white tree ornaments. The material looks like salt dough or air dry clay, cut with a tree shaped cookie cutter.
A thin black line loops between the prints like a wire, and each tree wears a little yellow star.
Kids press a fingertip into washable ink or paint, then stamp it onto the dried tree. Grownups can add the cord lines with a fine marker afterward.
Writing the year on the bottom turns this into a keepsake that comes out every December.
Of all the Christmas crafts for kids on this list, this one pulls at grandparents’ hearts the most.
Subscribe to DIY Craft Bloom
Get updates on the latest posts and more from DIY Craft Bloom straight to your inbox.
Wrap one up with a gift tag that says who made it. Green yarn loops finish them off and hang easily on a branch.
14. Cardboard Star Character Ornaments
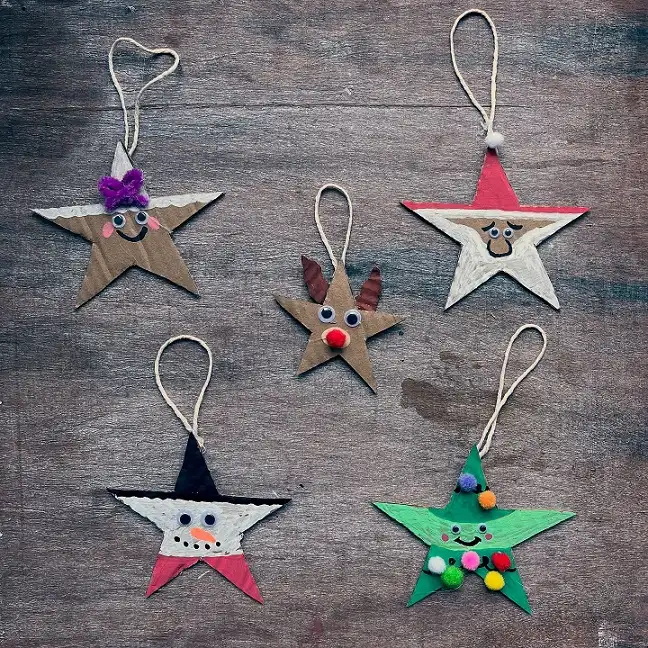
- Materials: Corrugated cardboard, white, red, green, and black paint, googly eyes, pom poms, and string.
- Make: Cut out star shapes and let kids decide which character each one becomes.
- Finish: Paint the top point as a hat, then add faces, eyes, and tiny details.
- Display: String a full set along a garland or across a window.
One star turns into Santa, another into a snowman with a black top hat, and a third into a smiling green tree covered in pom poms.
There’s also a tiny reindeer with paper antlers and a gingerbread girl wearing a purple pipe cleaner bow. The points of a star make natural hats, arms, and feet, so the shape guides the design.
Beginner shortcut: Trace one star template on cardboard and cut several at once with sturdy kitchen scissors. An adult should handle thick cardboard, while kids take over the painting.
15. Clay Shapes on Wood Slice Ornaments

Best for: School age kids who like modeling clay and want a gift that lasts.
Natural wood slices with bark edges make the base for these little ornaments.
Colored clay forms a tall green tree, a dotted wreath with a red bow, and a cluster of red berries with a holly leaf. Other slices show a pink gingerbread outline and a tiny Santa.
Rolling, pinching, and pressing clay builds hand strength, which makes this one of the more useful holiday crafts for children.
If you use oven bake clay, bake the shapes on a tray first, then glue them to the wood. Air dry clay skips the oven but may need a dab of glue once it hardens.
Budget swap: Craft stores sell bags of wood slices, but cardboard circles painted tan work for a cheaper version.
16. Craft Stick House Photo Frames

Family photos tucked inside little craft stick houses make ornaments that stay on the tree for years. All three houses have peaked roofs and a photo in the middle, but the styling changes from one to the next.
Sparkly silver frames, white pom pom trim, gold glitter roofs, a tiny bell, and a gingerbread cutout all show up here.
Pattern note: Painting the sticks in alternating pink, mint, and red gives one house a candy stripe look with almost no effort.
Display idea: Pull the photo from this year’s holiday card and print it small, so the ornament matches what family members already got in the mail.
Proportion note: Trim the photo slightly smaller than the opening so a frame or trim can overlap the edges and hide uneven cuts.
17. Pinecone Reindeer

You’ll need: Small pinecones, twigs, tan felt, googly eyes, sparkly red pom poms, red ribbon, and glue.
Nature supplies most of what this kids Christmas craft needs. Children gather pinecones and thin twigs, and those twigs become surprisingly realistic antlers.
Tan felt ears, big googly eyes, and a glittery red nose finish each little face.
Pinecone scales are bumpy, so regular school glue may not grab well. A low temp glue gun works better, with an adult handling it while kids choose where each piece goes.
Tuck a loop of red ribbon between the scales to turn each reindeer into an ornament.
Care tip: Bake foraged pinecones on a foil lined tray at low heat to dry out sap and any tiny bugs before crafting. Let them cool fully first.
18. Jeweled Craft Stick Trees

Short painted stick pieces stack from wide to narrow across a center stick to form each tree. Coral, bright green, and turquoise paint give every tree its own personality.
Rows of colorful stick on gems sparkle like lights, and a gold glitter star sits at the top. Matching purple trunks tie the trio together.
Why it works:
- Peel and stick gems skip the glue step entirely.
- Bold, nontraditional colors suit modern or playful decor.
- Graduated stick lengths create a clean tree shape without any drawing.
Make it easier: Craft sticks tend to splinter when cut with scissors. An adult can snip them with sturdy shears and sand any rough ends.
19. Paper Chain Santa, Snowman, and Elf
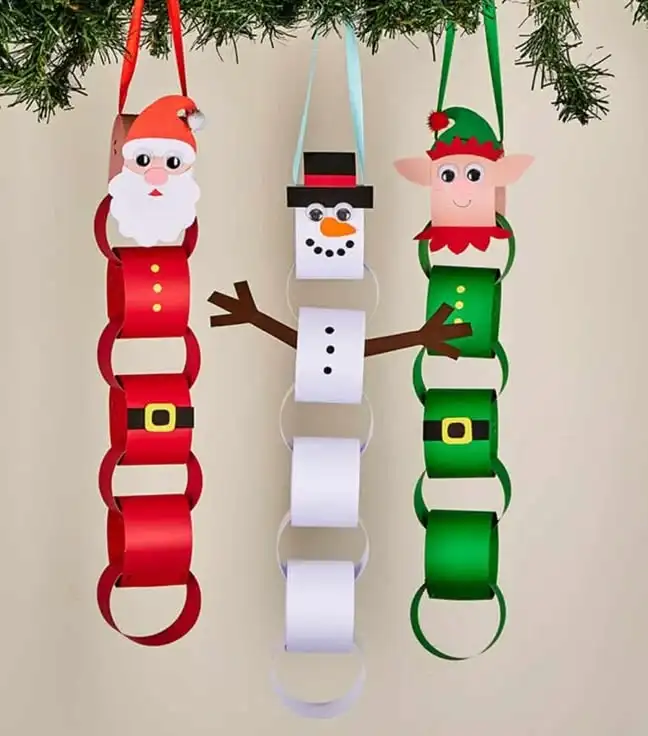
- Materials: Red, white, green, and black paper, googly eyes, glue, and ribbon.
- Make: Loop paper strips into a short chain, gluing each link closed.
- Finish: Glue a character head to the top link and add belts, buttons, or stick arms.
- Display: Tie the trio to a mantel garland or a doorframe with ribbon.
Classic paper chains get a character upgrade in this festive paper craft for kids.
Santa has a black belt with a gold buckle, the snowman sports twig arms and a top hat, and the elf wears pointy ears above a matching green chain.
Roughly 20 minutes per character is enough once the head pieces are cut.
Holiday twist: Turn any of the three into a countdown by adding one link for each day left before Christmas. Kids tear off a link every night.