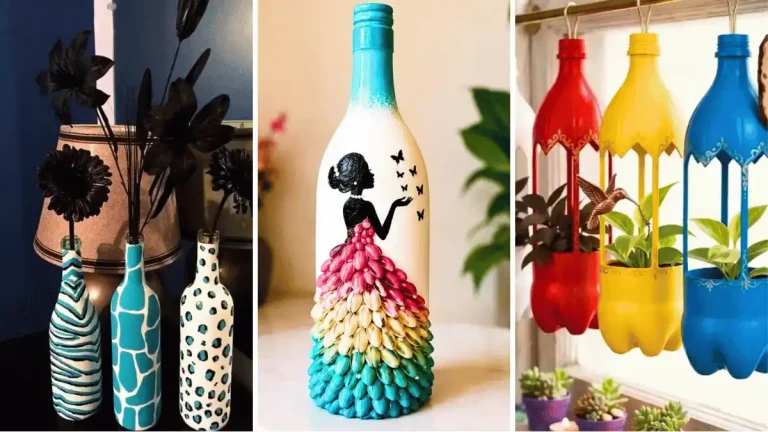
17 Bottle Craft Ideas With Clay You Can Actually Make This Weekend

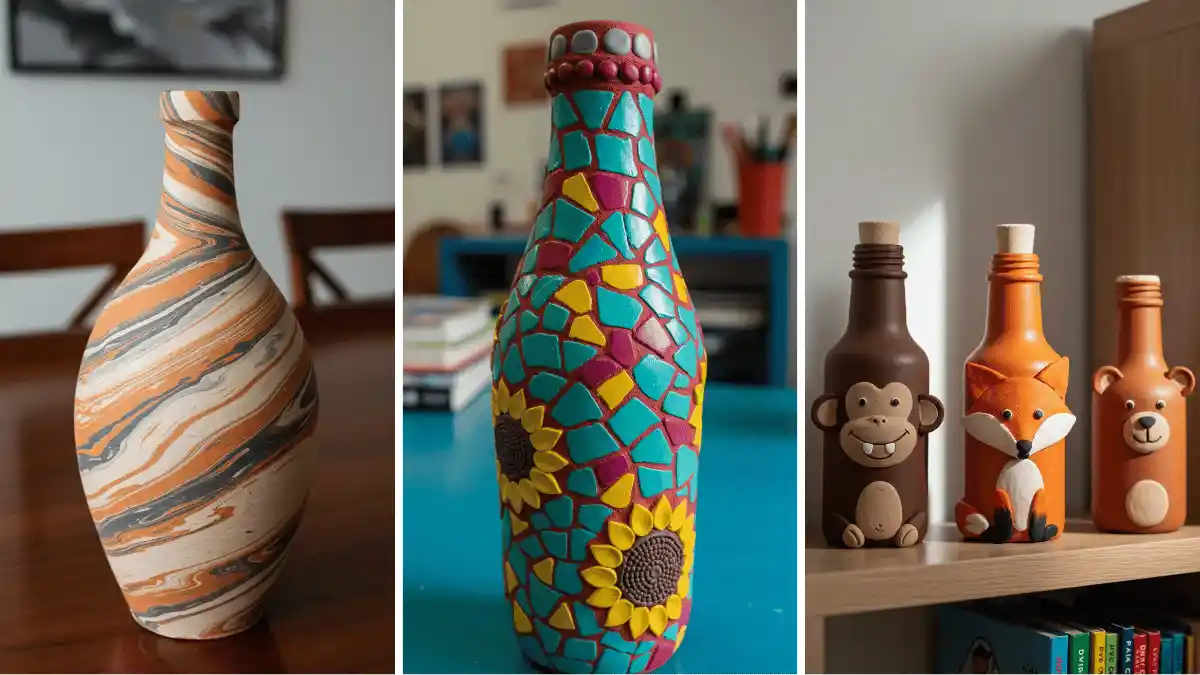
Empty bottles pile up fast, and most of them end up in the recycling bin without a second thought.
Clay changes that. With a little air dry or polymer clay, a plain glass or plastic bottle turns into something worth keeping out in the open, whether that is a vase, a candle holder, or a small jar for keepsakes.
This list covers 17 bottle craft ideas with clay, from simple textured vases to detailed animal shapes kids can help build.
Each one uses supplies most crafters already have on hand, so no idea here needs a special trip to the store.
If you have ever looked at a used bottle and wondered what else it could become, these projects answer that question with real, doable steps. Grab a bottle, grab some clay, and pick the idea that fits your space best.
1. Ladybug Dotted Vase for a Garden Table
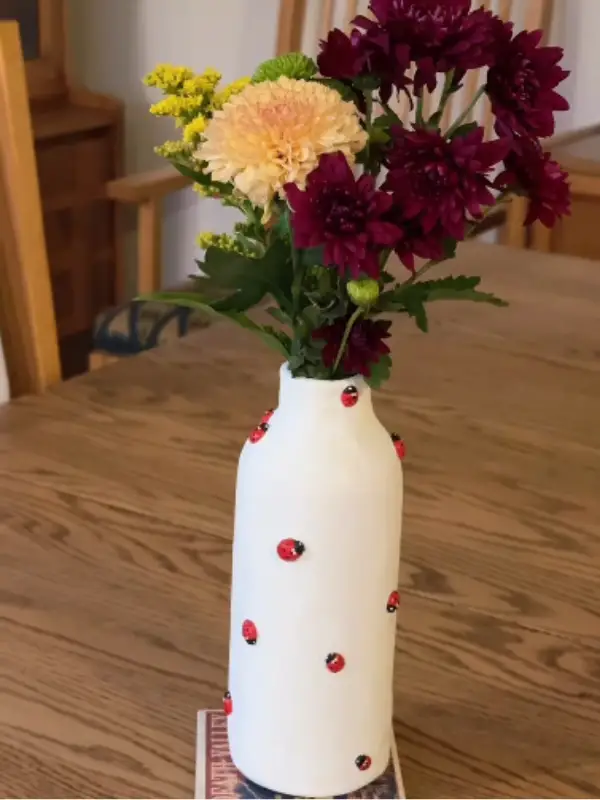
Small red dots turn a plain glass bottle into a spring find. This bottle keeps its milky white base and lets rolled clay ladybugs do the work. Random spacing across the surface makes the whole piece feel unplanned, almost like the bugs landed there on their own.
Start with tiny balls of red clay, flatten them slightly, then press a black clay half circle on one edge for the head. Score a thin line down the middle to split the wings before you press each one against the bottle.
Bake or air dry based on your clay type, then glue in place if the clay hardens separately from the surface.
Fill the top with a mixed bouquet once the bugs are set, and the contrast between soft petals and tiny hard shells carries the whole design.
Nothing about this build needs painting skill or a steady hand. Even a rough ladybug reads as charming once flowers surround it.
2. Tiny Clay Face Bottles for a Windowsill Family
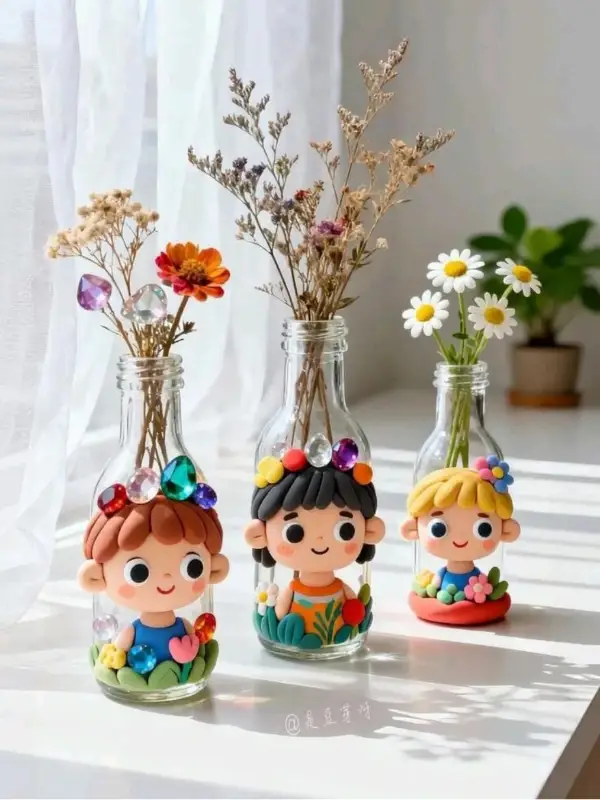
Three small glass bottles turn into tiny characters once faces join the design. Each bottle holds a different face, hair color, and flower arrangement growing from its base, so no two look alike.
Sprigs of dried flowers rise out the top like hair accessories for the whole scene.
Shape the face from a ball of clay, add small ears, then press features into place with a toothpick or clay tool.
Build the hair separately in one solid color, then blend the edges into the scalp so the seam disappears. Gems or tiny flowers pressed near the crown finish the look before the piece dries.
Line up all three bottles on a windowsill and the light catches every gem and petal. Younger crafters or beginners can manage one face in an afternoon without much trouble.
A shelf of these characters brings a playful note to any table that plain painted bottles cannot match.
3. Twine Wrapped Daisy Bottle for a Cottage Corner
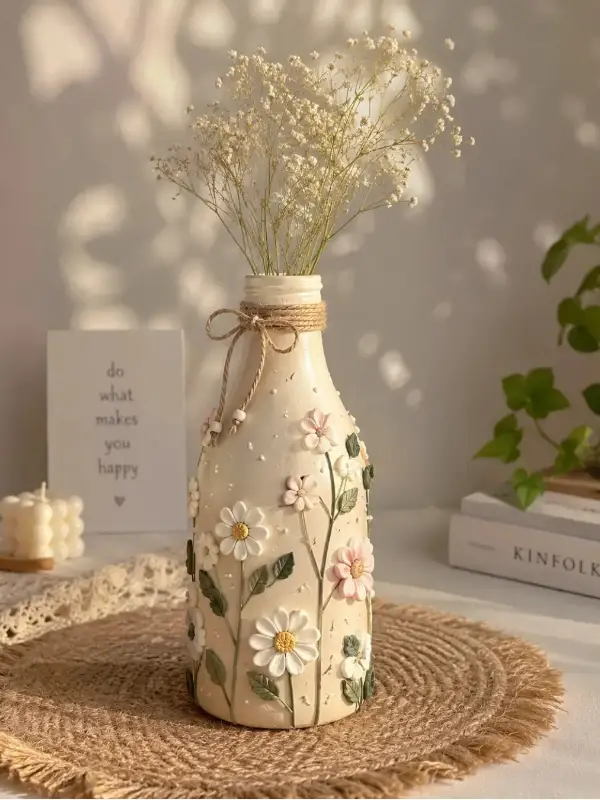
Twine wrapped around the neck gives this bottle a handmade, cottage feel before you even look at the flowers. Painted daisies climb the body in soft pink and white against a warm cream base.
Tiny dot clusters scattered between the blooms add texture without crowding the design.
Coat a clean glass bottle in cream acrylic first, then shape flat clay daisies with five rounded petals each. Press a small yellow center into every flower and add thin clay stems with leaf shapes running between them.
Wrap jute twine near the top and knot it loosely once the clay has fully cured.
Set the finished piece on a woven mat with dried baby’s breath for a display that photographs well without extra effort. This build works for anyone who likes a softer, farmhouse style over bold color.
Keep the palette limited to two or three shades so the whole thing reads calm instead of busy.
4. Gold Scrollwork Bottle for a Formal Shelf
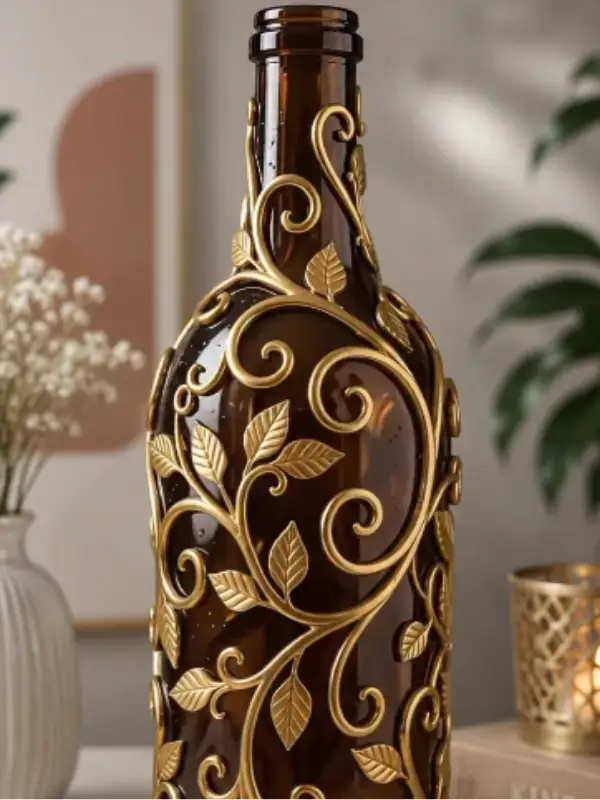
Gold scrollwork wraps this amber bottle like ironwork on an old gate. Vines and leaf shapes trail from the neck down to the base in one continuous pattern. The dark glass underneath makes the metallic clay stand out even more.
Roll thin clay ropes and press them into curling vine shapes directly onto the glass, building the pattern section by section.
Add small leaf cutouts along the vines using a simple leaf mold or a butter knife for the veins. Once everything cures, paint the raised clay with gold paint or gold mica powder for the metallic finish.
This project takes patience more than skill, since the scrollwork needs planning before the clay sets.
Group it with candle holders or other metallic pieces for a display that feels pulled together. A single finished bottle like this can anchor a whole shelf on its own.
5. Layered Floral Wrap for a Statement Centerpiece
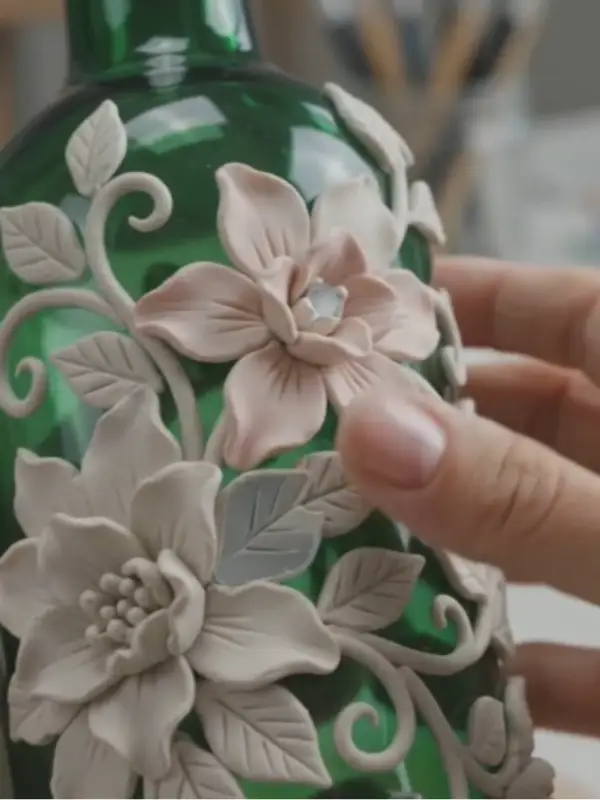
A green glass bottle gets a full floral wrap in this piece, with layered clay flowers and leaves covering most of the surface.
Subscribe to DIY Craft Bloom
Get updates on the latest posts and more from DIY Craft Bloom straight to your inbox.
Petals overlap in different sizes so the arrangement looks grown rather than placed. Small silver beads pressed into a few flower centers catch the light against the matte clay.
Work in sections, pressing a base layer of vines and leaves first, then building flowers on top once the base holds its shape.
Layer petals from largest to smallest around a central point, angling the outer ones slightly upward for depth. Press one bead or a flattened clay dot into each center before the piece dries fully.
Plan on this taking a full afternoon at least, since layered florals need the base clay to firm up before you add weight on top. If a full weekend project feels like too much, cover just one side of the bottle instead of wrapping the whole thing.
Even a partial version still reads as a real centerpiece next to a lamp or a stack of books.
6. Single Flower Cluster for a Quick First Try
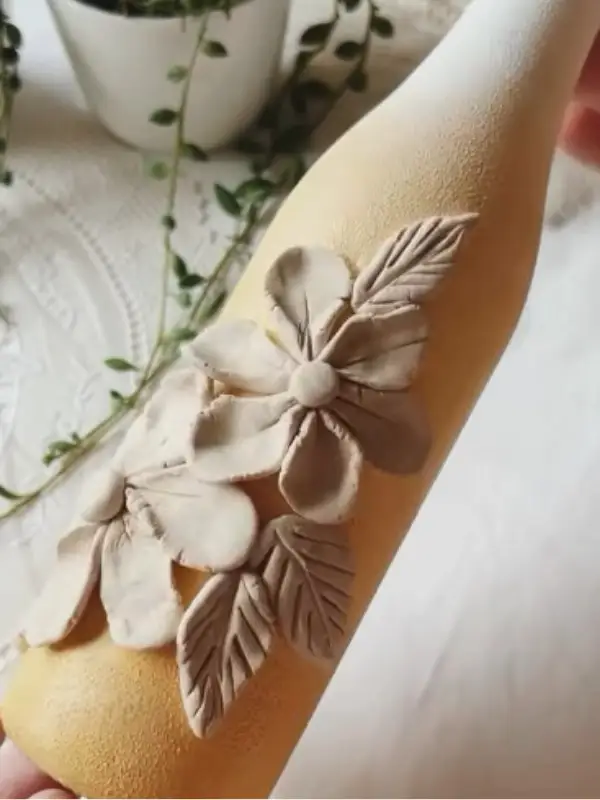
Warm mustard glass carries a soft floral accent along one side, not a full wrap around the whole bottle.
One cluster of cream flowers and layered leaves breaks up the solid color while leaving plenty of plain space. The textured, sandy finish on the glass adds warmth that a smooth surface would not give.
Coat the bottle first in a matte mustard paint mixed with a bit of sand or fine texture medium for grip. Shape five or six petals per flower, layering two flowers slightly overlapping, then add three or four leaves tucked underneath.
Press the whole cluster onto the bottle while both the paint and clay still have a little give so everything bonds.
One cluster like this takes far less time than a full wrap, which makes it a solid pick for a first attempt.
Set it near a sunny window and the texture catches shadow throughout the day. Small and contained, this idea proves a single detail can carry an entire piece.
7. DIY Clay-Textured Bottle Vase

Texture turns a plain glass bottle into a vase worth keeping on a shelf. Roll air dry clay into a thin sheet and press it around a clean bottle until the surface is fully covered. Smooth the seams with your fingers so the clay reads as one piece, not a wrap.
Once the clay sits in place, use a toothpick or a small sculpting tool to carve waves, ridges, or simple geometric lines into the surface.
These marks catch shadow and light differently depending on where you set the vase, which is what makes a textured piece feel handmade instead of store bought.
Let the clay dry fully before you paint it, usually a full day or two depending on thickness.
Stick to a neutral or pastel palette so the texture stays the star, then drop in a few dried stems once the paint has cured. A single vase like this works well with other pieces from these aesthetic craft ideas for room decor.
8. DIY Clay Bottle Candle Holders

Old glass bottles make sturdy candle holders once you wrap the base in clay. Cover the bottom half of a clean bottle with a thin, even layer and smooth out any air bubbles as you go.
Press a sculpting tool into the wet clay to add floral shapes or a simple embossed border around the middle.
Keep the pattern shallow so the holder still feels sturdy once it hardens, and check that the base sits flat before you set it down to dry.
Paint the dried clay in a soft earthy shade like clay red, sage, or warm cream, then seal it if you plan to use real flame candles nearby.
Drop in a taper or a votive and the glow through the glass neck adds warmth to a dinner table without much effort.
9. DIY Clay Mosaic Bottle Art

Small squares of clay turn a bottle into a mosaic piece with real color depth. Roll out air dry clay and cut it into little squares or circles with a butter knife or a clay blade.
Press each piece onto the bottle in a pattern, leaving a small gap between pieces the way real tile mosaics do.
Mixing shapes keeps the pattern from feeling stiff, so combine a few squares with rounded pieces if you have them.
Paint every piece a different color once the clay sets, then seal the whole bottle with a matte or glossy finish to protect the surface.
A finished mosaic bottle brings real color to a plain desk, and it pairs well with pieces from this study table decor list.
10. DIY Embossed Clay Bottle Design
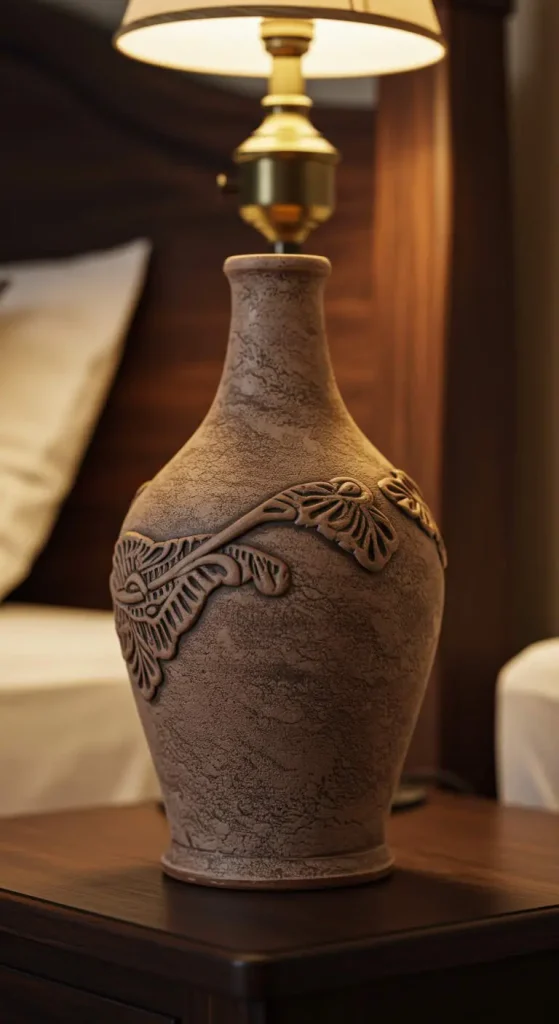
Raised patterns give a bottle real dimension without paint or glitter. Roll out clay and cut simple floral, tribal, or abstract shapes with a small knife or a clay cutter.
Press the cut shapes onto the bottle while both the clay and a light coat of water are still tacky, so the pieces bond without slipping. Space the shapes so the pattern breathes instead of crowding the glass.
Subscribe to DIY Craft Bloom
Get updates on the latest posts and more from DIY Craft Bloom straight to your inbox.
Let everything dry for a full day before you paint or seal it, since rushing this step causes cracks along the raised edges.
A bottle finished this way looks like carved stone from a few feet away, which makes it a quiet, detailed piece for a bedside table.
11. DIY Clay Bottle Planters

Empty bottles make surprisingly good planters once you cut them down and wrap the base in clay. Cut a plastic or glass bottle in half with a craft knife, and sand the cut edge smooth so it will not catch on anything.
Wrap the lower half in clay and shape the sides into a simple pot, pressing gently so the clay grips the plastic or glass underneath. A slightly uneven surface actually looks better here, since it reads as handmade rather than molded.
Paint and seal the dried clay so it can handle regular watering, then fill it with soil and a small succulent or two.
A row of these planters on a windowsill brings in real greenery, and you will find more ideas like it in this bottle craft ideas decoration guide.
12. DIY Clay Animal Bottles for Kids

Kids take to this project fast because a plastic bottle can become almost any animal with a bit of clay. Cover the bottle in a base layer of clay, then pinch out ears, a nose, or a tail depending on which animal you pick.
Small details make the biggest difference here, so let your child press in eyes, whiskers, or spots with a toothpick before the clay sets. Simple shapes like a bear or an owl work best for younger hands still learning to sculpt.
Once the clay dries, bright paint brings the animal to life and covers any uneven spots from little fingers.
Line a few finished bottles on a bookshelf and you have a set of characters no store bought decor can match.
13. DIY Clay Bottle Wind Chime

Wind chimes need weight and rhythm, and clay covered bottle rings give both. Cut a bottle into rings with sturdy scissors or a craft knife, then wrap each ring in a thin layer of clay.
Shape small clay charms, like leaves or drops, to hang alongside the rings for extra movement and sound. Poke a hole through each piece while the clay is still soft so you can thread twine through it later.
String the dried, painted pieces onto twine and tie them to a wooden dowel or a sturdy stick. Hang the finished chime near an open window, where the breeze does the rest of the work for you.
14. DIY Marbled Clay Bottle
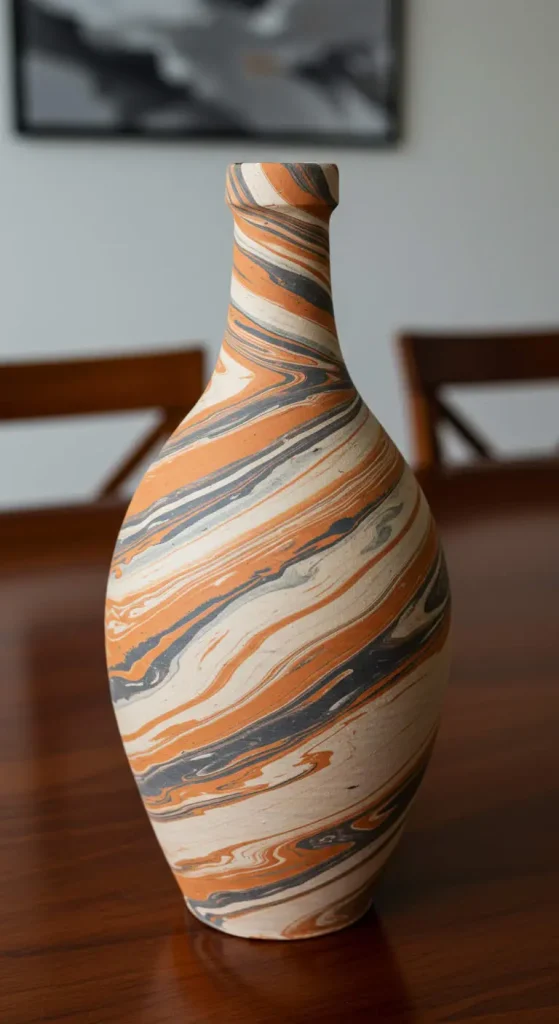
Two clay colors twisted together create a marbled look no single shade can match on its own. Take two or more colors of clay and roll them into long ropes, then twist the ropes together a few times.
Fold and roll the twisted clay again until you see thin streaks running through it, but stop before the colors blend into one flat tone. Wrap the marbled sheet around a bottle and smooth the seam so the pattern flows around the glass.
Bake the piece if you used polymer clay, or let it air dry if not, then wipe it with a soft cloth once it sets.
A marbled bottle like this works as a centerpiece on its own, no extra flowers or filler needed.
15. DIY Clay Bottle Jewelry Holder

Small hooks sculpted from clay turn a bottle into a jewelry stand that actually gets used. Cover a glass bottle in a smooth layer of clay, then shape a few small hooks or loops around the neck and shoulders.
Press each hook firmly into the base layer so it holds weight once necklaces and bracelets hang from it. Leave enough space between hooks so pieces do not tangle together on a busy morning.
Paint the dried clay in a neutral tone like cream, sand, or soft gray so it fits most dressers without clashing. Set it next to a mirror and rings, bracelets, and necklaces finally have a home instead of a pile.
16. Cherry Branch Bottle for a Kitchen Counter
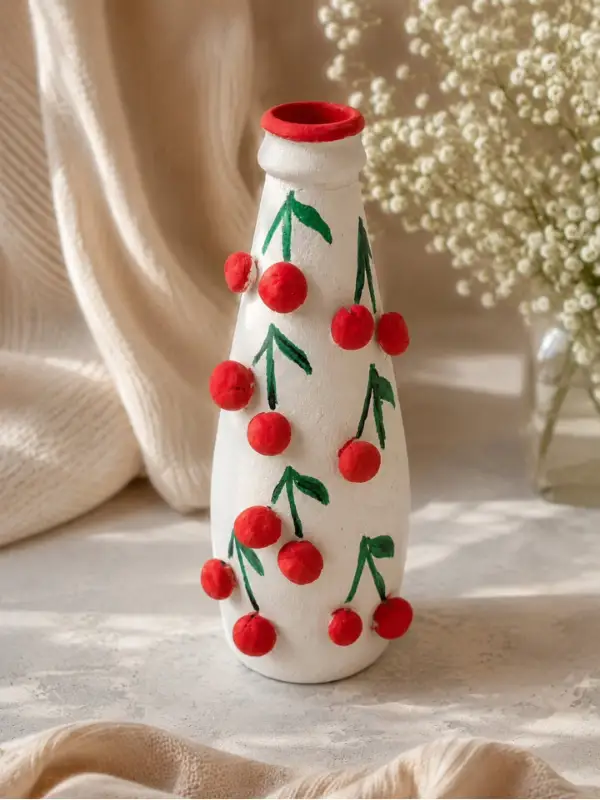
Cherries climbing a white bottle bring a cheerful, kitchen ready look with almost no color mixing required. Painted green stems connect each pair of clay cherries running up the surface.
The red rim at the top ties the whole piece together and signals the theme before you even spot the fruit.
Shape small round balls of red clay for the cherries and pinch tiny indents where the stems will attach.
Paint thin curved stems in green directly onto the bottle, then press the cherry pairs on while the paint is still workable enough to hold them. Finish the neck in the same red so the color repeats top and bottom.
This one suits a kitchen windowsill or a counter next to fresh produce, since the theme fits food spaces naturally.
Swap cherries for berries or cherry tomatoes if red feels too bold for your space. Either way, the same simple technique carries the whole idea.
17. DIY Clay Bottle Keepsake Jar

Notes, tickets, and small trinkets need a home, and a clay wrapped bottle makes a good one. Cover a bottle in clay and press in a small pocket or slit near the front where a folded note can slide in easily.
Smooth the edges of the pocket so paper slides in without tearing, and keep the opening a little wider than you think you need. A jar like this works well for love notes, ticket stubs, or tiny mementos from a trip.
Let the clay dry completely, then paint and decorate the outside however fits the room it will sit in. Fill it slowly over months and it becomes less of a craft project and more of a small record of your year.