14 Ribbon Wreath Ideas for Beginners

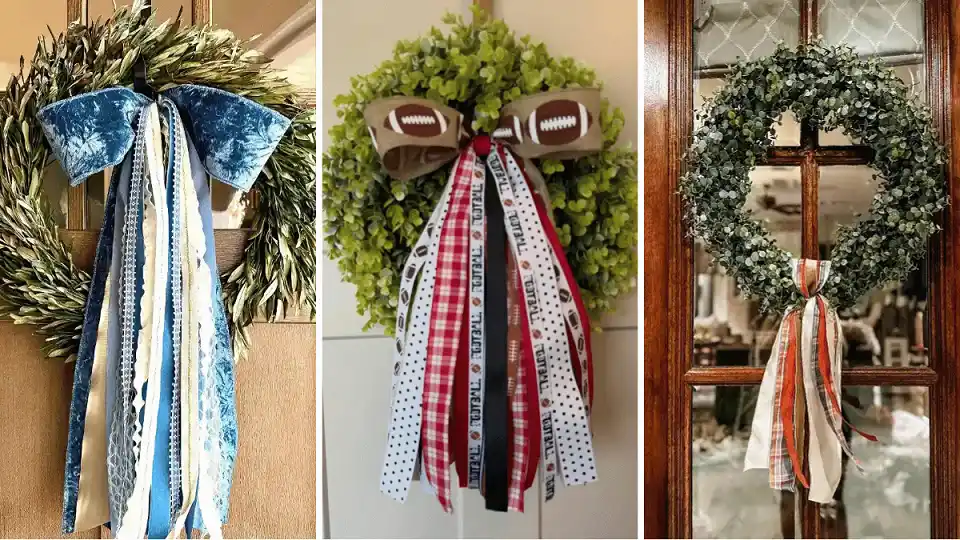
Most people stall out on wreaths at the exact same spot: the bow. The greenery part feels forgiving, but ribbon looks like it demands a skill you don’t have yet.
These 14 ribbon wreath ideas say otherwise. Some skip the bow entirely and lean on loose streamers instead.
Others hide the tie low or off to one side, where a wobbly loop never shows. A few swap ribbon for felt charms or yarn pom poms and let the ribbon just frame the piece.
What ties the whole list together is texture and placement doing more work than perfect technique.
Velvet, plaid, burlap, checkerboard, and curled metallic all show up here, proven out on real front doors, not staged photos.
Whether you’re working through a first project or just want a fresh take on a holiday standby, these ribbon wreath ideas are built to be copied by beginners, with plenty of shortcuts for anyone still working up to a flawless bow.
14 Ribbon Wreath Ideas for Beginners
1. Game Day Ribbon Streamer Wreath
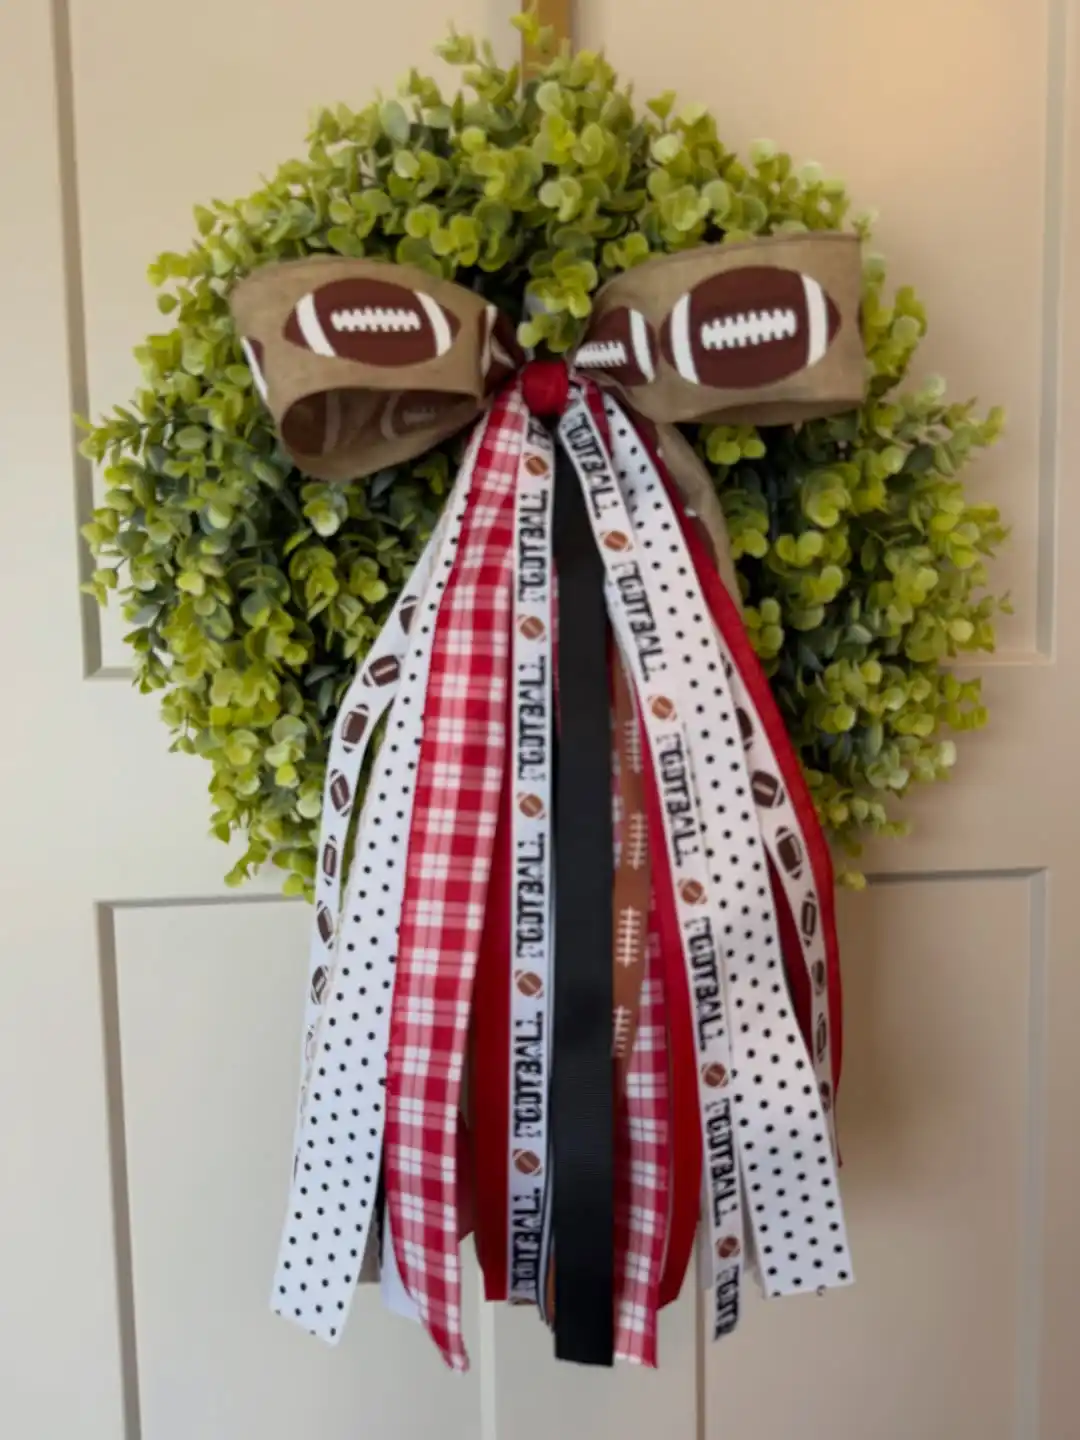
This one skips the single bow and goes straight for a full curtain of ribbon tails, which is an easy trick for beginners because messy is part of the design.
A faux greenery base holds a burlap bow printed with football details, then five or six ribbon patterns spill down in different lengths so the eye keeps moving.
Red plaid, black grosgrain, white polka dot, and a football text ribbon all sit side by side without matching, and that clash is exactly what makes it read as intentional instead of random.
Beginners can copy the layering order rather than hunting for the exact prints. Cut each ribbon a slightly different length before tying so the ends stagger naturally instead of lining up in a flat row.
2. Graduated Gold Bell Wreath
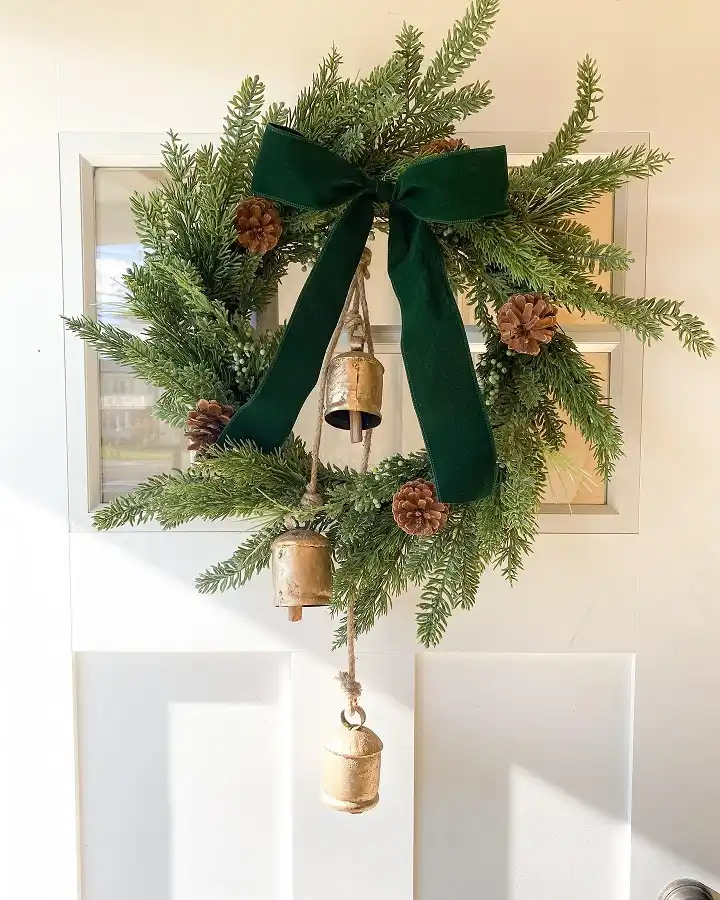
Fresh cedar and pine branches build the base here, layered so the greenery still has movement instead of sitting flat.
A wide green velvet ribbon does the heavy lifting, tied into a loose two loop bow at the top rather than anything fussy, and its long tails run straight down the center.
Three rustic gold bells hang from jute cord at staggered lengths below the bow, getting smaller as they trail lower, with a few pinecones tucked into the branches on either side for balance.
The velvet texture is what separates this from a flat satin ribbon, and it holds its shape without wire support.
Velvet ribbon holds a loop shape better than satin, so beginners get a fuller bow with fewer twists needed to keep it from flopping.
3. Plaid Ribbon Bottom Bow on Eucalyptus
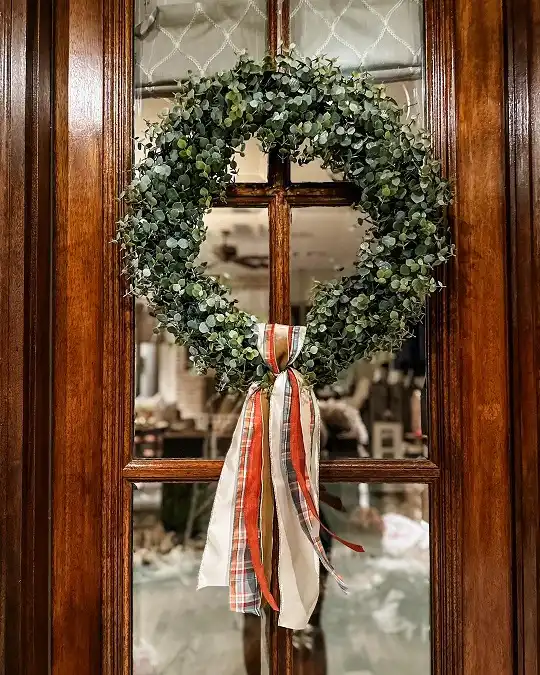
Placed low against a glass paned door, this wreath swaps the usual top bow for one tied at the base instead, which changes the whole shape of the piece.
The eucalyptus base is soft and silvery green with a natural, slightly irregular fullness, and a plaid ribbon in cream, rust, and forest green hangs down in loose tails that pool near the bottom of the glass.
Because the bow sits low, the greenery gets to be the star and the ribbon reads more like a finishing accent than the main event.
This is a good pick for anyone nervous about bow tying, since a bottom placed bow hides small mistakes that would show up front and center at the top.
Attach greenery stems starting at the outer edge and working inward so the shape stays even.
Tuck shorter stems toward the center last, once the outer shape already holds.
Measure your ribbon against the lower third of the wreath before cutting so the tails land near the bottom edge.
4. Yard Line Ribbon Bow with Matching Porch Pots
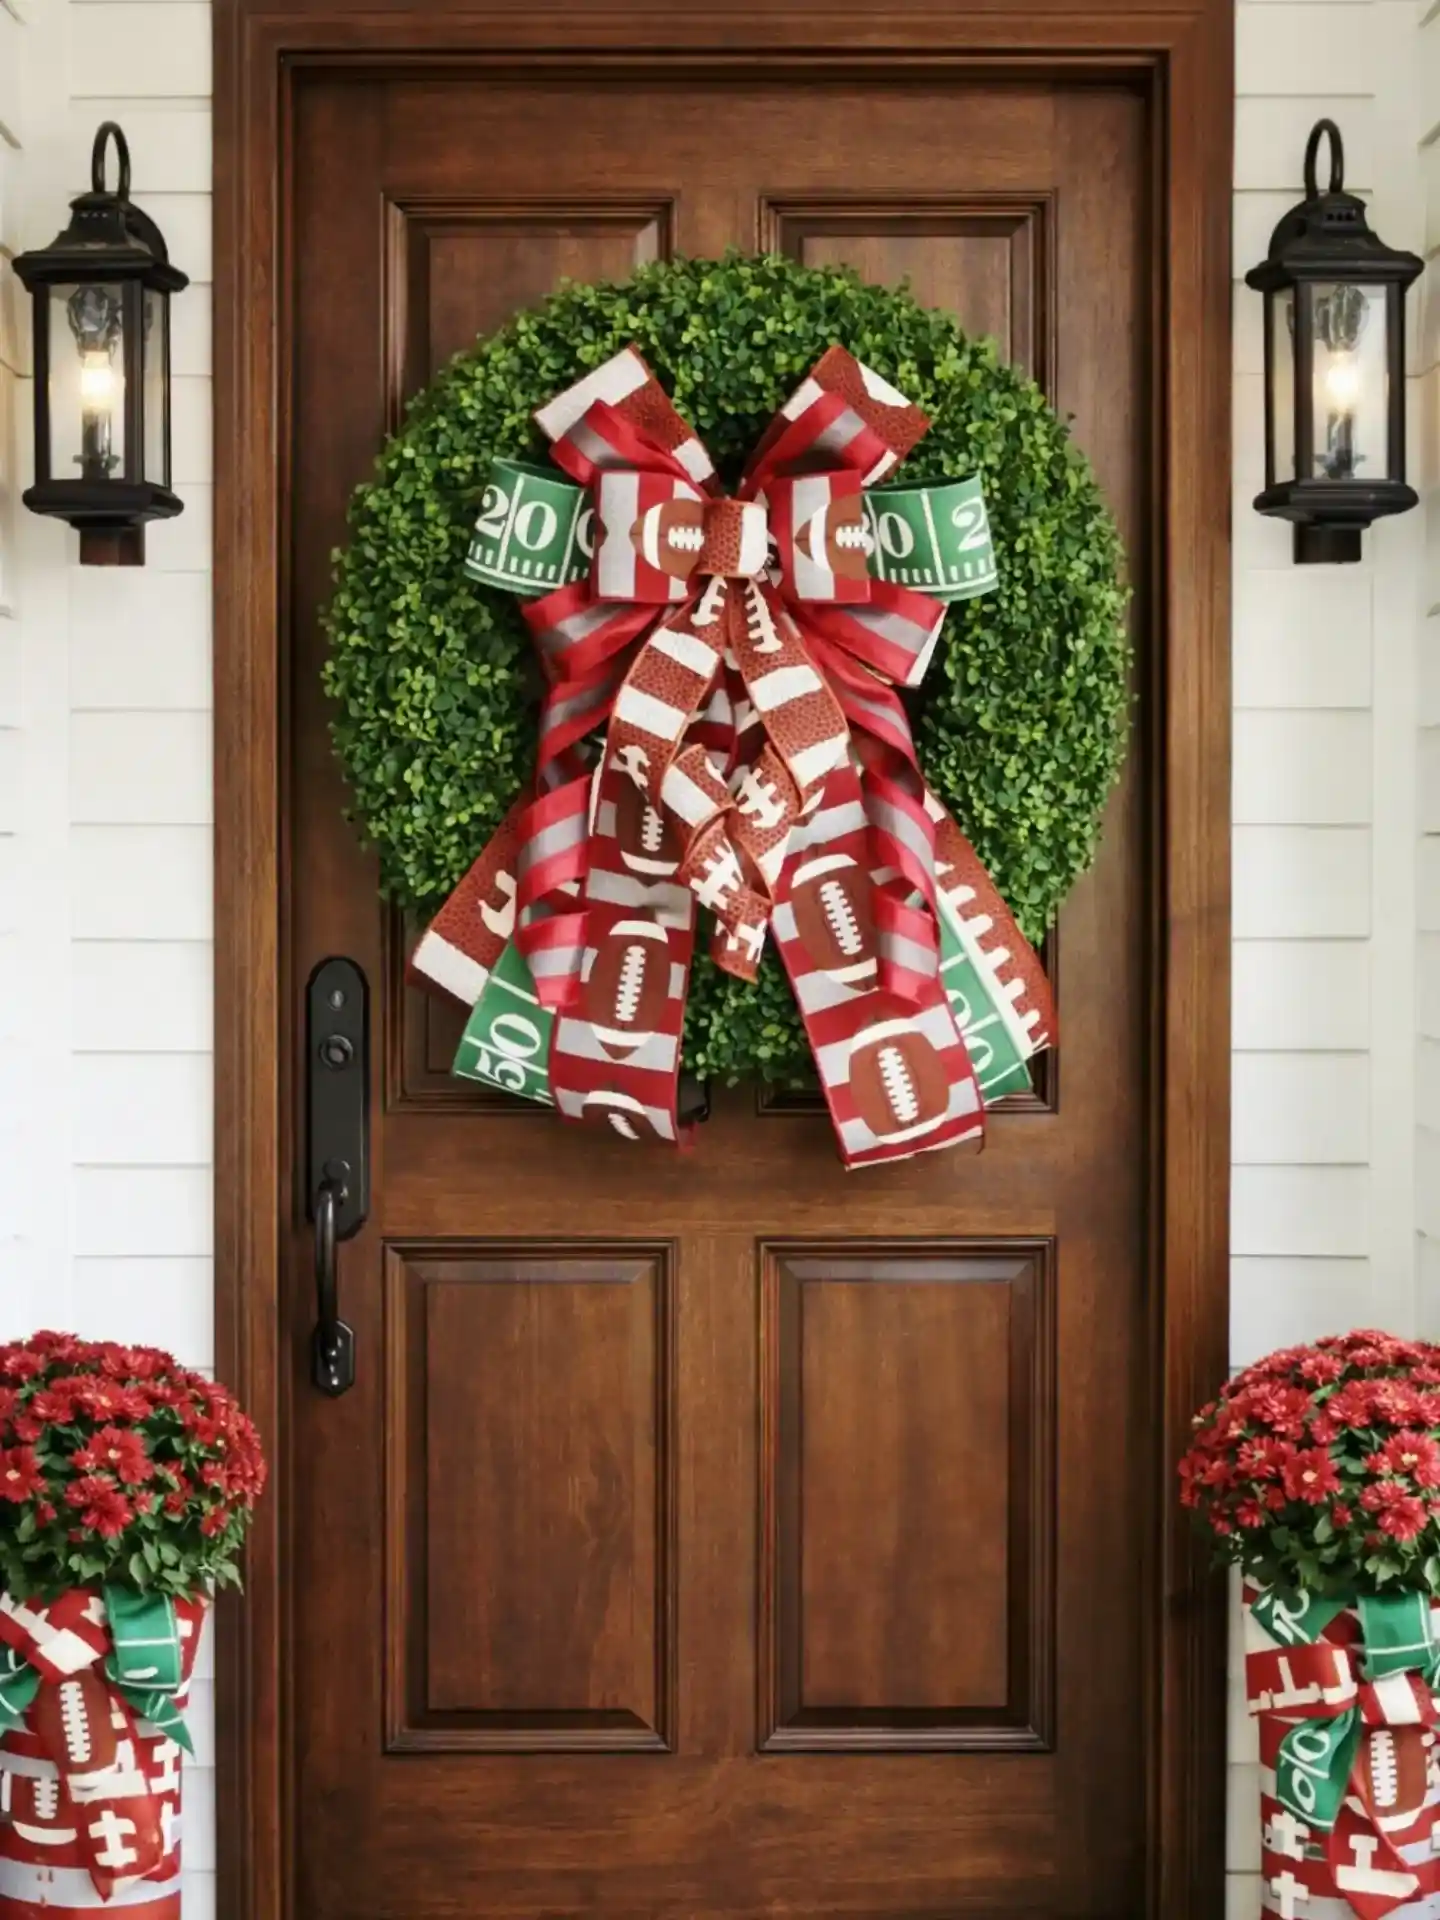
A dense boxwood wreath becomes the backdrop for a big three ribbon bow built from a candy cane striped print, a football pattern, and a green yard line ribbon with painted numbers.
The layered ribbons cross and loop at different heights instead of stacking neatly, giving the whole bow a fuller, more sculptural shape than a simple two loop tie.
What pulls the look together is the porch itself: the same three ribbons reappear in smaller bundles tied around the mum pots on either side of the door, so the wreath does not stand alone.
Coordinating the door and the pots is a low effort way to make a single wreath feel like a full styled entrance.
Subscribe to DIY Craft Bloom
Get updates on the latest posts and more from DIY Craft Bloom straight to your inbox.
- Style: sports themed
- Cost: moderate
- Effort: one afternoon
- Ribbon count: three patterns
5. Frayed Strip Wreath with Felt Charms
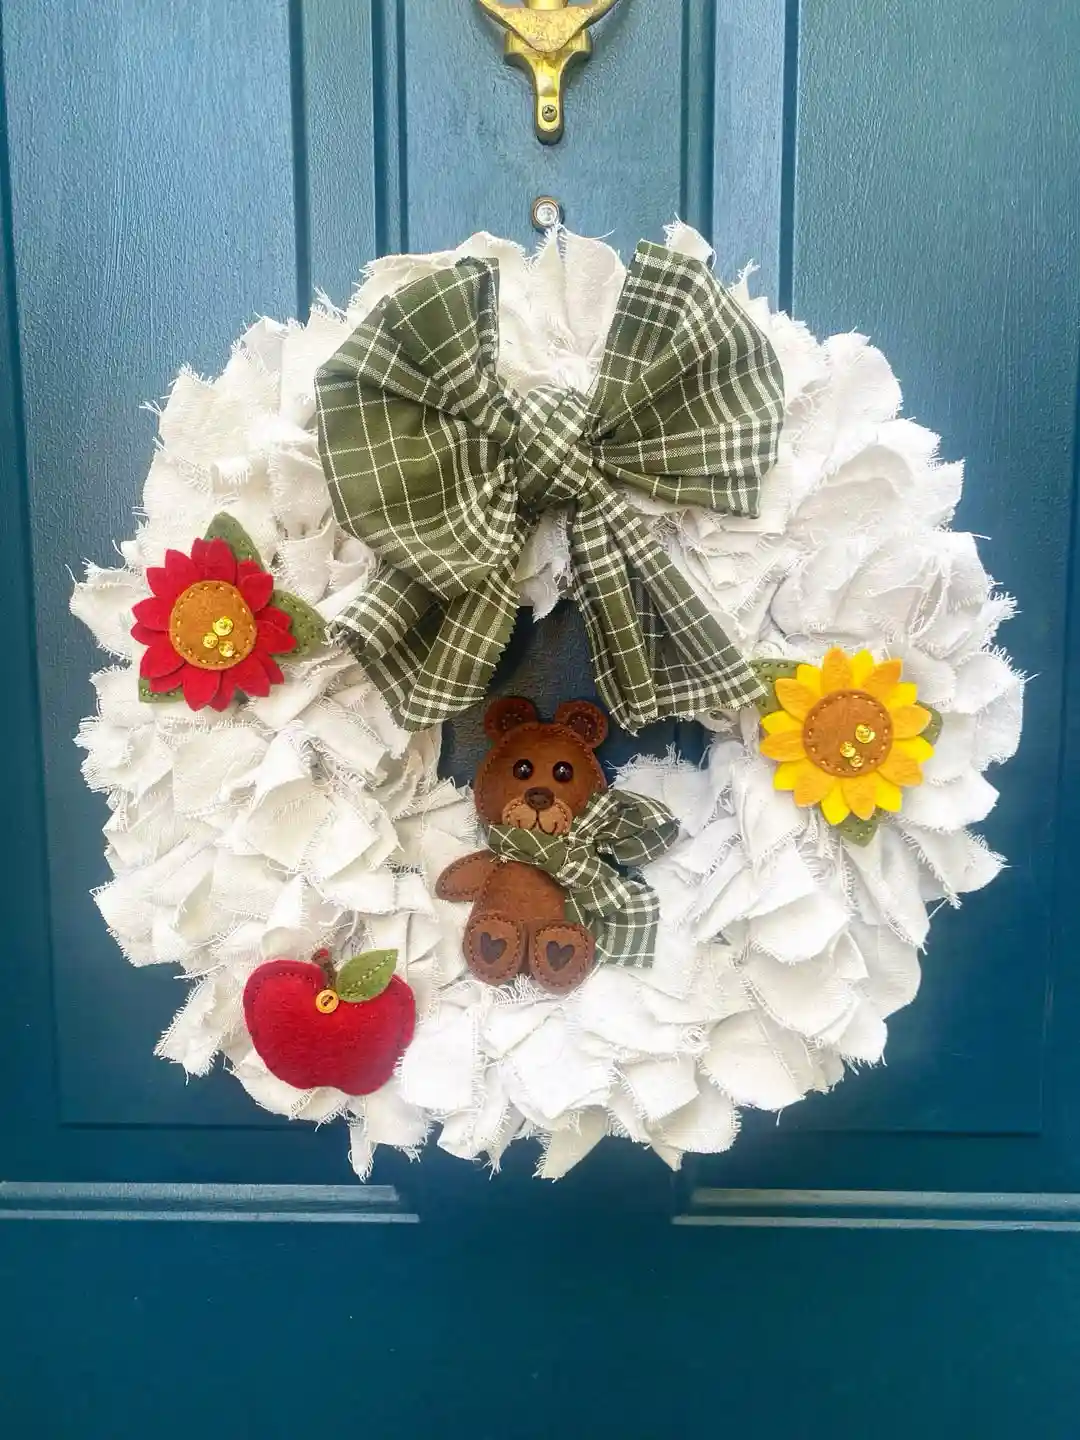
Torn white fabric strips knotted around a wire form give this wreath a soft, textured base that looks nothing like a smooth satin build, and that fray is the whole point of the style.
An olive plaid ribbon ties into a loose, asymmetrical bow at the top with no wire needed to hold its shape, since the checked pattern hides small folding mistakes well.
Below it, a set of felt charms does the real storytelling: a stitched teddy bear wearing its own tiny plaid bow, a red poinsettia, a yellow sunflower, and a button topped apple, arranged in a loose ring around the lower half.
For a beginner, this swaps ribbon skill for craft store charms, so the wreath still feels handmade without a single perfect bow required.
Torn cotton strips instead of ribbon give texture without any tying skill needed.
A plaid pattern forgives uneven loops since the print breaks up the eye.
Felt pieces add color and a theme without touching the ribbon itself.
6. Layered Velvet and Lace Ribbon Bundle
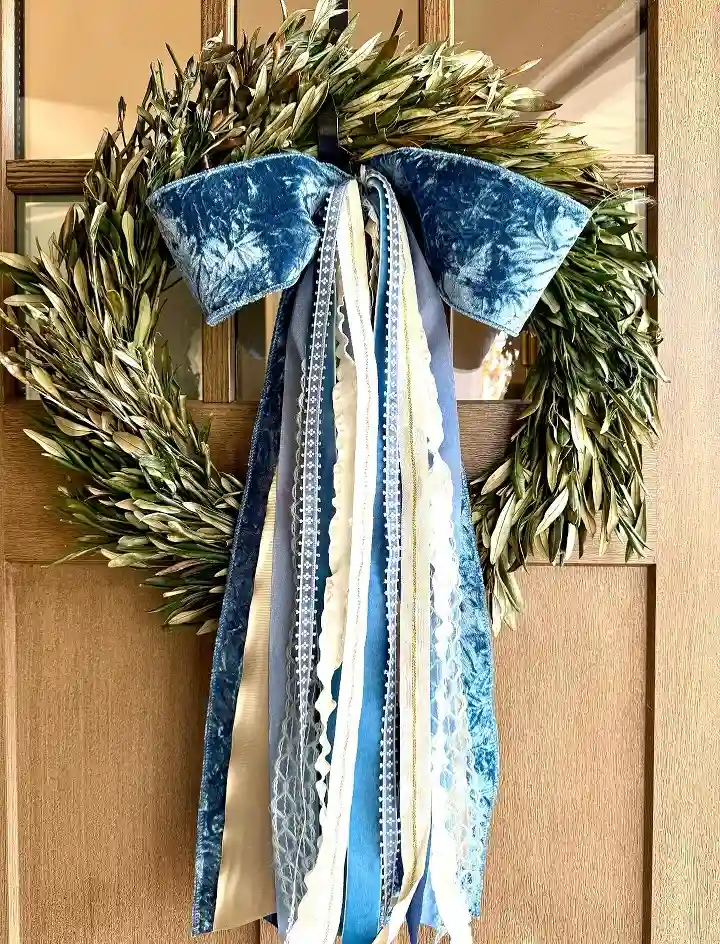
Dried olive branches with silvery green leaves form a loose, textured wreath base, and the ribbon treatment leans into quantity over a single statement piece.
A wide teal velvet bow sits at the top, tied simply with no extra loops, then a full bundle of narrow ribbons drops straight down below it: lace trim, cream satin, a thin metallic stripe, and more velvet in varying widths.
None of the tails are trimmed to match, so the uneven lengths become part of the texture instead of a mistake to fix.
Choosing ribbons in one color family but different textures keeps a bundle like this from looking cluttered, even with six or more strands hanging together.
- First piece: velvet ribbon for the bow
- Second piece: narrow lace trim
- Third piece: thin metallic ribbon
- Result: a textured bundle finish
7. Curled Ribbon and Scallop Edge Fern Wreath
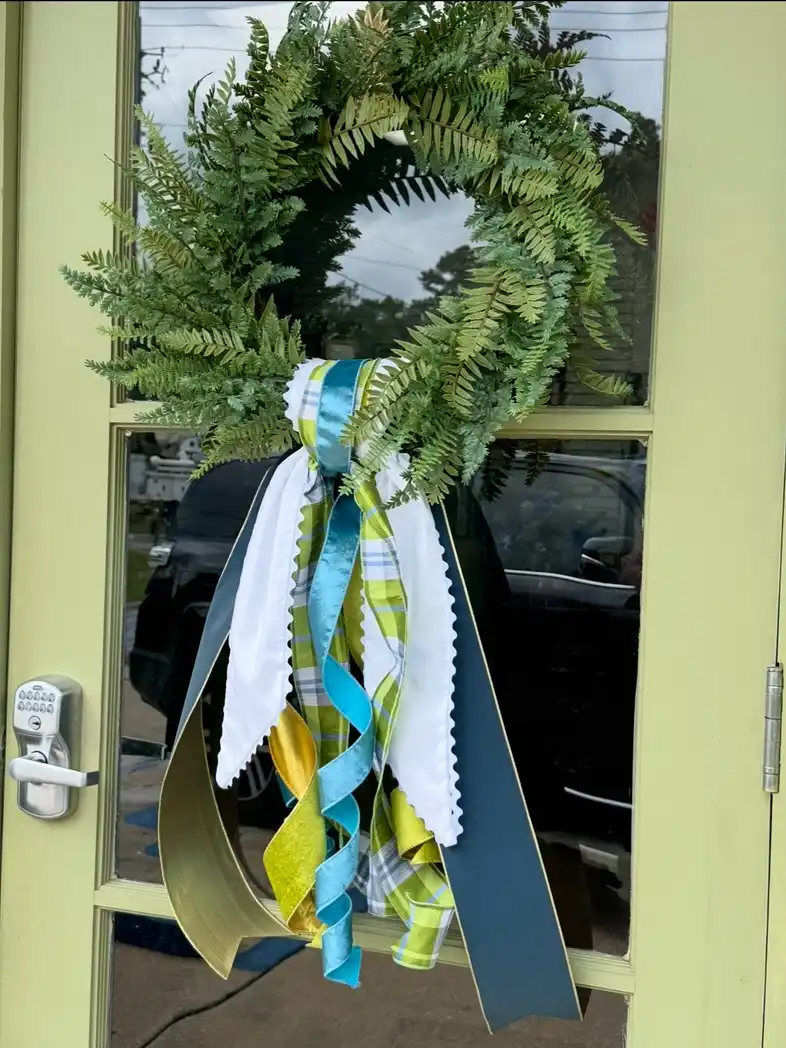
Layered fern fronds in two green tones build a loose, feathery base with plenty of gaps between the greenery, which lets the ribbon underneath show through instead of getting swallowed.
A wide plaid ribbon anchors the top in teal, lime, and white checks, but the real interest is below it: metallic gold and turquoise ribbon curled into tight spirals, a scalloped edge white ribbon with pinked trim, and a stiff teal ribbon left flat and uncurled for contrast.
Mixing curled, scalloped, and flat ribbon textures in one bundle gives beginners a way to add visual interest without needing three different bow techniques, since curling is done with scissors, not knots.
- Curled metallic: spiral texture from scissor curling
- Scalloped edge: pinked white ribbon for a soft border
- Flat teal: left straight for contrast against the curls
- Plaid anchor: ties the bundle to the top of the wreath
8. Pom Pom Wreath with a Burlap Bow Anchor
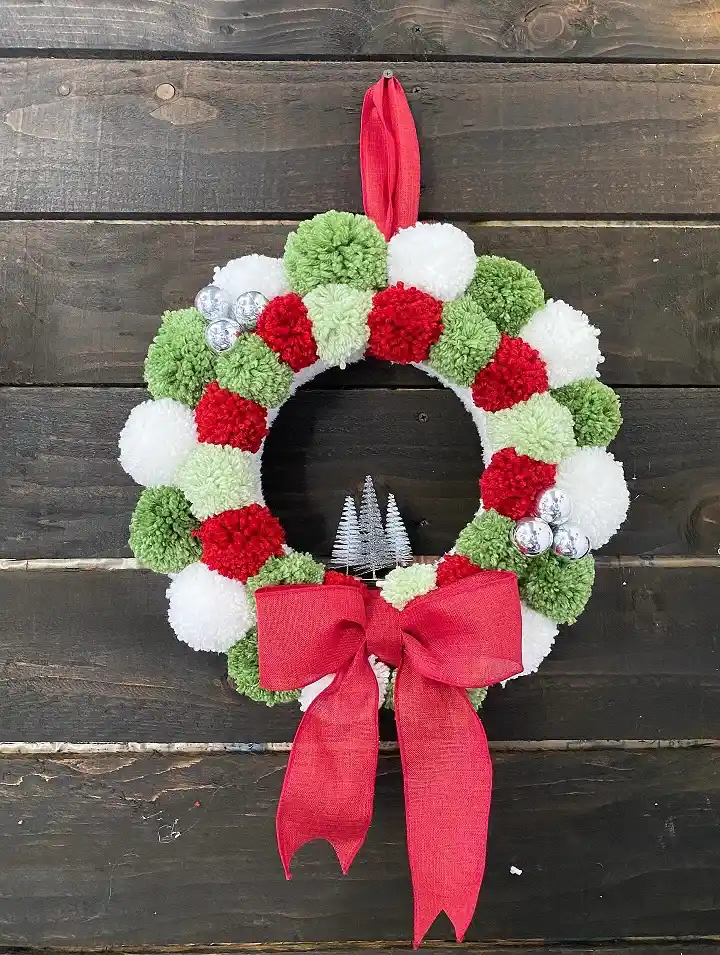
Yarn pom poms in red, white, and two shades of green cover this wreath edge to edge, with small silver ornaments and mini bottle brush trees tucked into the open center for extra detail.
The ribbon work here is minimal but doing two important jobs: a wide burlap bow sits low at the bottom instead of the top, weighing down the design so it does not feel top heavy, and a folded ribbon loop at the very top doubles as the hanger.
Burlap holds its shape without wire, so the bow stays full even after hanging for weeks.
For beginners newer to yarn crafts, this is proof that ribbon does not need to be the star every time. Sometimes its job is just to frame the piece.
- Do this: use burlap or a stiff cotton ribbon for a bottom bow, since it holds volume without drooping
- Do this: loop a short ribbon length at the top before attaching pom poms, so the hanger is hidden once the wreath fills in
- Skip this: thin satin ribbon for a bottom bow, since it tends to go limp under its own weight
- Skip this: gluing the bow on last, since it is easier to tuck pom poms around it while the base is still bare
Use burlap or stiff cotton for a bottom bow so it holds volume without drooping.
Loop a short ribbon at the top before attaching pom poms to hide the hanger.
Thin satin ribbon for a bottom bow, since it tends to go limp under its own weight.
Gluing the bow on last, when it is easier to tuck the base around it first.
9. Side Set Gingham Bow on a Floral Wreath
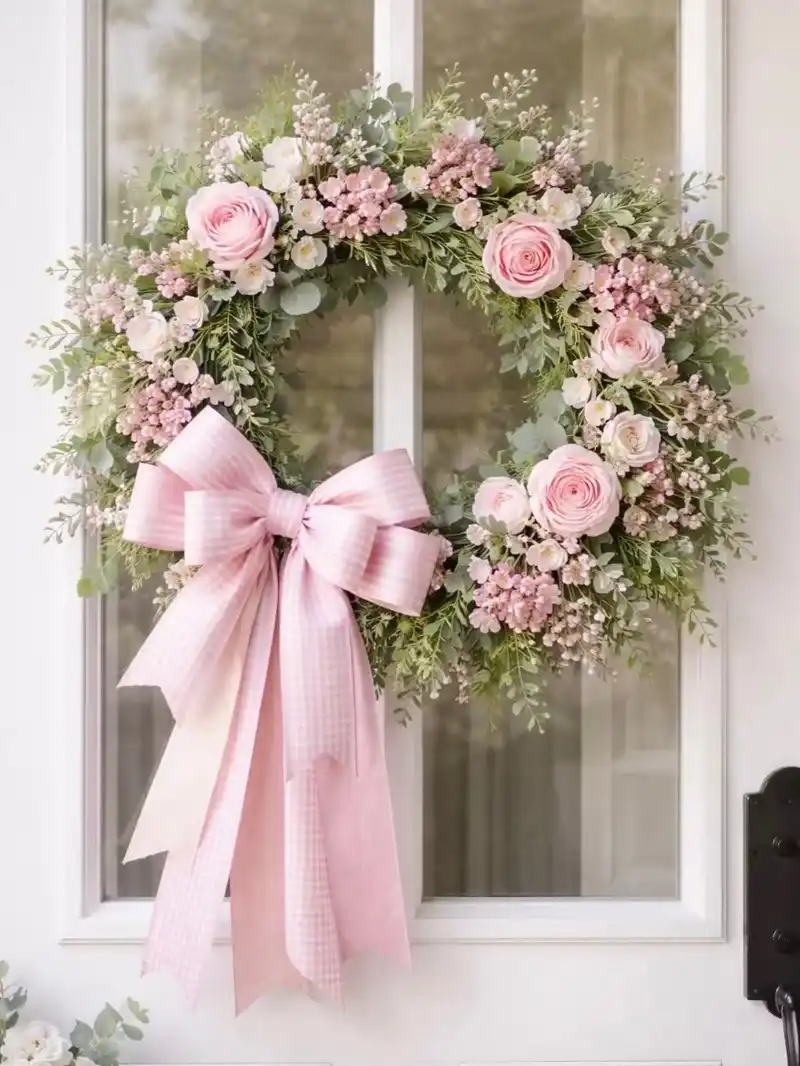
Blush roses, white ranunculus, and waxflower fill this wreath in a soft, garden gathered way, mixed with eucalyptus so the greenery never goes fully hidden behind the blooms.
The bow breaks from center entirely, tied low on the left side instead, with a pale pink gingham ribbon that has just enough pattern to read as detail without competing with the flowers.
Long tails drop well past the bottom edge of the wreath, extending the shape and giving the whole piece a taller, more finished silhouette than the florals alone would create.
An off center bow works especially well on floral wreaths because it leaves the fullest cluster of blooms untouched and gives the ribbon its own visual lane.
Subscribe to DIY Craft Bloom
Get updates on the latest posts and more from DIY Craft Bloom straight to your inbox.
10. Dried Citrus Wreath with a Side Placed Velvet Bow
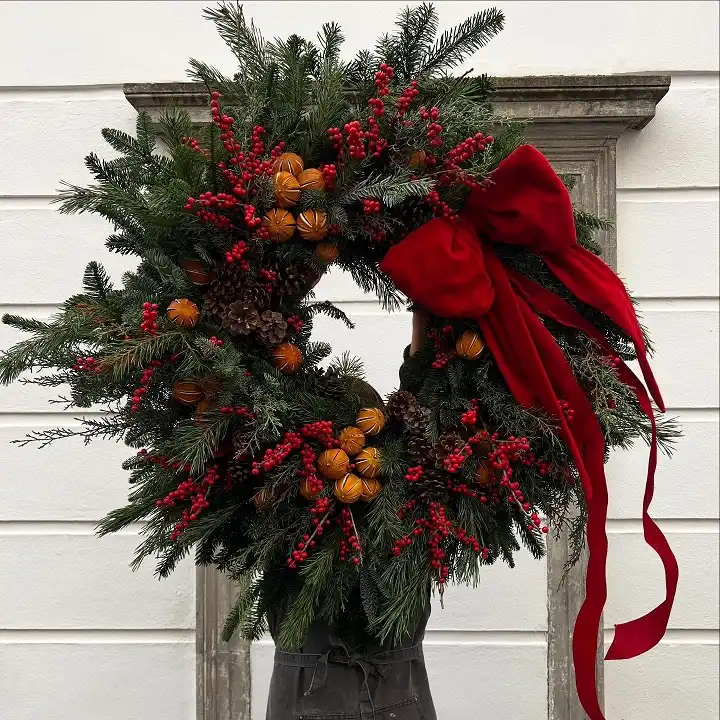
This build layers pine, cedar, and fir with red berries and pinecones, then adds dried orange slices for a warm, textured pop that reads more handmade than store bought.
Instead of centering the ribbon, the bow sits off to the right side, low enough that the tails hang well past the bottom of the wreath rather than tucking behind the greenery.
Deep red velvet gives the bow real weight and richness, and a side placement like this lets you get away with a simple, loosely tied bow because there is no symmetry to get wrong. The long single tail balances the density of the greenery on the opposite side.
Watch out: a bow this heavy needs a sturdy attachment point, so wire it directly to the wreath frame rather than just to a few thin stems.
A bow this heavy needs a sturdy attachment point, so wire it directly to the wreath frame rather than to a few thin stems.
11. Two Tone Velvet Ribbon on a Rose Heavy Wreath
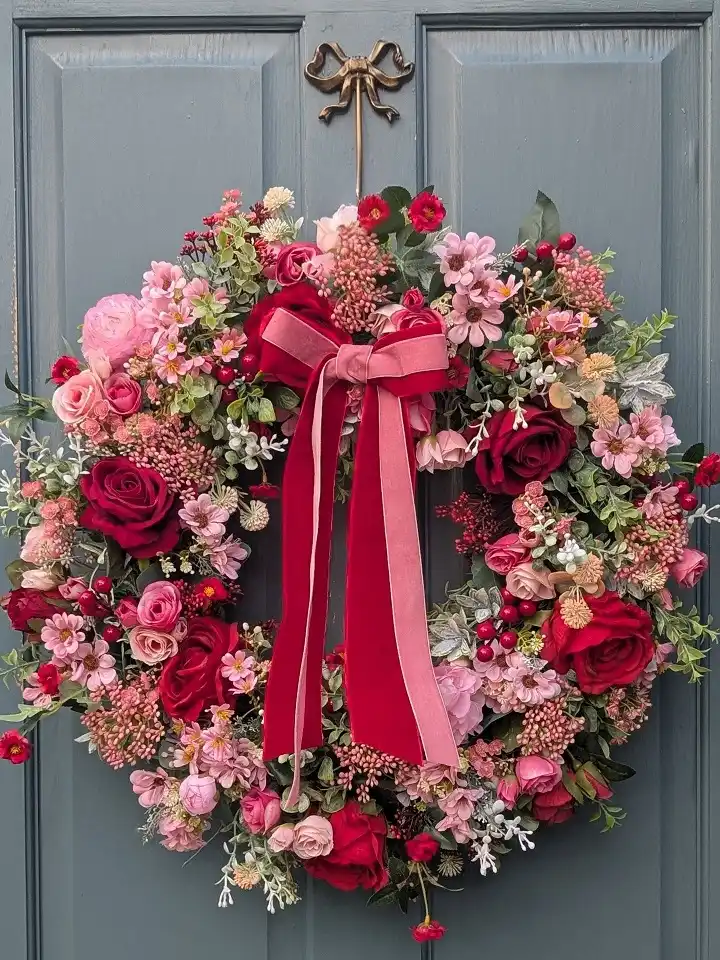
Deep crimson roses mix with blush pink blooms, waxflower, and trailing greenery here, built dense enough that almost no wreath form shows through.
The ribbon choice does a lot of work in this one: a red velvet bow sits on top of a slightly wider dusty pink velvet bow, so two colors show at once instead of one flat ribbon.
Both tails hang long and straight down the center, splitting the wreath visually in half and drawing the eye straight down through the densest part of the blooms.
Layering two ribbon colors instead of picking one lets the bow echo both the deep reds and the softer pinks already in the florals, so nothing in the palette feels left out.
Two velvet tones let the bow pick up every color already in the florals instead of picking just one.
12. Checkerboard Ribbon with Curled Hot Pink Accents
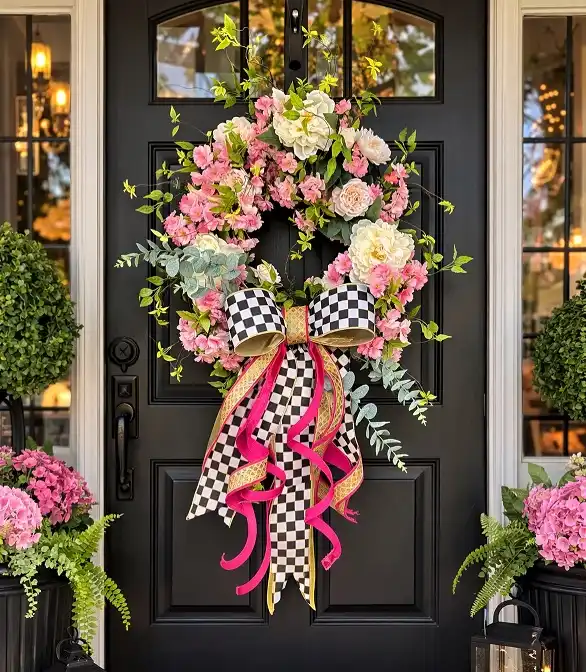
Pink cherry blossoms, cream peonies, and hydrangea fill an asymmetrical wreath that spills to one side rather than sitting in a perfect circle, giving it a loose, gathered feel against a black door.
The ribbon choice is the boldest move here: a black and white checkerboard print with gold trim forms the main bow, then thin hot pink ribbon gets curled into tight spirals and tucked among the checkered tails, adding a sharp pop of color the florals alone do not have.
The high contrast pattern only works because the florals stay soft and pale. Pair a graphic print ribbon with muted blooms so the two elements trade off being the loud one.
Before deciding on a bold print like checkerboard, compare it side by side with a quieter option to see which one fits the door.
| Bold Print Ribbon | Solid Color Ribbon |
|---|---|
| Adds graphic contrast against soft florals | Blends smoothly into the greenery |
| Works best against a dark or neutral door | Works on any door color |
| Reads as a statement piece on its own | Lets the flowers stay the main focus |
13. Grapevine Wreath with a Sculptural Bow and Velvet Pumpkin
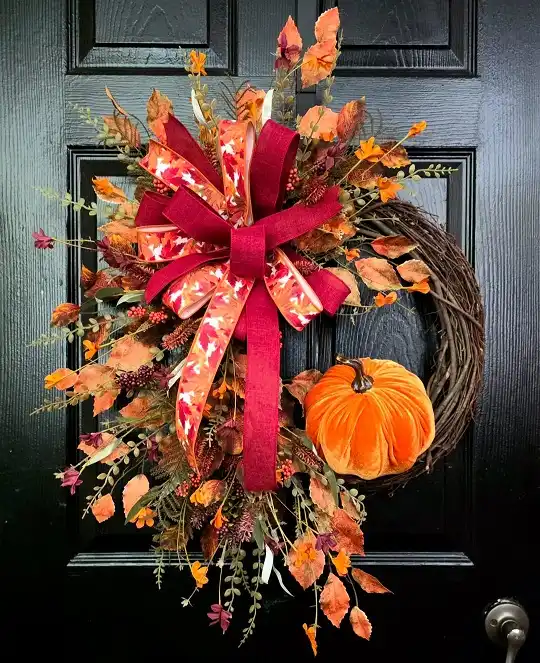
An exposed grapevine base stays visible on one side rather than getting fully covered, giving this wreath an open, rustic frame that most florals hide.
Faux fall leaves in burnt orange and burgundy cluster on the left, and a velvet pumpkin sits low on the vine like an accessory rather than a filler piece.
The bow is the standout: wide burgundy wired ribbon layered with a floral printed sash, twisted into loops that stack and cross instead of sitting flat, taking up nearly a third of the wreath’s visual space.
A bow this large only works because the grapevine base stays partly bare. Give an oversized bow room to breathe by not covering every inch of the frame with greenery.
- Skill needed: moderate, multi loop bow
- Mess level: some leaf and wire trimming
- Time: about an hour
14. Black and Purple Florals with a Checkerboard and Sheer Bow Trio
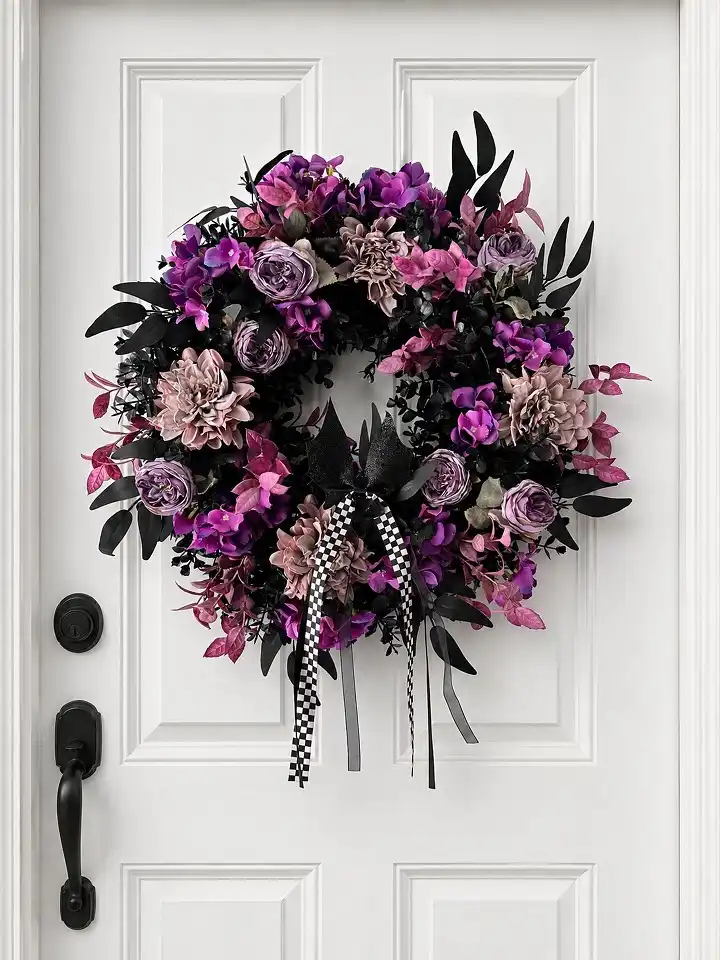
Purple and mauve dahlias, roses, and eucalyptus build a moody, jewel toned wreath against black foliage, giving the whole piece a dramatic, almost gothic softness rather than anything cartoonish.
The ribbon bundle at the bottom mixes three different finishes: black and white checkerboard grosgrain, a sheer charcoal chiffon, and a solid black satin, all left long and loose rather than gathered into a tight bow.
Because the ribbons are not cinched tightly at the base, they fan out slightly, echoing the loose, spilling shape of the florals above.
Combining a graphic print with a sheer and a solid is a reliable way to add depth to a monochrome bow without introducing a second color.
One print, one sheer, one solid keeps a monochrome ribbon bundle from looking flat.
conclusion
That’s the full list, from streamer heavy football wreaths to gothic florals with a three ribbon bundle at the base.
Notice how often the trick was placement, not a harder bow. Bottom ties, side ties, and loose bundles all did the heavy lifting while the greenery stayed the real star.
Pick one style that matches what’s already on hand, whether that’s leftover plaid from the holidays or a spool of velvet you’ve been saving, and build from there.
Ribbon wreaths are forgiving projects, and every idea here proves a beginner can get a finished, styled look without a single perfectly symmetrical bow.
Save this for the next time your door needs something new.