16 Easy Christmas Card Crafts for Kids to Send Holiday Love


Store bought cards look nice. Handmade ones get kept. A child’s wobbly snowman or glitter tree tells Grandma more than any printed verse could.
These easy Christmas card crafts for kids turn paper scraps, paint, and a little glue into holiday love that travels by mail. Most projects need only basic supplies you already own.
Little hands can do the fun parts while grown ups handle cutting and folding. Each idea below works for preschoolers and older kids alike, with tips to adjust the mess level.
Pick a design, clear the kitchen table, and let the season’s sweetest mail begin.
1. Watercolor Tree Window Cards
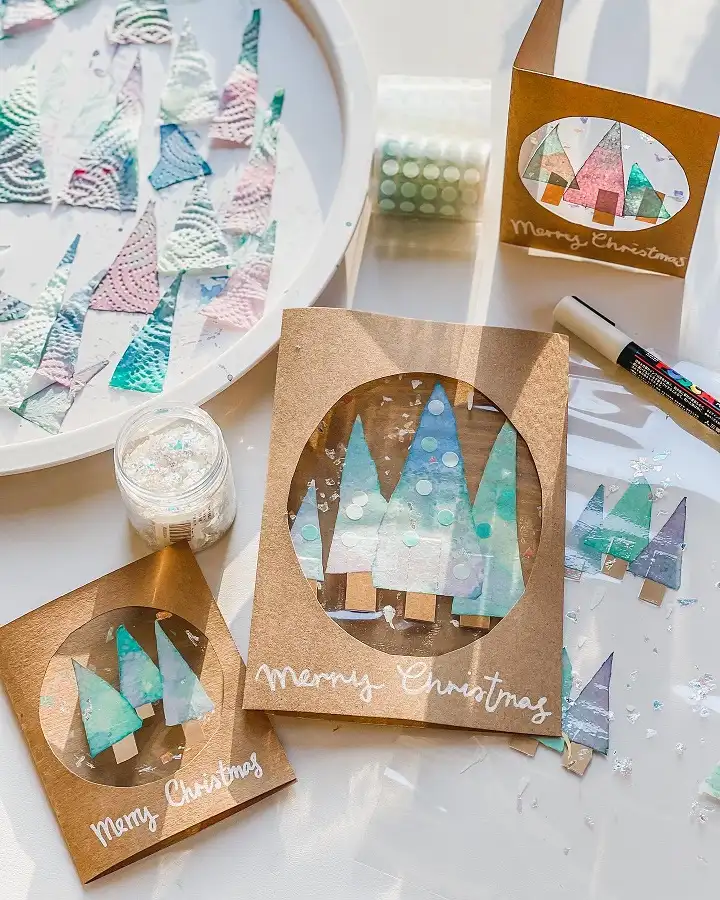
- Materials: Kraft card, clear sticky sheet, painted paper towel, dot stickers, iridescent flakes.
- Make: Cut an oval window, then press paper trees and kraft trunks onto the sticky sheet.
- Finish: Sprinkle flakes, seal with a second clear layer, and letter the front in white marker.
- Display: Tape it to a window so light glows through the trees.
Those quilted tree textures come from what looks like paper towel brushed with watercolor in teal, pink, and violet. Kids love painting it because the colors bleed on their own.
Once dry, the sheet cuts into skinny triangles with no fuss. Small round stickers on the tallest tree read as ornaments, and the shimmer flakes catch the sun like snow.
Paint tip: Let the painted towel dry flat on a tray before cutting. Soggy paper tears when little fingers press it onto the sticky film.
2. Tape Resist Sequin Tree Cards

Crisp white gaps slice through this painted tree, and they look a lot like tape resist. A grown up could lay strips of masking tape at angles across the card, then let kids paint between them in red, deep green, and bright green.
Peeling the tape reveals sharp stripes that no wobbly brush could manage alone.
Sequins come next, one dab of glue each, in every color from teal to gold. Up top sits a shiny copper star, while a brown painted trunk grounds the design.
Behind it lies a whole stack of matching cards, which shows how well this works for a class or a big family list.
Plan two short sessions, since thick paint needs to dry before the sequins go on. For younger kids, swap sequins for round stickers to skip the glue.
These easy Christmas cards kids can make still look bright and cheerful from across the room.
3. Handprint Reindeer With Fingerprint Lights
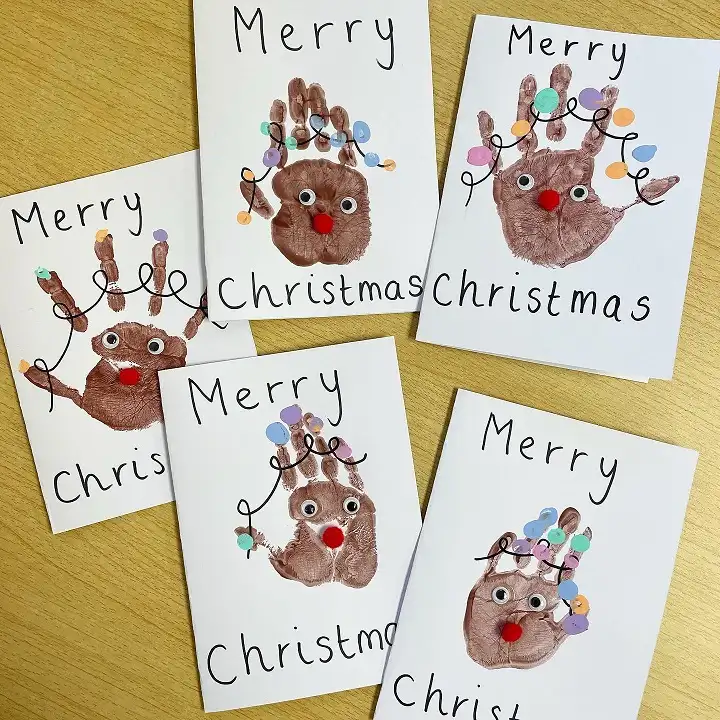
Every card in this batch starts with a brown painted handprint, flipped so the fingers rise like antlers. Two googly eyes and a fluffy red pom pom turn the palm into a reindeer face.
Then a black marker loop drapes across the fingers, and pastel fingertip dots in pink, blue, orange, and lilac become the bulbs. Each print comes out a little different, which is exactly why relatives keep them.
Kid friendly: Brush the paint onto the child’s palm instead of dipping, so you control the thickness. Prints smudge less that way.
Keepsake idea: Write the child’s name and age on the back. A handprint card doubles as a record of how small those hands were this year.
Glue tip: Pom pom noses need a drop of tacky glue, not a glue stick, to stay put in the mail.
4. Fuse Bead Gift Box Cards
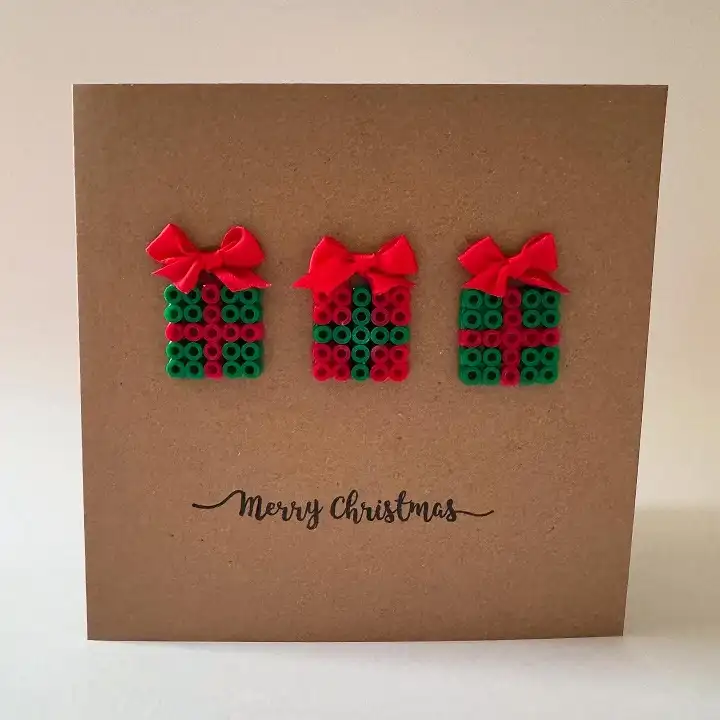
You’ll need: Red and green fuse beads, a small pegboard, ironing paper, red satin ribbon, kraft card, and strong glue.
Three tiny presents line up across this square kraft card, each built from ironed beads. Red and green rows cross in the middle like wrapped ribbon.
Above every box sits a small red satin bow, which gives the flat beads some soft dimension.
Kids can place the beads on a pegboard one by one, which builds fine motor skills and patience.
An adult handles the iron, since the beads melt together under heat. After cooling, the little squares glue flat onto the card front with a neat printed greeting below.
Scale note: Each gift uses only a small grid of beads, so a handful of leftovers covers a whole stack of cards.
5. Rainbow Outline Character Cards

Bright crayon or oil pastel dashes trace a smiling tree, a gingerbread man, and a snowman on these cheerful kids Christmas cards.
Each outline switches color every few strokes, so it reads like a rainbow. Googly eyes, rosy cheeks, pom pom buttons, and fuzzy pipe cleaner arms give every character a personality. Sparkly frames in purple, blue, and gold wrap around the white centers.
Why it works:
Subscribe to DIY Craft Bloom
Get updates on the latest posts and more from DIY Craft Bloom straight to your inbox.
- Short color segments forgive shaky lines, since the breaks look planned.
- Simple outlines leave plenty of white space for stickers and pom poms.
- Glitter borders hide uneven edges on the inner white card.
Beginner shortcut: Trace a cookie cutter for the outline, then let kids color over the pencil in short rainbow dashes.
6. Button Tree and Wreath Cards

Best for: Kids who love tipping out the button jar and picking favorites.
Buttons stack into a tidy triangle here, with big white ones near the base and small blue ones climbing toward a glittery foam star.
A silver glitter square makes the trunk. The second card repeats the idea in all greens, while the third bends a red pipe cleaner bow over a ring of green buttons.
Sorting by size first helps kids build a stable shape, so larger buttons anchor the bottom.
Laying everything out dry lets them rearrange before anything sticks. Hand deliver these, since raised buttons may need extra postage.
Thrift find: Secondhand shops often sell mixed button bags for very little, and sticking to one color family, like these blues, makes the tree look planned.
7. Paper Strip Tree With Dot Ornaments

- Materials: Green paper strips in mixed shades, brown paper, a glitter foam star, white card.
- Make: Glue strips from longest at the bottom to shortest at the top.
- Finish: Dot on ornaments with paint markers or a cotton swab.
- Display: Stand a pair together on a shelf to mimic a tiny forest.
Mixed greens give this tree its depth, from lime to mint to a deep forest shade. Strips overlap a little and sit slightly crooked, which keeps the look playful instead of stiff.
Bright paint dots in red, pink, blue, and yellow pop against all that green. It ranks among the simplest Christmas card crafts for kids, because cutting straight strips suits beginners with safety scissors.
Upcycle idea: Paper scraps from earlier projects work here, since every strip can be a different green.
8. Bright Cardstock Cutout Cards

Solid backgrounds in teal, red, green, and yellow make each cutout shape pop. A cheerful snowman sits on fluffy cotton ball snow, while a layered green tree rests on a scalloped white drift. Two gift boxes round out the set, tied with red glitter ribbon bows.
Every shape here is basic: circles, triangles, rectangles, and loops. Little crafters can cut most of them alone after a grown up draws the lines. White dots scattered across each background read as falling snow and fill empty space.
Contrast does the heavy lifting, so pair a red gift with a green card and a green gift with yellow. Snow dots go fast with a white gel pen or paint marker. Allow about half an hour per card for younger kids.
9. Knitted Cord Cards With Stamped Greetings

You’ll need: Knitted yarn cord, tacky glue, kraft cards, a wooden letter stamp set, and an ink pad.
Soft cords of red, pink, coral, and teal yarn shape a Santa hat, a hanging bauble, a reindeer nose, and a zigzag tree.
The cord looks like finger knitting or spool knitting, which many kids pick up in an afternoon. Coiling it into a tight spiral makes the bauble and the nose.
Greetings come from a wooden letter stamp set, so each card reads in neat typewriter style.
One even says Frohes Fest, a German Christmas greeting. Older kids can stamp the words while younger siblings glue down the yarn.
Skill level: Moderate for finger knitting, though plain twisted yarn glued in the same shapes gives little ones a similar look.
10. Minimal Red Nose Reindeer Cards
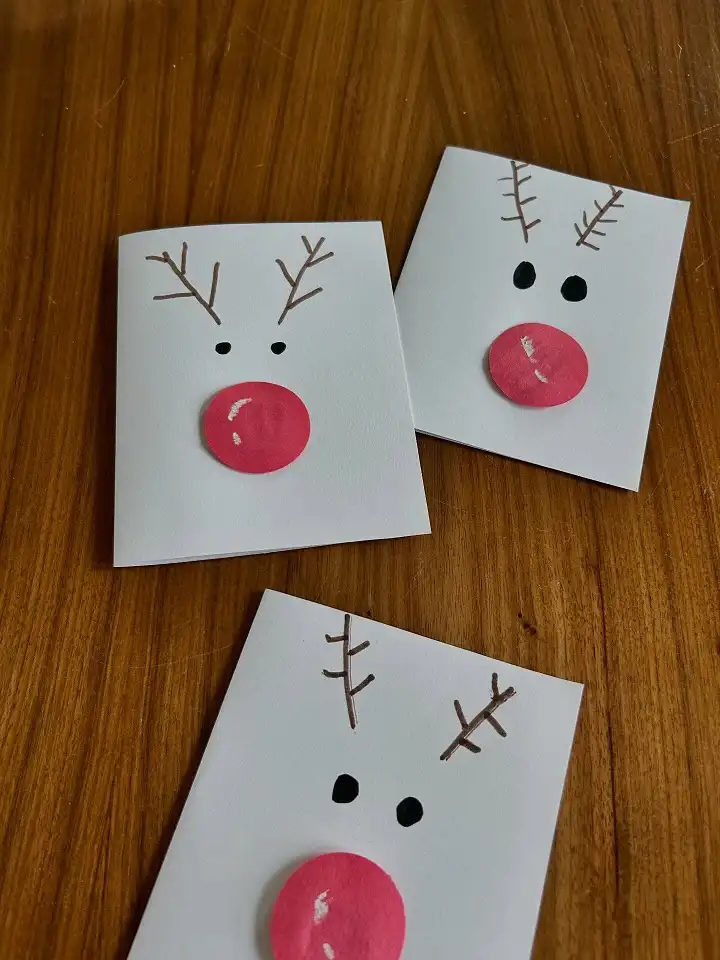
Sometimes the simplest homemade Christmas cards for kids win the most smiles.
Brown marker antlers branch out at the top of a plain white card, and two black dots sit below as eyes. A round red paper nose with a small white shine mark finishes the reindeer face.
Notice how the antlers differ on every card, which gives each one its own character. Folded printer paper works fine as the base.
Time needed: Roughly ten minutes per card, which suits toddlers with short attention spans.
Make it easier: Trace a bottle cap onto red paper so the nose comes out round every time.
One small change: Dabbing white paint on the nose gives it that glossy shine seen here.
11. Fingerprint Candy Cane Cards
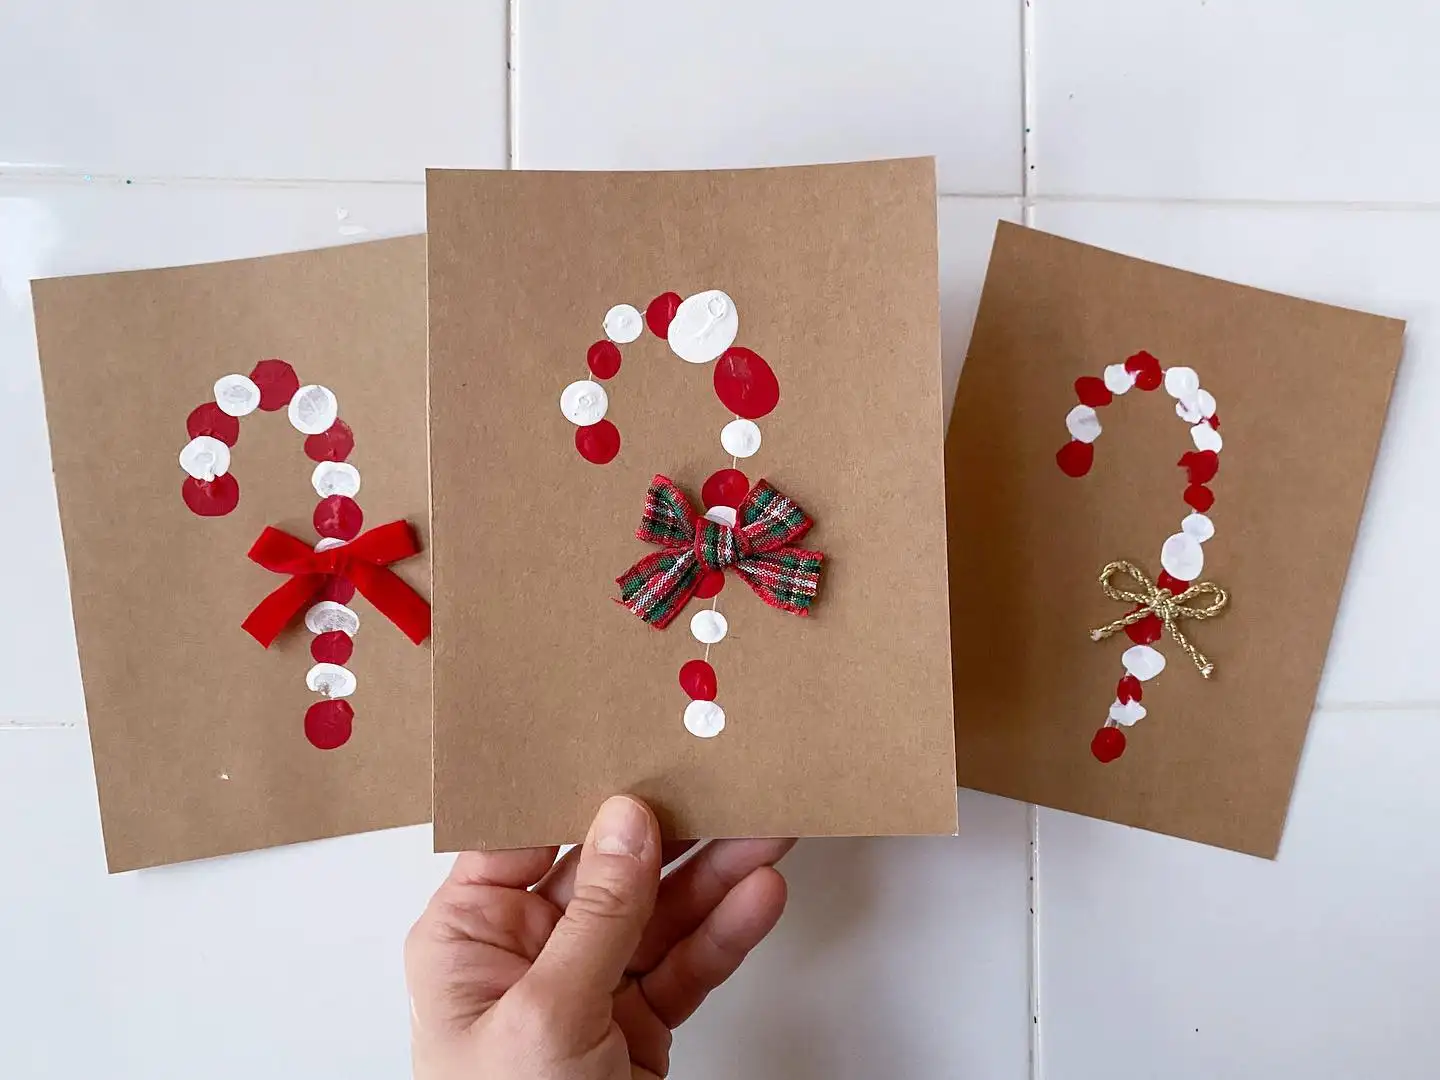
Red and white fingertip dots alternate along a hooked line to form a candy cane on each kraft card. A thin white line seems to run beneath the dots, keeping the curve smooth.
Kids can press one finger in red and another in white, then take turns down the line. Every cane wears a different bow: red velvet, plaid ribbon, and twisted gold cord.
Subscribe to DIY Craft Bloom
Get updates on the latest posts and more from DIY Craft Bloom straight to your inbox.
Why it works:
- Two colors keep the pattern simple enough for preschoolers to follow.
- Kraft paper makes white paint stand out more than white card would.
- Bows add texture and let each child pick a favorite finish.
Accent idea: Leftover gift wrap ribbon works for the bows, so each card can match the family’s wrapping paper this year.
12. Tinsel Pom Pom Wreath Card
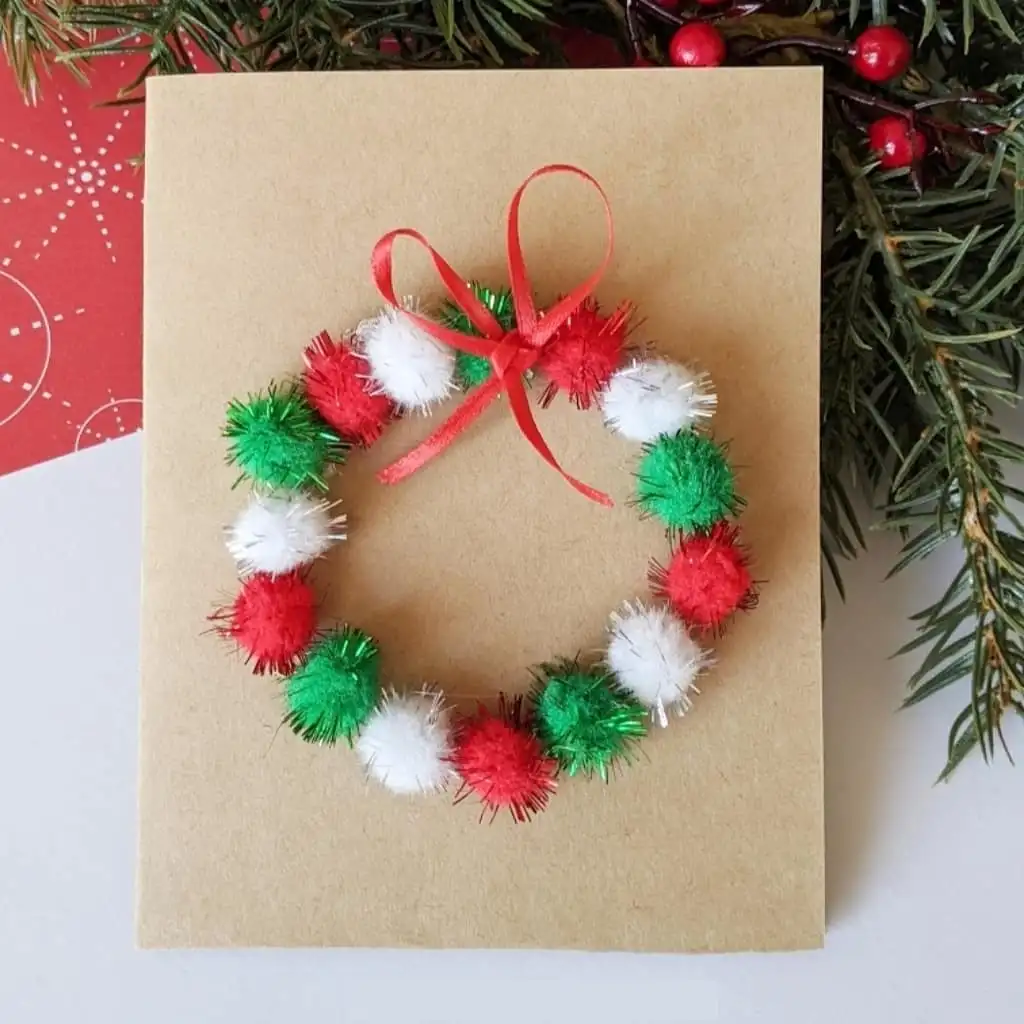
Best for: Classroom card swaps and kids who love anything sparkly.
Glittery pom poms in red, green, and white circle around this kraft card in a repeating pattern.
A narrow red satin ribbon ties into a loopy bow at the top. Fir sprigs and red berries nearby echo the same holiday colors.
Patterning practice hides inside this craft. Kids can say the order out loud as they glue, red then white then green.
Spacing the pom poms evenly before gluing keeps the ring round. Mail it in a padded envelope so they stay fluffy.
Dollar store swap: Plain pom poms cost less than tinsel ones and still look cheerful, just with less shine.
13. Dotted Rainbow Bauble Card

You’ll need: A white square card, paints in warm and cool colors, cotton swabs or fingertips, and thin gold ribbon.
Hundreds of tiny dots crowd into a circle on this bright card, mixing red, orange, yellow, teal, royal blue, and gold. Up close it looks like confetti.
From a distance, the circle reads as a shiny Christmas bauble hanging from a gold ribbon and bow.
This dotty design ranks among the calmest holiday card crafts for children because the motion repeats.
Dots can spill slightly past the edge, as they do here, and the card still looks handmade on purpose. The ribbon runs from the top edge down to the bauble, glued flat so it survives the envelope.
Texture note: Cotton swabs give smaller, neater dots than fingertips, so they suit older kids filling a big circle.
14. Rolled Paper Tree Card
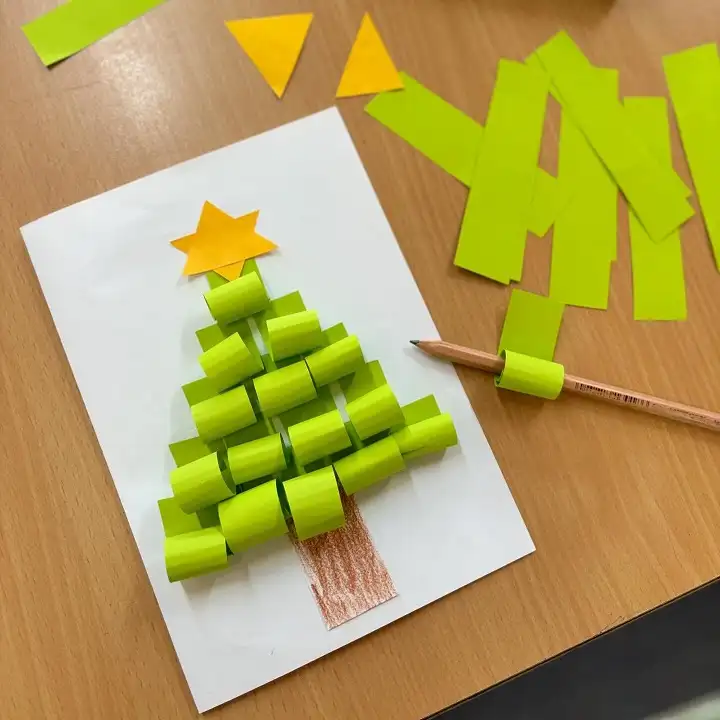
Curled paper tubes give this tree real depth. Each lime green strip was wrapped around a pencil, as the one on the table shows, then glued in rows that shrink toward the top. Flat strips peek out behind the rolls and fill the gaps.
A yellow paper star sits at the peak, likely made from two overlapping triangles like the ones cut nearby. Below, the trunk is colored straight onto the card in brown pencil, which saves a cutting step.
Rolling paper builds hand strength and patience, so it suits kids around five and up. Expect some uncurling at first.
Holding each roll for a few seconds after gluing helps it keep its shape. Since the rolls stand tall, slip this card into a sturdy envelope.
15. Gingerbread Heart Banner Card
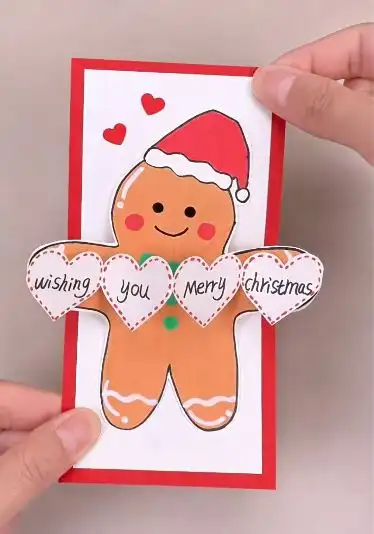
A smiling gingerbread friend in a Santa hat stretches his arms across this red and white card. Four paper hearts link between his hands, spelling out a cheerful holiday message in handwritten letters.
Rosy cheeks, a green pom pom button, and wavy icing lines on his arms and legs finish the cookie look. The figure appears cut out and layered, so it lifts slightly off the white panel.
Holiday twist: Swap the words on the hearts for a personal note, like “Love you Nana,” spread one word per heart.
Printable shortcut: If drawing feels hard, print a gingerbread outline so younger kids can focus on coloring while older ones cut.
Placement tip: Glue only the body down and leave the heart chain loose so it flutters when the card moves.
16. Cozy House Shaped Christmas Card

Shaped like a little house, this card swaps the usual rectangle for a peaked roof and a tall chimney. A glossy red arched door sits front and center under a dark green swag with a burgundy bow.
Above it hangs a round wreath dotted with stars and candy canes, and a decorated tree with wrapped gifts stands by the wall.
Older kids who want a bigger challenge will find this one of the most rewarding DIY Christmas cards for children.
Why it works:
- Cutting the card into a house shape makes it feel special before anyone opens it.
- Small cutout details like the wreath and tree add polish without fine drawing.
- The soft wavy line under the roof hints at snow along the eaves.
Hidden message: Cut the door on three sides so it opens like a flap, then write a greeting behind it.